|
|
This document describes how to install Oracle JRockit Real Time as a standalone application. It includes information on the following subjects:
| Note: | JRockit Real Time can be used by any application and does not interact with or create an Oracle registry. |
This document shows how to install JRockit Real Time, which includes the Oracle JRockit JDK, the Oracle JRockit JRE, and the Oracle JRockit JVM. The Oracle JRockit JVM is installed as a part of many Oracle products. Refer to the documentation for those products for installation instructions.
For a complete list of supported configurations, please visit:
http://edocs.bea.com/jrockit/jrdocs/suppPlat/supp_plat.html
Throughout this document, JRockit Real Time versions are defined with the following notation:
jrrt-<jrrt_version>-<java_version>
In this example, the product is JRockit Real Time 3.1.0 for Java SE 6.
This section explains how to install and uninstall a standalone version of JRockit Real Time in GUI mode for the following platforms:
| Note: | If you are installing on Linux and Solaris, please refer to Default Location of System Preferences for information on where to fnd the system preferences. |
In the following procedure you will run the self-installing executable (Windows) or the self-extracting binary (Solaris and Linux). The screen shots are taken from a Windows installation of JRockit Real Time. Table 1 lists the installers.
| Note: | If you install JRockit Real Time on Linux or Solaris please refer to Ensure the Installer is Executable. |
The install process begins and the Oracle installer window appears, followed by the Welcome window.
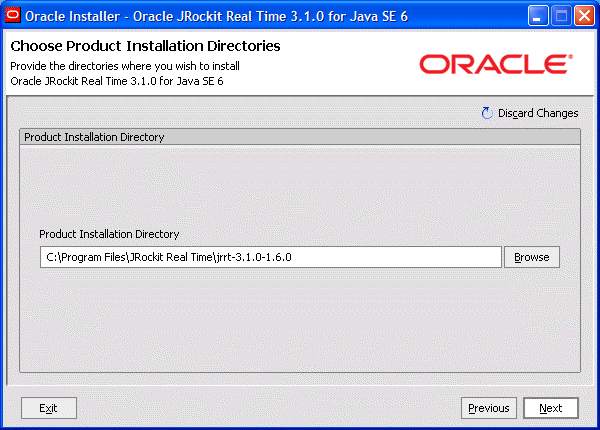
The Choose Product Installation Directories window appears (see Figure 1-2).
| Note: | If you want a different location for the installation you can pick one by clicking Browse or type a new directory into the Product Installation Directory field. By clicking Discard Changes, you set the selection back to the default directory. |
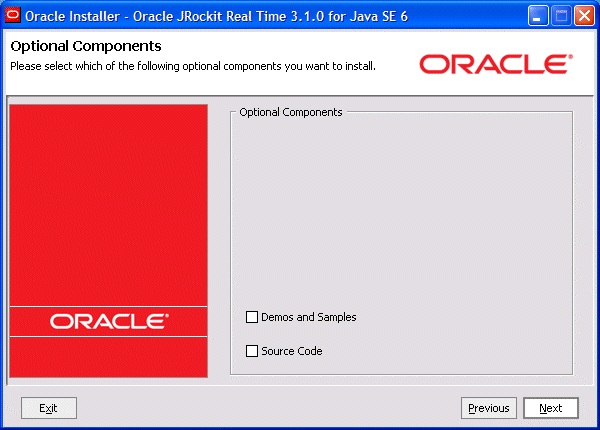
The Optional Components window appears (see Figure 2).
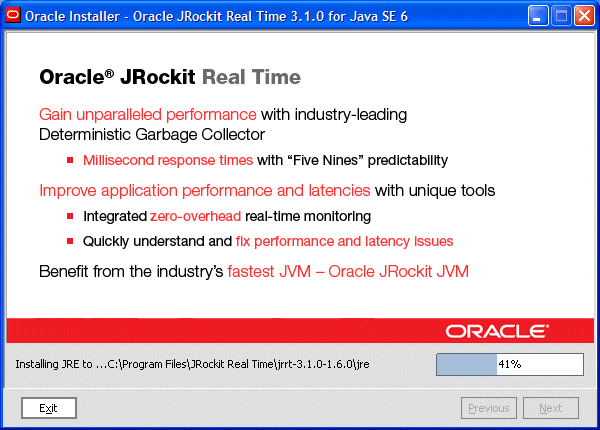
The Oracle Installer window appears and the installation process continues, as indicated on the progress meter in the lower right corner of the window (see Figure 2-1).
When the installation is complete, the Installation Complete window appears.
If you have installed JRockit Real Time you can start Oracle JRockit Mission Control 3.1.0 from the Start menu.
Once you have installed JRockit Real Time, you need to add it to your path.
Use this command for Windows platforms:
| Note: | This example assumes that you are using the Windows command prompt (DOS) or compatible command shell and have selected the default product installation directory. |
set PATH=%ProgramFiles%\JRockit Real Time\jrrt-<jrrt_version>-<java_version>\bin;%PATH%
Use this command for Linux and Solaris platforms:
| Note: | This example assumes that you are using the UNIX bash shell or compatible command shell and have selected the default product installation directory. |
export PATH=$HOME/jrrt-<jrrt_version>-<java_version>/bin:$PATH
This section describes how to uninstall the Windows, Linux, and Solaris versions of JRockit Real Time.
To uninstall JRockit Real Time, do the following:
JRockit Real Time is removed from your computer.
To uninstall JRockit Real Time from the command line, run the following command from a console window:
%SystemRoot%\Installer\Oracle\jrrt-<jrrt_version>-<java_version>-<arch>\uninstall.exe
To uninstall Linux and Solaris versions of JRockit Real Time, do the following:
JRockit Real Time is removed from your computer.
This section describes how to install JRockit Real Time using console mode, rather than from a GUI.
To install JRockit Real Time in console mode, do the following:
| Note: | If you install JRockit Real Time on Linux or Solaris please refer to Ensure the Installer is Executable. |
jrrt-<jrrt_version>-<java_version>-<platform>.<ext> -mode=console
where <ext> is the file name extension; that is, exe on Windows and bin on Linux and Solaris.
Extracting 0%....................................100%
Once the extraction process is complete, the system will prompt you through the installation, replicating the procedures described in Installing and Uninstalling JRockit Real Time.
| Note: | If you don’t specify -mode=console at the command line, the installer will revert to GUI mode, as described in Installing and Uninstalling JRockit Real Time. |
To uninstall Windows versions, use one of the methods described in Uninstalling Windows Versions and Uninstalling Windows Versions from the Command Line.
To uninstall Linux and Solaris versions, use the method described in Uninstalling Linux and Solaris Versions from the Command Line.
The silent installation mode lets you set installation configurations only once and then use those configurations to duplicate the installation on many machines. During installation in silent mode, the installation program reads installation options from an XML file that you create prior to beginning the installation (see The silent.xml File). The installation program does not display any configuration options during the installation process. For more information on silent mode, please refer to “What Is Silent-Mode Installation?” in the Oracle WebLogic Server Installation Guide.
For a silent mode installation to be successful, you will need to create the file silent.xml and store it on your computer. This file contains the values you want included in your setup. Listing 1 shows an example of a silent.xml file for JRockit Real Time 3.1.0 for Java SE 6.
<?xml version="1.0" encoding="UTF-8" ?>
<domain-template-descriptor>

<!--
The values in this example silent.xml file corresponds to a default
installation of Oracle JRockit Real Time 3.1.0 for Java SE 6 on
Windows 32-bit x86.
-->

<input-fields>
<!--
      Installation directory
         The full pathname for the directory where you want to install your
         product.
         This option is available on all platforms.
-->
<data-value name="USER_INSTALL_DIR" value="c:\Program Files\JRockit Real
   Time\jrrt-3.1.0-1.6.0" />

<!--
      Optional installation of Demos and Samples
        Use "true", or "yes", to install this optional component.
        Use "false", or "no", to skip this optional component. The default is
        "false".
        This option is available on all platforms.
-->
<data-value name="INSTALL_DEMOS_AND_SAMPLES" value="false" />

<!--
      Optional installation of Source Code
        Use "true", or "yes", to install this optional component.
        Use "false", or "no", to skip this optional component. The default is
        "false".
        This option is available on all platforms.
-->
<data-value name="INSTALL_SOURCE_CODE" value="false" />
</input-fields>
</domain-template-descriptor>
To install JRockit Real Time in silent mode, do the following (this procedure assumes that silent.xml is stored in the same directory as the JRockit Real Time installer):
| Note: | If you install JRockit Real Time on Linux or Solaris please refer to Ensure the Installer is Executable. |
jrrt-<jrrt_version>-<java_version>-<platform>.<ext> -mode=silent -silent_xml="silent.xml"
where <ext> is the file name extension; that is, exe on Windows and bin on Linux and Solaris.
You will receive a message advising that files are being extracted and no other confirmation.
To confirm the sucessful installation on Windows, you can look for Oracle JRockit Real Time [version] in your Start menu.
| Note: | If you want to create an install log, add the option -log=log.log at the end of the command. |
To uninstall Windows versions, use one of the methods described in Uninstalling Windows Versions and Uninstalling Windows Versions from the Command Line.
To uninstall Linux and Solaris versions, use the method described in Uninstalling Linux and Solaris Versions from the Command Line.
If you are installing JRockit Real Time on either a Linux or Solaris machine, note the following information.
If you install JRockit Real Time on Linux or Solaris by using the .bin file, you need to ensure the file is executable. You can use chmod +x <filename> to make the file executable.
If you choose to install JRockit Real Time on Linux or Solaris into a system-wide location such as /usr/local, you must first become the root user to gain the necessary permissions. If you do not have root access, simply install JRockit Real Time into a directory where you have permission to write, for example, your home directory.
When installing on Linux and Solaris, the default location for system preferences will be:
[JAVA_HOME]/.systemPrefs
where [JAVA_HOME]=[INSTALL_DIR]/jre.
unless the user is root, in which case it will be /etc/.java/.systemPrefs.
Starting with JRockit Real Time 3.1.0, each product installation directory is also an Oracle home, allowing additional product registration with the Oracle Central Inventory. The Central Inventory contains information about all installed Oracle products on the same host and can be managed by running the Oracle Universal Installer.
| Note: | The examples assume that you have installed Oracle Universal Installer either directly or indirectly as part of another Oracle product. For more information on how to start the Oracle Universal Installer see: |
The Oracle home name in the examples is supposed to be unique between all Oracle products installed on the same host and is obtained from the name of the default product installation directory by replacing dashes by underscores, removing dots in product version numbers, and attaching the name of the architecture.
Once you have installed JRockit Real Time, you can attach it to the Central Inventory by using the Oracle Universal Installer.
Use this command for Windows platforms:
| Note: | This example assumes that you are using the Windows command prompt (DOS) or compatible command shell and have selected the default product installation directory. |
setup.exe -noconsole -attachHome \
ORACLE_HOME="%ProgramFiles%\JRockit Real Time\jrrt-<jrrt_version>-<java_version>" \
ORACLE_HOME_NAME="jrrt_<jrrt_version_compact>_<java_version_compact>_<arch>"
Use this command for Linux and Solaris platforms:
| Note: | This example assumes that you are using the UNIX bash shell or compatible command shell and have selected the default product installation directory. |
./runInstaller -attachHome \
ORACLE_HOME="$HOME/jrrt-<jrrt_version>-<java_version>" \
ORACLE_HOME_NAME="jrrt_<jrrt_version_compact>_<java_version_compact>_<arch>"
Before you uninstall JRockit Real Time you should ensure that it is detached from the Central Inventory.
Use this command for Windows platforms:
This example assumes that you are using the Windows command prompt (DOS) or compatible command shell and have selected the default product installation directory.
setup.exe -noconsole -detachHome \
ORACLE_HOME="%ProgramFiles%\JRockit Real Time\jrrt-<jrrt_version>-<java_version>" \
ORACLE_HOME_NAME="jrrt_<jrrt_version_compact>_<java_version_compact>_<arch>"
Use this command for Linux and Solaris platforms:
This example assumes that you are using the UNIX bash shell or compatible command shell and have selected the default product installation directory.
./runInstaller -detachHome \
ORACLE_HOME="$HOME/jrrt-<jrrt_version>-<java_version>" \
ORACLE_HOME_NAME="jrrt_<jrrt_version_compact>_<java_version_compact>_<arch>"


|