This section describes how to integrate AquaLogic Enterprise Security with AquaLogic Data Services Platform, using the WebLogic Server 8.1 SSM or WebLogic Server 9.x SSM. It includes the following topics:
AquaLogic Enterprise Security (ALES) can provide fine-grained entitlements for Data Services serviced by AquaLogic Data Services Platform (ALDSP) 2.1. AquaLogic Enterprise Security can be used to manage access control to entire services or elements of those services. AquaLogic Enterprise Security allows you to have common set of security policies for a heterogeneous environment, and a single security infrastructure that supports WebLogic Portal, WebLogic Server, and custom applications.
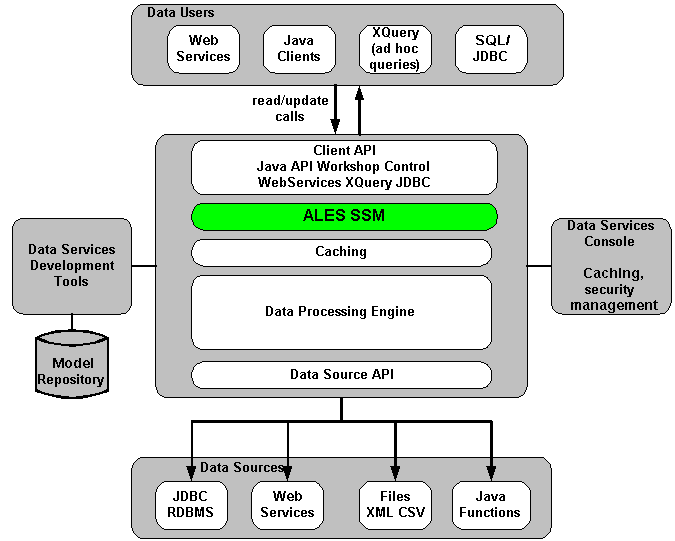
The ALES service does not replace all of the management functionality provided by the ALDSP. The ALDSP Administrative console (ldconsole) is still used to manage all of the attributes of the various data services aggregated by ALDSP (see Figure 10-1).
Figure 10-1 ALDSP Integration Overview
The AquaLogic Enterprise Security WebLogic SSM enables you to write, deploy, and manage fine-grained policy for controlling access to all WebLogic server application resources, including data services. A specific resource type ld allows a security administrator to represent the data services in the ALES resource hierarchy. Elements of that data service are also converted to the ALES format for evaluation by the ASI authorization engine.
AquaLogic Data Service Platform (ALDSP) 2.1 requires WebLogic Server 9.2, 9.1, or 8.1 (with Service Pack 4 or 5) and uses the WLS 9.x or WLS 8.1 SSM. While the ALES framework allows for different security providers to be used with ALDSP, the following providers were certified:
The ASI Authorization and Role Mapping providers enable you to use AquaLogic Enterprise Security to write, deploy, and manage fine-grained authorization of Data Services.
The Database Authentication provider performs authentication services for the SSM.
Supported Use-case Scenario
The following use-case scenario is supported when you integrate AquaLogic Enterprise Security with AquaLogic Data Services Platform:
The AquaLogic Enterprise Security Administration Server assumes responsibility for management and policy of data services and elements of those services through the ALES console or Policy Management API.
The AquaLogic Enterprise Security Administration Server is responsible for access control of J2EE applications deployed on the ALDSP WebLogic Server.
The ALDSP Administration Console continues to be the management point for data services.
Constraints and Limitations
AquaLogic Enterprise Security integration with ALDSP has the following constraints and limitations:
Data service elements must be enabled for security through the ALDSP Admin console before ALES can manage element-based access control.
ALES cannot provide entitlements and control which records are returned by the data service. This can still be done, but must be performed through the ALDSP Admin console.
Integration Pre-Requisites
Before you begin, you must ensure that the following pre-requisites are satisfied:
WebLogic Server 9.1 or 9.2, or 8.1 with Service Pack 4 or 5
WebLogic Server 8.1 or 9.x Security Service Module
You must have access to an ALES Administration Console that is running on the AquaLogic Enterprise Security 2.2 Administration Server on either the local machine or a remote machine.
AquaLogic Data Services Platform 2.1
Integrating with AquaLogic Data Services Platform: Main Steps
This section describes how to integrate AquaLogic Enterprise Security with AquaLogic Data Services Platform. Once integrated, you can use the AquaLogic Enterprise Security Administration Console to write and deploy a set of authorization and role mapping policies to protect Data Services and elements of those services.
Note:
The instructions provided in this section use as an example the ALDSP sample application RTL App that ships with the ALDSP 2.1 software distribution. This procedure is representative of any integration of AquaLogic Enterprise Security with ALDSP.
To integrate AquaLogic Enterprise Security with AquaLogic Data Services Platform, perform the following tasks:
Install the WebLogic Server SSM, as described in Installing Security Service Modules. If you use ALSDSP with WebLogic Server 8.1, install the WebLogic Server 8.1 SSM. If you use ALSDSP with WebLogic Server 9.1 or 9.2, install the WebLogic Server 9.x SSM.
Use the ALDSP Administration console to enable the elements to which you want to control access, as described in Enabling Elements for Access Control.
Configure the WebLogic Server SSM, as described in Creating the WebLogic Server SSM Configuration. Note that this procedure varies, depending on whether you are using WLS 8.1 or WLS 9.x.
Create the startWebLogicALES file for WebLogic Server, as described in Creating the WebLogic Server startWebLogicALES File. Note that this procedure varies, depending on whether you are using WLS 8.1 or WLS 9.x.
Create the security configuration file, as described in Creating the security.properties File. Note that this step applies if you are using WLS 8.1 and does not apply if you are using WLS 9.x.
Before enabling your ALDSP domain for ALES, open the ALDSP Administration console:
Open a browser to visit http://<hostname>:<port>/ldconsole.
Login as Administrator.
Browse to the data services elements that are to be controlled by ALES. For this example, enable the following:
Expand RTLServices/OrderSummaryView and select Security Tab.
Select Secured Elements Tab.
Expand elements and check OrderSummary > OrderDate as an element to be secured. (This allows the element call to go to the security check.)
Do the same to secure CustomerView.ds > CUSTOMER > ORDERS> ORDER_SUMMARY > OrderDate.
Creating the WebLogic Server SSM Configuration
Securing ALDSP with ALES employs either the WLS 8.1 SSM or the WLS 9.x SSM. Install the WLS SSM on the machines on which you have installed ALDSP, as described in Installing Security Service Modules.
Next, create a new WLS SSM configuration named aldsprealm. An SSM configuration defines the set of security providers to use for adjudication, authentication, auditing, authorization, role mapping, and credential mapping services.
Refer to Table 10-1 and use the AquaLogic Enterprise Security Administration Console (for the WLS 8.1 SSM) or the WebLogic Server Administration Console (for the WLS 9.x SSM) to configure the security providers listed there. Set the Configuration ID to aldsprealm. For instructions on creating an SSM configuration, see Configuring and Binding a Security Service Module in Installing Security Service Modules and the Console Help.
Table 10-1 Providers for Use in ALDSP Integration
Provider
Configuration Settings
ASI Adjudication Provider
Accept default settings.
Log4j Auditor
Accept the default settings, and click Create.
Database Authentication Provider
Set the Control Flag to SUFFICIENT, and click Create. For the Details tab settings, except for the Identity Scope, the parameters are populated automatically. Set the Identity Scope to aldspusers, and click Apply.
Note: Even though you set the Identity Scope to aldspusers, you do not actually create the aldspusers identity until you perform the steps in Creating the Realm Resource.
ASI Authorization Provider
On the General tab, accept the default settings, and click Create.
On the Details tab, set the Identity Scope to aldspusers.
WebLogic Credential Mapper Provider
Uncheck the Credential Mapping Deployment Enabled check box, and click Create.
ASI Role Mapping Provider
On the General tab, accept the default settings, and click Create. On the Details tab, set the Identity Scope to aldspusers.
Binding the SSM Configuration
The SSM configuration must be bound to a Service Control Manager (SCM).
To bind the aldsprealm SSM configuration, see "Binding a Security Service Module to a Service Control Manager" in the Console Help.
Distributing the SSM Configuration
The aldsprealm SSM configuration must be distributed.
To distribute the aldsprealm SSM configuration, see "Distributing Configuration" in the Console Help.
Creating an Instance of the Security Service Module
Before starting a WebLogic Server Security Service Module, you must first create an instance of the WebLogic Server Security Service Module using the Create New Instance Wizard.
Enrolling the Instance of the Security Service Module
You must have the ALES Administration Server running prior to enrolling the Security Service Module. For information about enrolling a security service module, see Enrolling the Instance of the Security Service Module in Installing Security Service Modules.
Creating the WebLogic Server startWebLogicALES File
Before you can start a WebLogic Server instance that uses BEA AquaLogic Enterprise Security, you must create the startWeblogicALES file based on the startWeblogic file that is located in the WebLogic domain. For information about how to do this, see:
If you are using the WLS 8.1 SSM, create a text file named security.properties and place it in the domain directory. You use this file to define the AquaLogic Enterprise Security realm and the default realm.
# AquaLogic Enterprise Security Configuration File
#
# This file contains AquaLogic Enterprise Security configuration
# properties. By default, the AquaLogic Enterprise Security runtime
# looks for a property file called 'security.properties' in the
# working directory
wles.realm=aldsprealm
wles.default.realm=aldsprealm
Note:
This step does not apply if you are using the WLS 9.x SSM
Configuring Policy for Data Services
Developing a set of policies typically begins by determining which resources you need to protect and your access control requirements. You then create the identity directory, resources, groups, users, and roles that you will use to write policies to protect those resources. Next you write a set of authorization and role mapping policies to define access control on those resources. Finally, you deploy the set of polices to the WebLogic Server Security Service Module that you use to control access to your data services.
For more information on how to use the ALES Administration Console to write policy, see the Policy Managers Guide and the Console Help. In addition, the ALES Administration Server installation includes a set of sample polices for BEA AquaLogic Data Services Platform, located at BEA_HOME/ales22-admin/examples/policy/aldsp_sample_policy. You can import these sample policies and use them as a starting point for developing a full set of policies for your applications. For information about how to import the sample policies, see the README file in the sample directory and see also Importing Policy Data in the Policy Managers Guide.
You can choose any application name for your ALDSP application.
To create application resources, use the Administration Console to perform the following steps:
Expand the Resources folder, and click Resources. The Resource page displays.
In the Resources page, select the Policy node, and click New. The Create Resource dialog box appears.
In the Name text box, enter aldsprealm, select Binding from the Type drop-down list box, and click Ok. The aldsprealm resource appears under the Policy node.
Select the aldsprealm resource and click Configure. The Configure Resource dialog box appears.
From the Type drop-down list box, select Binding Application, check the Distribution Point and Allow Virtual Resources check boxes, and click Ok.
Refer to Table 10-2 and modify the configuration of the ASI Authorization provider and the ASI Role Mapper provider as described there.
Table 10-2 ALDSP SSM Configuration Modifications
Security Provider
Configuration Setting
ASI Authorization Provider
On the Details tab, set the Application Deployment Parent to //app/policy/aldsprealm and click Apply.
On the Bindings tab, from the Bind drop-down menu, select //app/policy/aldsprealm, and click Bind.
ASI Role Mapper Provider
On the Details tab, set the Application Deployment Parent to //app/policy/aldsprealm and click Apply.
On the Bindings tab, from the Bind drop-down menu, select //app/policy/aldsprealm, and click Bind.
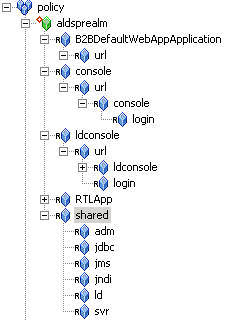
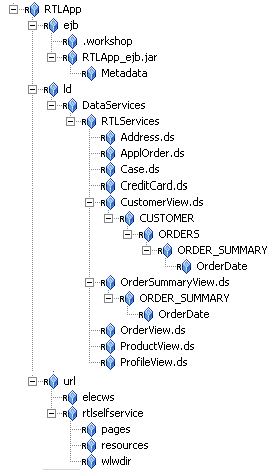
Creating the ALDSP Resources
Figure 10-2 shows the ALDSP resource tree with all nodes expanded except the RTLApp node. The resources under that RTLApp node are shown in Figure 10-3. You must create the resources shown in Figure 10-2 and Figure 10-3.
Figure 10-2 ALDSP Resource Tree with RTLApp Node Collapsed
Figure 10-3 ALDSP Resource Tree with RTLApp Node Expanded
Creating the Role Mapping Policies
This section describes how to use the Administration Console to create the role mapping policies that will be used to control access the sample ALDSP application.
Table 10-3 lists the role mapping policies required for the WebLogic domain.
Table 10-3 ALDSP Application Role Mapping Policy
Role Mapping Policy
Description
grant(//role/Everyone, //app/policy/aldsprealm, //sgrp/aldspusers/allusers/) if true;
Creates the role mapping policy necessary for the Everyone role to be used in the aldsprealm Identity directory.
Note: If you do not create the Everyone role mapping policy correctly, none of the policy rules defined in Table
grant(//role/Admin, //app/policy/aldsprealm, //user/aldspusers/weblogic/) if true;
Grants the weblogic user Admin role within the aldsp realm.
To create the role mapping policies, refer to Table 10-3 and perform the following steps.
Note:
If you do not create the Everyone role mapping policy correctly, none of the authorization policies defined in Figure 10-4 will work.
Expand the Policy folder in the left pane, and click Role Mapping Policies. The Role Mapping Policies page appears.
Click New. The Create Role Mapping Policy dialog box appears.
Select the Grant radio button.
Select the Roles tab, select Everyone in the Available Roles list box, and click Add.
Select the Resources tab, select aldsprealm, and click Add.
Select the Policy Subjects tab, select allusers in the list box, click Add, and click Ok.
Creating Authorization Policies
This section describes how to use the Administration Console to create authorization policies to protect data services and application resources. Table 10-4 lists the authorization policies required for WebLogic Server, the WebLogic Server console, and the RTL sample application.
Table 10-4 Authorization Policies
Authorization Policy
Description
grant(any, //app/policy/aldsprealm/shared/svr, //role/Admin) if true;
grant(any, //app/policy/aldsprealm/shared/adm, //role/Admin) if true;
grant(any, [//app/policy/ aldsprealm /RTLApp/ejb,//app/policy/aldsprealm/RTLApp/ld,//app/policy/aldsprealm/RTLApp/url/rtlselfservice/pages], [//role/Admin]) if true;
grant(any, [//app/policy aldsprealm /RTLApp/ejb/RTLApp_ejb.jar/Metadata,//app/policy/aldsprealm/RTLApp/ejb/RTLApp_ejb.jar], [//role/Admin]) if true;
grant([any,//priv/create], //app/policy/ aldsprealm /RTLApp/ejb/.workshop, //role/Admin) if true;
grant(any, [//app/policy/ aldsprealm /console,//app/policy/aldsprealm/shared/svr,//app/policy/aldsprealm/shared/adm], //role/Admin) if true;
Grants Admin Role and/or weblogic user permission to boot the WebLogic Server and perform administrative tasks.
grant(//priv/lookup, //app/policy/aldsprealm/shared/jms, //role/Everyone) if true;
grant(any, //app/policy/aldsprealm/shared/ld, //role/Everyone) if true;
grant(//priv/lookup, [//app/policy/aldsprealm/shared/jdbc,//app/policy/aldsprealm/shared/jndi], //role/Everyone) if true;
grant(//priv/send, //app/policy/aldsprealm/shared/jms, //role/Everyone) if true;
grant(//priv/GET, //app/policy/aldsprealm/console/url/console/login, //role/Everyone) if true;
grant(//priv/reserve, //app/policy/aldsprealm/shared/jdbc, //role/Everyone) if true;
grant([//priv/GET,//priv/POST], //app/policy/aldsprealm/ldconsole/url/ldconsole/login, //role/Everyone) if true;
grant([//priv/GET,//priv/POST], //app/policy/aldsprealm/RTLApp/url/elecws, //role/Everyone) if true;
grant(//priv/GET, //app/policy/aldsprealm/ldconsole/url/ldconsole/images, //role/Everyone) if true;
grant(//priv/GET, [//app/policy/ aldsprealm /B2BDefaultWebAppApplication/url,//app/policy/aldsprealm/RTLApp/url/rtlselfservice/resources,//app/policy/aldsprealm/RTLApp/url/rtlselfservice/wlwdir], //role/Everyone) if true;
Grants permission to those in the role Everyone (includes the anonymous user) to access all of the shared open resources.
grant([//priv/GET,//priv/POST], //app/policy/ aldsprealm /RTLApp/url/rtlselfservice, //user/aldspusers/Steve/) if true;
deny(any, [//app/policy/ aldsprealm /RTLApp/ld/DataServices/RTLServices/OrderSummaryView.ds/ORDER_SUMMARY/OrderDate,//app/policy/aldsprealm/RTLApp/ld/DataServices/RTLServices/CustomerView.ds/CUSTOMER/ORDERS/ORDER_SUMMARY/OrderDate], //user/aldspusers/Steve/) if true;
Denies Steve access to the Order Date element of the Customer View Data Service
deny(any, //app/policy/aldsprealm/RTLApp/ld/DataServices/RTLServices/ProfileView.ds, //user/aldspusers/Jack/) if true;
Denies Jack access to an entire data service
grant(any, [//app/policy/aldsprealm/RTLApp/ejb,//app/policy/aldsprealm/RTLApp/ld,//app/policy/aldsprealm/RTLApp/url/rtlselfservice/pages], [//sgrp/aldspusers/LDSampleUsers/,//role/Admin]) if true;
Grants Admin and Sample Users access to Data Services
Perform the following steps to create the authorization policies listed in Table 10-4.
Expand the Policy folder in the left pane, and click Authorization Policies. The Authorization Policies page appears.
Click New. The Create Authorization Policy dialog box appears.
Select the Grant radio button.
To create the first authorization policy listed in Table 10-4, click the Policy Subjects, select the Admin role from the Roles List box, click Add, and click Ok.
Note:
If Table 10-4 lists multiple resources for a single privilege and role, you may define all of the resources in one authorization policy.
Repeat for each of the remaining authorization policies listed in Table 10-4.
Discovering Data Services
When developing policies for use with a Security Service Module, you can use the Discovery mode feature to help define your policy components. Instructions for using Discovery mode are provided in the Resource Discovery section in the Policy Managers Guide.
Distributing Policy and SSM Configuration
Distribute policy and SSM configuration to the WebLogic Server SSM.
For information on how to distribute policy and SSM configuration, see "Deployment" in the Console Help. Be sure to verify the results of your distribution.
Starting the WebLogic Server
To start a WebLogic Server instance, perform the following steps:
Open a shell (command prompt) on the machine on which you created the domain.
Change to the ALDSP sample domain directory: <bea_home>\<weblogic_home>\samples\domains\ldplatform
Run one of the following scripts:
On Windows: startWebLogicALES.cmd
On UNIX: startWeblogicALES.sh
Accessing the ALDSP Application
To access the RTLApp running on an ALDSP server:
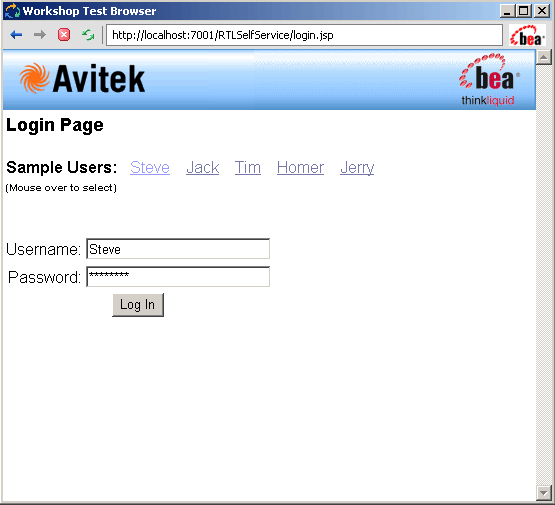
Open browser to visit http://<hostname>:<port>/RTLSelfService, where <hostname> is the machine on which RTL application is running. The browser is redirected to the authentication page (see Figure 10-4).
Figure 10-4 Authentication Page
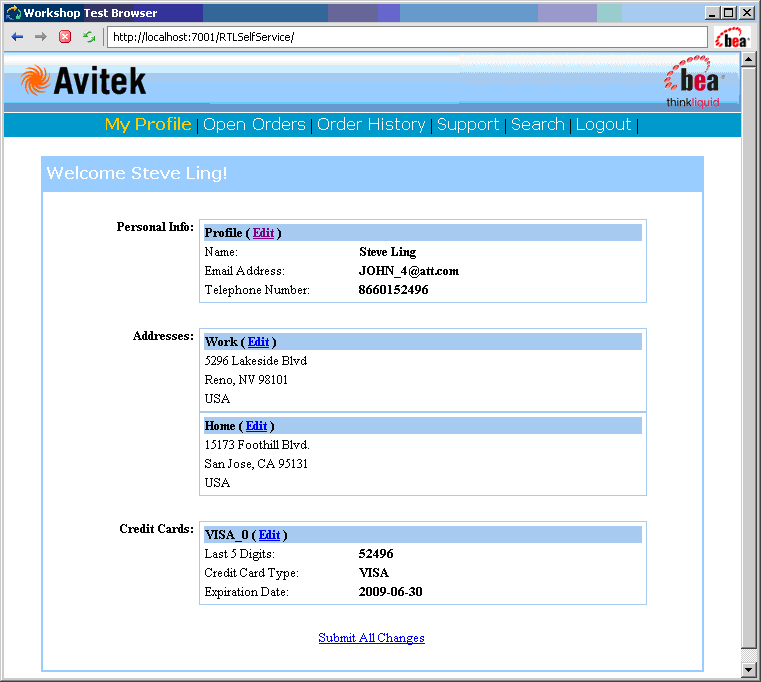
Set username as Steve by dragging over link, then click Login button. Your client should be granted access to the Profile Page (see Figure 10-5).
Figure 10-5 Profile Page
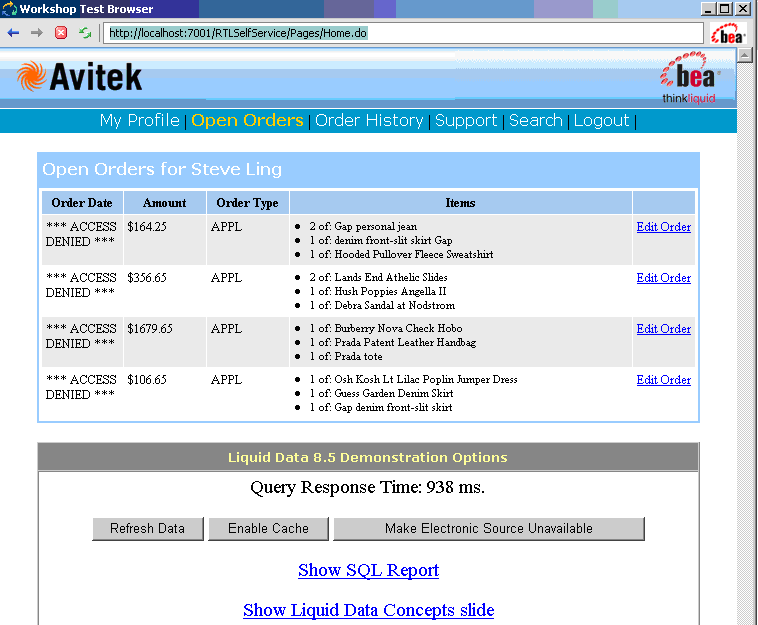
Select Open Orders Page from top menu. Open orders should be visible (see Figure 10-6). Order Data should have "ACCESS DENIED".