|
|
Data transformation is the mapping of data from one format to another. This section describes how BEA AquaLogic Service Bus routes and transforms messages, when necessary, according to specific configurations for a proxy service.
This section includes the following topics:
Complete Tutorial 1. Routing a Loan Application.
The tutorial provides the steps to create and test a routing and transformation scenario developed using the graphical environment provided in AquaLogic Service Bus Console.
Using the AquaLogic Service Bus Console you will build on what you learned in Tutorial 1. Routing a Loan Application, to:
A primary mortgage company uses AquaLogic Service Bus to identify and re-route loan applications that can be sold to secondary loan companies. Loan applications with a principal request of greater than US$ 25 million are candidates for sale to a secondary loan company. When AquaLogic Service Bus receives a loan application meeting these criteria, the applicant's credit rating information is retrieved (by making a callout to a Web Service). The credit rating information is added to the loan application, then the application is forwarded to the secondary mortgage company Web Service to be processed.
Loan applications with a principal request equal to or less than US$ 25 million are routed to a different business service for processing.
The target business services respond indicating whether the loan application is approved or rejected.
Figure 4-1 illustrates where AquaLogic Service Bus fits in your enterprise to mediate the messaging between the enterprise services and the business services.
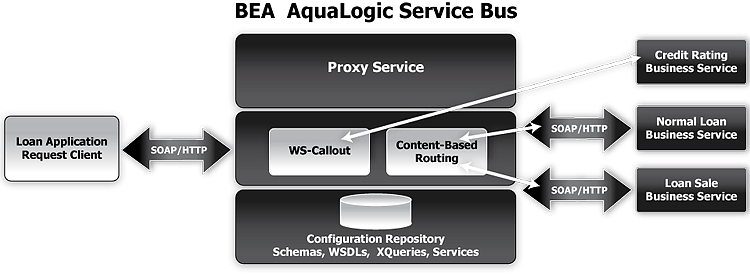
A primary mortgage company receives a loan application. It is routed through the AquaLogic Service Bus proxy service, LoanGateway2, to determine the target business service to process the application. If the loan amount is greater than US$ 25 million, the application is routed to the LoanSaleProcessor business service. If the amount is less than or equal to US$ 25 million, the application is routed to the NormalLoan business service. When the loan amount is more than US$ 25 million, the request pipeline makes a service callout to the CreditRatingService and receives the credit rating of the applicant using the $creditRating variable. To fulfill the interface requirements of the secondary loan company service, the message body is transformed by adding the credit rating details. The transformed message ($body) is routed to a business service that handles applications for large loan amounts. The service returns a response similar to the following:
Loan Application Response: CREDIT RATING: AA: LOAN PURCHASED BY THE <i><b>LARGE</b></i> LOANS SERVICE
You will use the Project folder, MortgageBroker, and the directory structure you created in the previous tutorial to hold the project artifacts. The resources required for this scenario are described in Table 4-1.
Complete the following steps to design and configure the proxy service and the associated resources in AquaLogic Service Bus and resolve this user case scenario:
Ensure that AquaLogic Service Bus is running in the domain that you created for the tutorial and that you have completed the steps described in Tutorial 1. Routing a Loan Application.
For this tutorial, you need to use the MortgageBroker project folder, and the directory structure that you created in Tutorial 1. Routing a Loan Application to hold the project artifacts.
The Project Explorer pane is opened in the navigation pane and a project page is displayed in the console.
In this step, you will import the WSDL resource, and create the proxy service and the business services required for the tutorial:
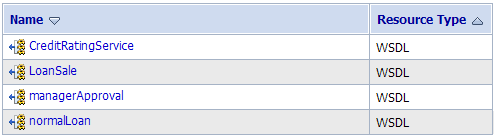
You must create the WSDL resources (LoanSale and CreditRatingService) before creating the other resources required for this scenario since WSDLs are the base on which you create the business and proxy services.
To import the appropriate WSDLs and create the WSDL resources, follow the steps described in To Import a WSDL, but for this instance, name your resources and base them on the WSDLs as described in Table 4-2.
When you complete this step, the MortgageBroker/WSDL folder contains the WSDL resources created in this tutorial and in Tutorial 1. Routing a Loan Application as in Figure 4-2.
In this step, you will create a proxy service. The proxy service is used to route the loan application to the appropriate business service. It also calls a look up service to obtain the credit rating of the requestor if the loan amount requested is greater than US$ 25 million.
| Note: | No units are assigned to the loan amount, but units can be any currency such as US Dollars. |
To create a new proxy service, follow the steps described in To Create the Proxy Service, but for this instance, use the proxy service name and the Endpoint URI described in Table 4-3.
After you complete this step, a summary of the configuration settings for the proxy service is displayed as in the following Figure 4-3. Review the configuration settings prior to registering the proxy service.

When you complete this step, the MortgageBroker/ProxyService folder contains the proxy services that you created in this tutorial and in Tutorial 1. Routing a Loan Application as in Figure 4-4.

In this scenario, the proxy service is configured to route to one of several different business services, depending on the business requirements as follows:
You created the Normal Loan service in Tutorial 1. Routing a Loan Application. To create the LoanSaleProcessor and CreditRatingService business services for this scenario, follow the steps described in Create the NormalLoan Business Service. However, in this case, configure your services using the names, service types, and endpoint URIs described in Table 4-4 and Table 4-5:
Ensure that the pre-populated value for the Endpoint URI in the Existing URIs field is
http://<host:port>/ljws_basic_ejb/LargeSimpleBean
where
<host:port> represents the machine and port on which your AquaLogic Service Bus server is running. The host and port values must be the same as the values specified in BEA_HOME\weblogic92\samples\servicebus\examples\src\examples.properties
For more information, see Edit the examples.properties File.
|
Ensure that the pre-populated value for the endpoint URI in the Existing URIs field is
http://<host:port>/crejws_basic_ejb/CreditSimpleBean
where
<host:port> represents the machine and port on which your AquaLogic Service Bus server is running. The host and port values must be the same as the values specified in BEA_HOME\weblogic92\samples\servicebus\examples\src\examples.properties
For more information, see Edit the examples.properties File.
|
When you complete this step, the MortgageBroker/BusinessService folder contains the business services that you created in this tutorial and in Tutorial 1. Routing a Loan Application as in Figure 4-5.

The resources required for this scenario are created when you complete Step 1: Prepare the Environment to Step 3: Create the Resources. You have also configured the proxy service with a base configuration. Step 4: Configure the Routing for the LoanGateway2 Proxy Service to Step 6: Configure the Routing Table Response Actions for the LoanGateway2 Proxy Service describe how to complete the configuration of the proxy service to add the routing, transformation, and Service Callout behavior for the loan application messages.
A proxy service is implemented in AquaLogic Service Bus as a message flow, which includes request and response pipelines. This step includes the following tasks:
The Resource Browser pane is opened in the navigation pane and the Summary of Proxy Services page is displayed in the console.
| Note: | You must be in a session to edit resources. |
The Edit Message Flow page for the proxy service LoanGateway2 is displayed.
In the configuration dialog, RouteNode1 is added.
The Edit Stage Configuration page is displayed and contains a single link, Add an Action.
 Routing Table from the pop-up menu.
The Edit Stage Configuration page changes to display the routing table configuration information.
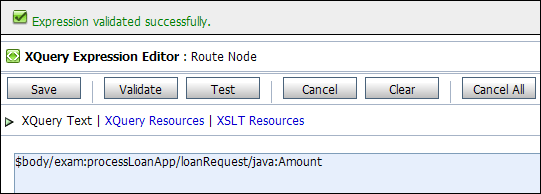
To configure the routing table to route messages to business services based on evaluating the amount element of the incoming message, you must create an XQuery expression using the XQuery Expression Editor.
<Expression> link. The XQuery Expression Editor page is displayed.The structure of the loan request document is displayed.
| Note: | At run time, the proxy service makes its routing decision based on the value in the amount element of the message. |
 associated with the Amount node element, drag and drop it in the XQuery Expression text box.
The $body/exam:processLoanApp/loanRequest/java:Amount XQuery expression is written in the text box.
| Note: | The drag and drop functionality works only in Internet Explorer (IE) browsers. If you are using a browser other than IE, select the Amount element in the Variable Structures pane. The expression is displayed in the Property Inspector palette. Place the cursor in the XQuery expression text box and click Copy Property. The expression is copied to the text box. You can also copy the expression in the palette and paste it into the XQuery Expression text box. |
It is good practice to do this before you submit the expression. The expression is validated for syntax. If there are errors in the expression, they are displayed directly above the Validate button. In this case, the expression is valid as in Figure 4-6.
The routing table is displayed on the Edit Stage Configuration page. <Expression> is now replaced by the expression that returns the value of the amount element in the message.
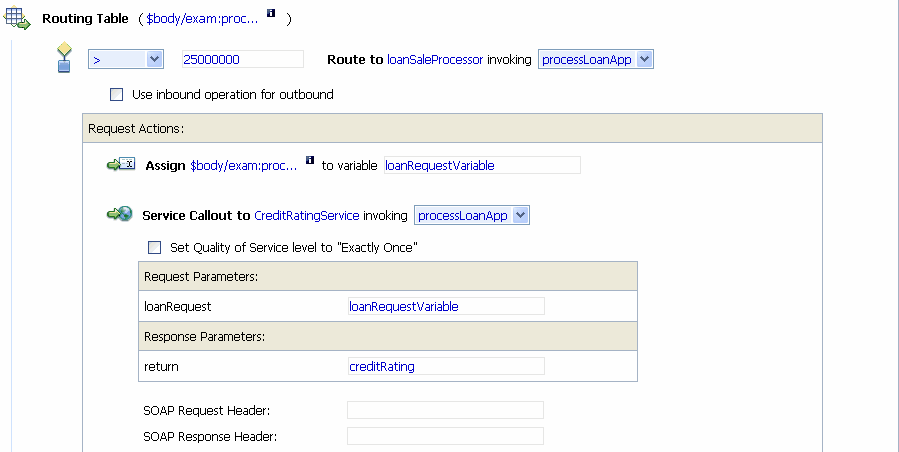
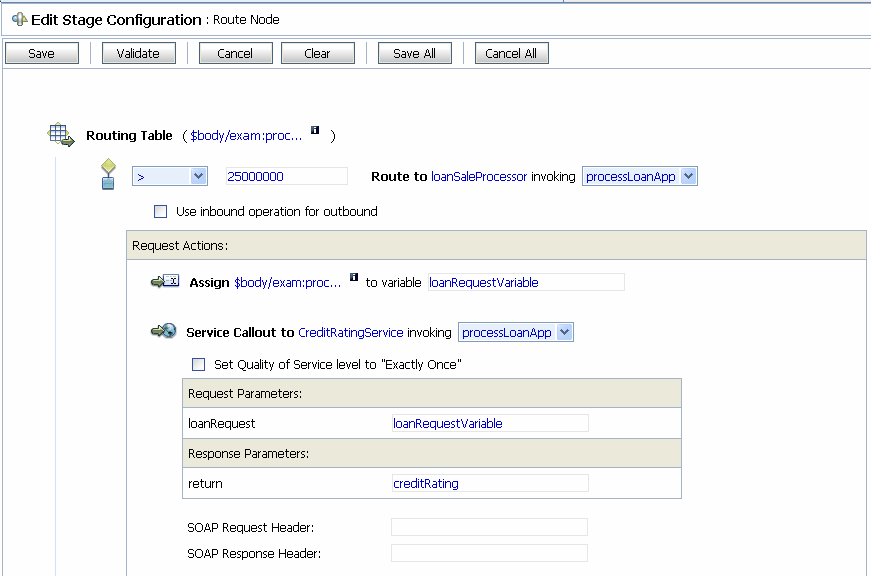
The routing table now contains an expression that determines the routing behavior. If the value in the Amount field is greater than US$ 25 million, then messages are routed according to the routing table configuration.
This is the operation on the LoanSaleProcessor service business service that is invoked at run time if the amount of the loan requested in the loan application is greater than US$ 25 million.
You have now defined the case for routing the loan application to the LoanSaleProcessor business service as in Figure 4-7.

When a loan application with the amount of the loan greater than US$ 25 million is identified, a Web Service callout (Service Callout) is performed to retrieve the customer's credit rating. The credit rating information is added to the loan application and the application is then forwarded to the secondary mortgage company's business service to be processed. Step 5: Configure the Routing Table Request Actions for the LoanGateway2 Proxy Service describes how to configure the proxy service to do the Service Callout and transform the message appropriately for the target service.
Execute the following steps to configure the Routing Table Request actions:
A Service Callout is used to send the loan application to the CreditRatingService business service, which returns the credit rating of an applicant. Before configuring the Service Callout action, you must assign an input parameter for the Service Callout action as follows:
Assign.The Assign action is added to the Request Action pipeline in the Routing Table.
<Expression> link. The XQuery Expression Editor page is displayed. element and drop it into the XQuery expression text box. The XQuery expression is written in the text box:$body/exam:processLoanApp/loanRequest
The routing table is displayed on the Edit Stage Configuration page. <Expression> is now replaced by the expression that returns the content of the message to be sent to the Service Callout service.
inputparam in the variable text box as in Figure 4-8.
This step completes the assignment of the value returned by the XQuery expression ($body/exam:processLoanApp/loanRequest) to the inputparam variable.
This section describes how you can configure the Service Callout action to send the loan application to the CreditRatingService business service, which returns the credit rating of an applicant.
CommunicationService Callout. The Service Callout action is added to the Request Action pipeline in the Routing Table.
This step completes the configuration of the Service Callout to the creditRatingService Web Service. The credit rating returned by the Web Service is assigned to the creditRating context variable.
In this section, you will configure the message transformation to match the public contract (interface requirements) of the loanSaleProcessor service. You will configure the proxy service to:
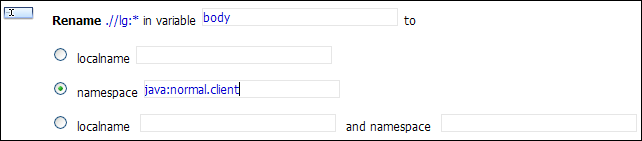
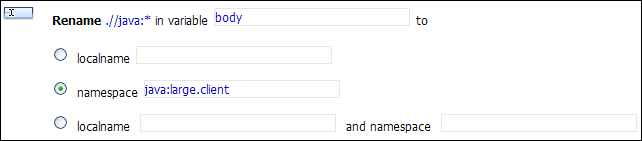
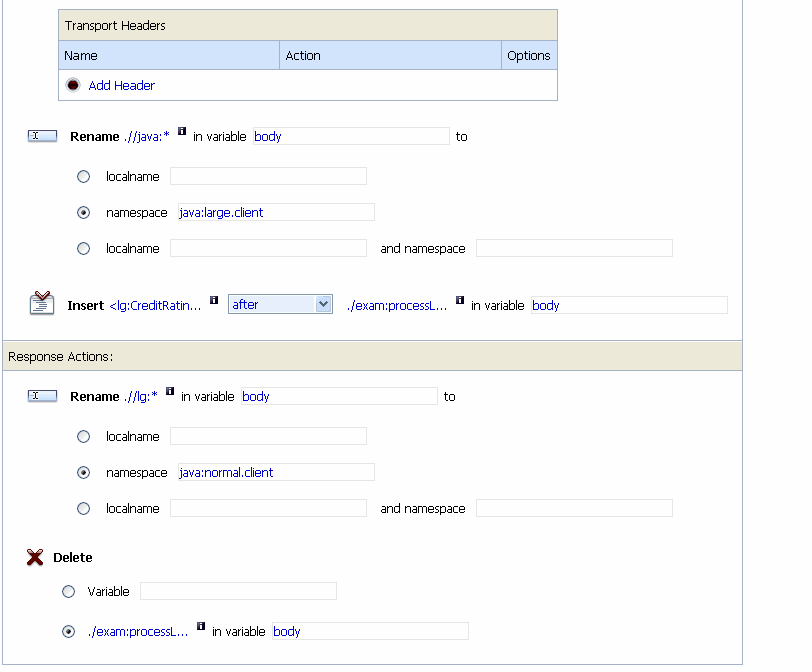
Message ProcessingRename. The Rename action configuration fields are added to the Request Actions pane.
body.
The body context variable contains the body of the message. You have completed creating a condition in which the XPath expression finds all the namespaces with the java prefix in the body context variable. The next step specifies the namespace with which to replace the namespaces identified by the XPath expression.
java:large.client.| Note: | The namespace that you are replacing in this case is java:normal.client. |
The Rename action should now appear as in Figure 4-10.
Message ProcessingInsert.The Insert action configuration fields are added to the Request Actions pane.
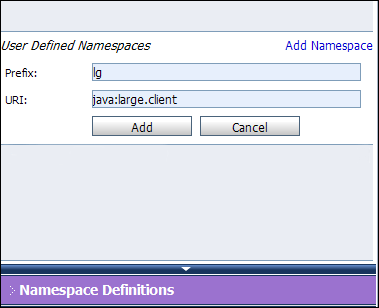
Expression. The XQuery Expression Editor page is displayed. You will add a new namespace on this page in the subsequent steps.
lg.java:large.clientThe new namespace is displayed in the User Defined Namespaces area in the Namespace Definitions palette as in Figure 4-11.
<lg:CreditRating>{data($creditRating)}</lg:CreditRating>java:large.client namespace.{} indicates to the XQuery engine that the content between the {} is not XML and must be interpreted.
At run time, the $creditRating variable is assigned a credit rating value by the credit rating service (to which we configured a Service Callout action in Add a Service Callout Action).
| Note: | It is good practice is to validate the expression before you submit it. |
The following XPath expression is written to the text box
./exam:processLoanApp/loanRequest/java:Notes
| Note: | The drag and drop functionality works only in Internet Explorer (IE) browsers. If you are using a browser other than IE, select the Notes element in the Variable Structures pane. The XPath expression is displayed in the Property Inspector palette. Place the cursor in the XPath expression text box and click Copy Property. The expression is copied to the text box. You can also copy the expression in the palette and paste it into the XPath Expression text box. |
./exam:processLoanApp/loanRequest/lg:Notes
body in the Variable text field (the last field in the expression). This is the context variable into which the new <CreditRating> element is inserted at run time.The Insert action should now look like Figure 4-12.

This step completes the configuration of the outbound message. You added a credit rating element to the message and changed the namespace so that the message complies with the public contract (interface) of the target service.
The configuration of the outbound message should look like Figure 4-13.
The next step describes how you can configure the response actions for the LoanGateway2 proxy service.
This step describes how you can configure the response actions in the Routing Table so that the message that is returned by the proxy service to the client complies with the client's public contract (WSDL). You can configure the proxy service to:
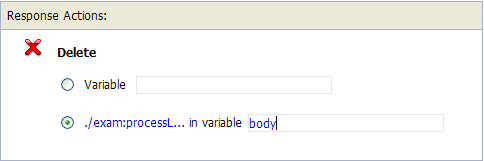
java:normal.client as described in Add a Rename Action.Message ProcessingDelete. The Delete action configuration fields are added to the Response Actions in the Routing Table.
./exam:<processLoanAppResponse>/return/lg:CreditRating
where <processLoanAppResponse> is the WSDL operation that was invoked with the string Response appended to it, and return is the WSDL part name.
body in the variable text field in the Delete action. The configuration for the Delete action is therefore:
Delete ./exam:processLoanAppResponse/return/lg:CreditRating in variable body as in Figure 4-14.
You have specified that AquaLogic Service Bus removes the credit rating element from the response message as the message is processed in the response pipeline.
This section describes how you can rename the namespace to the namespace that the client requires, that is java:normal.client.
| Note: | Recall that you configured the request message to the loanSaleProcessor business service to change the namespace to that required by that service. (See Rename the Namespace. |
Message ProcessingRename.The Rename action configuration fields are added to the Response Actions pane.
body.java:normal.client.
When these steps are completed, you have specified that AquaLogic Service Bus replaces all namespaces with the prefix lg: in the response message with java:normal.client as in Figure 4-15.
After these steps are complete, the configuration of the response action of the proxy service appears in Figure 4-16.

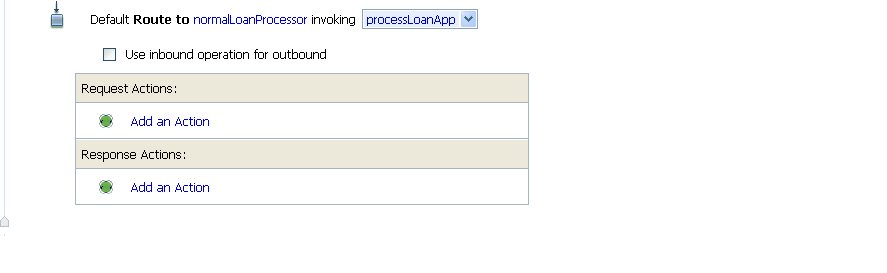
The last step in the configuration of the routing table for the LoanGateway2 proxy service is to add a default routing case (an else condition) to the case expression.
This step describes how you can configure a default routing case for the routing table of the LoanGateway2 proxy service. At run time, if none of the conditions configured in the Routing Table are met, AquaLogic Service Bus routes messages according to the configuration of this default case.
Default Case.The default case is added after the routing table on the Edit Stage Configuration page.
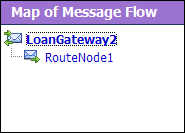
as in Figure 4-17.You can view the map of the message flow of the proxy service in Figure 4-18.
Now that you have configured AquaLogic Service Bus to work with the client and the target business services, you can test your configuration. The routing behavior of the proxy service in this scenario is based on the value of the loan amount in the loan application message. Changing the value of the loan amount changes the routing behavior.
This section describes how you can test the proxy service for both cases. The message returned in the command window after running a test indicates the success or failure of the test and also identifies the business service that processed the request.
This section includes the following test scenarios:
setEnv.cmd to set up your environment, you must do so now.BEA_HOME\weblogic92\samples\servicebus\examples\src\examples\webservices\jws_basic\normal
build.xml file run target in this directory:build.xml. build.xml file looking for the string:<arg line="http://$... the following string and save the changes.<arg line="http://${wls.hostname}:${wls.port}/loan/gateway2 steve 555 25000001 20 5.1 notes" />This changes the URI of the proxy service to that of the deployed Web Service (gateway2) running in the tutorial domain, and specifies US$ 25000001 as the loan amount. For more information about the input parameters for the test, see Step 7: Test Your Loan Application Routing Configuration.
antrun
This tests the routing logic of the proxy service. The following message from the Web Service is displayed at the command prompt:
[java] Loan Application Response: CREDIT RATING: AA: LOAN PURCHASED BY THE <i><b>LARGE</b></i> LOANS SERVICE
[java] Rate: 5.1
BUILD SUCCESSFULThe response message indicates that the Large Loan Service processed the request because the amount of the loan requested was greater than US$ 25 million.
build.xml file in the following directory:BEA_HOME\weblogic92\samples\servicebus\examples\src\examples\webservices\jws_basic\normal
In this case (to test the normalLoan business service), in the build.xml file, enter a value of 25000000 for the loan amount (see Step 7: Test Your Loan Application Routing Configuration), then save the changes.
ant runA response message from the Web Service is displayed at the command prompt.
[java] Loan Application Response: APPROVED BY THE <i><b>NORMAL</b></i> LOAN APPLICATION PROCESSING SERVICE [java] Rate: 5.1BUILD SUCCESSFULThe response message indicates that the Normal Loan Application Processing Service processed the request because the amount of the loan requested was US$ 25 million.
In this tutorial, you configured the transformation and replaced the namespaces in the Route node. Alternatively, it is possible to configure the same logic in the request pipeline in a pipeline pair. The work you must do to accomplish the transformation and namespace replacement is the same regardless of the model that you choose.
In the case of the tutorial scenario, it is easier to add the actions to the request and response actions of the existing route node rather than create a separate pipeline pair, add a stage, and then add the transformation actions to that stage.


|