| Download Docs | Site Map | Glossary | |
|
|
|||
| bea.com | products | dev2dev | support | askBEA |
|
|
|
||||||||
| e-docs > WebLogic Platform > Tour of the WebLogic Platform Sample Application > Web Services Tour |
|
Tour of the WebLogic Platform Sample Application
|
The sample application includes two Web services that we created in WebLogic Workshop. If you took the tour through the business-to-consumer (B2C) sample portal for Avitek Digital Imaging — section 02 from the sample's Introduction page — you probably saw the results returned by the Web services. One performs the product rating look-up that is displayed in the site's Product Evaluator portlet. The other Web service performs the credit card payment authorization.
This portion of the WebLogic Platform sample takes you behind the scenes to learn how BEA WebLogic Workshop was used during the development cycle to create the Web services. In addition, we show you how the Portlet Wizard can be used to reference the product rating Web service's WSDL and generate code for a portlet.
Note: The information that is presented in this section is also available by clicking the "BEGIN Web Services Tech Tour" button on the sample application's Introduction page.
This Web services tour contains the following sections:
The first step is to start the WebLogic Workshop visual development environment. This section explains how to do that on supported Microsoft Windows and UNIX platforms.
For supported platforms information, please refer to the Supported Platforms page on the BEA e-docs Web site.
To start WebLogic Workshop from the Microsoft Windows Start menu, choose:
Programs
To start WebLogic Workshop on UNIX, follow these steps:
$HOME/bea/weblogic700/workshop/Workshop.sh
sh Workshop.sh
For this tour, we are going to look at two Web services that were defined in WebLogic Workshop for the WebLogic Platform Sample Application. The project files that comprise these Web services were installed into the following locations under your BEA_HOME directory:
weblogic700\samples\platform\e2eDomain\beaApps\e2eWebServicesApp\workshop\productEvalWSC
weblogic700\samples\platform\e2eDomain\beaApps\e2eWebServicesApp\workshop\paymentWS
The easiest way to view and test these Web services is to copy these two folders, shown above in bold, to the following folder:
weblogic700\samples\workshop\applications\samples
After the copy operation, the folder hierarchy is as follows:
Then in WebLogic Workshop, use the Open Project menu option to navigate to the JWS file for each Web service. When you start WebLogic Workshop for the first time after installation, it prompts you to create a new project, or open a new one. We suggest that you:
Because you copied the productEvalWSC and paymentWS folders into the WebLogic Workshop samples project's folder, you will see them in the project tree, as shown in the following figure.
Note: Each WebLogic Workshop project corresponds to a J2EE Web application, as evidenced by the WEB-INF folder in the samples folder.
For example, you can expand the productEvalWSC folder in the project tree and then double-click the EvalProduct.jws file. The WebLogic Workshop visual development environment displays a screen that is similar to the following:
Notice that a WebLogic Server instance is not running. See the next section for information about server startup options.
If you are interested in simply viewing the definitions of the Web services, you will not need to start a WebLogic Server instance in the WebLogic Workshop visual development environment. However, if you want to run and test the Web services as part of this tour, follow these steps. Although a server instance is already running for the e2eDomain, in this tour we will start a separate server instance to run and test the Web services located under:
weblogic700\samples\workshop\applications\samples
This assumes that you have already copied the paymentWS and productEvalWSC folders from the Platform samples area to the Workshop samples area, as described in the previous section, About the Project Locations.
To run and test the Web services, follow these steps:
When the server startup has completed, WebLogic Workshop displays a Server Running status near the bottom of the screen.
Note: You can test already deployed Web services that were created in WebLogic Workshop in a domain other than cgDomain. For example, the e2eDomain is installed with the paymentWS and productEvalWSC Web services deployed under:
weblogic700\samples\platform\e2eDomain\beaApps\e2eWebServicesApp\workshop\*
With the server instance for the e2eDomain running, you could test these Web services, without having to open the WebLogic Workshop visual development environment, by pointing your browser to:
http://localhost:7501/workshop/productEvalWSC/EvalProduct.jws
http://localhost:7501/workshop/paymentWS/Payment.jws
Whether you invoke the test pages from within WebLogic Workshop or not, the product provides these very useful pages to test your Web services.
The next section presents an overview of WebLogic Workshop features and outlines the process for defining a Web service.
Defining Web Services with WebLogic Workshop — An Overview
Before we examine the Product Evaluator and Payment Web services that were created for the WebLogic Platform sample application, let's look at the basic steps for defining Web services in WebLogic Workshop. We will cover some introductory topics for this exciting new product, and also provide links to its online documentation for more details.
WebLogic Workshop is a new visual development environment that makes it easy for application developers and J2EE experts alike to build and deploy enterprise-class Web services. The product is comprised of two major components:
The WebLogic Workshop Visual Development Environment
The WebLogic Workshop visual development environment provides a complete environment for developing a Web service application. Standard features such as project management, syntax highlighting, code completion, and integrated debugging are all included. Also, WebLogic Workshop provides a useful visual approach to Web services. For example, the following shows a sample Design View screen.
The Payment Web service under development appears at the center of the screen. The design view lets users graphically create new methods, set properties on controls, and specify the overall structure of a Web service and its relationship to the outside world. The goal is to enable developers to focus on writing business logic — the code that is executed in response to each incoming method — not the machinery of typical Java programming. WebLogic Workshop supports two-way editing so any changes made through the graphical environment are reflected immediately in code, and vice versa.
The WebLogic Workshop Source View screen provides all the standard Java IDE editing features and exposes the Java Web Service (JWS) annotations. For example:
WebLogic Workshop controls are a key innovation that ease the use of enterprise resources and J2EE APIs. WebLogic Workshop simplifies the complexity of these APIs and reduces the amount of object-oriented programming needed to access external resources. For example, WebLogic Workshop has a database control that simplifies the JDBC API. Database administrators can create a reusable database control that links SQL statements with Java methods in a simple declarative fashion. Developers can then use these components to access database resources with a simple function call.
For example, for the productEvalWSC Web service, we used WebLogic Workshop to define a database control named ProductEvalDBControl. One of the four methods in the database control is findRatingData:
     /**
      * @jws:sql statement="SELECT RELIABILITY_RATING,
            VALUE_RATING, OVERALL_RATING,
            COMMENTS FROM E2E_PRODUCT_EVAL
            WHERE SKU = {productId}"
      */
     public Evaluation findRatingData(String productId)
             throws SQLException, ControlException;
Notice how a special WebLogic Workshop Javadoc annotation associates an SQL statement with a Java method. Once a method is on a control this way, users of the control can simply call the function to execute the SQL command.
Java Web Service Files and Control Files
The meeting place between the design-time tool and the run-time framework is the Java Web Service (JWS) file and associated control (CTRL) files.
JWS files are standard Java files with annotations (using the Javadoc syntax) to express additional functionality. Annotations are used to display the Web service and its properties graphically. And the annotations are used by the framework to generate the EJB and J2EE code to execute the Web service. By moving code generation out of the tool and into the framework, developers never have to manage and maintain code that they didn't write.
Files with the extension CTRL are WebLogic Workshop controls. They typically include a collection of method definitions that allow you to easily access a resource such as a database or another Web service. CTRL files can represent the following types of controls:
The WebLogic Workshop Framework
Once a JWS file containing all the business logic for a Web service has been created, the WebLogic Workshop framework is responsible for generating the standard EJB code needed to implement it. The framework exposes, through annotations, functionality specifically designed to support building enterprise-class Web services. The WebLogic Workshop framework does the following:
The WebLogic Workshop framework automatically manages asynchronous message correlation and state management across messages in a conversation. What does that mean? Users can simply mark methods as starting, finishing, or continuing a conversation, and the framework takes care of the details. A unique ID is automatically generated to identify the conversation, and any state (class member variables) defined in the Web service is managed persistently with entity Java beans.
The WebLogic Workshop framework uses simple, declarative XML maps to map between internal Java code and XML messages that are exchanged between Web services. Users indicate the structure of the desired method and associate XML fields with Java variables.
To ensure availability under high load, Web services take advantage of message buffers. Users mark a method as requiring a buffer, and the WebLogic Workshop framework handles creating a queue and wiring it to the Web service. This feature enables one-click access to sophisticated J2EE functionality.
Outline of the Web Service Development Process
This section of the tour outlines the basic steps to building a Web service. You can find more information about each of these steps in the WebLogic Workshop online documentation. A good starting point is the tutorial. It is available within the visual development environment by clicking from the top-level menu: Help
You can access components that are available via the Java Message Service (JMS) using the JMSControl. Through this control, you can send and receive messages of various types, including XML. You also can access Enterprise Java Beans (EJBs) through the EJBControl. The EJBControl simplifies your use of an EJB by providing a single component representing the EJB's interface in your Web service design.
With the TimerControl, you can add timer functionality to your Web service. In this way, you can limit the time-specific operations that are allowed to execute, or force something to happen at regular intervals. You also can use the onException callback to handle exceptions thrown from your Web service's operations. When prompted by this callback, your code can perform any necessary clean-up and send a message to the client.
You can make your Web service more secure by ensuring that it is exposed via the HTTPS protocol rather than HTTP. To do this, you edit the configuration file associated with your Web service's project. Using the JwsCompile command, you can then package your Web service for deployment to a production server.
This covers the basic steps. The next section will discuss the productEvalWSC Web service that we created in WebLogic Workshop for the WebLogic Platform sample application.
Defining the Product Evaluator Web Service
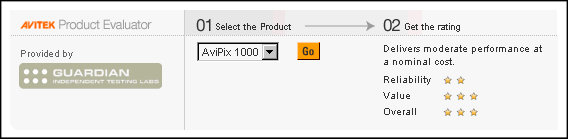
In the business-to-consumer (B2C) portal Web site for the fictitious company, Avitek Digital Imaging, we provided a Product Evaluator portlet for users who are browsing the product catalog:
This portlet used a Web service that we created in WebLogic Workshop to return product rating information about the selected catalog item. This section of the tour describes that Web service, productEvalWSC. This section also describes the steps taken in the Portlet Wizard to create the Product Evaluator portlet.
Viewing the Existing productEvalWSC Web Service
In the WebLogic Workshop project tree window, double-click on the productEvalWSC folder that you copied to:
weblogic700\samples\workshop\applications\samples\productEvalWSC
If you skipped this step in a prior tour page, see the section About the Project Locations. Then return to this page.
In the expanded project folder for productEvalWSC, double-click on the Java Web Service file named EvalProduct.jws. The following screen shows the Design View display for this Web service.
We used WebLogic Workshop to define the ProductEvalDBControl and its methods:
We then used WebLogic Workshop to define the following methods for the JWS:
In the Design View display, notice the small (s), (c), and (f) notations for the JWS methods. These notations indicate which method starts the Web service's conversation (getEvaluation), which method(s) continue the conversation (getComments through getValueRating), and which method finishes the conversation (endEvaluation).
Note: For a production Web service, we would not make separate calls to return the product evaluation's comments, overall rating, reliability rating, and value rating. Instead, we would create a complex object in the Web service and get all the ratings in a single call. Using a complex object and avoiding the separate calls should provide better performance.
Defining a database control and its methods in the WebLogic Workshop visual development environment is easy. This tour does not show the steps taken to create the control and methods. These steps are documented in the WebLogic Workshop documentation, which is available from within the visual development environment, or on the BEA e-docs Web site's pages for WebLogic Workshop.
However, here is a brief explanation about the purpose of the ProductEvalDBControl database control and its methods. During development, before the application's database schema is finalized for the enterprise application being placed into production, it is helpful to define database control methods that create or drop (as needed) the metadata, for testing purposes. As a convenience to our development process, we started by defining the createProductEvaluatorTable and dropProductEvaluatorTable methods. In WebLogic Workshop, you can double-click on the arrow for each method to see the SQL statements that we provided. For example, createProductEvaluatorTable defines:
We then defined the insertEvaluationRecord and findRatingData methods (please see the SQL statements in the WebLogic Workshop visual development environment).
With those database control methods available, we defined the JWS methods that use the database control methods. For example, the getEvaluation method starts the Web service conversation and uses the findRatingData method from the database control. In WebLogic Workshop, you can view the code for the JWS by either selecting the Source View tab, or by clicking the getEvaluation method's underlined link, which brings up the Source View near the line that starts the selected method. For example:
* @jws:operation
* @jws:conversation phase="start"
*/
public String getEvaluation(String productId)
{
   try
   {
     evaluation = productEvalDB.findRatingData(productId);
        }
        catch (java.sql.SQLException e)
        {
            // will be interpreted as productId not found
        }
        if( evaluation != null )
        {
            return "SUCCESS";
        }
        else

     {
            return("NOT FOUND");
     }
 }
You can read the code in WebLogic Workshop for the methods that we defined for EvalProduct.jws, the JWS for productEvalWSC. If you need more information about defining methods in the visual development environment, please see the WebLogic Workshop documentation. It is available from within the visual development environment, or on the BEA e-docs Web site's pages for WebLogic Workshop.
Building and Testing the productEvalWSC Web Service
If the WebLogic Server instance for the cgDomain is not already running, start it. If you skipped this step in a prior tour page, see the section Server Startup Options. Then return to this section.
When the server is running, you will notice the following status icon near the bottom of the WebLogic Workshop visual development environment:
With the server running, click Debug
weblogic700\samples\workshop\cgServer\.jwscompile\_jwsdir_samples
 \classes\productEvalWSC\*.class
With the server running, click Debug
The test pages are browser-based. The initial tabbed page is the Test Form. For now, select the Overview tab. The following screen shows the Overview page with the server running on a remote machine named blues.
Select the Test Form tab. You can test the productEvalWSC Web service by entering sample data. Because you are testing the Web service in the cgDomain (the default server used with WebLogic Workshop), you must first run the CreateProductEvaluatorTable method on the following initial Test Form page, before trying the getEvaluation method. (We use the CreateProductEvaluatorTable method to conveniently create the database table and populate it, for testing purposes only while using the visual development environment. In production, the Web service will use a production database.)
The Web service method should return a Created message. For example:
Next, click the Start operations link on the Test Form. On the refreshed page, start the test of the Web service's getEvaluation method. For example, enter pix1000 in the productId field, as shown below. Then click the getEvaluation button.
The Web service conversation is invoked, and the WebLogic Workshop run-time engine returns a SUCCESS status, as shown in the following screen.
To continue the test, click the Continue this conversation link on the page. WebLogic Workshop returns a list of subsequent methods defined for the productEvalWSC Web service as shown in the following screen.
Click one of the methods to see the Web service return a product rating for this pix1000 camera. For example, when we clicked the getReliabilityRating method test, WebLogic Workshop returned:
Notice the Web service response is the integer 2. On the Product Evaluator portlet, this results in displaying two out of five possible stars. For example:
On the Test Form, you can try other methods in the conversation. As noted earlier, for a production Web service we would not make separate calls to return the product evaluation's comments, overall rating, reliability rating, and value rating. Instead, we would create a complex object in the Web service and get all the ratings in a single call.
After we used WebLogic Workshop to create and test a Java Web Service (JWS) file for productEvalWSC, we used the Portlet Wizard to generate a draft version of the portlet (minus final presentation coding, graphics, Webflow, and packaging changes). The Portlet Wizard tool is part of the E-Business Control Center, a graphical tool provided by WebLogic Portal. Portlet Wizard was used to generate the Web services interfaces code for the portlet. We also used WebLogic Server to generate the client proxy.
Note that when you first accessed the Web service, WebLogic Workshop automatically generated for you all the EJBs, with no action or work required by the developer. In our example, the first access resulted in the productEvalWSC.EvalProductEJB.jar file creation in:
weblogic700\samples\workshop\cgServer\.jwscompile\_jwsdir_samples\EJB
The Web service class files were created in:
weblogic700\samples\workshop\cgServer\.jwscompile\_jwsdir_samples\classes\productEvalWSC\*.class
At any time in the development process, the Web Service Description Language (WSDL) file describing your Web service is available from WebLogic Server. WSDL is a standard XML document type controlled by the World Wide Web Consortium (W3C, see http://www.w3.org for more information).
WSDL files describe all the methods a Web service exposes (in the form of XML messages it can accept and send), as well as the protocols over which the Web service is available. The WSDL file provides all the information a client application needs to use the Web service.
There are several ways to obtain the WSDL file corresponding to a JWS file:
http://blues:7001/samples/productEvalWSC/EvalProduct.jws?WSDL
Use your browser's File
Use Portlet Wizard to Generate Initial Code for the Product Evaluator Portlet
The E-Business Control Center (EBCC) is a Java client-based tool suite. It provides graphical interfaces that simplify complex tasks such as rule definitions, Webflow editing, and portal creation and management. As users of the E-Business Control Center work with its point-and-click interface, it generates XML files that are synchronized with the server.
One of the features in the EBCC is the Portlet Wizard. You can use it to reference WSDL for a Web service, and generate the code needed by a portlet. The following list outlines the general steps in the Portlet Wizard. When you work with the Portlet Wizard, be careful that you do not overwrite the existing evaluator portlet's files.
Note: The packaging and the variables used in the installed evaluator.jsp portlet are different from the content.jsp file created by Portlet Wizard in the following steps. The purpose of this section is to explain what could be created initially by Portlet Wizard.
To start the EBCC, for example on a Windows system, click the following in the Start menu:
weblogic700\samples\platform\e2eDomain\beaApps\e2eApp-project
http://localhost:7501/workshop/productEvalWSC/EvalProduct.jws?WSDL
Note that the URL is case sensitive. In the following example, we used the WSDL URL for the e2eDomain application (note: localhost:7501). After entering the WSDL URL in the input box, click the Add URL button. Portlet Wizard checks the URL and, if valid, adds it to the Web service(s) list. Then click the Close button on the Web service(s) List screen.
Back on the Web Service(s) screen, click the EvalProduct Web service in the list. Portlet Wizard connects with the WSDL URL and retrieves the operations we defined for the self-describing Web service. A progress screen is displayed during this step. After you see the Operations retrieved status message on the screen, click the Next button.
In this example, the following files will be created under weblogic700\samples\platform\e2eDomain\beaApps:
In addition, Portlet Wizard will update the following XML file that lists the available portlets (but not yet enabled on a Products page) for the b2cPortal Web application:
If you want to proceed, click the Create button. Or click the Cancel button if you simply wanted to see the process in the Portlet Wizard.
Behind the scenes, Portlet Wizard executes the following build command to generate the Web service interfaces for you:
weblogic700\server\bin\ant.bat -f buildfile client-gen.xml
This command creates a JAR file containing .class, .WSDL, and other files that comprise the Web service's interfaces that can be used by the portlet. Also included in the JAR are the .java source files.
On the final Next Steps screen, you can uncheck the edit options and click the Close button if you are satisfied with the settings for the initial portlet. Note that you would need to make important enhancements to the portlet's JSP code and associated files before using the EBCC to synchronize the project (placing the portal definitions on the server) and before making the draft portlet visible and available on the Product page. The next section highlights the packaging differences. For information about EBCC server synchronization and making portlets available and visible to a portal page, see the WebLogic Portal Administration Guide.
Now that you understand the general process of using the Portlet Wizard screens to generate the initial portlet's JSP and the interfaces (including .class, .wsdl, .java files in a JAR), we should note again: the packaging and the variables used in the installed Product Evaluator portlet and the EvalProd Web service are different from what you may have just created using Portlet Wizard. When we created the JAR file, we extracted the Java sources, significantly modified the portlet JSP (and added two include JSP files), and deployed the resulting files as follows. Note: the Java sources did not require any modifications; we extracted them simply to provide them with the installed sample directories.
Product Evaluator Portlet JSP files
weblogic700\samples\platform\e2eDomain\beaApps\e2eApp\b2cPortal \portlets\evaluator\*.jsp
In the main evaluator.jsp portlet file and the included step1.jsp and step2.jsp files, we enhanced the presentation graphics that comprised the portlet, and added scriptlets to work with the Webflow for the portlet and the b2cPortal.
Web service client interfaces, CLASS files, used by WebLogic Workshop runtime
weblogic700\samples\platform\e2eDomain\beaApps\e2eApp\b2cPortal\WEB-INF\classes\productEvalWSC\*.class
Web service client interfaces, JAVA files
weblogic700\samples\platform\e2eDomain\beaApps\e2eApp\b2cPortal\WEB-INF\src\productEvalWSC\*.java
weblogic700\samples\platform\e2eDomain\beaApps\e2eWebServicesApp\workshop\productEvalWSC\*
These files include the deployed EvalProduct.jws and ProductEvalDBControl.ctrl copied from the WebLogic Workshop area and deployed as part of the workshop Web application, which was deployed as part of the e2eWebServicesApp enterprise application. Of course, the workshop Web application has a WEB-INF subdirectory that contains the configuration settings in *.xml files.
SOAP Conversation, JAVA files, generated by the client-gen task
weblogic700\samples\platform\e2eDomain\beaApps\e2eApp\b2cPortal\WEB-INF\src\org\openuri\www\x2002\x04\soap\conversation
For information about the Payment Web service that is used in the b2cPortal, refer to the next section.
Defining the Payment Authorization Web Service
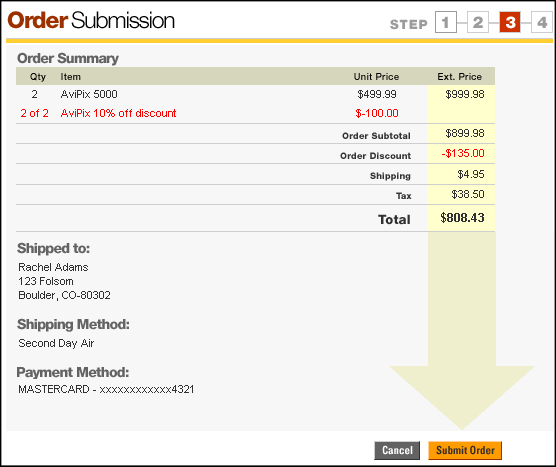
The B2C portal for Avitek Digital Imaging includes an Order Submission page as part of the checkout process.
When the user clicks the Submit Order button, the credit card payment authorization processing is handled by a pipeline component named CajunBasedPaymentPC, which calls a Java proxy that lets the pipeline component call the Payment Web service. We created the Web service in WebLogic Workshop.
The Payment Web service uses the conversational aspect of WebLogic Workshop framework. The first call is to authorize the credit card; we pass in the credit card number and the amount to be authorized as arguments. After the credit card authorization is complete, a call is made to capture an amount. Eventually a request is made to settle the amount.
The codes returned by the Payment Web service to the CajunBasedPaymentPC are as follows:
Note: The Payment Web service always sends payment information through without any errors, as if it were connected to and approved by a third-party payment service. The processing of payment via the Payment is not designed for production use. You must integrate with your third-party vendor's payment service to process payment correctly. Note, however, that the code shown in the sample pipeline component is set up to appropriately handle error conditions.
The Role of the CajunBasedPaymentPC Pipeline Component
Before we look at the definition of the Payment Web service in WebLogic Workshop, let's examine portions of the CajunBasedPaymentPC.java pipeline component. You can find the source file in the following directory under your BEA_HOME:
weblogic700\samples\platform\e2eDomain\beaApps\e2eApp\src\examples\e2e\b2c\payment\pipeline
The sample pipeline component contains many import statements, including:
import paymentWS.Payment_Impl;
import paymentWS.PaymentSoap;
import examples.e2e.b2c.util.B2CPortalConstants;
import com.bea.p13n.util.debug.Debug;
import org.openuri.www.*;
import org.openuri.www.x2002.x04.soap.conversation.*;
import com.beasys.commerce.axiom.units.Money;
import com.beasys.commerce.ebusiness.shoppingcart.ShoppingCart;
These statements import packages for the Payment proxy, the generated SOAP interfaces, and a set of sample constant values (such as the payment type) to simplify the application. Also imported is a ShoppingCart EJB that processes shopping cart data for commerce applications.
Part of the CajunBasedPaymentPC pipeline component's work in the b2cPortal application is to get the current shopping cart data from the pipeline session.
CreditCard cc = (CreditCard) getSessionAttribute(PipelineSessionConstants.PAYMENT_CREDIT_CARD, namespace, pipelineSession);
ShoppingCart sc = (ShoppingCart) getSessionAttribute(PipelineSessionConstants.SHOPPING_CART, namespace, pipelineSession);
Money amt = (Money) sc.getTotal();
We instantiate the proxy for the Web service:
try {
       proxy = new Payment_Impl(connectString +
          "/workshop/paymentWS/Payment.jws?WSDL");
       if (DEBUG.ON) {
           DEBUG.out("proxy instantiated");
       }
After setting up header objects in preparation for the conversation with the Web service, we start the conversation by first getting the credit card number and value (amount of the purchase) from the pipeline session. Then we pass authorize data to the Payment Web service, which returns a result. This entry point simply reserves credit on the supplied card for the amount specified.
Authorize auth = new Authorize(cc.getNumber(), amt.getValue());
long result = proxySoap.authorize(auth, startHeader).getAuthorizeResult() ;
If no errors are returned in the authorization method, we continue with capture data. In payment transactions, the word "capture" refers to the amount of the credit card holder's remaining available credit. The total amount to settle must be less than the capture amount.
Capture capture = new Capture(amt.getValue());
result = proxySoap.capture(capture, continueHeader).getCaptureResult();
After getting the capture result from the Web service, we finish the conversation with the settlement data.
Settle settle = new Settle(amt.getValue());
result = proxySoap.settle(settle, continueHeader).getSettleResult();
See the CajunBasedPaymentPC.java source file for a closer look at the error handling. Again, the file is provided in:
weblogic700\samples\platform\e2eDomain\beaApps\e2eApp\src
 \examples\e2e\b2c\payment\pipeline
Viewing the Existing paymentWS Web Service
In the WebLogic Workshop project tree window, double-click on the paymentWS folder that you copied to:
weblogic700\samples\workshop\applications\samples\paymentWS
If you skipped this step in a prior tour page, see the section titled "About the Project Locations." Then return to this section.
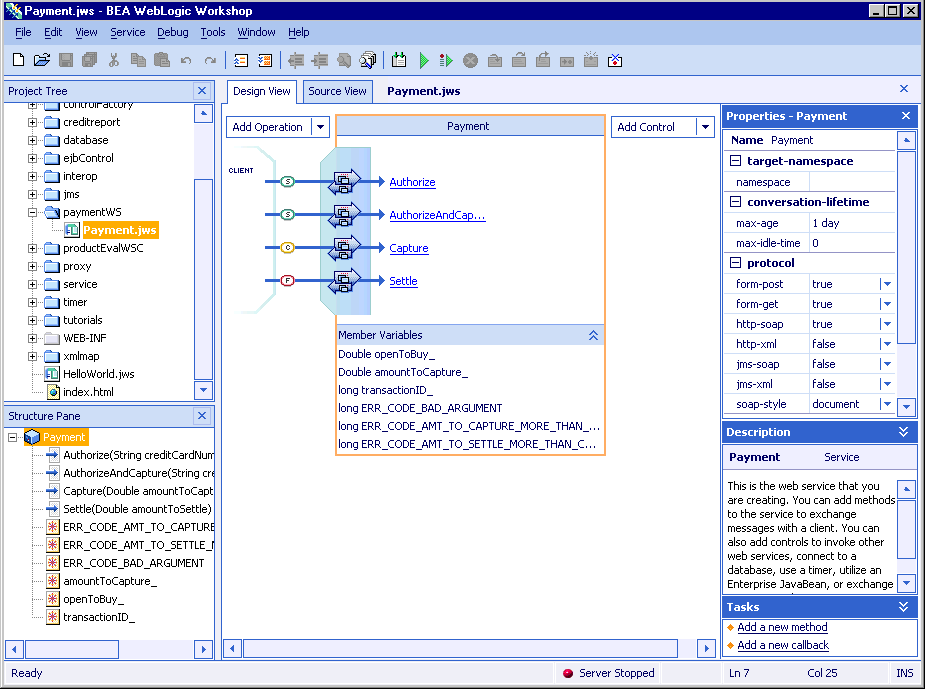
In the expanded project folder for paymentWS, double-click on Java Web Service file named Payment.jws. The following screen shows the Design View display for this Web service:
We used the WebLogic Workshop to define the following methods for the Web service:
In the Design View display, notice the small (s), (c), and (f) notations for the JWS methods. These notations indicate which methods can start the Web service's conversation (Authorize or AuthorizeAndCapture), which method(s) continue the conversation (Capture), and which method finishes the conversation (Settle).
If successful, the Web service methods return a unique transactionID, calculated in this sample as the time that the transaction occurred, in milliseconds. Returning an ID this way is typical for credit card authorization applications.
Defining methods in the WebLogic Workshop is simple. This tour does not show the steps taken to create the control and methods. These steps are documented in the WebLogic Workshop documentation, which is available from within the visual development environment, or on the BEA e-docs Web site's pages for WebLogic Workshop.
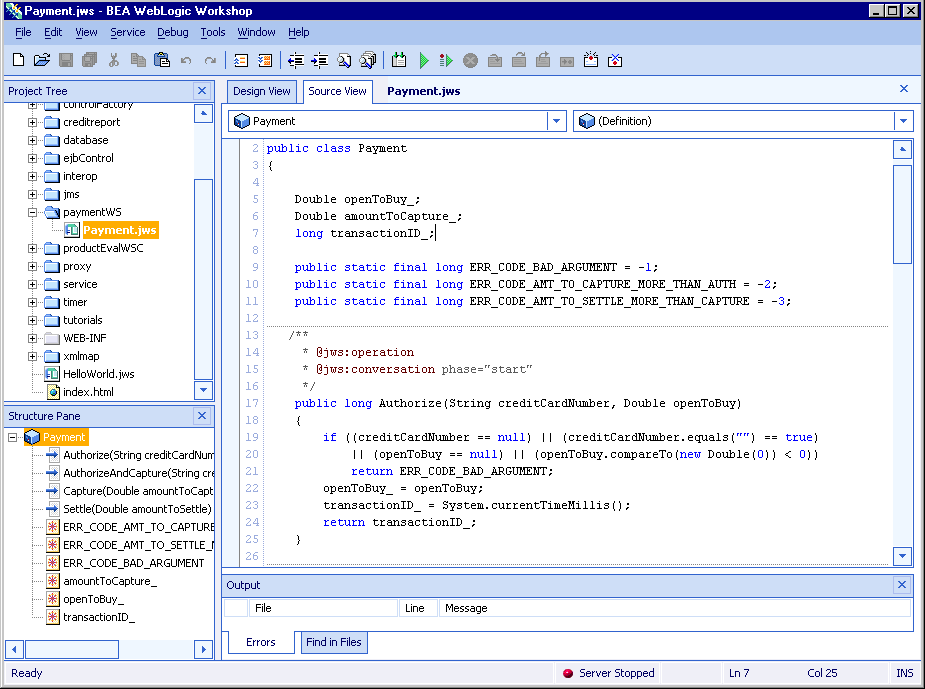
In the workshop, you can switch to Source View to see the definitions for the Web service's methods. After we added these four methods, and of course before we added the business logic you see in the visual development environment, we added member variables that we would need in the Web service. To do this, we right-clicked the Payment heading in the visual development environment and selected Add Member Variable from the pull-down menu:
The members variables defined for the Payment.jws are as follows. The underscore suffix is used to indicate instance variables.
Payment Models and the Methods Defined
In credit card transactions, there are two types of payment models: terminal-based and host-based. The difference between these payment models is where the transaction batch is stored. For a host-based model, the transaction batch is stored on the host network rather than on the local system at the merchant's site. Settlement typically occurs sometime at the end of the day, and the merchant is not required to do anything to initiate the settlement process.
For a terminal-based model, the transaction batch is stored as data files on the local system at the merchant's site. Merchants must initiate the settlement process at the end of each day in order for the funds to be transferred to the merchant's bank account.
The following list describes each of the terminal-based payment models that may be assigned by the financial institution.
This payment model is used for soft goods. Settlement occurs as soon as authorization is complete, because it is assumed that soft goods are shipped at the time of purchase.
This payment model is used in cases where goods have been shipped at authorization but the merchant requests that funds should be transferred at a later date.
This payment model allows merchants to indicate that the goods have been shipped, at which point settlement is done automatically.
This is the most flexible payment model in that it allows merchants to specify when goods are shipped and when funds should be transferred. The mark process allows the merchant to specify that the goods have been shipped. The settlement process allows the merchant to indicate that funds may be transferred.
This next list describes each of the host-based payment models that may be assigned:
This payment model is used for services, sale of digital goods, or physical goods shipped within 24 hours of when the order is placed. In this case, the merchant only needs to get an authorization for the purchase amount. The capture of the authorization into the batch and the settlement of the transaction are done for the merchant by the processor at the time of authorization.
When the merchant fulfills orders more than one day after receiving them, the merchant must authorize and capture transactions separately. In this payment model, authorization is performed at the time the consumer wants to make the purchase. Capture is performed when the merchant ships the order. The processor handles settlement of the batched transactions at certain times of the day.
Again, the Authorize method is used for terminal-based payment models. This entry point validates the credit card number and reserves credit on the supplied card for the amount specified. When validated, it creates a new entry in a database table that records the incident and sets the state based on the payment model. The amount of the transaction is deducted from the openToBuy field in the customer's credit balance. However, the funds are not transferred to the merchant until settling.
Note: Merchants who are using a terminal-based processor must perform a capture and settlement procedure before the funds from the sale are transferred to their account. This is accomplished by a subsequent call to Capture and/or Settle, depending on the "Auto Mark/Auto Settle" processor configuration.
The AuthorizeAndCapture method is used for host-based payment models. This entry point validates the credit card number and reserves credit on the supplied card for the amount specified. When validated, it creates a new entry in a database table that records the incident and sets the state based on the payment model. The amount of the transaction is deducted from the openToBuy field in the customer's credit balance. However, the funds are not transferred to the merchant until settling.
Note: Merchants who are using a host-based post-authorization capture processor must perform a capture and settlement procedure before the funds from the sale are transferred to their account.
The Capture method in the Payment Web service determines the amount of the credit card holder's remaining available credit. The total amount to settle must be less than the capture amount, as checked in the Settle method:
* @jws:operation
* @jws:conversation phase="finish"
*/
public long Settle(Double amountToSettle)
{
if ((amountToSettle == null) ||
(amountToSettle.compareTo(new Double(0)) < 0))
return ERR_CODE_BAD_ARGUMENT;
if (amountToSettle.compareTo(amountToCapture_) > 0)
return ERR_CODE_AMT_TO_SETTLE_MORE_THAN_CAPTURE;
return transactionID_;
}
If you need more information about defining methods in the visual development environment, please see the WebLogic Workshop documentation. It is available from within the visual development environment, or on the BEA e-docs Web site's pages for WebLogic Workshop.
Building and Testing the Payment Web Service
If the WebLogic Server instance for the cgDomain is not already running, start it. If you skipped this step in a prior tour page, see the section Server Startup Options. Then return to this section.
With the server running, click Debug
weblogic700\samples\workshop\cgServer
 \.jwscompile\_jwsdir_samples\classes\paymentWS\*.class
With the server running, click Debug
The test pages are browser-based. The initial tabbed page is the Test Form. For now, select the Overview tab. The following screen shows the Overview page with the server running on a remote machine named blues.
Select the Test Form tab. You can test the Payment Web service by entering sample data. For example, you can enter any set of numbers for the credit card, such as 0099-8877-6655-4433 (with or without hyphens) and an openToBuy authorization amount such as 10000. For this test, we used the Authorize method:
To start the conversation, click the Authorize button. This Web service method, if successful, returns a unique transactionID, computed as the time the transaction occurred in milliseconds, as shown in this example.
To continue the test, click the Continue this conversation link on the page. WebLogic Workshop returns a list of subsequent methods defined for the Payment Web service. In the amountToCapture variable for the Capture method, enter 1000. Then click the Capture button. If the amount to capture is less than the authorize amount (success), the Web service returns a unique transactionID:
Next, click the Continue this conversation link again. In the amountToSettle variable for the Settle method, enter a value such as 999.95. Then click the Settle button. If the amount to settle is less than the capture amount (success), the Web service returns a unique transactionID:
On the Test Form, you can try other values in the conversation to confirm the error handling.
Note that when you built the Web service in WebLogic Workshop, it automatically generated for you all the EJBs, with no action or work required by the developer. In our example, the first access resulted in the paymentWS.PaymentEJB.jar file creation in:
weblogic700\samples\workshop\cgServer
 \.jwscompile\_jwsdir_samples\EJB
The Web service class file was created in:
weblogic700\samples\workshop\cgServer
 \.jwscompile\_jwsdir_samples\classes\paymentWS\Payment.class
At any time in the development process, the Web Service Description Language (WSDL) file describing your Web service is available from WebLogic Server. WSDL is a standard XML document type controlled by the World Wide Web Consortium (W3C, see http://www.w3.org for more information).
WSDL files describe all the methods a Web service exposes (in the form of XML messages it can accept and send), as well as the protocols over which the Web service is available. The WSDL file provides all the information a client application needs to use the web service.
There are several ways to obtain the WSDL file corresponding to a JWS file:
http://blues:7001/samples/paymentWS/Payment.jws?WSDL
Use your browser's File
Packaging of PaymentWS Web Service for Use in e2eDomain
We packaged the files that comprise the Payment Web service for the installed e2eDomain as follows:
Web service client interfaces, CLASS files, used by WebLogic Workshop runtime
weblogic700\samples\platform\e2eDomain\beaApps\e2eApp
 \b2cPortal\WEB-INF\classes\paymentWS\*.class
Web service client interfaces, JAVA files
weblogic700\samples\platform\e2eDomain\beaApps\e2eApp
 \src\paymentWS\*.java
weblogic700\samples\platform\e2eDomain\beaApps
 \e2eWebServicesApp\workshop\paymentWS\Payment.jws
This is the Payment.jws file copied from the WebLogic Workshop area and deployed as part of the workshop Web application, which was deployed as part of the e2eWebServicesApp enterprise application. Of course, the workshop Web application has a WEB-INF subdirectory that contains the configuration settings in *.xml files.
JAR file of the EJBs used by the paymentWS Web service
weblogic700\samples\platform\e2eDomain\e2eServer
 \.jwscompile\_jwsdir_workshop\EJB\paymentWS.PaymentEJB.jar
Webflow Input Processors, CLASS files, for Payment processing
weblogic700\samples\platform\e2eDomain\beaApps
 \e2eApp\b2cPortal\WEB-INF\classes\examples\e2e
 \b2c\payment\webflow\*IP.class
Final Step for the Web Services Tour
This concludes the Web Services Tour. In the online tour, please click the Back to Introduction button to return to the sample's Introduction page.

|

|

|