Supported Configurations for WebLogic Platform 9.2
|
|
|
Autonomy Support
BEA WebLogic Portal 9.2 uses certain products from Autonomy for searching unstructured or structured data, including content stored in the BEA Content Repository. The following sections provide information on support for local and remote Autonomy installations:
Support for Local Autonomy Installation
Where possible, the BEA WebLogic Portal 9.2 installer includes the required Autonomy components and is referred to as a local Autonomy installation. Local Autonomy is only supported on platforms using a 32-bit JDK. The following table provides the operating system and hardware where the WebLogic Portal 9.2 supports a local Autonomy installation:
|
Operating System and Hardware1 |
1. Supported only when using a 32-bit JDK.
See http://download.oracle.com/docs/cd/E13218_01/wlp/docs92/autonomy.html.
Using a Remote Autonomy Installation
The following sections provide information on using a remote Autonomy Installation:
- Support for Remote Autonomy Installation
- Requirements for Remote Autonomy Installation
- How to create a Remote Autonomy Installation
- Setting Up BEA Content Management Search
- Post-Installation Instructions for BEA Smart Update Patch DY4Y
Support for Remote Autonomy Installation
The BEA WebLogic Portal 9.2 installer for certain platforms does not include these Autonomy components due to incompatibilities between the supported operating system, WebLogic Portal 9.2, and Autonomy. In these situations, you must choose an alternate supported operating system on which to run Autonomy. Remote Autonomy installations are supported for platforms using 32- bit and 64-bit JDKs. This installation is remote to your BEA WebLogic Portal 9.2 installation. The following table provides the operating system and hardware where the BEA WebLogic Portal 9.2 supports remote Autonomy installation:
|
Operating System and Hardware1 |
|
Novell SUSE Linux Enterprise 9 on 64-bit AMD64 and 64-bit Xeon |
|
Red Hat Enterprise Linux 4.0 on 64-bit AMD64 and 64-bit Xeon |
1. Supports platforms using 32-bit and 64-bit JDKs.
Requirements for Remote Autonomy Installation
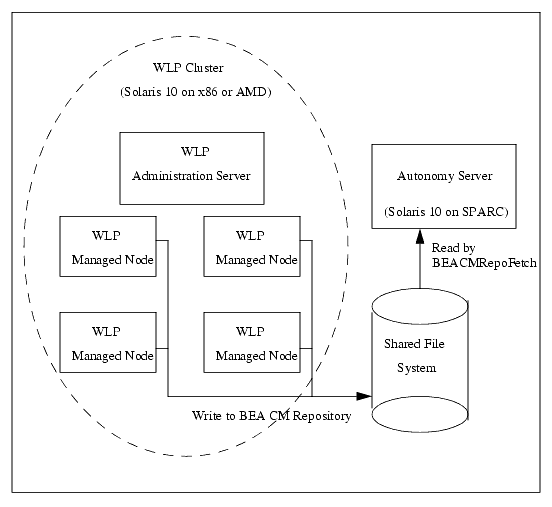
In a configuration where WebLogic Portal 9.2 is running on an operating system that is not supported by Autonomy, you must provide a shared file system that can be written to by each of your WebLogic Portal servers and is also accessible by the server that is hosting Autonomy. This allows the BEA Content Repository to continue to utilize Autonomy components for indexing and searching content. The following figure provides a simple example of a remote Autonomy installation using a shared file system:
Figure 6-1 Example Remote Autonomy Installation
How to create a Remote Autonomy Installation
Use the following steps to create a remote Autonomy installation:
- Go to the BEA download site at http://commerce.bea.com/index.jsp.
- Optional, when the installation process is complete, you may remove any or all of the non-Autonomy related artifacts such as WebLogic Server 9.2, Workshop Runtime for WebLogic Platform 9.2, or WebLogic Portal 9.2.
- Navigate to
WL_HOME/portal/thirdparty/autonomy-wlp92/<operating_system_directory>and configure autonomy and BEACMRepoFetch as documented. - Use the instructions in Configuring Autonomy on Your Target Server in BEA WebLogic Portal 9.2 Integrating Search to configure your Autonomy installation.
- Use the instructions in Setting up BEA Content Management Search in BEA WebLogic Portal 9.2 Integrating Search to configure the BEA Content Management Fetch.
Setting Up BEA Content Management Search
Use the following steps to utilize a shared file system to configure a BEA Content Management search:
- Create a shared directory using the tools and instructions according to your target operating system platform(s) where
shared_driveis the name of your shared drive. - Set the
WLP_SEARCH_OPTIONenvironment variable tononeon each managed server to prevent Autonomy from starting with WebLogic Portal instance. - Using the WebLogic Portal Administration Console, set the
search.staging.arearepository property toshared_driveafter theWL_HOMEenvironment variable is set. For more information on setting other Autonomy properties, see Adding Autonomy Properties to your BEA Repository in BEA WebLogic Portal 9.2 Integrating Search. - If
shared_driveon the Autonomy host is notWL_HOME/portal/thirdparty/autonomy-wlp92/internal/BEACMRepoTemp, use a text editor to modify theDirectoryPathCSVsvariable under theBEACMRepoImportandBEACMRepoIDXImportto point toshared_drive/binaryandshared_drive/nonbinaryin theWL_HOME/portal/thirdparty/autonomy-wlp92/<operating_system_directory>/internal/BEACMRepoFetch/BEACMRepoFetch.cfgfile.
Note: Mount shared_drive with the same exact mapping on each managed server.
Post-Installation Instructions for BEA Smart Update Patch DY4Y
Use the following steps to perform post-installation instructions for Smart Update Patch DY4Y when using remote Autonomy:
- Using a text editor, modify the enterprise host and port properties in the
WL_HOME/samples/portal/portalApp/groupspaceSampleWeb/WEB-INF/web.xmlfile: -
com.bea.apps.groupspace.search.enterprise.DiSHServerHost: The IP address of the IDOL Server Host. com.bea.apps.groupspace.search.enterprise.IDOL_aciPort: The port number of the IDOL server ACI port.- Using a text editor, modify the enterprise host and port properties in the
WL_HOME/samples/portal/portalApp/groupspaceApp/WEB-INF/web.xmlfile: -
com.bea.apps.groupspace.search.enterprise.DiSHServerHost: The IP address of the IDOL Server Host. com.bea.apps.groupspace.search.enterprise.IDOL_aciPort: The port number of the IDOL server ACI port.- Install the following files using the instructions at Install applications and modules in the WebLogic Server Administration Online Help:
