


|
|
This section contains information on the following subjects:
WebLogic Event Server includes two complete examples: HelloWorld, which is a basic skeleton of a a typical WebLogic Event Server application, and a Foreign Exchange (FX) example that includes a multiple components.
These examples are provided in two forms, as follows:
The sample helloworld domain is located in WLEVS_HOME\samples\domains\helloworld_domain, where WLEVS_HOME refers to the main WebLogic Event Server installation directory, such as d:\beahome2\wlevs20. See Running the HelloWorld Example from the helloworld Domain for details.
The sample foreign exchange domain is located in WLEVS_HOME\samples\domains\fx_domain. See Running the Foreign Exchange Example for details.
The HelloWorld source directory is located in WLEVS_HOME\samples\source\applications\helloworld, where WLEVS_HOME refers to the main WebLogic Event Server installation directory, such as d:\beahome2\wlevs20. See Implementation of the HelloWorld Example for details.
The Foreign Exchange source directory is located in WLEVS_HOME\samples\source\applications\fx. See Implementation of the FX Example for details.
WebLogic Event Server also includes an algorithmic trading application, pre-assembled and deployed in its own sample domain; the source code for the example, however, is not provided.
The sample algorithmic trading domain is located in WLEVS_HOME\samples\domains\algotrading_domain. See Running the Algorithmic Trading Example for details.
The samples use Ant as their development tool; for details about Ant and installing it on your computer, see the Apache Ant Project.
To increase the throughput and latency when running the examples, and WebLogic Event Server applications in general, BEA recommends the following:
-dgc parameter to the command that starts the WebLogic Event Server instance for the appropriate domain:prompt> startwlevs.cmd -dgc
By default the deterministic garbage collector is disabled for the examples.
You must set your development environment before you can start WebLogic Event Server instances and run the examples. In particular, you must set the PATH and JAVA_HOME environment variables so that you are using the correct version of the JRockit JDK (R27.3).
There are two ways in which the R27.3 version of JRockit might have been installed on your computer:
Although not required, BEA recommends that you run WebLogic Event Server using the JRockit JDK version included in WebLogic Real Time 2.0 for best results; however, the following procedures describe how to set your environment for either case.
For clarity, it is assumed in the following procedures that you installed WebLogic Real Time and WebLogic Event Server in different BEA home directories; however, it is also possible to install both products in the same BEA home. If you do this, both products will install JRockit, although in different directories:
bin directory of the JRockit JDK. Also, be sure that your PATH environment variable includes the bin directory of your Ant installation.If using the JRockit JDK installed with WebLogic Real Time 2.0:
If you installed WebLogic Real Time 2.0 in the d:\beahome_wlrt directory and Ant is installed in the d:\ant directory, set your PATH environment variable as shown:
prompt> set PATH=d:\beahome_wlrt\jrockit-realtime20_150_11\bin;d:\ant\bin;%PATH%
If using the JRockit JDK installed with WebLogic Event Server 2.0:
If you installed WebLogic Event Server 2.0 in the d:\beahome_wlevs directory and Ant is installed in the d:\ant directory, set your PATH environment variable as shown:
prompt> set PATH=d:\beahome_wlevs\jrockit-R27.3.0-106-1.5.0_11\bin;d:\ant\bin;%PATH%
JAVA_HOME variable in the server start script points to the correct JRockit JDK. If it does not, edit the script.
The server start script (called startwlevs.cmd ) is located in the main domain directory. For example, the HelloWorld domain is located in WLEVS_HOME\samples\domains\helloworld_domain, where WLEVS_HOME refers to the main WebLogic Event Server installation directory, such as d:\beahome_wlevs\wlevs20.
If using the JRockit JDK installed with WebLogic Real Time 2.0, the set command should be as follows:
set JAVA_HOME=d:\beahome_wlrt\jrockit-realtime20_150_11
If using the JRockit JDK installed with WebLogic Event Server 2.0, the set command should be as follows:
set JAVA_HOME=d:\beahome_wlevs\jrockit-R27.3.0-106-1.5.0_11
JAVA_HOME variable in your own development environment to point to the JRockit JDK. If using the JRockit JDK installed with WebLogic Real Time 2.0:
prompt> set JAVA_HOME=d:\beahome_wlrt\jrockit-realtime20_150_11
If using the JRockit JDK installed with WebLogic Event Server 2.0:
prompt> set JAVA_HOME=d:\beahome_wlevs\jrockit-R27.3.0-106-1.5.0_11
To make it easier to reset your development environment after logging out of a session, you can create a command file, such as setEnv.cmd, that contains these set commands.
You can also set these environment variables permanently on your Windows computer by invoking the Control Panel > System window, clicking the Advanced tab, and then clicking the Environment Variables button. You can set the environment variables for the current user or for the entire system.
bin directory of the JRockit JDK. Also, be sure that your PATH environment variable includes the bin directory of your Ant installation.If using the JRockit JDK installed with WebLogic Real Time 2.0:
If you installed WebLogic Real Time in the /beahome_wlrt directory and Ant is installed in the /ant directory, set your PATH environment variable as shown:
prompt> PATH=/beahome_wlrt/jrockit-realtime20_150_11/bin:/ant/bin:$PATH
If using the JRockit JDK installed with WebLogic Event Server 2.0:
If you installed WebLogic Event Server in the /beahome_wlevs directory and Ant is installed in the /ant directory, set your PATH environment variable as shown:
prompt> PATH=/beahome_wlevs/jrockit-R27.3.0-106-1.5.0_11/bin:/ant/bin:$PATH
JAVA_HOME variable in the server start script points to the correct JRockit JDK. If it does not, edit the script.
The server start script (called startwlevs.sh ) is located in the main domain directory. For example, the HelloWorld domain is located in WLEVS_HOME/samples/domains/helloworld_domain, where WLEVS_HOME refers to the main WebLogic Event Server installation directory, such as /beahome_wlevs/wlevs20.
If using the JRockit JDK installed with WebLogic Real Time 2.0, the JAVA_HOME variable should be set as follows:
JAVA_HOME=/beahome_wlrt/jrockit-realtime20_150_11
If using the JRockit JDK installed with WebLogic Event Server 2.0, the JAVA_HOME variable should be set as follows:
JAVA_HOME=/beahome_wlevs/jrockit-R27.3.0-106-1.5.0_11
JAVA_HOME variable in your development environment to point to the JRockit JDK. If using the JRockit JDK installed with WebLogic Real Time 2.0:
prompt> JAVA_HOME=/beahome_wlrt/jrockit-realtime20_150_11
If using the JRockit JDK installed with WebLogic Event Server 2.0:
prompt> JAVA_HOME=/beahome_wlevs/jrockit-R27.3.0-106-1.5.0_11
To make it easier to reset your environment after logging out of a session, you can create a command file, such as setEnv.sh, that contains these commands.
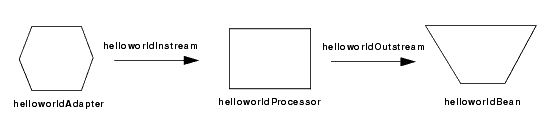
The first example that shows how to create a WebLogic Event Server application is the ubiquitous HelloWorld. The following diagram shows the components that make up the application and how they fit together, which together make up the HelloWorld event processing network:
The example includes the following components:
helloworldAdapter—Component that simply generates Hello World messages every second. In a real-world scenario, this component would typically read a stream of data from a source, such as a data feed from a financial institution, and convert it into a stream of events that the complex event processor can understand. The HelloWorld application also includes a HelloWorldAdapterFactory that creates instances of HelloWorldAdapter.helloworldInstream—Component that streams the events generated by the adapter (in this case Hello World messages) to the complex event processor.helloworldProcessor—Component that simply forwards the messages from the helloworldAdapter component to the POJO that contains the business logic. In a real-world scenario, this component would typically execute additional and possibly much more complex processing of the events from the stream, such as selecting a subset of events based on a property value, grouping events, and so on.helloworldOutstream—Component that streams the events processed by the complex event processor to the POJO that contains the user-defined business logic.helloworldBean—POJO component that simply prints out a message every time it receives a batch of messages from the processor via the output stream. In a real-world scenario, this component would contain the business logic of the application, such as running reports on the set of events from the processor, sending appropriate emails or alerts, and so on.
To run the HelloWorld application that is pre-deployed to the helloworld domain, you simply start an instance of WebLogic Event Server, as described in the following steps:
WLEVS_HOME\samples\domains\helloworld_domain directory, where WLEVS_HOME refers to the main WebLogic Event Server installation directory, such as d:\beahome2\wlevs20.prompt> cd d:\beahome2\wlevs20\samples\domains\helloworld_domain
startwlevs.cmd (Windows) or startwlevs.sh (UNIX) command:prompt> startwlevs.cmd
If you are using the JRockit JDK included in WebLogic Real Time 2.0, enable the deterministic garbage collector by passing the -dgc parameter to the command:
prompt> startwlevs.cmd -dgc
After server status messages scroll by, you should see the following message printed to the output about every second:
Message: HelloWorld - the current time is: 3:56:57 PM
This message indicates that the HelloWorld example is running correctly.
The HelloWorld sample source directory contains the Java source, along with other required resources such as configuration XML files, that make up the HelloWorld application. The build.xml Ant file contains targets to build and deploy the application to the helloworld domain; see Description of the Ant Targets to Build Hello World for details.
Because a pre-packaged version of the Hello World application is already deployed to the helloworld domain, the following procedure shows how to build and deploy a duplicate of the HelloWorld application alongside the original one, rather than overwriting it.
To build and deploy the HelloWorld application, follow these steps:
WLEVS_HOME\samples\source\applications\helloworld, where WLEVS_HOME refers to the main WebLogic Event Server installation directory, such as d:\beahome2\wlevs20.prompt> cd d:\beahome2\wlevs20\samples\source\applications\helloworld
all Ant target to compile and create the application JAR file:prompt> ant all
stage Ant target to copy the application JAR file, along with its configuration XML file, to the WLEVS_HOME\samples\domains\helloworld_domain\applications\helloworld_new directory:prompt> ant stage
This target does not override the existing Hello World application, which is located in the WLEVS_HOME\samples\domains\helloworld_domain\applications\helloworld directory, but rather, creates an entirely new directory.
WLEVS_HOME\samples\domains\helloworld_domain directory:prompt> cd d:\beahome2\wlevs20\samples\domains\helloworld_domain
deployments.xml file and change the location attribute of the lone <wlevs:deployment> tag to point to the new directory; the updated tag should look like this (updated text in bold):<wlevs:deployment id="helloworld" state="start" location="file:${wlevs.domain.home}/applications/helloworld_new/com.bea.wlevs.example.helloworld_2.0.0.0.jar"/>prompt> startwlevs.cmd
If you are using the JRockit JDK included in WebLogic Real Time 2.0, enable the deterministic garbage collector by passing the -dgc parameter to the command:
prompt> startwlevs.cmd -dgc
For details, see Stopping and Starting the Server.
After server status messages scroll by, you should see the following message printed to the output about every second:
Message: HelloWorld - the current time is: 3:56:57 PM
This message indicates that the HelloWorld example has been redeployed and is running correctly.
The build.xml file, located in the top level of the HelloWorld source directory, contains the following targets to build and deploy the application:
clean—This target removes the dist and output working directories under the current directory.all—This target cleans, compiles, and jars up the application into a file called com.bea.wlevs.example.helloworld_2.0.0.0.jar, and places the generated JAR file into a dist directory below the current directory.stage—This target deploys the JAR file, along with its configuration file (processor.xml) to the helloworld domain by copying the two files to the WLEVS_HOME\samples\domains\helloworld_domain\applications\helloworld_new directory. The implementation of the HelloWorld example generally follows the main steps for creating a WebLogic Event Server application; refer to that section for a task-oriented procedure that describes the typical development process.
The HelloWorld example, because it is relatively simple, does not use all the components and configuration files described in the general procedure for creating a WebLogic Event Server application. All the files of the example are located relative to the WLEVS_HOME\samples\source\applications\helloworld directory, where WLEVS_HOME refers to the main WebLogic Event Server installation directory such as c:\beahome\wlevs20. BEA recommends that you use this example directory setup in your own environment, although it is obviously not required.
The files used by the HelloWorld example include:
In the example, the file is called com.bea.wlevs.example.helloworld-context.xml and is located in the src/main/resources/META-INF/spring directory.
For details, see The HelloWorld EPN Assembly File.
helloworldAdapter component, which also includes a factory bean to create adapter instances.
In the example, the two files are called HelloWorldAdapter.java and HelloWorldAdapterFactory.java and are located in the src/main/java/com/bea/wlevs/adapter/example/helloworld directory.
For detailed descriptions of these two files and how to program the adapter Java files in general, see Programming the Adapter Class: Guidelines and Programming the Adapter Factory Class.
HelloWorldEvent event type.
In the example, the file is called HelloWorldEvent.java and is located in the src/main/java/com/bea/wlevs/event/example/helloworld directory.
For a detailed description of this file, as well as general information about programming event types, see Creating Event Types.
helloworldProcessor, helloworldAdapter, and helloworldOutstream components. An important part of this file is the set of EPL rules that select the set of events that the HelloWorld application processes. You also use the XML configuration file to enabled monitoring. You are required to include a processor configuration file in your WebLogic Event Server application, although the adapter and stream configuration is optional.
In the example, the file is called config.xml and is located in the src/main/resources/META-INF/wlevs directory.
For details, see The HelloWorld Component Configuration File.
helloworldProcessor and helloworldAdapter components. This XSD file is optional and only required if your application extends the default configuration Schema for the components; the HelloWorld application extends the default adapter configuration.
In the example, the file is called helloworld.xsd and is located in the src/main/resources/extension directory.
For details, see The XSD File that Describes the Extended HelloWorld Component Configuration.
helloworldBean component of the application, a POJO that contains the business logic.
In the example, the file is called HelloWorldBean.java and is located in the src/main/java/com/bea/wlevs/example/helloworld directory.
For details about this file, and programming the business logic POJO in general, see Programming Business Logic: Guidelines.
MANIFEST.MF file that describes the contents of the OSGi bundle that will be deployed to WebLogic Event Server.
In the example, the MANIFEST.MF file is located in the src/main/main/resources/META-INF directory
See Assembling a WebLogic Event Server Application: Main Steps for information about creating this file, as well as a description of creating the OSGi bundle that you deploy to WebLogic Event Server.
The HelloWorld example uses a build.xml Ant file to compile, stage, assemble, and deploy the OSGi bundle; see Building and Deploying the HelloWorld Example from the Source Directory for a description of this build.xml file if you also use Ant in your development environment.
One of the main purposes of the EPN assembly file is to define the event processing network by declaring the components of the application and how they are all connected, or in other word, which components listen to which other components. WebLogic Event Server provides a set of custom Spring tags used to declare the network. You also use the EPN assembly file to register the event types used by your application and its EPL rules.
You use the EPN assembly file in the typical way to define the application component beans in the Spring application context; the application components beans are those implemented with Java classes, such as adapters and the POJO that contains the business logic.
For full reference information about the custom Spring tags, see WebLogic Event Server Custom Spring Tags Reference or the XSD Schema file that defines the tags.
The following example shows the EPN assembly file used in the HelloWorld sample application; see the explanation after the example for details about the entries in bold.
<?xml version="1.0" encoding="UTF-8"?>
<beans xmlns="http://www.springframework.org/schema/beans"
       xmlns:xsi="http://www.w3.org/2001/XMLSchema-instance"
       xmlns:osgi="http://www.springframework.org/schema/osgi"
       xmlns:wlevs="http://www.bea.com/ns/wlevs/spring"
       xsi:schemaLocation="
  http://www.springframework.org/schema/beans
  http://www.springframework.org/schema/beans/spring-beans.xsd
  http://www.springframework.org/schema/osgi
  http://www.springframework.org/schema/osgi/spring-osgi.xsd
  http://www.bea.com/ns/wlevs/spring
  http://www.bea.com/ns/wlevs/spring/spring-wlevs.xsd">
<!-- First, create and register the adapter (and factory) that generates hello world messages -->
    <osgi:service interface="com.bea.wlevs.ede.api.AdapterFactory">
        <osgi:service-properties>
            <prop key="type">hellomsgs</prop>
        </osgi:service-properties>
        <bean class="com.bea.wlevs.adapter.example.helloworld.HelloWorldAdapterFactory"/>
    </osgi:service>
<wlevs:event-type-repository>
<wlevs:event-type type-name="HelloWorldEvent">
<wlevs:class>com.bea.wlevs.event.example.helloworld.HelloWorldEvent</wlevs:class>
</wlevs:event-type>
</wlevs:event-type-repository><!-- Assemble EPN (event processing network) -->
<!-- The adapter id is used by the configuration system, so needs to be well-known -->
    <wlevs:adapter id="helloworldAdapter" provider="hellomsgs" manageable="true">
        <!-- This property is also configure by dynamic config -->
        <wlevs:instance-property name="message" value="HelloWorld - the currenttime is:"/>
    </wlevs:adapter>
<!-- The processor id is used by the configuration system, so needs to be well-known -->
<wlevs:processor id="helloworldProcessor" manageable="true" /> <wlevs:stream id="helloworldInstream" manageable="true">
<wlevs:listener ref="helloworldProcessor"/>
<wlevs:source ref="helloworldAdapter"/>
</wlevs:stream><!-- Manageable is so that we can monitor the event throughput -->
    <wlevs:stream id="helloworldOutstream" manageable="true">
        <wlevs:listener>
            <!-- Create business object -->
            <bean class="com.bea.wlevs.example.helloworld.HelloWorldBean"/>
        </wlevs:listener>
        <wlevs:source ref="helloworldProcessor"/>
    </wlevs:stream>
</beans>
<osgi:service ...> entry registers the helloworldAdapterFactory as an OSGi service. Note that the referenced interface is com.bea.wlevs.ede.api.AdapterFactory, the WebLogic Event Server-provided adapter factory, rather than the adapter factory specific to the HelloWorld application (com.bea.wlevs.adapter.example.helloworld.HelloWorldAdapterFactory).
The <prop> element gives the OSGi service a type name; this type, hellomsgs, will be referenced later on when the helloworldAdapter is declared a component of the event processing network.
The entry that begins <bean id="helloworldAdapterFact" .. > registers the helloworldAdapterFactory bean in the Spring application context; this class generates instances of helloworldAdapter.
<wlevs:event-type-repository> entry registers the event types that are used throughout the application; in the HelloWorld application, there is just a single event type: HelloWorldEvent, implemented with the com.bea.wlevs.event.example.helloworld.HelloWorldEvent class. WebLogic Event Server automatically creates instances of this data type when needed. You can also reference this data type in the EPL rules of the application.<wlevs:adapter>, <wlevs:processor>, and <wlevs:stream> entries together define the event processor network by declaring each component in the network; the following bullets describe the configuration of each component.<wlevs:adapter> tag defines the adapter component of the HelloWorld application:<wlevs:adapter id="helloworldAdapter" provider="hellomsgs" manageable="true">
<wlevs:instance-property name="message" value="HelloWorld - the currenttime is:"/>
</wlevs:adapter>
The id attribute specifies a unique identifier for this component; the id will be referenced later by other components. The provider attribute specifies that the provider of the adapter component is the OSGi service type hellomsgs, declared previously when the helloworldAdapterFactory was declared as an OSGi service. The manageable attribute enables monitoring for the adapter; by default the manageability of components is disabled.
The <wlevs:instance-property> child tag passes an instance variable to adapter instance; the name of the variable is message and the value is HelloWorld - the current time is:.
<wlevs:processor> tag defines the processor component of the application:<wlevs:processor id="helloworldProcessor" manageable="true" />
The id and manageable attributes function the same as those for <wlevs:adapter>.
<wlevs:stream> tags defines the two stream components of the application:<wlevs:stream id="helloworldInstream" manageable="true">
<wlevs:listener ref="helloworldProcessor"/>
<wlevs:source ref="helloworldAdapter"/>
</wlevs:stream>
<wlevs:stream id="helloworldOutstream" manageable="true">
    <wlevs:listener>
        <bean class="com.bea.wlevs.example.helloworld.HelloWorldBean"/>
    </wlevs:listener>
    <wlevs:source ref="helloworldProcessor"/>
</wlevs:stream>
The id and manageable attributes for streams function the same as those for <wlevs:adapter>.
The <wlevs:stream id="helloworldInstream"> tag uses the <wlevs:listener> child tag to specify that the helloworldProcessor listens to the stream, and the <wlevs:source> child tag to specify that the stream gets its events from the helloworldAdapter component.
The <wlevs:stream id="helloworldOutstream"> tag also uses these listener and source tags. One difference, however, is that it directly nests the definition of the business logic POJO in the <wlevs:listener> tag rather than reference a unique identifier. In this case, the nested tag is a standard Spring <bean> that specifies that the POJO is implemented with the com.bea.wlevs.example.helloworld.HelloWorldBean class.
The HelloWorld application contains a single complex event processor, a single adapter, and a single stream, all configured with the following XML file:
<?xml version="1.0" encoding="UTF-8"?>
<helloworld:config
  xmlns:helloworld="http://www.bea.com/ns/wlevs/example/helloworld">
  <processor>
    <name>helloworldProcessor</name>
    <rules>
      <rule id="helloworldRule"><![CDATA[ select * from HelloWorldEvent retain 1 event ]]></rule>
    </rules>
  </processor>
  <adapter>
    <name>helloworldAdapter</name>
    <message>HelloWorld - the current time is:</message>
  </adapter>
  <stream monitoring="true" >
      <name>helloworldOutstream</name>
      <max-size>10000</max-size>
      <max-threads>2</max-threads>
  </stream>
</helloworld:config>
If your application contains multiple processors, adapters or streams, you can either declare them all in a single configuration file, or create separate configuration files for each component; the method you chose depends on which you find easier to manage.
For each component you configure, you must add the <name> child element to explicitly declare the specific component to which you are referring. The value of the <name> element must correspond to the component’s unique identifier of its declaration in the EPN assembly file.
For example, assume a processor is declared in the EPN assembly file as follows:
<wlevs:processor id="helloworldProcessor" ...>
Then its corresponding XML configuration would be as follows:
 <processor>
  <name>helloworldProcessor</name>
  ...
 </processor>
The HelloWorld example uses a single configuration file for one processor with the name helloworldProcessor, one adapter with the name helloworldAdapter, and one stream with the name helloworldOutstream. These names correspond with the declaration of the components in the EPN assembly file.
| Note: | When you create the configuration file for the components of your application, you can use the default configuration XSD Schema files, or create a custom one if you want to add additional elements. In the HelloWorld application, the adapter uses a custom configuration, and thus has its own XSD Schema file that describes the configuration file. |
| Note: | Because the HelloWorld application uses an extended XSD schema when configuring its components, the corresponding configuration XML file must identify the namespace for this schema rather than the default schema. In the preceding example: |
| Note: | <helloworld:config |
| Note: | See The XSD File that Describes the Extended HelloWorld Component Configuration for details. |
The <processor> element configures the processor component. The most important part of the processor configuration is the declaration of the set of Event Processing Language (EPL) rules that this processor executes; these rules select the set of events that are eventually passed to the application business object. Each rule is declared with a <rule> element using an XML ![CDATA[...]] section; all rules are grouped together with a single <rules> element. You can define as many rules as you want for a particular processor.
The HelloWorld application has just a single very simple rule:
select * from HelloWorldEvent retain 1 event
This rule selects all events of type HelloWorldEvent, but retains only one event at a time in its window. For additional information and examples about using EPL, see the
EPL Reference Guide.
The <adapter> element configures the adapter component. The most important thing to note about the helloworldAdapter is that it has a custom element, <message>. The Java implementation of the adapter receives this information from WebLogic Event Server and then uses it in its code.
The <stream> element configures the helloworldOutstream component. First it enables monitoring of the stream using the monitoring="true" attribute. The monitoring attribute only takes effect if the manageable="true" attribute has also been set for this component in the EPN assembly file. The <max-size> and <max-threads> elements specify the maximum size of the stream and the maximum number of threads assigned to the stream, respectively.
WebLogic Event Server provides a default XSD Schema that describes the XML file which configures the components (processor, adapters, streams) of your application. If this Schema is adequate for your application, then you do not need to create an XSD file of your own.
However, sometimes it is helpful to extend the default component configuration with custom configuration information for your specific application; for example, the HelloWorld adds a <message> element that specifies the text of the message created by the helloworldAdapter component, as shown in The HelloWorld Component Configuration File.
If you want to extend the default configuration of the components, then you must also provide your own XSD schema file that describes the format of the new configuration files. This XSD schema file must describe the extended configurations, as well as the overall format of the configuration file. The HelloWorld application extends the default adapter configuration, but uses the default processor and stream configurations. The XSD file is shown below; see the explanation after the schema for a description of the sections in bold:
<?xml version="1.0" encoding="UTF-8"?>
<xs:schema xmlns="http://www.bea.com/ns/wlevs/example/helloworld"
xmlns:xs="http://www.w3.org/2001/XMLSchema"
xmlns:jxb="http://java.sun.com/xml/ns/jaxb"
xmlns:xjc="http://java.sun.com/xml/ns/jaxb/xjc"
xmlns:wlevs="http://www.bea.com/ns/wlevs/config/application"
targetNamespace="http://www.bea.com/ns/wlevs/example/helloworld"elementFormDefault="unqualified" attributeFormDefault="unqualified"
jxb:extensionBindingPrefixes="xjc" jxb:version="1.0">
<xs:annotation>
<xs:appinfo><jxb:schemaBindings></xs:appinfo>
<jxb:package name="com.bea.adapter.wlevs.example.helloworld"/>
</jxb:schemaBindings>
</xs:annotation>
<xs:import namespace="http://www.bea.com/ns/wlevs/config/application" schemaLocation="wlevs_application_config.xsd"/> <xs:element name="config">
<xs:complexType>
<xs:choice maxOccurs="unbounded">
<xs:element name="adapter" type="HelloWorldAdapterConfig"/>
<xs:element name="processor" type="wlevs:DefaultProcessorConfig"/>
<xs:element name="stream" type="wlevs:DefaultStreamConfig" />
</xs:choice>
</xs:complexType>
</xs:element> <xs:complexType name="HelloWorldAdapterConfig">
<xs:complexContent>
<xs:extension base="wlevs:AdapterConfig">
<xs:sequence>
<xs:element name="message" type="xs:string"/>
</xs:sequence>
</xs:extension>
</xs:complexContent>
</xs:complexType></xs:schema>
The important things to note about the preceding XSD file are:
<xs:schema targetNamespace..> entry defines the target namespace; the name can be anything you want.<jxb:schemaBindings> entry specifies that WebLogic Event Server should use JAXB to generate a Java class represents the XML conents of the configuration file; the server then passes this Java class to the adapter. The <jxb:package> child specifies the package name of this Java class, in this case com.bea.adapter.wlevs.example.helloworld.<xs:import> entry specifies the WebLogic Event Server XSD file to import; this file defines the default configuration file and the schema types defined in this imported XSD can then be references in the custom XSD.<xs:element name="config"> lays out the structure of the custom configuration file. In particular, it says that the root element is <config> and it has three possible child elements, <adapter>, <processor>, and <stream>.
The schema type of the <adapter> element is HelloWorldAdapterConfig, defined later in this custom XSD file. The schema typse of the <processor> and <stream> elements are the default configuration types for processors and streams: wlevs:DefaultProcessorConfig and wlevs:DefaultStreamConfig, respectively. These types are defined in the imported XSD file wlevs_application_config.xsd. In other words, only the adapter configuration is being changed in the custom XSD file.
<xs:complexType name="HelloWorldAdapterConfig"> entry defines what the HelloWorldAdapterConfig schema type looks like. In particular, it uses as a base the default adapter configuration, wlevs:AdapterConfig, defined in the imported XSD file wlevs_application_config.xsd., but then adds a new element called <message> of data type string.For additional details about extending the configuration of an adapter, see Extending the Configuration of an Adapter.
The foreign exchange example, called FX for simplicity, is a more complex example than the HelloWorld one because it includes multiple processors that handle information from multiple data feeds. In the example, the data feeds are simulated using the WebLogic Event Server load generator utility. The following diagram describes the FX event processing network:
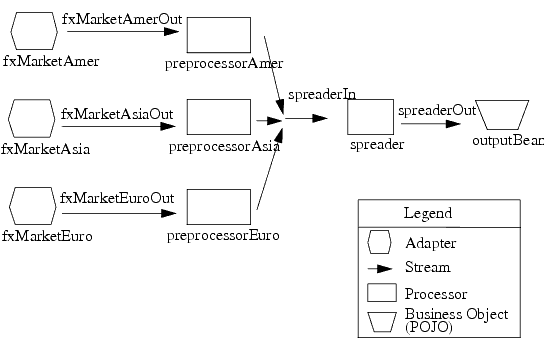
In the scenario, three data feeds, simulated using the load generator, send a constant pair of values from different parts of the world; the value pairs consist of a currency pair, such as USDEUR for US dollar - European euro, and an exchange rate between the two currencies. The fxMarketXXX adapters receive the data from the feeds, convert them into events, and pass them to the preprocessorXXX processors. Each processor performs an initial stale check to ensure that no event is more than ten seconds old and then a boundary check to ensure that the exchange rate between the two currencies is within a current boundary. The server also only selects a specific currency pair from a particular stream; for example, the server selects USDEUR from the simulated American data feed, but rejects all other pairs, such as USDAUD (Australian dollar).
After the data from each data feed provider passes this initial preparation phase, a different processor, called spreader, joins all events across all providers, calculates the mid-point between the maximum and minimum rate, and then applies a trader-specified spread. Finally, the processor forwards the rate to the POJO that contains the business code; in this example, the POJO simply publishes the rate to clients.
The WebLogic Event Server monitor is configured to watch if the event latency in the last step exceeds some threshold, such as no updated rates in a 30 second time-span, and if there is too much variance between two consecutive rates for the same currency pair. Finally, the last rate of each currency pair is forwarded to the dashboard.
For optimal demonstration purposes, BEA recommends that you run this example on a powerful computer, such as one with multiple CPUs or a 3 GHz dual-core Intel, with a minimum of 2 GB of RAM.
To run the Foreign Exchange (FX) application that is pre-deployed to the fx_domain domain, you simply start an instance of WebLogic Event Server, as described in the following steps:
WLEVS_HOME\samples\domains\fx_domain directory, where WLEVS_HOME refers to the main WebLogic Event Server installation directory, such as d:\beahome2\wlevs20.prompt> cd d:\beahome2\wlevs20\samples\domains\fx_domain
startwlevs.cmd (Windows) or startwlevs.sh (UNIX) command:prompt> startwlevs.cmd
If you are using the JRockit JDK included in WebLogic Real Time 2.0, enable the deterministic garbage collector by passing the -dgc parameter to the command:
prompt> startwlevs.cmd -dgc
The FX application is now ready to receive data from the data feeds.
WLEVS_HOME\utils\load-generator directory, where WLEVS_HOME refers to the main WebLogic Event Server installation directory, such as d:\beahome2\wlevs20.fxAmer.prop properties file:prompt> runloadgen.cmd fxAmer.prop
fxAsia.prop properties file:prompt> runloadgen.cmd fxAsia.prop
fxEuro.prop properties file:prompt> runloadgen.cmd fxEuro.prop
After the server status messages scroll by in the command window from which you started the server, and the three load generators start, you should see messages similar to the following being printed to the server command window:
{crossRate=USDJPY, internalPrice=119.09934499999781}, {crossRate=USDGBP, internalPrice=0.5031949999999915}, {crossRate=USDJPY, internalPrice=117.73945624999783}These messages indicate that the Foreign Exchange example is running correctly. The output shows the cross rates of US dollars to Japanese yen and US dollars to UK pounds sterling.
The Foreign Exchange (FX) sample source directory contains the Java source, along with other required resources such as configuration XML files, that make up the FX application. The build.xml Ant file contains targets to build and deploy the application to the fx_domain domain, as described in Description of the Ant Targets to Build FX.
Because a pre-packaged version of the FX application is already deployed to the fx_domain domain, the following procedure shows how to build and deploy a duplicate of the FX application alongside the original one, rather than overwriting it.
To build and deploy the FX application, follow these steps:
WLEVS_HOME\samples\source\applications\fx, where WLEVS_HOME refers to the main WebLogic Event Server installation directory, such as d:\beahome2\wlevs20.prompt> cd d:\beahome2\wlevs20\samples\source\applications\fx
all Ant target to compile and create the application JAR file:prompt> ant all
stage Ant target to copy the application JAR file, along with its configuration XML file, to the WLEVS_HOME\fx_domain\applications\fx_new directory:prompt> ant stage
This target does not override the existing FX application, which is located in the WLEVS_HOME\fx_domain\applications\fx directory, but rather, creates an entirely new directory.
WLEVS_HOME\samples\domains\fx_domain directoryprompt> cd d:\beahome2\wlevs20\samples\domains\fx_domain
deployments.xml file and change the location attribute of the lone <wlevs:deployment> tag to point to the new directory; the updated tag should look like this (updated text in bold):<wlevs:deployment id="fxApp" state="start" location="file:applications/fx_new/com.bea.wlevs.example.fx_2.0.0.0.jar"/>prompt> startwlevs.cmd
If you are using the JRockit JDK included in WebLogic Real Time 2.0, enable the deterministic garbage collector by passing the -dgc parameter to the command:
prompt> startwlevs.cmd -dgc
For details, see Stopping and Starting the Server.
After server status messages scroll by, you should see the following message printed to the output:
{crossRate=USDJPY, internalPrice=119.09934499999781}, {crossRate=USDGBP, internalPrice=0.5031949999999915}, {crossRate=USDJPY, internalPrice=117.73945624999783}This message indicates that the FX example has been redeployed and is running correctly.
The build.xml file, located in the top-level directory of the FX source, contains the following targets to build and stage the application:
clean—This target removes the dist and output working directories under the current directory.all—This target cleans, compiles, and jars up the application into a file called com.bea.wlevs.example.fx_2.0.0.0.jar, and places the generated JAR file into a dist directory below the current directory.stage—This target deploys the JAR file, along with its configuration files (preprocessor.xml and spreader.xml) to the fx_domain domain by copying the two files to the WLEVS_HOME\samples\domains\fx_domain\applications\fx_new directory. The implementation of the foreign exchange (FX) example generally follows the main steps for creating a WebLogic Event Server application; refer to that section for a procedure that describes the typical development process.
All the files of the FX example are located relative to the WLEVS_HOME\samples\source\applications\fx directory, where WLEVS_HOME refers to the main WebLogic Event Server installation directory such as c:\beahome\wlevs20. BEA recommends that you use this example directory setup in your own environment, although it is obviously not required.
The files used by the FX example include:
In the example, the file is called com.bea.wlrt.example.fx-context.xml and is located in the src/main/resources/META-INF/spring directory.
For details, see The FX EPN Assembly File.
The first XML file configures the preprocessorAmer, preprocessorAsia, and preprocessorEuro components, all in a single file. This XML file includes the EPL rules that select particular currency pairs from particular simulated market feeds and executes the boundary conditions described in the example overview. In the example, this file is called preprocessors.xml and is located in the src/main/resources/META-INF/wlevs directory.
The second XML file configures the spreader processor. This component joins together all the events that were selected by the pre-processors, calculates an internal price for the particular currency pair, and then calculates the cross rate. This file is called spreader.xml and is located in the src/main/config directory.
For details, see The FX Processor Configuration Files.
OutputBean component of the application, a POJO that contains the business logic. This POJO prints out to the screen the events that it receives, programmed in the onEvent method. The POJO also registers into the event type repository the ForeignExchangeEvent event type.
In the example, the file is called OutputBean.java and is located in the src/main/java/com/bea/wlevs/example/fx directory.
For additional information about the WebLogic Event Server APIs referenced in the POJO, see the WebLogic Event Server Javadocs.
ForeignExchangeBuilderFactory, which is the factory that generates ForeignExchangeEvents.
In the example, the file is called ForeignExchangeBuilderFactory.java and is located in the src/main/java/com/bea/wlevs/example/fx directory.
For additional information about the WebLogic Event Server APIs referenced in ForeignExchangeBuilderFactory, see the
WebLogic Event Server Javadocs.
MANIFEST.MF file that describes the contents of the OSGi bundle that will be deployed to WebLogic Event Server.
In the example, the MANIFEST.MF file is located in the src/main/main/resources/META-INF directory
See Assembling a WebLogic Event Server Application: Main Steps for information about creating this file, as well as a description of creating the OSGi bundle that you deploy to WebLogic Event Server.
The FX example uses a build.xml Ant file to compile, stage, assemble, and deploy the OSGi bundle; see Building and Deploying the Foreign Exchange Example from the Source Directory for a description of this build.xml file if you also use Ant in your development environment.
The following example shows the EPN assembly file used in the FX sample application; see the explanation after the example for details about the entries in bold.
| Note: | See the first few paragraphs of The HelloWorld EPN Assembly File for a brief overview of the EPN assembly file. For full reference information about the custom Spring tags, see WebLogic Event Server Custom Spring Tags Reference or the XSD Schema file that defines the tags. |
<?xml version="1.0" encoding="UTF-8"?>
<beans xmlns="http://www.springframework.org/schema/beans"
       xmlns:xsi="http://www.w3.org/2001/XMLSchema-instance"
       xmlns:osgi="http://www.springframework.org/schema/osgi"
       xmlns:wlevs="http://www.bea.com/ns/wlevs/spring"
       xsi:schemaLocation="
  http://www.springframework.org/schema/beans
  http://www.springframework.org/schema/beans/spring-beans.xsd
  http://www.springframework.org/schema/osgi
  http://www.springframework.org/schema/osgi/spring-osgi.xsd
  http://www.bea.com/ns/wlevs/spring
  http://www.bea.com/ns/wlevs/spring/spring-wlevs.xsd">
    <wlevs:event-type-repository>
      <wlevs:event-type type-name="ForeignExchangeEvent">
        <wlevs:class>
         com.bea.wlevs.example.fx.OutputBean$ForeignExchangeEvent
        </wlevs:class>
        <wlevs:property name="builderFactory">
         <bean id="builderFactory"
              class="com.bea.wlevs.example.fx.ForeignExchangeBuilderFactory"/>
</wlevs:property>
</wlevs:event-type>
</wlevs:event-type-repository> <!-- Assemble EPN (event processing network) --> <wlevs:adapter id="fxMarketAmer" provider="loadgen">
<wlevs:instance-property name="port" value="9011"/>
</wlevs:adapter> <wlevs:adapter id="fxMarketAsia" provider="loadgen">
<wlevs:instance-property name="port" value="9012"/>
</wlevs:adapter> <wlevs:adapter id="fxMarketEuro" provider="loadgen">
<wlevs:instance-property name="port" value="9013"/>
</wlevs:adapter> <wlevs:processor id="preprocessorAmer" listeners="spreaderIn"/>
<wlevs:processor id="preprocessorAsia" listeners="spreaderIn"/>
<wlevs:processor id="preprocessorEuro" listeners="spreaderIn"/> <wlevs:stream id="fxMarketAmerOut">
<wlevs:listener ref="preprocessorAmer"/>
<wlevs:source ref="fxMarketAmer"/>
</wlevs:stream> <wlevs:stream id="fxMarketAsiaOut">
<wlevs:listener ref="preprocessorAsia"/>
<wlevs:source ref="fxMarketAsia"/>
</wlevs:stream> <wlevs:stream id="fxMarketEuroOut">
<wlevs:listener ref="preprocessorEuro"/>
<wlevs:source ref="fxMarketEuro"/>
</wlevs:stream> <wlevs:stream id="spreaderOut" advertise="true">
<wlevs:listener>
<!-- Create business object -->
<bean id="outputBean"
class="com.bea.wlevs.example.fx.OutputBean"
autowire="byName"/>
</wlevs:listener>
</wlevs:stream> <wlevs:processor id="spreader">
<wlevs:listener ref="spreaderOut"/>
</wlevs:processor> <wlevs:stream id="spreaderIn">
<wlevs:listener ref="spreader"/>
</wlevs:stream></beans>
<wlevs:event-type-repository> entry registers the event types that are used throughout the application; in the FX application, there is just a single event type: ForeignExchangeEvent, implemented with the ForeignExchangeEvent inner class of the com.bea.wlevs.example.fx.OutputBean POJO class. The <wlevs:property name="builderFactory"> child tag specifies that the event builder factory class in the FX application is implemented by the com.bea.wlevs.example.fx.ForeignExchangeBuilderFactory.
WebLogic Event Server automatically creates instances of the ForeignExchangeEvent type when needed. You can then reference this data type in the EPL rules of the application, the adapter Java class, and the POJO.
<wlevs:adapter>, <wlevs:processor>, and <wlevs:stream> entries set up the event processor network by declaring each component in the network. The network consists of three adapters, four processors, and five streams, as described in FX Event Processing Network. Each component is given a unique ID which can be referenced by other components when they declare their listeners and sources.
<wlevs:adapter> entries specify the three adapters, for example:<wlevs:adapter id="fxMarketAmer" provider="loadgen">
<wlevs:instance-property name="port" value="9011"/>
</wlevs:adapter>
The provider="loadgen" attribute of each <wlevs:adapter> specifies that the adapters get their data from the WebLogic Event Server load generator utility. The <wlevs:instance-property> child tag specifies the port number to which the adapter should listen.
<wlevs:processor> entries specify the four complex event processors, for example:<wlevs:processor id="preprocessorAmer" listeners="spreaderIn"/>
The listeners attribute, common to all component tags, specifies the component that listens to the processor; in this case, it is a stream called spreaderIn.
You can also use a <wlevs:listeners> child tag to specify the listeners of a component:
<wlevs:processor id="spreader">
<wlevs:listener ref="spreaderOut"/>
</wlevs:processor>
In the example, the spreaderOut stream listens to the spreader processor.
<wlevs:stream> entries specify the four streams, for example:<wlevs:stream id="fxMarketAmerOut">
<wlevs:listener ref="preprocessorAmer"/>
<wlevs:source ref="fxMarketAmer"/>
</wlevs:stream>
As with all components, you can use the <wlevs:listener> and <wlevs:source> child tags to specify the other components that act as listeners and sources for this component.
In the example, the preprocessorAmer processor listens to the fxMarketAmerOut stream, which in turn listens to the fxMarketAmer adapter.
The following example shows how you can nest the definition of a component inside a <wlevs:listener> tag:
    <wlevs:stream id="spreaderOut" advertise="true">
        <wlevs:listener>
            <!-- Create business object -->
            <bean id="outputBean"
                  class="com.bea.wlevs.example.fx.OutputBean"
                  autowire="byName"/>
        </wlevs:listener>
    </wlevs:stream>
In the example, the outBean POJO, declared as a standard Spring bean using the <bean> tag, listens to the spreaderOut stream. The advertise="true" attribute of the spreaderOut stream is used to register the stream as an OSGI service in the registry.
The FX application uses four processors: three to handle the three data feeds and one that joins the resulting events. The first three processors are configured in a single XML file, called preprocessor.xml, as shown:
<?xml version="1.0" encoding="UTF-8"?>
<n1:config xsi:schemaLocation="http://www.bea.com/xml/ns/wlevs/config/application  wlevs_application_config.xsd"
 xmlns:n1="http://www.bea.com/xml/ns/wlevs/config/application"
xmlns:xsi="http://www.w3.org/2001/XMLSchema-instance">
<processor>
    <name>preprocessorAmer</name>
    <rules>
      <rule id="UsdToEurRule"><![CDATA[
      insert into ForeignExchangeEvent
      select avg(lastPrice) as price, 'USD' as fromRate, 'EUR' as toRate
      from (select * from StockTick where symbol='USDEUR') retain 1 sec
      where lastPrice < 3.0 and lastPrice > 0.25
      ]]></rule>
    </rules>
  </processor>
  <processor>
    <name>preprocessorAsia</name>
    <rules>
      <rule id="EurToJpyRule"><![CDATA[
      insert into ForeignExchangeEvent
      select avg(lastPrice) as price, 'EUR' as fromRate, 'JPY' as toRate
      from (select * from StockTick where symbol='EURJPY') retain 1 sec
      where lastPrice < 200.0 and lastPrice > 100.0
      ]]></rule>
    </rules>
  </processor>
  <processor>
    <name>preprocessorEuro</name>
    <rules>
      <rule id="EurToGbpRule"><![CDATA[
      insert into ForeignExchangeEvent
      select avg(lastPrice) as price, 'EUR' as fromRate, 'GBP' as toRate
      from (select * from StockTick where symbol='EURGBP') retain 1 sec
      where lastPrice < 1.5 and lastPrice > 0.5
      ]]></rule>
    </rules>
  </processor>
</n1:config>
The three processors in this file are all essentially the same; the differences lie only in the values used in the EPL queries for querying different items from the data feeds and applying different boundary conditions. For this reason, this section will discuss just a single one of the processors: preprocessorAmer.
The EPL rule fired for the american data feed is:
      insert into ForeignExchangeEvent
      select avg(lastPrice) as price, 'USD' as fromRate, 'EUR' as toRate
      from (select * from StockTick where symbol='USDEUR') retain 1 sec
      where lastPrice < 3.0 and lastPrice > 0.25
To understand the query, one must look at the various clauses, as follows:
insert clause specifies that any event selected by this EPL rule should be inserted into ForeignExchangeEvent; this is the object that the next processor in the network, spreader, performs its own EPL query against. from clause specifies that the processor should accept only those items from the StockTick data feed in which the symbol value is USDEUR (US dollar - European euro exchange) and should reject all other items. The from clause specifies also specifies that the window of time for which this EPL query executes is 1 second. where clause specifies the boundary condition to ensure that the rates for a particular item from the feed fall within an accepted range; in this case, the LastPrice for a particular item from the feed must be between $3.00 and $0.25. select clause specifies which values from the selected item should be inserted into the ForeignExchangeEvent object; in this case, the average of all prices in the window (1 second), and then the USD and EUR symbols to specify the to and from currency rates.
The spreader processor is configured with the spreader.xml file, as shown:
<?xml version="1.0" encoding="UTF-8"?>
<n1:config xsi:schemaLocation="http://www.bea.com/xml/ns/wlevs/config/application  wlevs_application_config.xsd"
xmlns:n1="http://www.bea.com/xml/ns/wlevs/config/application"
xmlns:xsi="http://www.w3.org/2001/XMLSchema-instance">
<processor>
    <name>spreader</name>
    <rules>
      <rule id="spreaderRule"><![CDATA[
      select ((a.price * b.price) + 0.05) as internalPrice, a.fromRate || b.toRate as crossRate
      from ForeignExchangeEvent a, ForeignExchangeEvent b retain 1 sec
      where a.toRate = b.fromRate
      ]]></rule>
    </rules>
  </processor>
</n1:config>
from and where clauses join two events from the ForeignExchangeEvent object (which contains events selected by the three preprocessorXXX components) where the value of the toRate and fromRate are the same. The from clause also sets the processing window, again of 1 second.select clause calculates an internal price of a particular currency, which averages the to and from rate of a the currency plus a fee of $.05, and also calculates a cross rate, which is defined as the price of one currency in terms of another currency in the market of a third country.The result of this query is then sent to the business object POJO.
For additional information and examples about using EPL, see the EPL Reference Guide.
The Algorithmic Trading sample application receives simulated market data and verifies if the price of a security has fluctuated more than two percent. The application also detects if there is a trend occurring by keeping track of successive stock prices for a particular symbol; if more than three successive prices fluctuate more than two percent, this is considered a trend.
The application simulates a market data feed using the WebLogic Event Server load generator utility; in this example, the load generator generates up to 10,000 messages per second. The example includes an HTML dashboard which displays the matched events along with the latencies; events consist of a stock symbol, a timestamp, and the price.
The example demonstrates very low latencies, with minimum latency jitter under high throughputs. Once the application starts running, the processor matches an average of 800 messages per second. If the application is run on the minimum configured system, the example shows very low average latencies (30-300 microsecond, on average) with minimal latency spikes (low milliseconds).
The example computes and displays latency values based on the difference between a timestamp generated on the load generator and timestamp on WebLogic Event Server. Computing valid latencies requires very tight clock synchronization, such as 1 millisecond, between the computer running the load generator and the computer running WebLogic Event Server. For this reason, BEA recommends running both the load generator and WebLogic Event Server on a single multi-CPU computer where they will share a common clock.
| Note: | In this release, you can only run the Algorithmic Trading example from its sample domain; the source files are not provided. |
For optimal demonstration purposes, BEA recommends that you run this example on a powerful computer, such as one with multiple CPUs or a 3 GHz dual-core Intel, with a minimum of 2 GB of RAM.
The algotrading domain contains a single application: the Algorithmic Trading sample application. To run the Algorithmic Trading application, you simply start an instance of WebLogic Event Server in the domain, as described in the following steps:
algotrading domain directory, located in WLEVS_HOME\samples\domains\algotrading_domain directory, where WLEVS_HOME refers to the main WebLogic Event Server installation directory, such as d:\beahome2\wlevs20.prompt> cd d:\beahome2\wlevs20\samples\domains\algotrading_domain
startwlevs.cmd (Windows) or startwlevs.sh (UNIX) command:prompt> startwlevs.cmd
If you are using the JRockit JDK included in WebLogic Real Time 2.0, enable the deterministic garbage collector by passing the -dgc parameter to the command:
prompt> startwlevs.cmd -dgc
The Algorithmic Trading application is now ready to receive data from the data feeds.
WLEVS_HOME\utils\load-generator directory, where WLEVS_HOME refers to the main WebLogic Event Server installation directory, such as d:\beahome2\wlevs20.fxAmer.prop properties file:prompt> runloadgen.cmd AMEX.prop
http://localhost:9002/demouc1/dashboard.html
Replace localhost with the name of the computer on which WebLogic Event Server is running.


|