| Download Docs | Site Map | Glossary | |
|
|
|||
| bea.com | products | dev2dev | support | askBEA |
|
|
|
||||||||
| e-docs > WebLogic Platform > WebLogic Integration > B2B Topics > B2B Samples > ebXML Sample |
|
B2B Samples
|
ebXML Sample
The ebXML sample demonstrates how two trading partners can exchange business messages using the ebXML business protocol. The ebXML sample application is provided in the SAMPLES_HOME\integration\samples\ebxml directory, where SAMPLES_HOME represents the WebLogic Platform samples directory.
This section includes the following topics:
Overview of the ebXML Sample
WebLogic Integration supports the ebXML business protocol for the exchange of business messages in e-business transactions. The ebXML sample demonstrates how two workflows are used to manage an ebXML-based conversation between two trading partners, each of which deploys WebLogic Integration.
The workflows in the sample are named ebXMLConversationInitiator and ebXMLConversationResponder. They choreograph the exchange of ebXML messages for trading partners, in the roles of initiator and participant, in a query price and availability (QPA) conversation. The sample provides a Java Server Page (JSP) you can use to initiate the QPA process and to display QPA request and response data.
The following figure illustrates the data flow between the trading partners involved in this sample QPA business transaction.
Figure 7-1 Data Flow in the QPA Business Process
Before Running the ebXML Sample
Before running the ebXML sample, complete the following steps:
Running the ebXML Sample
To run the ebXML sample:
cd WLI_HOME
The WebLogic Integration repository has already been
created and populated, possibly from a previous run
of this RunSamples script. Do you want to destroy all the
current data in the repository and create and populate the
WebLogic Integration repository, again? Y for Yes, N for No
If you answer N to this question, the RunSamples script skips the steps for creating and populating the repository and runs only the step for booting an instance of WebLogic Server in the sample domain.
If you answer Y to this question, the RunSamples script recreates and repopulates the repository, and then it boots an instance of WebLogic Server in the sample domain. When you answer Y, the RunSamples script destroys all the data currently in the repository and loads an unaltered version of the sample data into the repository. Answer Y in the following circumstances:
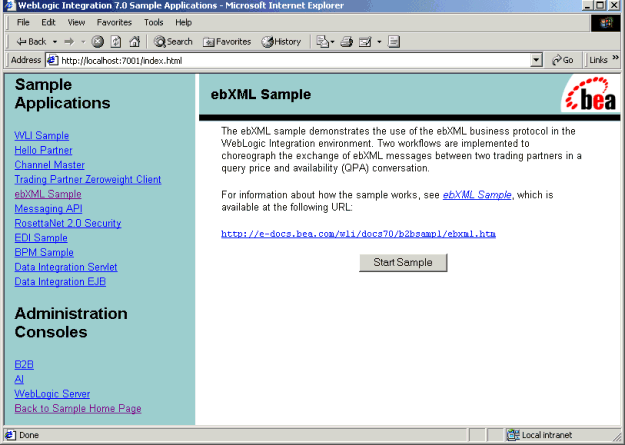
Figure 7-3 ebXML Sample Launcher Page
How the Sample Works
This section includes the following topics:
Introduction
The configuration data to support this sample application is bulk loaded into the WebLogic Integration repository when you run the RunSamples script during the sample setup (see Running the ebXML Sample). WebLogic Integration allows you to bulk load configuration data or enter it through the WebLogic Integration B2B Console. You do not need to run the B2B Console when you run the ebXML sample, but you can use it to view the repository data after the data is bulk loaded for the sample.
Two workflows provided in this sample choreograph the exchange of ebXML-based business messages in a QPA conversation. These workflows manage the sender and receiver sides of the ebXML message exchange.
An exhaustive discussion of how to configure your B2B integration environment is beyond the scope of this document. However, this section briefly describes the WebLogic Integration repository data that is used in the sample application. This section also describes the implementation of the workflows on the sender side and receiver side of the sample ebXML business transaction. Key workflow design elements, tasks, and events are highlighted.
Loading the Repository Data
The data required by the sample for integrating the trading partners is bulk loaded into the WebLogic Integration repository when you run the RunSamples script during the sample setup (see Running the ebXML Sample).
The RunSamples script loads the repository with the B2B configuration data contained in the following XML files:
c:\bea\weblogic700\integration\dbscripts
The SystemRepData.xml file contains system data. The elements used by this sample include:
This BulkLoaderData.xml file contains data specific to the ebXML sample. It describes the following elements:
Understanding the Repository Data
This section highlights important information about the following data elements that are bulk loaded to the WebLogic Integration repository for the ebXML sample application:
Data from the SystemRepData.xml file and BulkLoaderData.xml file are imported into the WebLogic Integration repository to support the sample application. When you create ebXML applications, you can bulk load configuration data or enter it through the WebLogic Integration B2B Console. You can also access and configure bulk-loaded data using the B2B Console. For information about configuring the WebLogic Integration data required for e-business transactions, see Administering ebXML in Implementing ebXML for B2B Integration.
Business Protocol Definitions
The SystemRepData.xml file contains definitions for all the business protocols supported by WebLogic Integration including ebXML.The following excerpt from the SystemRepData.xml file shows the ebXML business protocol definition.
Listing 7-1 ebXML Business Protocol Definition
<business-protocol-definition
        name="ebXML"
        business-protocol-name="ebXML"
        protocol-version="1.0"
        endpoint-type="PEER">
                <java-class>com.bea.b2b.protocol.ebxml.EBXMLProtocol
                </java-class>
<decoder>EBXML-Decoder</decoder>
        <encoder>EBXML-Encoder</encoder>
</business-protocol-definition>
Logic Plug-Ins
Logic plug-ins are Java classes that intercept and process business messages at run time. Each business protocol is associated with standard router and filter logic plug-ins. The SystemRepData.xml file contains logic plug-in data for the XOCP, RosettaNet, cXML, and ebXML business protocols. This sample uses the ebXML logic plug-ins only:
The following excerpt from the SystemRepData.xml file shows the ebXML Encoder and Decoder logic plug-ins.
Listing 7-2 ebXML Logic Plug-In Definition
<logic-plugin
        name="EBXML-Decoder"
        type="decoder">
        <java-class>com.bea.b2b.protocol.ebxml.EBXMLDecoder
        </java-class>
</logic-plugin>
<logic-plugin
        name="EBXML-Encoder"
        type="encoder">
        <java-class>com.bea.b2b.protocol.ebxml.EBXMLEncoder
        </java-class>
</logic-plugin>
Trading Partners
The ebXML sample scenario involves two business partners: a buyer and a supplier. In the WebLogic Integration environment, a trading partner must be configured for each business partner. In this case, two trading partners are configured in the BulkLoaderData.xml file: ebXML-sender and ebXML-receiver. For configuration elements, attributes, and subelements associated with these trading partners, see the following file:
SAMPLES_HOME\samples\ebxml\lib\BulkLoaderData.xml
SAMPLES_HOME represents the WebLogic Platform samples directory.
Conversation Definitions
The BulkLoaderData.xml file contains the conversation definition for the ebXML-based Query Price and Availability (QPA) conversation in this sample. The conversation definition is named ebxmlQPA. It contains two roles: Initiator and Participant. For the ebXML business protocol, all conversation definitions reference two roles with predefined names: Initiator and Participant.
The following listing is an excerpt from the BulkloaderData.xml file. It defines the ebXMLQPA conversation.
Listing 7-3 Conversation Definition in the BulkLoaderData.xml File
<conversation-definition
        name="ebxmlQPA"
        version="1.0"
        business-protocol-name="ebXML"
        protocol-version="1.0">
        <role
                name="Initiator">
        </role>
        <role
                name="Participant">
        </role>
</conversation-definition>
Collaboration Agreements
The BulkLoaderData.xml file contains the collaboration agreement used by the ebxml-sender and ebxml-receiver trading partners for this sample. The following figure illustrates the relationships between trading partners, parties to the collaboration agreement, and roles defined for the conversation in this sample application.
Figure 7-5 Collaboration Agreement Between Trading Partners in a QPA Conversation
The following listing is an excerpt from the BulkloaderData.xml file. It shows the elements of the ebxml-QPA-CA collaboration agreement. Listing 7-4 Collaboration Agreement in the BulkLoaderData.xml File Understanding the Workflows Two workflows manage the exchange of ebXML messages by the two trading partners, in the roles of initiator and participant, in this sample QPA conversation. The workflows, named ebXMLConversationInitiator and ebXMLConversationResponder, are loaded to the WebLogic Integration repository when you run the RunSamples script during the sample setup (see Running the ebXML Sample). This section contains the following topics:
<collaboration-agreement
        name="ebxml-QPA-CA"
        version="1.0"
        status="ENABLED"
        global-identifier="sachin/172.16.15.113:2423d2:
                                        ea8fe66b8f:-8000"
        conversation-definition-name="ebxmlQPA"
        conversation-definition-version="1.0">
        <party
                trading-partner-name="ebxml-sender"
                party-identifier-name="sender-party"
                delivery-channel-name="sender-dc"
                role-name="Initiator"/>
        <party
                trading-partner-name="ebxml-receiver"
                party-identifier-name="receiver-party"
                delivery-channel-name="receiver-dc"
                role-name="Participant"/>
</collaboration-agreement>
Using the WebLogic Integration Studio
The WebLogic Integration Studio allows you to design new workflows and monitor running workflows using a familiar flowchart paradigm. You are not required to run the Studio when you run the ebXML sample, but you may find it useful for viewing the details of any workflow or workflow node, and for learning how nodes are defined and configured for this sample.
Launch the Studio by completing the procedure appropriate for your platform:
a. Choose Start
b. Log on to the Studio (user: wlisystem; password: wlisystem).
a. Open a command window.
b. Go to the WebLogic Integration directory (the directory in which you installed WebLogic Integration) and run the setenv script to set the top-level WebLogic environment variables. For example, if WebLogic Integration is installed in the c:\bea directory, enter the following:
cd c:\bea\weblogic700\integration
setEnv
c. Go to the bin directory below the WebLogic Integration installation directory:
cd bin
d. Open the Studio by entering:
studio
e. Log on to the Studio, using wlisystem as both your username and password.
cd /home/me/bea/integration
. ./setenv.sh
cd bin
. ./studio
After you launch the Studio, you can view a workflow template and its properties by completing the following procedure:
See Using the WebLogic Integration Studio for complete details about the Studio tools and functionality.
Understanding the ebXMLConversationInitiator Workflow
This section describes the workflow that manages the buyer side of the QPA conversation in the ebXML sample scenario. The following figure shows the ebXMLConversationInitiator workflow template in the Studio.
Figure 7-6 ebXMLConversationInitiator Workflow Template
Start
A QPA request is created as XML, based on your input to the HTML Web form (see Figure 7-3) when you run the sample. The XML is sent, via a JSP (ebXML_Sample.jsp), to a JMS queue.
The ebXML_Sample.jsp file can be found in the following directory (where SAMPLES_HOME represents the WebLogic Platform samples directory):
SAMPLES_HOME\integration\config\samples\applications\DefaultWebApp_myserver
The Start node is designed to start this ebXMLConversationInitiator workflow when an XML event is received from the JMS queue. The Start Properties dialog box for the Start node is displayed in the following figure.
Figure 7-7 Start Properties Dialog Box

Note the following property settings displayed in the preceding figure:
Note: Contrast this start method to that defined for Start Node in the ebXMLConversationResponder workflow (see Start).
The Start node extracts the message using XPath expressions, and stores the data in workflow variables: ProductID, ProductQuantity, and ProductUnitPrice.
Build XML Message Attachment
The outXMLAttach workflow variable is set at this task node. It holds the QPA Request XML message (ebXMLQPARequest) that will be sent to the supplier's workflow (ebXMLConversationResponder) as part of the ebXML message payload. (For details, see the next node in this workflow.)
Send ebXML Message
An action defined at this task node sends the first ebXML message in the QPA conversation. Because the ebXMLConversationInitiator workflow is designed for an ebXML-based conversation, this task node uses the Send ebXML Message action (provided by the ebXML plug-in to BPM).
You can define a Send ebXML Message action in the Studio as follows:
To view the Send ebXML Message properties specified for this sample node:
Figure 7-8 Send ebXML Message Dialog Box

Note the following Send ebXML Message properties in the preceding figure:
Note: Quotes are required around the static value in this field.
Note: Quotes are required around the static value in this field.
The message is sent asynchronously at this node. That is, in the Actions
Receive ebXML Response
The workflow waits, at this event node, for a specific ebXML event from the ebXMLConversationResponder workflow. Note that ebXML Event is selected in the Event Properties dialog box, displayed in the following figure.
Figure 7-9 Event Properties Dialog Box
When the ebXML event is received, the message envelope is stored in an envelope variable (inEnvelope, in this case), and the payload is stored in XML or binary variables, as appropriate. In this case, there are two attachments in the payload: one XML and one binary. They are assigned to the inXMLAttach and inBinAttach variables, respectively. Write Out Binary Attachment This task node first defines a Set Workflow Variable action that extracts the name of the image file from the incoming QPA Response XML document (ebXMLQPAResponse), and assigns that name to the imageFileName workflow variable. The Set Workflow Variable action performs these tasks by using the following XPath expression: Subsequently, an action that uses a business operation (ebXMLSavePictureToWebApp) is defined at this node. This action saves the binary attachment from the incoming ebXML message to the following directory (where SAMPLES_HOME represents the WebLogic Platform samples directory): The local file is consumed by a JSP. (See the description of the Respond to JSP node later in this section.) To see the business operations defined for this sample, choose Configuration Respond to JSP This task node defines a Post XML Event action. (You can define such an action for a node by double-clicking the node to display the Task Properties dialog box, then choosing Add This action posts the XML from the response message (the inXMLAttach variable defined at the previous node) as an internal XML event. The JMS queue to which the XML event is posted is defined in the Destination tab, which is shown in the Post XML Event dialog box. The Post XML Event dialog box for this node is displayed in the following figure. Figure 7-10 Post XML Event Dialog Box: Destination Tab
XPath("/ebXMLQPAResponse/ImageFileName/text()", $inXMLAttach)) SAMPLES_HOME\integration\config\samples\applications\DefaultWebApp_myserver\
SAMPLES_HOME\integration\samples\ebxml\src\ebxmlsamples\util\EBXMLBizOp.java
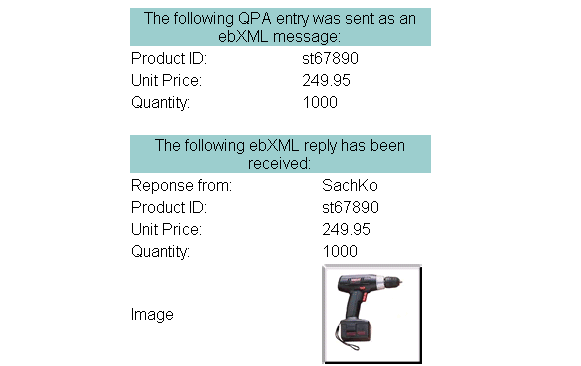
In the preceding figure, note that JMS Queue is selected in the Destination field. This means that the message is posted to an internal queue that has been configured in WebLogic Server. You can enter a static JNDI name for the queue enclosed by quotation marks, or you can enter an expression that will determine the queue name at run time. In this case, the JNDI name of the internal JMS queue is com.bea.wlpi.EventQueueExt. The XML message from the JMS queue is consumed by the ebXML_Sample.jsp file, which displays the contents of the QPA response message in your browser when you run the sample, as shown in Figure 7-4. The ebXML_Sample.jsp file can be found in the following directory, where SAMPLES_HOME represents the WebLogic Platform samples directory: Done Marks the end of the workflow. An ebXML-based conversation ends when the exchange of ebXML messages is complete for both trading partners. Contrast this behavior to that of the XOCP business protocol. WebLogic Integration supports an XOCP conversation management service, meaning that the workflow responsible for initiating the conversation also ends the conversation and sends an end-of-conversation message to each workflow in the conversation. (See Ending Collaborative Workflows in Creating Workflows for B2B Integration.) In the case of an XOCP conversation, to define a conversation termination property, you select the Custom option on the Done node in the workflow that initiated the conversation. You do not end ebXML-based conversations in this way, however. Note, for example, that the Custom option for this Done node is not selected. Understanding the ebXMLConversationResponder Workflow This section describes the workflow that manages the supplier side of the QPA conversation in this ebXML sample scenario. The following figure shows the ebXMLConversationResponder workflow template in the Studio. Figure 7-11 ebXMLConversationResponder Workflow Template
SAMPLES_HOME\integration\config\samples\applications\DefaultWebApp_myserver
Start
This ebXMLConversationResponder workflow is designed for a trading partner in the participant role in an ebXML-based conversation. This workflow is started when it receives an ebXML message from a trading partner. The Studio provides an ebXML-specific option in the Start node to support the design of a workflow for the participant role in an ebXML-based conversation. The following figure shows the Start Properties dialog box.
Figure 7-12 Start Properties Dialog Box
Note the following property settings displayed in the preceding figure:
Note: Contrast this start method to that defined for Start Node in the ebXMLConversationInitiator workflow (see Start).
Perform Message Processing
This task node processes the incoming ebXML message. Actions are defined to set workflow variables, and to perform business operations.
XPath expressions extract the product ID, quantity, and unit price from the incoming QPA ebXML message, and assign the data to the following workflow variables: ProductID, ProductQuantity, and ProductUnitPrice.
The following business operations are performed at this node:
To see the business operations defined for this sample, choose Configuration
You can find the Java classes for the ebXMLGetQPAReply and ebXMLGetPictureForProductID business operations in the following location, where SAMPLES_HOME represents the WebLogic Platform samples directory:
SAMPLES_HOME\samples\integration\samples\ebxml\src\ebxmlsamples\util\EBXMLBizOp.java
You can find the Java class for the file to binary business operation in the following location, where SAMPLES_HOME represents the WebLogic Platform samples directory:
SAMPLES_HOME\samples\integration\samples\wlis\src\examples\wlis\common\util\Utils.java
Send ebXML Response
At this task node an action is defined for sending an ebXML message in response to the ebXML message received by this trading partner in the QPA conversation. Because the ebXMLConversationResponder workflow is defined for an ebXML-based conversation, this task node uses the Send ebXML Message action (provided by the ebXML plug-in to BPM).
You can define a Send ebXML Message action in the Studio as follows:
To view the Send ebXML Message properties specified for this sample node:
Figure 7-13 Send ebXML Message Dialog Box

Note the following properties for this ebXML sample task node in the preceding figure:
When Related Conversation is selected, you do not need to specify the conversation name, sender business ID, or recipient business ID because the system obtains these attributes from the previous message exchange. For information about using the New Conversation option, see Send ebXML Message.
Done
Marks the end of the workflow. For information about Done nodes in workflows that exchange ebXML messages, see the description of the Done node for the ebXMLConversationInitiator workflow in Done.

|

|

|