| Download Docs | Site Map | Glossary | |
|
|
|||
| bea.com | products | dev2dev | support | askBEA |
|
|
|
||||||||
| e-docs > WebLogic Platform > WebLogic Integration > Starting, Stopping, and Customizing > Customizing WebLogic Integration |
|
Starting, Stopping, and Customizing
|
Customizing WebLogic Integration
The following sections describe how to modify the default installation of WebLogic Integration:
For information about more advanced configuration options, such as clustering, see Deploying BEA WebLogic Integration Solutions.
WebLogic Integration Commands and Supporting Files
A number of commands and supporting files are provided with WebLogic Integration. Many of the commands are used by the Database Wizard and the RunSamples script described in Domain Configuration Requirements. Although such commands are not normally invoked in isolation, in some situations you may need to modify a command or troubleshoot the execution of a command. To help you familiarize yourself with the use of these commands, a command reference is provided in WebLogic Integration Commands.
In addition, examples of the files that control the configuration and startup of a typical WebLogic Integration domain are provided in WebLogic Integration Sample Configuration Files.
Specifying a New Database for a Domain
Which method you use to specify a new database for a domain depends on:
Note: For information about creating and customizing a WebLogic Integration domain, see Creating and Customizing a New Domain.
The following table summarizes the methods used in each situation.
The following table provides the location of the information required to perform the preceding tasks.
Initializing the Database for a Domain
Which method you use to initialize the database for a domain depends on whether the database will be used for the samples domain or for a custom domain created with the Configuration Wizard:
Note: For information about creating and customizing a domain, see Creating and Customizing a New Domain.
For additional information about the tasks performed by the RunSamples command and the Database Wizard, see Domain Configuration Requirements.
Using the Database Wizard
As described in Configuring the Database for a Domain, the WebLogic Integration Database Wizard is provided to automate database configuration tasks. A domain-specific version of the command is installed in each WebLogic Integration domain.
The following sections provide the information you need to use the Database Wizard to initialize the database for a domain, specify a new database for a domain, or migrate a WebLogic Integration 2.1 database to WebLogic Integration 7.0:
Database Connection Information
The following table summarizes the information required to connect to each supported database type. The Database Wizard prompts you to provide the values required to connect to the database you are configuring.
Database Wizard Options The Database Wizard provides the following options:
Note: Although this option is available for the samples domain, it does not complete all the tasks required to initialize the samples database. To initialize the database for the samples domain, you must execute the RunSamples command, as described in Configuring and Starting the Samples Domain.
How the Database Wizard Works
The WebLogic Integration Database Wizard updates the environment variables set by the setDBVars and setDBVarsExt commands for the domain, updates the config.xml file to reflect the database access information provided, and invokes the commands required to perform the selected tasks.
For detailed information about the environment variables and command files used, see the wliconfig command in WebLogic Integration Commands.
Database Configuration Modes
Like the WebLogic Integration installer, the WebLogic Integration Database Wizard supports the following modes:
Follow the procedure appropriate for your system, as described in the following sections:
Using the Database Wizard in Graphical Mode
The following procedure describes how to update your database configuration using the WebLogic Integration Database Wizard in graphical mode.
To configure the database for a domain:
For example, if you created mydomain in the /home/bea/user_projects directory, enter the following:
cd /home/bea/user_projects/mydomain
The Database Selection dialog box is displayed. This dialog box reflects the database that is currently configured for the domain. For example, if you specified the connection parameters for a Pointbase database when you created the domain, Pointbase is selected, as shown in the following figure.
Figure 3-2 Database Selection Dialog Box
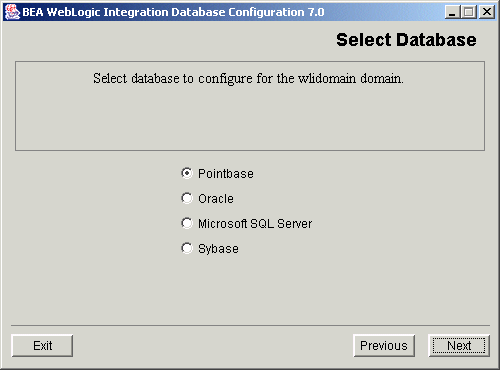
Figure 3-3 Database Configuration Dialog Box
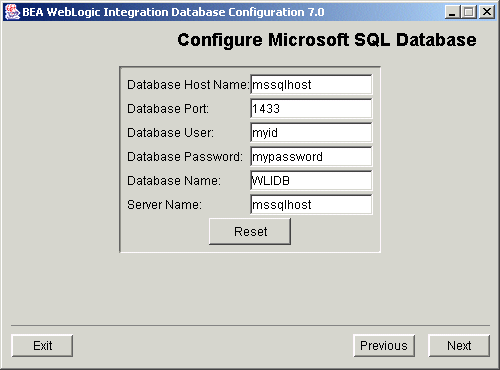
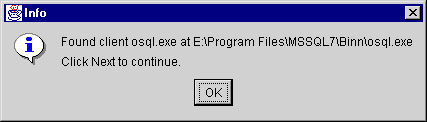
Figure 3-4 Locate Database Client Dialog Box
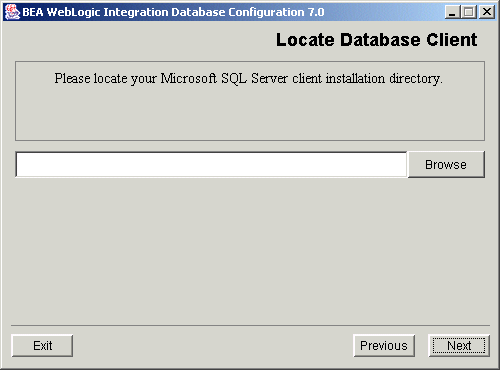
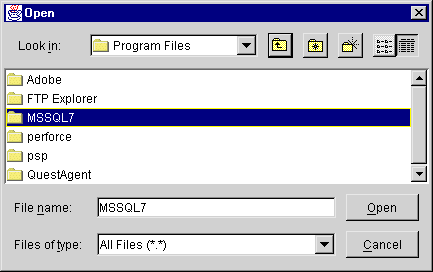
Figure 3-5 Open Dialog Box
Using the Database Wizard in Console Mode
This section summarizes the console-mode database configuration procedure, a set of steps that emulates the graphical installation procedure.
To start the Database Wizard in console mode, enter the following commands at the prompt:
cd DOMAIN_HOME
wliconfig console
The following listing shows the console-mode prompts and responses for the Create Database option described in Database Wizard Options. (Responses are indicated in bold.)
The prompts that are presented will vary from those shown, depending on your responses to the Please Select Configuration Option: and Please specify the database type to configure: prompts.
Listing 3-1 Database Wizard Procedure in Console Mode
===============================================================================
BEA WebLogic Integration Database Wizard 7.0
-------------------------------------------------------------------------------
===============================================================================
Configuration Selection
--------------------------------------------------
1- Switch Database
2- Create Database
Please Select Configuration Option: 2
===============================================================================
Database Selection
--------------------------------------------------
Please specify the database type to configure.
1- Oracle
->2- Microsoft SQL Server
3- Sybase
Select a number or <Enter> for default(2): 1
Oracle Server Hostname: oraclehost
Oracle Server Port Number: 1521
Oracle User: myuser
Oracle Password: mypassword
Oracle SID: nj908
Oracle Net Service Name: oraclehost.world
Please enter the location of your Oracle client installation: c:\oracle
Searching for Oracle client(Sqlplus.exe)...
Found client Sqlplus.exe at c:\oracle\sqlplus.exe
->1- Use Located Client
2- Choose new Location
Please choose a number(1): 1
===============================================================================
Switching Database please wait...
--------------------------------------------------
===============================================================================
Creating Database please wait...
--------------------------------------------------
===============================================================================
Finalizing changes, please wait...
--------------------------------------------------
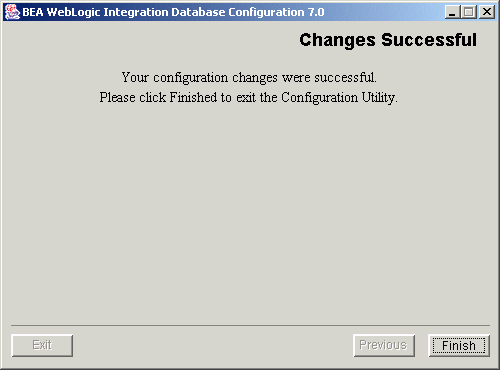
Your configuration changes were successful. Press Enter to exit the Configuration Utility.
Updating the Database Configuration from the WebLogic Server Administration Console
Although the Database Wizard should be used to update the database configuration for any WebLogic Integration domain, there may be circumstances under which it is necessary to update the configuration from the WebLogic Server Administration Console. This section describes the procedure for doing so.
You should be aware that if you use this method to change to a new database, you will be unable to use the wizard, the createDB command, or the RunSamples command to create the tables in, or to populate, the database. These commands rely on settings for certain environment variables and the database access information stored in the DOMAIN_HOME/dbInfo directory. Unless you update this information manually, the wizard, the createDB command, and the RunSamples command will not work on the new database.
If you use the WebLogic Server Administration Console to update the database configuration, you can create the tables by executing the database-specific SQL scripts that are located in the WLI_HOME/dbscripts directory. Once you have created the tables, you can use the Bulk Loader or the B2B Console to import system data from the WLI_HOME/dbscripts/SystemRepData.xml file.
Updating the JDBC Connection Pool
To update the WebLogic Integration JDBC connection pool:
Updating the RDBMS Realm Properties
By default, the RDBMS realm is not configured for the samples domain or a custom domain created with the Configuration Wizard. To configure an RDBMS realm for a domain, you must manually add elements to the config.xml file. This procedure is described in "Migrating from the RDBMS Realm" in Migrating WebLogic Integration 2.1 to WebLogic Integration 7.0 in BEA WebLogic Integration Migration Guide. An RDBMS realm must be configured before the RDBMS realm properties can be updated.
To update the RDBMS realm properties:
Database Access Parameters
The following table summarizes the database access parameter information required to configure the JDBC connection pool from the WebLogic Server Administration Console.
Database Access URL Format Each JDBC connection pool URL includes the following:
The following table provides a sample URL for each supported database.
Creating and Customizing a New Domain
This section outlines the basic procedure for creating and customizing a WebLogic Integration domain. Detailed information is found in the following documents:
Preparing to Create a Domain
Before you create a new domain, you should, at a minimum, complete the following tasks:
A set of domain configuration templates is included in your WebLogic Platform installation. These templates are used by the Configuration Wizard to create new WebLogic Server domains. To help you determine which configuration template most accurately meets your application requirements, review WebLogic Integration Configuration Templates and Configuration Wizard Template Reference.
Note: Make sure you select a template that supports WebLogic Integration functionality. By using this type of template, you can ensure that the domain created is based on the WebLogic Server 6.x file-based realm in compatibility mode (FileRealm). The new WebLogic Server 7.0 LDAP-based realm is not supported with WebLogic Integration. If you create a new domain by selecting a WebLogic Server or WebLogic Portal template, the WebLogic Server 7.0 LDAP-based realm will be used in the new domain. For directions on configuring an RDBMS realm for WebLogic Integration, see "Migrating from the RDBMS Realm" in Migrating WebLogic Integration 2.1 to WebLogic Integration 7.0 in BEA WebLogic Integration Migration Guide.
Procedure for Creating and Customizing a Domain for a Single Server
To create and customize a WebLogic Integration domain for a single server:
Choose Start
cd c:\bea\weblogic700\integration
setenv.cmd
cd c:\bea\weblogic700\common\bin
dmwiz
cd c:\bea\weblogic700\integration
setenv.cmd
cd c:\bea\weblogic700\common\bin
dmwiz console
cd /home/joe/bea/weblogic700/integration
. setenv.sh
cd /home/joe/bea/weblogic700/common/bin
dmwiz.sh
cd /home/joe/bea/weblogic700/integration
. setenv.sh
cd /home/joe/bea/weblogic700/common/bin
dmwiz.sh console
The Choose Domain Type and Name window is displayed.
For more information, see Using the Configuration Wizard in the BEA WebLogic Platform document set, available at the following URL:
http://download.oracle.com/docs/cd/E13196_01/platform/docs70/confgwiz/index.html
The following section provides additional information about the directories and files installed when you create a WebLogic Integration domain.
Supporting Directories and Files
The following table lists the directories and files that are included in a domain that supports WebLogic Integration. All the scripts and directories listed in Table 3-5 are located in the domain directory. For example, if you created domain using the Configuration Wizard in the c:\bea\user_projects\mydomain directory, the applications directory path would be c:\bea\user_projects\mydomain\applications.
Note: Each item is included in all domains that support WebLogic Integration, unless otherwise specified.
Updating the WebLogic Integration Environment
The environment variables used by WebLogic Integration are set by the setEnv.cmd (Windows) or setenv.sh (UNIX) file. This file is located in the WebLogic Integration installation directory (WLI_HOME). An example of this file is provided in WebLogic Integration Sample Configuration Files.
The variables in the setEnv file are set when you install WebLogic Integration and normally do not need to be updated. If you must update the environment, however, you can do so by completing the following procedure.
To update the WebLogic Integration environment:
When you execute the startWeblogic command (as described in Starting WebLogic Integration) the setEnv command is invoked and the environment variables become effective.
Configuring a Custom Java Message Service Queue
You can create custom Java Message Service (JMS) queues and run the message-driven bean generator utility to generate a deployable Java Archive (JAR) file that listens on the custom queue. Configuring a custom queue involves the following steps:
For more information about creating JMS queues, see your WebLogic Server 7.0 documentation.
To create the custom JMS queue:
To run the mdbgenerator utility:
mdbgenerator -queue queue_name [-min number] [-max number]
[-order number] [-transact] [-validate] [-timeout seconds] [-help]
The options for the mdbgenerator command are listed in the following table.
The queue_name-mdb-generator.jar file is created in the bin directory.
c:\bea\weblogic700\integration\lib\META-INF
Listing 3-2 Sample Domain application.xml File
<!DOCTYPE application PUBLIC '-//Sun Microsystems, Inc.//DTD J2EE Application 1.2//EN' 'http://java.sun.com/j2ee/dtds/application_1_2.dtd'>
<application>
	<display-name>WebLogic Integration</display-name>
	.
	.
	.
	<module>
		<ejb>queue_name-mdb-generator.jar</ejb>
	</module>

	<!--BPM Initialization Bean must be deployed after BPM plug-ins-->
	<module>
		<ejb>bpm-init-ejb.jar</ejb>
	</module>
</application>
Deploying EJBs and Java Classes for Business Operations
To deploy EJBs and make the associated business operations available for use in WebLogic Integration, you must perform the following steps:
To deploy custom Java classes and make them available in your WebLogic Integration applications, you must add the Java Archive (JAR) file containing the custom Java classes to your CLASSPATH. This procedure is described in Adding Java Classes to the CLASSPATH.
Note: The term WebLogic Integration application refers to an application that is developed by customers using WebLogic Integration. Do not confuse this term with the WebLogic Integration or WLI application elements in the config.xml file. The WebLogic Integration application element contains the collection of J2EE components that make up WebLogic Integration. In the WebLogic Integration sample config.xml file, WLI is the name of the application element that contains the collection of J2EE components that make up WebLogic Integration. In config.xml files generated by the Configuration Wizard, WebLogic Integration is the name of the application element that contains the collection of J2EE components that make up WebLogic Integration.
Adding an EJB to the WebLogic Integration Application Element
To add an EJB to the WebLogic Integration application element, complete the following steps:
To specify the EJB descriptor files, use the <EJBComponent> element.
The following code listing is excerpted from the config.xml file for the samples domain. It shows the information required to deploy an EJB called MyEJB.jar. This file is located in the SAMPLES_HOME/integration/config/samples directory, where SAMPLES_HOME represents the WebLogic Platform samples directory. Notable lines of code are shown in bold.
Listing 3-3 Adding an EJB to the WebLogic Integration Application Element
<Application Name="WebLogic Integration"
  Path="c:/bea/weblogic700/integration/lib" TwoPhase="true">

	<!--Repository-->
	<EJBComponent Name="repository-ejb.jar" Targets="myserver"
	   URI="repository-ejb.jar" />

	<!--B2B-->
	<EJBComponent Name="WLI-B2B Startup" Targets="myserver"
	   URI="b2b-startup.jar" />
	<WebAppComponent Name="TransportServlet" Targets="myserver"
	   URI="b2b.war" />
	<EJBComponent Name="WLI-B2B RN MDB" Targets="myserver"
	   URI="b2b-rosettanet.jar" />
	<WebAppComponent Name="b2bconsole" ServletReloadCheckSecs="1"
	   Targets="myserver" URI="b2bconsole.war"/>

	<!--AI-->
	<EJBComponent Name="WLI-AI Server" Targets="myserver"
	   URI="wlai-server-ejb.jar"/>
	<WebAppComponent Name="wlai" URI="wlai.war" Targets="myserver"/>
	<EJBComponent Name="WLI-AI Async Processor" Targets="myserver"
	   URI="wlai-asyncprocessor-ejb.jar"/>
	<EJBComponent Name="WLI-AI Event Processor" Targets="myserver"
	   URI="wlai-eventprocessor-ejb.jar"/>

	<!--BPM-->
	<EJBComponent Name="wlpi-ejb.jar" Targets="myserver" URI="wlpi-ejb.jar" />
	<EJBComponent Name="wlpi-master-ejb.jar" Targets="myserver"
	   URI="wlpi-master-ejb.jar" />
	<EJBComponent Name="wlpi-mdb-ejb.jar" Targets="myserver"
	   URI="wlpi-mdb-ejb.jar" />

	<!--XT-->
	<EJBComponent Name="wlxtpi.jar" Targets="myserver" URI="wlxtpi.jar"/>

	<!--Plugins-->
	<EJBComponent Name="WLI-B2B RN Plugin for BPM" Targets="myserver"
	   URI="wlc-wlpi-plugin.jar" />
	<EJBComponent Name="WLI-B2B EBXML Plugin for BPM" Targets="myserver"
	   URI="ebxml-bpm-plugin.jar"/>
	<EJBComponent Name="WLI-AI Plug-In for BPM" Targets="myserver"
	   URI="wlai-plugin-ejb.jar"/>
	<WebAppComponent Name="WLAIPlugin" URI="wlai-plugin.war" Targets="myserver"/>
	<WebAppComponent Name="XTPlugin" Targets="myserver" URI="wlxtpi.war"/>

	<!--Samples-->
	<WebAppComponent Name="com.bea.wlpi.SamplePlugin" Targets=""
	   URI="sampleplugin.war"/>
	<EJBComponent Name="sampleplugin-ejb.jar" Targets=""
	   URI="sampleplugin-ejb.jar"/>
	<EJBComponent Name="wlxtejb.jar" Targets="" URI="WLXTEJB.jar"/>
	<EJBComponent Name="pobean.jar" Targets="myserver" URI="pobean.jar"/>

	<!--BPM Initialization-->
	<EJBComponent Name="WLI-BPM Initialization" Targets="myserver"
	   URI="bpm-init-ejb.jar"/>
	<EJBComponent Name="WLI Error Listener" Targets="myserver"
	   URI="wli-errorlistener-mdb.jar"/>
</Application>
Note: Add your EJBs to the end of the WebLogic Integration or WLI application element list (before the </Application> tag).
Warning: In the sample config.xml file, WLI is the name of the application element that contains the collection of J2EE components that make up WebLogic Integration. In config.xml files generated by the Configuration Wizard, WebLogic Integration is the name of the application element that contains the collection of J2EE components that make up WebLogic Integration.
For more information about updating the config.xml file, see BEA WebLogic Server Configuration Reference in the BEA WebLogic Server documentation set at the following URL:
http://download.oracle.com/docs/cd/E13222_01/wls/docs70/config_xml/index.html
c:\bea\weblogic700\integration\lib\META-INF
The following code listing is excerpted from the application.xml file for the samples domain. It shows the information required to deploy an EJB called MyEJB.jar.
The order in which the EJB JAR files are deployed is determined by the order in which the EJB JAR files are listed in the application.xml file. If you are adding more than one EJB JAR file, keep in mind the following rule of thumb: in general, if EJB A is dependent on EJB B, then EJB B must be deployed first.
Listing 3-4 Sample Domain application.xml File
<!DOCTYPE application PUBLIC '-//Sun Microsystems, Inc.//DTD J2EE Application
  1.2//EN' 'http://java.sun.com/j2ee/dtds/application_1_2.dtd'>
<application>
	<display-name>WebLogic Integration</display-name>
	.
	.
	.
	<module>
		<ejb>MyEJB.jar</ejb>
	</module>

	<!--BPM Initialization Bean must be deployed after BPM plug-ins-->
	<module>
		<ejb>bpm-init-ejb.jar</ejb>
	</module>
</application>
Adding Java Classes to the CLASSPATH
You can add the JAR file for your custom Java classes to the server CLASSPATH in one of the following ways:
Adding the JAR File to the setEnv Command File
To add the JAR file to the setEnv command file:
set WLISERVERCP=%WLISERVERCP%;%JAVA_HOME%\lib\tools.jar
To make a Java class available to client applications, you can also add a Java class to the WLICP variable that is used to set the CLASSPATH for WebLogic Integration clients.
Note: You may notice that the WLISERVERCP environment variable does not appear in the startWeblogic command file. For each domain, a setDomainTypeData file is invoked after the setEnv command file. The value of the WLISERVERCP environment variable is transferred to the SVRCP environment variable in this command file.
Adding the JAR File to the startWebLogic Command File
To add the JAR file to the startWeblogic command file:
REM Start weblogic
%JAVA_HOME%\bin\java %DB_JVMARGS% -Xmx256m -classpath %SVRCP%...
set SVRCP=%SVRCP%;MyJAR
Configuring BPM to Support Null Variables
Support for null variables can be enabled at server startup by modifying the Java command in the startWeblogic command to include the following:
-Dwli.bpm.server.evaluator.supportsNull=true
When added to the Java command that starts the server, this option turns on null variable support for BPM. If this option is set to false, or if it is omitted from the command, then support for null variables is disabled.
After the server has started in a domain, the first time an expression is evaluated, a message indicating the status of null variable support is displayed:
The server displays this message only once, the first time an expression is evaluated.
The following sections summarize how variable initial values and expression evaluation work when null support is enabled, and when it is disabled.
wli.bpm.server.evaluator.supportsNull=true
When wli.bpm.server.evaluator.supportsNull=true, the following rules apply:
For example, if the workflow variables $a and $c have a null value, and $b has a non-null value, then:
$a=NULL      true
$a=$c        true
$a<>NULL     false
$b<>NULL     true
$b>$a        false
The following section describes the usage rules that apply when wli.bpm.server.evaluator.supportsNull=false. It is important that you understand the differences before you set this option to true.
If you have workflows that were defined in a previous version, or with null support disabled, these workflows will not work as they did earlier if they rely, in any way, on functionality that is affected. You must reexamine any legacy workflows and initialize appropriate workflow variable values. If you do not do so, the workflow may not run when you enable null variable support.
wli.bpm.server.evaluator.supportsNull=false
When wli.bpm.server.evaluator.supportsNull=false, the WebLogic Integration process engine operates exactly as it has operated in previous releases. The following rules apply:
For example, if the workflow variables $a and $c have a null value, and $b has a non-null value, then:
$a=$c      false
$a<>$c     false
$b<>$c     false
$b>$a      false
String       ""
Boolean      false
Integer      0
Double       0.0
Date         Current date
Entity       null
Session      null
Object       null
XML          null
Understanding the BPM Security Model
The security model provided by WebLogic Integration for business process management (BPM) functions is distinguished by the following characteristics:
Note: For important background information about the WebLogic Server Security Service, see the following documents:
When you use the Configuration Wizard to create a domain that supports BPM functionality, the domain is configured to use a FileRealm security realm. In this type of realm, default users, groups, and access control lists (ACLs) are maintained in the fileRealm.properties file, which is located in the domain directory.
A default RDBMSRealm can also be configured. To configure an RDBMS realm for a domain, you need to do the following:
If you configure this realm, then users and groups are maintained in the database configured for the WebLogic Integration repository.
The BPM-defined ACL objects are managed differently from users and groups. Even if you enable the RDBMSRealm, ACL objects are stored in the FileRealm (the fileRealm.properties file) and must be managed through the WebLogic Server Administration Console.
You can use the existing FileRealm, enable the RDBMSRealm, or configure an alternate security realm. For an overview of the supported WebLogic Server security realm types, see "Security Fundamentals" at the following URL:
http://download.oracle.com/docs/cd/E13222_01/wls/docs70/security/concepts.html
No matter what type of security realm you configure, you can continue to create users, organizations, and roles through the WebLogic Integration Studio, as long as the security realm you configure conforms with the guidelines described in Security Realm Guidelines.
Note: WebLogic Integration and WebLogic Server user names and passwords (users created using the WebLogic Integration Studio) can contain any character from the JDK-supported character sets, including international characters.
The procedure for enabling the RDBMSRealm is provided in Enabling the RDBMS Security Realm.
The procedure for creating a custom security realm is provided in Configuring a Custom Security Realm. If you are creating another type of security realm (for example, NT or UNIX), see the WebLogic Server documentation for instructions.
BPM User Groups and Permissions
To support BPM functionality, default users (described in WebLogic Integration Users and Passwords) are organized into three types of user groups:
The following tables list the default groups and the members assigned to them.
Security Realm Guidelines You can create an alternate security realm as long as it conforms to the following guidelines:
For procedures for creating an alternate security realm, see your WebLogic Server 7.0 documentation.
Once a manageable security realm is populated in conformance with the preceding guidelines, and configured as described in the following section, you can create additional users, roles, and organizations, and assign permissions to users and roles through the WebLogic Integration Studio. For information and procedures, see Administering Data in Using the WebLogic Integration Studio.
Enabling the RDBMS Security Realm
To change the security realm from the default FileRealm to the RDBMSRealm:
Configuring a Custom Security Realm
Configuring a custom security realm involves the following tasks:
The following sections provide a procedure for each of these tasks.
Creating the Custom Realm
To create a custom security realm:
Configuring the Caching Realm
To configure the caching realm:
Enabling the WLPI Caching Realm
To enable the WLPI caching realm:
Removing the RDBMS Realm
Note: This step is optional.
To remove the RDMBS realm:
Note: If you remove a RDBMS realm that is referenced by a Caching Realm, you might need to edit the config.xml file and modify the value of the CachingRealm's BasicRealm attribute to point to your new custom realm.
Updating Passwords
To ensure system security, update the default passwords listed in WebLogic Integration Users and Passwords, as described in the following procedures.
Warning: The wlisystem user name and password are stored in the WebLogic Integration repository and used in the WebLogic Integration run-time environment. This type of password must be updated using the B2B Console; do not use the WebLogic Server Administration Console for this purpose. If you modify the wlisystem password through the B2B Console, the password is updated in both the WebLogic Integration repository and the security realm.
Note: WebLogic Integration and WebLogic Server user names and passwords (users created using the WebLogic Integration Studio) can contain any character from the JDK-supported character sets, including international characters.
Updating the system Password
The password for the system login for the active domain can be changed through the WebLogic Server Administration Console, as described in the following procedure.
To change the password, complete the following procedure:
Warning: The startWeblogic.cmd (Windows) or startWeblogic (UNIX) command is configured for automatic login. If you change the password for system, you must modify the password specified in this file. See the sample startWebLogic file in WebLogic Integration Sample Configuration Files.
Updating the BPM Passwords
You can update the passwords for the BPM users admin, joe, mary, and any new users you create in the Studio application, through the WebLogic Server Administration Console, as described in the previous section.
Updating the wlisystem Password
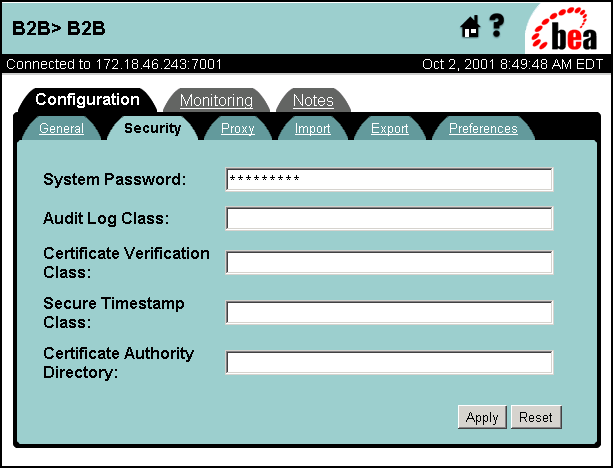
The password for the wlisystem user can be changed only through the B2B Console, as described in the following procedure. Do not update this password from the WebLogic Server Administration Console.
To update the password for the wlisystem user:
Customizing Mail Session Properties
The mail session properties you specify when you use the Configuration Wizard to create a domain are used to set up a basic mail session configuration for the domain. You can modify the mail session configuration by updating existing settings, or by adding properties. The following procedure describes how to update the mail session properties for any domain.
To update the mail session properties for any domain, complete the following procedure:
Figure 3-11 wlpiMailSession Configuration Tab
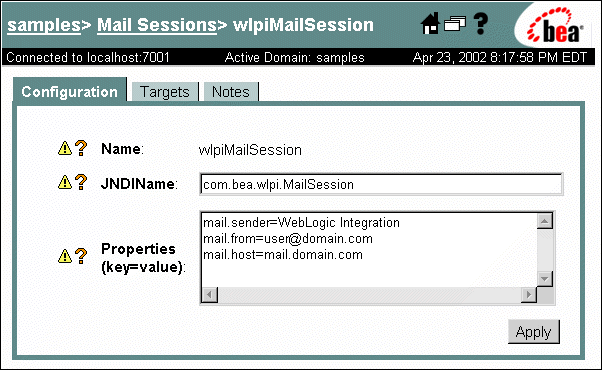
The following table provides descriptions of the properties that can be set.
Root Directory of a Domain
Some components of WebLogic Integration need access to particular files, such as the XML DTD, in the root directory. By default, the startWeblogic script for WebLogic Integration uses the home directory of the domain (DOMAIN_HOME) as the domain's root directory.
For example, suppose that, using the Configuration Wizard, you create a domain in c:/bea/user_projects/mydomain. That directory is now known as DOMAIN_HOME. The startWeblogic.cmd script, located in the DOMAIN_HOME directory, sets the root directory (also known as the run-time directory) to the same directory (c:/bea/user_projects/mydomain) using the weblogic.RootDirectory property.
Using an Alternate Character Set
If you are running WebLogic Integration in another locale, no special configuration is required, as long as your database, your operating system, WebLogic Integration, and the WebLogic Integration client applications (the Studio, Worklist, and Format Builder), are all running in the same locale.
The only change required after installation is to your B2B preferences. To enable the B2B Console to allow input from an alternate character set, you must verify that language and character set preferences are properly defined. For details about setting the language and the default character set for the language, see "Setting Preferences" in Configuring B2B Integration in the Online Help for the WebLogic Integration B2B Console.
Changing WebLogic Integration Port Numbers
Two WebLogic Integration instances running on a single machine cannot share the default port number (7001). If you are running two instances on one machine, you must change the port number used by one of them.
Warning: You may need to change parameters other than the WebLogic Server listen port number. For more information, see Table 3-11.
The following steps contain instructions for changing the WebLogic Integration port numbers in your application:
Step 1. Change the WebLogic Server Listen Port Number
The WebLogic Server listen port number specifies the dedicated TCP/IP port at which the server listens for connections. To change the listen port configured for a server, follow the steps in Changing the Listen Port from the WebLogic Server Administration Console or Changing the Listen Port by Editing the Configuration File.
Changing the Listen Port from the WebLogic Server Administration Console
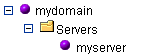
To change the listen port from the WebLogic Server Administration Console:
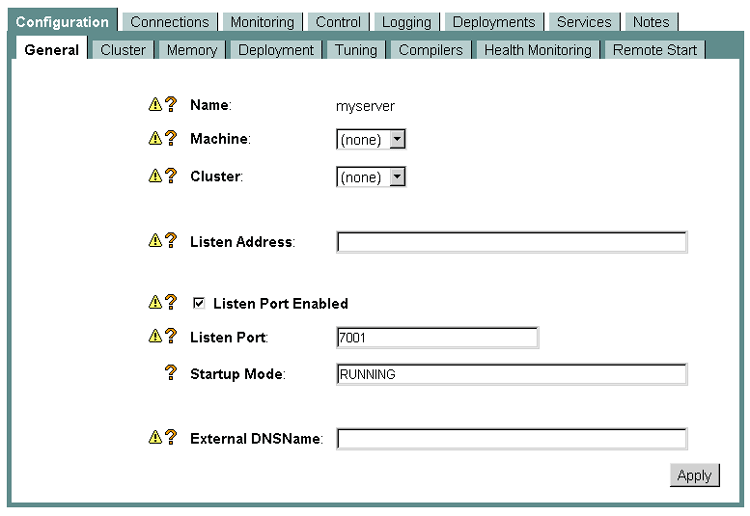
Figure 3-12 Choosing a Server
Warning: You must change the listen port using the WebLogic Server Administration Console. Do not change the port number using the B2B Console.
Changing the Listen Port by Editing the Configuration File
Note: Do not edit the config.xml file while the server is running. If the server is running, update the listen port as described in the preceding procedure.
To change the listen port by editing the config.xml file:
Listing 3-5 Changing the ListenPort Element in the config.xml File
<Server
 ListenPort="7001"
 Name="myserver"
  TransactionLogFilePrefix="c:\bea\weblogic700\samples/integration/config/samples/logs/"
 StdoutDebugEnabled="true"
 StdoutEnabled="true"
 StdoutSeverityLevel="64" NativeIOEnabled="true">
Step 2. Changing Other WebLogic Integration Port Numbers
Which steps you must complete to update the remainder of the WebLogic Integration port numbers is determined by which features of WebLogic Integration are used in the application. To find out which steps are required to change the port number for your application, refer to the following table.
Table 3-11 Changing WebLogic Integration Port Numbers
Warning: The samples contain many files in which the port number is set. To avoid introducing errors, we recommend that you do not change the default port number in the samples. Changing B2B URI Endpoints A WebLogic Integration URI endpoint specifies the location at which a trading partner listens for a B2B message. If you have already changed the listen port for your WebLogic Server, as described in Step 1. Change the WebLogic Server Listen Port Number, and you are using WebLogic Integration B2B functionality, you must change the URI Endpoints for your B2B trading partners. To change the port number in the URI Endpoint:
Warning: URI endpoints are also specified in the Bulk Loader repository data file. If you change the port number in the URI endpoint in the repository and you want your Bulk Loader repository to reflect that change, make sure you export the current repository information using the B2B Console or the command-line Bulk Loader. For more information, see "Importing and Exporting B2B Integration Components" in Administering B2B Integration.
Changing the Application View Console Port Number
If you have changed the listen port for your WebLogic Server, as described in Changing B2B URI Endpoints, and you are using the WebLogic Integration Application View Console, you must update the port number specified in the startAIconsole command.
To update the port number specified in the startAIconsole command:
Changing the B2B Console Port Number
If you have changed the listen port for WebLogic Server, as described in Changing B2B URI Endpoints, and you are using the WebLogic Integration B2B Console, you must update the port number specified in the startB2Bconsole command.
To update the port number specified in the startB2Bconsole command:
Changing the WebLogic Integration Shutdown Scripts
If you have changed the listen port for WebLogic Server, as described in Changing B2B URI Endpoints, you must change the port number in the shutdown script for the server.
To change the port number in a shutdown script:
Deploying B2B Without Persistence
By default, WebLogic Integration is deployed in persistence mode, which means that WebLogic Integration can recover in the event of hardware or network failures. For more information about the benefits of deploying WebLogic Integration in persistence mode, see "What to Expect from WebLogic Integration Recovery" in Understanding WebLogic Integration High Availability in Deploying BEA WebLogic Integration Solutions.
The ability to turn off persistence is supported only for the B2B functionality provided by WebLogic Integration. Persistence is turned off using the WebLogic Server Administration console. For more information, see Configuring Persistence and Recovery in Administering B2B Integration.

|

|

|