

|
Worklist provides a web-based user portal for interacting with tasks. This portal allows users to see the details of a task and take actions on the task to move it through its lifecycle. Each step in a task plan can define unique actions and thus present its own unique considerations to the user.
This document provides the following information:
To login to Worklist User Portal:
http://localhost:7001/<web project name>/
The Web project corresponds to the Web application of Worklist that acts as the user interface for the system. For more information, see "Worklist Application" in Creating and Managing Worklist Task Plans in Using Worklist. You can use any external browser, for example Internet Explorer, or the default browser that comes with Workshop for WebLogic Platform.
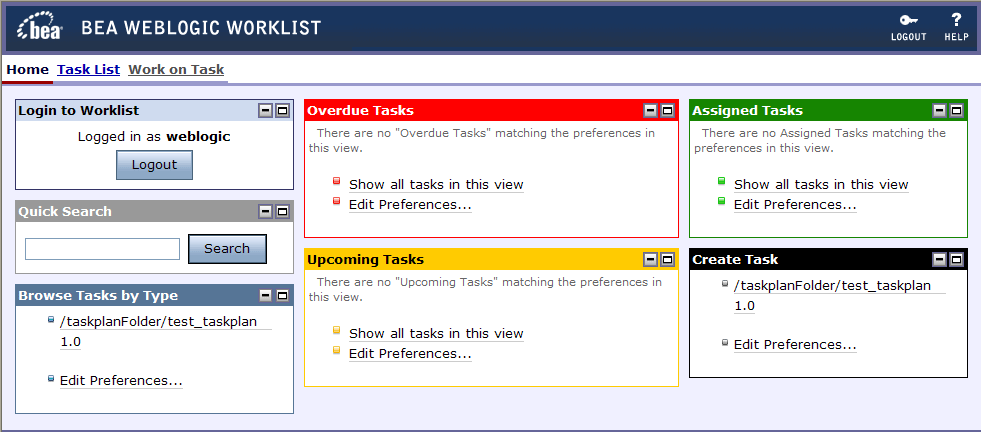
Worklist User Portal is displayed.
| Note: | E-mail notifications regarding tasks associated with you contain the URL to the specific task instances. You can also click on this URL to access the task in the Worklist User Portal. |
Assigned, upcoming, overdue tasks associated with you are displayed in the appropriate portlet in the User Portal home page. Task plans based on which you can create task instances are displayed in the Create task portlet.

| Note: | After you are done, click Logout to exit from Worklist User Portal. |
The Worklist User Portal consists of three pages - Home, Task List, and Work on Task. The different functions that can be done in each of these pages are as follows:
|
|||
|
Worklist User Portal contains the following default portlets:
| Note: | Tasks that are displayed in the portlets are based on your permissions. For example, the Browse Tasks by Type portlet will show only those tasks for which the current user has Query privileges. The Create New Task portlet will show only those tasks for which the current user has Create privileges. For more information, see "Security Policies" in User Management in Using Worklist Console. |
You can create a task instance based on any existing task plan in the Create Task portlet. For more information about task plans, see Creating and Managing Worklist Task Plans in Using Worklist.
| Note: | You can create a task instance only if you have task creation privileges. For more information, see "Security Policies" in User Management in Using Worklist Console. |

| Note: | Editing preferences for this portlet is similar to the Browse Tasks by Type portlet. For more information, see Edit Preferences of Browse Tasks by Type Portlet. Changes to the preferences are only valid for the current session. |
| Note: | Make sure that you do not enter an empty string as task name. |
Month dd, yyyy h:mm:ss AM/PM format. For example, you can enter date as Nov 28, 2006 06:00:00 AM.Month dd, yyyy h:mm:ss AM/PM format.<days>dt <hours>h <minutes>m format. The task instance is created and shows up in the Upcoming Tasks portlet on the home page.

| Note: | The task shows up on the Inbox of the current user because the current user is the owner of this task instance. By default, the user who creates the task instance becomes the owner of that task instance. This enables the owner to track the status of the task instance although the owner is not assigned to work on the task instance. |
If Interactive is selected as the value of Candidate List Handling, a human actor can use Worklist User Portal or Custom Task UI, if any, defined for the task plan or step in a task plan. When candidate list handling is interactive, you need to manually assign task through the portal interface either from the Create Task portlet or the Work on Task page (if the task requests interactive assignment on the current step).
Interactive assignment of a user or group to a task involves:
If required, modify the initial assignee list to include users or groups to generate an appropriate list of candidates.
To create a task instance and provide assignee instructions:
Any existing assignees for the task (based on the assignment instructions specified while creating the task plan associated with this task instance) are listed in the Assignee list. You can do any of the following actions with the users displayed in this list:
When you specify a group, all users in that group are automatically added to the Assignee list.
You can also select User, enter a valid user name and click Select Claimant to automatically claim the task for the selected user.
The task instance is created and shows up in the Upcoming Tasks portlet on the home page.
| Note: | The task shows up on the Inbox of the current user because the current user is the owner of this task instance. By default, the user who creates the task instance becomes the owner of that task instance. This enables the owner to track the status of the task instance although the owner is not assigned to work on the task instance. |
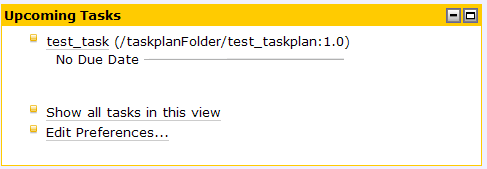
You can view your scheduled tasks in the Upcoming Tasks portlet (Figure 2-5). In this portlet, you can view:
| Note: | By default, the start date is current date and time and the end date of the date range is 7 calendar days from current date. |
By default, a maximum of 8 tasks are displayed in this portlet. To view all the upcoming tasks, click the Show all tasks in this view link. All upcoming tasks are displayed in the Task Link page. Click on the task name to view the task details in the Work on Task page. For more information, see Task List Page.
| Note: | Editing preferences for this portlet is similar to the Overdue Tasks portlet. For more information, see Edit Preferences in the Overdue Tasks Portlet. Changes to the preferences are only valid for the current session. |
You can view tasks assigned to you in the Assigned Tasks portlet (Figure 2-9). In this portlet, you can:
By default, a maximum of 8 tasks are displayed in this portlet. To view all the assigned tasks, click the Show all tasks in this view link. All assigned tasks are displayed in the Task Link page. Click on the task name to view the task details in the Work on Task page. For more information, see Task List Page.
| Note: | Editing preferences for this portlet is similar to the Browse Tasks by Type portlet. For more information, see Edit Preferences of Browse Tasks by Type Portlet. Changes to the preferences are only valid for the current session. |
If you are in the assignee list of a task, you can claim the task as follows:
When a user in a group assigned to this task claims it, this task is only displayed in the Upcoming Tasks portlet of that user. It is no longer displayed for any user in the group assigned to this task.
| Note: | You can click Work to directly claim and work with the task. For more information, see Working on a Task Instance. |
To work on a task that is assigned to you or that you have claimed:
| Note: | You can also click on the Work on Task link to work on a task. In this page, you can view the current step of the task, take actions on the task, see and edit details of the task, and reassign the task. |
If any custom task user interface is defined for the current step in the task or the task plan associated with the task, that interface is displayed instead of the default interface. For more information, see Customizing Worklist User Portal.
If any user properties defined for the task plan are required for this action, they are displayed in the Key Action Properties section of this page.
The task transitions to the next logical entity as defined in the task plan.
Based on your task affinity (owner, creator, claimant, or assignee for the task) or state of the task, you can view the task details from the Assigned Tasks, Upcoming Tasks, or Overdue Tasks portlet. You can also click the Task List link in the home page and click Upcoming Tasks, Associated Tasks, Claimed Tasks, Owned Tasks, Assigned Tasks, or Overdue Tasks link to view a list of tasks related to you.
To view the task details from a relevant portlet in the User Portal home page:
You can view task details like task name, current step name, task ID, task plan, date of task creation and last update, Administrative and Working state of the task.
In the Quick Search portlet, you can search for any tasks that match for the specified task criteria.
All tasks for which you have query privileges and that match the search criteria are displayed in the Task List page. For more information, see Task List Page.
You can browse for tasks based on specific task plan in the Browse Tasks by Type portlet. This portlet shows all task plans for which you have query privileges. For each task plan, the complete hierarchical path and version is displayed. Click on the task plan name to view the tasks instances of this task plan in the Task List page. For more information, see Task List Page.
| Note: | You have query privileges if you are assigned to the roles listed in the Query policy for the task plan. For more information, see "Security Policies" in User Management in Using Worklist Console. |

To edit preferences of the Browse Tasks by Type portlet:
The preferences for this portlet are saved and you are returned to the Home page. These changes to the preferences are only valid for the current session.
| Note: | You can edit preferences of the Assigned Tasks and Create Tasks portlet in a similar manner. |
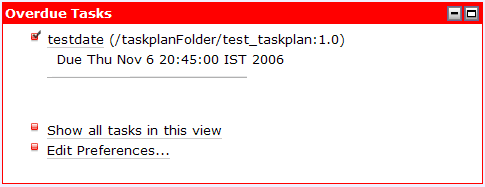
You can view tasks that are overdue in the Overdue Tasks portlet. This portlet shows any tasks claimed, owned, or created that have not been completed before the completion due date specified for the task. That is, tasks that have not been completed and for which the completion due date is earlier than the current date are displayed in this portlet. Click on the task name to view the task details in the Work on Task page.

By default, a maximum of 8 tasks are displayed in this portlet. To view all the overdue tasks, click the Show all tasks in this view link. All overdue tasks are displayed in the Task Link page. Click on the task name to view the task details in the Work on Task page. For more information, see Task List Page.
You can edit preferences to set the display of tasks in the Overdue Tasks portlet.
8. True instead of False to view tasks that are not associated with a due date in this portlet. The preferences for this portlet are saved and you are returned to the Home page. These changes to the preferences are only valid for the current session.
| Note: | You can edit preferences of the Upcoming Tasks portlet in a similar manner. |
The task list page has a set of views shown in a portlet at the left-hand side of the page. These views define a range of tasks that will be displayed when the view is selected. Tasks meeting the criteria for the view are shown in the task list portlet at the right-hand side of the page. Clicking different views in the view list causes the contents of the task list at the right to change. For example, click the Assigned Tasks link to view all the tasks that are assigned to you. The various views that are available in this page are:
You can click on any task to view the task details. For more information, see Viewing the Task Instance Details.
The task list may be long. If the list is longer than the maximum number of tasks configured to be listed in this page, the page will show only that maximum number. Click on the arrow buttons to navigate to the next page to see a continuation of the list.
Every column in the task list have a sort header. Clicking on the sort header for a column sorts the tasks in the list by that column. Clicking repeatedly on a header toggles between sorting in ascending order and sorting in descending order. The current sort order will be shown by an up or down arrow icon on the header.
By default, tasks in this view are sorted by:
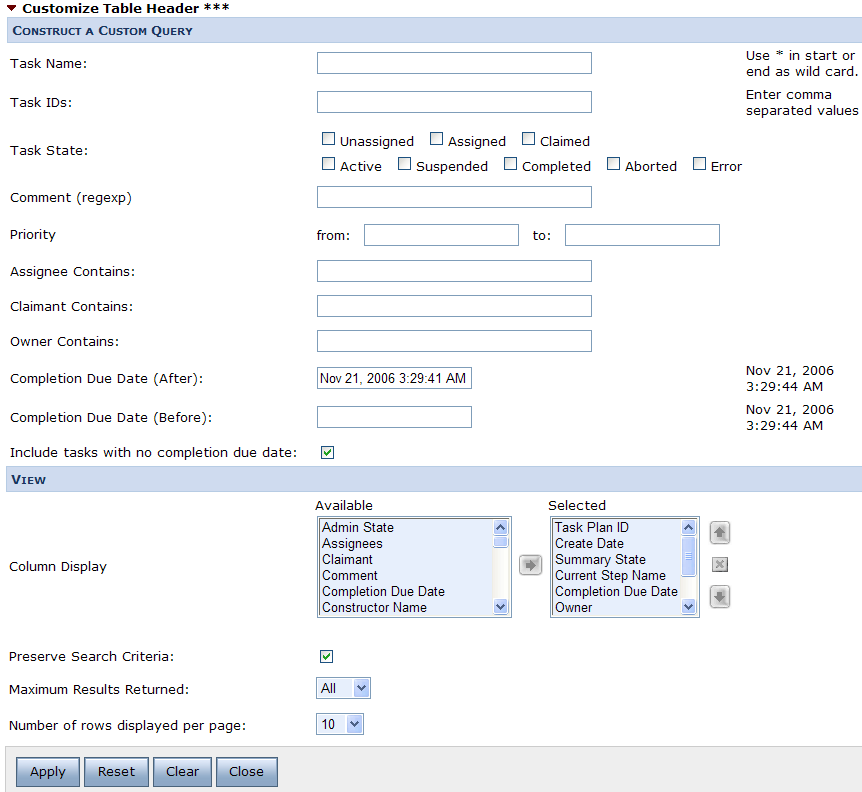
You can customize the column headers or search for required tasks by clicking on Customize Table Header. The option allows you to specify the columns to be showed in the list table, to provide the sorting order, and to set the page size. The sorting order could be complex with option to provide multiple columns for sorting and the order (ascending/descending) for each of them.

To create a custom query and search for tasks:
In the Construct a Custom Query form, specify the search criteria by specifying any of the following values.
All tasks that match the specified criteria are displayed in the Task List page.
To customize the table header:
The view in the Task List page is updated based on the current settings.
You can delete a task instance from Worklist Console. For information, see "Deleting Tasks" in Worklist Administration in Using Worklist Console.


|