

|

|
|
|
|
Starting Collaborative Workflows
The following sections explain how to define start actions for collaborative workflows:
About Starting Collaborative Workflows
The job of starting collaborative workflows comprises two tasks:
The following two sections describe the design and programming implications of each task.
Defining Collaborative Workflow Start Properties
There are three ways in which you can start a collaborative workflow:
You define the start properties for a workflow based on the type of workflow being designed (conversation initiator versus conversation participant) and according to the following rules:
Note: To instantiate any workflow, the workflow template definition must be active and not expired.
Starting the Collaborative Workflow at Run Time
How you start a collaborative workflow at run time typically depends on whether the workflow is a conversation initiator or conversation participant:
Starting a Conversation Initiator Workflow
A conversation initiator workflow is started in one of the following ways:
Conversation initiator workflows that are started programmatically must have a manual start property defined in the Start node. For more information about starting a conversation initiator workflow programmatically, see Developing Applications that Start Conversation Initiator Workflows.
Conversation initiator workflows that are started via another local workflow must have the called start property defined in the Start node. The local workflow—in the design pattern used in the sample applications, this local workflow is called a private workflow—starts the conversation initiator workflow as a subworkflow. For more information about the sample applications, see Learning to Use BEA WebLogic Integration and Running the B2B Integration Samples.
To define the start property for a conversation initiator workflow:
Figure 3-1 Start Properties Dialog Box: Manual Start

For more information about these options, see Defining Workflow Templates in Using the WebLogic Integration Studio.
Defining the Start Node for a Conversation Participant Workflow
A conversation participant workflow is started when it receives an initial business message from a trading partner. You must define a Business Message start state for such workflows.
To define the Business Message start state for a conversation participant workflow:
Figure 3-2 Choosing a Business Message Start State
The Start Properties dialog box is displayed again with the additional fields, shown in the following figure. In these fields you add information specific to the collaborative workflow, particularly information related to the business protocol on which the workflow is based. (The following figure shows the Start Properties dialog box for a workflow based on the XOCP protocol.)
Figure 3-3 Start Properties for a Conversation Participant Workflow
Starting Conversation Participant Workflows Based on the XOCP 1.1 Protocol
In the Start Properties dialog box, enter the following information for workflows based on the XOCP 1.1 protocol.
Figure 3-4 XOCP 1.1 Start Properties
If you want to specify that the sender name is to be converted to an XPath expression, select the XPath Conversion button.
Starting Conversation Participant Workflows Based on the RosettaNet 2.0 Protocol
In the Start Properties dialog box, enter the following information for workflows based on the RosettaNet 2.0 protocol.
Figure 3-5 RosettaNet 2.0 Start Properties
For complete details about creating start properties for workflows based on the RosettaNet 2.0 protocol, see Implementing RosettaNet for B2B Integration.
Starting Conversation Participant Workflows Based on the RosettaNet 1.1 Protocol
In the Start Properties dialog box, enter the following information for workflows based on the RosettaNet 1.1 protocol.
Figure 3-6 RosettaNet 1.1 Start Properties
For complete details about creating start properties for workflows based on the RosettaNet 1.1 protocol, see Implementing RosettaNet for B2B Integration.
Defining the Start Public Workflow Action
You can use the Start Public Workflow action to start a collaborative workflow from a parent workflow. When you use the Start Public Workflow action, you need to specify the following:
When you start a collaborative workflow via the Start Public Workflow action, that collaborative workflow must include a means to synchronize the collaborative workflow with the parent workflow.
The sections that follow explain how to define the Start Public Workflow action and how to synchronize the called collaborative workflow with the parent workflow.
Defining the Start Public Workflow Action
The Start Public Workflow action can be associated with any workflow nodes, but typically is associated with a task node. You must explicitly add the Start Public Workflow action to the workflow template definition.
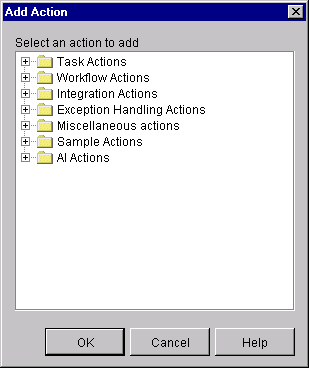
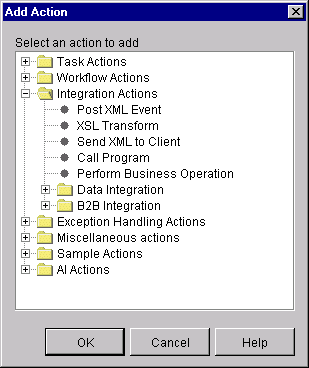
Adding a Start Public Workflow Action
To define the Start Public Workflow action for a parent workflow in the Studio:
Figure 3-7 Add Action Dialog Box
Figure 3-8 Add Action Dialog Box with Integration Actions
Figure 3-9 Start Public Workflow Dialog Box
Table 3-1 Sections on the Conversation Page
Figure 3-10 Workflow Page of the Start Public Workflow Dialog Box
Table 3-2 Fields and Sections of the Workflow Tab

Using the Expression Builder to Specify Values in the Start Public Workflow Dialog Box
You can use the Studio Expression Builder to specify the following values in the Start Public Workflow dialog box:
To display the Expression Builder, right-click in the cell in which you specify one of the preceding values and choose Expression. The Expression Builder is displayed, as shown in the following figure.
Figure 3-11 Studio Expression Builder
For information about how to use the Expression Builder, see Using Workflow Expressions in Using the WebLogic Integration Studio. Synchronizing the Child Workflow With the Parent Workflow As mentioned in Defining the Start Public Workflow Action, when you start a collaborative workflow via the Start Public Workflow action, you must have a means of synchronizing that collaborative workflow with the parent workflow. You can do this in either of two ways:
Developing Applications that Start Conversation Initiator Workflows
You can start a conversation initiator workflow at run time via a Java application, known as a workflow application. The following sections describe how to create a workflow application to start a conversation initiator workflow programmatically:
To start a conversation initiator workflow programmatically, the start node for the workflow template must have a Manual start property, as described in Starting a Conversation Initiator Workflow.
Note: In WebLogic Integration release 2.0 and later, attempting to start a collaborative workflow via the Worklist results in an error.
Message Manipulator API
Workflow applications can use the com.bea.b2b.wlpi package to start workflows. This package provides the following interface and classes.
Table 3-3 Components of the com.bea.b2b.wlpi Package
For details about this package, see the BEA WebLogic Integration Javadoc.
Programming Steps for Accessing Conversation Initiator Workflows
To access a conversation initiator workflow, a workflow application completes the following steps:
The workflow application also needs to handle exceptions thrown by each of the method invocations on the Message Manipulator API, as explained in Handling Exceptions.
Note: Before creating an application that starts a workflow, verify the following:
Step 1: Import the Necessary Packages
To access a workflow, a workflow application begins by importing the necessary package(s). At a minimum, the application must import the com.bea.b2b.wlpi package, as shown in the following example.
Listing 3-1 Importing the com.bea.b2b.wlpi Package
import java.io.*;
import java.util.*;
import javax.servlet.*;
import javax.servlet.http.*;
import javax.naming.*;

import com.bea.wlpi.common.*;
import com.bea.b2b.wlpi.*;

import com.bea.eci.logging.*;
Step 2: Create a Workflow Instance Object for a Specific Workflow Template
The workflow application next needs to create a workflow instance object of a specific workflow template definition, as shown in the following example.
Listing 3-2 Creating a Workflow Instance Object
Hashtable[] array = new Hashtable[2];
Hashtable party1  = new Hashtable();
Hashtable party2  = new Hashtable();

party1.put(WorkflowInstance.PARTYNAME_KEY, PARTY_SOURCE);
party2.put(WorkflowInstance.PARTYNAME_KEY, PARTY_DEST);

array[0] = party1;
array[1] = party2;

WorkflowInstance wi = new WorkflowInstance(BUSINESS_PROCESS_NAME,
                               BUSINESS_PROCESS_MAJOR,
                               BUSINESS_PROCESS_MINOR,
                               BUSINESS_PROCESS_ROLE,
                                array);
Step 3: Initialize Input Variables
If input variables are defined for a conversation initiator workflow, you must initialize and assign values to them in the application before starting the workflow instance. These input variables must first be declared in the template definition in the Studio, as described in About Using Workflow Variables.
A workflow application sets instance variables by invoking the setVariable method on the workflow instance and passing it the name and value of the variable. The setVariable method requires the following parameters.
Table 3-4 Parameters for the setVariable Method
The following example shows how to use the setVariable method to specify values for two variables in the workflow to be started.
Listing 3-3 Setting the Value of Input Variables
wi.setVariable( INTEGER_ONE_VAR, new Long( 3 ) );
wi.setVariable( INTEGER_ONE_VAR, new Long( 5 ) );
Step 4: Start a Workflow Instance
After creating a workflow instance and initializing input variables, a workflow application starts the workflow instance by invoking the start method on the instance object, as shown in the following example.
Listing 3-4 Start a Workflow Instance
wi.start();
Step 5: Wait for the Workflow Instance to Complete
Once a workflow instance has been started, a workflow application can wait for its completion by calling the waitForCompletion method on the workflow instance. The operation blocks until the workflow instance has completed.
Listing 3-5 Waiting for Completion of the Workflow Instance
wi.waitForCompletion();
While waiting for the workflow instance to complete, a workflow application can determine the completion state of the workflow instance by invoking the isCompleted method on the workflow instance. This method returns a Boolean true if the execution of the workflow is complete, or false if it is not.
Step 6: Handle Results in Output Variables
After a workflow instance has completed, a workflow application can handle the results of the workflow instance by retrieving the information stored in output variables. These output variables must first be declared in the template definition in the Studio.
A workflow application retrieves the value of an instance variable by calling the getVariable method on the workflow instance and passing it the name of the variable to be retrieved, as shown in the following example listing.
Listing 3-6 Retrieving the Results in Output Variables
product = (String)wi.getVariable(MULTIPLY_REPLY_VAR);
note = (String)wi.getVariable(NOTE_VAR);
The getVariable method returns a Java object that should be cast to the appropriate Java data type. For information about the Java types to which you must cast the return values, depending on the corresponding workflow variable types, see Using the WebLogic Integration Studio.
Handling Exceptions
If an error occurs while a workflow application is running, a com.bea.b2b.wlpi.WLPIException is thrown. With each method invocation on the workflows API, workflow applications can catch this exception and process it as appropriate, as shown in the following listing.
Listing 3-7 Handling WLPIExceptions in Workflow Applications
catch (WorkflowException we){
      debug("Error starting workflow");
      we.printStackTrace();
}

|

|

|
|
|
|
Copyright © 2001 BEA Systems, Inc. All rights reserved.
|