|
|
Use this chapter as you prepare your Workshop for WebLogic environment for portal development. This chapter describes the Portal EAR Project Wizard, Portal Web Project Wizard, Datasync Project Wizard, the Add/Remove a Project dialog, and a subset of the WebLogic Domain Configuration Wizard. This chapter also describes some features in the Workshop for WebLogic interface that you might find useful as you use it to develop portals.
For a step by step example of how to perform the tasks related to each wizard, see the Getting Started with WebLogic Portal tutorials.
| Tip: | You can find detailed information about how these setup tasks are related to the deployment of your project in the Production Operations Guide. |
This chapter contains the following sections:
The required environment setup options vary depending on whether you want to develop a “conventional portal,” a collaboration portal, or a “development-free” GroupSpace application. Table 4-1 describes the basic tasks that you should perform in each case:
|
||||
Copying J2EE library files into your project (for instructions, refer to Copying J2EE Library Files into a Project)
|
||||
|
||||
Copying J2EE library files into your project (for instructions refer to Copying J2EE Library Files into a Project).
|
||||
In addition to the default options, select the WebLogic Portal Collaboration facet and these sub-features:
|
||||
Copying J2EE library files into your project (for instructions refer to Copying J2EE Library Files into a Project).
|
||||
This section describes the sections of the Configuration Wizard that are interesting from a WebLogic Portal perspective.
A domain is a group of WebLogic Server resources that contain the application server. You must have a server domain that is WebLogic Portal – enabled in order to test the portal that you create. This customized domain is generally called a portal domain.
A sample portal domain comes with WebLogic Portal and is, by default, located at WebLogic_HOME/samples/domains/portal. This sample domain is configured for use with a GroupSpace application.
You can start the Domain Configuration Wizard in several ways. Here are summaries of two methods:
The first dialog in the wizard looks like the example in Figure 4-1.
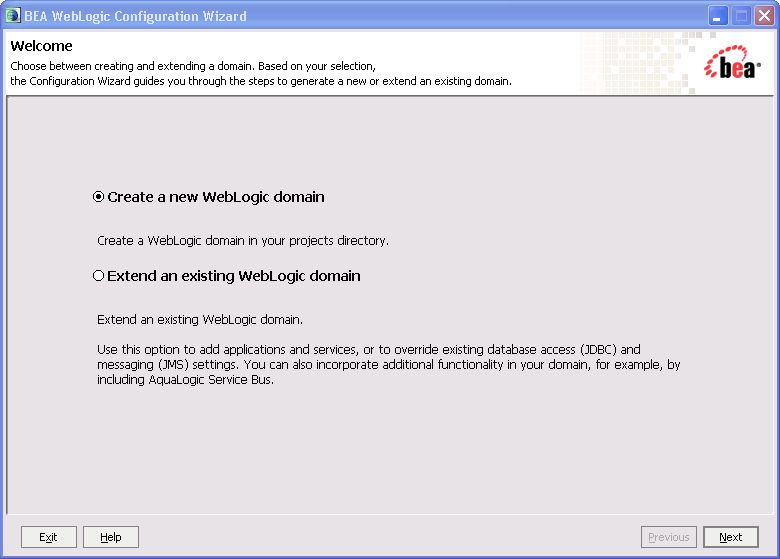
Table 4-2 shows the values that you would typically enter in the wizard, along with some useful notes that you might find useful as you set up your portal domain.
|
For example, you can select the WebLogic Portal GroupSpace Framework and WebLogic Portal GroupSpace Application check boxes to create a domain that is GroupSpace-enabled; projects based on the GroupSpace sample application must have a GroupSpace-enabled domain.
For more information on the options available here, refer to Roadmap for Environment Setup Tasks.
|
|
For information on the implications of using either of these options, refer to the Production Operations Guide. |
|
This section describes the dialogs of the WebLogic Portal Enterprise Application Archive (EAR) Project Wizard.
An EAR project collects the component projects of the application for deployment; you create one EAR project per enterprise application. The EAR project contains JAR files, deployment descriptors, build files, and auto-generated files. For more information about EAR projects and their relationship to the other projects in the Workshop for WebLogic workbench, refer to the “Applications and Projects” topic in the Workshop for WebLogic Programmers’s Guide.
The Portal EAR Project is an EAR project that is customized for WebLogic Portal. EAR projects appear as siblings to the other projects in a workspace but functionally, they link together projects and do not contain any of the content of your web application.
To start the Portal EAR Project Wizard, perform these steps:
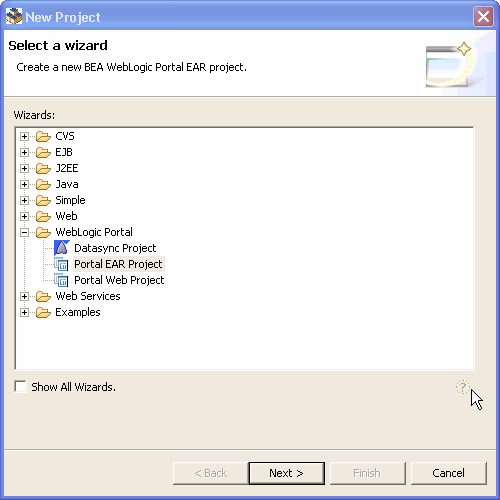
The New Project – Select a Wizard dialog displays.
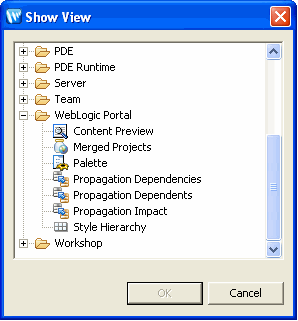
Select WebLogic Portal > Portal EAR Project, as shown in Figure 4-2.
The New Portal EAR Project dialog displays. When you enter a name for your project and click Next, the Select Project Facets dialog displays.
Figure 4-3 shows an example of the New Portal Web Project – Select Project Facets dialog.
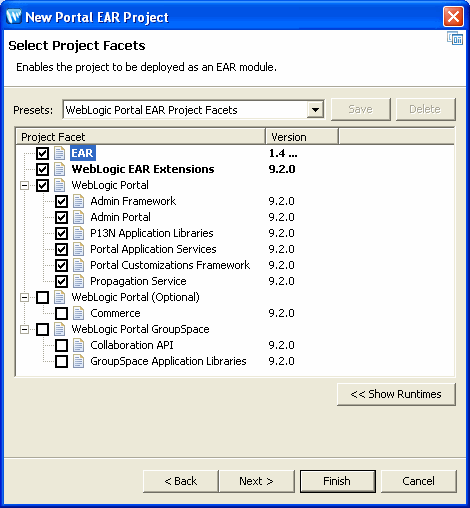
Table 4-3 describes each WebLogic Portal– related field of the Select Project Facets dialog. The selections that you make here cause WebLogic Portal to create files that you can use as you create your project, and associate the project with the correct set of shared J2EE libraries. For more information about shared J2EE libraries, see WebLogic Portal and Shared J2EE Libraries.
The value automatically displayed in this dropdown menu corresponds to the selections made in the tree view of project facets. You can select a preset group of facets from the dropdown menu, or select and unselect specific check boxes in the tree display. If you select a customized set of facets, <custom> displays in the field.
|
|
Check this box (and one or more of its sub-features) to enable this project as a collaboration-enabled, and potentially GroupSpace-enabled EAR.
For details about creating a GroupSpace application, refer to the Communities Guide and the GroupSpace Guide.
|
|
This section describes the Add and Remove Projects dialog, which you use to associate an EAR project with a portal domain. If your EAR Project already exists when you create you domain, you can make this association when you create the server domain. If not, you can do it later using the steps outlined in this section.
To associate the Portal EAR Project with the server, perform these steps:
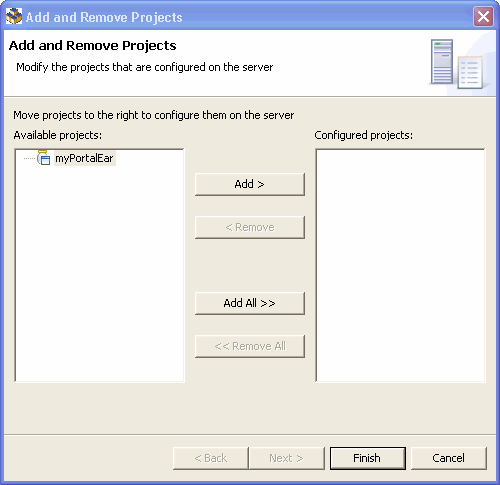
The Add and Remove Projects dialog displays, as shown in Figure 4-4.
The project is added to the Configured projects column on the right.
The Portal EAR Project is now associated with the server. To verify this, in the Servers view you can expand the server node to view the server’s associated projects. The myPortalEAR project should be shown as a subordinate node.
You use the Portal Web Project Wizard to create the web project that contains portal files. When you create a Portal Web Project, WebLogic Portal creates a set of shared J2EE libraries and files that you can use as you create your portal.
To start the wizard, perform these steps:
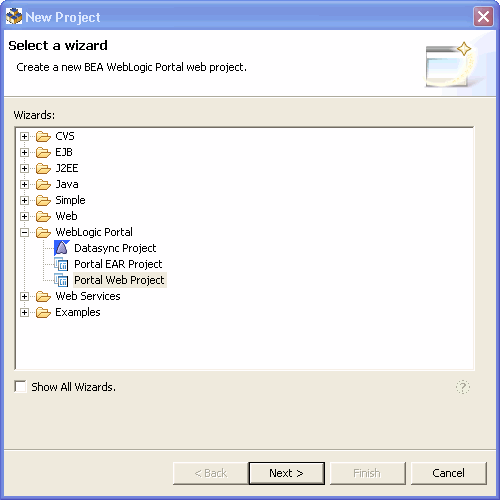
The New Project – Select a Wizard dialog box displays.
Figure 4-6 shows an example of the New Portal Web Project dialog.
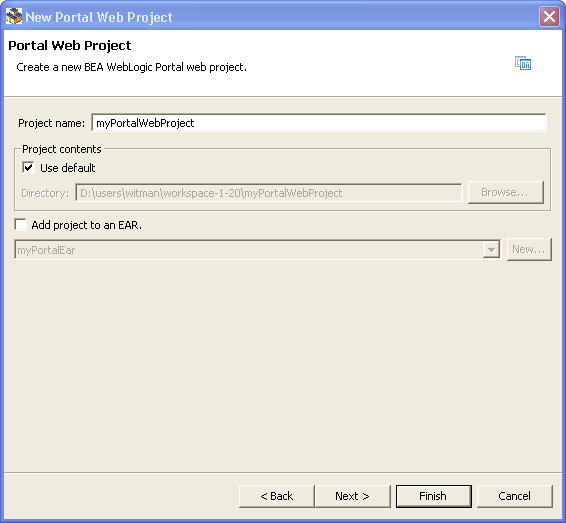
Table 4-4 describes each field of the New Portal Web Project – Portal Web Project dialog.
The New Portal Web Project – Select Project Facets dialog is shown in Figure 4-7.
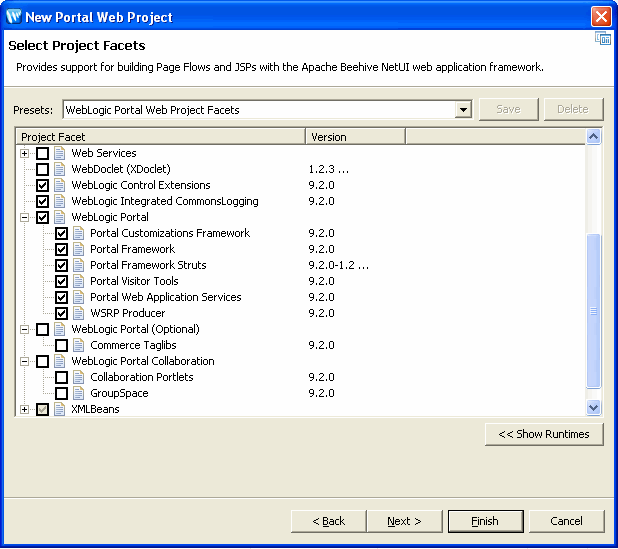
Table 4-5 describes each WebLogic Portal– specific field of the dialog.
The value automatically displayed in this dropdown menu corresponds to the selections made in the tree view of project facets. You can select a preset group of facets from the dropdown menu, or select and unselect specific check boxes in the tree display. If you select a customized set of facets, <custom> displays in the field.
|
|||
Select the WebLogic Portal facets that you want to install. If certain facets depend on others, messages appear to describe these dependencies and your selections must conform to these requirements.
|
|||
Check this box (and one or both of its sub-features) to add the collaboration portlets to the project, or to enable the project as a GroupSpace project.
For detailed instructions on creating a GroupSpace-based application, refer to the Communities Guide
|
|||
The New Portal Web Project – Web Module dialog is shown in Figure 4-7.

Table 4-6 describes each field of the dialog.
The New Portal Web Project – WebLogic Web Module dialog is shown in Figure 4-9.
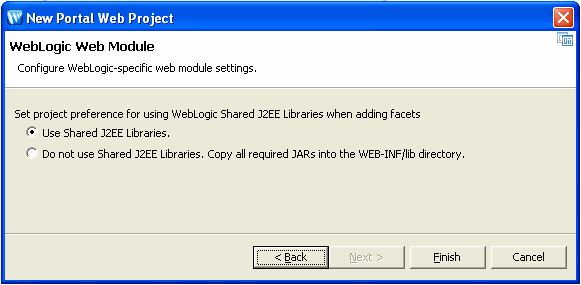
Table 4-7 describes the dialog.
If you select the Use Shared J2EE Libraries radio button, WebLogic Portal creates associations with shared J2EE libraries rather than copying the complete set of JAR files into your project. BEA recommends that you use shared J2EE libraries because of their significant advantages in source control, file sharing, and patch application. With any future patch installations, WebLogic Portal supports only configurations that do not have copied J2EE library resources in the project. For more information about shared J2EE libraries, refer to WebLogic Portal and Shared J2EE Libraries.
|
A datasync project is an optional project that stores general purpose portal services data that is used in the development of personalized applications and portals. These portal services include User Profiles, Session Properties, Campaigns and others. You can share a single datasync project among several EAR projects if you wish.
To create the datasync project, perform these steps:
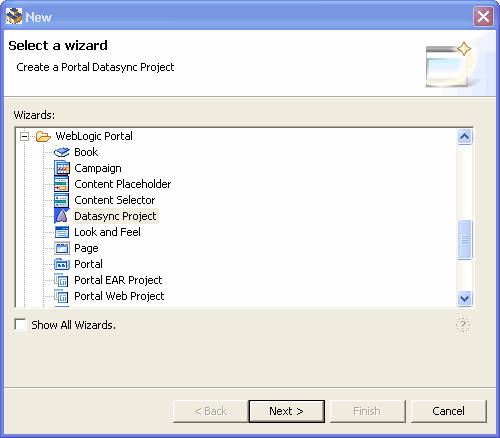
The Select a Wizard dialog box displays.
The Create New Datasync Project dialog is shown in Figure 4-11.
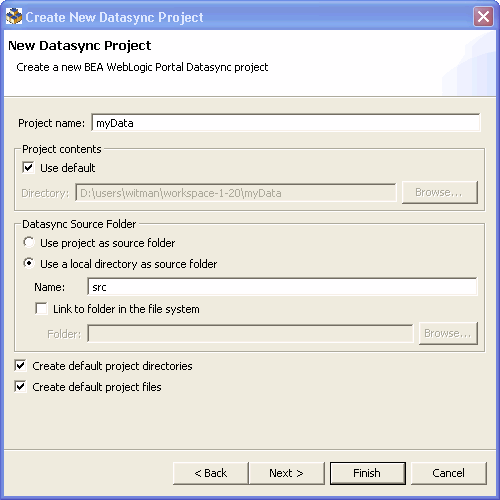
Table 4-8 describes each field of the dialog. When you click Next, the EAR Projects dialog displays.
The Create New Datasync Project – EAR Projects dialog is shown in Figure 4-12.
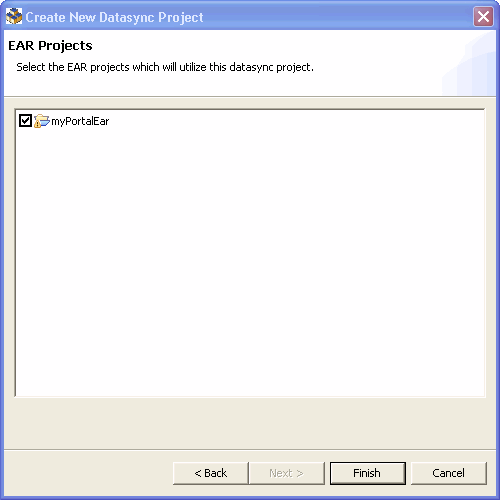
This dialog allows you to select the check box for the appropriate Portal EAR project.
| Tip: | If you create a datasync project without associating it with an EAR, you can do this step later by right-clicking the datasync project in the Package Explorer tree and selecting Properties; then expand the Datasync node in the tree and select EAR Projects to associate the project with the EAR. |
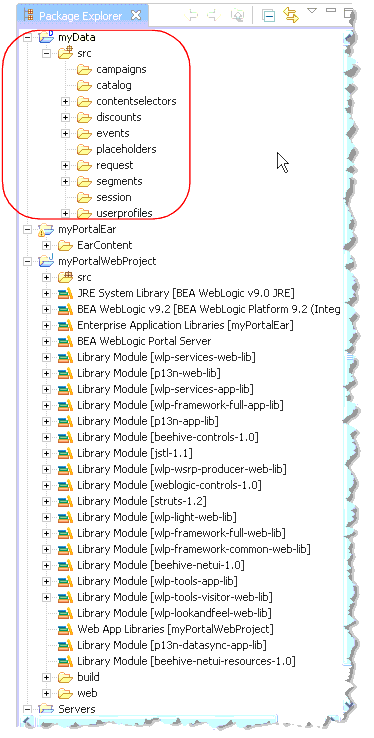
If you add a Datasync Project with the default settings, it will look similar to the Package Explorer tree shown in Figure 4-13.
The WebLogic Portal Merged Projects View is included by default in the Portal Perspective. This view shows a combined list of the files in your project, including the associated shared J2EE libraries. This view provides important reference information for your portal development project.
If you are not using the Portal Perspective, you should open the Merged Projects view in the workbench. To do so, perform these steps:
| Tip: | Some items listed in the Merged Projects view are italicized. The italicized items represent entities that are stored in shared J2EE libraries. All entities that are stored on your filesystem, such as the portal file you created, are shown in regular type. |
Notice that other useful portal-specific views are available here. Experiment to find the best combination of views that you want to have available as you develop portals.
| Note: | You can view a Properties dialog for a file in the Merged Projects view by right-clicking the file and selecting Properties. The dialog shows the J2EE library information for the file, including the shared J2EE library name and version. |
| Caution: | If you use the Merged Projects view to copy a J2EE library resource into your project, keep in mind that with future updates to the WebLogic Portal product, you might have to perform manual steps in order to incorporate product changes that affect those projects. |
You can use either of two options for running and viewing the results of your project development; the selection you make depends on the changes you have made in your project and whether or not your server is already started.
The following list describes each option available from the context menu in the Project Explorer view:
| Tip: | You can customize the browser setting so that an external browser displays the application; to do this, select Window > Preferences > General > Web Browser and select the appropriate external browser application. |
Optionally, you can create a personally customized combination of views, so that you can easily return to it any time.
To save the current workbench layout as a perspective, select Window > Save Perspective As, enter a name for your customized perspective in the Name field, and click OK. Your new perspective is added to the list, in the Other category.
You can also set this perspective as the default perspective for Workshop for WebLogic, using the Window > Preferences options. For more information, refer to your Eclipse documentation.
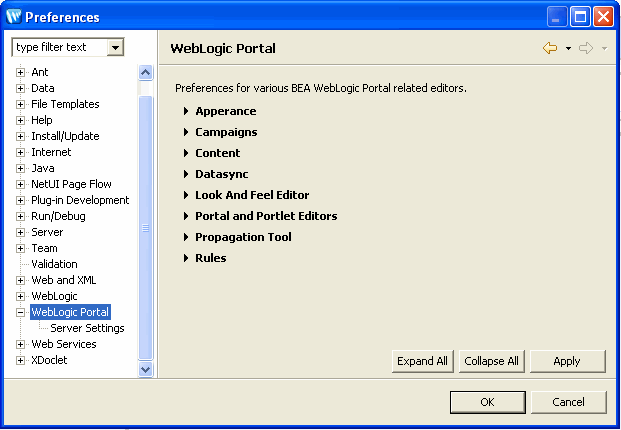
You can set preferences for the behavior of the various editors and features of WebLogic Portal. The following sections describe how to access WebLogic Portal-specific settings within Workshop for WebLogic.
A dialog similar to the example in Figure 4-15 displays:
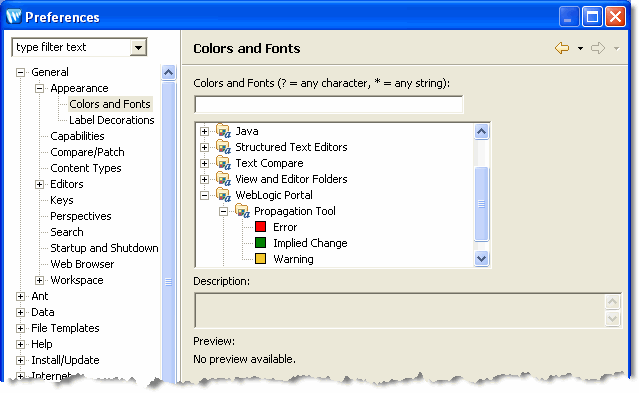
For example, if you select Appearance > Colors and Fonts, and then select WebLogic Portal > Propagation Tool, a dialog similar to the example in Figure 4-16 displays:
In the Propagation Tool node, you can change the assigned colors for status indicators.
In the Rules Editor Font node, you can change the font, style, and size for the Rules Editor that is used for campaigns, user segments, placeholders, and content selectors.


|