Beehive Integration in WebLogic Server 9.1
|
|
Annotation Overrides
Beehive's control architecture provides three techniques for setting the values of resource access attributes:
This list shows the order of precedence, from highest to lowest. For example, an externally configured value can override the value set for that property by a metada annotation but not the value set by a setter method. This overriding of the value can happen at deployment time or run time.
WebLogic Server annotation overrides, the subject of this chapter, refers to the second of the above techniques. That is, annotation overrides is a technique for overriding, at run time, property values that were originally set by means of metadata annotations.
For background information on Beehive controls architecture and how it includes the above material, please see the documentation on the Apache Beehive site.
Process Flow
In order to use annotation overrides, you must perform specific actions at specific stages while creating a project. These stages and actions are summarized here and are then covered in more detail in the subsequent sections of this chapter.
- Code time
In your code, you designate an annotated property value as externally configurable by annotating it with the following special meta attribute:
- Build time
You include various Ant macros in your
build.xmlfile in order to create certain required artifacts — annotation manifests, annotation overrides files, and a deployment plan. Annotation manifests and annotation overrides files are explained below. For information about WebLogic Server deployment plans, see the BEA document titled Deployment Plan Reference and Schema.- Deployment time
When the application is being deployed, WebLogic Server requires information that must be contained in a file named
weblogic-extension.xml, stored in a specific directory.- Run time
Sample Code
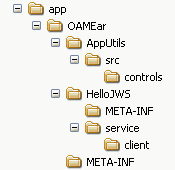
For this chapter, we will use an application containing one module, OAMEar.
The application's directory structure looks like this:
In the following sections, we will be looking at these application files:
In the following sections, for clarity, only part of the code of these files is displayed. The complete code for all the files mentioned in the table above can be found in Code Samples for Annotation Overrides,.
Code Time
MyControl.java
...
@ControlInterface
public interface MyControl
{
  public String getAnnotationValue();
}
MyControlImp.java
...
@ControlImplementation
public class MyControlImpl implements MyControl, Extensible, Serializable
{
    @Context
    ControlBeanContext ctx;

    public String getAnnotationValue() {

        // This is a key part. The control framework will make sure
        // that the precedence is followed when looking up annotation
        // values for MyAnnotation
        MyAnnotation myAnnotation =
            ctx.getControlPropertySet(MyAnnotation.class);

        return myAnnotation.value();
    }

    public Object invoke(Method method, Object[] args) throws Throwable
    {
        // Control Extension not defined for simplicity
        return null;
    }
}
MyAnnotation.java
...
@PropertySet(externalConfig=true)
@AllowExternalOverride
@Retention(RetentionPolicy.RUNTIME)
public @interface MyAnnotation
{
    String value() default "DEFAULT";
}
MyJcx.java
...
@PropertySet(externalConfig=true)
@AllowExternalOverride
@Retention(RetentionPolicy.RUNTIME)
public @interface MyAnnotation
{
    String value() default "DEFAULT";
}
HelloService.java
...
@WebService(name="Hello")
@SOAPBinding(style=SOAPBinding.Style.RPC, use=SOAPBinding.Use.ENCODED)
@WLHttpTransport(contextPath="helloJWS", serviceUri="HelloService")
public class HelloService
{
    @Control()
    @MyAnnotation("Overriden@Field")
    protected MyJcxBean _jcxBean;

    @WebMethod
    public String sayHello()
    {
        return _jcxBean.getAnnotationValue();
    }
}
Build Time
Generate the Annotation Manifests
As part of your build process, you must generate artifacts called annotation manifests. These files, named annotation-manifest.xml, contain information required for annotation overrides.
There is one annotation manifest for each module in your application and one for the application root. In our example application, OAMEar, there is only module, the service, so our build script will generate two annotation manifests.
To generate the required set of annotation-manifest.xml files for your application, include a call to the generate-manifests Ant macro in your build script. Be sure that your build script performs all the compilation steps before it calls this macro.
The generate-manifests macro is defined in the file
<weblogic.home>/beehive/weblogic-beehive/ant/weblogic-beehive-imports.xml
which must be imported into your build.xml file so that it can use the macro.
The macro takes the following parameters:
- destdir
-
The absolute path where you want the task to generate the manifest file. Normally this would be the directory where the application or the module resides. The manifest file is created in the subdirectory
META-INFunder the destdir — that is, the macro creates<destdir>/META-INF/annotation-manifest.xml. - searchclasspathref
-
The search path for the task to find overrideable annotations. Include only jars, zip files or class directories that need to be processed for annotation overrides. Examples of
searchClasspathentries are: classes directory as result of apt,WEB-INF/classes, andWEB-INF/lib/myExtensibleControl.jar.searchClasspathcan be a nested<searchClasspath>path structure,searchClasspathdefined as a attribute, or a reference to a path that is defined elsewhere usingsearchClasspathRef. - classpathref
-
The classpath that allow the build-manifest task to load the necessary classes to generate and merge the manifest files. The classpath usually includes a few jars from
${wl.home}/server/lib, such asweblogic.jarandwlsbeehive.jar. Again, the path can be defined as a nested<classpath>path structure, classpath defined as a attribute, or a reference to a path that is defined elsewhere usingclasspathRef. - tempdir
For example, in our sample code, the call to the macro looks like this:
<generate-manifests destdir="${current.dir}"
                        searchclasspathref="app.inf.classes"
                        classpathref="app.build.classpath"
tempdir="${current.dir}/.staging"/>
After this macro call, our application includes the following directory structure:
The directory OAMEar/META-INF contains the following files:
application.xml
annotation-manifest.xml
weblogic-extension.xml
weblogic-application.xml
This annotation-manifest.xml file is the annotation manifest for the application root. It contains this XML:
<?xml version="1.0" encoding="UTF-8"?>
<annotation-manifest xmlns="http://www.bea.com/2004/03/wlw/external-config/">
  <annotated-class>
    <annotated-class-name>controls.MyJcx</annotated-class-name>
    <component-type>Control Extension (JCX)</component-type>
    <annotation>
      <annotation-class-name>controls.MyAnnotation</annotation-class-name>
      <member>
        <member-name>value</member-name>
        <member-value>OnClassDecl</member-value>
      </member>
    </annotation>
  </annotated-class>
  <annotation-definition>
    <annotation-class-name>controls.MyAnnotation</annotation-class-name>
    <allowed-on-declaration>false</allowed-on-declaration>
    <member-definition>
      <member-name>value</member-name>
      <is-array>false</is-array>
      <is-required>false</is-required>
      <simple-type-definition>
        <base-type>STRING</base-type>
        <default-value>DEFAULT</default-value>
      </simple-type-definition>
    </member-definition>
  </annotation-definition>
  <version>1.0.0</version>
</annotation-manifest>
The directory service/META-INF contains the following files:
annotation-manifest.xml
MANIFEST.MF
This annotation-manifest.xml file is the annotation manifest for the service module. It contains this XML:
<?xml version="1.0" encoding="UTF-8"?>
<annotation-manifest xmlns="http://www.bea.com/2004/03/wlw/external-config/">
  <annotated-class>
    <annotated-class-name>service.HelloService</annotated-class-name>
    <component-type>Web Service (JWS)</component-type>
    <field>
      <field-name>_jcxBean</field-name>
      <instance-type>controls.MyJcxBean</instance-type>
      <annotation>
        <annotation-class-name>controls.MyAnnotation</annotation-class-name>
        <member>
          <member-name>value</member-name>
          <member-value>Overriden@Field</member-value>
        </member>
      </annotation>
    </field>
  </annotated-class>
  <annotation-definition>
    <annotation-class-name>controls.MyAnnotation</annotation-class-name>
    <allowed-on-declaration>false</allowed-on-declaration>
    <member-definition>
      <member-name>value</member-name>
      <is-array>false</is-array>
      <is-required>false</is-required>
      <simple-type-definition>
        <base-type>STRING</base-type>
        <default-value>DEFAULT</default-value>
      </simple-type-definition>
    </member-definition>
  </annotation-definition>
  <version>1.0.0</version>
</annotation-manifest>
Note the bolded code above. This points to the code
@Control()
    @MyAnnotation("Overriden@Field")
    protected MyJcxBean _jcxBean;
in the service. (See HelloService.java, above.)
Create A Deployment Plan
Now you must create a deployment plan. You do this using the weblogic.PlanGenerator configuration tool. For documentation about the use of this tool, please see the BEA document weblogic.PlanGenerator Command Line Reference.
In our example, to use this tool, we open a command prompt in the parent directory where app resides and issue the following command:
java weblogic.PlanGenerator -plan plan/Plan.xml app/OAMEar
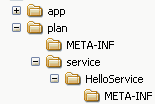
Our deployment directory now contains this directory structure:
The directory plan/META-INF contains a file named annotation-overrides.xml. This artifact corresponds to the annotation manifest file in the app/OAMEar/META-INF directory. This annotation overrides file contains the following XML:
<?xml version='1.0' encoding='UTF-8'?>
<annotation-overrides xmlns="http://www.bea.com/2004/03/wlw/external-config/" xmlns:xsi="http://www.w3.org/2001/XMLSchema-instance">
  <annotated-class>
    <annotated-class-name>controls.MyJcx</annotated-class-name>
    <component-type>Control Extension (JCX)</component-type>
    <annotation>
      <annotation-class-name>controls.MyAnnotation</annotation-class-name>
      <member>
        <member-name>value</member-name>
        <member-value>OnClassDecl</member-value>
        <cleartext-override-value>Application scope set at -1868610374!!</cleartext-override-value>
      </member>
    </annotation>
  </annotated-class>
</annotation-overrides>
The directory plan/HelloService/META-INF contains a file named annotation-overrides.xml. This artifact corresponds to the annotation manifest file in the app/OAMEar/service/META-INF directory. This annotation overrides file contains the following XML:
<?xml version='1.0' encoding='UTF-8'?>
<annotation-overrides xmlns="http://www.bea.com/2004/03/wlw/external-config/" xmlns:xsi="http://www.w3.org/2001/XMLSchema-instance">
  <annotated-class>
    <annotated-class-name>service.HelloService</annotated-class-name>
    <component-type>Web Service (JWS)</component-type>
    <field>
      <field-name>_jcxBean</field-name>
      <instance-type>controls.MyJcxBean</instance-type>
      <annotation>
        <annotation-class-name>controls.MyAnnotation</annotation-class-name>
        <member>
          <member-name>value</member-name>
          <member-value>Overriden@Field</member-value>
          <cleartext-override-value>I hereby override this value to -338576924</cleartext-override-value>
        </member>
      </annotation>
    </field>
  </annotated-class>
</annotation-overrides>
Note the bolded code, which corresponds to the bolded code in the corresponding annotation manifest file, above.
The new plan directory contains the newly generated deployment plan, plan.xml, which contains this segment of code:
<module-override>
    <module-name>service/HelloService.war</module-name>
    <module-type>war</module-type>
    <module-descriptor external="false">
      <root-element>weblogic-web-app</root-element>
      <uri>WEB-INF/weblogic.xml</uri>
    </module-descriptor>
    <module-descriptor external="false">
      <root-element>web-app</root-element>
      <uri>WEB-INF/web.xml</uri>
    </module-descriptor>
    <module-descriptor external="false">
      <root-element>weblogic-webservices</root-element>
      <uri>WEB-INF/weblogic-webservices.xml</uri>
    </module-descriptor>
    <module-descriptor external="false">
      <root-element>webservices</root-element>
      <uri>WEB-INF/webservices.xml</uri>
    </module-descriptor>
    <module-descriptor external="false">
      <root-element>webservice-policy-ref</root-element>
      <uri>WEB-INF/weblogic-webservices-policy.xml</uri>
    </module-descriptor>
    <module-descriptor external="true">
      <root-element>annotation-overrides</root-element>
      <uri>META-INF/annotation-overrides.xml</uri>
      <hash-code>1133371728402</hash-code>
    </module-descriptor>
    <module-descriptor external="false">
      <root-element>annotation-manifest</root-element>
      <uri>META-INF/annotation-manifest.xml</uri>
    </module-descriptor>
  </module-override>
Override the Property Values — Annotation Override
Overriding property values set by means of annotation can happen at application deployment time or while the application is running. In both cases, you change the property value set in the appropriate annotation-overrides.xml file.We recommend that you not edit those files directly. Rather, you should change the values by running a Python script.
Two Python script files are required, OverrideUtils.py and driver.py. Both scripts can be found in Python Scripts for Annotation Overrides,.
In the driver.py script, you will find this section of code:
# Update a field's override value
moduleName='service/HelloService.war'
key=moduleName+'/service.HelloService/_jcxBean/value'
value='I hereby override this value to %d' % (r.nextInt())
util.applyOverride(moduleName, key, value)
(Note that this script assumes that the Hello service was packed as a WAR file.)
This is where you set the new property value. After you have edited the script to change the value, run this script and it will update the property value in the annotation-overrides.xml file. In our code examples, the script will reset the value of the property originally set in the code with the @MyAnnotation tag to the string "Application scope set at n!!" where n is a randomly generated integer.
To run this script, issue the following command-line command in the plan directory:
java weblogic.WLST driver.py
Deployment Time
When the application is deployed, the properties will have the values you last set by using the driver.py script, as opposed to the values originally set via annotation in the code.
Run Time
You can also change an application's property values dynamically while it is running.
First use the driver.py script, as described above, to change the values in the annotation-overrides.xml file.
Then use the weblogic.Deployer tool to cause the WebLogic Server to perform a hot update, causing the application to pick up the new overriden values while it is running. (For documentation about the use of this tool, please see the BEA document weblogic.Deployer Command Line Reference.)
Issue the following command-line command:
java weblogic.Deployer -adminurl t3://localhost:7001 -user username -password password -name MyApp -update
That will trigger a dynamic update to the application and the application will pick up the annotation overrides.


