 Understanding Projects
This chapter provides overviews of projects, project creation options, and project managers, lists a prerequisite, and discusses how to:
Create project templates.
Create new projects by using templates.
Create projects from copies.
Create and define projects.
Initiate projects by using project initiation checklists.
Maintain project status.
Track your projects.
Modify existing projects by using templates.
Delete project data.
Understanding Projects
After you set up your Project Costing system, you can create projects and add activities to them. You can do this manually through Project Costing or by using batch processes and integration with other applications.
At the highest level, projects are managed within a project business unit. Within each project, costs are organized and analyzed by activity. Activities are the specific tasks that make up a project. During the course of an activity, transactions are created for such things as labor and materials. Transactions are attached only at the activity level. Project Costing organizes and groups these transactions to monitor and report on the conditions of a project. This diagram illustrates the hierarchy:
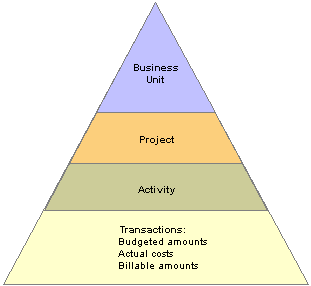
Hierarchical relationship of a project and its activities and transactions
All project transactions are stored in the Project Transaction table (PROJ_RESOURCE). Project transactions provide the basis for project reporting, analysis, billing, and asset capitalization.
Understanding Project Creation Options
Project Costing provides you with project creation tools that eliminate the need to recreate key information for each new project. To create a new project you can perform any of these actions:
Add a new, blank project and enter the required information.
Use a predefined project template or copy any existing project as a starting point for a new project.
Receive projects from feeder systems such as PeopleSoft Program Management or PeopleSoft Proposal Management.
Create a project from a Microsoft Project file.
 Project Templates
You can create and modify an unlimited number of reusable project templates to populate new projects with preset standard information such as project and activity-level information, teams, budget plans, and attachments. You can also modify existing active or pending projects using data from templates.
To create a template, either save a new or existing project as a template, or create a new template by starting with a blank project. For easy access to your templates, you can attach a link to the templates on the My Projects page. Alternatively, you can search for project templates—just as you search for transactional projects—using many of the component search pages in the Project Definitions, Activity Definitions, and Budgeting menu navigation folders. To search for templates, enter a processing status of Template as a search criteria to view the list of available project templates.
The Copy Template Option 1 and Copy Template Option 2 pages in the Project Costing Options component (PC_BUS_UNIT_OPT) identify the tables that the system uses to copy data into projects and activities that you create or modify by using project templates.
Process Flow - Creating a Template from a Blank Project
This diagram illustrates the process of creating a new template from a blank project:

Creating a new template from a blank project
Process Flow - Creating a Template from an Existing Project
This diagram illustrates the process of creating a new template from an existing project:
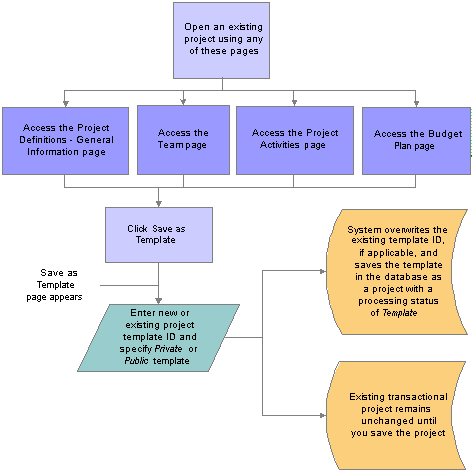
Creating a new template from an existing project
Modify Existing Projects with Templates
If you use project templates to modify existing projects, the system determines which template data to append or overwrite to the existing project data, or ignore, based on the criteria that you select and:
The project processing status.
If duplicate data exists on the project.
The business unit options in the Copy Template Option 1 and Copy Template Option 2 pages that identify the tables that the system uses to copy data into projects and activities.
Note. You can use project templates to modify existing transactional projects; however, you cannot use project templates to modify other existing templates.
This table lists the pages that you can use to import template data into an existing project based on the project processing status:
|
Pages Used to Import Template Data |
Project Processing Status |
|
All pages in the Project General component (PROJECT_GENERAL) |
Pending |
|
Project Activities |
Pending |
|
Team (if you use PeopleSoft Project Costing without PeopleSoft Program Management) |
Pending Active |
|
Resources (if you use PeopleSoft Program Management) |
Pending Active |
This diagram illustrates the process of importing data from a project template into an existing project:

Importing data from a template into an existing project
Security and Structure
Templates can be public or private. Templates are designated as public or private at the project level, and the designation applies to all information on the template. Users who have security permission to create and modify projects for a business unit and project type can create and modify public templates. Users can create their own user-specific, private templates to use in projects, and view or modify as needed.
The system treats project templates as projects with a processing status of Template. Templates use the same project tables, pages, and menu structure as transactional projects. However, you cannot post transactions against templates, they do not appear in transactional project reports and in some component search pages, and they are available only in PeopleSoft Project Costing and PeopleSoft Program Management.
You can delete templates by using the Project Delete utility.
Project CopiesAny project and activity to which you have access is available to be copied to new or existing projects and activities. You can copy project and activity-level information, project and activity team, and transactions to a new project.
You must open a project to copy information from that project. The Copy Template Option 1 and Copy Template Option 2 pages in the Project Costing Options component for the business unit identify the tables that the system uses to copy data into projects and activities that you create or modify by using a copy of an existing project.
You can access the Project Copy feature by using any of these methods:
Create a new project by selecting the Project from Copy option on the Project Definitions - General Information - Add a New Value page.
Modify an existing project or create a new project by clicking Copy Project on any Project General component page of the project that you want to copy.
Create a new project by navigating to the Copy Project page from the Project Costing, Utilities menu navigation folder.
Understanding Project ManagersYou can select project managers for projects, project templates, and programs. If you use PeopleSoft Expenses, you can control project costs by requiring the project manager to approve time and expense reports in Expenses. If you use PeopleSoft Program Management and PeopleSoft Resource Management, you can enable workflow to send resource assignments to the project manager for approval if another user adds resources to the project by using Resource Management. Additionally, you can enable workflow to send assignment schedule changes to the project manager for approval.
If you use PeopleSoft Program Management:
The system automatically assigns the project manager as the issue owner when issues are created for the project.
The system assigns the project manager as the issue owner if an issue is created for a project activity, and no activity owner exists.
The system automatically lists the project manager as an interested party on issues created for the project.
The project manager can modify a project without submitting a change request if you use change requests on the project.
You select project managers for projects and templates on the Project Definitions - Team Detail page if you use PeopleSoft Project Costing without PeopleSoft Program Management. You can designate any project team member as the project manager, regardless of the team member’s project role. A project can have different project managers for different time periods, but the time periods cannot overlap. You can view current, previous, and future project managers in the Project Definitions - Manager page.
Some of the rules for defining project managers also apply to program managers. For example, you can assign different program managers for different time periods, but the time periods cannot overlap. Additionally, you can assign the program manager on the Project Definitions - Team Detail page.
However, there are some differences in the way that the system treats program managers and project managers, such as:
You can enter and modify program managers on the Project Definitions - Manager page, as well as on the Resource Detail page.
You can select any employee as a program manager.
Employee data is loaded into the Financial Management Solutions (FMS) database from the Human Capital Management (HCM) database by using an application messaging process that uses the PERSON_BASIC_SYNC and PERSON_BASIC_FULLSYNC enterprise integration points (EIPs).
You can assign a manager to a program, and then change the program to a detail project.
The system automatically adds the project manager to the project team. If there are multiple effective dated project managers for the program when you change the program to a detail project, the system adds all of the project managers to the project team and selects the Project Manager check box for the current project manager on the Resources page.
You cannot change a project to a program after you assign a manager to the project.
PrerequisiteYou must define an FTP server if you want to attach files to projects and activities.
See PeopleSoft Enterprise Financials, ESA and Supply Chain Management 9.0 Product-Specific Installation Instructions located on Oracle's PeopleSoft Customer Connection website.
Creating Project TemplatesThis section discusses how to:
Create project templates from existing projects.
Create project templates from blank projects.
Pages Used to Create Project Templates
|
Page Name |
Object Name |
Navigation |
Usage |
|
PC_SAVEAS_TMPL |
|
Save an existing transactional project as a project template. |
|
|
PROJECT_GEN_01A |
Project Costing, Project Definitions, General Information, Add a New Value Select Project Template as the create option in the General Information - Add a New Value page, and click Add. |
Create a new template from a blank project. |
Creating Project Templates from Existing Projects
Access the Save as Template page.
The template inherits the project business unit.
|
Project Template |
Enter NEXT for the system to assign the next sequential project ID, or enter a unique project template ID, or select an existing template to replace. If you select an existing template, the system overwrites all data on the existing template with the new project information when you save the page. |
|
Private and Public |
Select Private to create a template that only you can use and modify. This is the default value. Select Public to create or search for a template that all users who have security permission to create projects can use and modify. |
When you save the page, the system copies project-level information, project team, budget plan, activities, activity assignments, work breakdown structure (WBS), and deliverables (if you use PeopleSoft Program Management) from the original project to a template project, and opens the Project Definitions - General Information page for the template.
The system copies budget items and any distributed amounts to the new project, but does not copy budget adjustments.
In the Project Definition - General Information page for new templates, initially the Project Status field is editable. After you select a project status for the template and save the Project Definitions - General Information page for the first time, the Project Status field is no longer editable. The Processing Status field value is Template and does not change.
For each labor resource on the original project:
Only one assignment schedule row appears on the template for a labor resource, even if the assignment schedule contains multiple date ranges.
The assignment schedule row start date on the template is based on the project start date, and the end date is based on the project end date.
The project role is based on the project role listed in the first row in the Availability dates grid on the Project Definitions - Team Detail page for a resource, if you use PeopleSoft Project Costing without PeopleSoft Program Management.
The project role is based on the Primary Project Role field on the Resources page, if you use PeopleSoft Program Management.
There is no assignment ID for project templates.
The system does not create assignments in PeopleSoft Resource Management for resources on project templates.
Go to the Project Costing Options - Copy Template Option pages to view the list of tables that are eligible for the system to copy to a template project.
See Defining Parameters for Copying Projects and Creating Projects from Templates.
Note. When you click Save as Template on the original transactional project, the system does not save any modifications that you made to the transactional project. You must click Save on the transactional project to save any modifications that you made since the previous save.
Creating Project Templates from Blank Projects
Access the Project Definitions - General Information page. When you add a new project, select Project Template as the create option.
The system assigns a processing status of Template.
Designate the template as Public or Private. The default value is Private. Enter the required project level information as you would when you create a new transactional project. Optionally create a project team, activities, activity team, and budget plan.
Creating New Projects by Using TemplatesThis section discusses how to create projects from templates.
Page Used to Create New Projects by Using Templates
|
Page Name |
Object Name |
Navigation |
Usage |
|
PC_CRTPRJ_TMPL |
Project Costing, Project Definitions, General Information Select Project from Template as the create option in the General Information - Add a New Value page, and click Add. |
Select a project template to use as a starting point for a new project. |
Creating Projects from Templates
Access the Create Project From Template page.
To access this page, select Project from Template as the create option in the General Information - Add a New Value page. Use this page to specify the template, start date, and details to copy to a new project.
|
Project Template |
Select the template that contains the information that you want to copy into a new project. The list of available templates is based on the business unit's public templates and your user-specific private templates. |
|
New Start Date |
Enter the new project start date that the system uses to calculate other project and activity related dates. The system calculates the new project and activity start and end dates by using the new project start date, the date ranges in the template, and the relationship of the dates to the template project start date, to calculate:
If you use PeopleSoft Program Management, the system calculates the correct activity start and end dates for the new project based on activity dependencies. The system also uses the new project start date to calculate activity deliverable due dates and deadlines. |
|
Activities |
Select to copy all activities from the template to the new project. This option is selected by default. Activity information includes the WBS and activity attachments. If you use PeopleSoft Program Management, the imported information also includes dependencies and deliverables. If you create project activities from a template, the system does not copy any activity constraints to the target activities. |
|
Project Resource |
Select to copy all active project resources from the template to the new project. This option is selected by default. The system does not copy inactive resources. If the template contains inactive resources, a message appears when you click Create stating that one or more of the resources from the template are no longer active and are not copied to the open project. |
|
Activity Resource |
Select to copy activity resources from the template to the new project. This option is available if you select the Activities and Project Resource options. The Activity Resource option is selected by default. |
|
Budget Plan |
Select to copy the active budget plan from the template to the new project. This option is available if you select the Activities option. The Budget Plan option is selected by default. The system copies budget items and any distributed amounts to the new project, but does not copy budget adjustments. The system does not copy budget plans that use calendars that are not valid for the new project dates. If the template budget plan uses a calendar that is not valid, a message appears stating that the budget calendar used in the budget plan is not valid for this project’s dates. To copy the template budget plan to the new project, you must update the template budget calendar to include the new project dates. |
The new project status is based on the project status of the project template, and the effective date is based on the project start date. If the project start date is in the future, the project status effective date is the current date.
Creating Projects from CopiesThis section discusses how to create or modify projects from existing projects.
Pages Used to Create Projects from Copies
|
Page Name |
Object Name |
Navigation |
Usage |
|
PC_CPY_DETL_PNL1 |
|
Create a new project or update an existing project by copying information from an existing project. |
|
|
PC_CPY_DETL_PNL |
Project Costing, Utilities, Copy Project, Copy Project |
Create new projects by copying information from existing projects. |
Creating or Modifying Projects from Existing Projects
|
Copy Options |
Select a copy option. Available values are based on the options that are selected on the Copy Template Option 1 page for the business unit. For example, if Allow Project Copy is selected and Allow Activity Copy is cleared on the Copy Template Option 1 page, the only copy option that is available on the Copy Project page is Copy Project Only. If Allow Project Copy and Allow Activity Copy are both selected, you can select from these options: ACTV: Copy activity only. This is the only valid option if the target project is an existing project. BOTH: Copy the project and all activities. PROJ: Copy project only. |
|
Project to Copy |
Select the source project from which to create the new project. You can select from any transactional project to which you have access in the project business unit. |
|
Update Tree |
This group box appears for you to enter the tree name, tree effective date, and parent node for the target project, if the Update Project Tree option is selected on the Copy Template Option 1 page for the business unit. |
|
Target Project |
Enter the name of the new project. Enter NEXT for the system to assign the next sequential project ID. If you access the Copy Project page from the Project General component, you can enter an existing project as a target project only if you enter ACTV in the Copy Options field. |
|
Copy Analysis Group |
Specify the analysis group that the system uses for mapping transactions from the existing project activity to the new project activity. You can enter an analysis group if you allow transactions to be copied to the target project. You cannot enter an analysis group if either of these conditions exist:
The system copies only the rows with an analysis type that is in the selected analysis group. Project Costing delivers the COPY analysis group as system data, but you have the option of using any analysis group. If you use the delivered COPY analysis group, the system selects rows with analysis types of ACT (Actual Cost), CAC (Cost Sharing Actuals), and PAY (Time and Labor Actual), and maps them to rows with a BUD (Total Cost Budget) analysis type. This means that actual cost rows are selected from the existing project and created as cost budget rows in the new project. Note. If you perform a project copy by using the COPY analysis group and create rows with a BUD analysis type, the BUD rows are inserted directly into Project Costing; however, a budget is not created in Projects Budgeting. |
|
Reuse Activity |
Select to create new activities using the same IDs as the existing project's activities. |
|
Select All Activities |
Select to copy all activities from the existing project to the new project. The system selects the Allow Copying check box for all activities in the Activities grid. |
|
Allow Transactions Copy |
Displays the setting for the Allow Transactions Copy option on the Copy Template Option 1 page. You can change the value only on the Copy Template Option 1 page. |
|
Copy |
Click to copy the existing project values to the new project. |
Activities
|
Activity |
Displays the activities in the existing project that are available to be copied to the new project. |
|
Allow Copying |
Select to copy the corresponding activity to the new project. |
|
Activity |
Enter an ID for each activity that will be copied to the new project. If you select the Reuse Activity option, this column displays the existing activity IDs that will be used as the activity IDs in the new project. Note. The system copies the WBS structure to the new project only if you copy all activities. If you copy only some of the activities to the target project, the system copies the selected activities as WBS level 1 on the target project. See Understanding Work Breakdown Structures. If you use PeopleSoft Program Management and you create a project from a copy of an existing project, the system copies the project dependencies to the new project. Additionally, if you create a project activity from a copy of an existing project activity, the system copies the activity constraint to the new activity. |
Creating and Defining ProjectsGeneral project maintenance tasks include creating, defining, and updating a project, as well as tracking a variety of project-related information. This section discusses how to:
Enter project general information.
Enter additional project schedule dates
Define projects.
Define program management.
View project managers.
Define project locations.
Define project phases.
Define project approval status.
Justify projects.
Assign and tracking rates.
Attach files to projects.
Pages Used to Create and Define Projects
|
Page Name |
Object Name |
Navigation |
Usage |
|
PROJECT_GEN_01A |
Project Costing, Project Definitions, General Information, General Information |
Create or update a project. This page operates in deferred processing mode. |
|
|
PC_ADD_DATES_SEC |
Click Additional Dates on the Project Definitions - General Information page. |
Optionally enter project baseline start and finish dates, early start and finish dates, actual start and finish dates, and late start and finish dates. |
|
|
PROJECT_GEN_01 |
Project Costing, Project Definitions, General Information, Project Costing Definition |
Define various project options, project currency, and analysis groups. |
|
|
PC_PROJ_TREE_SEC |
Click Project Tree on the Project Definitions - General Information page. |
Add a project to a project tree. |
|
|
PROJECT_MGR |
Project Costing, Project Definitions, General Information, Manager |
View and track project managers. Enter program managers if you use PeopleSoft Program Management. |
|
|
PROJECT_LOCATION |
Project Costing, Project Definitions, General Information, Location |
Assign the physical location of the project. |
|
|
PROJECT_SCHED |
Project Costing, Project Definitions, General Information, Phases |
Track time spent on stages of a project. |
|
|
PROJECT_APPROVAL |
Project Costing, Project Definitions, General Information, Approval |
Specify which project events require approval, who is authorized to approve the events, and in what order the events must be approved. Approve a project event or check on approval status. |
|
|
PROJ_JUSTIFY |
Project Costing, Project Definitions, General Information, Justification |
If your company employs an approval cycle for projects, enter a reason for justifying a project-related action. |
|
|
PC_PROJ_USER |
Project Costing, Project Definitions, General Information, User Fields |
Include additional, user-defined project information. |
|
|
PROJECT_SEC_OPRCLS |
Project Costing, Project Definitions, General Information, Security by Permission List |
View and add permission lists to which the project was attached. This page is available in the Project General component only if security is defined using permission list, list-based security. |
|
|
PROJECT_SERVICES |
Project Costing, Project Definitions, General Information, Rates |
Track billing, costing, and burdening project rates and view contracts integration information that is associated with a project. |
|
|
PROJECT_DOC_01 |
Project Costing, Project Definitions, General Information, Attachments |
Attach, view, and delete project-related files. |
|
|
PC_AM_RULE_PRJ |
Project Costing, Project Definitions, General Information, Asset Integration Rules |
Define integration with PeopleSoft Asset Management at the project level. See Defining Asset Integration Rules for Express Capitalization, Defining Asset Integration Rules for Manual Capitalization. |
|
|
PC_BUD_PROJ_ALERTS |
Project Costing, Project Definitions, General Information, Budget Alerts |
Define budget alert thresholds at the project level for cost budgeting to alert the project manager of potential cost overruns at the project level. |
Entering Project General Information
Access the Project Definition - General Information page.
|
Create |
Select an option on the General Information - Add a New Value page to create a new project. Available options are: Blank Project: Creates a new transactional project and opens the Project Definitions - General Information page. Project Template: Creates a new project template and opens the Project Definitions - General Information page. Project from Copy: Opens the Copy Project page so you can identify the source project, target project, and copy options. Project from Microsoft Project: Opens the Create Project from Microsoft page so you can identify key project fields and integration options to create a new project from an existing Microsoft Project 2002 project. Project from Template: Opens the Create Project From Template page so you can identify the project template, new start date, and project details to include in the new project. |
|
Project |
Leave the default value of NEXT for the system to assign the next sequential project ID, or override the default value with a unique project ID. |
|
Add to My Projects |
Click to add this project to the list of projects that appear on your My Projects page. |
|
Program |
Select to designate this project as a program or summary project. When this option is selected, the system prevents you from adding activities to the program, because only projects can have activities. If you try to select this option for a project that already has activities, a message appears indicating that the project cannot be changed to a program because it has activities associated with it, and you must either remove the activities from the existing project or create a new program. After you convert a project to a program by selecting this option and saving your changes, the project ID of this program is available in various program and parent project ID prompt list fields that appear on pages throughout the PeopleSoft Program Management system. |
|
Processing Status |
Displays the processing status that is associated with the project status. The system uses the processing status to restrict incoming transactions. You map project status types to processing statuses during implementation on the Project Status Defaults page. Processing statuses are: Active: Projects can be selected from prompt lists in PeopleSoft feeder systems, allowing transactions from the feeder systems to be attributed to the project. This is the default processing status for new projects if you use PeopleSoft Project Costing without PeopleSoft Program Management. Inactive: Projects do not appear in prompt lists in PeopleSoft feeder systems. Pending: Projects are not active yet, but you can begin some planning, such as creating a budget and project team. You cannot charge cost transactions to pending projects. This is the default value for new projects if you use PeopleSoft Program Management. |
|
Integration |
Enter the integration template that is used to integrate this project with other financial applications. Available values are from the Integration Template table (PC_INT_TMPL). The default value is based on the integration template that is defined on the User Preferences page. |
|
Project Status |
Enter the project's status when you are in add mode. After you save the project for the first time, the Project Status field becomes read only on this page and appears as a link to the Project Definitions - Status page so you can update the status. If you use PeopleSoft Project Costing without PeopleSoft Program Management, the default value of this field is based on the Default Project Status field value on the Project Status Defaults page that maps to the Active Processing Status. If you use PeopleSoft Program Management, the default value of this field is based on the Default Project Status field value that maps to the Pending Processing Status. The system updates the Processing Status field value based on the value that you enter in this field. You set up project status type values and project status default values during implementation. See Defining Status Types, Defining Project Status Default Values. |
|
Project Type |
Select a project type. Use project types to:
You set up project types during implementation on the Project Types page. |
|
Percent Complete |
Displays the percentage of the project completed based on calculation method that you define on the Project Costing Definition page. If you select Manual in the Calculation Method field on the Project Costing Definition page, you can enter a value in the Percent Complete field on this page. If you select a calculation method of Budget Amount, Budget Hours, Duration, Forecast Amount, or Forecast Hours, the system automatically calculates and displays the percent complete value. The Duration calculation method is available only if you use PeopleSoft Program Management. See Defining PeopleSoft Project Costing Options for Business Units. |
|
As Of (percent complete) |
Displays the date that you enter the percent complete data. The date and time appear when you enter a percent complete value save the page. |
|
Project Health |
Enter a value that represents the project's health. If you use PeopleSoft Project Costing without PeopleSoft Program Management, select Fair, Good, or Poor from the drop-down list box. A visual indicator that represents the project's overall health appears on the My Projects page. If you use PeopleSoft Program Management, fields appear that indicate health for Project Overall, Schedule, Budget, Resources, Issues, Risks, and User-Defined. Values for these fields are based on the default methods of calculating project health that are specified on the Program Management Options - Health Options page for the business unit. |
|
As Of Date(project health) |
Displays the date that you enter the project health data. |
|
Work Order Managed |
Select to designate the project as a work order managed project, which indicates that the project is managed with work orders in PeopleSoft Maintenance Management, instead of by a project manager in Project Costing. You can select or clear this option until you save the page for the first time, after which the field is not editable. This field appears only if you use PeopleSoft Maintenance Management. The default value is cleared. See Creating Work Orders and Work Order-Managed Projects in PeopleSoft Project Costing. |
Project Schedule
|
Start Date |
Select the project start date. The start date cannot be after any of the project's activity start dates. |
|
End Date |
Select the date that the project ends. The end date cannot be before any of the project's activity end dates. |
|
Additional Dates |
Click to access the Additional Dates page, where you can enter project baseline start and finish dates, early start and finish dates, actual start and finish dates, and late start and finish dates. |
|
Calculate |
Select Start Date, End Date, or Duration (days) to specify which one of these three fields is calculated by the system based on the values that you enter for the other two fields. For example, select End Date for the system to calculate the end date based on the values that you enter for start date and duration. The default value is based on the project calculation method that is specified on the Program Management Options page for the business unit. The Calculate field is available only if you use PeopleSoft Program Management. |
|
Duration in Days |
Enter the number of business days between the start date and end date of the project or program. This field is available only if you use PeopleSoft Program Management. |
Classification
The fields in this group box appear only if you use PeopleSoft Program Management.
See Setting Up General Control Data.
|
Release |
Select a release to further classify the project. Available values are based on active releases in the Release table (PGM_RELEASE_ALL). You can specify a release for projects in any processing status. This field appears only for projects, not programs. You cannot specify releases for programs. The release description appears when you enter the release. |
|
Release Date |
Displays the current target release date when you enter the release. This field appears only for projects, not for programs. |
|
Category |
Select a category to further classify the project. Available values are based on the categories in the Active Categories table (PGM_CATEGORY_AC) that are valid for the business unit based on the setID mapping. |
|
Application Area |
Select an application area to further classify the project. Available values are based on the application areas in the Active Application Areas table (PGM_APPLAREA_AC) that are valid for the business unit based on the setID mapping. |
|
Application |
Select an application. Available values are based on the application area. |
Additional Pages
Additional buttons and links appear on the page for existing projects or when you save new projects.
|
Save as Template |
Click to access the Save as Template page to save an existing transactional project as a project template. The Save as Template button appears on this page for pending and active projects. This field appears only for projects and not for programs. |
|
Import from Template |
Click to access the Import From Template page and import data into an existing transactional project from a project template. The Import from Template button appears on this page for pending projects. This field appears only for projects and not for programs. |
|
Copy Project |
Click to access the Copy Project page and modify an existing project or create a new project with information from this project. The Copy Project button appears on this page for pending and active projects. This field appears only for projects and not for programs. |
|
My Projects |
Click to access the My Projects page to view a list of your projects and templates. |
|
Project Valuation |
Click to access the Project Valuation page. |
|
Project Team |
Click to access the Project Definitions - Team page to view and modify membership to the project team. This link appears if you use PeopleSoft Project Costing without PeopleSoft Program Management. |
|
Resources |
Click to access the Resources page to view and modify the list of project team resources. This link appears if you use PeopleSoft Program Management. |
|
Project Activities |
Click to access the Project Activities page to view and modify the project's activities. |
|
More |
Select an option to access project-related pages: Integrate with MSProject: Access the Integrate with Microsoft Project page to create or update a project in Microsoft Project 2002 with data in a PeopleSoft Project Costing or PeopleSoft Program Management project. See Creating and Updating Microsoft Projects from PeopleSoft Data. Manager Workbench: Access the Manager Workbench to view a summary of the project's health scorecard, milestones, issues, risks, change requests, and project deliverables. This option appears only if you use PeopleSoft Program Management. See Reviewing Programs and Projects. PC Chartfield Default for WO: Access the Work Order Project Chart field Mapping page (WM_PC_DFLT_CFS) for a business unit, work type, and service group combination to specify default project ChartField values for work order tasks. This option appears only if you use PeopleSoft Maintenance Management. See Setting Up Rules and Data Related to PeopleSoft Project Costing. Project Budgeting: Access the Budget Plan page, if a budget plan exists for this project, to view budget plans associated with the current project. See Creating and Defining Budget Plans. Project Defaults for WO: Access the Work Order - Projects Association page to specify default work order values on projects. This option appears only if you use PeopleSoft Maintenance Management. See Setting Up Rules and Data Related to PeopleSoft Project Costing. Project Initiation Checklist: Access the Project Initiation Checklist page to view a list of steps that are required to set up, initiate, and track a project. The page also provides links to the components where each step of a project is implemented. See Initiating Projects by Using Project Initiation Checklists. Project Request: Access the Project Request page if the project is associated with a project request. This option appears only if you use PeopleSoft Program Management. Project Status: Access the Project Definitions - Status page to view or define project status. See Maintaining Project Status. Status Report Frequency: Access the Status Report Frequency page to define or view how often status reports are required for the project. This option appears only if you use PeopleSoft Program Management. Status Report Reminder: Access the Status Report Reminder run control page to send email notifications to project team members as a reminder of status report due dates. This option appears only if you use PeopleSoft Program Management. |
Entering Additional Project Schedule Dates
Access the Additional Dates page.
You can use the additional dates fields as needed for information and reporting. They do not serve a functional purpose in Project Costing.
|
Baseline Start Date and Baseline Finish Date |
Enter the projected start and finish dates for the project. |
|
Early Date Start and Early Finish Date |
Enter the earliest possible project start and completion dates. |
|
Actual Start Date and Actual Finish Date |
Enter the actual project start and completion dates. The system can automatically populate these fields when you integrate with the Microsoft Project 2002 scheduling application. |
|
Late Start and Late Finish Date |
Select the latest possible project start and completion dates. |
Defining Projects
Access the Project Costing Definition page.
System Fields
|
Enter a setID in cases where multiple project business units relate to the same general ledger business unit. Because a general ledger business unit can relate to only one setID or project business unit combination, the FS_08 SetID enables you to associate the setID that the general ledger business unit is using in the FS_08 record group. If you use an integration template that relates the general ledger business unit to a different setID, the FS_08 SetID field changes to the correct setID value that is used in the FS_08 record group. |
|
|
System Source |
Enter the origin of a project, such as a third-party application or an online entry page in another PeopleSoft application. The default value is PPC (Project Costing online entry page). Available values are based on the translate values in the System Source field (SYSTEM_SOURCE) properties. |
Projects Utilities
|
Project Tree |
Click to access the Assign To Project Tree page, where you can add the project to a project tree. |
Designate who can charge time and expenses to a project or activity by selecting an option in the Enforce Team group box. These options are available for selection at the project level if you selected the Decide at the Project Level option on the Project Costing Options page for the business unit.
|
Do Not Enforce |
Select to indicate no project team restriction. This project is available for employees to charge time and expenses regardless of their membership to the project team. The Products drop-down list box does not appear when you select this option. |
|
Project Team Only |
Select to indicate that only members of the project team can charge time and expenses to the project. The Products drop-down list box appears for you to define the charge restrictions for project team members. |
|
Project and Activity Team |
Select to indicate that only members of the project and activity teams can charge time and expenses to the project. The Products drop-down list box appears for you to define the charge restrictions for project and activity team members. |
|
Products |
Select the kind of charges to allow for a project or activity. This field is available if you select an enforce team option of Project Team Only or Project and Activity Team. Available product options are: Exp and TL (Expenses and Time and Labor): Allows members of the project or activity team to charge to the project from both PeopleSoft Expenses and PeopleSoft Time and Labor. Expenses: Allows members of the project or activity team to charge to the project from PeopleSoft Expenses. Time&Labor: Allows members of the project or activity team to charge to the project from PeopleSoft Time and Labor. |
|
Project Resource Pools Only |
Select to enable only resources that belong to the project’s resource pools to charge time and expense against the project in the PeopleSoft Expenses system. If you select this option, the Expenses value appears in the Products field and is not editable. This option appears if both PeopleSoft Program Management and PeopleSoft Resource Management are installed. |
|
Project Activity Resource Pool |
Select to enable only resources that belong to an activity’s resource pools to charge time and expense against the activity in the PeopleSoft Expenses system. If you select this option, the Expenses value appears in the Products field and is not editable. You cannot select this option if the Activity Costing Level option is selected as the project charging level on the Program Management Options page. This option appears if both PeopleSoft Program Management and PeopleSoft Resource Management are installed. See Defining Business Unit Options, Selecting Activity Resource Pools. |
Note. The PeopleSoft Time and Labor 9.0 application does not enforce project activity team. If you select the Project and Activity Team option, and select the Exp and TL or Time&Labor product option, the system restricts PeopleSoft Time and Labor users for projects to which they can charge time. However, PeopleSoft Time and Labor users can charge time to any activity on a particular project if they have security access to the project.
|
Calculation Method |
Select a method to calculate the percent complete component. The default value is based on the business unit. Available methods are: Budget Amount Budget Hours Duration: This option appears only if you use PeopleSoft Program Management. Forecast Amount Forecast Hours Manual Calculation methods are discussed in more detail in the "Setting Up Project Business Units" chapter. See Defining PeopleSoft Project Costing Options for Business Units. |
|
Summary Method |
Select a method that the system uses to roll up activity completion percentages to the project. The default value is based on the business unit. Available methods are: None: This option is available if you select the Manual calculation method. Straight-Line: This option is available for all calculation methods. Weighted: This option is available if you select a calculation method of Budget Amount, Budget Hours, Duration, Forecast Amount, or Forecast Hours. Summary methods are discussed in more detail in the "Setting Up Project Business Units" chapter. See Defining PeopleSoft Project Costing Options for Business Units. |
|
Retain History |
Select the frequency in which the system retains the percent complete data. The default value is based on the business unit. Available options are: Daily Monthly Quarterly Weekly Note. If the percent complete calculation method is Manual, the system retains the percent complete value that you enter on the Project Definitions - General Information, Activity Definitions - General Information, and Project Activities pages in the history tables based on the selected retain history option. See Defining PeopleSoft Project Costing Options for Business Units. |
Project Currency
The system uses the currency code and rate type that you define in this group box when you review transactions online through the Transaction List page. The value in the Project Amount field on the Transaction Detail page is not stored in Project Costing tables. It is calculated each time that you access the page.
|
Currency Code |
Indicate the type of currency used to track costs. The default value is based on the business unit. |
|
Rate Type |
Select the default exchange rate type for the project. The default value is based on the business unit. |
|
Effective Date Default |
Select the default date on which the currency code becomes effective. This field is used in conjunction with the rate type and currency code. Available options are: Acct Date: Accounting date. Cur Date: Current date. Trans Date: Transaction date. Note. When source transactions are entered into Project Costing in a currency that is different currency from the project currency code, the converted value is not stored in any Project Costing table. However, you can view the project currency amount for an individual transaction on the Transaction List page. The system uses the effective date default to determine which date to use when converting the source transaction amount to the project currency code when you view the transaction online. |
Analysis Group Options
Default values for these analysis group options are based on the Installation Options - Project Costing page. You can override the default values for the project.
|
Cost Budget |
Select an analysis group for designating cost budget transactions for this project. |
|
Revenue Budget |
Select an analysis group for designating revenue budget transactions for this project. |
|
Actual Cost |
Select an analysis group for designating actual cost transactions for this project. |
|
Actual Revenue |
Select an analysis group for designating actual revenue transactions for this project. |
|
Forecast |
Select an analysis group for designating the estimate at completion costs for this project |
See Defining Project Costing Installation Options.
Options
|
Standard Activities |
Select to restrict this project's activities to a predefined list based on setID and project type. The default value is cleared. |
|
Allow Interest Calculation |
Select to include costs that are incurred by all activities belonging to the project in interest calculations. Only projects and activities with a processing status of Active are eligible for interest calculation. The default value is cleared. If you select the Allow Interest Calculation option at the project level, the system automatically selects the Allow Interest Calculation option as the default value for new all activities that are added to the project. You can override the project default value for individual activities. |
|
Add me to Project Security |
This is a setup option that appears if you use project security, and you are creating a new project from a blank project. The field remains visible until you save the Project Costing Definition page and refresh the component. The behavior of the Add me to Project Security option is based on the type of security that is enabled on the Security Options page. For example, if you use team-based security, use this option to automatically add yourself—the employee who is associated with the user ID that is logged into the system—to the project team with security access that is determined by your project role. Alternatively, if you use user, tree-based security, use this option to automatically add the new project to a project tree and grant you access to the project based on your project role. This list discusses the behavior of the Add me to Project Security option based on the project security options that you can select on the Security Options page:
|
|
Project Role |
This field appears in conjunction with the Add me to Project Security field. Select your project role—the project role of the user ID who is creating the project. The project role contains a security profile that determines your access to projects and activities, such as no access, read only, or read/write access. The project role can also specify the transactions to which you have access. |
|
Auto Review for Billing |
Select to automatically designate transactions for this project as reviewed, indicating that the transactions do not require review by the project manager before sending them to PeopleSoft Billing. This option is available if the Review Required for Billing option is selected on the Installation Options - Project Costing Integration page. |
See Also
Defining Project Costing Installation Options
Defining Program Management
Access the Program Management page for options for scheduling, forecasting, project charging levels, change control, and project health if you use PeopleSoft Program Management.
See Establishing and Maintaining Programs and Projects.
Viewing Project Managers
Access the Project Definitions - Manager page.
The system adds, modifies, or deletes effective-dated rows on this page as follows:
When you designate a resource as a project manager on the Project Definitions - Team Detail page in Project Costing, or on the Resource Detail page in PeopleSoft Program Management, the system adds a row with an effective date that is based on the start date of the selected schedule.
When you modify the project manager’s role or schedule dates in PeopleSoft Project Costing or PeopleSoft Program Management, the system modifies the existing row.
When you modify the project manager’s schedule dates in PeopleSoft Resource Management, the system modifies the existing row.
When you select the Project Manager check box on a different schedule row for the same project manager resource, the system adds a row with an effective date that is based on the start date of the selected schedule row.
When you delete the project manager resource from the list or clear the Project Manager check box, the system deletes the corresponding project manager row.
You cannot enter or modify project managers on this page. However, if you use PeopleSoft Program Management, you can enter program managers on this page.
See Also
Staffing Project and Activity Teams
Enterprise PeopleTools 8.48 PeopleBook: Integration Broker
Defining Project Locations
Access the Project Definitions - Location page.
|
Location Code |
Select a location code that has already been defined in the system. The address for this code appears in the bottom half of the page and cannot be edited. |
|
Add Location |
Click to access the Location Definition page, where you can add or modify a location in the Location table (LOCATION_TBL). See Setting Up Locations. |
Defining Project Phases
Access the Project Definitions - Phases page.
|
Phase Type |
Select a phase type to track the time spent on different stages of a project and, for exception reporting, to view the projects that are on schedule. You define phase types on the Phase Types page. See Phase Types. |
|
Status |
Select a phase status of A (Actual Schedule) or E (Estimated Schedule). |
Defining Project Approval Status
Access the Project Definitions - Approval page.
Use the approval sequences that you set up on this page to set up customized workflow processing. For example, when a change in status occurs for which a project event is defined, it can trigger approval workflow that you define for that project event and notify the appropriate people that their approval is required.
|
Project Event |
Select an event to approve, add, or view detailed information. You define project events on the Events page. See Project Events. |
|
Approval Sequence |
Enter the order in which the specified approvers must approve the project. You can identify as many approvers as necessary, and you can specify more than one approval with the same approval sequence number for the same project event. If you define two approvals for an approval sequence, such as sequence 1, both of the approvals must be completed before completing the approval for approval sequence 2. |
|
Source |
Enter the person or department that requires this approval. |
|
Role Type |
Select the role that is authorized the event. Available options are: Manager or Approver: Indicates that anyone assigned that role is authorized to approve the event. Operator: Enables you to assign approval authority to a specific person. The Operator ID field becomes active when you select this option. |
|
User ID |
Enter an operator ID if you select an option of Operator in the Role Type field. If you select a role type of Operator and leave the User ID field blank, anyone assigned the role of operator is authorized to make the approval. If you selected a role type of Manager or Approver, the User ID field displays the operator ID that is logged into the system. |
|
Approve |
Select to approve the change in status. |
Note. This page is for informational purposes only; it does not actually enforce the Approval Authority functionality described.
Justifying Projects
Access the Project Definitions - Justification page.
Use this page to provide justification for a project if you use an approval cycle for projects.
|
Justification Type |
Select from the following justification types: EXT: External justification INT: Internal justification IRR: Internal rate of return PAY: Quick payback Available values are based on the translate values in the Justification Type field properties. |
|
Reason |
Enter a short reason to justify the project. |
|
Employee Name |
Select the name of the person submitting the justification. |
Assigning and Tracking Rates
Access the Project Definitions - Rates page.
See Also
Attaching Files to Projects
Access the Project Definitions - Attachments page.
|
|
Click the Add Attachment icon to browse to the file to attach, and click Upload. The system copies the file to the server where your project information resides. If other documents already appear in the Document Attachments grid, add a row to make the Add Attachment icon appear again. |
|
|
Click the Delete Attachment icon to remove an attachment from the grid. |
|
|
Click the View Attachment icon to view an attachment. |
Initiating Projects by Using Project Initiation Checklists
This section lists a prerequisite and discusses how to:
Start a project.
View explanations.
Define additional steps.
Prerequisite
Because checklists are keyed by project ID, you must create a project before you can activate the checklist.
Pages Used to Initiate Projects by Using Project Initiation Checklists
|
Page Name |
Object Name |
Navigation |
Usage |
|
PC_PIC_CHKLST |
Project Costing, Project Definitions, Project Initiation Checklist, Project Initiation Checklist |
View the steps required to set up, initiate, and track a project. |
|
|
PC_PIC_EXPLANATION |
Click the Explanation link on the Project Initiation Checklist page. |
Enter specifics about the required tasks for a project step. |
|
|
PC_PIC_NOTES |
Click the Notes link on the Project Initiation Checklist page. |
Enter notes as the project team progresses through this step. Multiple people can enter notes about a project step. |
|
|
PC_PIC_ADD_STEP |
Click the Define Additional Steps button on the Project Initiation Checklist page. |
Create new project steps that are specific to this project and add them to the Project Initiation Checklist page. |
Starting a Project
Access the Project Initiation Checklist page.
This page provides a series of links that access the appropriate components in Project Costing where each step of a project is implemented. Project managers can change the status of each step so that the checklist becomes an overall picture of the project's progress.
Project Steps
|
Explanation |
Click the link to access the Project Initiation Checklist - Step Explanation page for the corresponding step and view the purpose and tasks for each step. You cannot edit fields on the Step Explanation page. |
|
Notes |
Click the link to access the Project Initiation Checklist - Step Notes page and enter notes for the corresponding step. |
|
Define Additional Steps |
Click to access the Project Initiation Checklist - Define Additional Steps page, where project managers can create steps and add them to the checklist. |
Note. The Define project scheduling calendar and Define status reporting links are functional only if you use PeopleSoft Program Management.
Contract Steps
Contract steps appear for you to access if you use PeopleSoft Contracts.
Viewing Explanations
Access the Project Initiation Checklist - Step Explanation page.
This page displays more detailed information about the requirements to complete this project step.
You cannot modify the explanation for steps that are delivered with Project Costing. You can, however, enter new explanations when you define your own additional steps.
Defining Additional Steps
Access the Project Initiation Checklist - Define Additional Steps page.
|
Sequence Number |
Enter or modify the sequence in which the step appears in ascending order in the Additional Steps grid of the Project Initiation Checklist. This information appears on the Project Initiation Checklist - Step Explanation page. |
|
Step Description |
Enter or modify the name of the step that appears in the Additional Steps grid on the Project Initiation Checklist page. |
|
Step Explanation |
Enter or modify the explanation that appears on the Project Initiation Checklist - Step Explanation page when you click the Explanation link for the step on the Project Initiation Checklist page. |
When you save the data, the Project Initiation Checklist displays an Additional Steps grid that lists steps that you create. You can modify fields that define an additional step.
Note. Additional steps are specific to the Project Initiation Checklist only for the selected business unit and project.
Maintaining Project Status
This section discusses how to define project status.
Page Used to Maintain Project Status
|
Page Name |
Object Name |
Navigation |
Usage |
|
PROJECT_STATUS |
Project Costing, Project Definitions, Status, Status |
Assign the project status. This page operates in deferred processing mode and is not available for project templates. |
Defining Project Status
Access the Project Definitions - Status page.
|
Sequence |
The system increments the sequence number, which tracks incremental changes in status. By using a sequence number in combination with the status effective date, multiple status changes can occur on the same day. |
|
Status |
Select the project status and assign a status effective date. Available options are based on the values that you enter on the Status Types page during implementation. If you use project type status paths, the only available status types are based on the current status of the project. See Project Type Status Paths. When you change the project status on this page, the system automatically sends an email notification to each team member for which there is an email address on the Project Definitions - Team Detail page with the option selected to Email Notify for Status Change. |
|
Priority |
Enter the project priority. This field is for information only. |
|
Interest Calculation Factor |
Enter the percent that the system uses to calculate the amount of interest for this project based on the project status. For example, enter 1 to calculate 100 percent interest for the project when it is Open. Enter 0.5 to calculate 50 percent interest when the project is In Service. This field is available if you select the Allow Interest Calculation option on the Project Costing Definition page. |
Create a new transaction for each status change to maintain a history of the project. For example, assign a project status of Proposed when the project is first proposed. When the project passes the review cycle and is accepted, change the status to Open.
To assign status changes in advance, create new transactions and assign the appropriate future effective date for each status change. Alternatively, manually change the project status if you do not want to change the status in advance.
Tracking Your Projects
This section discusses how to:
Create a personal project list.
Review project milestones.
Pages Used to Track Your Projects
|
Page Name |
Object Name |
Navigation |
Usage |
|
PC_MYPROJECT_PNL |
Project Costing, My Projects, My Projects |
Provide users with a modifiable list of all their projects. This page operates in deferred processing mode. |
|
|
PC_MYPROJ_ADD_PNL |
Project Costing, Project Definitions, Projects List, Projects List |
Enter search criteria at the top of the page to view list of existing projects matching the specified criteria, and add the displayed projects to the My Projects page. |
|
|
CA_PROJ_MLS |
Project Costing, Project Definitions, Project Milestones, Project Milestones |
Search and view projects that have activities designated as project milestones that meet selected search criteria. Navigate to details of contracts that are tied to the project milestone. |
Creating a Personal Project List
General
|
Project |
Click a project link to access the Project Definitions - General Information page for more information on a specific project. |
|
Program |
Displays a check mark if the project is a program or summary project. |
|
Project Status |
Click to access the Project Definitions - Status page to view or modify the project status. |
|
Processing Status |
Displays the processing status that corresponds to the project status value. |
|
Project Health Indicators |
Displays visual indicators that represent the project's health in various areas of the business. If you use PeopleSoft Project Costing without PeopleSoft Program Management, the Project Overall column appears. If you use PeopleSoft Program Management, additional project health columns appear for Schedule Health, Budget Health, Resources Health, Issues Health, and Risks Health. |
|
|
Displays a visual indicator in a project health column that this measure of project health is good. |
|
|
Displays a visual indicator in a project health column that this measure of project health is fair. |
|
|
Displays a visual indicator in a project health column that this measure of project health is poor. |
|
Create New Project |
Click to create a new project on the Project Definitions - General Information page. |
|
Projects List |
Click to access the Projects List page and search for projects to add to the My Projects page. |
|
Create Project from Microsoft |
Click to access the Create Project from Microsoft page to create a project in Project Costing from Microsoft Project 2002 data. |
Details
|
Release, Category, Application Area, and Application |
These columns appear in the Details grid if you use PeopleSoft Program Management. |
|
|
Click the Drill to Project Activities icon to access the Project Activities page for the corresponding project. |
|
|
Click the Drill to Resources by Activity icon to access the Project Definitions - Team page for the corresponding project. If you use PeopleSoft Program Management, this icon accesses the Resources page. |
|
|
Click the Drill to Program Details icon to access the Review Program page for the corresponding program. This icon appears for programs only if you use PeopleSoft Program Management. |
|
|
Click the Link to Project Request icon to access the Project Request page for the corresponding project. This icon appears only if you use PeopleSoft Program Management. |
Amounts
|
Total Issues, Total Deliverables, and Total Risks |
These columns appear in the Amounts grid if you use PeopleSoft Program Management. |
|
|
Click the Drill to Project Valuation icon to access the Project Valuation page for the corresponding project. |
|
|
Click the Project Budgets icon to access the Budget Plan page for the corresponding project. |
|
|
Click the Manager Transactions Review icon to access the Manager Transaction Review page for the corresponding project. |
|
|
Click the View Earned Value Projection icon to access the Earned Value Projection page for the corresponding project. This icon appears only if you use PeopleSoft Program Management. |
Reviewing Project Milestones
Access the Project Milestones page.
Project milestones are designated by selecting the New Milestone option on the Activity Definitions - Definition page.
To filter search results, enter values in the fields in the Search Criteria group box. You must enter a business unit. If you leave all other fields blank, the search returns all project milestones for the business unit.
Search Criteria
|
Show Contract Impact Only |
Select to return search results for project milestones attached to contract billing plans, revenue, plans, or contract milestones only. These milestones are used in PeopleSoft Contracts to tie billing and recognizing revenue to reaching a milestone. |
Milestones
|
Activity |
Click to access the Activity Definitions - General Information page, where you can review details of the activity associated with this milestone. |
|
Status as of Effective Date |
Displays the effective date of the activity status. Values include: Active or Inactive. |
|
Contract Impact |
Displays whether this milestone is associated with any contract lines. Values include: Yes or No. When the project milestone is referenced in a Contract billing plan, revenue plan, or contract milestone, Yes appears in this field. Click the Yes link to access the Impacted Contract Details page in PeopleSoft Contracts. See Reviewing Details of Project Milestones Attached to Contract Billing or Revenue Plans. |
See Also
Modifying Existing Projects by Using Templates
This section discusses how to modify projects from templates.
Page Used to Modify Existing Projects by Using Templates
|
Page Name |
Object Name |
Navigation |
Usage |
|
PC_IMPFRM_TMPL |
You can access the Import from Template page through multiple navigation paths. This list presents five frequently used paths.
|
Import data from a template into an existing active or pending transactional project. |
Modifying Projects from Templates
Access the Import from Template page.
The project business unit and currency must be the same for the template and the transactional project.
|
Project Template |
Select the template that contains data that you want to import into the open project. The list of available templates is based on the business unit's public templates and user-specific private templates. |
|
Project Level |
Select to import project-level information, including attachments, from the template into the open project. This option is available only for pending projects. The system overwrites all project-level data, except the project start date, project ID, and description. The system retains the open project start date and uses it to calculate dates on the open project. The system calculates the new project and activity start and end dates by using the new project start date, the date ranges in the template, and the relationship of the dates to the template project start date, to calculate:
If you use PeopleSoft Program Management, the system also uses the open project start date to calculate activity deliverable due dates and deadlines. Note. If the date range for the activities or project team from the template are outside of the open project end date, the system adjusts the open project end date accordingly. A message appears when you select this option to remind you that project-level data will be overwritten in the open project. |
|
Activities |
Select to append the activities from the template to existing project activities on the open project. This option is available only for pending projects. Activity information includes the WBS and activity attachments. If you use PeopleSoft Program Management, the imported information also includes dependencies and deliverables. If there is a duplicate activity ID on the template and open project, a message appears when you click Import stating that the duplicate template activity ID will use the next sequential activity ID in the project. |
|
Project Resource |
Select to append all active project resources from the template to the open project. If there is a duplicate resource ID, a message appears when you click Import stating that the duplicate template resource ID is not imported into the open project. The system imports only active resources. If the template contains inactive resources, a message appears when you click Import stating that one or more of the resources from the template are no longer active and are not added to the open project. |
|
Activity Resource |
Select to append activity resources from the template into the open project. This option is available if you select the Activities and Project Resource options, and only for pending projects. |
|
Import |
Click to import the selected information from the template and open the Project Definitions - General Information page for the target project. |
You can change project data that you import from the template.
Deleting Project DataThis section lists a prerequisite and discusses how to:
Delete project data, activities, and transactions.
View the deleted project log.
See Also
Prerequisite
You must establish business unit parameters on the Delete Utility Tables page before using the Project Delete utility.
See Defining Parameters for the Delete Utility.
Pages Used to Delete Project Data
|
Page Name |
Object Name |
Navigation |
Usage |
|
PC_DEL_OPTN_PAGE |
Project Costing, Utilities, Project Delete Utility, Project Delete Utility |
Delete projects, activities, and transactions. This page operates in deferred processing mode. |
|
|
PC_DEL_RESL_PAGE |
Project Costing, Utilities, Review Project Delete Log, Review Project Delete Log |
View the result of the Project Delete utility run on this page. View deletion activity for a specified business unit and project. |
|
|
PC_DEL_EXC_PAGE |
Click Exceptions on the Review Project Delete Log page. |
View details of project deletions that were not completed as specified on the Project Delete page. |
Deleting Project Data, Activities, and TransactionsAccess the Project Delete Utility page.
Warning! Deleted project data, including transaction rows, are not copied or saved anywhere. Because project deletions are permanent and irreversible, use caution when using the Project Delete utility.
Note. Data that you delete from the Project Transaction table in the FMS database is not deleted from the HCM database. This ensures that time and labor transactions are still accessible in HCM for projects that you delete from the Project Transaction table.
Transaction-Level Deletions
To delete transactions:
Select Transaction Level Deletion.
To delete transactions based on an analysis group, select a group that contains the analysis types that identify the kind of transactions to delete from the Project Transaction table.
The available analysis groups are defined on the Delete Utility Tables page for the business unit.
Select an analysis type to delete transactions based on a single analysis type.
You must enter a value in the Analysis Group field or in the Analysis Type field for transaction-level deletions. After selecting an analysis group or analysis type, optionally use the System Source field to further define the rows to delete.
In the Activities grid, select the Delete check box for each activity that has transactions of the specified analysis group that you want to delete.
To delete all transactions of the specified analysis group from all of the project's activities, select Delete in all activity rows, or Select All Activities.
Click the Delete button to delete transactions that belong to the specified analysis group and are assigned to the selected project activities.
Note. You can use the Project Delete utility to delete all transactions belonging to an analysis group or an analysis type. You cannot use the utility to delete an individual transaction. To delete an individual transaction, use the Transaction Adjustment page to create another transaction that offsets the amount of the transaction that you want to delete.
You can purge transactions from the Project Transaction table without purging the corresponding projects-related data from feeder systems, such as PeopleSoft Asset Management, Contracts, and Payables.
Activity-Level Deletions
To delete activities from a project:
Select Activity Level Deletion.
In the Activities grid, select the Delete check box for each activity that you want to delete.
To delete all activities, select the Select All Activities check box. When you delete an activity, the system also deletes all transactions that are assigned to the activity.
Click the Delete button.
A warning message appears if a transaction row exists for any of the activities that you want to delete. The project delete options on the Delete Utility Tables page determine if you can delete the activity and transactions.
Project-Level Deletions
To delete a project:
Select Project Level Deletion.
Click Delete.
A warning message appears if a transaction row exists for any of the activities that you want to delete. When you delete a project, the system also deletes all activities and subsequent transactions that are assigned to the project. The project delete options on the Delete Utility Tables page determine if you can delete the project, activities, and transactions. The system deletes corresponding rows from the tables that are specified in the Project Records grid on the Delete Utility Tables page.
Projects that you delete no longer appear on your My Projects page.
Project Tree Node Deletions
You can delete a project tree node if the Delete Project Tree Node option is selected on the Delete Utility Tables page for the business unit.
To simultaneously delete a project and its corresponding project tree node:
Select Project Level Deletion.
Enter the tree name and tree effective date in the Delete Project Tree Node group box.
Click Delete.
Viewing the Deleted Project LogAccess the Review Project Delete Log page.
|
Delete |
Select this check box and click Refresh to remove the corresponding row from the Run Results grid. |
|
Instance |
Displays the process instance number assigned by PeopleSoft Process Scheduler if the deletion request is triggered a part of finalizing budgets or integrating with Microsoft Project. A blank Instance field indicates that the deletion request was processed in real-time by using online pages. |
|
Proj Cnt (project count), Act Cnt (activity count), and Trans Cnt (transaction count) |
Displays the number of projects, activities, and transactions, respectively, that were deleted based on your delete request. |
|
Exceptions |
Click to access the Delete Utility Exceptions page to view a list of objects that were not deleted in the request due to the existence of transaction rows that you cannot delete based on project delete options for the business unit. |