Release 11g (11.1.1)
Part Number E13880-01
Contents
Previous
Next
| Oracle Fusion Middleware Administrator's and Developer's Guide for Oracle Business Intelligence Publisher Release 11g (11.1.1) Part Number E13880-01 | Contents | Previous | Next |
This chapter covers the following topics:
Oracle BI Publisher supports security models of other Oracle products. This chapter describes how to configure BI Publisher to use the following:
For conceptual information regarding BI Publisher roles and permissions, see Understanding BI Publisher Users, Roles, and Permissions.
Before you implement any of these security models, first create a local superuser. The local superuser credentials ensure that you can access the Administration pages of Oracle BI Publisher in case of any unexpected failures in the configured security settings.
To create a local superuser:
On the Administration page, click Security Configuration.
On the Security Configuration tab, under the Local Superuser region, select the Enable Local Superuser check box.
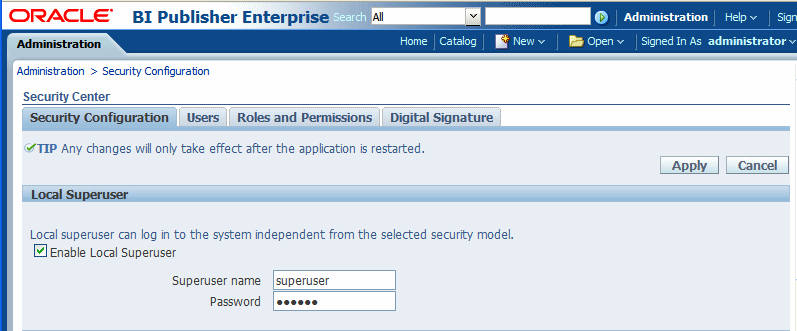
Enter a name and password for your superuser.
Restart BI Publisher for the Superuser to become activated in the system.
If you have installed BI Publisher as part of the Oracle Business Intelligence Enterprise Edition and you have configured Oracle BI Enterprise Edition to use legacy Oracle BI Server authentication, follow these procedures to configure BI Publisher to use the BI Server security.
Important: The Oracle BI Server security option is for customers wishing to use legacy 10g authentication. This section does not apply to you if you have configured Oracle Fusion Middleware Security.
These procedures assume that you have already performed the configuration required in the Oracle BI Server. For information on configuring legacy Oracle BI security, see the Oracle Fusion Middleware Security Guide for Oracle Business Intelligence Enterprise Edition.
Perform the following in BI Publisher:
In the Oracle BI Publisher Administration page, configure Oracle BI Publisher to use Oracle BI Server security.
In the Oracle BI Publisher Administration page, assign BI Publisher data sources to roles
Configuring BI Publisher To Use Oracle BI Server Security
Log in to BI Publisher with administrator credentials. Navigate to the BI Publisher Administration page. On the Administration page click Security Configuration.
Note: To log in directly to the BI Publisher server, use the login URL with the /xmlpserver suffix, for example: http://example.com:9704/xmlpserver
In the Security Model region of the page, select Oracle BI Server from the list. Provide the following connection information for the Oracle BI Server:
JDBC Connection String - example: jdbc:oraclebi://host:port/
If you do not know the connection string to the BI Server, you can copy it from data source connection page. From the Administration page, under Data Sources, click JDBC Connection. Locate the Oracle BIEE server and copy the connection string. If this has not been configured, see Setting Up a JDBC Connection to the Oracle BI Server.
Administrator Username and Administrator Password
Enter the BISystemUser and password.
Database Driver Class - example: oracle.bi.jdbc.AnaJdbcDriver
Restart the BI Publisher application for the security changes to take effect.
Add Data Sources to the Oracle BI Server Roles
Log in to Oracle Business Intelligence as an administrator.
On the global header click Administration. On the Oracle BI Administration page, click Manage BI Publisher.
On the BI Publisher Administration page click Roles and Permissions. The groups to which you assigned the BI Publisher groups will display as available roles.
Find the group (role) that you wish to add data sources to and click Add Data Sources.
Note: Alternatively, you can navigate to the data source and add the roles that will require access to the data source.
Locate the appropriate data sources in the Available Data Sources list and use the shuttle buttons to move the sources to the Allowed Data Sources list for the role.
Click Apply.
Repeat for all roles that need access to report data sources.
BI Publisher can leverage your E-Business Suite security to enable your E-Business Suite users to log in to BI Publisher using their E-Business Suite credentials. When you integrate with the E-Business Suite security, your E-Business Suite responsibilities become available as roles in the BI Publisher security center. You can then add BI Publisher catalog permissions and data access privileges to the imported roles/responsibilities. See Understanding Users and Roles.
Note: In this release your users will not be able to access or execute reports stored on the E-Business Suite instance.
Oracle BI Publisher relies on information stored in the DBC file to connect to the E-Business Suite instance. Ensure you can locate and have access to this file. The DBC file is typically located under the $FND_SECURE directory.
In the Oracle E-Business Suite, log in as a System Administrator and create the following responsibilities to correspond to the BI Publisher functional roles:
XMLP_ADMIN – this is the administrator role for the BI Publisher server.
XMLP_DEVELOPER – allows users to build reports in the system.
XMLP_SCHEDULER – allows users to schedule reports.
XMLP_ANALYZER_EXCEL – allows users to use the Excel Analyzer feature.
XMLP_ANALYZER_ONLINE – allows users to use the online analysis feature.
XMLP_TEMPLATE_BUILDER - allows users to connect to the BI Publisher server from the Template Builder and to upload and download templates. Allows users to design layouts using the BI Publisher Layout Editor.
Add these new BI Publisher responsibilities to the appropriate Users.
Note: Ensure to assign at least one user to the XMLP_ADMIN group.
Log in to Oracle BI Publisher. On the Administration page, select Security Configuration.
In the Security Model section of the page, select Oracle E-Business Suite from the list.
Load the DBC file from the E-Business Suite instance. This is typically located under the $FND_SECURE directory. If you do not have access to this file, contact your E-Business Suite system administrator. This file specifies how BI Publisher should access the E-Business Suite instance.
Restart BI Publisher for the security changes to take effect.
Once you restart the system, the E-Business Suite responsibilities to which BI Publisher roles have been assigned will be visible as roles in the BI Publisher security center.
To view a report generated from a particular data source, a report consumer's role must be granted access to the data source. Similarly, to create a data model based on a particular data source, the report author's role must be granted access to the data source.
To grant a role access to a data source:
On the Administration tab, under Security Configuration, click Roles and Permissions. The responsibilities assigned BI Publisher roles in your E-Business Suite instance will display as available roles.
Find the role to which you want to add data sources and click Add Data Sources. The Add Data Sources page will display.
Locate the appropriate data sources in the Available Data Sources list and use the shuttle buttons to move the sources to the Allowed Data Sources list for the role.
Click Apply.
Repeat for all roles that need access to report data sources.
For a role to access objects in a folder, you must grant the role permissions to the catalog object. You can grant permissions at the folder level, so that a role has the same access to every object in a folder, or you can assign access individually to each object in a folder.
See the following for more information:
In the catalog, navigate to a catalog object required for a role.
Click the More link for the object and then click Permissions to open the Permissions dialog.
Click the Create icon to open the Add Roles dialog.
Click Search to populate the list of Available Roles.
Use the Move button to move the appropriate roles from the Available Roles list to the Selected Roles list.
Click OK.
Enable the appropriate permissions for the role by selecting the check boxes.
If you have selected a folder: To apply the selections to all items within a folder, select Apply permissions to items within this folder.
BI Publisher offers integration with Oracle Database security so that you can administer the BI Publisher users with your Oracle Database users. To accomplish this you must define the BI Publisher functional roles in your Oracle Database, assign the roles to your Oracle Database users, and then specify Oracle Database as your security model in the BI Publisher Administration page.
Note: For information on setting up Oracle Database security, see the Oracle Database Security Guide.
In your Oracle Database, create the following roles to correspond to the BI Publisher functional roles:
XMLP_ADMIN – this is the administrator role for the BI Publisher server.
XMLP_DEVELOPER – allows users to build reports in the system.
XMLP_SCHEDULER – allows users to schedule reports.
XMLP_ANALYZER_EXCEL – allows users to use the Excel analysis feature.
XMLP_ANALYZER_ONLINE – allows users to use the online analysis feature.
XMLP_TEMPLATE_BUILDER - allows users to connect to the BI Publisher server from the Template Builder and to upload and download templates.
Assign these roles to the appropriate Database roles and users. You may also want to create additional reporting roles that you can utilize when setting up your report privileges on the BI Publisher side. For example, you might create a role called "HUMAN_RESOURCES_MANAGER" that you can assign a Human Resources Folder of reports to. You can then assign that role to any user requiring access to the Human Resources reports.
Ensure to assign the XMLP_ADMIN role to a user with administration privileges, such as SYSTEM.
In the BI Publisher application, log in with Administration privileges. From the Administration tab select Security Configuration.
In the Security Model section of the page, select Oracle Database from the list. Provide the following connection information:
JDBC Connection String - example: jdbc:oracle:thin:@mycompany.com:1521:orcl
Administrator Username and Administrator Password - note the following requirements for this user:
the user must be granted the XMLP_ADMIN role
the user must have privileges to access data from the dba_users/_roles/_role_privs tables.
Database Driver Class - example: oracle.jdbc.driver.OracleDriver
Restart the BI Publisher server for the security changes to take effect.
Once you restart the server, the roles to which BI Publisher roles have been assigned will be visible as roles in the BI Publisher security center.
To view a report generated from a particular data source, a report consumer's role must be granted access to the data source. Similarly, to create a data model based on a particular data source, the report author's role must be granted access to the data source.
To grant a role access to a data source:
On the Administration tab, under Security Configuration, click Roles and Permissions.
Find the role to which you want to add data sources and click Add Data Sources. The Add Data Sources page will display.
Locate the appropriate data sources in the Available Data Sources list and use the shuttle buttons to move the sources to the Allowed Data Sources list for the role.
Click Apply.
Repeat for all roles that need access to report data sources.
For a role to access objects in a folder, you must grant the role permissions to the catalog object. You can grant permissions at the folder level, so that a role has the same access to every object in a folder, or you can assign access individually to each object in a folder.
See the following for more information:
In the catalog, navigate to a catalog object required for a role.
Click the More link for the object and then click Permissions to open the Permissions dialog.
Click the Create icon to open the Add Roles dialog.
Click Search to populate the list of Available Roles.
Use the Move button to move the appropriate roles from the Available Roles list to the Selected Roles list.
Click OK.
Enable the appropriate permissions for the role by selecting the check boxes.
If you have selected a folder: To apply the selections to all items within a folder, select Apply permissions to items within this folder.
To configure BI Publisher to integrate with Siebel security, perform the following three general tasks (described in more detail below):
Set up BI Publisher roles as Siebel CRM responsibilities.
Configure BI Publisher to use Siebel Security.
Authorize Siebel responsibilities to access data sources and catalog objects in BI Publisher.
Using Siebel Administrator credentials, navigate to Administration - Application, and then Responsibilities.
In the Responsibilities list, add a new record for each of the BI Publisher functional roles:
XMLP_ADMIN – this is the administrator role for the BI Publisher server.
XMLP_DEVELOPER – allows users to build reports in the system.
XMLP_SCHEDULER – allows users to schedule reports.
XMLP_ANALYZER_EXCEL – allows users to use the Excel analyzer feature.
XMLP_ANALYZER_ONLINE – allows users to use the online analysis feature.
XMLP_TEMPLATE_BUILDER - allows users to connect to the BI Publisher server from the Template Builder and to upload and download templates and grants access to the layout editor.
Assign these roles to the appropriate users. You may also want to create additional reporting roles that you can utilize when setting up your report privileges in the BI Publisher. For example, you might create a role called "EXECUTIVE_SALES" that you can assign a executive-level report folder. You can then assign that role to any user requiring access to the Executive reports.
Ensure to assign the XMLP_ADMIN role to a user with administration privileges.
In the BI Publisher application, log in with Administration privileges. From the Administration tab select Security Configuration.
In the Security Model section of the page, select Siebel Security from the list. Provide the following connection information:
Siebel Web Service Endpoint String
Administrator Username.
Administrator Password
Restart the BI Publisher server for the security changes to take effect.
When you log back in to BI Publisher, the responsibilities to which you added the BI Publisher functional roles will display in the Roles and Permissions page.
To view a report generated from a particular data source, a report consumer's role must be granted access to the data source. Similarly, to create a data model based on a particular data source, the report author's role must be granted access to the data source.
To grant a role access to a data source:
On the Administration tab, under Security Configuration, click Roles and Permissions.
Find the role to which you want to add data sources and click Add Data Sources. The Add Data Sources page will display.
Locate the appropriate data sources in the Available Data Sources list and use the shuttle buttons to move the sources to the Allowed Data Sources list for the role.
Click Apply.
Repeat for all roles that need access to report data sources.
For a role to access objects in a folder, you must grant the role permissions to the catalog object. You can grant permissions at the folder level, so that a role has the same access to every object in a folder, or you can assign access individually to each object in a folder.
See the following for more information:
In the catalog, navigate to a catalog object required for a role.
Click the More link for the object and then click Permissions to open the Permissions dialog.
Click the Create icon to open the Add Roles dialog.
Click Search to populate the list of Available Roles.
Use the Move button to move the appropriate roles from the Available Roles list to the Selected Roles list.
Click OK.
Enable the appropriate permissions for the role by selecting the check boxes.
If you have selected a folder: To apply the selections to all items within a folder, select Apply permissions to items within this folder.
![]()
Copyright © 2004, 2010, Oracle and/or its affiliates. All rights reserved.