A User Interface
This section provides information about the user interface screens and covers the following topics:
A.1 Text Release Setup Page
Use this page to access the setup dialogs for the Kofax Capture release script.

| Element | Description |
|---|---|
| Batch class | The name of this batch class. A batch class describes how the documents in a batch will be processed. A batch class contains one or more document classes, which in turn contain one or more form types. This allows you to have different kinds of documents and forms within one batch. |
| Document class | The name of this document class. A document class is a definition of a particular type of document, such as an order form or medical form. Document classes provide a convenient mechanism for associating the same group of index fields and processing settings with multiple form types. You can define a document class, and then add one or more form types to it. Then, you can associate a set of index fields and processing settings with the document class. The same set of fields and settings will be shared across all the form types defined for the document class. |
| Name | The name for this release script. |
| Index Storage tab | Displays the "Index Storage Tab". |
| Document Storage tab | Displays the "Document Storage Tab". |
| Image Format tab | Displays the "Image Format Tab". |
| Server tab | Displays the "Server Tab". |
| OK button | Saves the current settings. |
| Cancel button | Closes the page without saving the current settings. |
| Apply button | Applies and saves the current settings. |
| Help button | Opens the applicable context-sensitive help screen. |
A.2 Index Storage Tab
Use the Index Storage tab to set index values for the batch class. The Kofax Capture release script establishes assignments for the required information field items found in an initial Oracle Content Server installation. The values assigned to the index fields are supplied from the Validation module during Kofax Capture batch processing.
Note:
You must add index fields to a document class before they are available to assign as index values in a customized release script. By default, all index fields currently defined for the selected document class will be in the list of index values.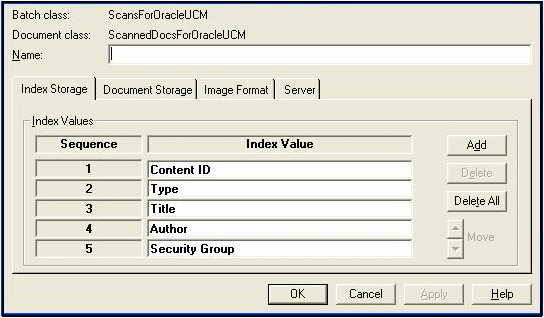
| Element | Description |
|---|---|
| Sequence number | Use the sequence position to establish the priority for the specified index values. |
| Index Value | The Content Server metadata parameters used for index values associated with the new file checkin. |
| Add button | Opens a dialog to add a new metadata parameter as an index value. |
| Delete button | Removes a selected index value from the list. |
| Delete All button | Removes all of the listed index values. |
| Up / Down buttons | Used to adjust the specific placement order of the selected entry in the index values list. The position of each entry in the list is relevant to its priority for batch processing. The higher an entry is positioned in the list, the higher its priority is in the processing. Each click on the up or down arrow moves the selected entry up or down one position in the list. |
A.3 Document Storage Tab
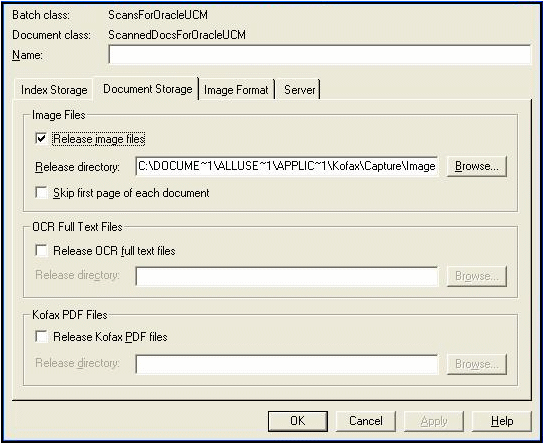
Use the Document Storage tab to view or change the directory paths for released files and to set how Kofax Capture monitors the Acrobat Capture PDF conversion process.
| Element | Description |
|---|---|
| Release image files | Select this check box if you want to release your image files. |
| Release directory | Enter the path to the folder to which you want to release the files. If desired, you can use the Browse button.
Note: The path to the Image Files release directory must not exceed 122 characters. |
| Skip first page of each document | Select this check box if you do not want the first page of your documents released. For example, you might want to check this option if you are using separator sheets to separate the documents in your batches and do not want to release the separator sheets.
Note: If you are not using separator sheets, checking this option will cause the first page of each document to be skipped (not released). |
| Release OCR full text files | Select this check box if your want to release your OCR full text files. |
| Release directory | Enter the path to the folder to which you want to release the files. If desired, you can use the Browse button.
Note: The path to the OCR full text files release directory must not exceed 122 characters. |
| Release Kofax PDF files | Select this check box to release Kofax PDF files. |
| Release directory | Enter the path to the folder to which you want to release the files. If desired, you can use the Browse button.
Note: The path to the Kofax PDF files release directory must not exceed 122 characters. |
A.4 Image Format Tab
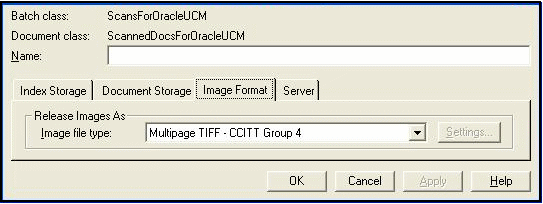
Use the Image Format tab to set the format (file type) of released images.
| Element | Description |
|---|---|
| Image file type | Provides a list of file types to use to check documents into Content Server. |
| Settings | Displays the "Adobe Acrobat Capture Settings". |
A.5 Adobe Acrobat Capture Settings
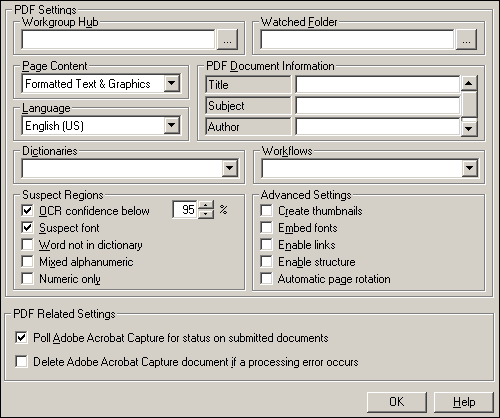
Use the Settings button to open the Adobe Acrobat Capture Settings dialog box where you can specify PDF settings.
| Element | Description |
|---|---|
| Workgroup Hub | Select the location of your Adobe Acrobat Capture workgroup hub by using the Browse button. The workgroup hub is a folder on a drive accessible to all stations off the workgroup. Each workstation in the group needs read and write access to the hub folder to operate. The workgroup hub property is required by Adobe Acrobat Capture. Upon selection of a workgroup hub, the Dictionaries and Workflow's properties will be populated with default values. |
| Watched Folder | Select the location of your Adobe Acrobat Capture watched folder by using the Browse button. This is where your files and images will be temporarily copied for PDF processing. The watched folder property is required by Adobe Acrobat Capture and is used to submit your files to the Adobe Acrobat Capture workflow. |
| Page Content | Select the desired output format for your PDF images. You can choose from the following:
Note: The "Formatted Text & Graphics," "Searchable Image (Compact)," and "Searchable Image (Exact)" formats use the Adobe Acrobat Capture OCR engine to perform OCR on the text. You can control the behavior of the engine for words or characters that cannot be recognized by selecting "Suspect Regions" options, as described below. |
| Language | Select the desired language. The default is English (U.S.). Changing the language from English (U.S.) changes the character set, the primary spelling dictionary, and (with some languages) the recognition engine. |
| PDF Document Information | Enter or select the desired PDF document information. When viewing the PDF file, your selections will show up as "Document Info." You can enter text, select an index field, batch field, or an Kofax Capture Value for Title, Subject, Author, or Keywords. |
| Dictionaries | Select the desired dictionary for OCR processing. You can accept the default Adobe Acrobat Capture dictionary or select a predefined custom dictionary to process your documents. Note that the default dictionary is automatically populated after a workgroup hub has been selected. |
| Workflows | Select the desired workflow for Adobe Acrobat Capture processing. You can accept the default Adobe Acrobat Capture workflow or select a different workflow. Workflow's are automatically populated after a workgroup hub has been selected. Note that your workflow must have a designated watched folder. Adobe Acrobat Capture lets you create your own workflow or use one of the predefined workflow's. |
| Suspect Regions | Select the desired behavior for how suspect regions should be handled. A suspect region is one that the Adobe Acrobat Capture engine cannot recognize with a confidence level greater than or equal to your selected OCR confidence threshold. |
| OCR confidence below | Enter or select the desired OCR confidence threshold. If the confidence of a word is below the set confidence threshold, the word will be replaced with the original bitmap region. The default is 95 percent. You can choose a value from 0 to 100 percent.
During processing, the Adobe Acrobat Capture engine assigns to each word a value that indicates how confident the engine is that its results are correct. The confidence threshold you choose will determine the minimum value returned from the engine that you want to accept. Only those words with a confidence level greater than or equal to your threshold will be returned as correct. All others will be returned as "Suspect Regions" and replaced with the original bitmap region. |
| Suspect font | Select to replace unusual fonts with the original bitmap region if the confidence of the font is below the OCR confidence threshold. |
| Word not in dictionary | Select to replace a word with the original bitmap region if the word is not found in the specified dictionary. |
| Mixed alphanumeric | Select to replace a word with the original bitmap region if a word is found that contains mixed alpha and numeric characters. |
| Numeric only | Select to replace a word with the original bitmap region if a word is found that contains only numeric characters. |
| Advanced Settings | Select the appropriate check boxes to turn on and off advanced features. |
| Create thumbnails | Select to create thumbnails for every page in the document. Note that enabling this setting increases the file size significantly. |
| Embed fonts | Select to embed fonts in your document. This ensures that the fonts will be the ones you choose, even if those fonts are absent from the computer displaying the document. Embedded fonts must be identified in the Adobe Acrobat Capture Image Properties dialog box or assigned in Reviewer. Note that enabling this setting increases the file size significantly. |
| Enable links | Select to enable hyperlinks within your document such as table of contents, chapter, and index references. This will also add bookmarks to your PDF file for any titles and headings in your document. |
| Enable structure | Select to provide invisible tags for structural elements to use for searching and document navigation with PDF viewers. It is particularly useful to visually impaired users using a text-based user interface such as that provided by Adobe Document Server. |
| Automatic page rotation | Select to automatically detect the correct orientation of the page and rotate the image to that orientation. You may choose to clear this option if you know that all input pages will be properly oriented or if a step that handles rotation precedes the Capture Image step in your Adobe Acrobat Capture workflow. |
| Poll Adobe Acrobat Capture for status on submitted documents | Select this check box to allow Kofax Capture to monitor the status of the Adobe Acrobat Capture conversion process. When polling is enabled, status messages are displayed at the Release workstation in the Kofax Capture PDF Release dialog box.
Clear this check box to allow Kofax Capture to release document to Adobe Acrobat Capture and close the batch. The status of the Adobe Acrobat Capture conversion process will not be returned to Kofax Capture. |
| Delete Adobe Acrobat Capture document if a processing error occurs | Select this check box to automatically cancel any "hung" documents in Adobe Acrobat Capture if an error occurs during the PDF conversion process. If cleared, the documents in error will remain in the Adobe Acrobat Capture workflow. This property is only available if you select the "Poll Adobe Acrobat Capture for status on submitted documents" check box.
Note: If an Adobe Acrobat Capture error occurs during release, you must clear your Adobe Acrobat Capture finished documents and cancel any "hung" documents, either automatically or manually, before re-releasing the same documents in Kofax Capture. |
A.6 Server Tab
The Server tab on the Oracle Content Server Release Setup dialog is used to specify settings for Oracle Content Server URL, user name, and password; to select options for workflow and primary/alternate file check in formats; and to access the CHECKIN parameters editor.
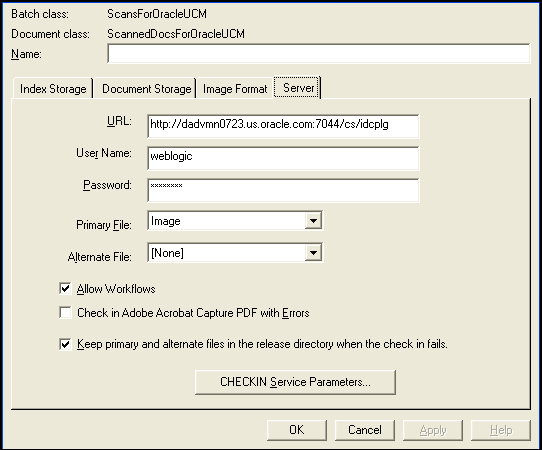
| Element | Description |
|---|---|
| URL | Destination URL in Content Server. |
| User Name | Name of user. |
| Password | Password for user's name entered in the User Name field. |
| Primary file | Format type of the new native file check-ins. |
| Alternate file | Format type of the alternate file checkin that is web-viewable or can be converted to a web-viewable. |
| Allow Workflows | Select this check box to allow workflows. |
| Check In Adobe Acrobat Capture PDF with Errors | Select this check box to allow a new PDF file to be checked in that may contain errors. |
| Keep primary and alternate files in the release directory when the check in fails | Select this check box to retain the primary and alternate files in the release directory if the checkin procedure fails. |
| CHECKIN Service Parameters button | Processes the service parameter settings. |