19 Working with the Events Service
The Events service provides group calendars that you can use to schedule meetings, appointments, and any other type of team occasion. Additionally, a dedicated Events page is available to every group space where the space's moderator has enabled the Events service.
The Events service also enables you to view your own personal Microsoft Exchange calendar within your personal space. In addition, you can overlay group space calendars on top of that calendar, so that you can view all your important meetings in a single calendar.
Note:
The Events service is available only in the WebCenter Spaces application, not in custom WebCenter applications. Consequently, when we discuss it in this chapter, we do so only within the context of WebCenter Spaces.This chapter explores the features offered through the Events service. It contains the following sections:
This chapter is intended for users who want to use Events service task flows to schedule and track events.
The WebCenter Spaces application administrator has the authority to expose or hide a particular service's task flows. Tasks discussed in this chapter are not available to you if the relevant service is hidden. For information about WebCenter Spaces seeded user roles, see the Oracle Fusion Middleware Administrator's Guide for Oracle WebCenter.
19.1 What You Should Know About the Events Service
Events include appointments, meetings, presentations, and so on. Within WebCenter Spaces, there are two kinds of events:
-
Personal events are those that concern only you. They could include things like dentist appointments or a meal with a friend.
Personal events come from your Microsoft Exchange calendar and display only to you and only in Events task flows that are located on pages in your personal space.
-
Group space events are those that involve all members of a specific group space. They could include weekly meetings or presentations.
Group space events display to all members of the group space on the group space's dedicated Events page or in any Events task flow that is located on a page in the group space. Members with the required level of permission can schedule or update events.
Note:
If your application uses WebCenter's default user roles, then the required permissions to create an event are included in both the participant and moderator roles. Participants and Moderators can manage all events.
In addition to displaying your personal Microsoft Exchange calendar, in the Events task flow in your personal space you can overlay your personal calendar with events from significant group spaces. In this way, you can have all your important events available in one location, rather than having to go to multiple group spaces to manage your daily schedule. In a group space, if you can create a page and add an Events task flow to it, you can also extend that task flow to display events from other group spaces. This is useful if some group spaces are very closely connected with similar membership lists.
Note:
The Events page only displays events from the current group space.When you first add an Events task flow to a page in your personal space, the task flow does not initially display the calendar of events. Instead the task flow displays a link prompting you to log in (Figure 19-1). For information about logging in to your personal calendar, see Section 19.2.2, "Accessing Your Personal Microsoft Exchange Calendar."
If you do not have a Microsoft Exchange calendar, or do not want to display personal events, but still want to view group space events in your personal space, enable calendar overlaying and then click Continue (Figure 19-2) For information about calendar overlaying, see Section 19.2.8, "Displaying Multiple Calendars in a Single Task Flow."
Figure 19-2 Events Task Flow in Personal Space with Calendar Overlay Enabled

Description of "Figure 19-2 Events Task Flow in Personal Space with Calendar Overlay Enabled"
Your application may provide a variety of locations from which to view events.
-
Figure 19-3 shows events in an Events task flow on a group space page. The Events task flow can also be included on a personal space page.
-
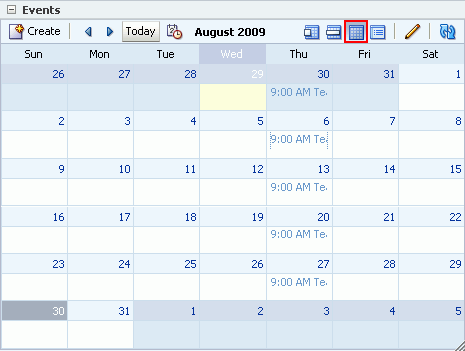
Figure 19-4 shows events on the Events page.
Through its tight integration with the Links service, the Events service provides the opportunity to associate events with other WebCenter Spaces items. Linking enables you to associate documents, notes, announcements, discussions, and URLs with an event. You can create links from an event by editing the event and clicking the Links icon. For more information, see Chapter 21, "Working with the Links Service."
19.2 Working with Events Service Features
Meetings are a fact of life. The art is in keeping on top of all those meetings, making sure you can attend all those that matter and keep abreast of what is going on.
Note:
The steps in the following sections apply to personal events and group space events. Where there are any differences, these are noted.This section includes the following subsections:
-
Section 19.2.1, "Adding an Events Service Task Flow to a Page"
-
Section 19.2.2, "Accessing Your Personal Microsoft Exchange Calendar"
-
Section 19.2.8, "Displaying Multiple Calendars in a Single Task Flow"
19.2.1 Adding an Events Service Task Flow to a Page
For the steps to add an Events service task flow to a page, see Section 10.1.4, "Adding Task Flows to a Page."
19.2.2 Accessing Your Personal Microsoft Exchange Calendar
You may maintain a calendar of events outside of WebCenter Spaces that does not relate to specific group spaces. If you use Microsoft Exchange 2003 or 2007 for this calendar, you can include the information in your WebCenter Spaces personal space. This keeps all your calendar information in a single place, making it much easier for you to organize your day.
Before you can access your Microsoft Exchange calendar in WebCenter Spaces, your administrator must have created a connection to the Microsoft Exchange Server. For more information, see the chapter "Managing the Events Service" in the Oracle Fusion Middleware Administrator's Guide for Oracle WebCenter.
To access your Microsoft Exchange calendar:
-
Log in to WebCenter Spaces and go to your personal space.
-
Locate the page where you want to add your Microsoft Exchange calendar.
-
Edit the page and add the Events task flow to the appropriate region on the page.
For more detailed information, see Section 10.1.4, "Adding Task Flows to a Page."
-
Click Save and then Close.
-
In the Events task flow, click Login to Personal Calendar.
Note:
If you see the link Try Again instead of Login to Personal Calendar, there is a problem with the connection to the Microsoft Exchange Server. Contact your administrator. -
Enter your Microsoft Exchange login credentials and click OK.
19.2.3 Viewing Events
You can view events as a grid or a list; choose to display events a day, a week, or a month at a time; select the range of hours displayed per day; and include a second time zone in the display.
This section includes the following subsections:
-
Section 19.2.3.1, "Displaying the Events Page for a Group Space"
-
Section 19.2.3.2, "Displaying Events by Day, Week, or Month or as a List"
19.2.3.1 Displaying the Events Page for a Group Space
In every group space, group space events display on the Events page. However, the Events page may not display by default. If so, it's easy to display the Events page using the Manage Pages dialog.
To display the Events page:
-
Log in to WebCenter Spaces and go to the group space where you want to display the Events page.
-
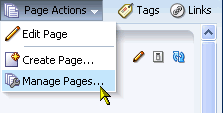
Select the Manage Pages command from the Page Actions menu (Figure 19-6).
-
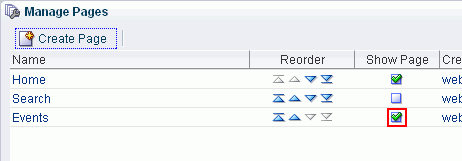
In the Manage Pages dialog, select the Show Page checkbox for the Events page. (Figure 19-7).
-
In the group space, there is now a tab for the Events page (Figure 19-8).
-
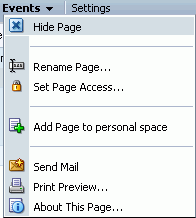
If you later decide that you no longer want to display the Events page, click the tab and choose Hide Page from the menu (Figure 19-9).
19.2.3.2 Displaying Events by Day, Week, or Month or as a List
You can display personal and group space events in grid form or in list form. When you display events as a list, all upcoming events for the next year are listed. When you display events as a grid, you can display events by day, week, or month.
To display events by day, week, or month or as a list:
-
Log in to WebCenter Spaces and go to the Events task flow (or Events page) where you want to set event display options.
If the Events page is not available, see Section 19.2.3.1, "Displaying the Events Page for a Group Space."
-
On the toolbar:
-
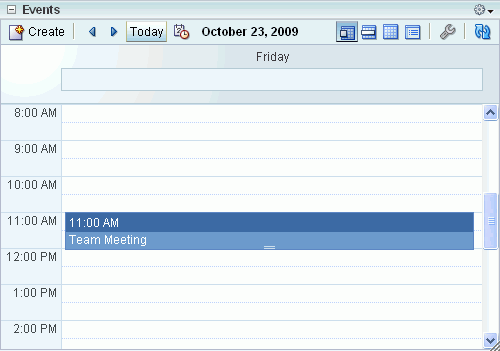
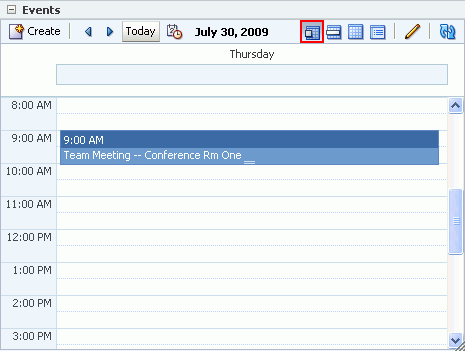
Click the Day icon to display the calendar one day at a time (Figure 19-10).
-
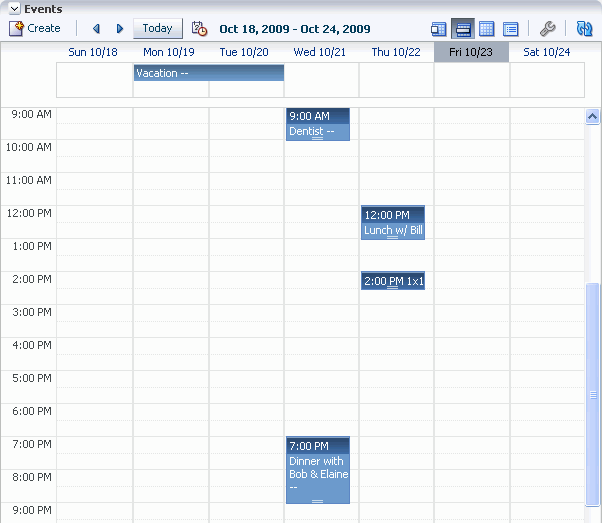
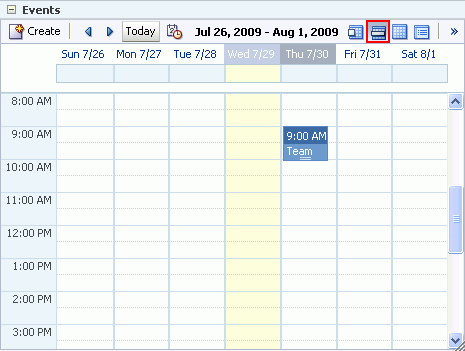
Click the Week icon to display the calendar for the whole week (Figure 19-11).
-
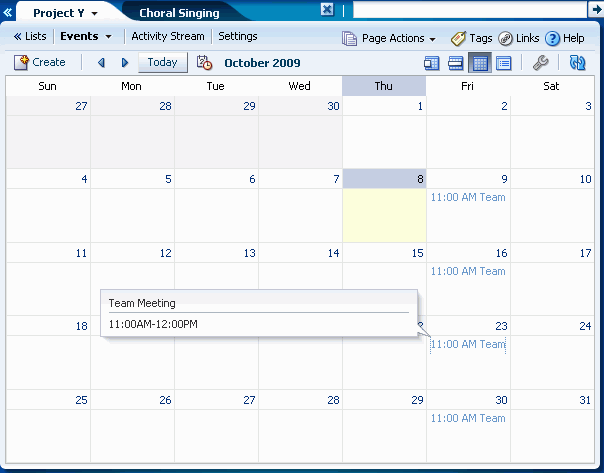
Click the Month icon to display the calendar for the whole month (Figure 19-12).
-
Click the List icon to display a list of upcoming events (Figure 19-13).
The calendar refreshes and appears in the selected mode.
-
19.2.3.3 Viewing Events for a Different Date
Usually, in grid mode, the Events page or Events task flow displays events for the current day, week, or month. To view events for a specific point in time, you can use the previous or next buttons or select a date so that the calendar displays events for a different date.
To select a date:
-
Log in to WebCenter Spaces and go to the Events task flow (or Events page) where you want to select a date for an event.
If the Events page is not available, see Section 19.2.3.1, "Displaying the Events Page for a Group Space."
-
On the toolbar, click the Previous or Next icon until the appropriate date is displayed.
In Day view, this displays the previous or next day. In Week and List view, this displays the previous or next week. In Month view, this displays the previous or next month.
-
If you know the specific date, on the toolbar, click the Select Date icon (Figure 19-14).
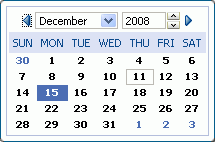
The date picker opens (Figure 19-15). Today's date is boxed, and the currently selected date (which may also be today's date) is highlighted. For example, in Figure 19-15, today's date is the 11th and the selected date is the 15th.
Note:
If the calendar overlay feature is enabled in Full mode for the task flow, the Date Picker is always visible to the left of the calendar. -
Use the date picker to select the month, year, and day.
For example, select a month from the dropdown list; select a year using the controls to the right of the current year, or enter the value yourself; click a date to select a day. Once you select a day, the date picker closes and the calendar shows events for that date.
-
To quickly return to today's date, click the Today link.
19.2.3.4 Refreshing Your View of Events
The Events task flow and Events page include a Refresh icon that you can use to refresh your calendar (Figure 19-16).
This is useful for updating your view of the calendar with any recent changes made by other users. Click the Refresh icon and the calendar redraws, reflecting recent changes.
19.2.3.5 Setting Time Display Preferences
Time display preferences determine the earliest time displayed on the calendar when events are viewed by day or week.
You can also use time display preferences to identify a secondary time zone. This feature is particularly useful with international workforces. When selecting an hour to hold a meeting, it's useful to know the hours most optimal for meeting in both time zones.
To set up time display preferences:
-
Log in to WebCenter Spaces and go to the Events task flow (or Events page) where you want to set time display preferences.
If the Events tab is not available, see Section 19.2.3.1, "Displaying the Events Page for a Group Space."
-
Click the Set time display preferences icon on the toolbar (Figure 19-17).
The Time Display Preferences dialog opens (Figure 19-18).
-
From the Start Time dropdown list, select the first hour to display on the grid when there is limited display space. If the grid is big enough to display hours from before the start time up until 11PM, it does so.
Choose from 12AM to 11PM.
-
Optionally, from the Secondary Time Zone dropdown list select a secondary time zone to display along with the primary time zone.
When a user rolls a mouse pointer over the event in the calendar, event details pop up. The secondary time zone appears in the popup (Figure 19-19).
-
Click OK to save your changes.
19.2.4 Scheduling Events
The following section shows you how to schedule an event.
To schedule an event:
-
Log in to WebCenter Spaces and go to the Events task flow (or Events page) where you want to schedule an event.
If the Events tab is not available, see Section 19.2.3.1, "Displaying the Events Page for a Group Space."
-
Click the Create a new event icon on the toolbar (Figure 19-20).
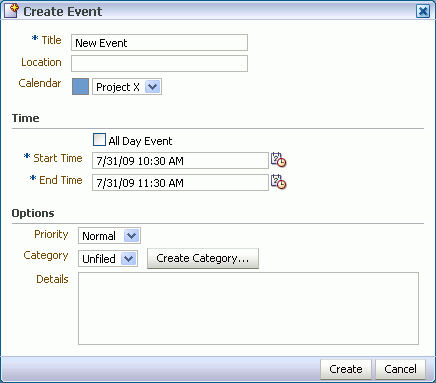
The Create Event dialog opens (Figure 19-21). The fields in the Create Event dialog are slightly different depending on whether you are creating a personal event or a group space event. For group space events, the dialog includes a Category dropdown list; for personal events, the dialog includes a Private checkbox. These options are described in further detail later in this procedure.
Note:
You can also easily invoke the Create Event dialog in grid view by double-clicking an empty space or right-clicking an empty space and choosing Create. The advantage of this is that date and time of the event are automatically specified in the dialog.Figure 19-21 The Create Event Dialog Invoked from a Group Space
Description of "Figure 19-21 The Create Event Dialog Invoked from a Group Space"
-
In the Title field, enter a brief descriptive title for the event.
For example,
Project Reality Check. -
In the Location field, enter the location of the event.
For example,
Bldg. 5, room 786. -
From the Calendar dropdown list, select the calendar against which you want to create the event.
If you do not have the calendar overlay feature enabled, there is only one option in this list: the current calendar. For more information about calendar overlays, see Section 19.2.8, "Displaying Multiple Calendars in a Single Task Flow."
-
In the Time section, select All Day Event to block out the entire day for the event.
All-day events can span multiple days.
-
In the Start Time field enter or select a date and time to start the event. You can click the Select Date and Time icon and select a start time from the Date Picker, if you prefer.
-
In the End Time field enter or select a date and time to finish the event. You can click the Select Date and Time icon and select an end time from the Date Picker, if you prefer.
Note:
All selections under the Options section are optional. -
In the Options section, assign a priority for the event.
Choose from Highest, High, Normal, Low, or Lowest.
-
Select a category to classify this event from the Category dropdown list.
Optionally, click the Create Category button to create a category and automatically select it for this event.
Categories are useful for creating distinct groups of events, organized according to their general purpose.
Note:
The Category dropdown list is not available for personal events. -
In the Details text box, enter any additional details you want to include, up to a maximum of 4000 characters.
-
Select the Private checkbox if you do not want other users to be able to view this event.
-
Click the Create button.
-
In the Send Mail message window, click Yes to send an email notification to all members of the group space distribution list informing them about the event (Figure 19-22).
If you do not want to send a notification, click No.
Note:
The Send Mail message window does not appear when creating personal events. -
Provide your mail login credentials, if necessary.
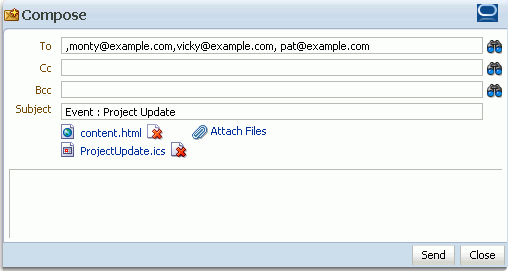
The Compose window displays (Figure 19-23). The To field is automatically populated with the member email addresses, distribution list, or both for the group space. The Events service also provides a default subject, and attaches a text or HTML file containing the message body file and an icalendar file with details of the event.
Note:
If the contents of the To field would be greater than 256 characters, the To field is left empty and a warning message is included in the message body file. -
Compose the body of the message and click Send.
A dialog opens with a message that asks whether you want to compose another message or close the Compose window.
-
Click Yes to open a new Compose window or No to exit.
The event is added to the calendar (Figure 19-24)
19.2.5 Viewing Event Details
The Events page or Events task flow displays basic information about events. To view more information, such as the location or start and end times, simply hover your mouse over an event.
To view event details:
-
Log in to WebCenter Spaces and go to the Events task flow (or Events page) where you want to view event details.
If the Events page is not available, see Section 19.2.3.1, "Displaying the Events Page for a Group Space."
-
Hover the mouse over a link to an event to display the event details (Figure 19-25).
To view the priority or category of the event you must edit the event. For more information, see Section 19.2.6, "Revising Scheduled Events."
19.2.6 Revising Scheduled Events
You may want to change some aspect of an event; for example, you may want to change the time to accommodate a particular attendee, or the location might become unavailable.
To revise a scheduled event:
-
Log in to WebCenter Spaces and go to the Events task flow (or Events page) where you want to revise a scheduled event.
If the Events page is not available, see Section 19.2.3.1, "Displaying the Events Page for a Group Space."
-
Right-click the event and choose Edit (Figure 19-26).
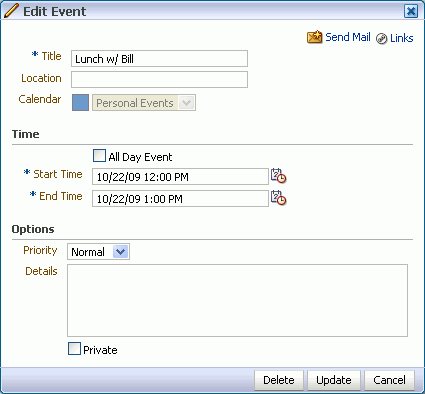
The Edit Event dialog opens (Figure 19-27).
You can also get to the Edit Event dialog by clicking an event, or by moving the mouse pointer (or using the Tab key) to highlight an event and pressing Enter.
Figure 19-27 The Edit Event Dialog Invoked from a Personal Space
Description of "Figure 19-27 The Edit Event Dialog Invoked from a Personal Space"
-
Revise the event details.
-
Click Update to save your changes.
19.2.7 Cancelling Scheduled Events
To cancel an event, you can delete it from the Events page or task flow.
To cancel a scheduled event:
-
Log in to WebCenter Spaces and go to the Events task flow (or Events page) where you want to cancel a scheduled event.
If the Events tab is not available, see Section 19.2.3.1, "Displaying the Events Page for a Group Space."
-
Right-click the event and choose Delete (Figure 19-28).
You can also delete an event by hovering your mouse over the event and pressing the Delete key and from the Edit Event dialog.
-
Click Delete in the Delete Confirmation dialog.
The event is removed from the calendar.
19.2.8 Displaying Multiple Calendars in a Single Task Flow
Within WebCenter Spaces, you may be a member of several group spaces. Each of these group spaces may have its own calendar of events. In addition to that, you may also have your own calendar where you track those events that concern only yourself. At the start of each day, the last thing you want to have to do is trawl through each of these calendars individually to determine your schedule for the day.
To solve this issue, the Events service enables you to view multiple calendars, or overlay calendars, in a single Events task flow. The best place to do this is in your personal space, so that you can also include your personal appointments. However, you can also overlay calendars in a group space Events task flow.
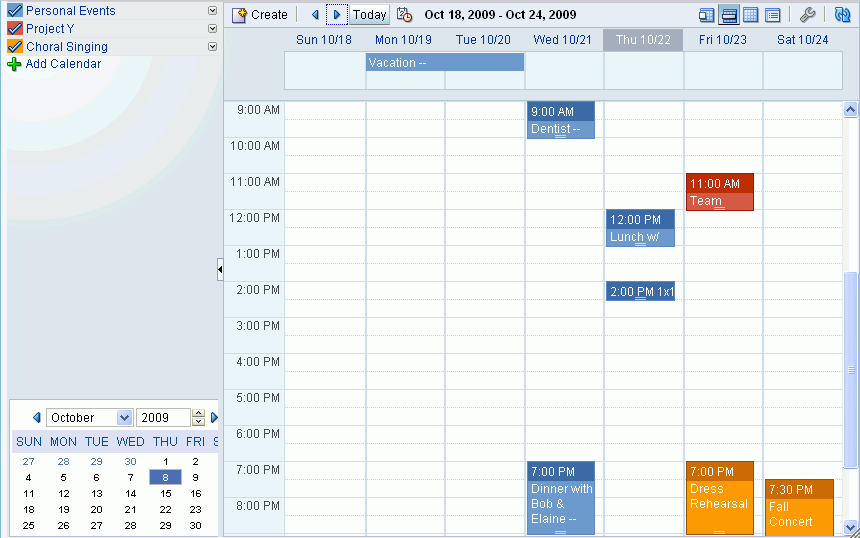
The events from each calendar are displayed in a different color to help identify the source of the event.
To overlay multiple calendars in a single task flow:
-
Log in to WebCenter Spaces and go to your personal space or the appropriate group space.
-
Locate the page that contains the Events task flow.
If you have not yet added the Events task flow to a page, see Section 10.1.4, "Adding Task Flows to a Page."
-
From the Page Actions menu, choose Edit Page.
-
Click the Edit icon for the Events task flow.
Note:
If you are working in a group space, you may not have the appropriate permissions to edit the task flow. To enable calendar overlay, contact the group space moderator. -
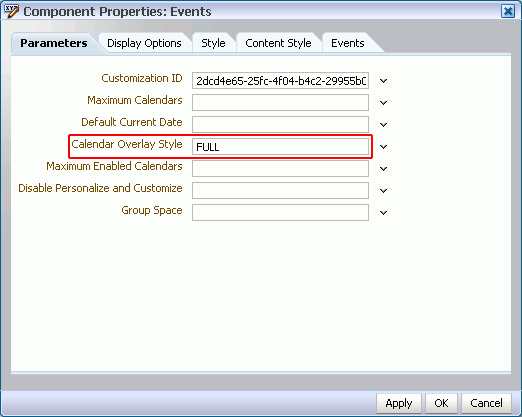
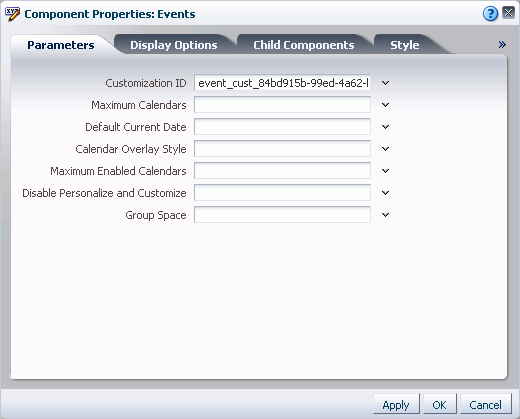
In the Parameters tab of the Component Properties: Events dialog (Figure 19-29), enter
FULLorMINIin the Calendar Overlay Style field.-
FULLprovides a more detailed view of the calendar overlay, but takes up more space on your screen. You may want to use theFULLoption when you are first using calendar overlays. -
MINIprovides a view of the calendar overlay that takes up less space on your screen, but it might not be immediately obvious how to work with the overlays. You might want to use theMINIoption when you have become more familiar with calendar overlays and how to use them.
-
-
Click OK.
-
Click Save and then Close.
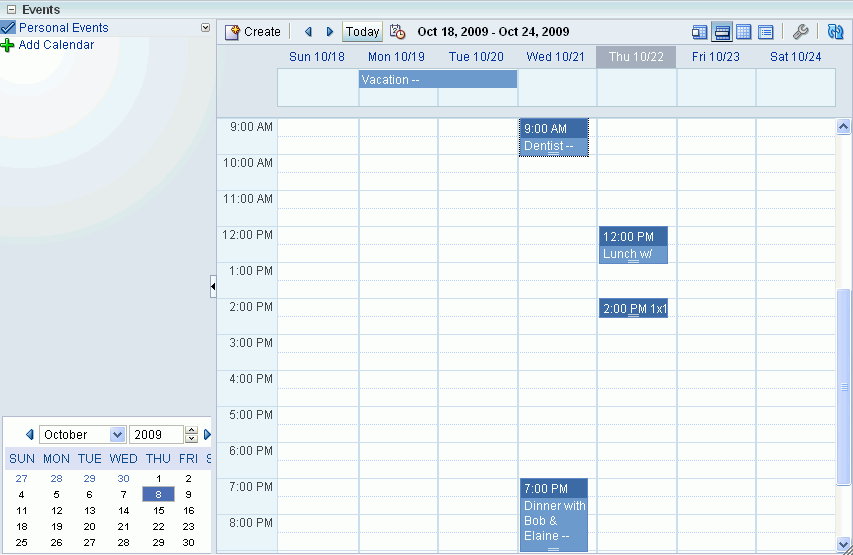
The Events task flow now includes an area to the left of the calendar where you can choose other calendars to display in the task flow (Figure 19-30).
If you select the
FULLoption for the Calendar Overlay Style, the task flow also now includes a date picker to help you easily move around your calendar. -
To add another calendar to the task flow:
-
In the calendar overlay area of the Events task flow, click the Add Calendar icon.
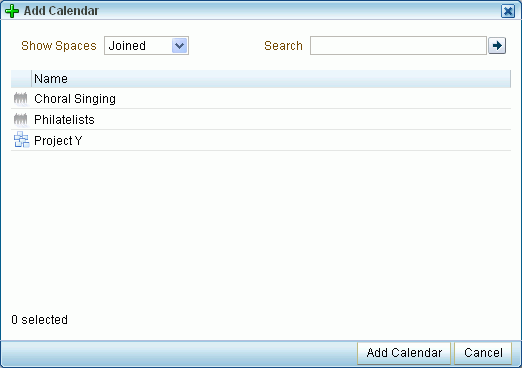
-
In the Add Calendar dialog (Figure 19-32), select the group space whose events you want to see in your calendar.
You can select multiple group spaces in this dialog.
-
Click Add Calendar.
The calendar overlay area now includes your selected group space and the calendar on the right includes events from that group space. The events from the each group space are displayed in a different color.
-
-
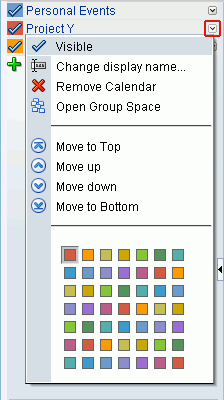
After adding a group space's events to your calendar you can change various display options by clicking the arrow icon to the right of the group space in the calendar overlay area.
Choose
-
Visible to toggle the display of this calendar's events in the calendar.
You can also toggle the display of a calendar's events by clicking the calendar name or the colored square next to the calendar name.
-
Change display name to make the name in the list of calendars more meaningful to you than just the group space name.
-
Remove Calendar to remove this calendar's events permanently.
-
Open Group Space to open the group space associated with this calendar.
-
Move to Top/Move up/Move down/Move to Bottom to rearrange this calendar in the list.
The order in which the calendars are listed determines the order in which events are listed when events from multiple calendars occur in the same time slot. Events from the calendar at the top of the list are displayed first.
-
A color to change the color used for the events from this calendar.
-
19.3 Setting Events Service Task Flow Properties
The Events service task flow has associated properties, which users with sufficient privileges can access through the Component Properties dialog in Oracle Composer (Figure 19-35). Many properties are common to all task flows, and the method for accessing task flow properties is the same from task flow to task flow. Common task flow properties and how to access them are discussed in Section 10.4, "Setting Properties on Page Content."
The properties on the Parameters tab of the Component Properties dialog control the default task flow content and facilitate the wiring of the task flow to page parameters and page definition variables. These properties are unique to the task flow type. For information about wiring pages and components, see Chapter 11, "Wiring Pages, Task Flows, Portlets, and UI Components."
Changes to the properties on the Display Options, Style, and Content Style tabs affect the appearance and behavior of the task flow for all users. These properties are common to all task flows. For more information, see Section 10.4, "Setting Properties on Page Content."
The contents of the Events tab depend on the events supported by the task flow. For more information, see Section 10.4.8, "Working with Component Contextual Events."
The Child Components tab displays all of the components contained within the current component. It provides controls for rearranging, showing, and hiding child components. Not all components contain children. So you may find this tab devoid of content. For more information, see Section 10.4.6, "Working with Child Components."
All properties on the Parameters and Display Options tabs provide access to an Expression Language (EL) editor, which you can use to select or specify a variable value instead of a constant value. Click the Edit icon next to a property field to open the editor. For more information about using the editor and for descriptions of common EL expressions, see Section 10.4.5, "Using Expression Language (EL) Expressions with Component Properties."
Table 19-1 describes the properties that are unique to the Events service task flow.
Table 19-1 Events Service Task Flow Properties: Parameters Tab

