|
|
The Event Generator module allows you to:
| Note: | You must be logged in as a member of the Administrators, IntegrationAdministrators, or IntegrationOperators group to create, change, or delete event generators. For more information, see “About WebLogic Integration Users, Groups, Roles, and Security Policies” in User Management in Using Worklist Console. |
The following topics are provided:
Event generators publish messages to Message Broker channels in response to system events (for example, files arriving in a directory, or messages arriving in an email account or JMS queue). The following event generators can be created from the Oracle WebLogic Integration Administration Console:
A set of channel rules is configured for each event generator. For a JMS event generator, the rules are applied to incoming JMS messages in the user-designated order. For example, the following rules are configured for a JMS event generator:
In this case, a message with a JMS header property “VendorId” set to “ACME Trading Corp” would be posted to the myapp/orders/AllOrders channel because the presence of the “VendorId” property triggers the first rule. The order must be reversed to achieve the desired result.
Now a message with a JMS header property “VendorId” set to “ACME Trading Corp” is properly posted to the myapp/orders/ACMEOrders channel.
Channel rule sequence is only significant for JMS event generators. The sequence is not significant for Email or File event generators.
Additional information regarding the configuration of event generators is also found in the following sections of Deploying WebLogic Integration Solutions.
wli.jmseg.EatSoapActionElement property for event generators.The following table lists the pages you can access from the Event Generator module. The tasks and help topics associated with each are provided:
For more information about TibcoRV Event Generators and other WLI products, see
Oracle WebLogic Integration documentation.
|
||
The Event Generator module allows you to create and deploy the event generators included as part of Oracle WebLogic Integration. When you create a new event generator as described in this section, it is packaged and deployed as an EJB (JMS, File, Email, Timer, MQ Series, JCA and RDBMS event generators) or web application module (HTTP event generator) on a single managed server. Once the event generator has been created and deployed, you can suspend, resume, or add additional channel rules as required.
| Note: | JMS, HTTP, MQ Series, JCA, and RDBMS event generators can be targeted to any number of managed servers in a cluster. For JMS and MQ event generators, it is typical to target the generator to a single managed server when using a physical JMS destination, or to the cluster when using distributed destinations. To deploy to a single managed server, see the procedures in this section. |
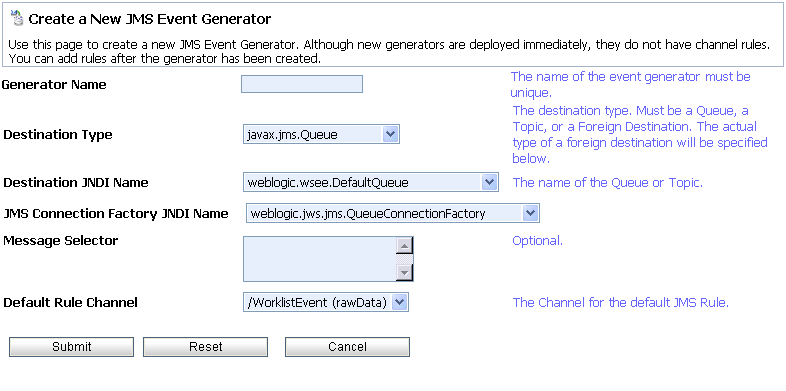
The Create a New JMS Event Generator page is displayed.
| Note: | Names are not case sensitive. Leading or trailing spaces are removed. |
The Event Generator Definition page is displayed.
| Note: | The event generator is created and deployed without channel rules, therefore, the first task is to define channel rules for the generator. |
 button to move entries up or down the list. Changes take effect immediately.
The Create New page for the selected type is displayed.
| Note: | You must ensure the following before starting the server, after you install MQSeries. |
| Note: | Sometimes, the File Event Generator picks up a file before it is completely uploaded to the polling directory. As a result, the process is invoked with incomplete data. The Event Generator should pick up the file only when it is completely uploaded. To solve this problem, you can edit the setDomainEnv.cmd/sh file to include com.bea.wli.fileeg.waitTimeMillis as the system property. This is useful if the file is being uploaded, and the File Event Generator must wait for a defined number of milli seconds before processing the file. |
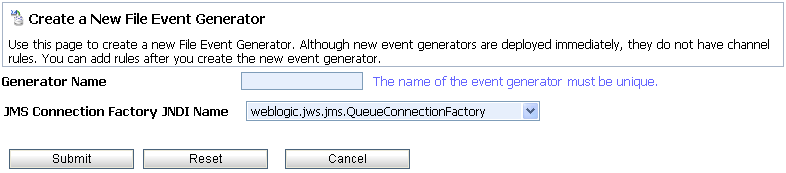
The Event Generator Definition page is displayed.
| Note: | The event generator is created and deployed without channel rules, therefore, the first task is to define channel rules for the generator. |
button to move entries up or down the list. Changes take effect immediately.| Note: | This functionality is provided for convenience only. Channel rule sequence is not functionally significant for Email or File event generators. |
The File Generator Channel Rule Definition page allows you to define the properties for the channel rule.
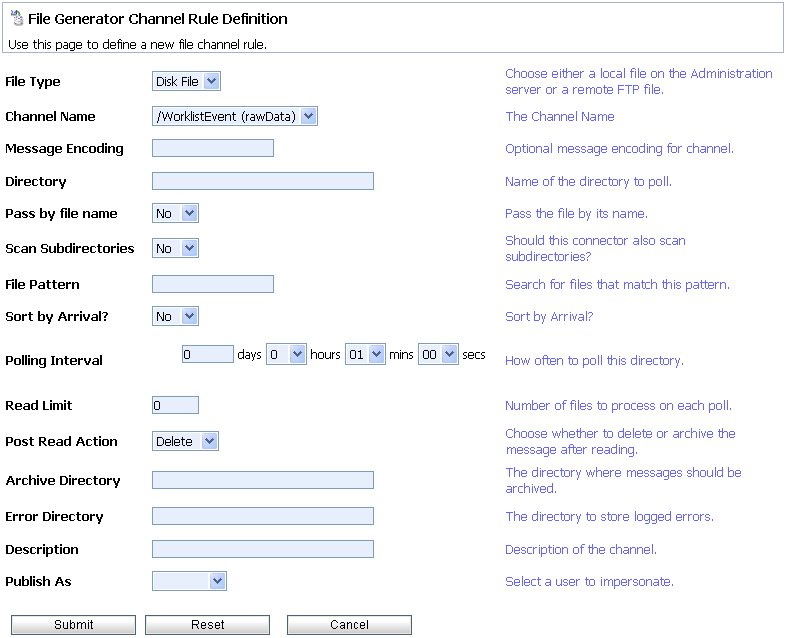
The following table summarizes the available settings:
In the Message Encoding field, if you do not want to select the default value, enter the name of the character set.
|
The character set, if other than the default. This property applies only if the selected Channel Name is of type string. For more information, see
http://www.iana.org/assignments/character-sets for valid values.
|
|||
The SFTP authentication method to use for authenticating with the SFTP server. You can configure the following authentication methods:
|
||||
The password used for authentication with the SFTP server. You can enter the password in the following ways:
|
||||
Any additional properties required for host-based and public key based authentication can be specified as a list of name/value pairs separated by semi-colon (;). The custom properties are required when you are adding third-party SFTP client implementations. See Sample Host File for Host Based Authentication for details.
|
||||
If you enter the password in the Use Value field, it is stored in clear text in the event generator configuration file. To secure the password, add it to the password store. For more information, see Password Aliases and the Password Store. After the alias has been added to the password store, it is available for selection from the Use Alias drop-down list.
|
||||
|
Whether the File Type is Disk or FTP, we highly recommend that you specify a location that is writeable.
If the File Type is Disk, the system verifies that the directory is writeable before polling. If it is not writeable, the error count is incremented, and the reading and publishing process is skipped.
If the File Type is FTP, the files in the directory are read and published at each polling interval. If an error is encountered in deleting a file, the error is logged, and the error count is incremented. The inability to delete files will result in the same files being published at every polling interval.
|
||||
| Note: | The File Event Generator polls a specified directory for a specified file pattern, finds a file, generates a event, and publishes it to the specified channel. In case of any error, the file is moved into an error directory. These details can be specified while creating a File Event Generator from the WLI Administration Console. |
| Note: | When the server is shut down, the File Event Generator encounters an exception during message publishing, as the corresponding JPD is already undeployed. The file is moved to the error folder. When the server is restarted, there is no recovery of the message, as the message was not successfully published to the channel, or the file had been moved to error directory, as the error was encountered during shutdown. In case of a force shutdown or crash, check the error directory for unprocessed/in-flight messages. You must manually redeliver and publish these messages after the server re-starts. |
A sample host file for host-based authentication is as follows:
<?xml version="1.0" encoding="UTF-8"?>
<HostAuthorizations>
<!-- Host Authorizations file, used by the abstract class HostKeyVerification to verify the servers host key -->
<!-- Allow the following hosts access if they provide the correct public key -->
<AllowHost HostName="testSFTPserver” Algorithm=”ssh-dss” Fingerprint="12H HRYYR %668 JJFJF”/>
<AllowHost HostName="testSFTPserver1” Algorithm=”ssh-dss” Fingerprint="178H HRYHFHF %668 JJFJF”/>
<!-- Deny the following hosts access -->
<DenyHost HostName="testFTPServer111”/>
<DenyHost HostName="testFTPServer134”/>
</HostAuthorizations>
The sample host file, sftp_known_hosts.xml is created in the \BEA_Home\wli_10.3\user_projects\domains\<Created Domain >\wli-config directory and named as sftp_known_hosts.xml.
| Note: | The properties for Allow Host is set in the wli-config file, then all the files from the SFTP server are accepted. To deny access to a host, specify the host name using the Deny Host option. |
The Email Generator Channel Rule Definition page allows you to define the properties for the channel rule.
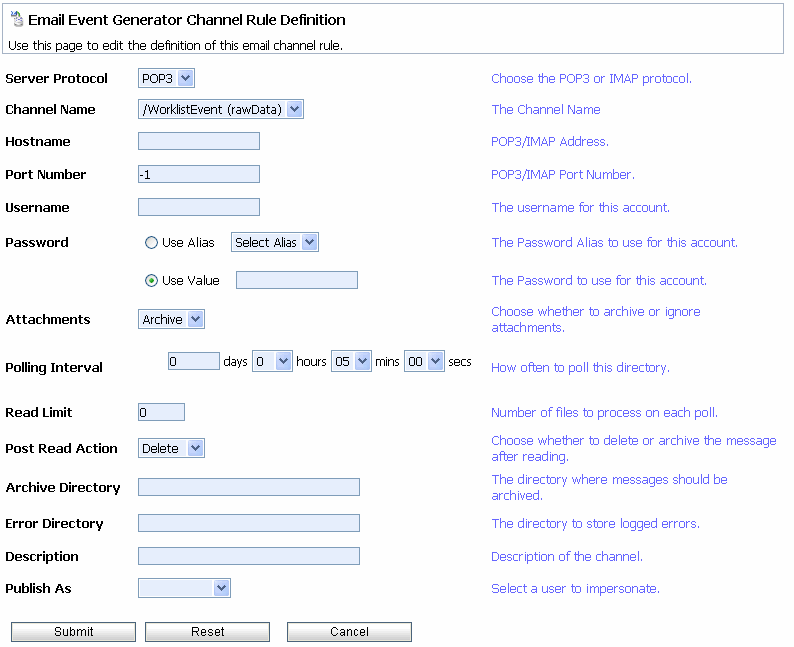
The following table summarizes the available settings:
If you enter the password in the Use Value field, it is stored in clear text in the event generator configuration file. To secure the password, add it to the password store. For more information, see Password Aliases and the Password Store. After the alias has been added to the password store, it is available for selection from the Use Alias drop-down list.
|
||
The JMS Generator Channel Rule Definition page allows you to define the properties for the channel rule.
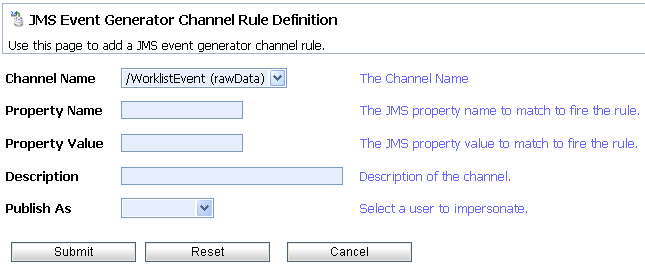
The following table summarizes the available settings:
The Timer Event Generator Channel Rule Definition page allows you to define the properties for the channel rule.
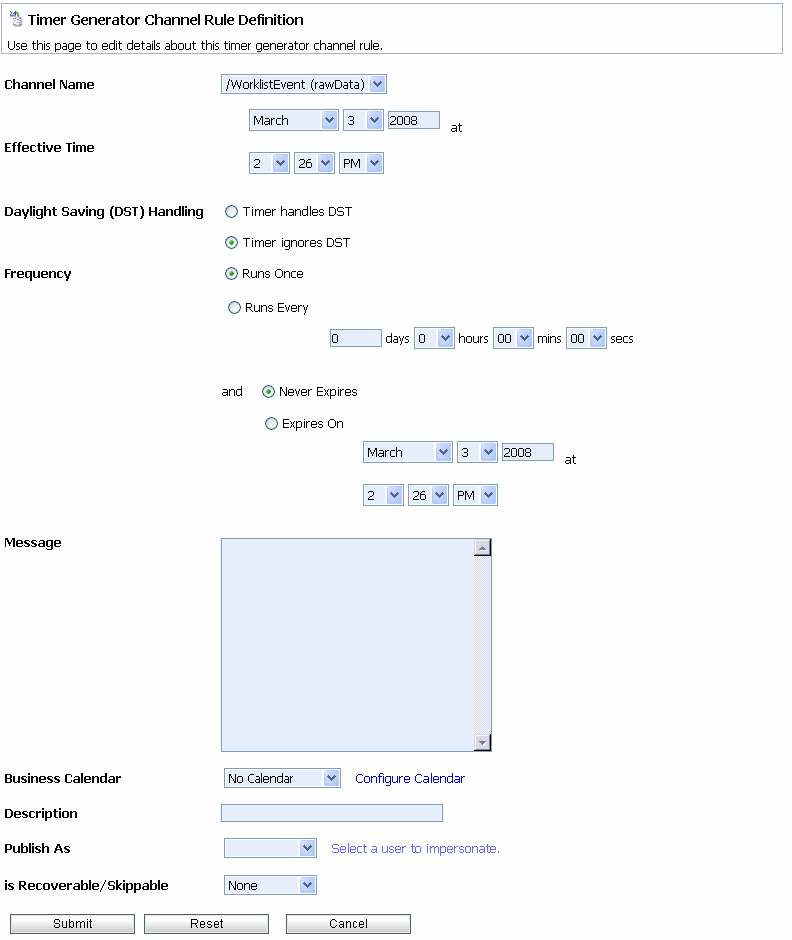
The following table summarizes the available settings:
The date and time the first event is to be generated. If the effective time has already passed, the event generator will not publish an event until the next Runs Every interval (see next setting). If the Runs Once option is selected, you must enter a valid, future, Effective Time or no event will be generated.
If you want to create an event that fires at the same time, every day, for the calendar year, you must take into account the fact that a time change occurs when the time changes from standard time to daylight savings time. To account for this you must define two timer events, one that operates during standard time (e.g. from April 6 2004, 2:30PM to October 31 2004 2:30PM) and another that operates during daylight savings time (e.g. from November 1 2004 2:30PM to April 2 2005 2:30PM) with the interval set to 1 day. You also need to define more timers for future years as needed.
|
||||
Intervals from the Effective Time that each event is to be generated. If the Runs Once option is selected, the Effective Time constitutes the first and last event generated.
|
||||
If a business calendar is selected, the Runs Every interval represents business time calculated against the specified calendar. For more information, see “
About Business Calendars and Business Time Calculations” in the Using WorkList Console.
If no calendar is selected, the Runs Every interval represents an absolute period (24 hour day, every day).
If you want to modify event generator channel rules and the business calendar associated with the channel rules, you must suspend the corresponding timer event generator before you make any changes. For information on suspending a timer event generator, see Suspending and Resuming Event Generators.
|
||||
TIBCO Rendezvous (TIBCORV) Event Generator is one of the Oracle WebLogic Integration event generators that you can create from the Oracle WebLogic Integration Administration Console. The TIBCORV event generator listens for messages on a subject and raises events to the message broker on receiving the desired message. Figure 5-10 shows the Create New TibcoRV Event Generator page.

Once you have created a new TIBCORV event generator, you can add the channel rule definition as shown in Figure 5-11.
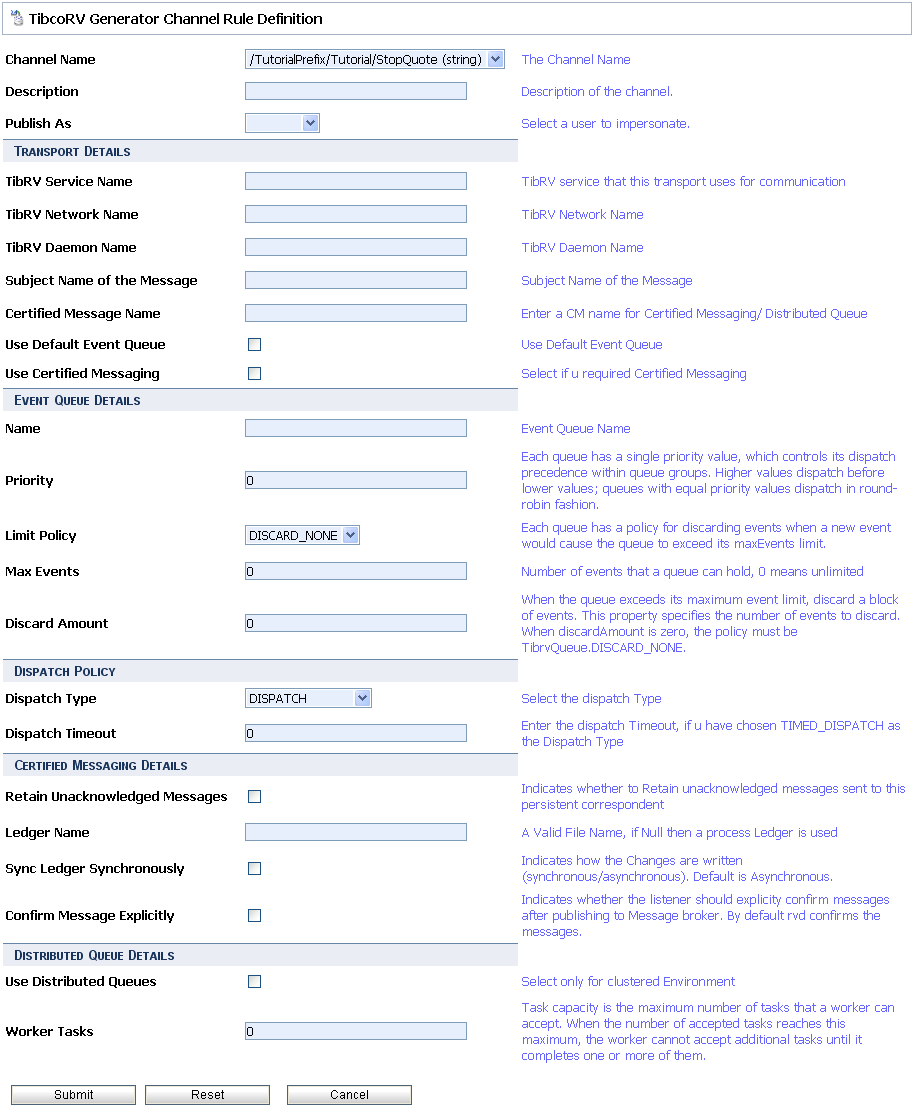
For more information about the TIBCORV event generator and creating the channel rule definition, see TIBCO Rendezvous Event Generator in the TIBCO Rendezvous Control and Event Generator User Guide.
The MQSeries Generator Channel Rule Definition page allows you to define the properties for the channel rule.
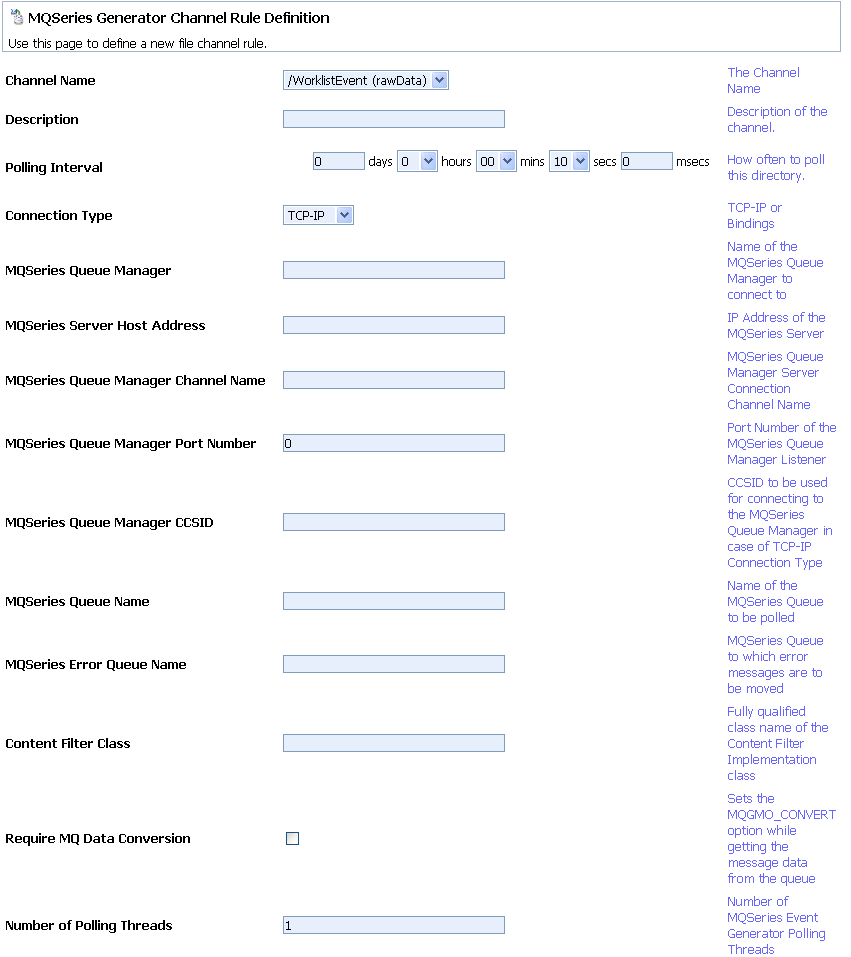
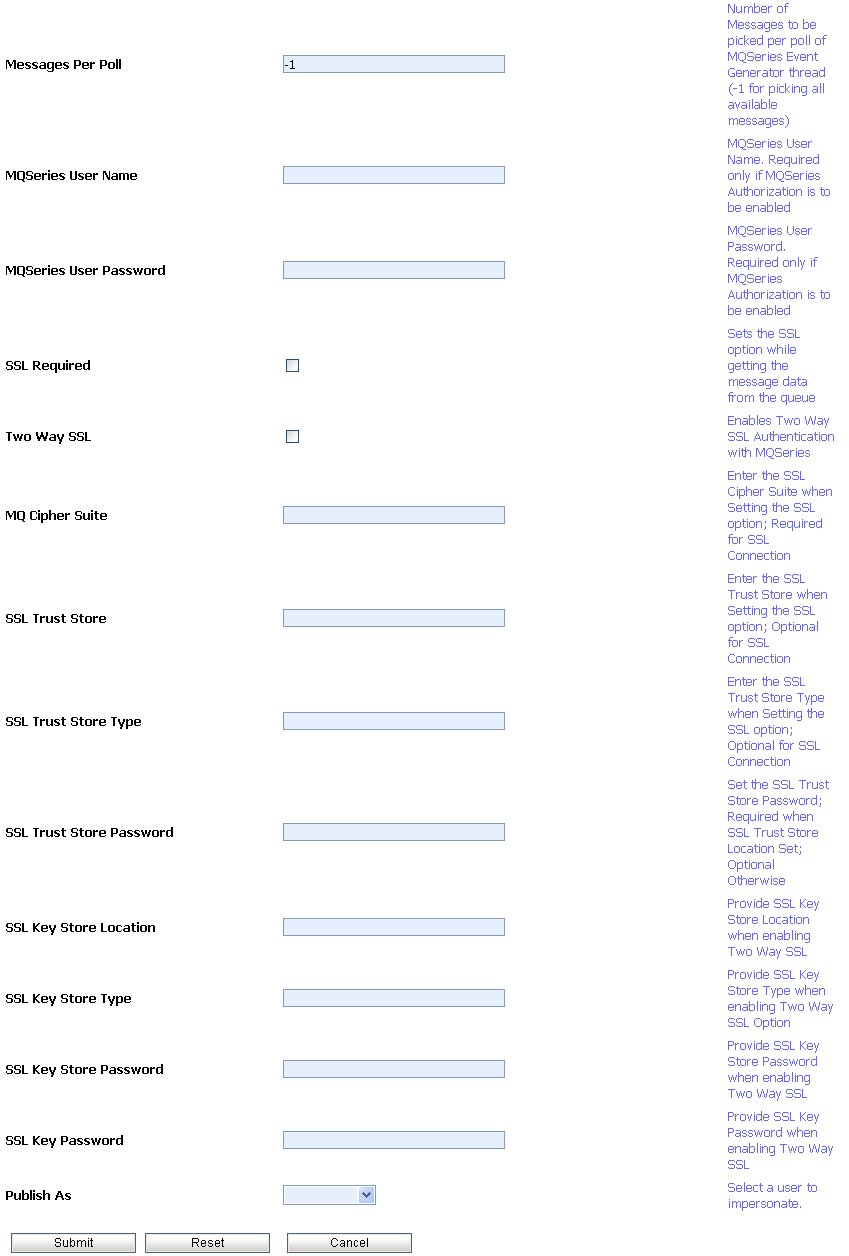
The following table summarizes the available settings:
The connection mode to be used to connect to the WebSphere MQ queue manager. Select TCP-IP or Bindings.
|
||
The fully qualified name of the class implementing the event content filtering logic. As described in Content Filtering, this class is an extension of the
com.bea.wli.mbconnector.mqseries.AbstractContentFilter class.
|
||
When checked, the
MQGMO_CONVERT option is enabled, and directs the queue manager to convert the contents of the message retrieved from the queue. This option must be checked when retrieving messages in a cross platform environment involving mainframes (for example, a mainframe application puts a message on the queue that is retrieved by the event generator on a PC). This option is typically enabled to convert messages to the native character set as specified by the CCSID.
|
||
Filtering the messages in a queue based on message contents requires a custom content filter class that extends the com.bea.wli.mbconnector.mqseries.AbstractContentFilter class.
package com.bea.wli.mqseries.eventgen.contentfilter;

import com.bea.wli.mbconnector.mqseries.AbstractContentFilter;

public class ContentFilter extends AbstractContentFilter

{

    public ContentFilter()
    {
    }

    public boolean matchContent(byte abyte[])
    {
        /*This function always returns true, ensuring that all
           messages generate the event. However the user should
           put in his content filtering logic based on the
           contents of the message here. The abyte[] byte array
           parameter to this function is the byte array
           representation of the message. Return true if the
           message should generate an event, otherwise return
           false*/
       return true;
    }
The parameter to this function is the byte array representing the message retrieved from the queue by the event generator. You can create content filtering logic by performing required checks on the contents of the message represented by the byte array. Return a Boolean value of True from the function if the message should generate an event. Otherwise return a Boolean value of False.
Once it is defined, the class implementing the content filtering logic should be bundled in a jar file and included in the WebLogic CLASSPATH.
mqegEjbUtil.jar from the WLI_HOME\egs\mqEG.ear file and include it in the CLASSPATH variable of the environment where the custom content filter class will be developed.com.bea.wli.mbconnector.mqseries.AbstractContentFilter| Note: | This class is present in the mqegEjbUtil.jar file that you extracted in step 1. |
AbstractContentFilter class from the mqegEjbUtil.jar and store in a directory in your file system by maintaining the package structure.mycontentfilter.jar, which contains the com.bea.wli.mbconnector.mqseries.AbstractContentFilter class and the custom content filter class compiled in step 4.CLASSPATH variable in the WebLogic Start Server script.The HTTP Generator Channel Rule Definition page allows you to define the properties for the channel rule.
The following table summarizes the available settings:
The RDBMS Event Generator Channel Rule Definition page allows you to define the properties for the channel rule.
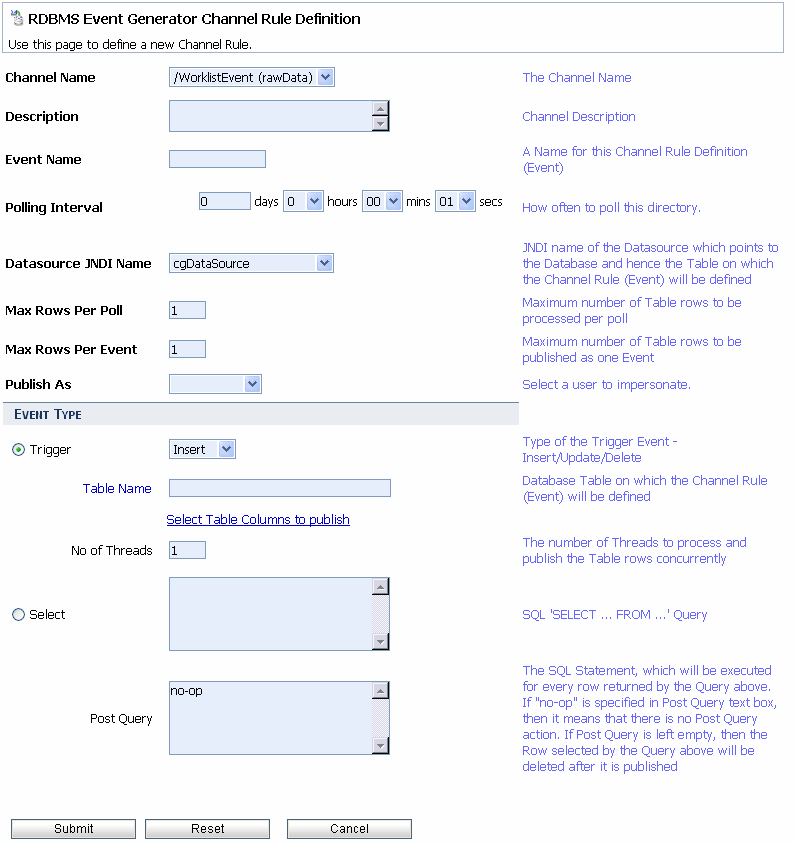
Table 5-10 summarizes the available settings:
The name of the Message Broker channel to which messages matching the configuration criteria are published. If you are publishing to an XML or string channel, then an XML schema (
.xsd) file will be created in the WebLogic domain folder under a directory with the same name as the channel rule definition. You can use this .XSD for validations.
|
||||
Identifies the JNDI name of the data source connection for the database. The list is populated based on the data sources configured in the Oracle WebLogic Server where the event generator is running.
For more information on configuring data sources, see the
RDBMS Event Generator User Guide.
|
||||
Specifies the number of records to be retrieved by each thread in each polling cycle. This number must be a valid integer greater than 1 and less than 10,000.
|
||||
Specifies that an Insert, Update, or Delete event has occurred in a database table using the trigger mechanism.
|
||||
Click this link to browse the columns of the database table entered in the Table Name field. Select the desired columns by checking the check box beside the desired column. Click Select Columns to choose the checked columns.
Only those columns of the row you select are published when an Event occurs. For example, when 2 of 4 columns are selected for an Update Event, this does NOT mean that the Event is going to listen for updates on those 2 columns alone. The two are not connected. When a Trigger Type Event is configured, it is for an entire Row. An Event will be fired even if only 1 column is chosen and even if it is not one of the updated columns. For Delete and Insert Trigger Events, the selected columns of the Inserted/Deleted row will be published.
|
||||
Specifies the number of event generator processing threads. If the number entered is greater than 1, then the events may not be delivered in the same order as they were in the database. The greater the number of threads, the better the concurrency, as with any concurrent system, order is sacrificed for higher throughput.
|
||||
Specifies a Post Query that will be executed for every row returned by the SQL Query above. You must enter the exact names of the columns and the @ prefix to provide runtime values. Post Query is not validated for correctness.
“
SELECT *” will not work if the Post Query refers to a column in the Query. The selected columns must be listed individually. All SQL statements must use fully qualified table names.
The Post Query is only executed if the Query specified in the SQL Query field returns a
ResultSet and if it contains one or more rows.
If you leave the Post Query field empty and enter a SELECT query in the SQL Query field, the selected row is deleted after it gets published. If
no-op, meaning “No Operation”, is specified in the Post Query field, the selected rows are not deleted automatically. If you do not want to specify a Post Query and also do not want the selected rows to be deleted automatically, then you must enter no-op in the Post Query field. Also, automatic-delete only works if a SELECT query refers to a single Table (SELECT DEPT. NAME, EMP.ADDRESS FROM DEPT., EMP WHERE DEPT.NAME = EMP NAME refers multiple tables). Automatic delete does not work for DB2 and Informix.
|
||||
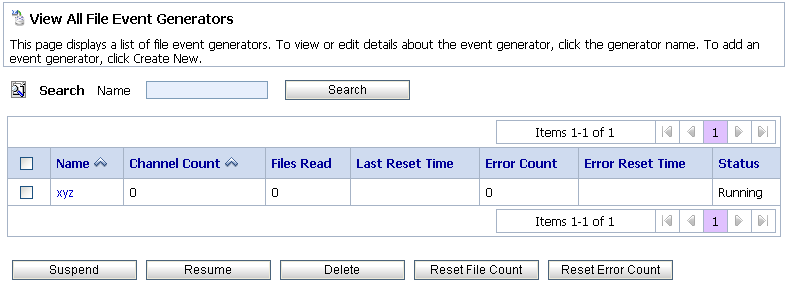
The View All File Event Generators page displays the following information for each configured event generator:
| Note: | The elements for Email, JMS, Timer, MQ Series, RDBMS, JCA, and HTTP event generators are the same as the File event generator and listed in the same sequence as on the View all File Event Generators page. |
To locate an event generator, do the following:
? to match any single character or * to match zero or more characters.), then click Search. The generators matching the search criteria are displayed. and descending
  arrow buttons indicate sortable columns. Click the button to change the sort order.
 , previous
  , first
  , or last
  page.
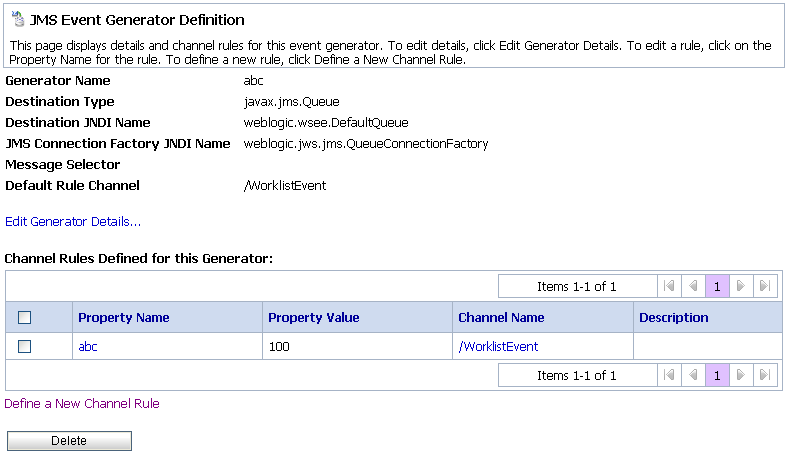
page.The Event Generator Definition page allows you to view and update the channel rules. For a JMS event generator, you can also update the default rule channel.
The JMS Event Generator Details page is displayed.
Timer—Effective time
File—Channel Directory
Email—Hostname
JMS—Property Name
MQ—Polling Interval
HTTP—Channel Name
JCA—Channel Name
| Note: | You cannot update the channel rules for a RDBMS event generator. You must delete the channel and create a new one. |
Defining Channel Rules for a File Event Generator.
Defining Channel Rules for an Email Event Generator.
Defining Channel Rules for a JMS Event Generator.
Defining Channel Rules for a Timer Event Generator.
Defining Channel Rules for an MQ Series Event Generator.
Defining Channel Rules for an HTTP Event Generator.
Defining Channel Rules for a JCA Event Generation
A confirmation dialog box is displayed.
| Note: | Not available for all event generator types. |
Click the up or down arrow button to move entries up or down the list. Changes in list order take effect immediately.
You can suspend or resume an event generator from the View All page. Suspending a generator undeploys the Event Generator. On resuming the generator it is deployed.
| Note: | The messages read and error counts are stored in memory only; the counts are not stored to disk or other persistent store. Therefore, when you suspend and resume an event generator, the messages read and error counts are reset to zero. |
| Note: | If you attempt to resume a generator that is already running, or suspend a generator that is already suspended, the command is ignored. |
| Note: | When an event generator is suspended before a server restart, it automatically switches to Running mode on restart. This functionality is uniform across all event generators. |
The selected generators are suspended.
| Note: | For all event generators, when an event generator is suspended, the counter resets to 0. However, when you suspend a RDBMS event generator, the event generator resets to 0 AND the message changes to “Last-Reset-Time”. |
You can reset the read and error counters from the View All page.
You can delete any channel rules from the Event Generator Definition page.
The selected channel rules are deleted.
| Note: | You cannot delete a RDBMS event generator channel rule if a transaction is inserting rows into the User Table on which the event in question has been configured. You must wait for the transaction to complete before deleting the channel rule. |
You can delete an event generator from the View All page.


|