


|
This section provides information you need to use the Worklist module in Oracle WebLogic Integration Worklist Console to:
The following table lists the pages you can access from the Worklist module. The tasks and topics associated with each are provided:
Worklist uses several types of policies to control access to certain global operations. You can define policies for the administration, creation, update, and retrieval of tasks. These policies can be defined for Worklist system instances and task plans (both global level and individual level).
You can provide authorization against tasks or Worklist system instances in a more granular way to allow access to the resource based on your business needs for security. For example, some types of tasks may require that a user be granted a specific role in order to create a task. Users granted this role may not be candidates for holding more global and powerful roles such as IntegrationAdmin. In such a scenario, you can set the per-task plan policy to grant appropriate privileges to work with a specific task plan without necessarily or inadvertently granting access to a wider range of resources.
In addition to the security policies that are explicitly defined for a role, there are certain implicit policies that are based on the user’s task affinity (for example, task owner, claimant, assignee, and so on).
Worklist security protects access to the following resources:
For the types of operations that are protected for these resources, see Operations and Policies.
Explicit policies explicitly define which roles a user must be granted in order to perform operations on the resource. The explicit policies are:
In Worklist, security policies can be set for global and individual Worklist system instance; and global and individual task plans.
| Note: | When a specific resource (Worklist system instance or task plan) does not have a defined security policy it inherits the global policy for the resource. However, if the resource defines an explicit security policy, the global policy for the resource is ignored. |
The following table lists the various security policies that can be explicitly set. When used with the default Oracle WebLogic Server authorization provider these policies are defined as a list of role names. Users granted any of the roles listed in the policy are authorized to perform the type of operation associated with the policy.
Tasks represent work items to be carried out by one or more human actors. Human actors may be associated with a task in the following ways. An actor’s association with a task is called the actor’s affinity to the task. The possible types of task affinity are:
The association between a task and human actors can be very dynamic. This makes it impossible to define an appropriate security policy that can take into account all the users that may eventually be associated with a task. To account for this, Worklist uses task affinity (current user associations with a task, for example Owner, Claimant, or Assignees) to make access control decisions. The following table lists the implicit security policies.
A given task affinity is granted a fixed set of privileges to perform operations on the tasks for which that affinity applies. So, each type of task affinity represents an implicit security policy. They are implicit because administrators do not need to define them explicitly in order for them to take effect.
The following table lists the implicit security policies.
The following table lists all the possible operations, as defined in the API, that can be performed on a given type of resource (via the Worklist API), and the policy that is consulted before allowing a user to perform the operation.
| Notes: | The operations listed for TaskPlan resources may exist on any one of the WorklistTaskAdmin, WorklistTaskUser, and WorklistTaskQuery interfaces. |
Global Admin, Global Update. See, Out-of-box Security Policies.
|
||||
Global Admin, Global Update, Global Query. See, Out-of-box Security Policies.
|
||||
Global Admin See, Out-of-box Security Policies.
|
||||
Global Admin, Global Query, Global Update. See, Out-of-box Security Policies.
|
||||
Global Admin See, Out-of-box Security Policies.
|
||||
Global Admin, Global Query, Global Update. See, Out-of-box Security Policies.
|
||||
|
||||
Security policies are defined in Worklist Console and associated with one of the protected resources described in the Protected Resources. Security policies may also be set using the Worklist API, which is also used by Worklist Console.
Security policies are never stored directly in the metadata for a protected resource. Rather, these policies are stored in the active security provider for the Oracle WebLogic Server domain hosting Worklist. The security provider stores the policies and their association with a Worklist resource. At runtime, the Worklist runtime makes calls to the Oracle WebLogic Server security framework (specifically isAccessAllowed calls) using the current user identity to ensure that only authorized users gain access to protected resources. The isAccessAllowed call is made passing the key for a protected resource. The Oracle WebLogic Server security framework handles establishing the identity of the current user, and then calls into the authorization provider to make the actual decision for or against allowing access.
| Note: | The authorization provider stores the association of the policy expression with the resource for the policy. This mapping is one-to-one, and thus a given policy cannot apply to more than one resource. Also, the association treats the protected resource as an opaque resource key. Worklist defines resource keys for the protected resources it defines. These keys include the type and name or identifier for the resource, as well as the type of access being requested. For example, an attempt to get a property value from a task will result in the creation of a PropertySet resource describing the task plan ID, and property set name that contain the property, and the Query policy describing the type of access requested. |
Different authorization providers use different expression languages for policies, and offer different capabilities in those expressions. The Oracle WebLogic Server default authorization provider allows a policy expression that is a list of role names. Worklist helps users work directly with the Oracle WebLogic Server default authorization provider and provides enough information to make manual integration with other providers possible.
Worklist provides API-level support for defining policies within the Oracle WebLogic Server default authorization provider. This API-level support defines a policy as a list of role names. No other type of policy expression is supported via the APIs. However, it is possible to define more detailed policies using the Oracle WebLogic Server default authorization provider policy expression language. For more information about this policy expression language, see “WebLogic Security Framework” in WebLogic Security Service Architecture in Understanding WebLogic Security. Custom policy expressions can be associated with the appropriate Worklist resource by constructing the appropriate instances of Worklist resource classes (see Defining Policies within Oracle WebLogic Server Default Security Provider), and then passing the resource instance and policy expression to methods in the Oracle WebLogic Server security framework API. For more information, see Securing Oracle WebLogic Server and Securing WebLogic Resources Using Roles and Policies.
Worklist provides the following methods on the WorklistSystem interface to set the default administrative, creation, and query policies on a WorklistSystem resource:
public interface WorklistSystem {/**
* Operations for which a Worklist system policy may be set
*/
public static enum OPERATION { Admin, Create, Query, Update };…
/**
* Set the global policy for *all* Worklist system instances that don't
* specify their own explicit policy for the given operation type.
* Note, this method is provided for convenience only. Oracle recommends you
* use WorklistAdminMBean instead.
* <p>
* Note, this method has the same effect regardless of what WorklistSystem
* instance is used, or what Worklist system instance it comes from.
* <p>
* To call this method, you must be granted one of the roles
* listed for the global Worklist System Admin policy (by default this is
* the Admin or IntegrationAdmin roles). If an unauthorized user attempts
* this call, a SecurityException will be thrown.
* <p>
* NOTE: This method will only work when you are using the WLS default
* authorization provider. If you are using a third-party provider, you must
* use that provider's tools for assigning the policy to the task plan.
* @see com.bea.wli.worklist.management.WorklistAdminMBean#setGlobalWorklistSystemPolicy(String, String[])
*/
public void setGlobalWorklistSystemPolicy(OPERATION operation,
String[] roles)
throws ManagementException, RemoteException;
/**
* Set a simple policy for this Worklist system instance and the given
* operation type. The policy is described in terms of the roles which are
* authorized to perform the given operation on this Worklist system
* instance.
* <p>
* To call this method, you must be granted one of the roles
* listed for this Worklist system instance's Admin policy, or you must be
* granted one of the roles listed for the global Worklist System Admin
* policy if this Worklist system instance has not had an explicit policy
* set for it. If an
* unauthorized user attempts this call, a SecurityException will be thrown.
* <p>
* NOTE: This method will only work when you are using the WLS default
* authorization provider. If you are using a third-party provider, you must
* use that provider's tools for assigning the policy to the Worklist system
* instance.
* @param operation The type of operation for which the policy is being set.
* @param roles The roles which are authorized to perform the given
* operation on tasks of the given type. If roles is empty or null,
* the policy will be reset to the default/global policy.
* @see #setGlobalWorklistSystemPolicy(OPERATION, String[])
*/
public void setWorklistSystemPolicy(OPERATION operation,
String[] roles)
throws ManagementException, RemoteException;
…
}
| Note: | The setGlobalWorklistSystemPolicy method sets the policy on the global WorklistSystem resource, regardless of the Worklist system instance that is being used. The setWorklistSystemPolicy method sets the policy on this instance of WorklistSystem. |
Worklist provides the following methods on the WorklistTaskAdmin interface for setting policies on the global and specific task plans.
public interface WorklistTaskAdmin {…
/**
* Operations for which a task plan policy may be set
*/
public static enum OPERATION { Admin, Create, Query, Update };…
/**
* Set the global policy for *all* task plans that don't specify their
* own explicit policy for the given operation type. Note, this method is
* provided for convenience only. Oracle recommends you use WorklistAdminMBean
* instead.
* <p>
* Note, this method has the same effect regardless of what WorklistTaskAdmin
* instance is used, or what Worklist system instance it comes from.
* <p>
* To call this method, you must be granted one of the roles listed for
* the global TaskPlan Admin policy (by default this is the Admin and
* IntegrationAdmin roles).
* If an unauthorized user attempts this call, a SecurityException
* will be thrown.
* <p>
* NOTE: This method will only work when you are using the WLS default
* authorization provider. If you are using a third-party provider, you must
* use that provider's tools for assigning the policy to the task plan.
* @see com.bea.wli.worklist.management.WorklistAdminMBean#setGlobalTaskPlanPolicy(String, String[])
*/
public void setGlobalTaskPlanPolicy(OPERATION operation, String[] roles)
throws ManagementException, RemoteException;
/**
* Set a simple policy for the given task plan and operation type. The
* policy is described in terms of the roles which are authorized to
* perform the given operation on tasks of the given task plan.
* <p> To call this method, you must be granted one of the roles listed for
* the Admin policy for this task plan, or be granted one of the roles
* listed for the global TaskPlan Admin policy if this task plan has no
* explicit policy set for it.
* If an unauthorized user attempts this call, a ManagementException
* will be thrown.
* <p>
* NOTE: This method will only work when you are using the WLS default
* authorization provider. If you are using a third-party provider, you must
* use that provider's tools for assigning the policy to the task plan.
* @param taskPlanId The ID of the TaskPlan for the tasks for which this
* policy is being set.
* @param operation The type of operation for which the policy is being set.
* @param roles The roles which are authorized to perform the given operation
* on tasks of the given type. If roles is empty or null, the policy
* will be reset to the default/global policy.
* @see #setGlobalTaskPlanPolicy(OPERATION operation, String[] roles)
*/
public void setTaskPlanPolicy(TaskPlanId taskPlanId,
OPERATION operation,
String[] roles)
throws ManagementException, RemoteException;
…
}
Worklist does not provide any direct support for defining policies within third-party authorization providers. However, a third-party provider that can plug into the Oracle WebLogic Server security framework should be able to make authorization decisions given the proper resource information.
This section describes the resources Worklist uses to enable authorization checks. It is these resources that are used to associate a policy in a third-party provider with the task plans you wish to control access to.
Worklist defines the following resources:
To define and store a policy for either of these resources in a third-party authorization provider, you must instantiate an instance of the appropriate resource implementation class and use it to obtain the proper resource identification information.
Given the proper identification for the resource, you can then use the tools of the third-party provider to associate a policy with the resource.
Documents related to security for Oracle WebLogic Server at located at the following URL:
http://edocs.bea.com/wls/docs103/security.html
The implementation classes for these resources are in the com.bea.wli.worklist.security package. This package is not strictly public, but access to the resource implementation classes is supported for the purpose of obtaining resource identification for use with third-party providers.
The Worklist configuration extension template adds the following policies to the configuration of the Oracle WebLogic Server default authorizer. These policies are also the policies Worklist recommends when you are setting up a domain to host Worklist application modules. The following descriptions give detailed information about the resources Worklist considers protected resources, and the default policies recommended for those resources.
Each resource definition describes the resource in the following format:
resource type = "<type of resource to protect>"
<key1 name> = "<key1 value>", … , <keyN name> = "<keyN value>"
Roles = { <Role 1>, …, <Role N> }
where, the keys define parameters controlling the scope of the resource, and the Roles list defines the list of roles that are granted access to that resource. For Worklist, the Worklist system resource has type WorklistSystem, and task plan resources have type TaskPlan.
For WorklistSystem resources, the Oracle WebLogic Server security framework knows them by a type of <wli-worklist-system>. For TaskPlan resources the Oracle WebLogic Server security framework knows them by a type of <wli-task-type>. This type information along with the provided key/value pairs is enough to construct a low-level resource identifier for use with authorization providers other than the Oracle WebLogic Server default provider.
The policies described below are for the global WorklistSystem and TaskPlan resources. In other words, they do not apply to specific Worklist system instances or task plans. Rather, they exist as default policies for resources that do not define their own specific policies.
To set polices specific to a Worklist system instance or task plan you may either:
WorklistSystem.setWorklistSystemPolicy() or WorklistTaskAdmin.setTaskPlanPolicy() method to set policies using the Oracle WebLogic Server default authorization provider, or …resource type = "WorklistSystem"
operation key = "Admin"
hostAppId key = null
Roles = {Admin, IntegrationAdmin }resource type = "WorklistSystem"
operation key = "Create"
hostAppId key = null
Roles = {Admin, IntegrationAdmin }resource type = "WorklistSystem"
operation key = "Query"
hostAppId key = null
Roles = { Admin, IntegrationAdmin, IntegrationUser }resource type = "WorklistSystem"
operation key = "Update"
hostAppId key = null
Roles = {Admin, IntegrationAdmin }resource type = "TaskPlan"
operation key = "Admin"
taskTypeId key = null
Roles = {Admin, IntegrationAdmin }resource type = "TaskPlan"
operation key = "Create"
taskTypeId key = null
Roles = { Admin, IntegrationAdmin, TaskCreationRole, Anonymous}resource type = "TaskPlan"
operation key = "Query"
taskTypeId key = null
Roles = {Admin, IntegrationAdmin, IntegrationUser }resource type = "TaskPlan"
operation key = "Update"
taskTypeId key = null
Roles = {Admin, IntegrationAdmin }Worklist defines default policy expressions for the global Admin, Create, Query and Update policies for both Worklist system instances and task plans. These policies are automatically set when the Oracle supplied authorization providers (for example, LDAP and SQL) are used. If you use a third-party authentication provider, these default policies should serve as a suggestion for Oracle-recommended policies you should set within your provider (using their policy expression client tools).
The following table summarizes the actions the IntegrationMonitor, IntegrationOpertator, and IntegrationAdmin, and IntegrationUser roles can execute by virtue of these default global policies.
| Note: | Administrators are free to modify the global policies. In that case, the values given in the table below may not necessarily apply. |
A Worklist system instance is an instance of the Worklist API and its implementation. A user application can contain only one Worklist system instance, and that instance has the same name as the application that hosts it. A Worklist system instance provides access to the task plans deployed in an application, as well as the tasks that have been created based on that task plan. In addition, a Worklist system instance can be configured with its own security policies, runtime configuration, and so on.
The Worklist System Instances page displays the following information for each Worklist system instance.

You can do the following actions from the Worklist System Instances page:
Set the policy for all Worklist system instances that do not define their own explicit policy. For more information, see Setting the Global Worklist System Instance Policies.
|
|
Manually purge all tasks that are eligible for purging. For more information, see Purging Tasks.
|
|
Set the global task plan policy. For more information, see Setting the Global Task Plan Policies.
|
|
View the Tasks Summary page. For more information, see Listing and Locating Worklist Tasks.
|
|
View and edit the task plan configuration. For more information, see Viewing Task Plan Details and Changing Task Plan Details.
|
|
Manage the sessions. For more information, see Managing Sessions.
|
All the existing Worklist system instances are displayed in this page.
Edit sessions allows you to edit Worklist system instance configuration and task plan configuration. Before you edit these configurations, you must start an edit session. You can view resources and configurations in the console without being in a session, but to edit these configurations, you must be in an active session. The Session Management section manages sessions in the console.
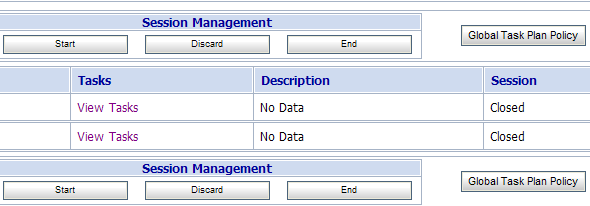
The following table provides a list of actions you can take in the Session Management section.
An event handler defines what Worklist-defined event listeners should do in response to events generated by changes in tasks that are managed by Worklist. Event handlers can define the behavior of event notification in response to task events. Event handlers can specify a response to various events that includes any or all of the following:
Any number of event handlers can be associated with a Worklist system instance. Each event handler specifies a number of task types for which it applies or it can indicate that it is a “global” event handler that applies to all task types.
For more information, see Changing the Event Handler Details.
Event Handlers contain event subscriptions that define which events are of interest to the event handler, and what to do with those events. You can define event subscriptions to send notifications for various event types. An event subscription is associated with one or more event types and for each event subscription, the desired response to the event notification is also defined.
Each Worklist system instance contains three pre-defined event handlers. These are:
Users can modify the configuration of any Worklist defined handler or subscription. In addition, users are free to enable or disable handlers and the subscriptions they contain at any time. However, handler and the subscriptions on the base Worklist handlers cannot be removed.
The various event types in Worklist are:
The Worklist System Instance page displays the Worklist system instance configuration details.
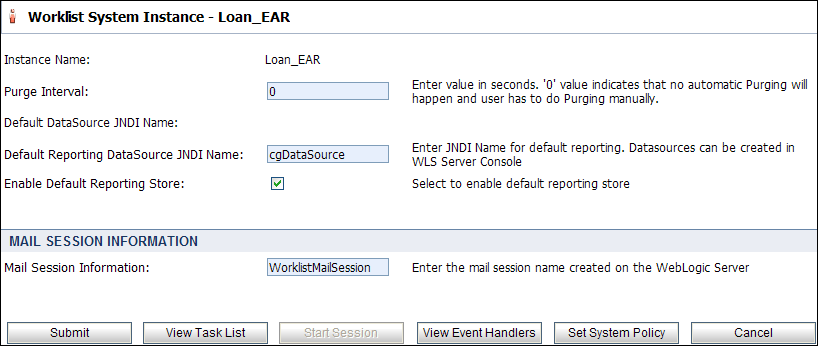
You can start a session and change the Worklist system instance configuration. In addition, you can do the following actions from the Worklist System Instance page:
Locate and list Worklist tasks in the Task Summary page. For more information, see Listing and Locating Worklist Tasks.
|
|
Start the session. For more information, see Managing Sessions.
|
|
View a list of existing event handlers. For more information, see Listing and Locating Event Handlers.
|
|
Set the policy for the current Worklist system instance. For more information, see Setting the Worklist System Instance Policies.
|
The configuration of the Worklist system instance is updated.
The Set System Policy page allows you to set the security policy for all Worklist system instances. When the policy is not set for a Worklist system instance, the global Worklist system instances policy is applied.
You can assign roles to any of the Worklist policy in the Set Global Worklist Policy page. Users belonging to the role can then do the operations associated with that role. For more information, see Security Policies and Security Provider Requirements for User Management.
| Note: | For Admin, Create, and Query actions, any individual Worklist system instance policy takes precedence over the global Worklist policy. For more information, see Setting the Worklist System Instance Policies. |
 (to select multiple options, press and hold the Ctrl key as you click each additional option). Make sure that at least one role is selected for each action. For more information, seeSecurity Policies and Security Provider Requirements for User Management.
| Note: | Take care not to remove all roles from an admin policy for which you have access. Doing so will effectively lock you from making any further edits to that policy. |
The global Worklist system policy is updated. You are returned to the Set System Policy page. Click Cancel to return to the Worklist System Instances page.
In addition to setting the global policy for all Worklist system instances, you can set the policy of an individual Worklist system instance. For more information, see Setting the Global Worklist System Instance Policies, Security Policies, and Security Provider Requirements for User Management.
 (to select multiple options, press and hold the Ctrl key as you click each additional option). For more information, see Security Policies and Security Provider Requirements for User Management.
| Note: | Take care not to remove all roles from an admin policy for which you have access. Doing so will effectively lock you from making any further edits to that policy. |
The policy for the selected Worklist system instance is updated. You are returned to the Set System Policy page. Click Cancel to return to the Worklist System Instances page.
The View Global Task Plan Policies page allows you to view and edit the global task plan policies. The global task plan policy takes precedence over the individual task plan policy.
You can assign roles to any of the Worklist policy in the Set Global Worklist Policy page. Users belonging to the role can then do the operations associated with that role. For more information, see Security Policies and Security Provider Requirements for User Management.
| Note: | For Admin, Create, and Query actions, any individual task plan policy takes precedence over the global task plan policy. For more information, see Viewing and Changing Task Details. |
 (to select multiple options, press and hold the Ctrl key as you click each additional option). For more information, see Security Policies, and Security Provider Requirements for User Management.
| Note: | Take care not to remove all roles from an admin policy for which you have access. Doing so will effectively lock you from making any further edits to that policy. |
The global task plan policy is updated. You are returned to the View Global Task Plan Policies page. Click Cancel to return to the Worklist System Instances page.
You can set the individual task plan policy in the Task Plan Details page. The individual task plan policy takes precedence over the global task plan policy. For more information, see Setting the Global Task Plan Policies.
You can assign roles to any of the Worklist policies in the Task Plan Details page. Users belonging to the role can then do the operations associated with that role. For more information, see Security Policies and Security Provider Requirements for User Management. For information about setting individual task plan policies, see the “To edit the task plan policies” procedure in Changing Task Plan Details.
The runtime repository supports automatic purging of completed or aborted tasks (referred to as terminal tasks) based on a purge interval specified by you. The length of time to retain terminal task instances can be configured at both the system and task plan level.
When you change the Worklist system instance details, you can set the purge interval. For more information, see Changing the Worklist System Instance Configuration. You can set the terminal tasks retention time when you set the task plan details. For more information, see Changing Task Plan Details.
The purge process automatically runs at the purge interval and tasks that are terminal and are older than the configured system or task plan limits are permanently removed from the runtime repository.
If the purge interval is set to zero, you need to manually purge the tasks. You can manually purge tasks from the Worklist System Instances page.
All the tasks in the selected Worklist system instance are purged.
The Event Handlers page displays a list of all existing event handlers. You can view the event handler name and the scope of the event handler. The scope of the event handler can be global and applicable to all tasks plans or specific to selected tasks plans associated with the event handler. For more information, see About Worklist Event Handlers and Event Types.

| Note: | The View Event Handlers button is enabled only when you are in a session. |
 and descending
  arrow buttons indicate sortable columns. Click the button to change the sort order.
 , previous
  , first
  , or last
  page.
page.The Event Handler Details page displays the event handler details and a list of event subscriptions associated with the event. You can change the task plan details and the event subscriptions associated with the event handler. For more information, see About Worklist Event Handlers and Event Types.
| Note: | Any changes to Event Handlers can be only be done in a session. Start a session before making any change. For more information, see Managing Sessions. |
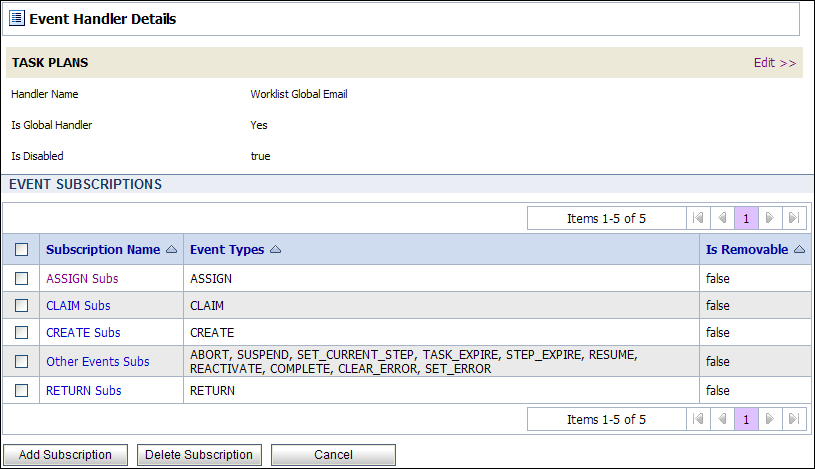
If you clear this check box, you need to select the task plans that will be handled by this event handler.
When you disable an event handler, all event subscriptions associated with the event handler are disabled. This implies that there will be no event notification sent from the event handler to the notification consumers.
 (to select multiple options, press and hold the Ctrl key as you click each additional task plan)
This option is available only when the Global Handler check box is not selected.
The event handler details are updated. You are returned to the Event Handler Details page.
You can also add, change or delete event subscriptions associated with the event handler. For more information, see Adding Event Subscriptions, Changing Event Subscriptions, and Deleting Event Subscriptions. These changes to the event subscriptions associated with the event handler are reflected only after you end the current session.
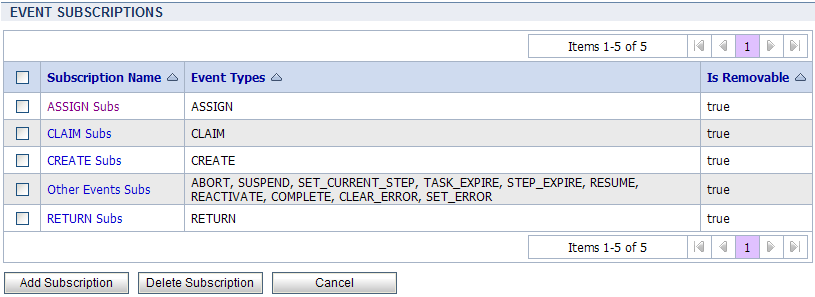
The Event Handler Details page displays the event handler details and a list of event subscriptions associated with the event. You can change the task plan details and the event subscriptions associated with the event handler.You can also add, change, and delete event subscriptions from this page. For more information, see About Worklist Event Handlers and Event Types.
For each event subscription, you can view the name of the subscription, the event type and if this event subscription can be removed or not. When true is displayed in the Is Removable field, it implies that the event subscription can be deleted.
| Note: | The View Event Handlers button is enabled only when you are in a session. |
A list of event subscriptions associated with the event handler are displayed on the page.
 and descending
  arrow buttons indicate sortable columns. Click the button to change the sort order.
 , previous
  , first
  , or last
  page.
page.The actions that you can do from the Event Subscription section of the Event Handler Details page are listed in the following table.
Add a event subscription. For more information, see Adding Event Subscriptions.
|
|
Edit an existing event subscription. For more information, see Changing Event Subscriptions.
|
|
Delete the selected event subscriptions. For more information, see Deleting Event Subscriptions.
|
You can use the Event Subscription Details page to add event subscriptions that will be associated with event handlers. For more information, see About Worklist Event Handlers and Event Types.
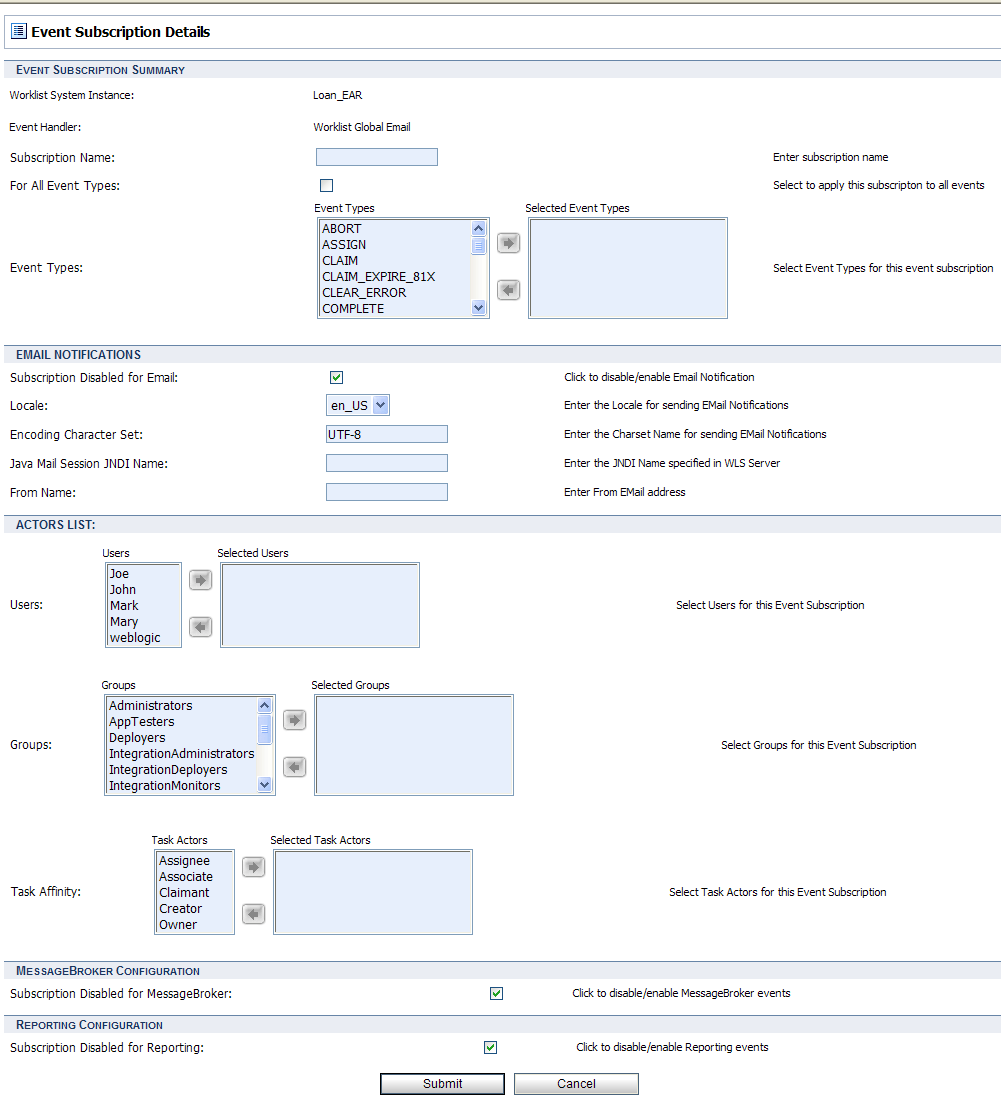
 (to select multiple options, press and hold the Ctrl key as you click each additional event type). For more information, see Listing and Locating Worklist System Instances.
You need to select the event types only when the For All Event Types check box is not selected.
 (to select multiple options, press and hold the Ctrl key as you click each additional user name). The selected users will be associated with this event subscription.
 (to select multiple options, press and hold the Ctrl key as you click each additional group name). The selected groups will be associated with this event subscription.
 (to select multiple options, press and hold the Ctrl key as you click each additional option).
 Task actors are specified in terms of their affinity to a task. Creator, Owner, Claimant, and Assignees are task actors who have a specify meaning and relation with respect to a task.
The event subscription is added. The subscription details are displayed in the Event Subscription Details page in the view mode. If required, click Edit to modify the details or click Back to return to the Event Handler Details page.
The Event Subscription Details page displays a summary of the event subscription, the event notification details, and the human actors associated with the event. You can change the event subscription details associated with the event handler. For more information, see About Worklist Event Handlers and Event Types.
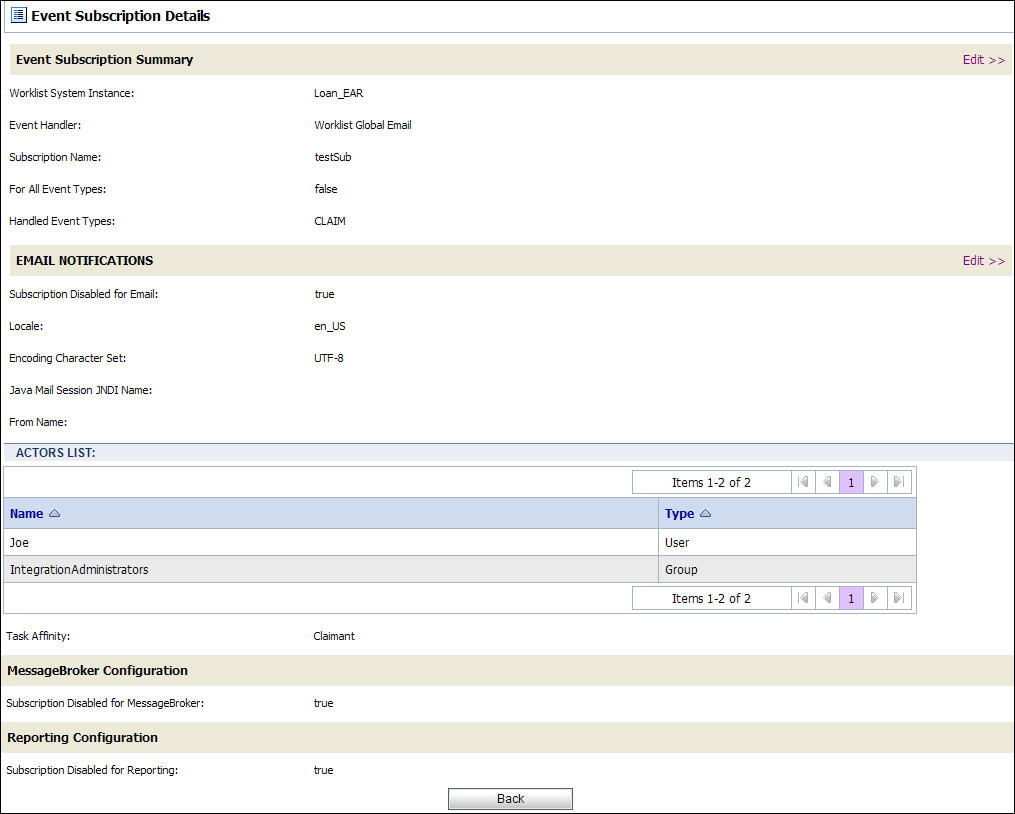
 (to select multiple options, press and hold the Ctrl key as you click each additional event type). For more information, see Listing and Locating Worklist System Instances.
You need to select the event types only when the For All Event Types check box is not selected.
 (to select multiple options, press and hold the Ctrl key as you click each additional user name). The selected users will be associated with this event subscription.
 (to select multiple options, press and hold the Ctrl key as you click each additional group name). The selected groups will be associated with this event subscription.
 (to select multiple options, press and hold the Ctrl key as you click each additional option).
 Task actors are specified in terms of their affinity to a task. Creator, Owner, Claimant, and Assignees are task actors who have a specify meaning and relation with respect to a task.
The event subscription is updated after you click Submit. The subscription details are displayed in the Event Subscription Details page in the view mode. If required, click Edit to modify the details or click Back to return to the Event Handler Details page.
You can delete an event subscription from the Event Handler Details page.
| Note: | You can delete an event subscription only when the Is Removable flag is set to true for that subscription. For event subscriptions that are deployed as part of the Worklist application (that is, not added after deployment in Worklist Console), this flag is set to false. |
The event subscription is deleted.
A task plan is a description of the steps, properties, task assignment rules, and so on that are common to a class of tasks defined for a given purpose. For more information about tasks and task plans, see Creating and Managing Worklist Task Plans in Using the Worklist.
In the Task Plan Details page, you can view and edit the task plan details including the task plan summary details, task plan policies, user-defined properties, and task steps. For more information, see Changing Task Plan Details.
 icon next to the Worklist system instance. All the task plans associated with the Worklist system instance are displayed.
 In the Task Plan Details page, you can view and edit the task plan details including the task plan summary details, task plan policies, user-defined properties, and task steps.
3min2hour1day or 10 years 5 hours 3 seconds) required to complete the task. This information is used by the default Worklist assignment handler for load balancing. If specified, this value is used as a default value for the time estimate setting on all the steps this task contains.The interval may define a number of days, hours and/or minutes in the D days H hours M minutes format, where D is number of days, H is number of hours, and M is number of minutes.
The completion due date of the task is generated based on the interval, and the user or business calendar. For example, if the interval is specified as 10 days and the business calendar is selected. If current date is 1, and the next 5 days are busy based on selected business calendar, then the completed due date for the task would be 15.
3min2hour1day or 10 years 5 hours 3 seconds) for which Completed or Aborted tasks should be retained in the runtime store before becoming eligible for purging. For more information, see Purging Tasks.The task parameters have been updated. You are returned to the Task Plan Details page.
Policies can be set at the individual task plan level or at the global task plan level. When set, individual task plan policy takes precedence over the global task plan. For more information, see Setting the Global Task Plan Policies.
You can set the individual task plan policy in the Task Plan Details page. You can assign roles to any of the Worklist policies in the Task Plan Details page. Users belonging to the role can then do the operations associated with that role. For more information, see Security Policies and Security Provider Requirements for User Management..
 (to select multiple options, press and hold the Ctrl key as you click each additional role). For more information, see Security Policies, and Security Provider Requirements for User Management.
| Note: | Take care not to remove all roles from an admin policy for which you have access. Doing so will effectively lock you from making any further edits to that policy. |
The policy for the selected task plan has been updated. You are returned to the Task Plan Details page.
| Note: | You can also click View detailed information about the steps. The Complete Step Information page appears. Click Edit. |
You can configure the parameters for each step in the task and each action in a step.
3min2hour1day or 10 years 5 hours 3 seconds) required to complete the step. This information is used by the default Worklist assignment handler for load balancing.The interval may define a number of days, hours and/or minutes in the D days H hours M minutes format, where D is number of days, H is number of hours, and M is number of minutes.
The completion due date of the step is generated based on the interval, and the user or business calendar. For example, if the interval is specified as 10 days and the business calendar is selected. If current date is 1, and the next 5 days are busy based on selected business calendar, then the completed due date for the step would be 15.
 (to select multiple options, press and hold the Ctrl key as you click each additional user name).
 (to select multiple options, press and hold the Ctrl key as you click each additional group).
 (to select multiple options, press and hold the Ctrl key as you click each additional user name).
 (to select multiple options, press and hold the Ctrl key as you click each additional group).
The parameters associated with steps in a task and the actions in a step are updated. You are returned to the Task Plan Details page.
A task represents an activity that is assigned to a human user. The human user oversees the progress of the task and ensures that it is completed in a correct and timely fashion. For more information about tasks and task plans, see Creating and Managing Worklist Task Plans in Using the Worklist.
The Tasks Summary page displays the following information for each task instance. For a more detailed description of the properties, see Viewing and Changing Task Details.

Name assigned to the task. Click on the task name to view the Worklist Task Details page. For more information, see Viewing and Changing Task Details.
|
|
You can do the following actions from the Tasks Summary page:
Construct a custom query to locate specific task instances. For more information, see Constructing a Custom Query for Task Instances.
|
|
Change the task instance details by clicking on the task name. For more information, see Viewing and Changing Task Details.
|
|
Depending on the current state of a task, you can suspend, resume, complete, abort, set error, clear error, claim, return, delete, or reactive the task. For more information, see Updating Task State.
|
|
Claim the selected tasks on behalf of another user. For more information, see Claiming a Task for a User.
|
|
Assign the selected tasks to the appropriate user or group. For more information, see Assigning a Task to User or Group..
|
 next to the Worklist system instance. The task plan associated with the Worklist system instance is displayed. Click View Tasks.
  and descending
  arrow buttons indicate sortable columns. Click the button to change the sort order.
 , previous
  , first
  , or last
  page.
page.The Custom Query page allows you to construct a complex task instance search.
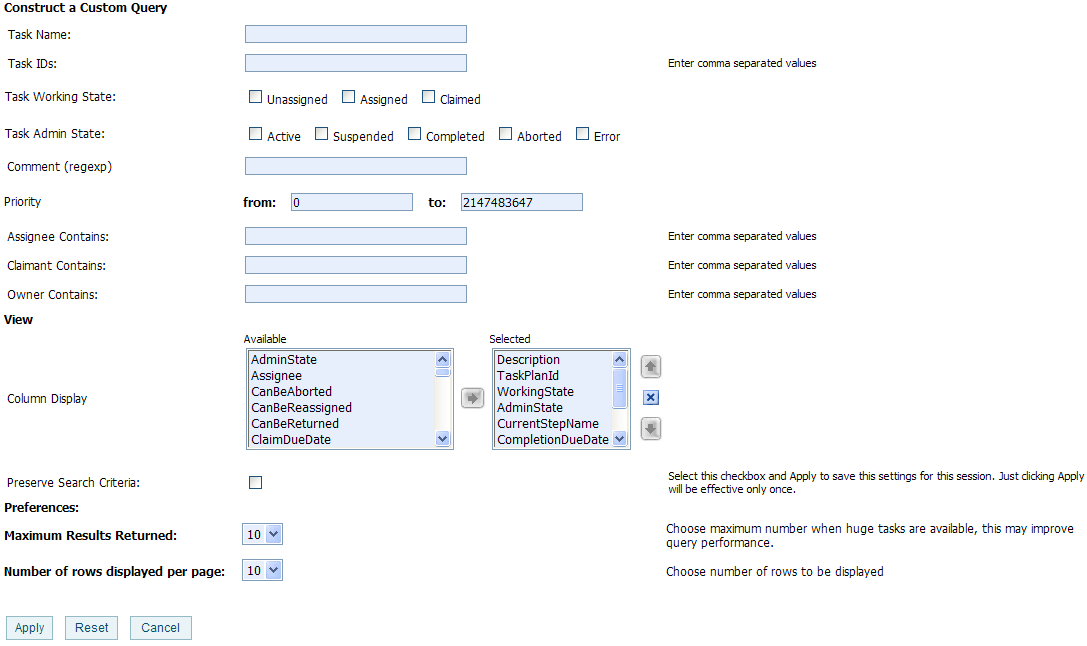
The following table summarizes the available search criteria:
The Worklist Task Details page allows you to view task properties. If the Administrative state of the task is Active (that is the task is not in Suspended, Aborted, Competed, or Error Administrative state), you can click Edit to update the task. For more information about Administrative state of tasks, see Creating and Managing Worklist Task Plans in Using the Worklist.
| Note: | If an authenticator that implements the required MBeans is not configured, the options for updating the owner, or assigning or claiming the task are disabled. To learn more about the authenticator requirements, see Security Provider Requirements for User Management. |
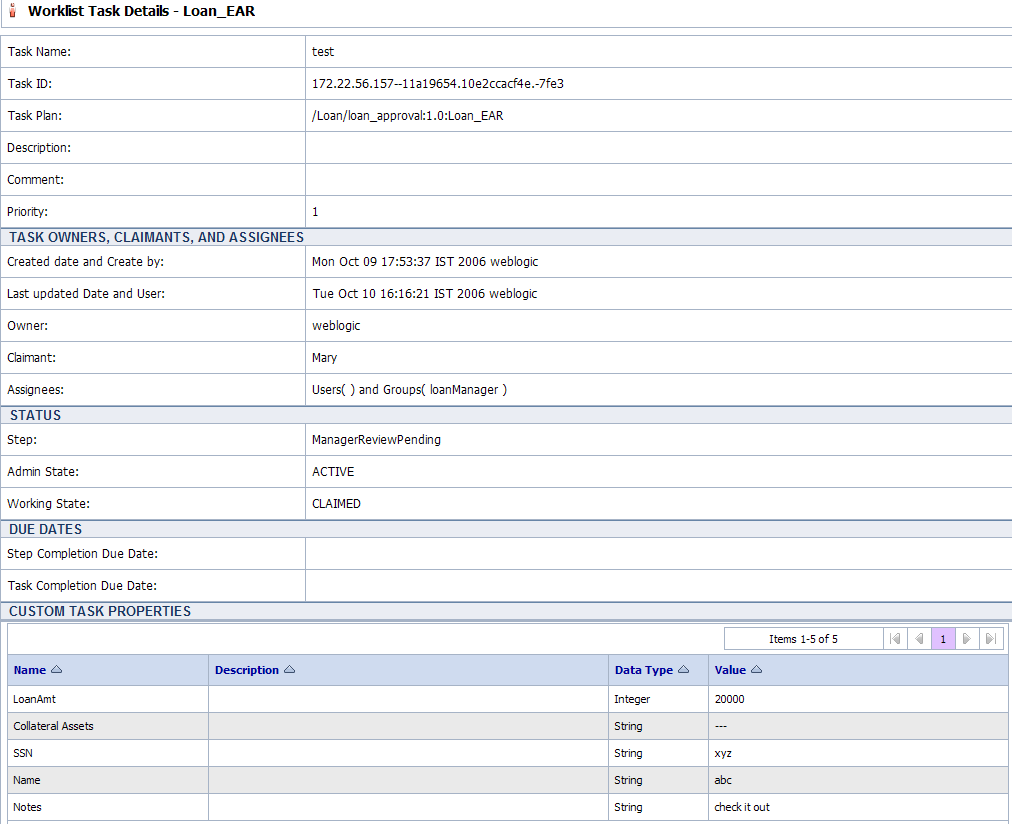
The following table summarizes the properties displayed:
Actions that you can do in the Worklist Task Details page are listed in the following table:
Apply actions on the selected tasks and update the status of the task. For more information, see Updating Task State.
|
|
Claim the selected tasks for the selected user. For more information, see Claiming a Task for a User.
|
|
Assign the selected tasks to the selected users and / or groups. For more information, see Assigning a Task to User or Group.
|
|
Delete the selected tasks. For more information, see Deleting Tasks.
|
| Note: | The Edit Tasks option is available only when the Administrative state of the task is Active. |
The Worklist System Instance - <Task Plan name>: <Task Name> page is displayed.
format indicated to the right of the field because this format is locale specific) when the task should be completed. format indicated to the right of the field because this format is locale specific) when the current step should be completed.The changes to the task are updated and you return to the Worklist Task Details page.
Depending on the current state of a task instance, you can assign, claim, return, complete, suspend, abort, or delete the task. The following tables describes each available action. To learn more about task states and operations, see Creating and Managing Worklist Task Plans in Using the Worklist.
| Note: | If an authenticator that implements the required MBeans is not configured, the options for updating tasks assigmees or claimant are disabled. To learn more about the authenticator requirements, see Security Provider Requirements for User Management. |
Designates who should perform the task and updates the task to the
Assigned state. Tasks can be assigned to one or more users or groups. Once assigned, the task can be claimed by:
For more information, see Assigning a Task to User or Group.
|
|
Claims the task on behalf of the specified user and updates the task to the claimed state. Claiming a task indicates intent to complete the current step in the task. For more information, see Claiming a Task for a User.
|
|
Deletes the task from the system. For more information, see Deleting Tasks.
|
|
The following table summarizes the actions available for the Administrative task state:
The actions available in the Working state are:
You can update the state of a task in the following contexts:
The task state is updated to reflect the action. You can view the updated Administrative state of the task in the Task Summary page.
The task state is updated to reflect the action. You can view the updated Administrative state of the task in the Task Summary page.
You can claim a task for a user from the Tasks Summary page. For information about claiming a task from the Worklist User Portal, see Using Worklist User Portal.
All selected tasks are claimed by the selected user.
In the Task Summary page, you can assign selected tasks to selected users and / or groups. For information about assigning a task from the Worklist User Portal, see Using Worklist User Portal.
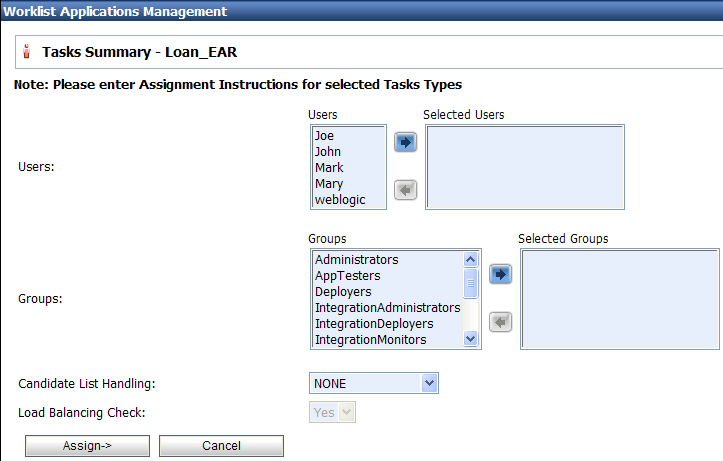
 (to select multiple options, press and hold the Ctrl key as you click each additional user name).
 (to select multiple options, press and hold the Ctrl key as you click each additional group).
All selected tasks are assigned to the selected users and / or groups.
The selected tasks are deleted.
The Worklist User Summary page lists all users and their associated group and business calendar names.
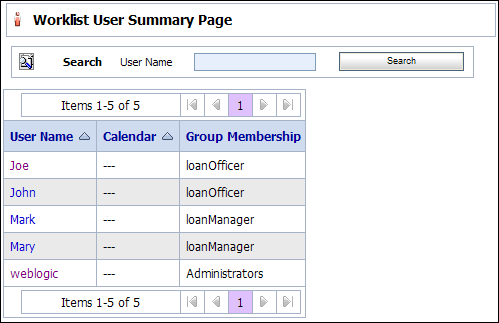
 and descending
  arrow buttons indicate sortable columns. Click the button to change the sort order.
 , previous
  , first
  , or last
  page.
page.Click on any user in this page and you can reassign work to another user or associate a business calendar to the user. For more information, see Reassigning Work to a User and Associating Business Calendars with Users.
You can set the e-mail address of a user from the User Profiles link in the Worklist module. This e-mail address for any e-mail notification.
You can reassign existing tasks and task planks to users on a temporary basis or permanently reassign work (as in the case of employee leaving the company) to another user.

All deployed Worklist system instances are reassigned to the selected user.
When users are not available (due to vacation or work assignment or other reasons) for handling tasks or when users leave the organization, tasks assigned to those users need to be assigned to other users or groups.
Non-availability of the user can be handled using any of the following methods:
The Work Substitute Routing Table page displays the following properties for each work substitute rule.

? to match any single character or * to match zero or more characters.), then click Search. The rules matching the search criteria are displayed. , previous
  , first
  , or last
  page.
page.The Add Substitute page allows you to create a work substitute rule. These rules dynamically re-route tasks or task status notifications to a substitute user or group.
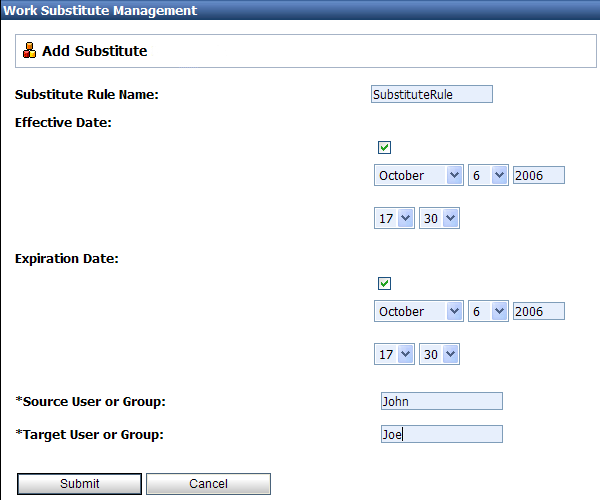
YYYY format), Hour, and Minute. This is the date and time the rule takes effect. If you do not check the Effective Date check box, the rule takes effect immediately
YYYY format), Hour, and Minute. This is the date and time the rule expires. If you do not check the Expiration Date check box, the rule remains in effect indefinitely.
| Note: | In the target field, only a group can substitute for a group and only a user can substitute for a user. |
The Work Substitute Routing Table page is displayed. The new rule is included in the list. The tasks and task status notification of the source are now dynamically routed to the specified target during the effective and expiration dates (inclusive).
The Edit Substitute Rule page allows you to change the properties of a work substitute rule.
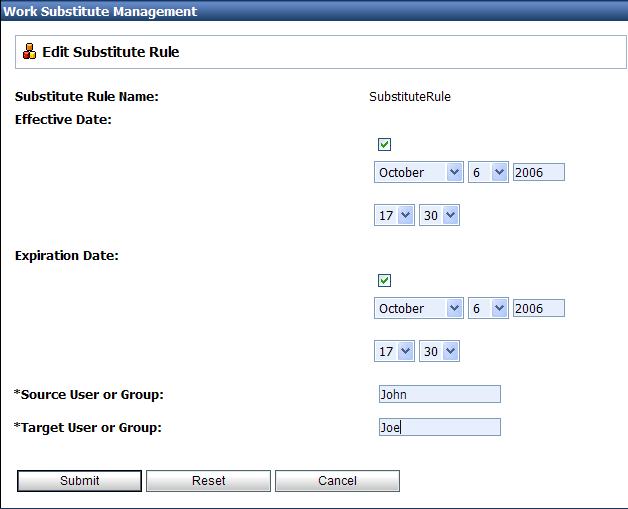
YYYY format), Hour, and Minute. This is the date and time the rule takes effect. If you do not check the Effective Date check box, the rule takes effect immediately.
YYYY format), Hour, and Minute. This is the date and time the rule expires. If you do not check the Expiration Date check box, the rule remains in effect indefinitely.
The Work Substitute Routing Table page is displayed. The updated rule is included in the list.
| Note: | If there is an error, the Edit Substitute Rule page is redisplayed. A message indicating the problem is displayed above the input requiring correction. |
You can delete work substitute rules from the Work Substitute Routing Table page.
The selected substitute rules are deleted.


|