2 Configuring the OracleAS CDC Adapter for SQL Server
This chapter describes how to configure Oracle Connect using Oracle Studio.
All modeling of Oracle Connect is performed using Oracle Studio. To use Oracle Studio, you first configure it to enable access to a Windows computer where the SQL Server database resides.
This chapter includes the following topics:
-
Setting Up a Change Data Capture with the OracleAS CDC Adapter for SQL Server
-
Testing the OracleAS CDC Adapter for SQL Server CDC Solution
Setting Up a Windows Computer in Oracle Studio
Using Oracle Studio, perform the following steps to configure the Windows computer:
-
From the Start menu, select Programs, Oracle, and then select Studio. Oracle Studio opens, displaying the Design perspective.
-
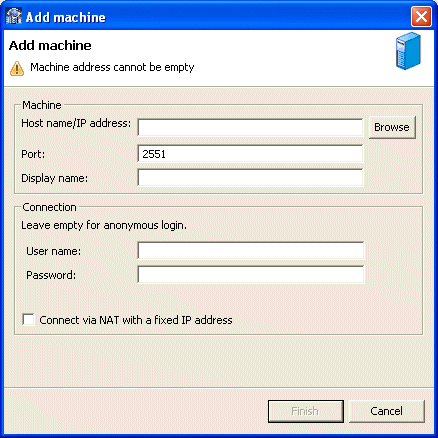
Right-click Machines in the Configuration Explorer and select Add Machine. The Add Machine screen is displayed.
-
Enter the name of the computer you want to connect to, or click Browse to select the computer from the list of computers that is displayed and which use the default port (2551).
-
Specify the user name and password of the user who was specified as the administrator when Oracle Connect was installed.
Note:
Selecting Anonymous connection enables anyone having access to the computer to be an administrator, if this was defined for the computer. -
Click Finish.
The computer is displayed in the Configuration Explorer.
Securing Access to Oracle Connect
Oracle Studio includes mechanisms to secure access to Oracle Connect both during modeling and at run time.
During modeling, the following security mechanisms can be applied:
At run time client access to Oracle Connect is provided by the user profile:
Setting Password Access to Oracle Studio
Initially, any operation performed using Oracle Studio does not require a password. You can set a password so that the first operation that involves accessing the server from Oracle Studio requires a password to be entered.
Perform the following steps to set password access to Oracle Studio:
-
From the Start menu, select, Programs, Oracle, and then select Studio. Oracle Studio opens.
-
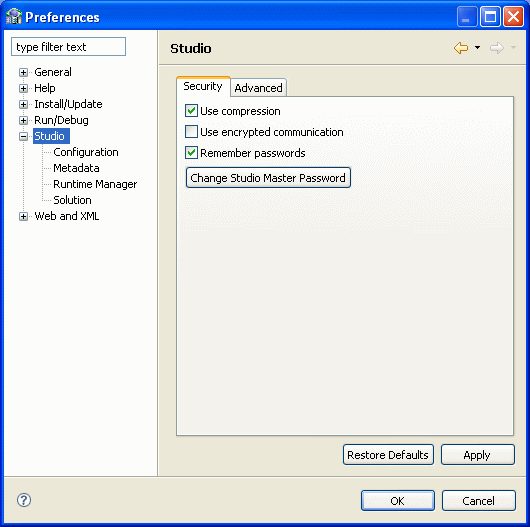
Select Window from the menu bar, and then select Preferences. The Preferences screen is displayed.
-
Click Studio in the left pane as shown in the following figure:
-
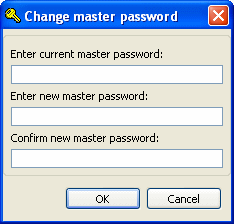
Click Change Studio Master Password. The Change Master Password screen is displayed, as shown in the following figure:
-
Leave the Enter current master password field blank and type a new master password in the Enter new master password field.
-
Enter the new passoword again in the Confirm new master password field.
-
Click OK.
Specifying Users with Administrative Rights
By default, only the user who was specified during the installation as an administrator has the authorization to modify settings on that computer from Oracle Studio. This user can then authorize other users to make changes or to view the definitions for a selected computer. Adding a computer to Oracle Studio is described in "Setting Up a Windows Computer in Oracle Studio".
Note:
The default during installation is to enable all users to be administrators.-
From the Start menu, select, Programs, Oracle, and then select Studio. Oracle Studio opens.
-
In the Design perspective Configuration view, Right-click the computer and select Administration Authorization.
The Administration Authorization screen is displayed as shown in the following figure:
The screen has the following sections:
Administrators: Administrators can view and modify all the definitions in Oracle Studio for the selected computer. On initial entry to Oracle Studio, every user is defined as a system administrator.
Designers: Designers can view all the definitions for the computer in Oracle Studio and can modify any of the definitions under the Bindings and Users nodes for the selected computer. For example, Oracle Studio database administrator can add new data sources and adapters and can change metadata definition for a table in a data source.
Users: Users can view all the definitions for the computer in Oracle Studio for the selected computer. Regular users cannot modify any of the definitions.
-
Add users or groups of users by clicking Add User or Add Group for the relevant sections.
The user or group that is added must be recognized as a valid user or group for the computer. Once a name has been added to a section, only the user or group that logs on with that user name has the relevant authorization.
Setting Up Run-Time User Access
During run time, client access to Oracle Connect is provided by the user profile. A user profile contains name and password pairs that are used to access a computer, data source or application at run time, when anonymous access is not allowed.
-
From the Start menu, select, Programs, Oracle, and then select Studio. Oracle Studio opens.
-
From the Design perspective, Configuration view, expand the Machines folder, then expand the machine where you want to set the user name and password.
-
Expand Users.
-
Right-click the NAV user profile and select Open. The NAV user profile editor is displayed:
-
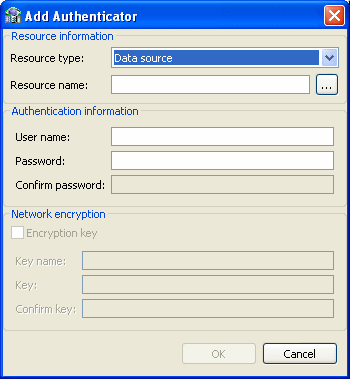
In the User editor, click Add. The Add Authenticator screen is displayed:
-
Select Remote Machine from the Resource Type list.
-
Enter the name of the Windows computer defined in Oracle Studio.
-
Enter the name and password used to access the computer and confirm the password.
-
Click OK.
Setting Up a Change Data Capture with the OracleAS CDC Adapter for SQL Server
You must set up the Oracle Connect SQL Server CDC adapter on a Windows computer to handle capture changes to the SQL Server data. To work with the SQL Server CDC adapter, you must various tasks on the computer with the SQL database and then configure the change data capture using the Oracle Studio CDC Solution perspective. Oracle Studio can be installed on a Windows or UNIX computer.
Perform the following steps to set up the change data capture and configure the CDC adapter:
Enabling SQL Replication
When logging an UPDATE operation, the MS SQL Server records only changed data to the TLOG. This is not enough information for the CDC agent to provide before and after images for UPDATE statements. There is not enough information to provide the values for changed columns with primary keys, which is the minimum requirement for a CDC agent.
To solve this problem, you must turn Replication on in the MS SQL Server. The log reports update changes as usual. In addition, Before Image results are also supported in this mode. Replication is valid only for tables with primary keys. Therefore, the MS SQL Server CDC Agent works only with tables that have a primary key.
The Microsoft Replication solution used by Oracle's MS SQL Server CDC must be enabled by a qualified system administrator. The system administrator must use the tools provided with the MS SQL Server to enable replication.
The following sections explain how to set up replication for SQL Server 2000 and SQL Server 2005.
SQL Server 2000 Replication
In SQL Server 2000, open the SQL Server's Publishing wizard in the Microsoft SQL Server's Enterprise Manager and follow the instructions provided by the wizard or see the SQL Server documentation.
The following should be added to the database's definitions:
-
A new Distribution database
-
A replication entry
-
A replication monitor entry
SQL Server 2005 Replication
In SQL Server 2005, in the Microsoft SQL Server's Management Studio, follow the instructions provided by the Configure Distribution wizard to set up replication or see the SQL Server documentation.
To open the wizard from Microsoft SQL Server 2005:
-
In the Microsoft SQL Server Management Studio, right-click the Replication folder and select Configure Distribution.
The Configure Distribution wizard opens.
You should make the following selections in the wizard:
-
In the Distributor step, select <SQL Server Name> will act as its own distributor; SQL Server will create a distribution database and log
-
In the SQL Server Agent Start step, select Yes, configure the SQL Server agent to start automatically
Configuring Security Properties
To ensure that the security requirements for the OracleAS SQL server CDC adapter are met, do the following:
-
Set up an account with administrator rights to run the SQL Server andMS SQL Server CDC components.
-
Ensure that the OracleAS SQL Server CDC adapter and the TLOG Miner (LGR) are executed as members of the
sysadminserver role.
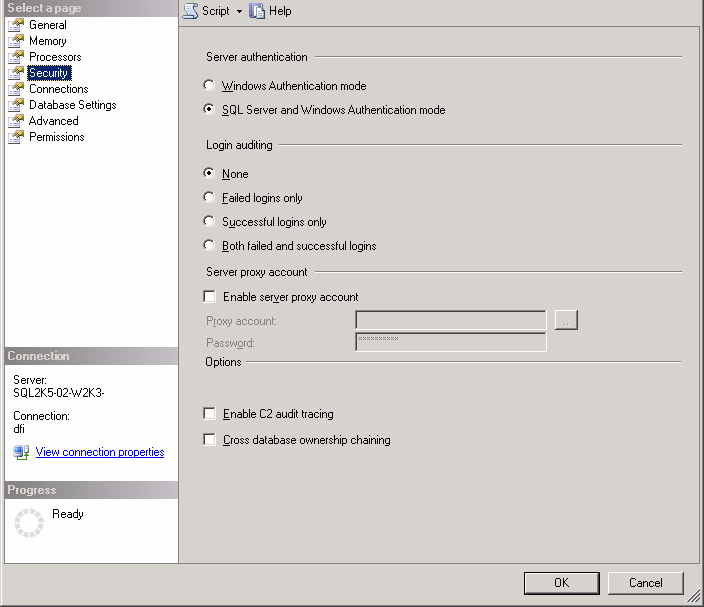
In addition, set the following security properties from the SQL Server Properties dialog box. The following figure shows the Security tab. The example below may look different on your computer depending on the version of SQL Server you are using. The following example is from SQL Server 2005.
-
Set the Authentication settings to SQL Server and Windows.
-
Set the Audit level to None.
Setting up Log On Information
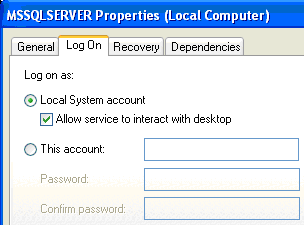
The SQL Service Login account information must match the configuration information for the Oracle IRPCD and Oracle LGR services. The logon setups should be entered in a way that allows the Oracle Services to access the SQL Server database. In most cases, the services log on at the Local System account. You should enter the following information in the SQL Server (MSSQLSERVER) Properties Log On tab. You access this through the Windows services control panel. The following describes how to set up the log on information:
-
From the Windows Start menu, select Control Panel.
-
Double-click Administrative Tools.
-
Double-click Services. The Services control panel is displayed.
-
From the Services list, right-click SQL Server (MSSQLSERVER) and select Properties.
-
Configure the system as shown in the figure below.
The configuration shown is the default for the IRPCD and LGR services, which allows anonymous access.
If you want the SQL Server (MSSQLSERVER) to Log on using Windows authentication, the system administrator must enter the correct settings to log On to accounts for Oracle services.
Setting up the Database
You must ensure that some database set up and configurations are set so that the OracleAS CDC Adapter for SQL Server consumes the changes made to the database. This section describes the properties that must be set for the correct operation of the adapter.
SQL Server 2000 Settings
Set the following properties in the SQL Server Enterprise Manager.
-
In the database properties Options tab, set the Recovery Model to Full. In this mode, the transaction Log is more durable and truncation occurs less frequently.
-
Create enough log space to handle the size of the published database.
-
In the database properties Transaction Log tab, select the correct setting for File Growth based on the application's capacity profile.
-
Set the
trunc. log on chkptproperty toFALSE. To set this property, enter the following in the SQL Query Analyzer:EXEC sp_dboption '<database name>', 'trunc. log on chkpt.', 'FALSE' -
ensure that all tables that are consumed by the SQL Server CDC have a primary key.
Note:
See the documentation provided with Microsoft SQL Server for information on how to set the above properties correctly.SQL Server 2005 Settings
Set the following properties in the SQL Server Management Studio.
-
From the Object Explorer, right click the database and select Properties. In the Options tab, set the Recovery model to Full. In this mode, the transaction Log is more durable and truncation occurs less frequently.
-
Create enough log space to handle the size of the published database.
-
From the Object Explorer, right click the database and select Properties. In the Files tab, set the initial size and growth parameters for the log files based on the application's capacity profile.
-
Set the
trunc. log on chkptproperty toFALSE. To set this property, run the following query:EXEC sp_dboption '<database name>', 'trunc. log on chkpt.', 'FALSE' -
ensure that all tables that are consumed by the SQL Server CDC have a primary key.
Note:
See the documentation provided with Microsoft SQL Server for information on how to set the above properties correctly.Setting Up the TLOG Miner (LGR)
SQL Server handles logs in a way that is not fully compatible with standard CDC solutions. For example, the MS SQL Server truncates a TLOG after a period of inactivity to make more space available for logging operations. Uncontrolled LOG truncation could cause a loss of the truncated data. To solve these problems, the OracleAS CDC Adapter for SQL Server uses a TLOG miner. This component is initiated as a Microsoft Windows service. It mines the data and sends it to a Transient Storage area. The OracleAS Adapter for SQL Server uses the data in Transient Storage to consume changes.
The Log reader (LGR) is the component that actually reads the MSQL transaction LOG. All logged data that is affected by MS replication is read and placed at the transient storage folder. It is implemented as an independent standalone Windows Service. Since its functionality is highly sensitive, it has high availability features and fault tolerance and attempts to be always up.
The following sections describe the procedures necessary for setting up the TLOG Miner service:
Call the LGR Service Interface
You must call the service interface. Enter the following command at the service command prompt to call the service interface.
>>>sqlcdclgr -?
The service interface is displayed. The service interface shows commands that you can use. The following is an example of the service interface that is displayed.
SQLCDCLGR Transaction LOG mining service controller:----------------------------------------------------sqlcdclgr -s register -a <service-name> <input-file> Register a service and its input filesqlcdclgr -s unregister -a <service-name> Unregister a servicesqlcdclgr -s start -a <service-name> Start service executionsqlcdclgr -s stop -a <service-name> Stop service executionsqlcdclgr -s restart -a <service-name> Restart service execution (=refresh parameters)sqlcdclgr -p name <service-name> Display input file P_arameter name registered for a servicesqlcdclgr -p contents <service-name> Display input file P_arameter contents registered for a servicesqlcdclgr -p help Display help for parameters values assignmentsqlcdclgr -t T_ype an input file templatesqlcdclgr -b <input-file> Run the service in an online 'B_locking' mode, using input filesqlcdclgr [-h|-?] Display this H_elp bannerService input is held at: HKEY_LOCAL_MACHINE\SOFTWARE\Oracle\Oracle Connect\Services
Configuring the Template Input File
The configuration template defines some basic configuration parameters. You must define some parameters manually in the template. Generate the template and then edit the parameters. Enter the following at the command prompt to generate the configuration template.
<your drive>:\<full path>\sqlcdclgr>sqlcdclgr -t >sqlcdclgr_pars.xml
The following is an example of the configuration template that opens.
<serviceConfig>
        <cdcOrigin server='?xxx?' database='?xxx?' user='sa' password=''defaultOwner=''/>
password=' ' useWindowsAuthentication='false' defaultOwner='dbo'/>
        <transientStorage    directory='?xxx?'maxFileSize='1' totalSize='100'
                                lowThreshold='65' highThreshold='85'/>

        <logging directory='?xxx?'/>

        <control batchSize='50000' retryInterval='1' debugLevel='none'
traceDBCC='false' traceStatistics='false'/>

        <detainer detainingTimeInterval='300' detainerTxnDurationLimit='2147483647'                   traceActivity='false'/>
</serviceConfig>
You must enter the correct values for some of the parameters in this file. These parameters are shown as placeholders ?xxx? in the example above. Enter the current information for your system where the placeholders are shown. The following table describes the parameters to be changed.
Table 2-1 Configuration Parameters
| Property | Parameter | Parameter Description |
|---|---|---|
|
|
|
Enter the name of the SQL server database you are using. The name given for the database must be in the same literal form as the name given to the dbName when you Set up the Data Source. |
|
|
Enter the name of the server computer where SQL Server is installed. The name given for the server must be in the same literal form as the name given to the SQL Server Name when you Set up the Data Source. |
|
|
|
Enter the name of the authorized user for the server. Note: The user entered must have |
|
|
|
Enter the password for the user entered in the User parameter. |
|
|
|
The default value for this property is |
|
|
|
|
Enter the full path to the directory where the transient storage files are located. |
|
|
The maximum size (in MB) allowed for a single transient storage file. For this parameter, you can change the default value.Foot 1 |
|
|
|
The maximum size (in MB) allowed for all of the transient storage. For this parameter, you can change the default value.Footref 1 |
|
|
|
For this parameter, you can change the default value.Footref 1 |
|
|
|
For this parameter, you can change the default value. |
|
|
|
|
Enter the full path to the directory where he log files are located. LOG files are named by adding the leading prefix, SQLCDCLGR, then the server computer identifier and the database name. An example of an LGR file name is: SQLCDCLGR-192_168_165_167+CDClog5#0002.log You can view the information about the log file for an LGR instance in the Windows Event Properties dialog box. 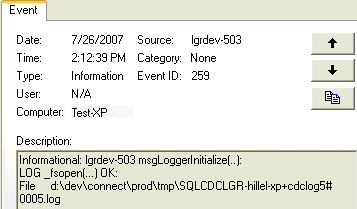 |
|
control |
|
The limit of the batch size for records being read upon a single LGR scan pass. |
|
|
The time interval in seconds that the system waits for additional information when the number of lines is less than defined in the |
|
|
|
Set the level for the debugging log. |
|
|
|
Set |
|
|
|
Set |
|
|
detainer |
|
Set the amount of time is seconds that data is held in the TLOG before it can be truncated. You can change the default for this parameter. |
|
|
This is not an active parameter. |
|
|
|
Set |
Footnote 1 Transient storage management is space oriented. It is based on a maximum allowed allocated space (default:100MB) and upper/lower thresholds. After every LOG scan, the LGR checks whether the transient storage space is close to exceeding its upper threshold (by default it checks to see if the storage space it at 85% or more). If it is close to exceeding the maximum space, a cleanup is started. The cleanup reduces the occupied space to the lowThreshold parameter (default 65%) of the total size specified. Cleanup activity is always reported in the LGR log file for all debug/trace settings.
Notes:
The -p help option displays a list of these parameters and an explanation for each.
All paths must be fully qualified. You cannot use logical names.
Registering the TLOG Miner (LGR) Service
Do the following to register the LGR service:
-
Provide a name for the service. You should use the same name as the name of the database that you are using.
-
Register the service by entering the following at the system prompt:
C:\Program Files\Oracle\Connect\tmp>sqlcdclgr -s register -a <service name> C:\Program Files\Oracle\Connect\def\sqlcdclgr_pars.xmlNote:
You must enter the full path to the configuration template file as the last parameter, as shown above.The following is an example of the system response:
| SQLCDCLGR Transaction LOG mining feature.
| Associated program is : C:\Program Files\Oracle\Connect\BIN\sqlcdclgr.exe
+-----------

Install(): Service 'SQLCDC' installed
setServiceParameter(): Parameter 'C:\Program Files\Oracle\Connect\def\sqlcdclgr_pars.xml' has been set for Service 'SQLCDC' at HKEY_LOCAL_MACHINE\SOFTWARE\Oracle\Oracle Connect\Services
addEventSource(): Key (+values) added : HKEY_LOCAL_MACHINE\SYSTEM\CurrentControlSet\Services\EventLog\Application\SQLCDC
Setting the Recovery Policy
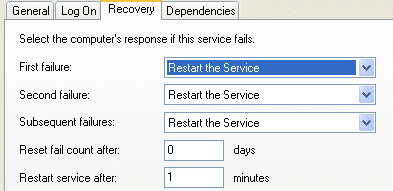
You must also set the Recovery policy for the service. The Recovery Policy is set in the Service Properties. Follow these steps to set the Recovery Policy for the new TLOG Miner (LGR) service:
Do the following to set the recovery policy:
-
From the Windows Start menu, select Control Panel, Administrative Tools and double-click the Services icon.
-
In the Windows Services control Panel, right click your new TLOG Miner service and select Properties.
-
In the Properties screen, click the Recovery tab.
-
Select the following computer response for each failure:
-
First failure: Restart the Service
-
Second failure: Restart the Service
-
Subsequent failures: Restart the Service
-
Setting up a Change Data Capture in Oracle Studio
You set up the change data capture in Oracle Studio. Oracle Studio can be installed on Windows XP or Vista operating systems, or on UNIX.
A change data capture is defined in the CDC Solution perspective, which contains a series of links to guide you through the CDC set up process. The CDC solution perspective guides display the following symbols in front of a link to show you what tasks should be done, and what tasks were completed.
-
Triangle: This indicates that there are subtasks associated with this link. When you click the link, the list expands to display the subtasks.
-
Asterisk (*): This indicates that you should click that link and perform the tasks and any subtasks presented. If multiple links have an asterisk, you can perform the marked tasks in any order.
-
Check mark (✓): This indicates that the tasks for this link and any sublink are complete. You can double click the link to edit the configuration at any time.
-
Exclamation mark (!): This indicates a potential validation error.
Perform the following to set up a change data capture:
Create a CDC Project
Do the following to create a CDC Project
-
From the Start menu, select, Programs, Oracle, and then select Studio.
-
Open the CDC Solution perspective, click the Perspective button on the perspective toolbar and select CDC Solution from the list.
The CDC Solution perspective opens with the Getting Started guide in the left pane of the workbench.
-
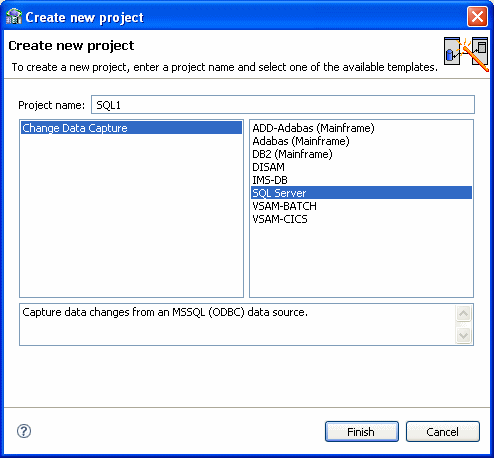
Click Create new project.
The Create new project screen opens.
-
In the Project name field, enter a name for your project.
The types of projects available are listed in the left pane.
-
Select Change Data Capture.
From the right pane, select SQL Server.
-
Click Finish. The Project Overview guide is displayed in the left pane.
-
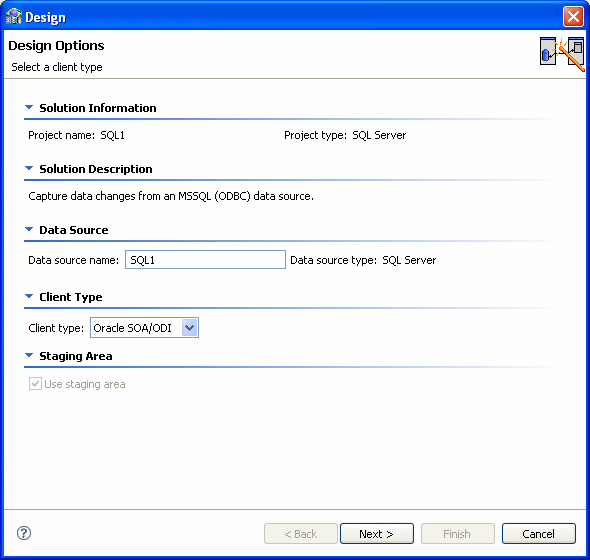
Click Design. The Design wizard opens. Use this wizard to enter the basic settings for your project.
Note:
The wizard screens are divided into sections. Some sections provide information only and other sections let you to enter information about the project. If you do not see any information or fields for entering information, click the triangle next to the section name to expand the section. -
In the Client Type you can select Oracle SOA/ODI only. The Use staging area is selected and cannot be changed, you must use a staging area with the OracleAS CDC Adapter for SQL Server.
-
Click Next.
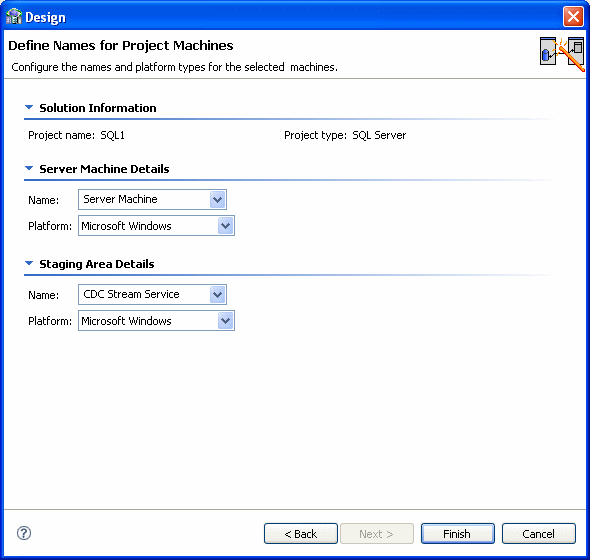
The Design Wizard's second screen is displayed. In this step you configure the computers used in your solution. Enter the information for the following computers:
-
Server Machine Details: Information about the computer where Oracle Connect is installed. The selection here is always Server Machine and Microsoft Windows.
-
Staging Area Details: Information about the computer platform where the staging area is located.
In the Name list, you should select Server Machine. This creates the Staging Area on the same computer specified as the Server computer. Although this is not the default selection, and you can select a different computer, for guaranteed delivery reasons, it is recommended to use a One Machine solution when working with the OracleAs SQL Server CDC adapter.
In the Platform list, select the operating system for the staging area. This can be Windows, Linux or UNIX. The available options are:
-
Microsoft Windows
-
HP-UX
-
IBM AIX
-
Sun Solaris
-
Linux (Red Hat)
-
Suse (Linux)
-
-
-
Click Finish. The wizard closes.
Set up the CDC Server
Click Implement in the Getting Started guide to open the Implementation guide.
In the Implementation guide, do the following to set up the CDC server:
You do the following to define the IP Address/host name and Port for the CDC server machine.
-
Click Machine.
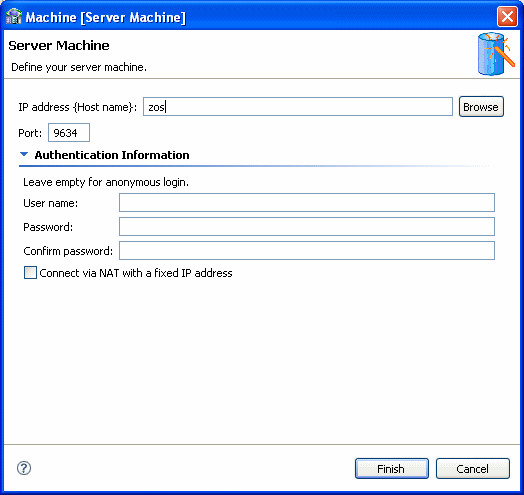
The machine definition screen is displayed:
-
In the IP address/host name field, do one of the following:
-
Enter the server computer's numeric IP address.
-
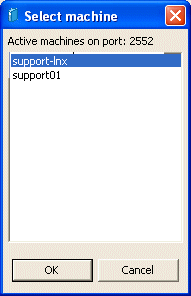
Click the Browse button and select the host computer from the ones presented, then click Finish.
Note:
The machine you enter must be compatible with the platform designated in the Design Wizard (Configure Solution Machines) screen.
-
-
Enter the port number.
The default port number is 2551.
-
To connect with user authentication, enter a user name and password, with confirmation, in the Authentication Information area.
-
Select the Connect via NAT with a fixed IP address check box if you are using Network Access Translation and want to always used a fixed IP address for this machine.
-
Click OK.
Continue setting up the CDC Server on the Windows computer.
In this step, set up the SQL Server data source that you are using. Enter the following information in this step:
-
SQL Server Name: Enter the name of the SQL server database you are using.
The name given for the database must be in the same literal form as the name given to the
databaseparameter when Configuring the Template Input File. -
dbName: Enter the name of the server computer where the SQL Server is installed.
The name given for the server must be in the same literal form as the name given to the
Serverparameter when Configuring the Template Input File.
Continue setting up the CDC Server.
In this step you define the starting point or event for the change capture and then indicate the name of the change logger. Do the following to set up the CDC service.
-
In the Solution perspective, click Implement.
-
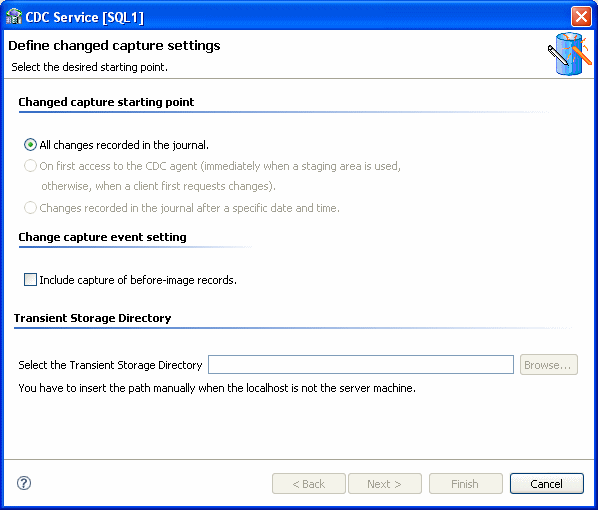
In the Server Configuration section, click CDC Service. The CDC Service wizard is displayed. The Define changed capture settings is the first step. It has three sections.
-
In the Change capture starting point section, select one of the following to determine the Change Capture starting point:
-
All changes recorded to the journal
-
On first access to the CDC (immediately when a staging area is used, otherwise, when a client first requests changes
-
Changes recorded in the journal after a specific date and time.
When you select this option, click Set time, and select the time and date from the dialog box that is displayed.
-
-
In the Change capture event setting section, Select the Include capture of before image records to include these records in the CDC solution.
-
In the Transient Storage Directory section, Enter the path to the folder where the transient storage is located. This should be the same location as defined in the transientStorage parameter when Configuring the Template Input File.
The transient storage should be on the same computer where the OracleAS CDC Adapter for SQL Server is defined.
-
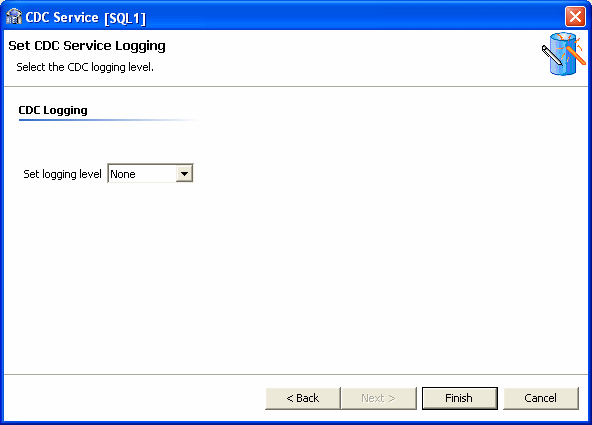
Click Next to go to the next step where you set the CDC Service Logging. Select the log level to use from the Logging level list.
Select one of the following from the list:
-
None
-
API
-
Debug
-
Info
-
Internal Calls
-
-
Click Finish.
Continue setting up the CDC Server on the Windows computer.
Set up the Staging Area Server
Click Implement in the Getting Started guide to open the Implementation guide.
In the Implementation guide, do the following under the Stream Service Configuration section, to set up the staging area server:
Set Up the Staging Area Machine
To set up the machine for the staging area, do the following.
-
Under the Stream Service Configuration section, click Machine.
-
Use the same configurations used to Set up the Machine for the CDC server.
Continue setting up the staging area Server.
In this step you set up the stream service. The Stream Service configures the following:
-
Staging area
-
Filtering of changed columns
-
Auditing
Note:
Null filtering is currently unsupported. Filtering empty values is supported. Space values are truncated and are handled as empty values.-
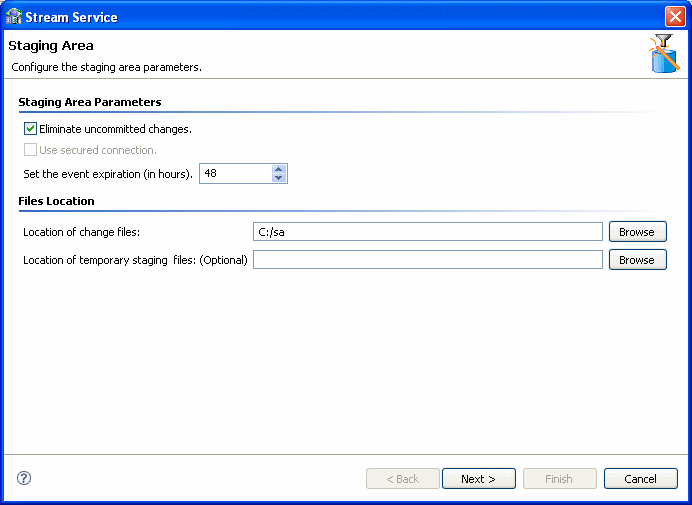
Click Stream Service. The Stream Service wizard opens.
Note:
This screen appears only if you selected the inclusion of a staging area in your solution. -
You can configure the following parameters in this screen:
-
Select Eliminate uncommitted changes to eliminate uncommitted changes from your CDC project.
-
Select the Use secured connection check box to configure the staging area to have a secured connection to the server. This is available only if you logged into the server using user name and password authentication.
-
Set the event expiration time in hours.
-
Under File Locations, click the Browse buttons to select the location of the changed files, and temporary staging files, if necessary.
-
-
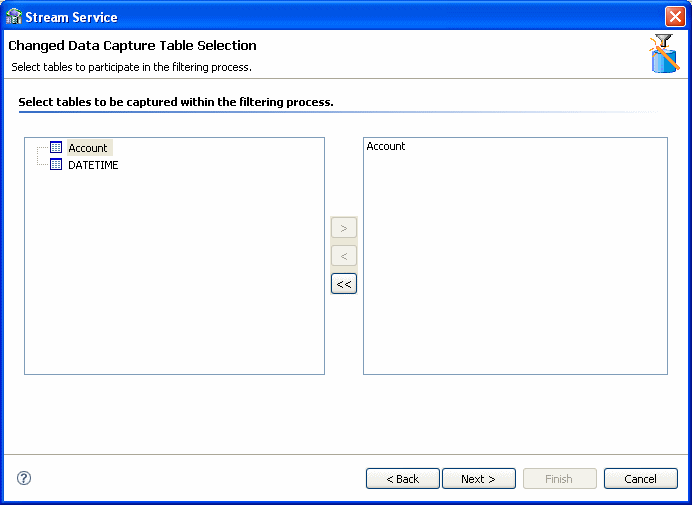
Click Next to select the tables to include in the filtering process.
-
Click the required tables in the left pane and move them to the right pane using the arrow keys.
Note: You can remove the tables and add new ones to be captured after you add the tables to the right pane. For more information, see Adding and Removing Tables.
-
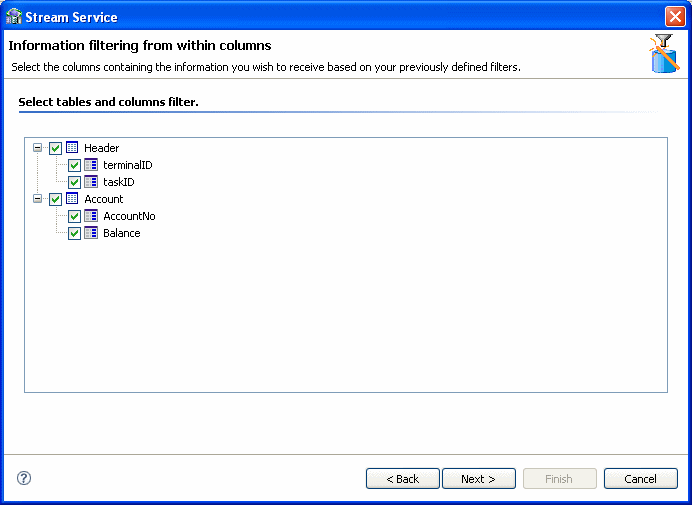
Click Next. From the tables selected above, select the columns that receive changes. Select the check box next to the table to use all columns in the table.
Note:
Table headers appear grouped in a separate table at the beginning of the list. You can also request the receipt of changes in the headers' columns.Any data changes in the columns selected are recorded.
-
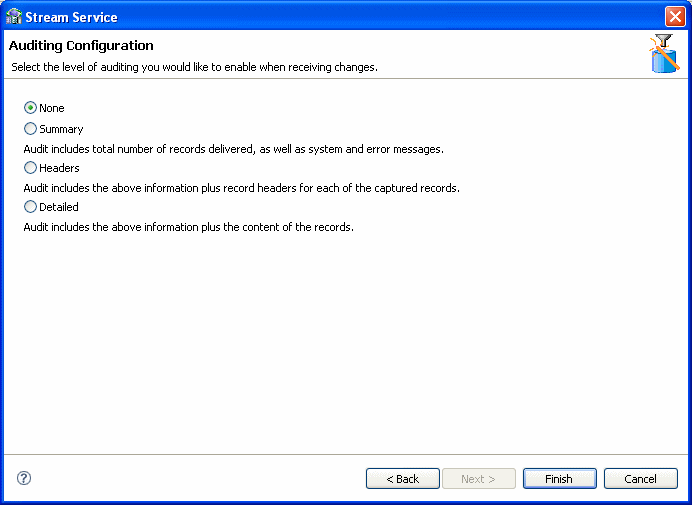
Select the required auditing level when receiving changes. Your options are:
-
None: For no changes.
-
Summary: For an audit that includes the total number of recordes delivered, system messages, and error messages.
-
Headers: For an audit that includes the total number of records delivered, system and error messages, and the record headers for each captured record.
-
Detailed: For an audit that includes the total number of records delivered, system and error messages, the record headers for each captured record, and the content of the records.
-
-
Click Finish.
Continue setting up the staging area Server.
Configure the Access Service Manager
In this step you set up a daemon workspace for the CDC adapter. Do the following to configure the access service manager.
-
Click Access Service Manager.
The Setup Workspace wizard opens.
-
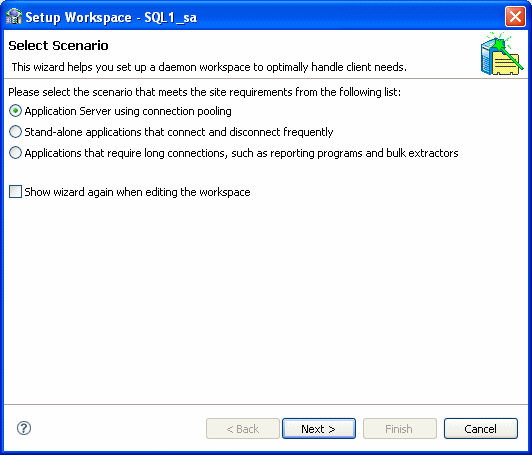
Select the scenario that best meets your site requirements:
-
Application Server using connection pooling
-
Stand-alone applications that connect and disconnect frequently
-
Applications that require long connections, such as reporting programs and bulk extractors
-
-
Click Next.
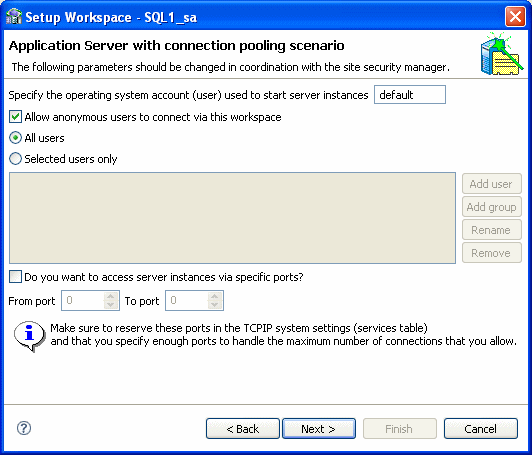
The Application Server with connection pooling scenario screen is used to create a workspace server pool. The parameters available depend on the selection you made in the first screen. The following are the available parameters:
-
If you selected Application Server using connection pooling:
-
What is the average number of expected concurrent connections? Enter the number of expected connections, which cannot be greater than the number of acutal available connections.
-
What is the maximum number of connections you want to open? Enter the number of connections you want opened.
-
-
If you selected Stand-alone applications that connect and disconnect frequently, in addition to the choices listed in the item above, you can also set the following:
-
What is the minimum number of server instances you want available at any time? Enter the number of instances, which cannot be greater than the number of actual available instances.
-
What is themaximum number of server instances you want available at any time? Enter the number of instances you want to be available.
-
-
If you selected Stand-alone applications that connect and disconnect frequently:
-
How many connections do you want to run concurrently? Enter the number of concurrent connections to run.
-
-
-
Click Next. In the next screen you set time out parameters. These parameters should be changed if the system is slow or overloaded. The parameters are:
-
How long do you want to wait for a new connection to be established? Enter the amount of time you want to wait for a new connection to be established (in seconds).
-
How long do you want to wait for a response that is usually quick? Change this parameter if you have a fast connection. Enter the amount of time to wait for a response (in seconds).
-
-
Click Next. In the next screen you set security parameters. You should consult with the site security manager before changing these parameters.
Edit the following parameters in this screen:
-
Enter the operating system account (user name) used to start server instances.
-
Select Allow anonymous users to connect via this workspace, to allow this option.
-
Enter the permissions for the workspace. You can allow All users to access the workspace, or select Selected users only to allow only the users/groups to have exclusive access.
-
Select Do you want to access server instances via specific ports, to allow this option. If this option is cleared, the defaults are used.
If you select this option, indicate the From port and To port and ensure that you reserve these ports in the TCP/IP system settings.
-
-
Click Next.
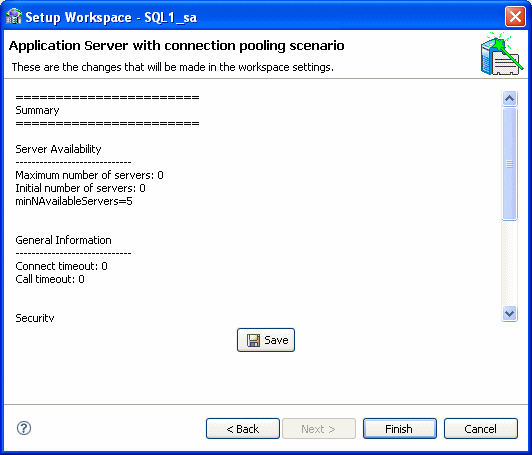
The summary screen opens.
-
Click Save and then click Finish.
When you complete all the Implementation operations, a check mark (✓) is displayed next to every link. Click Done to return so you can begin Deploying a Change Data Capture.
Deploying a Change Data Capture
After you complete the design and implementation guides, the following procedures are available.
-
Deployment Procedure: This section is used to deploy the project.
-
Control: This section is used to activate or deactivate workspaces after the project is deployed and you are ready to consume changes. In this section, you can deactivate the workspace anytime you want to suspend consumption of changes from the staging area.
Note:
Before deploying the solution, ensure that you have carried out the following tasks, in addtion to setting up the CDC solution in Oracle Studio:Do the following to deploy the CDC solution:
-
Click Deploy. The Deployment Procedure and Control sections are displayed in the Deployment view.
-
Click Deploy in the Deployment Procedure section.
Oracle Studio processes the naming information. This may take a few minutes. If there are naming collisions, a message is displayed asking if you want Oracle Studio to resolve them.
-
Click Yes to resolve any naming collisions.
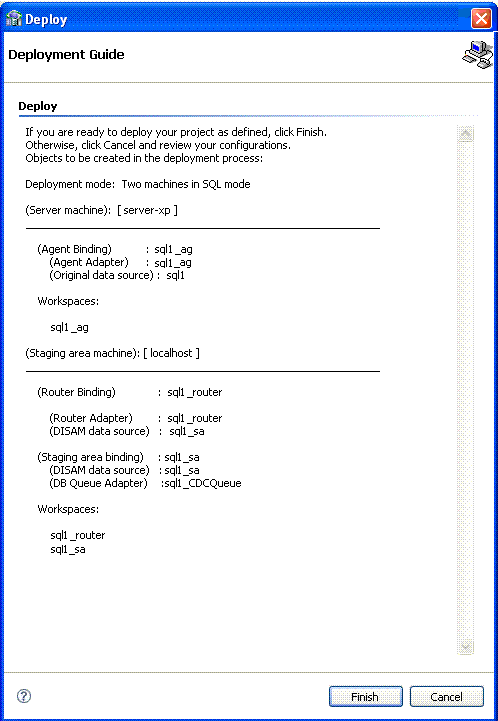
The Deployment Guide screen is displayed.
-
If you are ready to deploy, click Finish.
Otherwise, click Cancel and you can return to Create a CDC Project, Set up the CDC Server, or Set up the Staging Area Server to make any changes.
If this project was deployed previously, you are notified that re-deployment overrides the previous instance.
Notes:
-
When you redeploy a project where the metadata is changed, the Staging Area (SA) tables should be deleted so that no incorrect information is reported.
-
When you redeploy a solution, a new binding is created for the solution. The new binding is created with the default parameters only. Any temporary features that were added are lost.
-
-
Where applicable, click OK to redeploy.
-
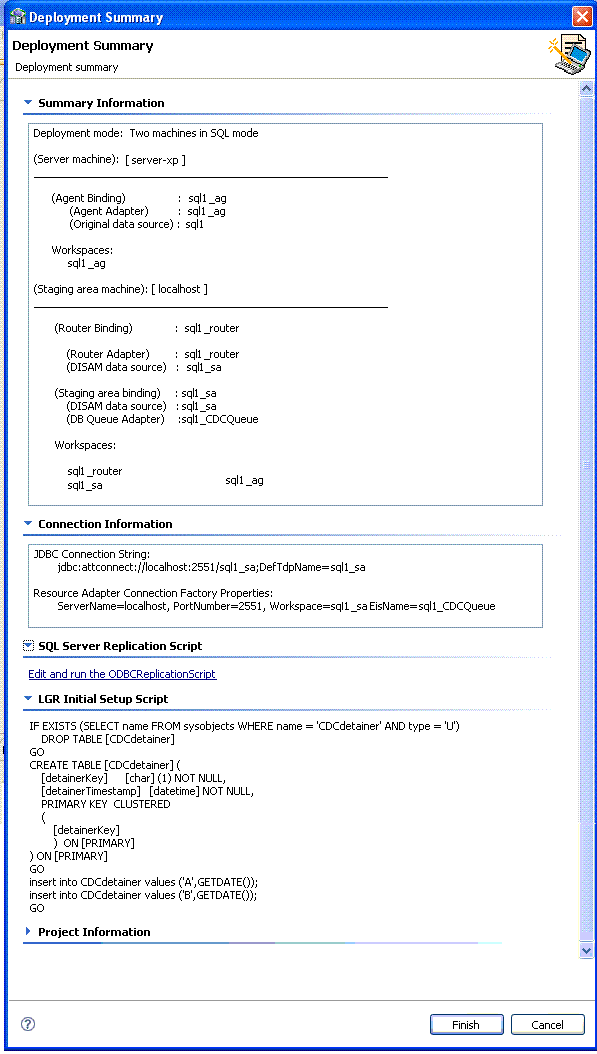
Click the Deployment Summary link.
The Deployment Summary is displayed. It includes the ODBC connection string, the JDBC connection string, and specific logger scripts to enable CDC capturing.
-
Cut and paste any information required from the Deployment Summary screen to your environment as necessary.
Note:
The scripts generated in the deployment summary is template. Before running the scripts, they should be reviewed and modified by a DBA. -
If there is nothing wrong with your deployment results, click Finish.
If you found problems, click Cancel and to return Create a CDC Project, Set up the CDC Server, or Set up the Staging Area Server to modify the solution.
Note:
If you are redeploying a solution you must follow these directions to ensure that thecontext and agent_context fields of the SERVICE_CONTEXT table must be saved. Follow these directions to save the fields:
-
In the staging area data source run: select context,
agent_context from SERVICE_CONTEXT; and save the returned values. -
Delete the
SERVICE_CONTEXTtable physical files. -
Re-deploy the solution.
-
Activate the router to create the
SERVICE_CONTEXTtable. -
Disable the router.
-
In the staging area data source run:
insert into SERVICE_CONTEXT (context, agent_context) values('XXX', 'YYY'). This inserts the saved values to the SERVICE_CONTEXT table. -
Activate the solution.
Activating and Deactivating Solution Workspaces
In the Project guide for your OracleAS CDC Adapter solution, click Deploy, then do one of the following to activate or deactivate the workspaces for a solution
-
To activate workspaces, under the Control section iclick the Activate Workspaces link.
-
To deactivate workspaces, click the Deactivate Workspaces link.
During the activation/deactivation process, you may receive messages indicating that the daemon settings on one or more of the computers involved in your solution have changed. Click Yes to proceed.
Testing the OracleAS CDC Adapter for SQL Server CDC Solution
Check the following to ensure that the OracleAS CDC Adapter for SQL Server operates correctly.
-
The system contains a Temporary Transient working folder
-
All consumed tables are "articled" within at least one Replication/publication definition
-
All consumed tables have a primary key
-
Verify that the TLOG Miner components are running (for more information, see Environment Verification)
Handling Metadata Changes
When you make changes to the source tables in your SQL Server CDC Solution, you must ensure that the CDC solution can recognize the changes and work with them. This section provides you with a procedure to handle the metadata in your OracleAS CDC Adapter for SQL Server CDC solution if changes are made after deploying the solution. You should perform these steps at a time when there is little or no activity in the system. If you want to receive new events with a new structure, consume the changes for the table you are updating before carrying out any the steps in this process.
Do the following to handle changes to metadata:
-
Deactivate the Solution using Oracle Studio.
-
Update the metadata on the back-end database for the table you are working with.
In Microsoft SQL Server 2005, an inconsistency between the modified metadata and the data layout can appear because of the changes made to the metadata. To handle this inconsistency:
-
If a clustered index is defined for the table, run:
DBCC DBREINDEX ('<table name>',<clustered index>)Where
<table name>is the table with updated metadata, and<clustered index>is the name of its clustered index. -
If no clustered index is defined, reload the table.
-
-
Update the metadata in the Staging Area by doing one of the following:
-
If you made manual changes to the CDC solution after deployment, or if you do not want to redeploy the solution, then on the Router's (Staging Area) computer, do the following:
-
Run Oracle Studio, and open the Design perspective.
-
Edit the Metadata for the Router's Data source.
-
Expand the table list and edit the metadata for the table.
If you are adding a new column, you must add it to the end of the
COLUMNlist. This operation can also be done using the Source view. ensure you select the correct data type.If you are modifying a data type, you must select the corresponding data type when making the modification.
-
Save the metadata.
For more information, see Advanced Tuning of the Metadata.
-
-
For cases where you can redeploy the solution:
-
Run Oracle Studio, and open the Solution perspective.
-
Open the CDC solution project.
-
Click Implement and then click Stream Service.
-
Run the wizard.
-
Redeploy the solution, but do not activate it.
For more information, see Deploying a Change Data Capture.
-
-
-
Delete the physical files that represent the modified tables from the Staging Area. Do not delete the SERVICE_CONTEXT and CONTROL_TABLE files.
-
Reactivate the solution using Oracle Studio.
Environment Verification
The following topics show how to ensure that the SQL Server CDC solution components are configured properly. This section has the following topics.
Verify the SQL Server Version
During setup, the LGR checks to see which version of the Microsoft SQL Server you are using to ensure that it works with the correct standards. You must verify that the correct SQL Server version is recognized by the LGR service. To verify the version, do one of the following:
-
In the initial setup section of the LGR log file, find the back-end version stamping as follows:
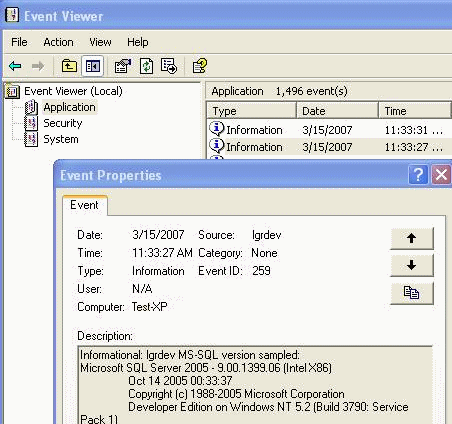
<<20070315-113327>> Module:sqlcdclgr/Line:697 MS-SQL version sampled: Microsoft SQL Server 2005 - 9.00.1399.06 (Intel X86) Oct 14 2005 00:33:37 Copyright (c) 1988-2005 Microsoft Corporation Developer Edition on Windows NT 5.2 (Build 3790: Service Pack 1) -
In the Windows Event Viewer, do the following:
-
Find the
lgrdevsource for any Information entry. -
Double-click the entry to display the following. Check to see if the message describes the SQL version. If not, try another entry.
-
Ensure that the Service is Registered
Use the System Registry (REGEDIT) to ensure that:
-
The TLOG Miner service is registered
-
The TLOG Miner service is assigned as a Windows event log source
Do the following to check that the TLOG Miner service is registered:
In the System Registry (REGEDIT), approve the service and its parameters. To access the registry:
-
Click Start, click Run, type regedit, and then click OK.
Scroll through the registry tree by expanding the folders that lead to the root folder where you installed Oracle Connect. The path listed here assumes that you installed Oracle Connect in the default location:
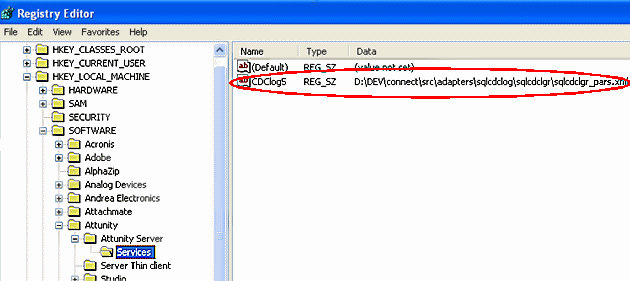
HKEY_LOCAL_MACHINE\SOFTWARE\Oracle\Oracle Connect\Services. Ensure that the LGR service registration is listed on the right side.The following is an example of how the registry may look:
For checking if the TLOG Miner service is assigned as a Windows event log source, follow this procedure.
Do the following to check that the LGR service is assigned as a Windows event log source:
In the System Registry (REGEDIT), browse to the CDClog folder. To access the registry:
-
Click Start, click Run, type regedit, and then click OK.
Scroll through the registry tree by expanding these folders:
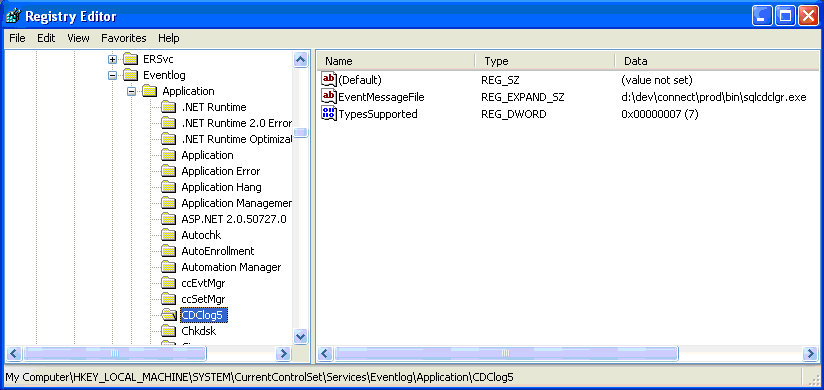
SYSTEM\CurrentControlSet\Services\EventLog\Application\CDClog5. Ensure that the LGR service registration is listed on the right side.The following is an example of how the registry may look:
Verify that the LGR Service is Running
You should carry out the following to ensure that the TLOG Miner service is running:
-
Ping the Service
-
Start the service for a short period, and then stop it. To start the service:
-
From the Windows Start menu, select Control Panel, Administrative Tools and double-click the Services icon.
Find the service is listed in the Name list and click Stop the service. To start the service click Restart the service. See the example below.
-
Viewing the Service Greetings
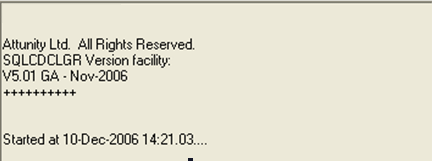
Open the Event Viewer and view the messages in the Event Properties dialog box.
Do the following to view the event properties:
-
From the Windows Start menu, select Control Panel, Administrative Tools and double-click the Events icon.
-
Select System on the left side of the viewer.
-
From the right pane, right click and event from the SQL Server CDC and select Properties. The following figure is a sample of the information that is displayed:
Check the Output Files
You should check the following files:
-
LGR Service log files: These files are in the folder or directory that is selected in the
Loggingparameter of the template input file. -
Transient storage output file: This file is in the folder or directory that is selected in the
transientStorageparameter of the template input file.
For information on where to define these parameters, see Configuring the Template Input File.
