11 Using Cost Object Tracking for Procurement
This chapter contains the following topics:
-
Section 11.1, "Understanding Cost Object Tracking for Procurement"
-
Section 11.2, "Understanding Cost Object Information Entry in Landed Costs"
-
Section 11.3, "Entering Cost Object Information in Purchase Order Entry"
-
Section 11.4, "Entering Cost Object Information in Purchase Order Receipts"
-
Section 11.5, "Entering Cost Object Information in Purchase Order Workbench"
-
Section 11.6, "Entering Cost Object Information During Voucher Match"
11.1 Understanding Cost Object Tracking for Procurement
When you enter a purchase order, requisition, or quote, the system captures cost object information that is useful for managerial accounting or activity-based costing. Additionally, as you receive the goods and match the receipt to the voucher, you can review or edit cost object information.
You can enter cost object information at multiple steps in the procurement process, such as purchase order entry, receipts, and voucher match; or you can have the system automatically populate the cost object fields, based on flex accounting rules.
11.1.1 Example: Cost Management in the Procurement System
During the procurement process, Company 200 believes it is incurring extra costs because its bicycle bags come from both domestic and non-domestic suppliers. The company has observed that some materials are delivered directly to the shop floor while others go through receiving, sorting, and quality inspection prior to being placed in inventory. Therefore, the company wants to use activity-based costing techniques to analyze the extra costs of procuring bicycle bags and determine how much of the cost can be attributed to whether it uses a domestic supplier.
This activity-based costing scenario is designed to analyze the cost of the procurement process for two different suppliers. Transactions originate from the following sources:
-
Expenditures - Procurement.
-
Quality - Procurement.
-
Inventory carry costs - General Ledger.
-
Miscellaneous, such as time to receive and sort bags - Cost Analyzer.
The company procures bicycle bags from two different suppliers. One is a domestic supplier; the other is not. The company has a special contract with the non-domestic supplier. This supplier can provide the bags at a lower cost (including duty fees) than the domestic supplier, and it imprints a logo onto the bags at no extra charge. The company places electronic orders with this supplier for both plain and imprinted bags. However, the company must process additional paperwork for customs and other regulatory requirements. The supplier requires a three month lead time. Therefore, the bags are shipped in very large quantities four times a year.
When the company receives the bags, it must inspect the merchandise quality for possible problems such as ink bleed from printing the logo. The inspection department averages a 90 percent pass rate. All rejected bags are scrapped because it is too costly to return them to the supplier. Next, the plain and logo-imprinted bags are separated from each other.
Upon completion of the inspection, the bags are placed into inventory and pulled out of stock on an as-needed basis. To assure sufficient inventory is available, the company carries a small safety stock of the bags.
The company also uses a domestic bicycle bag supplier for plain black bags. If the customer requests custom logo imprints on the bags, the company can pay the supplier a nominal fee for its imprinting service and then charge the customer for the printing.
The company uses a Kanban replenishments method. When the Kanban is empty, it is replenished with stock from the stockroom. When the stockroom Kanban is empty, an electronic purchase order is created to request that the supplier automatically replenish bicycle bags when the stock is needed. The supplier delivers small quantities of bags within a two day lead time directly to the storeroom. Due to the quality of bags, they average a 98 percent pass rate. If the shop floor rejects a bag, a credit request is submitted to accounting and the bag is scrapped.
As a result of analyzing the procurement process, the company identifies extra steps that incur hidden costs for receiving, sorting, inspecting, and carrying inventory for the non-domestic supplier. Therefore, they would like to analyze the extra costs that are related to these steps to determine how much can be attributed to each supplier.
11.1.2 Procuring Bags from Domestic Suppliers
This graphic illustrates the process for procuring bags from domestic suppliers. Bold captions identify where cost objects are associated with activities in the procurement process.
Figure 11-1 Procuring bags from domestic suppliers
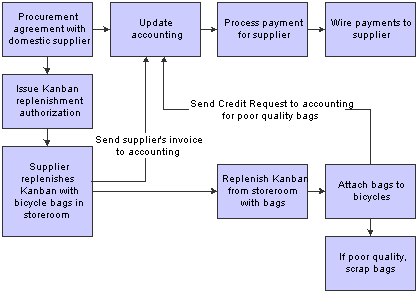
Description of ''Figure 11-1 Procuring bags from domestic suppliers''
11.1.3 Procuring Bags from Non-domestic Suppliers
This graphic illustrates the process for procuring bags from non-domestic suppliers. Bold captions identify where cost objects are associated with activities in the procurement process.
Figure 11-2 Procuring bags from non-domestic suppliers
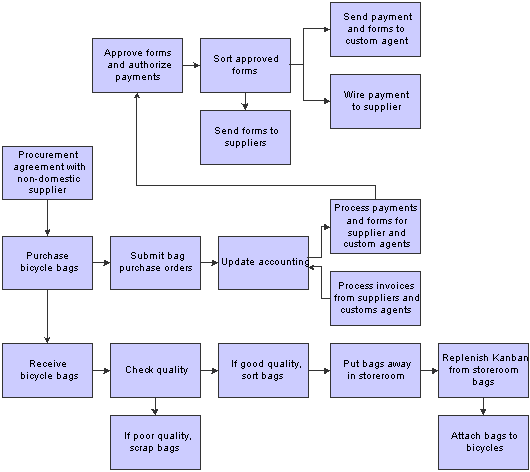
Description of ''Figure 11-2 Procuring bags from non-domestic suppliers''
11.2 Understanding Cost Object Information Entry in Landed Costs
When you purchase items, extra costs must often be paid for delivery fees, broker fees, import taxes, and so on. These costs are called landed costs. You can enter landed costs for items during the receipt process or as a stand-alone process.
Landed costs are applicable only to items for which you record receipt information. When you enter landed costs for items, the system allows you to work with only the landed costs that have been set up and assigned to the item. For each item that you receive, you can review, change, and enter the landed costs that are assigned to the item.
After you enter landed costs for items, the system might create a separate landed cost detail line for which you must create a voucher. The setup of the landed cost determines the way in which the system creates the detail information. You can review landed cost detail lines on the Voucher Match form.
You can enter cost object information as landed costs during purchase order receipts. The system verifies the cost object type and the cost object edit code that you defined in the Account Master table (F0901). The system searches flex accounting rules to verify which AAIs or accounts are automatically populated.
11.3 Entering Cost Object Information in Purchase Order Entry
This section provides an overview of cost object information entry in purchase order entry and discusses how to enter cost object information in purchase order entry.
11.3.1 Understanding Cost Object Information Entry in Purchase Order Entry
On the Order Detail form, you must enter information about each item or service that you want to procure. For each item or service, you must enter a line of detail that describes the following:
-
Item or service that you want to procure.
-
Quantity that you want to procure.
-
Cost of the item or service.
The system retrieves information such as the cost, description, and unit of measure for the item and enters it on the detail line. You can override these values and specify additional information such as a storage location, lot number, asset identifier, manufacturing details, and landed cost rules.
You can enter cost object information during purchase order entry; or you can have the system automatically populate the cost object fields, based on flex accounting rules.
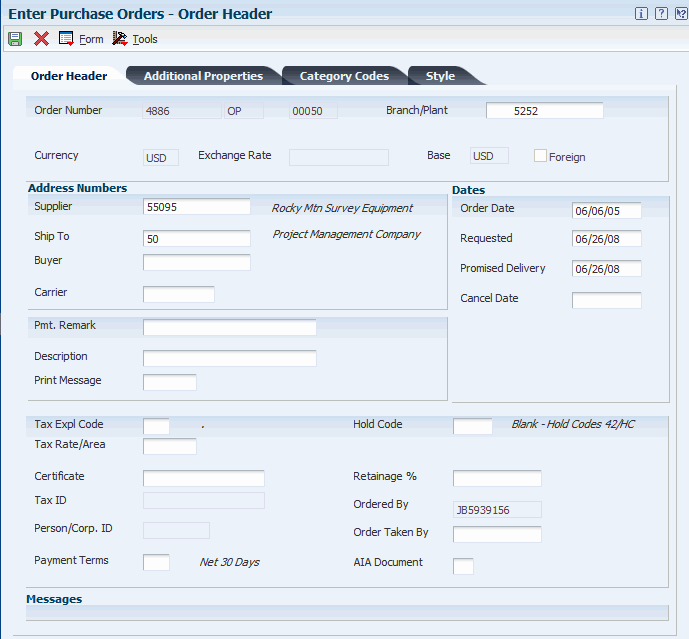
11.3.2 Form Used to Enter Cost Object Information in Purchase Order Entry
| Form Name | FormID | Navigation | Usage |
|---|---|---|---|
| Order Header | W4310A | Purchase Order Processing (G43A11), Enter Purchase Orders
Click Add on the Work With Order Headers form. |
Enter cost object information in purchase order entry. |
11.3.3 Entering Cost Object Information in Purchase Order Header
Access the Order Header form.
To enter cost object information in purchase order entry:
-
Review or complete the following fields for cost object information on the Order Detail form:
-
Item Number
-
Cost Object Type 1
-
Cost Object 1
-
Cost Object Type 2
-
Cost Object 2
-
Cost Object Type 3
-
Cost Object 3
-
Cost Object Type 4
-
Cost Object 4
-
-
Click OK.
11.4 Entering Cost Object Information in Purchase Order Receipts
This section provides an overview of cost object information entry in purchase order receipts and discusses how to enter cost object information in purchase order receipts.
11.4.1 Understanding Cost Object Information Entry in Purchase Order Receipts
After you receive the goods on a purchase order, you must record the details of the receipt. The system uses receipt information to:
-
Update item quantities and costs in the JD Edwards EnterpriseOne Inventory Management system.
-
Update general ledger accounts.
When you receive goods, you must verify that the details of the receipt correspond to the information on the purchase order. You must verify item numbers, quantities, units of measure, costs, and so on. If the receipt details differ from those on the purchase order, you must adjust the purchase order detail lines to reflect the receipt. For example, if landed costs, such as delivery charges or import taxes, apply to the item's purchase price, you enter these costs during the receipt process.
Each time that you receive an order, the system:
-
Creates a receipt record in the Purchase Order Receiver File table (F43121).
-
Updates item quantities and costs in the Item Location File table (F41021).
-
Adds a new record to the Item Ledger File table (F4111).
-
Updates the appropriate accounts in the Account Ledger table (F0911).
If you entered cost object information during purchase order entry, you can review cost object types, edit codes, and item information during the receipt process. Optionally, you can enter cost object information during the receipt process. The system verifies the cost object type and the cost object edit code that you defined in the Account Master table (F0901). If the processing option is set to use flex accounting, the system searches flex accounting rules to determine how to automatically populate cost objects.
You must set the processing option to use flex accounting in Purchase Order Receipts.
11.4.1.1 Related Task
This table lists the related task:
| Task | Description |
|---|---|
| Reviewing Cost Object Information in Receipts Reversal | Each time that you cancel or reverse a receipt, the system updates the Purchase Order Receiver File table (F43121). The system reverses all accounting and inventory transactions. When you reverse a receipt, the system reverses cost object information. The system retrieves the original cost object values for reversal journal entries.
You can use the Purchase Order Receipts Inquiry (P4312) to reverse a receipt only if you have not yet created a voucher for the receipt. You might need to do this procedure if you made a mistake. |
11.4.2 Form Used to Enter Cost Object Information in Purchase Order Receipts
| Form Name | FormID | Navigation | Usage |
|---|---|---|---|
| Work With Purchase Orders to Receive | W4312F | Purchase Order Processing (G43A11), Enter Receipts by PO | Enter cost object information in purchase order receipts. |
11.4.3 Entering Cost Object Information in Purchase Order Receipts
Access the Work With Purchase Orders to Receive form.
To enter cost object information in purchase order receipts:
-
Complete the following fields to locate open purchase order details lines that correspond to a receipt on Work With Purchase Orders to Receive:
-
Order Number
-
Branch/Plant
-
Item Number
-
Account Number
The system displays only those detail lines that have a next status code that is equal to the one that you specified in processing options.
-
-
Select a record in the detail area and click Select.
-
Review or complete the following fields on the Purchase Order Receipts form:
-
Item Number
-
Cost Object Type 1
-
Cost Object 1
-
Cost Object Type 2
-
Cost Object 2
-
Cost Object Type 3
-
Cost Object 3
-
Cost Object Type 4
-
Cost Object 4
-
11.5 Entering Cost Object Information in Purchase Order Workbench
This section provides an overview of cost object information entry in purchase order workbench and discusses how to enter cost object information in purchase order workbench.
11.5.1 Understanding Cost Object Information Entry in Purchase Order Receipts
You can enter orders for multiple suppliers simultaneously instead of entering a separate order for each supplier. On the Purchase Order Workbench form, you specify the items that you want to purchase and the supplier from whom you want to purchase each item.
After you enter the items, you must direct the system to create purchase orders. The system combines items for each supplier on a separate purchase order, and the information for each detail line defaults from master information for the item or procurement instructions for the supplier. You can use the Work With Order Headers form to review the orders that the system generates.
If you enter cost object information during purchase order entry, you can review cost object types, edit codes, and item information during the receipt, landed cost, and voucher processes. The system verifies the cost object type and the cost object edit code that you defined in the Account Master table (F0901).
11.5.2 Form Used to Enter Cost Object Information in Purchase Order Workbench
| Form Name | FormID | Navigation | Usage |
|---|---|---|---|
| Purchase Order Workbench | W43101B | Purchase Order Processing (G43A11), Purchase Order Workbench | Enter cost object information in purchase order workbench. |
11.5.3 Entering Cost Object Information in Purchase Order Workbench
Access the Purchase Order Workbench form.
To enter cost object information in Purchase Order Workbench:
-
Review or complete the following fields for cost object information, if applicable on Purchase Order Workbench:
-
Item Number
-
Cost Object Type 1
-
Cost Object 1
-
Cost Object Type 2
-
Cost Object 2
-
Cost Object Type 3
-
Cost Object 3
-
Cost Object Type 4
-
Cost Object 4
-
-
Click OK if you want the system to automatically generate a separate purchase order for each supplier from whom you are ordering items.
If you do not want the system to automatically generate separate purchase orders, you must first cancel the orders before exiting Purchase Order Workbench.
11.6 Entering Cost Object Information During Voucher Match
This section provides an overview of cost object information entry during voucher match, lists prerequisites, and discusses how to enter cost object information during voucher match.
11.6.1 Understanding Cost Object Information Entry During Voucher Match
Before you can pay a supplier for the goods and services that you purchase, you must create a voucher that:
-
Indicates that the terms of a transaction have been met.
-
Specifies the amount to pay to the supplier.
-
Notifies the JD Edwards EnterpriseOne Accounts Payable system to cut a check.
You can create a voucher that based on an invoice. You use this method to verify that invoice information corresponds to your receipt records. For example, if a supplier bills you for 100.00 United States Dollar (USD) worth of goods, you must verify that you received 100.00 USD worth of goods. If you do not record receipt information, you must verify that the invoice information corresponds to the purchase order detail lines.
You might want to review the receipt records for which you must create vouchers. After you locate this information, you can enter landed costs (costs in excess of an item's purchase price) for the items that you have received.
If you receive an invoice before you take receipt of the goods and services, you can create a preliminary voucher to account for the billing amount. After you receive the goods or services on the invoice, you can redistribute the amounts to the appropriate general ledger accounts.
You can enter cost object information at voucher match, or you can have the system automatically populate the cost object fields based on flex accounting rules.
11.6.1.1 Related Task
This table lists the related task:
| Task | Description |
|---|---|
| Voucher match methods | If you record receipt information for items, you compare invoices to receipt records to create individual vouchers. A three-way voucher match method implies that you use receipt records to create vouchers.
If you do not record receipt information, you compare invoices to order detail lines to create vouchers. A two-way voucher match method implies that you use order detail lines to create vouchers. The system creates a voucher when you match order detail lines to an invoice. |
11.6.2 Prerequisite
Before you complete the tasks in this section, set the processing options to perform voucher match processing.
11.6.3 Form Used to Enter Cost Information During Voucher Match
| Form Name | FormID | Navigation | Usage |
|---|---|---|---|
| Voucher Match | W0011F | Receipts Matching and Posting (G43A15), Match Voucher to Open Receipt
Click Add on the Supplier Ledger Inquiry form. |
Enter cost object information during voucher match. |
11.6.4 Entering Cost Information During Voucher Match
Access the Voucher Match form.
To enter cost object information during voucher match:
-
Complete the steps to create a voucher or to match a voucher to a receipt on the Match Voucher form.
If you do not enter cost object information, the system uses the flex accounting rules to populate cost objects automatically.
-
Complete the following fields to enter or review cost object information:
-
Item Number
-
Cost Object Type 1
-
Cost Object 1
-
Cost Object Type 2
-
Cost Object 2
-
Cost Object Type 3
-
Cost Object 3
-
Cost Object Type 4
-
Cost Object 4
-