4 Setting Up Forecast Management
This chapter contains the following topics:
4.1 Understanding Forecast Management Setup Requirements
-
Company hierarchies.
-
Distribution hierarchies.
-
Summary of detail forecasts and summary forecasts.
-
Summary forecast setup.
Before you generate a detail forecast, you set up criteria for the dates and kinds of data on which the forecasts are based, and set up the time periods that the system should use to structure the forecast output.
To set up detail forecasts, you must:
-
Set up inclusion rules to specify the sales history records and current sales orders on which you want to base the forecast.
-
Specify beginning and ending dates for the forecast.
-
Indicate the date pattern on which you want to base the forecast.
-
Add any forecast types not already provided by the system.
-
Define large customers for separate customer forecasts.
4.1.1 Supply and Demand Inclusion Rules
JD Edwards EnterpriseOne Forecast Management uses supply and demand inclusion rules to determine which records from the Sales Order Detail File table (F4211) and Sales Order History File table (F42119) to include or exclude when you run the Refresh Actuals program (R3465). Supply and demand inclusion rules enable you to specify the status and type of items and documents to include in the records. You can set up as many different inclusion rule versions as you need for forecasting.
4.1.2 Fiscal Date Patterns
Fiscal date patterns are user-defined codes (UDCs) (H00/DP) that identify the year and the order of the months of that year for which the system creates the forecast. JD Edwards EnterpriseOne Forecast Management uses fiscal date patterns to determine the time periods into which the sales order history is grouped. Before you can generate a detail forecast, you must set up a standard monthly date pattern. The system divides the sales history into weeks or months, depending on the processing option that you select. If you want to forecast by months, you must set up the fiscal date pattern. If you want to forecast by weeks, you must set up both the fiscal date pattern and a 52 period date pattern.
To set up fiscal date patterns, specify the beginning fiscal year, current fiscal period, and which date pattern to follow. JD Edwards EnterpriseOne Forecast Management uses this information during data entry, updating, and reporting. Set up fiscal date patterns for as far back as the sales history extends and as far forward as you want to forecast.
Use the same fiscal date pattern for all forecasted items. A mix of date patterns across items that are summarized at higher levels in the hierarchy causes unpredictable results. The fiscal date pattern must be an annual calendar: For example, from January 1, through December 31; or from June 1, through May 31.
The JD Edwards EnterpriseOne System recommends that you set up a separate fiscal date pattern for forecasting only so that you can control the date pattern. If you use the date pattern that is already established in Oracle's JD Edwards EnterpriseOne Financial Management system, the financial officer controls the date pattern.
4.1.3 52 Period Date Pattern
After you set up forecasting fiscal date patterns, you must set up a 52 period pattern for each code to forecast by weeks. When you set up a 52 period date pattern for a forecast, the period end dates are weekly instead of monthly.
4.1.4 Forecast Types
JD Edwards EnterpriseOne Forecast Management uses Forecast Type (34/DF) to differentiate the multiple forecasts that reside in the Forecast File table (F3460). Forecast Type can identify actual sales history, a system generated best fit forecast, each of the 12 generated forecast methods, or manually entered forecasts. Each time that sales history is extracted or a forecast is generated, you can select a forecast type to identify the data.
You can set up multiple forecasts for the same item, branch/plant, and date by using different forecast types. You can use existing codes or add codes to the UDC table 34/DF to identify forecast types.
This table illustrates different types of forecasts:
| Code | Description | Hard Coded |
|---|---|---|
| 01 | Simple Percent Over Last Year | Y |
| 11 | Exponential Smoothing | Y |
| AA | Actual Sales | N |
| BF | Best Simulated Forecast | N |
| MF | Maintenance Forecast | N |
| MM | Maintenance Management | N/A |
| PP | Production Plan | N/A |
| SP | Service Parts Forecast | N |
Processing options in the Distribution Requirements Planning (DRP), Master Production Schedule (MPS), and Material Requirements Planning (MRP) versions of MRP/MPS Requirements Planning (R3482) enable you to enter forecast type codes to define which forecasting types to use in calculations.
4.1.5 Large Customers
For customers with significant sales demand or more activity, you can create separate forecasts and actual history records. Use this task to specify customers as large so that you can generate forecasts and actual history records for only those customers.
After you set up the customer, set the appropriate processing option in the Forecast Generation program (R34650) so that the system searches the Sales Order History File table (F42119) for sales to that customer and creates separate Forecast File table (F3460) records for that customer.
Use a processing option to enable the system to process larger customers by Ship To instead of Sold To.
If you included customer level in the hierarchy, the system summarizes the sales actuals with customers into separate branches of the hierarchy.
4.1.6 Company Hierarchies
You must define the company hierarchy before you generate a summary forecast. It is strongly recommended that you organize the hierarchy by creating a diagram or storyboard.
This graphic shows an example of a company hierarchy:
Figure 4-1 Example of a company hierarchy
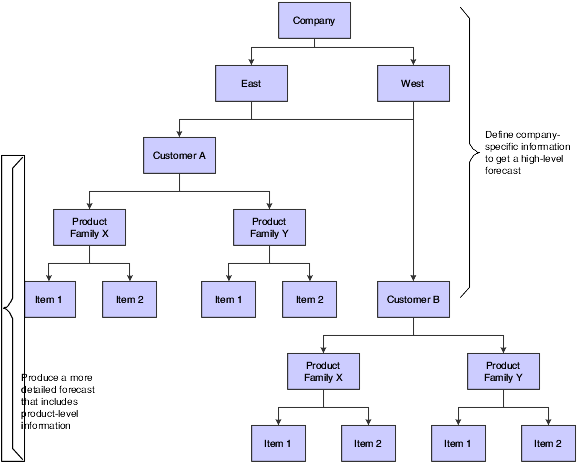
Description of ''Figure 4-1 Example of a company hierarchy''
Establish a forecasting structure that realistically depicts the working operation of the company, from item level to headquarters level, to increase the accuracy of the forecasts. By defining the company processes and relationships at multiple levels, you maintain information that is more detailed and can plan better for the future needs.
4.1.7 Distribution Hierarchies
When planning and budgeting for divisions of the organization, you can summarize detailed forecasts that are based on the distribution hierarchy. For example, you can create forecasts by large customer or region for the sales staff, or create forecasts by product family for the production staff.
To define the distribution hierarchy, you must set up summary codes and assign summary constants. You also must enter address book, business unit, and item branch data.
4.1.7.1 Example: Distribution Hierarchy
This chart shows an example of a distribution hierarchy:
Figure 4-2 Example of a distribution hierarchy for Company A
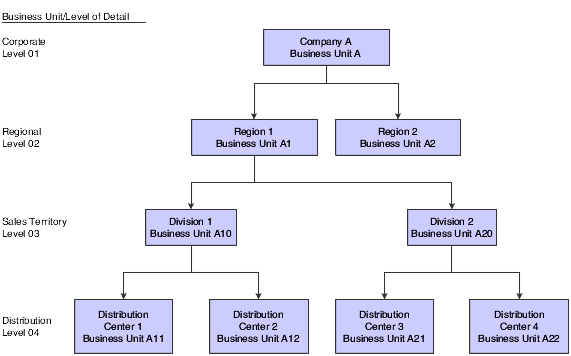
Description of ''Figure 4-2 Example of a distribution hierarchy for Company A''
4.1.7.2 Example: Manufacturing Hierarchy for Company 200
You might want to see a forecast of the total demand for a product summarized by product families.
This chart shows an example of how to set up a hierarchy to get the forecast summary by product:
Figure 4-3 Example of a manufacturing hierarchy for Company 200
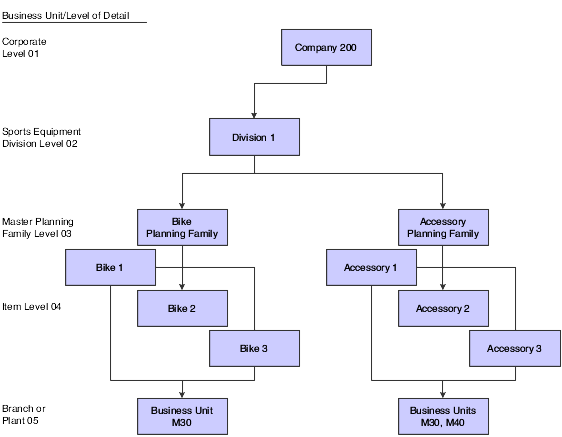
Description of ''Figure 4-3 Example of a manufacturing hierarchy for Company 200''
4.1.8 Summary of Detail Forecasts and Summary Forecasts
Summary of Detail forecasts and Summary forecasts are different.
4.1.8.1 Summary of Detail Forecasts
A summary of detail forecast uses item level data and predicts future sales in terms of item quantities and sales amounts.
The system updates the Sales Order History File table (F42119) with sales data from the Sales Order Detail File table (F4211). You copy the sales history into the Forecast File table (F3460) to generate summaries of detail forecasts. The system generates summary forecasts that provide information for each level of the hierarchy that you set up with summary constants. These constants are stored in the Category Code Key Position File table (F4091). Both summaries of detail forecasts and summary forecasts are stored in the Forecast Summary File table (F3400).
This diagram illustrates the process with shaded blocks:
Figure 4-4 Process for detail forecast summary
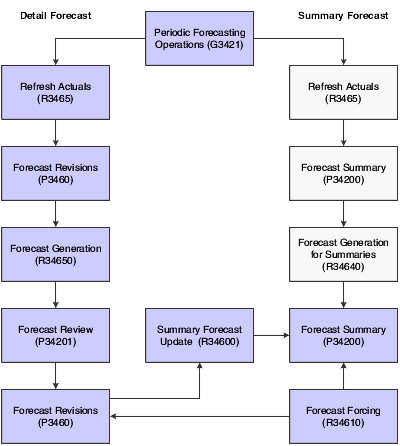
Description of ''Figure 4-4 Process for detail forecast summary''
4.1.8.2 Summary Forecasts
Use summary forecasts to project demand at a product group level. Summary forecasts are also called aggregate forecasts. You generate a summary forecast that is based on summary actual data.
Summary forecasts combine sales history into a monetary value of sales by product family, by region, or in other groupings that are used as input to the aggregate production planning activity. You can use summary forecasts to run simulations.
The system updates the Sales Order History File table (F42119) with sales data from the Sales Order Detail File table (F4211) to generate summary forecasts. You copy the sales history into the Forecast Summary File table (F3400) to generate summary forecasts. The system generates summary forecasts that provide information for each level of the hierarchy that you set up with summary constants. Summary constants are stored in the Category Code Key Position File table (F4091). Both summary forecasts and summaries of detail forecasts are stored in table F3400.
4.1.9 Summary Forecast Setup
For summary forecasts, the JD Edwards EnterpriseOne Forecast Management system requires you to set up the information for detail forecasts and set up and define a summary hierarchy.
You set up the summary codes (40/KV) and then identify the constants for each summary code. These summary codes and constants define the distribution hierarchy.
To set up summary forecasts, you must:
-
Define the hierarchy with summary codes and constants.
-
Enter address book data, business unit data, and item branch data.
You must set up detail forecasts before you can set up summary forecasts.
4.1.9.1 Summary Codes
To set up the hierarchy, you must set up summary codes. For each hierarchy that you define, you must specify a unique identifier called a summary code. Summary codes are set up in UDC 40/KV.
This table illustrates examples of summary codes:
| Codes | Description | Hard Coded |
|---|---|---|
| 200 | Sales Channel Summarization | N |
| CUS | Large Customer Summarization | N |
| EAS | Eastern Forecast | N |
| MDW | Midwestern Forecast | N |
| PHR | Pharmaceutical Forecast | N |
| SM | Marketing Summarization Code | N |
When creating summary forecasts, you select a summary code to indicate the hierarchy with which you want to work.
4.1.9.2 Summary Code Constants
For each summary code, use summary constants to define each level of the hierarchy. You can use category codes from the Address Book program (P01012) and Item Master table (F4101) to define up to 14 levels in the hierarchy. You can define these levels as follows:
-
Define the top level as the Global Summary to summarize forecasts for several companies into a single corporate view.
-
Define the second level as the Company Summary to summarize forecasts for all of the facilities in a single company.
-
Define up to 11 middle levels, which include the category codes and the customer level.
-
Use as many as 20 address book category codes and 20 item branch category codes to assign other levels in the hierarchy.
-
Use the Customer Level field as another category code. You can specify each of the large customers as a level of the hierarchy.
This action enables you to create specific forecasts for each large customer.
-
The lowest level that you can define is the item level.
-
Define an Item Summary level that provides forecasts for the individual item level.
All detail forecast records for an item can be summarized at this level.
Detail records for a branch/plant item are automatically placed after all levels of the hierarchy. The system does not include these detail records as one of the 14 levels of the hierarchy.
4.2 Setting Up Detail Forecasts
This section discusses how to:
-
Set up forecasting supply and demand inclusion rules.
-
Set up forecasting fiscal date patterns.
-
Set up the 52 period date pattern.
-
Set up large customers.
-
Assign constants to summary codes.
4.2.1 Forms Used to Set Up Detail Forecasts
| Form Name | FormID | Navigation | Usage |
|---|---|---|---|
| Work With Supply/Demand Inclusion Rules | W34004A | Material Planning Setup (G3442), Supply/Demand Inclusion Rules | Set up forecasting supply and demand inclusion rules.
Select the lines that you want to include. The program changes the included value of each line that you selected from 0 (not included) to 1 (included). |
| Set Up Fiscal Date Pattern | W0008A | Organization & Account Setup (G09411), Company Names & Numbers
On the Work With Companies form, select Date Pattern from the Form menu. On the Work With Fiscal Date Patterns form, click Add. |
Set up forecasting fiscal date patterns. |
| Set Up 52 Periods | W0008BF | 52 Period Accounting menu (G09313), Set 52 Period Dates
On the Work With 52 Periods form, select Add. |
Set up the 52 period date pattern.
Enter a fiscal date pattern, a beginning date for the fiscal year, and an end date for each period. |
| Customer Master Revision | W03013B | Sales Order Management Setup (G4241), Customer Billing Instructions
On the Work With Customer Master form, select a record. |
Set up large customers. |
| Revise Summary Constants | W4091G | Forecasting Setup (G3441), Summary Constants | Assign constants to summary codes and define hierarchy levels.
Select the More button for additional summary constants. |
4.2.2 Setting Up Forecasting Supply and Demand Inclusion Rules
Access the Work With Supply/Demand Inclusion Rules form.
Figure 4-5 Work With Supply/Demand Inclusion Rules form
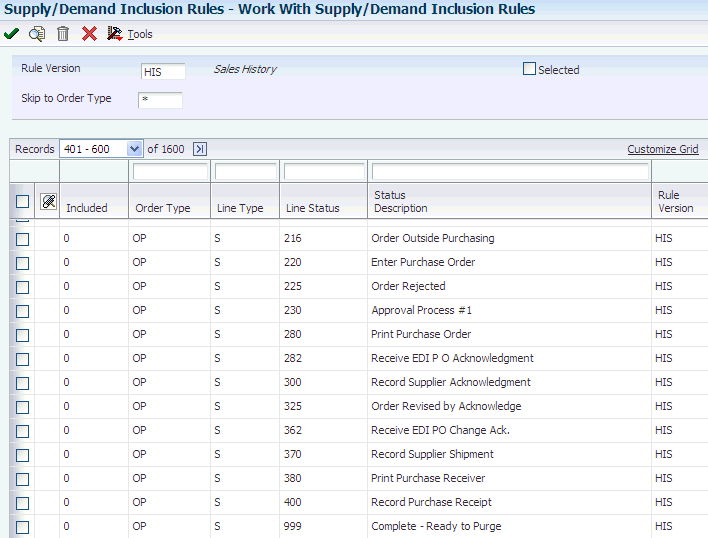
Description of ''Figure 4-5 Work With Supply/Demand Inclusion Rules form''
- Rule Version
-
Enter a user-defined code (40/RV) that identifies an inclusion rule that you want the system to use for this branch/plant. The JD Edwards EnterpriseOne Manufacturing system and Oracle's JD Edwards EnterpriseOne Warehouse Management system use these inclusion rules:
-
For JD Edwards EnterpriseOne Manufacturing:
Enables multiple versions of resource rules for running MPS, MRP, or DRP.
-
For JD Edwards EnterpriseOne Warehouse Management:
Enables multiple versions of inclusion rules for running putaway and picking. The system processes only those order lines that match the inclusion rule for a specified branch/plant.
-
- Included
-
Enter a code that is used to prompt detail selection from a list of items. Values are:
0: Not included
1: Included
- Order Type
-
Enter a user-defined code (00/DT) that identifies the type of document. This code also indicates the origin of the transaction. The JD Edwards EnterpriseOne system has reserved document type codes for vouchers, invoices, receipts, and time sheets, which create automatic offset entries during the post program. (These entries are not self balancing when you originally enter them.)
These document types are defined by the JD Edwards EnterpriseOne system and should not be changed:
P: Accounts Payable documents.
R: Accounts Receivable documents.
T: Payroll documents.
I: Inventory documents.
O: Purchase Order Processing documents.
J: General Accounting/Joint Interest Billing documents.
S: Sales Order Processing documents.
- Line Type
-
Enter a code that controls how the system processes lines on a transaction. It controls the systems with which the transaction interfaces, such as Oracle's JD Edwards EnterpriseOne General Accounting, Oracle's JD Edwards EnterpriseOne Job Cost, Oracle's JD Edwards EnterpriseOne Accounts Payable, Oracle's JD Edwards EnterpriseOne Accounts Receivable, and JD Edwards EnterpriseOne Inventory Management. It also specifies the conditions under which a line prints on reports, and is included in calculations. Codes include:
S: Stock item.
J: Job cost.
N: Nonstock item.
F: Freight.
T: Text information.
M: Miscellaneous charges and credits.
W: Work order.
- Line Status
-
Enter a user-defined code (40/AT) that indicates the status of the line.
4.2.3 Setting Up Forecasting Fiscal Date Patterns
Access the Set Up Fiscal Date Pattern form.
Figure 4-6 Set Up Fiscal Date Pattern form
Description of ''Figure 4-6 Set Up Fiscal Date Pattern form''
- Fiscal Date Pattern
-
Enter a code that identifies date patterns. You can use one of 15 codes. You must set up special codes (letters A through N) for 4-4-5, 13 period accounting, or any other date pattern unique to the environment. An R, the default, identifies a regular calendar pattern.
- Date Fiscal Year Begins
-
Enter the first day of the fiscal year.
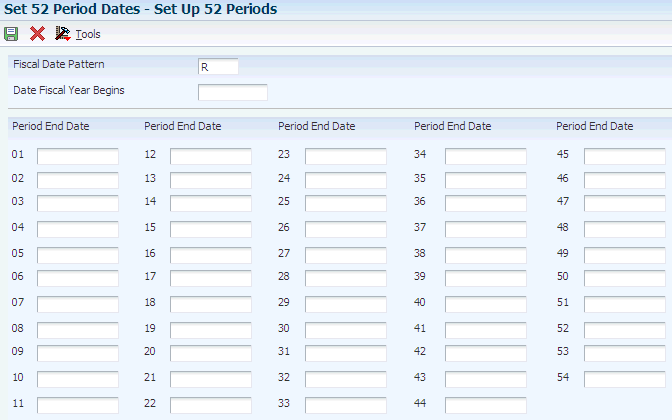
4.2.4 Setting Up the 52 Period Date Pattern
4.2.5 Setting Up Large Customers
Access the Customer Master Revision form.
Figure 4-8 Customer Master Revision form: Credit tab
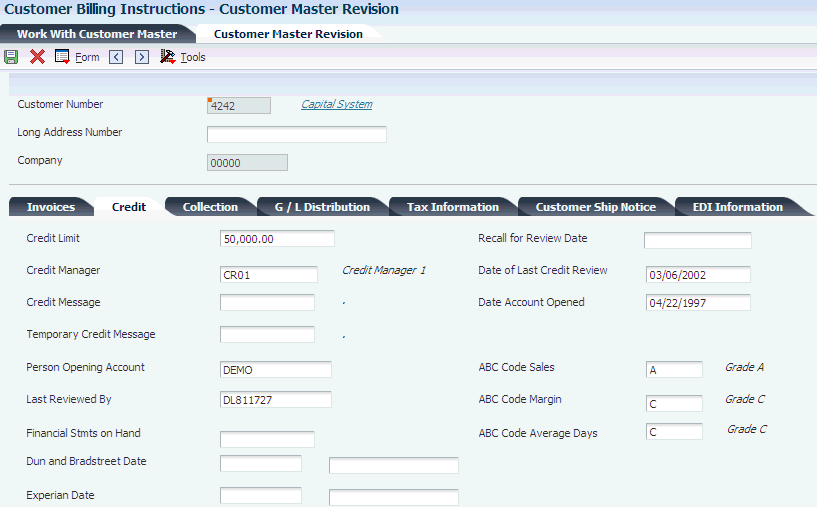
Description of ''Figure 4-8 Customer Master Revision form: Credit tab''
- ABC Code Sales
-
Enter A in this field.
The ABC code indicates an item's ABC ranking by sales amount. During ABC analysis, the system groups items by sales amount in descending order. It divides this array into three classes called A, B, and C. The A group usually represents 10 percent to 20 percent of the total items and 50 percent to 70 percent of the projected sales volume. The next grouping, B, usually represents about 20 percent of the items and 20 percent of the sales volume. The C class contains 60 percent to 70 percent of the items and represents about 10 percent to 30 percent of the sales volume. The ABC principle states that you can save effort and money when you apply different controls to the low value, high volume class than you apply to improve control of high value items.
You can override a system assigned ABC code on the Item/Branch Plant Info. form (W41026A) on the Additional Info. tab.
4.2.6 Assigning Constants to Summary Codes
Access the Revise Summary Constants form.
Figure 4-9 Revise Summary Constants form
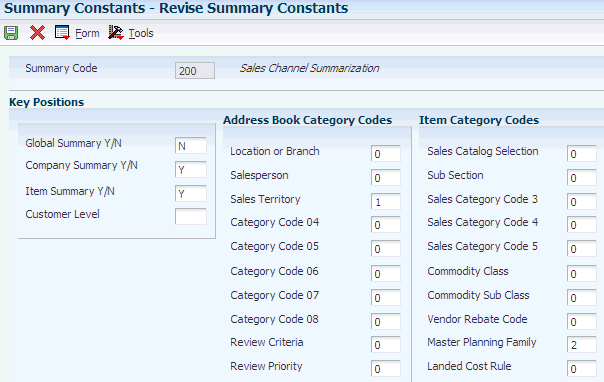
Description of ''Figure 4-9 Revise Summary Constants form''
- Summary Code
-
Enter a user-defined code (40/KY) that indicates the type of summary forecast.
- Global Summary Y/N (global summary yes/no)
-
Enter a code that indicates whether the forecast should be summarized to the global level. The global level is the top level of the forecasting hierarchy and represents a summary of all levels.
- Company Summary Y/N (company summary yes/no)
-
Enter a code that indicates whether the forecast should be summarized to the company level. The company level is the next level indicated as number one in the hierarchy. The system summarizes all forecasts within the company into this level.
- Item Summary Y/N (item summary yes/no)
-
Enter a code that indicates whether the forecast should be summarized down to the item number level. This level is the last level in the hierarchy. The system summarizes all forecast detail records for an item into this level.
- Customer Level
-
Enter a code that indicates the customer number as one of the levels in the forecasting hierarchy.
4.3 Setting Up Planning Bills
This section provides an overview of planning bill setup and discusses how to:
-
Set up Item Master information.
-
Set up category code information.
-
Set up additional system information.
-
Enter planning bills.
4.3.1 Understanding Planning Bill Setup
You must set up a planning bill before you generate a planning bill forecast. You use the JD Edwards EnterpriseOne Product Data Management system from Oracle to set up a planning bill. Then the system uses the planning bill to generate a forecast for the hypothetical average parent item. The forecast presents the component level exploded.
4.3.1.1 Item Master Information
Before you enter the criteria that you want to use on the planning bill, you must set up item master information on which the planning is based. The system stores this information in the Item Master table (F4101).
The Item Branch File table (F4102) also stores the item information. After you add item master records for the appropriate part numbers, the system retrieves item information from table F4102.
4.3.2 Forms Used to Set Up Planning Bills
| Form Name | FormID | Navigation | Usage |
|---|---|---|---|
| Item Master Revisions | W4101A | Inventory Master/Transactions (G4111), Item Master
On the Work With Item Master Browse form, select Add. |
Set up item master information.
Complete the Item Number, Description, Stocking Type, GL Class, and Kit/Configurator Pricing Method fields. |
| Category Codes | W4101B | On the Work With Item Master Browse form, select a record and select Category Codes from the Row menu. | Set up category code information.
Complete the Master Planning Family field. |
| Additional System Information | W4101C | On the Work With Item Master Browse form, select a record and select Addl System Info from the Row menu. | Set up additional system information.
Complete the Planning Code field. |
| Enter Bill of Material Information | W3002A | Daily PDM Discrete (G3011), Enter/Change Bill
On the Work with Bill of Material form, select a record. |
Enter planning bills.
Enter Item Number, Quantity, and Feat Plan percent information. Review the information in the Is Cd field. |
| Bill of Material Inquiry, Single Level | W30200C | On the Work with Bill of Material form, select BOM Inquiry from the Form menu. | View the single level bill of material. |
| Bill of Material Inquiry - Multi Level | W30200C | On the Bill of Material Inquiry, Single Level form, select Multi Level from the View menu. | View the multilevel bill of material. |
4.3.3 Setting Up Item Master Information
Access the Item Master Revisions form.
On Item Master Revisions, complete these fields and click OK:
-
Item Number
-
Description
-
Stocking Type
-
GL Class
-
Kit/Configurator Pricing Method
Depending on how the processing options are set, other forms might appear.
- Stocking Type
-
Enter a user-defined code (41/I) that indicates how you stock an item, for example, as finished goods or as raw materials. These stocking types are hard coded and you should not change them:
0: Phantom item
B: Bulk floor stock
C: Configured item
E: Emergency/corrective maintenance
F: Feature
K: Kit parent item
N: Nonstock
The first character of Description 2 in the user-defined code table indicates if the item is purchased (P) or manufactured (M).
- G/L Class (general ledger class)
-
Enter a user-defined code (41/9) that controls which general ledger accounts receive the dollar amount of inventory transactions for this item.
- Kit/Configurator Pricing Method
-
Enter a code that determines how the system calculates the price for kit items or configured items. Values are:
Blank: Use for items that are neither kit items nor configured items.
1: The system accumulates the base prices of components with the configured price adjustments, and then discounts the total.
2: The system accumulates the base price of the parent item with the configured price adjustments, and then discounts the total.
3: The system accumulates the configured price adjustments, and then discounts the total.
4: The system accumulates the individually discounted price of the components with the configured price adjustments.
Note:
Configured price adjustments are only included in the calculation for a configured item. Also, the system only discounts costs if you are using Oracle's JD Edwards EnterpriseOne Advanced Pricing system.The following is an example of how the system uses the various methods:
Parent Item: 125
Component A: 50
Component B: 100
Configured Cost Adjustment 1: 15
Configured Cost Adjustment 2: 10
Advanced Price Discount: 10%
Method 1: 50 + 100 = 150 + 15 + 10 = 175 - 17.50 = 157.5
Method 2: 125 + 15 + 10 = 150 - 15 = 135
Method 3: 15 + 10 =25 - 2.5 = 22.5
Method 4: (50 - 5) + (100 - 10) = 135 + 15 + 10 = 160
4.3.4 Setting Up Category Code Information
Access the Category Codes form.
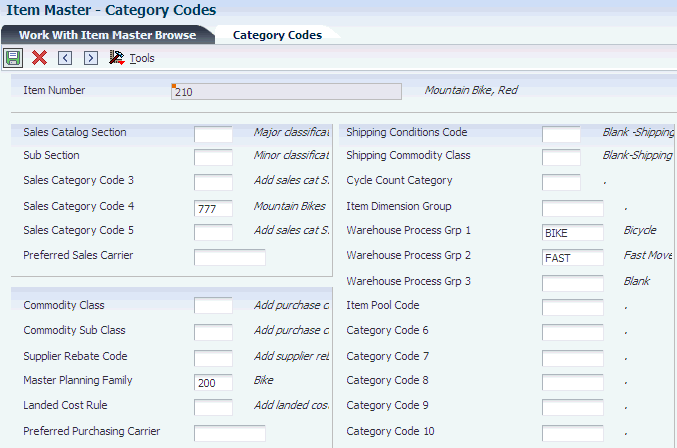
To set up category code information:
-
On Work With Item Master form, click Find.
-
Select the item, and then select Category Codes from the Row menu.
-
Complete the Master Planning Family field and click OK.
- Master Planning Family
-
Enter a user-defined code (41/P4) that represents an item property type or classification, such as commodity type or planning family. The system uses this code to sort and process like items.
This field is one of six classification categories available primarily for purchasing purposes.
4.3.5 Setting Up Additional System Information
Access the Additional System Information form.
-
On Work With Item Master form, click Find.
-
Select the item, and then select Additional System Information from the Row menu.
-
On the Manufacturing Data tab, complete the Planning Code field and click OK.
If the Item Branch Revisions form appears, click Cancel to return to the Work With Item Master form.
- Planning Code
-
Enter a code that indicates how Master Production Schedule (MPS), Material Requirements Planning (MRP), or Distribution Requirements Planning (DRP) processes this item. Values are:
0: Not Planned by MPS, MRP, or DRP.
1: Planned by MPS or DRP.
2: Planned by MRP.
3: Planned by MRP with additional independent forecast.
4: Planned by MPS, Parent in Planning Bill.
5: Planned by MPS, Component in Planning Bill.
These codes are hard coded.
4.3.6 Entering Planning Bills
Access the Bill of Material Inquiry - Multi Level form.
Figure 4-11 Bill of Material Inquiry - Multi Level form
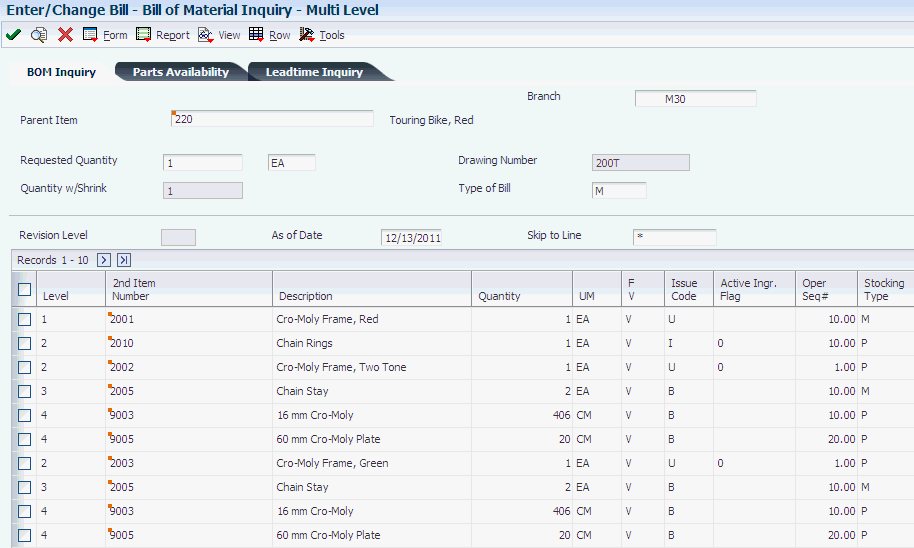
Description of ''Figure 4-11 Bill of Material Inquiry - Multi Level form''
- Feat Plan percent
-
Review the percentage of demand for a specified feature based on projected production. For example, a company might produce 65 percent of their lubricant with high viscosity, and 35 percent with low viscosity, based on customer demand.
MRP in the JD Edwards EnterpriseOne Requirements Planning system uses this percentage to accurately plan for the process co-products and by-products. Enter percentages as whole numbers, for example, enter 5 percent as 5.0. The default value is 0 percent.
- Is Cd (issue code)
-
Review the code that indicates how the system issues each component in the bill of material from stock. In JD Edwards EnterpriseOne Shop Floor Management, it indicates how the system issues a part to a work order. Values are:
I: Manual issue.
F: Floor stock (there is no issue).
B: Backflush (when the part is reported as complete).
P: Preflush (when the parts list is generated).
U: Super backflush (at the pay point operation).
S: Subcontract item (send to supplier).
Blank: Shippable end item.
You can issue a component in more than one way within a specific branch/plant by using different codes on the bill of material and the work order parts list. The bill of material code overrides the branch/plant value.