5 Maintaining Blocks and Harvests
This chapter contains the following topics:
-
Section 5.1, "Understanding Maintaining Blocks and Harvests"
-
Section 5.8, "Maintaining Harvests Using Speed Harvest Update"
5.1 Understanding Maintaining Blocks and Harvests
You often revise and update existing information through a growing period. After you add block and harvest records, you can revise information on individual or multiple records. To maintain block and harvests you can:
-
Edit and copy block and harvest records.
-
Initiate a block.
-
Use speed update programs for specific fields on multiple records.
-
Perform mass updates on attributes you define to be changed.
-
Push revisions on a block to associated harvests.
-
Create new harvests by rolling closed or current harvest to future harvest records.
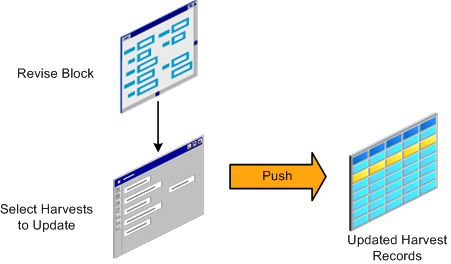
This diagram illustrates the maintenance tasks that you can perform on block and harvest records:
Figure 5-1 Block and Harvest Maintenance Tasks
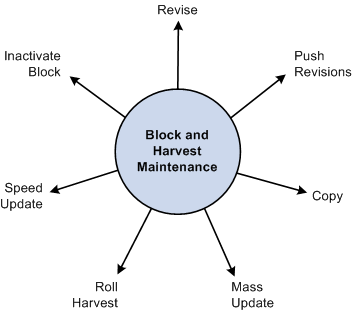
Description of "Figure 5-1 Block and Harvest Maintenance Tasks"
5.2 Prerequisites
Before you complete the tasks in this chapter:
-
Create block records.
-
Create harvest records.
5.3 Maintaining Block Records
This section provides an overview, and discusses how to maintain block records.
5.3.1 Understanding Block Maintenance
For single block records you can perform the following maintenance tasks:
-
Edit block records.
-
Copy block records.
-
Inactivate a block.
5.3.1.1 Edit Single Records
You can revise values for a single block record by accessing the Add/Edit Grower Block form.
5.3.1.2 Copy Function
You can copy values from existing block or harvest records to another record to minimize redundant data entry. When you copy a record, the system copies most of the values from the original record enabling you to revise the values on the new record. For example, you could use the copy function to set up a model block that you use as a template. Because blocks can look very similar, setting up model blocks enables you to copy the values from the model to another block and then update that block with specific information.
5.3.1.3 Inactivate a Block
The JD Edwards EnterpriseOne Grower Management system enables you to inactivate a block record. However, all of the harvests associated with the block must a be at Closed or Terminated status.
5.3.2 Forms Used to Maintain Blocks
5.3.3 Maintaining a Block Record
Access the Add/Edit Grower Block form.

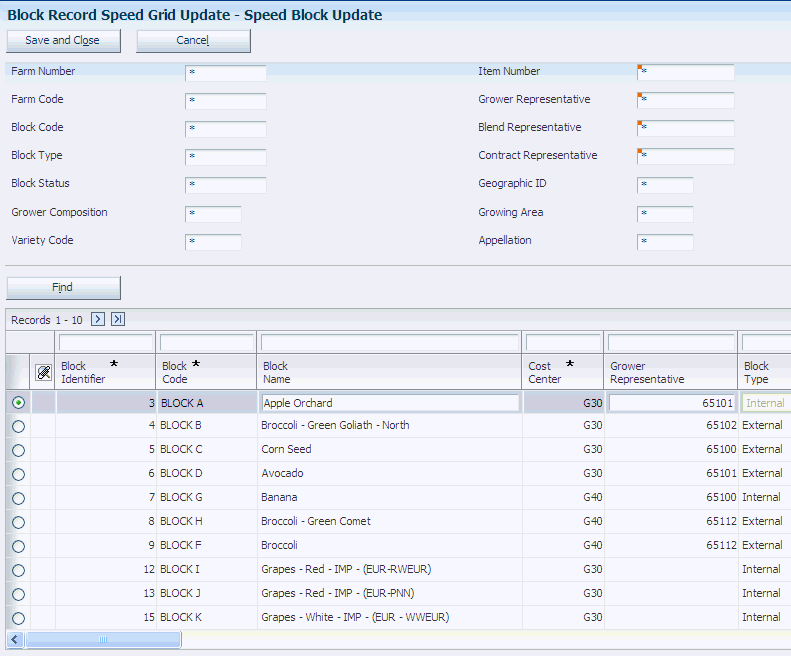
5.4 Maintaining Blocks Using Speed Block Update
This section provides an overview of speed block maintenance and discusses how to:
-
Set processing options for Speed Block Update (P40G020).
-
Maintain blocks using speed block update.
5.4.1 Understanding Speed Block Maintenance
Several ways are available to update data on a block. When a simple change to one block is required, you can access the Add/Edit Grower Block form. However, when changes are required across multiple blocks, you can use the Speed Block Update Block program (P40G020) or the Mass Update program (R40G0200).
5.4.1.1 Maintainable Fields
Using the Speed Block Update program, you can display specific block records and update information on the individual lines that require changes. Updates you can perform include the following values:
-
Block status.
-
Block address number.
-
Growing area, appellation, region, and district.
-
Variety code.
-
Maturity calculation program name.
-
Supplier number.
-
Default price.
-
Target and current quality.
-
Grower attributes and grower dates.
-
Item number.
-
Material type.
-
Harvest pattern.
5.4.2 Form Used to Maintain Blocks Using Speed Block Update
5.4.3 Setting Processing Options for Speed Block Update (P40G020)
Use these processing options to control whether the system allows these fields to be updated.
5.4.3.1 Process
These processing options control whether users can update certain fields.
- Dimension Unit of Measure
-
Specify whether the system allows users to update the dimension unit of measure. Values are:
Blank: Allow updates.
1: Do not allow updates.
- Pricing Unit of Measure
-
Specify whether the system allows users to update the pricing unit of measure. Values are:
Blank: Allow updates.
1: Do not allow updates.
- Container Type and Quantity Per Load
-
Specify whether the system allows users to update the container type and quantity per load. The container type and quantity per load are related fields. Values are:
Blank: Allow updates.
1: Do not allow updates.
5.4.4 Maintaining Blocks Using Speed Block Update
Access the Speed Block Update form.
5.5 Performing Mass Updates on Blocks
This section provides an overview of mass updates on blocks and discusses how to:
-
Create a block record update profile.
-
Set processing options for Mass Update - Block (R40G0200).
-
Run the Mass Update - Block program.
5.5.1 Understanding Mass Updates on Blocks
Use the Mass Update - Block program to update block attributes. This is a two-step process. First, you must create a block record update profile. This profile specifies the fields that the system updates and the new values. The second step is to launch the report. The system updates the fields on all records that are identified in the program's data selection.
If the report finds an error, it does not process the record. You should run this report in proof mode and then in final mode.
5.5.2 Forms Used to Perform Mass Updates on Blocks
5.5.3 Creating a Block Record Update Profile
Access the Add/Edit Grower Block Update Profiles form. Select the check box for each field or attribute you are changing, and enter the new value.
Figure 5-4 Add/Edit Grower Block Update Profiles form
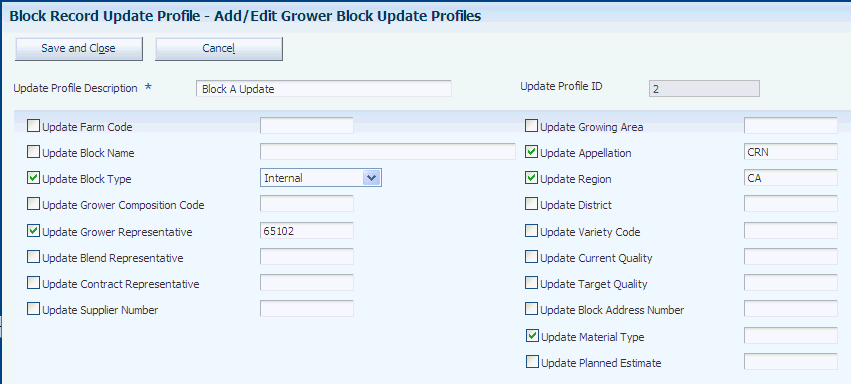
Description of "Figure 5-4 Add/Edit Grower Block Update Profiles form"
- Update Profile Description
-
Enter a unique description of a mass update profile for the grower block.
- Update Profile ID
-
The system assigns a profile ID.
To make changes to the block header information, select the check box for these fields and enter the new value:
-
Update Farm Name
-
Update Block Name
-
Update Block Type
-
Update Grower Composition Code
-
Update Grower Representative
-
Update Blend Representative
-
Update Contract Representative
-
Update Supplier Number
-
Update Growing Area
-
Update Appellation
-
Update Region
-
Update District
-
Update Variety Code
-
Update Current Quality
-
Update Target Quality
-
Update Block Address Number
-
Update Material Type
-
Update Planned Estimate
5.5.3.1 Attributes 1
Select the Attributes 1 tab.
Figure 5-5 Add/Edit Grower Block Update Profiles form: Attributes 1 tab
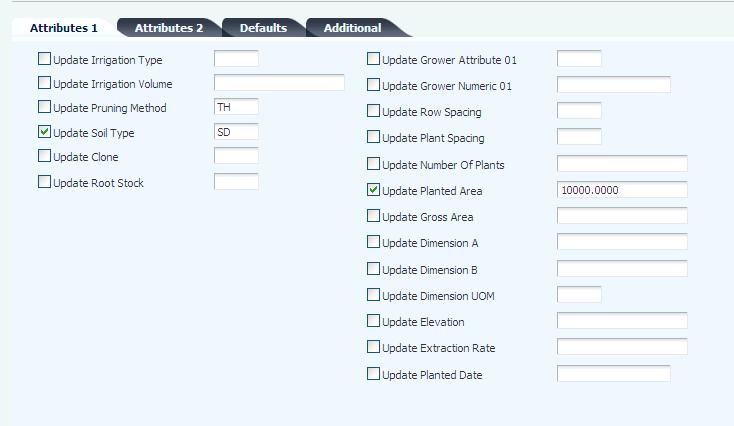
Description of "Figure 5-5 Add/Edit Grower Block Update Profiles form: Attributes 1 tab"
To make changes to the attributes 1 information, select the check box for these fields and enter the new value:
-
Update Irrigation Type
-
Update Irrigation Volume
-
Update Pruning Method
-
Update Soil Type
-
Update Clone
-
Update Root Stock
-
Update Grower Attribute 01
-
Update Grower Numeric 01
-
Update Row Spacing
-
Update Plant Spacing
-
Update Number of Plants
-
Update Planted Area
-
Update Gross Area
-
Update Dimension A
-
Update Dimension B
-
Update Dimension UOM
-
Update Elevation
-
Update Extraction Rate
-
Update Planted Date
5.5.3.2 Attributes 2
Select the Attributes 2 tab.
To make changes to the attributes 2 information, select the check box for these fields and enter the new value:
-
Update Grower Attribute 02 thru 15.
-
Update Grower Checkbox 01 thru 05.
-
Update Grower Date 01 thru 08.
-
Update Grower Numeric 02 thru 05.
5.5.3.3 Defaults
Select the Defaults tab.
To make changes to the default information, select the check box for these fields and enter the new value:
-
Update Crush Site
-
Update Produced Site
-
Update Default Price
-
Update Pricing UOM
-
Update Container Type
-
Update Quantity Per Load
-
Update Maturity Program Name
5.5.3.4 Additional
Select the Additional tab.
To make changes to the additional information, select the check box for these fields and enter the new value:
-
Update Alternate Block Name.
-
Update Parcel Number 1 thru 3.
-
Update Governmental ID 1 thru 4.
-
Update Operator ID.
-
Update Site ID Number.
-
Update Parcel Number 1 Area.
-
Update Parcel Number 2 Area.
-
Update Parcel Number 3 Area.
5.5.4 Setting Processing Options for Mass Update - Block (R40G0200)
Use these processing options to control how the system processes data and to define default versions.
5.5.4.1 Process
These processing options control whether the system runs in proof or final mode and specifies which profile to use.
- 1. Mode
-
Specify whether the system runs in proof or final mode. Values are:
Blank: Run in proof mode.
1: Run in final mode.
- 2. Grower Block Update Profile ID
-
Enter the update profile ID that determines which block values you want to update.
5.5.4.2 Versions
- Add/Update Block (P40G02)
-
Enter the version of Add/Update Block (P40G02) for the system to use.
5.5.5 Running the Mass Update - Block Program
Select Grower Management Periodic Processing (G40G121), Block Record Mass Update.
When you run the Mass Update - Block program, the system updates the fields on the block record based on the fields and values that you specified in the update profile from the processing options. The system does not update the associated harvest attributes for the changed block records.
5.6 Pushing Grower Block Changes to Harvests
This section provides an overview of pushing grower block changes to harvests and discusses how to push grower block changes to harvests.
5.6.1 Understanding Pushing Grower Block Changes to Harvests
When you make changes to certain fields on a grower block record, you can push the changes to the related current and future harvests. Pushing changes to other related harvests enables you to keep certain information about the harvests in-sync between the various related harvests.
To push harvest information, you identify an existing grower block record in the Search for Grower Blocks form of the Block Entry program (P40WG02). When you click the Edit link for the block record that includes the information to push to other harvests, the system displays the Add/Edit Grower Block form. Click the Update Harvest option and then click the Save and Close button to access the Push Grower Block to Harvest form.
The Push Grower Block to Harvest form includes three options that you can select to push information to harvests. You can select one or multiple options. The options are:
-
Push Attributes
When you select this option, the system copies attributes, such as the block code, region, and variety, from the block record to the selected harvest records.
-
Push EUR
When you select this option, the system deletes the current EURs for the selected harvest records and then copies the block EURs to the selected harvest records.
-
Push Estimates
When you select this option, the system updates the existing planned and current estimates of the selected harvest records with the planned estimates of the block record. If the Create Purchase Orders processing option is set to 1 in the Grower Harvest Maintenance program (P40G03), the system creates purchase orders when push estimates change.
If you change the maturity calculation program name on the block and then push this change to selected harvests, the system updates the program name, but does not recalculate the maturity date for the harvest. To recalculate the maturity date, click the Refresh button on the Add/Edit Grower Harvest form. On the Push Grower to Harvest form, you can replace the previous maturity calculation program name only with the new program name from the block. You cannot change the maturity calculation for individual harvest records on this form.
This diagram shows the grower block push process:
5.6.2 Forms Used to Push Grower Block Changes to a Harvest
5.6.3 Pushing Grower Block Changes to a Harvest
Access the Search for Grower Blocks form.
Figure 5-7 Push Grower Block to Harvest form

Description of "Figure 5-7 Push Grower Block to Harvest form"
-
Enter identifying information in the header area, and then click Find.
The system displays the block records that meet the search criteria that you entered.
-
Click the Edit link for the block record for which you want to push information to harvest records.
The system displays the Add/Edit Grower Block form.
-
On the Add/Edit Grower Block form, make any desired changes to the block record, and then:
-
Select the Update Harvest check box.
-
Click the Save and Close button.
The system displays the Push Grower Block to Harvest form.
-
-
Perform one of these actions:
-
Select the Push to Harvest check box for each harvest record to update.
-
Click the Select All button to select all harvest records.
-
-
Select one or more of the Push options:
-
Push Attributes
The system updates the selected harvest records with the attribute values of the block.
-
Push EUR
The system overwrites existing values for the selected harvests with the EUR information from the block.
-
Push Estimates
The system overwrites existing values for the selected harvests with the estimate information from the block.
-
-
If a confirmation window appears, click OK to confirm your updates.
The system displays a confirmation window if you select Push EUR, or Push Estimates.
-
Click the Save and Close button.
5.7 Maintaining Harvest Records
This section provides an overview, and discusses forms used to maintain harvest records.
5.7.1 Understanding Harvest Record Maintenance
For single harvest records you can perform the following maintenance tasks:
-
Edit harvest records.
-
Copy harvest records.
-
Reset harvest status.
5.7.1.1 Edit Single Records
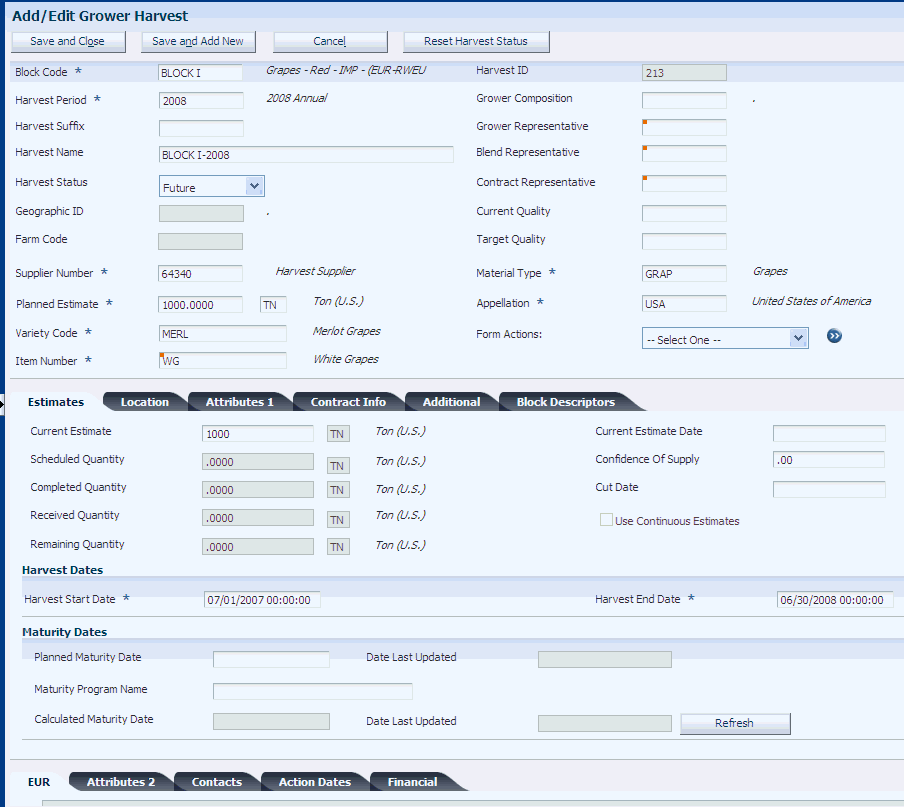
You can revise values for a single harvest record by accessing the Add/Edit Grower Harvest form.
5.7.1.2 Copy Function
You can copy values from existing harvest records to another record to minimize redundant data entry. When you copy a record, the system copies most of the values from the original record enabling you to revise the values on the new record. The harvest period that you enter must be set up in the Harvest Period Pattern.
5.7.2 Forms Used to Maintain Harvest Records
5.7.3 Maintaining Harvest Records
Access the Add/Edit Grower Harvest form.
5.7.4 Setting Processing Options for Calculate Maturity Dates (R40G50)
These processing options control default processing for the Calculate Maturity Dates program (R40G50).
5.7.4.1 Process
This processing option controls how the program processes data.
- Maturity Calculation Name
-
Specify the maturity date calculation program with the custom calculation the system uses to calculate maturity dates. If you leave this processing option blank, the system uses the maturity date calculation program that you associated with the selected harvests.
5.7.4.2 Versions
This processing option controls the program versions that the system uses.
- 1. Grower Harvest Maintenance (P40G03)
-
Specify the version of the Grower Harvest Maintenance program that the Calculate Maturity Dates program calls when calculating maturity dates. If you leave this processing option blank, the system uses the default version.
5.7.5 Calculating Crop Maturity Dates
Select Periodic Processing (G40G121), Calculate Maturity Dates.
Run the Calculate Maturity Dates program (R40G50) to calculate maturity dates for the crops of selected harvests. When you run the calculation, the system updates the Calculated Maturity Date and the Date Last Updated field for the selected grower harvests.
If you specify a maturity date calculation program in the processing options, the system uses this program. Otherwise, the system uses the maturity date calculation program that you entered for the harvest.
The calculation updates the maturity date only if the harvest status is Current or Future. You can run this program only in final mode.
Running the program also generates a report that prints errors and warning messages that are generated when attempting to recalculate crop maturity dates.
5.8 Maintaining Harvests Using Speed Harvest Update
This section provides an overview of maintaining harvests using speed harvest update and discusses how to:
-
Set processing options for Speed Harvest Update (P40G030).
-
Maintain harvests using Speed Harvest Update.
5.8.1 Understanding Maintaining Harvests Using Speed Harvest Update
You can quickly update data on a harvest in several ways. When a simple change to one harvest is required, you can use the harvest workbench. However, when changes are required across multiple harvests, you can use the Speed Harvest Update program (P40G030). Using this program, you can display specific harvest records and update information on the individual lines requiring changes.
5.8.2 Forms Used to Maintain Harvests Using Speed Harvest Update
5.8.3 Setting Processing Options for Speed Harvest Update (P40G030)
Use these processing options to control whether the system allows these fields to be updated. Access the processing options through interactive versions.
5.8.3.1 Process
These processing options control whether certain fields are displayed and whether users can update certain fields.
- Harvest Status
-
Specify whether the system allows updates to the harvest status. Values are:
Blank: Allow updates.
1: Do not allow updates.
- Calculated Maturity Date
-
Specify whether the system allows updates to the calculated maturity date. Values are:
Blank: Allow updates.
1: Do not allow updates.
- Container Type and Quantity Per Load
-
Specify whether the system allows updates to the container type and quantity per load. Values are:
Blank: Allow updates.
1: Do not allow updates.
- Harvest Period Effective Dates
-
Specify whether the system displays the harvest period effective dates. Values are:
Blank: Display the harvest period effective dates.
1: Do not display the harvest period effective dates.
- Default Price
-
Specify whether the system displays the default price. Values are:
Blank: Display the harvest default price.
1: Do not display the harvest default price.
5.8.4 Maintaining Harvests Using Speed Harvest Update
Access the Speed Harvest Update form.
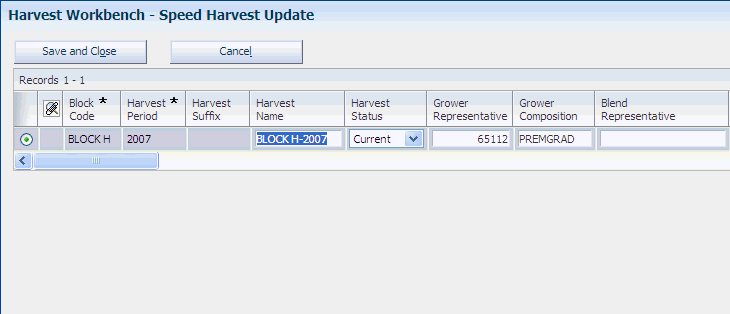
For each harvest, update the fields that require revisions, for example, harvest status, current and target quality, maturity calculation program name, planned maturity date, and composition information. You can revise the value in the Maturity Calculation Program Name field only if the harvest status is Current or Future.
If the Harvest Workbench program (P40G032) uses a version of the Grower Harvest Maintenance program (P40G03), which is set to create a purchase order, the system creates a purchase order if you revise the harvest end date.
5.9 Performing Mass Updates on Harvests
This section provides an overview of performing mass updates on harvests and discusses how to:
-
Create a harvest record update profile.
-
Set processing options for Mass Update - Harvest (R40G0300).
-
Run the mass harvest update program.
5.9.1 Understanding Performing Mass Updates on Harvests
Use the Mass Update - Harvest program to update harvest attributes. This is a two-step process. First, you must create a harvest record update profile. This profile specifies which fields the system updates and the new values. The second step is to launch the report. The system updates the fields on all records that are identified in the program's data selection.
5.9.2 Forms Used to Perform Mass Updates on Harvests
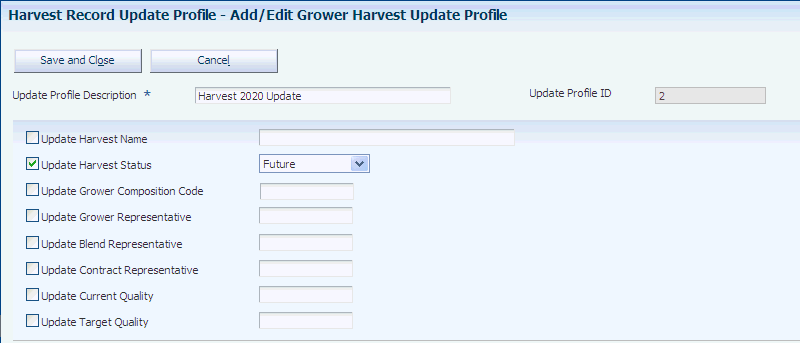
5.9.3 Creating a Harvest Record Update Profile
Access the Add/Edit Grower Harvest Update Profile form. Select the check box for each field or attribute that is being changed, and enter the new value.
Figure 5-10 Add/Edit Grower Harvest Update Profile form
Description of "Figure 5-10 Add/Edit Grower Harvest Update Profile form"
- Update Profile Description
-
Enter a unique description of a mass update profile for the grower harvest.
- Update Profile ID
-
The system assigns a profile ID.
To make changes to the harvest header information, select the check box for these fields and enter the new value:
| field | field | field |
|---|---|---|
| Update Harvest Name | Update Harvest Status | Update Grower Composition Code |
| Update Grower Representative | Update Blend Representative | Update Contract Representative |
| Update Current Quality | Update Target Quality |
5.9.3.1 Estimates
Select the Estimates tab.
Figure 5-11 Add/Edit Grower Harvest Update Profile form: Estimates tab
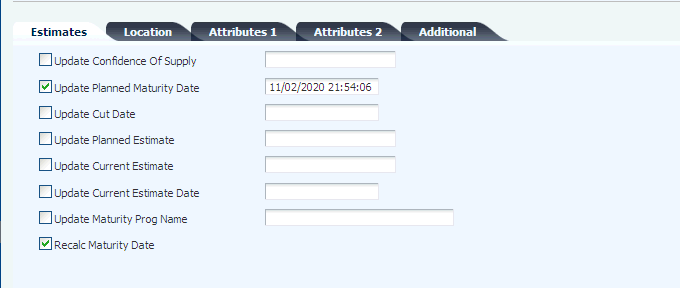
Description of "Figure 5-11 Add/Edit Grower Harvest Update Profile form: Estimates tab"
To make changes to the harvest estimates information, select the check box for these fields and enter the new value:
| field | field | field |
|---|---|---|
| Update Confidence of Supply | Update Planned Maturity Date | Update Cut Date |
| Update Planned Estimate | Update Current Estimate | Update Current Estimate Date |
| Update Maturity Program Name | Recalculate Maturity Date |
5.9.3.2 Location
Select the Location tab.
To make changes to the harvest location information, select the check box for these fields and enter the new value:
| field | field | field |
|---|---|---|
| Update Growing Area | Update Appellation | Update Variety Code |
| Update District | Update Region | Update County |
| Update State |
5.9.3.3 Attributes 1
Select the Attributes 1 tab.
Figure 5-12 Add/Edit Grower Harvest Update Profile form: Attributes 1 tab
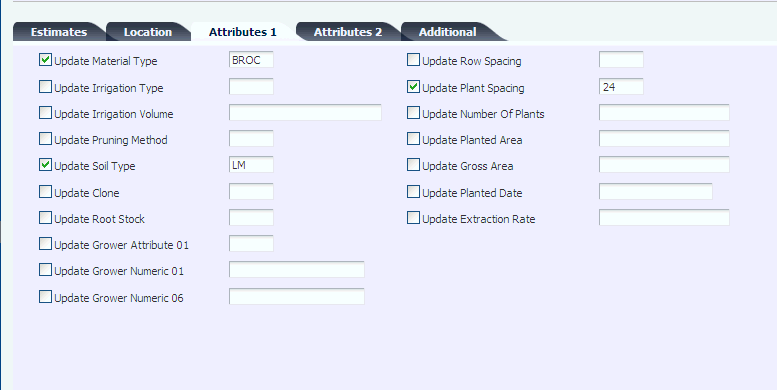
Description of "Figure 5-12 Add/Edit Grower Harvest Update Profile form: Attributes 1 tab"
To make changes to the attributes 1 information, select the check box for these fields and enter the new value:
| field | field | field |
|---|---|---|
| Update Material Type | Update Irrigation Type | Update Irrigation Volume |
| Update Pruning Method | Update Soil Type | Update Clone |
| Update Root Stock | Update Grower Attribute 01 | Update Grower Numeric 01 |
| Update Grower Numeric 06 | Update Row Spacing | Update Plant Spacing |
| Update Number of Plants | Update Gross Area | Update Planted Date |
| Update Extraction Rate |
5.9.3.4 Attributes 2
Select the Attributes 2 tab.
To make changes to the attributes 2 information, select the check box for these fields and enter the new value:
| field | field | field |
|---|---|---|
| Update Grower Attribute 02 - 15 | Update Grower Checkbox 01 - 05 | Update Grower Date 01 - 08 |
| Update Grower Numeric 02 - 05 |
5.9.3.5 Additional
Select the Additional tab.
To make changes to the additional information, select the check box for these fields and enter the new value:
| field | field | field |
|---|---|---|
| Update Container Type | Update Quantity Per Load | Update Last Load |
| Update Extraction Complete | Update Quarantined Flag | Update Default Price |
| Update Supplier Number | Update Parcel Number 3 Area |
5.9.4 Setting Processing Options for Mass Update - Harvest (R40G0300)
Use these processing options to control how the system processes data and to define default versions.
5.9.4.1 Process
These processing options control whether the system runs in proof or final mode and specify which profile to use.
- 1. Mode
-
Specify whether the system run in proof or final mode. Values are:
Blank: Run in proof mode.
1: Run in final mode.
- 2. Harvest Update Profile ID
-
Enter the update profile ID that determines which harvest values you want to update.
5.9.4.2 Versions
This processing option controls the version of the Add/Update Harvest program that the system uses.
- Add/Update Harvest (P40G03)
-
Enter the version of Add/Update Harvest program (P40G03) for the system to use.
5.9.5 Running Mass Harvest Update Program
Select Periodic Processing (G40G121), Harvest Record Mass Update.
When you run the Harvest Record Mass Update (R40G0300) program, the system updates the fields on the harvest record based on the fields and values that you specified in the update profile from the processing options.
If the update includes the maturity date calculation program, the system performs the update only if the harvest status is Current or Future.
If the Harvest Record Mass Update program uses a version of the Grower Harvest Maintenance program (P40G03) that creates purchase orders, the system creates or updates purchases orders when you revise harvest estimates.
5.10 Performing a Harvest Roll
This section provides an overview of performing a harvest roll and discusses how to:
-
Run the Harvest Roll program.
-
Set processing options for Harvest Roll (R40G0560).
5.10.1 Understanding Performing a Harvest Roll
The system enables you to create new harvest records based on existing harvests. The Harvest Roll program (R40G0560) uses the Maximum Harvest processing option for the Grower Harvest Maintenance program (P40G03) to identify the planning window that controls the number of new harvest records that the system creates.
This program rolls only harvests that are at a status of Closed and are in the Current harvest period. For example, if the harvest pattern is ANNUAL and the current period for the ANNUAL pattern is 2007, then only harvests with a harvest pattern of 2007 and a status of Closed are selected by the program to be rolled.
The program attempts to create the number of harvests that are specified by the Maximum Harvest processing option. The system either prints a message stating that No Harvest Periods Eligible to Roll for a particular harvest or lists the harvests that are or were rolled for a particular harvest.
New harvest records are created in a Future status.
5.10.2 Running the Harvest Roll Program
Select Advanced and Technical Operations (G40G131), Harvest Roll.
5.10.3 Setting Processing Options for Harvest Roll (R40G0560)
Use these processing options to control system processing and to define default versions.
5.10.3.1 Processing
This processing option controls whether the program runs in proof or final mode.
- Mode
-
Specify whether the system generates the report in proof mode or final mode. Proof mode prints the harvest records that are created but does not perform table updates. Final mode creates new harvest records, updates the Grower Harvest table (F40G03), and prints the harvest record. Values are:
Blank: Run in proof mode.
1: Run in final mode.
5.10.3.2 Versions
This processing option determines the version that the system uses to create a rolled up harvest estimate.
- Grower Harvest Maintenance (P40G03)
-
Specify the version of the Grower Harvest Maintenance program (P40G03) that the system uses. Review the version's processing options, specifically Maximum Number Of Harvests To Be Created, to ensure that the version meets your needs.
If the Harvest Roll program uses a version of the Grower Harvest Maintenance program that creates purchase orders, the system creates or updates purchases orders when you revise harvest estimates.
5.11 Spreading Expenses for Harvests
This section provides an overview of expense spreading and lists forms used to spread expenses for harvests.
5.11.1 Understanding Expense Spreading
Periodically, you must spread costs across active harvest records that do not accrue to the harvest directly from operations that are performed on the harvest. For example, you might allocate indirect costs, such as utility expenses, overhead costs, equipment maintenance, taxes, depreciation, and general labor and administration costs to harvests. These costs are allocated per acre. To determine the rate per ton of harvested product, the total annual expenses for a harvest block is divided by yield in tons. Without the ability to spread expenses, harvest costs are understated in the system.
You can use the Inventory by Vessel View program (P31B81) to locate the harvests to which you want to spread expenses. To locate harvests, you use either the Harvest check box on the form or the processing option on Vessel Class Search tab. You can select multiple harvests.
You spread expenses using the Expense Spread grid on the Inventory by Vessel View form. This area of the form becomes available to use if you set the Enable Expense Spreading processing option for the Inventory by Vessel View program. In the grid, the system displays the expenses for the selected harvests by cost component.
To spread expenses to harvests, you can use any configured operation that you have set up to allow changes to lot costs. After you select harvests for expense spreading, you access the Create Operation or WO from List program (P31B78) to generate the operations that allocate the costs to the different cost components of the harvest or harvests. When you complete this step, the system notifies you about the number of operations that were created. You can review the expense spreading operations on the Search For Operations form.
If you locate harvests using the EUR field, the system displays costs by the portion of the cost attributed to the EUR. Costs spread by EUR are spread proportionately to the EUR quantity, not the harvest quantity.
5.11.2 Prerequisite
Set the Enable Expense Spreading processing option on the Defaults tab for the Inventory by Vessel View program.