4 Entering Farms, Blocks, and Harvests
This chapter contains the following topics:
4.1 Understanding Farms, Blocks, and Harvests
JD Edwards EnterpriseOne Grower Management enables you to set up and maintain farms, blocks, and harvest records. A farm consists of one or more blocks that grow the crop that is then supplied to the processing entity. Adding farms in the system is optional. Farms are often defined by their physical geographical boundaries.
A parcel of land on a farm is commonly referred to as a block. You define a block using specific identifiers and attributes. The system uses some attributes that you assign to a farm as default values for a block that you associate with the farm.
A harvest is the representation of the block for a period of a growing cycle. Examples include:
-
The growing cycle for a vineyard is a year, and the grapes are harvested annually.
-
The growing cycle for avocados is two years, and the fruit can be harvested weekly
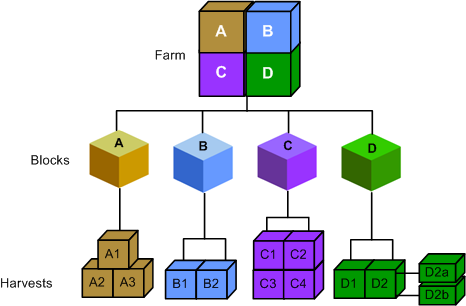
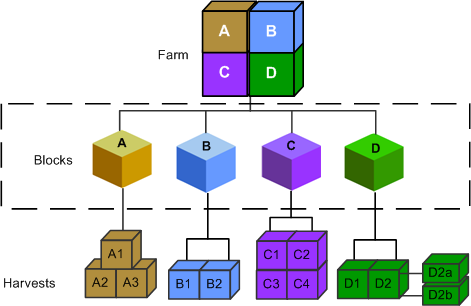
This diagram illustrates the relationship of farm, block, and harvest records:
Figure 4-1 Farm, Block, and Harvest Relationships
Description of "Figure 4-1 Farm, Block, and Harvest Relationships"
4.1.1 Relationship Between Farm, Block, and Harvest
A farm is divided into sections, commonly referred to as blocks. A farm can have multiple blocks, but a block can only be associated with a single farm. Each block can have multiple harvest records. A harvest represents the growing season, such as annual, semiannual, 90 days, or continuous.
The relationship between farm, block, and harvest:
-
A farm can have zero to many blocks.
-
A block can have zero to many harvests; however, only one is the current harvest period.
-
A harvest is identified by a unique combination of Block Code, Harvest Period, and Harvest Suffix. The harvest suffix is a subsection of a block that you can use to differentiate between the harvests on the same block.
4.2 Creating a Farm
This section provides an overview of creating farms and discusses how to:
-
Set processing options for the Farm Maintenance program (P40G01).
-
Create a farm.
4.2.1 Understanding Creating Farms
In JD Edwards EnterpriseOne Grower Management, a farm is defined as an entity that provides the crop harvest, for example fruits or vegetables, to a purchasing entity. The system supports two types of farms — external and internal.
The system considers an external farm a supplying entity. An example is when worldwide distributors of produce contract with local growers to supply crops for processing, packaging, and shipping to the consumer. External farms are optional. You can use external farms as a parent entity to one or more blocks.
Companies that process and package the crop can also grow and process their own products. In that situation you use internal farms. Internal farms enable the crop processing company to manage the balance sheet and track of the profit and loss for that farm.
You can define the status of a farm as either active or inactive. You cannot create blocks against an inactive farm.
4.2.1.1 Components of a Farm Record
This diagram illustrates the components of a farm record:
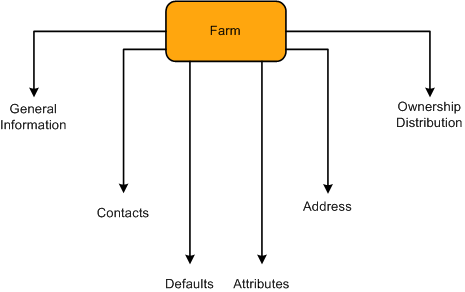
You can use the various parts of a farm record to store data that you must track and report for your farm. The farm record contains these many optional fields that you can use to meet business needs.
4.2.1.2 Attributes
The farm records includes:
-
Ownership information, including multiple owners for a farm.
-
Important dates, such as expiration and effective dates.
-
Geographic information, such as region and district.
-
Attributes that you can use to capture relevant information such as crush site and legal description
-
Entities or contacts that are associated with the farm
The farm has elements that you use for informational purposes.
This diagram illustrates the formats that are available for farm attributes:
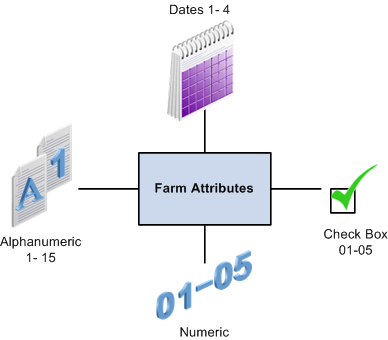
You can set up attributes that provide significant details for each farm. You then use these attributes to report and track information for the farm. The attributes are in alphanumeric, numeric, date, and check box formats. You can use the attributes with one another or use them for individual tracking. Information that you can track includes:
-
Classifying farms, such as commercial or noncommercial.
-
Accessing resources, such as renting the land or land ownership.
-
Coordinating activities, such as strategic alliances, franchising, and cooperative memberships.
4.2.2 Forms Used to Create a Farm
4.2.3 Setting Processing Options for Farm Maintenance (P40G01)
Use these processing options to define default versions, set system defaults, and define system processing for the Farm Maintenance program.
4.2.3.1 Versions
These processing options control the versions that are called by the program.
- Address Book
-
Specify the version that the system uses when you are editing the farm address book details and using the Address Book program (P01012). If you leave this processing option blank, the system uses ZJDE0001.
- Grower Block
-
Specify the version that the system uses when you are using the Grower Block program (P40G02) to create and review block records. If you leave this processing option blank, the system uses version ZJDE0001.
4.2.3.2 Defaults
This processing option controls the default search type.
- Search Type for Farm Address Book Record
-
Specify the default search type value that the system uses when creating an address book number.
4.2.3.3 Processing
These processing options control what to copy when you are performing a farm copy.
- 1. Copy Ownership Distribution on Farm Copy
-
Specify whether the system copies the ownership distribution records when copying a farm. Values are:
Blank: Do not copy ownership distribution records.
1: Copy the ownership distribution records.
- 2. Copy Contacts on Farm Copy
-
Specify whether the system copies the contact records when copying a farm. Values are:
Blank: Do not copy contact records.
1: Copy the contact records.
4.2.4 Creating a Farm
Access the Add/Edit Farm Records form.
- Farm Code
-
Enter a short description that uniquely identifies a farm.
- Farm Name
-
Enter the name of the farm.
- Farm Number
-
Enter an existing address book number for the farm. When you enter an existing address book number, the system populates the fields on the Address tab. If you leave this field blank, the system supplies a system-generated address book number.
- Farm Type
-
Specify whether the farm is internal or external. Use this field for reporting purposes.
- Grower Composition Code
-
Enter a user-defined code (UDC) (40G/GC) that specifies the grower composition.
- Grower Representative, Blend Representative, Contract Representative
-
Enter an address book number that represents the grower representative, blend representative, or contract representative. The representatives are the people within your organization that interact with the farm.
- Farm Status
-
Specify the status of the farm. Values are:
Active
Inactive.
If you set a farm to inactive, all associated blocks must have an inactive status. You cannot create new blocks for a farm that is inactive.
- Geographic ID
-
Enter a UDC (40G/GI) that represents the grower's geographic ID.
- Growing Area
-
Enter the geographic location of the farm. Geographic area definitions are used in the appellation and growing area hierarchies to determine composition information. Geographic area can be defined as a country or a region within the country, such as a state or province, or a small area within a region, based on the desired level of specificity. Values are set up in the Set Geographic Area and Relationship program (P31B37).
- Appellation
-
Enter the appellation of the farm. The appellation is the area that is the next larger designation above the district. Values are set up in the Set Geographic Area and Relationship program (P31B37). Appellation is the official geographic area determined by the relevant authorities. For example, in the wine industry, the relevant authorities would be the American Viticultural Areas (AVA) and the Australian Wine and Brandy Corporation (AWBC).
- Region
-
Enter a UDC (40G/GR) that represents the growing region.
- District
-
Enter a UDC (40G/GD) that represents the district where the farm is located. The district is the area that is the next larger designation above a block.
- Cost Center
-
Specify the grower cost center that is associated with the farm. The system displays the default cost center if it is set up on the Default Printers & Locations form. After you create a farm record, you cannot revise the cost center.
4.2.4.1 Ownership Distribution
Select the Ownership Distribution tab. Setting up ownership distributions at the farm level is optional.
Figure 4-5 Add/Edit Farm Records form: Ownership Distribution tab
Description of "Figure 4-5 Add/Edit Farm Records form: Ownership Distribution tab"
- Ownership Short Code
-
Enter the short code for the farm owner. When you enter a short code, the system updates the Address Number field. You set up values in the Setup Owners program (P31B35).
- Address Number
-
Enter the address book number of the farm owner. When you enter an address book number, the system updates the Ownership Short Code field. You set up values in the Setup Owners program (P31B35).
- Percentage
-
Enter the percentage of the farm that is owned by this entity. If you enter multiple owners, the ownership percentages must add up to 100 percent.
The system does not require ownership information for farm records.
4.2.4.2 Contacts
Figure 4-6 Add/Edit Farm Records form: Contacts tab
Description of "Figure 4-6 Add/Edit Farm Records form: Contacts tab"
- Contact Type
-
Enter a UDC (40G/AT) that represents the role or function that the contact performs as it relates to the farm. For example, a farm manager or supervisor.
- Address Number
-
Enter the address number for the contact type. The system displays the phone information that you set up in the first line of the associated address book record.
4.2.4.3 Address
The system indicates a farm as an address book record. If creating a new address book record, complete the appropriate fields, and then click the Address Book link. The system accesses the Address Book Revision program (P01012).
Enter any remaining fields, and click OK to create an address book record. After you create the address book record, the system displays the address number in the Farm Number field.
4.2.4.4 Attributes
Select the Attributes tab. The system uses these generic fields for searching, referencing, and reporting purposes.
- Farm Attribute 1 – 15
-
Enter specific UDCs (40G/F1–F9 and 0F–5F) for attributes that are relevant and specific to the farm.
- Farm Checkbox
-
Select the farm check boxes that are relevant and specific to the farm.
- Farm Numeric
-
Enter farm numerics.
- Farm Dates
-
Enter farm dates.
4.2.4.5 Defaults
Select the Defaults tab. The system supplies these values by default on the block records that you associate to the farm.
- Crush Site
-
Enter the business unit of the crush site. You set up values in the Business Unit program (P0006).
- Produced Site
-
Enter the business unit of the site where the crop is going to be produced.
- Container Type
-
Enter the container type that you use to transport the harvest to the crush site.
- Quantity Per Load
-
Enter the expected grower quantity per load. JD Edwards EnterpriseOne Blend Management uses the default information to determine where product is crushed and produced. Typically, you uses these fields if you are not growing a crop that you then process internally.
4.3 Creating a Block
This section provides an overview of blocks, lists prerequisites, and discusses how to:
-
Set processing options for the Grower Block Maintenance program (P40G02).
-
Create a block.
4.3.1 Understanding Blocks
This diagram illustrates the relationship of blocks with a farm and harvests:
In JD Edwards EnterpriseOne Grower Management, you can associate blocks with a farm. Typically, you define blocks by physical boundaries or characteristics. Physical characteristics may include a section of planting rows, geographical boundaries, or requirements for special treatment and management throughout the growing cycle.
A block is a representation of a parcel of land and is typically defined with physical boundaries and characteristics such as the crop grown on the block. For example, a grower may grow crops on a farm made up of 100 different parcels of land. Each of these parcels is represented in the JD Edwards EnterpriseOne Grower Management system as a block.
The block's geographic information such as growing area, appellation and region, and coordinates define the physical relationship of the block to the land. You can set up block identifiers and attributes to define the block such as a section of planting rows, geographical boundaries, or requirements for special treatment and management throughout the growing cycle.
4.3.1.1 Matrix Items
Each block may be associated with a parent item number to represent the crop. If the crop has different items that can be the result of growing and harvesting the parent item, the system refers to this parent item as a matrix item. The variations of the parent item are set up in the item master program (P4101). During receiving, another item number may be selected from a predefined list. This replaces the original item number with an item from the matrix.
Apples is an example of a matrix crop on a block. During farming operations, the apples are graded for size and quality. Therefore, receiving variations of the item may include:
-
Grade A, size large
-
Grade A, size medium
-
Grade B, size large
-
Grade B, size medium
-
Grade B, size small
Another example is green peppers. You grow green peppers, but green peppers (when allowed to sit) mature into red peppers. Matrix items accommodate receiving both red and green peppers from the same crop.
4.3.1.2 Grower Attributes
You can set up significant details for each block and harvest using the generic grower attributes. You use these attributes to report and track information for the block and harvest. The attributes are in alphanumeric, numeric, date, and check box formats. You can use the attributes with one another or use them for individual tracking.
Example 1: Grower attributes 1–3 can be set up with one another to track details, such as the soil composition percentage.
| Attribute | New Field Name | Value |
|---|---|---|
| Grower Attribute 2 - Soil Composition 2 | Clay | 5 percent |
| Grower Attribute 3 - Soil Composition 3 | Sand | 25 percent |
| Grower Attribute 4 - Soil Composition 4 | Humus | 70 percent |
Example 2: Grower check boxes can be set up to track information such as whether the crop requires refrigeration, whether it should be delivered to a grain elevator, and whether the crop is grown organically.
| Grower Checkbox 1–2 | New Field Name | Value |
|---|---|---|
| Grower Checkbox 1 | Refrigeration Required | Cleared |
| Grower Checkbox 2 | Organically Grown | Selected |
| Grower Checkbox 3 | Grain Elevator | Selected |
Example 3: Grower numerics can be set up to track annual rainfall and seasonal degree days.
| Grower Numerics 2–3 | New Field Name | Value |
|---|---|---|
| Grower Numeric 02 | Annual Rainfall | 35 (inches per year) |
| Grower Numeric 03 | Seasonal Degree Days | 1316 |
Example 4: Grower dates can be set up to record planning, planted, and cultivation dates.
| Grower Dates 01–03 | New Field Name | Value |
|---|---|---|
| Grower Date 01 | Planning Date | October 6, 2006 |
| Grower Date 02 | Planting Date | March 30, 2007 |
| Grower Date 03 | Cultivation Date | September 15, 2007 |
4.3.1.3 Harvest Period Pattern
One key piece of data that you may enter for the block is the harvest period pattern. The harvest pattern defines the typical growing cycle for a given piece of land or block. For example, grapes typically have an annual pattern, which means that the land is used for a year to grow the grapes. Other crops such as broccoli may have a quarterly pattern because they have a 90-day growing cycle. Still other crops such as bananas may use a weekly pattern as they are harvested weekly and continuously.
If you assign a harvest pattern to a block, then all the harvests associated with the block inherit the pattern from the block. You can change the harvest start and end dates at the harvest level.
If you leave the harvest pattern blank on the block, then you must enter a unique period, which need not be based on an existing harvest pattern.
A harvest code (UDC 40G/HP) must be set up before defining the harvest pattern using the Harvest Period/Pattern Maintenance program (P40G003). If you are using crop rotation, you must create a blank value in UDC table 40G/HP.
4.3.1.4 Update Harvest
When you maintain values on a block, you can automatically change the values on the associated harvest records by selecting the Update Harvest check box. The system updates the appropriate values based on the processing option that is set up.
4.3.1.5 Maturity Date Calculation
You can set up the system to calculate maturity dates for crops to enable growers to plan harvesting. You set up the maturity calculation in the Maturity Calculation Program Name - Setup program (P40G50). You can then attach the maturity program to the material type or directly to the block.
If you associate a maturity program with the material type, the system uses that maturity program name as the default value for the block when you enter the material type for a new block. However, you can override this default value for the block. You can enter only a maturity program name that you set up in the Maturity Calculation Program Name - Setup program.
4.3.1.6 Block Descriptors
Block descriptors are free-form text fields that you can use to identify information about your block such as a legal or specific description of the land. For example, south-facing hillside location or Napa river valley, extending up the east-facing gentle slope.
Block descriptors enable you to set up logical sub-blocks. When performing farming operations you can associate a block descriptor to the operation to indicate that this operation was against a sub-block. This is informational only and does not impact the level at which the system calculates costs. For example, enter block descriptors which represent two sprinkler systems that service the block. When performing an irrigation operation, you can select which sprinkler system was used by the irrigation operation.
To add block descriptors, enter a description of the logical sub-block, the system assigns a block descriptor ID. You can set up multiple rows of 30 character free-form text messages.
4.3.2 Prerequisites
Before you complete the tasks in this section:
-
Set up Item Master records.
-
Set up block styles.
4.3.3 Forms Used to Create a Block
4.3.4 Setting Processing Options for Grower Block Maintenance (P40G02)
Use these processing options to control system processing, control the information that is copied to the harvest, define default values, display related links, and define default versions.
4.3.4.1 Processing
These processing options specify which status to display for the block/harvest and which style type to use as the default on the Block Styles Search and Select form.
- Display Block Harvests by Status
-
Specify the default status. Values are stored in UDC 40G/HT. Values are:
Blank: Display all block harvests.
1: Display future block harvests.
2: Display current block harvests.
3: Display complete block harvests.
4: Display closed block harvests.
5: Display terminated block harvests.
- Style Type
-
Specify the style type that the system uses as a filter in the Block Styles Search and Select program (P40G022S). Values are stored in UDC 31B/TY.
4.3.4.2 Copy
These processing options specify which information to copy from the block to a new block.
- Copy EUR Information
-
Specify whether the system copies the EUR information to the new block record. Values are:
Blank: Copy the EUR values.
1: Do not copy the EUR values.
- Copy Ownership Information
-
Specify whether the system copies the ownership information to the new block record. Values are:
Blank: Copy the ownership values.
1: Do not copy the ownership values.
- Copy Contact Information
-
Specify whether the system copies the contact information to the new block record. Values are:
Blank: Copy the contact values.
1: Do not copy the contact values.
- Copy Action Date Information
-
Specify whether the system copies the action date information to the new block record. Values are:
Blank: Copy the action date values.
1: Do not copy the action date values.
4.3.4.3 Defaults
These processing options specify system default values for when you access the Add/Edit Grower Block form.
- Item Number
-
Specify a default item number that the system uses when creating a block.
- Supplier Number
-
Specify the address book number of the supplier that the system uses as a default when you enter a block.
- Geographic ID
-
Specify a default geographic ID that the system uses when creating a block.
- Search Type for Block
-
Specify a default search type that the system uses when you create a block address book.
- Default Address Book for 100% Ownership Distribution
-
Specify the address book number that the system uses as a default 100 percent ownership distribution if no ownership distribution is entered when creating a block.
- Error Level for 100% Ownership
-
Specify the error level when a default 100 percent ownership distribution is supplied to a grower block. Values are:
Blank or 0: Issue a warning message, and use 100 percent as the default in the ownership distribution that can be overridden by the user.
1: Issue an error message, and require the user to enter an ownership percentage that equals 100 percent.
- Default Recurring Number of Days
-
Enter the number of days to add to the Date Required field to generate the new recurring action date. This value provides the default value for the Recurring Number of Days field for recurring action dates if you do not enter a value on the Add/Edit Grower Block form. If you leave this processing option blank and do not enter a value in the grid, the system uses a default value of one day.
4.3.4.4 Versions
These processing options control the versions that are called by the program.
- Address Book
-
Enter a version of the Address Book program (P01012) that the system uses, or leave blank to use version ZJDE0001.
- Add/Update Harvest
-
Enter a version of the Grower Harvest program (P40G03) that the system uses, or leave blank to use version ZJDE0001.
- Block Coordinates
-
Enter a version of the Block Coordinates program (P40G023) that the system uses, or leave blank to use version ZJDE0001.
- Item Master
-
Enter a version of the Item Master program (P4101) that the system uses, or leave blank to use version ZJDE0001.
4.3.5 Creating a Block
Access the Add/Edit Grower Block form.
- Farm Code
-
Enter the farm code that is associated with the block. The farm code is optional. Associating a farm with a block supplies default information to the following fields:
-
Grower Composition Code
-
Grower Representative
-
Blend Representative
-
Contract Representative
-
Cost Center
-
Geographic ID
-
Growing Area
-
Appellation
-
Region
-
District
-
Crush Site
-
Produced Site
-
Container Type
-
Quantity Per Load
You can override these fields or you can enter values manually if no farm is attached to the block.
-
- Block Code
-
Enter a unique identifier for the block.
- Block Name
-
Enter the name of the block that represents a small parcel of land within a larger entity.
- Block Type
-
Select a code representing the type of block. For example:
-
External
-
Internal
-
Other
-
- Supplier Number
-
Enter the address book number of the supplier. The supplier provides the crop to your company. Typically, the supplier is a grower of the crop. The system uses the supplier when creating the purchase order from harvest or weigh tag operations.
- Cost Center
-
Enter the cost center that is responsible for activities on the block. This cost center defaults on the purchase order.
- Item Number
-
Enter the item number representing the crop that is planted in this block. The system retrieves the item description and costs based on the item number.
- Block Status
-
Enter the status of the block. For example:
-
Active
-
Inactive
-
- Variety Code
-
Enter a value that represents the variety code that is associated with the block. You set up values in the Variety Master program (P31B38).
See Setting Up Varieties.
- Current Quality
-
Enter a UDC (40G/QL) that represents the current quality for the block.
- Target Quality
-
Enter a UDC (40G/QL) that represents the target quality for the block.
- Harvest Pattern
-
Enter a UDC (40G/HP) that represents the harvest pattern for the crop that you are growing on the block. The harvest pattern is used as a default and can be overridden on the block before it is saved. If you use crop rotation, you must create a blank value in UDC table 40G/HP.
- Material Type
-
Enter a value that uniquely identifies a material type that is associated with the block. You set up values in the Material Type Revisions program (P31B04).
- Planned Estimate
-
Enter the planned estimate for the block. This is the overall harvest estimate for the block, or the yield you expect to receive from this block.
4.3.5.1 Harvest
Select the Harvest tab. All harvest records that are associated with a block appear on this tab. You can only view information on this tab. When you are in add mode, this tab is blank.
Figure 4-9 Add/Edit Block form: Harvest tab
Description of "Figure 4-9 Add/Edit Block form: Harvest tab"
4.3.5.2 Attributes 1
Figure 4-10 Add/Edit Block form: Attributes 1 tab
Description of "Figure 4-10 Add/Edit Block form: Attributes 1 tab"
- Irrigation Type
-
Enter a UDC (40G/IT) that specifies the type of irrigation that is used on the block. Values might include:
-
Drip
-
Rain
-
Sprinkler
-
Flood
-
- Irrigation Volume
-
Enter the amount of measured water to use for irrigation.
- Pruning Method
-
Enter a UDC (40G/PM) that specifies the pruning method for the crop. For example, values can include:
-
2 Bud Spur
-
Cane
-
Basal Buds
-
- Soil Type
-
Enter a UDC (40G/ST) that represents the soil type for the block. For example, values can include:
-
Sandy
-
Clay
-
Silt
-
Loam
-
- Clone
-
Enter a UDC (40G/CL) to distinguish between cloned crops.
- Root Stock
-
Enter a UDC (40G/RS) that represents the root stock for the crop. For example, root stock values for apple dwarfing can include:
-
EM: East Malling
-
MM: Malling Merton
-
- Grower Attribute 01
-
Enter a UDC (40G/01) for the grower attributes that are relevant and specific to the block.
- Grower Numeric 01
-
Enter a numeric value.
- Row Spacing
-
Enter a UDC (40G/RW) that specifies the distance between the planted rows. For example, values can include:
-
A: 1–2 feet
-
B: 4–6 feet
-
C: 6–8 feet
-
- Plant Spacing
-
Enter a UDC (40G/PL) that specifies the distance between each plant. For example, values can include:
-
A: 6 inches
-
B: 1 foot
-
C: 4 feet
-
D: 8 feet
-
- Number of Plants
-
Enter the number of plants that were planted on this block.
- Planted Area
-
Enter the planted area based on the default area unit of measure that is set up in the Grower Cost Center Defaults program (P40G002).
- Gross Area
-
Enter the gross area for the block based on the default area unit of measure that is set up in the Grower Cost Center Defaults program.
- Dimension A and Dimension B
-
Enter the dimensions and units of measure for the block.
- Elevation
-
Enter the elevation of the block based on the default elevation unit of measure that is set up in the Grower Cost Center Defaults program.
- Extraction Rate
-
Enter the extraction rate that is expected from the block.
- Planted Date
-
Enter the date that the crop was planted.
4.3.5.3 Attributes 2
Figure 4-11 Add/Edit Block form: Attributes 2 tab
Description of "Figure 4-11 Add/Edit Block form: Attributes 2 tab"
You can define details for each block using generic grower attributes.
- Grower Attribute 2- 15
-
Enter a UDC (40G/02–15) for the grower attributes that are relevant and specific to the block.
- Grower Checkboxes 01 - 05
-
Select the grower check boxes that are relevant and specific to the block.
- Grower Numerics 02 - 05
-
Enter the grower numerics that are relevant and specific to the block.
- Grower Dates 01 - 08
-
Enter the grower dates that are relevant and specific to the block.
4.3.5.4 Defaults
Figure 4-12 Add/Edit Block form: Defaults tab
Description of "Figure 4-12 Add/Edit Block form: Defaults tab"
- Crush Site
-
Enter the business unit where the crop is crushed.
- Produced Site
-
Enter the business unit where the crop is produced.
- Default Price
-
Enter the grower price that is supplied by default to the grower harvest when the harvest is created. The system uses this price in the unit price calculation for harvest receipts and weigh tag operations. You can override the price on the harvest record.
- Pricing UOM (pricing unit of measure)
-
Enter the pricing unit of measure.
- Container Type
-
Enter a UDC (00/UM) that specifies the type of container that is used for the harvested crop.
- Quantity Per Load
-
Enter the expected quantity of each container.
- Use Continuous Estimates
-
Select this check box to indicate that the crop on this block is harvested over a period. This value is supplied by default to the harvest records, but is maintained on the block. After harvests are created for a block, you cannot change this check box.
- Maturity Program Name
-
Enter the name of the program the system uses to calculate and return crop maturity dates. If you have associated a maturity calculation program with the material type that is used for the block, the system populates the field with this maturity program name. However, you can manually override this default value.
4.3.5.5 Block Descriptors
Select the Block Descriptors tab. Enter free-form text about the block.
Figure 4-13 Add/Edit Block form: Block Descriptors tab

Description of "Figure 4-13 Add/Edit Block form: Block Descriptors tab"
4.3.5.6 Additional
Figure 4-14 Add/Edit Block form: Additional tab
Description of "Figure 4-14 Add/Edit Block form: Additional tab"
- Alternate Block Name
-
Enter an alternate name for the block.
- Parcel Number 1, Parcel Number 2, and Parcel Number 3
-
Enter the parcel numbers for the block.
- Parcel Number 1 Area, Parcel Number 2 Area, and Parcel Number 3 Area
-
Enter the areas that are associated with the parcel numbers.
- Governmental ID 1, Governmental ID 2,Governmental ID 3, and Governmental ID 4
-
Enter the generic IDs that you use for a governmental description of property for a grower.
- Operator ID
-
Enter a unique ID for every property operator before buying or using pesticides for production agriculture.
The ID format is an 11-digit alphanumeric field and can bet set up using the following format:
-
XX - Reporting County.
-
XX - Calendar Year.
-
XX - Home County.
-
XXXXX - Unique ID that is assigned by the home county.
-
- Site ID Number
-
Enter a unique ID obtained from the county agricultural commissioner for each location or field where pesticides are used.
4.3.5.7 Block Coordinate
Click the Block Coordinates link on the Additional tab.
Figure 4-15 Add/Edit Block Coordinates form
Description of "Figure 4-15 Add/Edit Block Coordinates form"
- Display Sequence
-
Enter a number to specify the sequence of information.
- Longitude Direction
-
Enter a UDC (40G/D1) that represents the longitude direction of the block.
- Longitude Degrees, Longitude Minutes, and Longitude Seconds
-
Enter the longitude in degrees, minutes, and seconds of the block.
- Latitude Direction
-
Enter a UDC (40G /D2) that represents the latitude direction of the block.
- Latitude Degrees, Latitude Minutes, and Latitude Seconds
-
Enter the latitude in degrees, minutes, and seconds of the block.
- Elevation
-
Enter the elevation above sea level of a specific area of land, expressed in some unit of measure such as feet or meters.
4.3.5.8 EUR
If you do not enter EURs, the system creates an EUR balance record of 100 percent using an EUR code of unknown.
- EUR Code (end-use reservation code)
-
Enter a unique identifier of an EUR. You set up values in the Setup EUR program (P31B0780). The system requires a valid EUR code, so you should verify that the unknown value exists in the EUR Master File table (F31B07).
- Fixed or Balanced
-
Enter a value to indicate whether the EUR is for a fixed quantity or the remaining balance. If you enter Fixed, you must enter a quantity in the Planned Fixed Quantity field. If you enter Balance, you must enter a percentage in the Allocated Balance Percentage field.
- Planned Fixed Quantity
-
Enter the quantity for the fixed EUR.
- Allocated Balance Percentage
-
Enter the percentage for the balance of the EUR. The percentages must add up to 100 percent for all EURs that use the Balance quantity identifier.
- EUR Priority (end use reservation priority)
-
Enter the priority sequence if multiple fixed EUR exists. If you do not assign priority sequence, the system assigns a priority based on the line number for the fixed quantity.
4.3.5.9 Action Dates
Figure 4-17 Add/Edit Block form: Action Dates tab
Description of "Figure 4-17 Add/Edit Block form: Action Dates tab"
- Action Date Code
-
Enter a UDC (40G/AD) to represent the action that should be taken.
- Recurring
-
Select to indicate whether the action on the block is recurring. Values are:
-
Selected: The action date is recurring.
-
Clear: The action date is not recurring.
If the action is recurring, you can use the Recurring Number of Days field to calculate the next action date when you close the current action date.
-
- Recurring Number of Days
-
Enter the number of days the system uses to calculate the next action date if the action is a recurring action. The system adds the number of days that you enter to the current action date to calculate the next action date.
You can also use a processing option to enter a default value for this field. If you do not define a default value and do not enter a value here, the system uses a default value of one day.
- Date Required
-
Enter the date on which the action should be taken.
- Closed
-
Select this check box to indicate that the action is closed. If both the Recurring check box and the Closed check box are selected, the system creates a new copy of the Action Date record. The system calculates the new action date by adding the days from the Recurring Number of Days field to the action date that you closed.
For example, you set up a recurring Action Date Code called Till with a Required Date of March 1, 2009. When you select the Closed check box, the system creates a new line by copying the Action Date Code called Till and entering a Date Required that the system calculates based on the closed action date and the recurring number of days.
- Date Complete
-
Enter the date on which the action was completed.
- Person Responsible
-
Enter the address book number of the person who is responsible for completing the action. If you leave this field blank, the system assigns the person who adds the action date record as the responsible person.
4.3.5.10 Styles
Figure 4-18 Add/Edit Block form: Styles tab
Description of "Figure 4-18 Add/Edit Block form: Styles tab"
- Style Item
-
Enter a style item. Style items might include cultivation methods, dry farming techniques, and so forth. The system stores values in the Block Styles table (F40G022).
If the style that you assign to the block has a parent style, the system automatically assigns the parent style to the block as well.
The system uses the Style Item with farm and weigh tag operations.
4.3.5.11 Contacts
Select the Contacts tab. The system does not use the farm contact information to populate the Contacts tab. The values in the tab are unique to the block.
- Contact Type
-
Enter a UDC (40G/AT) that represents the contact type that is associated with the farm.
- Address Number
-
Enter the address number for the contact type.
4.3.5.12 Address
- Block Address Number
-
Enter the address book number that is associated with the block. If an address book number does not exist, you can create an address book number by:
-
Entering a unique value in the Block Address Number field, and then click the Address Book link.
The system accesses the Address Book Revision program (P01012). Complete any remaining fields, and click OK to create an address book record.
-
Selecting the Create Address Book check box to allow the address number fields to be entered.
When you save the block record, the system uses these values to generate a new address book number. The system updates the Block Address Number field with the newly created number.
-
4.3.5.13 Ownership
Select the Ownership tab. You can define how this information is used. For example, you can define the physical land owner, or divide the ownership of the block based on a percentage.
- Ownership Short Code
-
Enter a short code for the owner. You set up values in the Setup Owners program (P31B35). The system requires at least one owner for each block.
- Address Number
-
Enter a number that indicates the address book number of the block owner.
- Percentage
-
Enter the percentage of the block that is owned by this owner. The ownership percentage must total 100.
4.4 Creating a Harvest
This section provides an overview of harvests, lists a prerequisite, and discusses how to:
-
Set processing options for the Grower Harvest Maintenance program (P40G03).
-
Create a harvest.
4.4.1 Understanding Harvests
A harvest is the usage of a block for a certain period. A harvest may occur multiple times a year, annually, or every few years. You must associate harvest records with a block.
A harvest represents a single instance of a crop grown on a block of land. Use harvest records to track operations performed against a crop, materials used in the growing cycle, anticipated yield, and accumulated costs associated with a crop. For example, grapes and apples have an annual growing period while other products such as avocados may be harvested monthly. You can define harvests as needed for the seasonality of the crop.
Within JD Edwards EnterpriseOne Grower Management, a harvest record maintains specific information about the crop for a growing cycle.
This diagram illustrates the relationship of harvests with a block:
Each harvest has a unique ID that enables you to track and record all activities that are performed on that harvest. Key information that you can track for each harvest includes information such as block location, quality of the crop, operations conducted on the harvest, and ownership.
The system tracks activities performed on each harvest, such as:
-
Associating a harvest record with a contract.
-
Adding, maintaining, and terminating a block or harvest.
-
Viewing harvest information.
-
Estimating crop estimates and maturity.
-
Closing harvests.
-
Conducting quality checks to compare with standards.
-
Tracking deliveries of the harvest to processing sites.
-
Documenting spray activities that involve chemicals for government tracking.
-
Identifying the EUR.
-
Establishing a grower payment schedule.
-
Documenting farming operations.
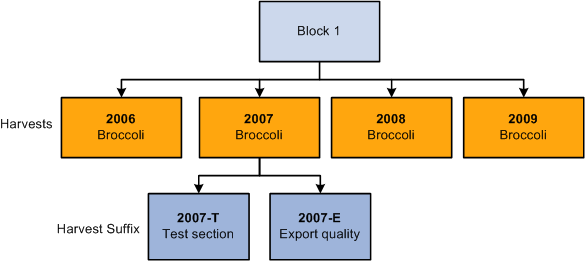
4.4.1.1 Harvest Suffix
The JD Edwards EnterpriseOne Grower Management system enables you to divide your harvests into multiple entities by using a harvest suffix to differentiate between harvests on the same block. For example, you can define a subsection of the block used for experimental farming. When using harvest suffixes, the sum of the gross and planted areas for all the harvests must equal the total area for the block.
4.4.1.2 Harvest Code
A harvest is identified by a unique combination of block code, harvest period, and harvest suffix. For example, if Block 1 is for broccoli you can create the following harvest records:
| Harvest Code | Identifies |
|---|---|
| Block 1–2006 | The harvest information for broccoli in the year 2006 |
| Block 1-2007 | The harvest information for broccoli in the year 2007. |
| Block 1-2007-T | The harvest information for a subsection of the 2007. This area is used for crop experimentation |
| Block 1-2007-E | The harvest information for a subsection of the 2007 harvest. This area is used for export quality broccoli. You are treating this area to produce a more perfect head of broccoli. |
| Block 1-2008 | The harvest information for broccoli in the year 2008. |
| Block 1-2009 | The harvest information for broccoli in the year 2009. |
4.4.1.3 Multiple Crops
When a block has multiple crops being harvested throughout a period, you can include all of the potential variations by creating separate harvest records. For example, broccoli is harvested in late fall. On this same block, winter wheat is grown and harvested in early spring. This requires two separate harvests to be set up for this block.
4.4.1.4 Item Matrix
You may have a product that has variations based on how the product is packaged. For example, broccoli is packed in boxes of 12, 14, and 18 count. You can use the item matrix functionality to support your needs.
4.4.1.5 Generate Multiple Harvest Records
The system can generate multiple harvest records from the Search for Grower Blocks form. Click the Generate Harvests button to automatically generate grower harvest records according to the planning window and the harvest pattern setup. The system-generated harvests are created in a future status.
If the item and harvest pattern fields are blank on the block, the system disables the Generate Harvests button. When this occurs, you must manually add harvests.
The system uses the value in the Maximum Harvests processing option to determine the number of harvest records to generate. If the Maximum Harvests processing option is set to two and you have an Annual harvest pattern with harvest periods set up through 2030, the system generates two new harvest records.
4.4.1.6 Maturity Date Calculation
You can associate a maturity date calculation with a specific harvest. When you add a harvest to a block and you have previously associated a maturity calculation program name with the block, the system uses that maturity calculation as the default value for the harvest. However, you can override this value because the status of the harvest is Current or Future. Set up the system to calculate the maturity for crops to enable growers to plan harvesting. You set up the maturity calculation in the Maturity Calculation Program Name - Setup program (P40G50). You can then attach the maturity program to the material type or directly to the block.
For each harvest you can manually enter a planned maturity date. If you have entered a maturity calculation program name for the harvest, you can have the system calculate the maturity date.
4.4.2 Prerequisite
Before you complete the tasks in this section, you must set up block records.
4.4.3 Forms Used to Create a Harvest
4.4.4 Setting Processing Options for Grower Harvest Maintenance (P40G03)
Use these processing options to control system processing, define defaults, specify tabs to display, enable related links, specify information to copy, and define default versions.
4.4.4.1 Processing
These processing options control whether a harvest can have multiple suffixes, determine whether the harvest status can change, determine whether the container type and quantity per load are at the harvest level, and control whether certain fields are input capable or displayed.
- Multiple Harvest Suffixes
-
Specify whether the system allows multiple harvest suffix for a block. Values are:
Blank: Allow multiple suffixes.
1: Do not allow multiple suffixes.
- Status Change
-
Specify whether the system allows the harvest status to be changed from this form. Values are:
Blank: Allow a status change.
1: Do not allow a status change.
- Container Type and Quantity Per Load
-
Specify whether the system allows the container type and quantity per load to be changed at the harvest level. Values are:
Blank: Do not allow the container type and quantity per load to be changed at the harvest level.
1: Allow the container type and quantity per load to be changed.
- Harvest Period Effective Dates
-
Specify whether the system displays the harvest period effective dates. Values are:
Blank: Display the dates.
1: Do not display the dates.
- Calculated Maturity Date
-
Specify whether the system enables the calculated maturity date. Values are:
Blank: Enable the calculated maturity date.
1: Disable the calculated maturity date.
- Base Price and Default Price
-
Specify whether the system displays the base price and default price fields. Values are:
Blank: Display the price fields.
1: Do not display the price fields.
- Create Purchase Order
-
Specify whether the system creates a purchase order while creating or modifying a grower harvest. Values are:
Blank: Do not create a purchase order.
1: Create a purchase order.
[Release 9.1 Update] This processing option drives the Supply and Demand (P4021) functionality and causes the system to create purchase orders during the grower process when you create a harvest, make changes to harvest estimates, or make changes to harvest end dates. When you activate this processing option, the system displays the External Ownership option on the Financial tab of the Add/Edit Grower Harvest form (W40G03C). When you add a harvest, you can select the External Ownership option if you want the system to use the External version of the Purchase Order Entry program (P4310) to create purchase orders. Leave the External Ownership option blank and the system uses the Internal version of the Purchase Order Entry program to create purchase orders. The system updates the External Ownership option value to the Grower Harvest table (F40G03). In addition to using the Grower Harvest Maintenance program, you can also use the following programs to add harvests and write the External Ownership option value to the Grower Harvest table:
-
Generate Harvests (P40G02)
-
Generate Harvests (B40G0560)
-
Harvest Roll / Generate Harvests (R40G0560)
-
Push Block to Harvest (P40G024)
Note:
In order to write the External Ownership option value to the Grower Harvest table, each respective program must activate a version of the Grower Harvest Maintenance program, which is set to create purchase orders.[Release 9.1 Update] When you make changes to the harvest estimates or harvest end dates the following programs access the Grower Harvest table to validate the External Ownership option value:
-
Continuous Harvest Estimate (P40G23)
-
Grower Harvest Maintenance (P40G03)
-
Harvest Estimate (P40G20)
-
Harvest Estimate - Batch Update (R40G20)
-
Mass update - Harvest (R40G0300)
-
Speed Harvest Update (P40G030)
-
- External Ownership
-
Specify the version of Purchase Order Creation (P4310), which indicates the line type and A/P interface flag the system uses to create the purchase order when creating a harvest. External ownership exists when the A/P interface flag is set to NO. Values are:
Blank: Internal.
1: External.
Note:
This processing option works only when you activate the Create Purchase Order processing option.
4.4.4.2 Defaults
These processing options specify system default values for when you access the Add/Edit Grower Harvest form.
- Default Harvest Suffix
-
Specify a default harvest suffix. A block can have multiple harvest. A harvest is identified by a unique combination of block code, harvest period, and harvest suffix. The harvest suffix is a free-form field.
- Maximum Harvests
-
Specify the maximum number of harvests to be created when a new harvest creation is requested either by contracts or by grower blocks.
- Default Recurring Number of Days
-
Enter the number of days to add to the Date Required field to generate the new recurring action date. This value provides the default value for the Recurring Number of Days field for recurring action dates if you do not enter a value on the Add/Edit Grower Harvest form. If you leave this processing option blank and do not enter a value in the grid, the system uses a default value of one day.
4.4.4.3 Tabs
These processing options specify whether the system displays the financial and contracts tabs.
- Financials
-
Specify whether the system displays the Financials tab on the Add/Edit Harvest form. Values are:
Blank: Display the Financials tab.
1: Do not display the Financials tab.
- Contracts
-
Specify whether the system displays the Contracts tab on the Add/Edit Harvest form. Values are:
Blank: Display the Contracts tab.
1: Do not display the Contracts tab.
4.4.4.4 Related Links
This processing option controls whether the Contract Detail link is enabled.
- Contract Detail
-
Specify whether the system enables the Contract Detail link. Values are:
Blank: Enable the link.
1: Disable the link.
4.4.4.5 Copy
These processing options specify which information to copy from an existing harvest record to a new harvest record.
- Copy EUR Information
-
Specify whether the system copies the EUR information to the harvest record. Values are:
Blank: Copy the EUR values.
1: Do not copy the EUR values.
- Copy Contacts Information
-
Specify whether the system copies the contact information to the harvest record. Values are:
Blank: Copy the contact values.
1: Do not copy the contact values.
- Copy Action Dates Information
-
Specify whether the system copies the action date information to the harvest record. Values are:
Blank: Copy the action dates.
1: Do not copy the action dates.
4.4.4.6 Versions
These processing options control the versions that are called by the program.
- Add/Update Block
-
Enter a version of the Add/Update Block program (P40G02), or leave blank to use version ZJDE0001.
- Purchase Order Entry
-
Enter a version of the Purchase Order Entry program (P4310), or leave blank to use version ZJDE0001. The system uses this version for viewing. It also uses this version for closing when the harvest status is changed to complete.
- Search for Contracts
-
Enter a version of the Search for Contracts program (P43C00), or leave blank to use version ZJDE0001.
- Purchase Order Entry (P4310) - Internal
-
The system invokes the internal Purchase Order Entry (P4310) version when the Ownership Flag is not set or checked, either in the Grower Harvest Maintenance program (P40G03) or in the Grower Harvest table (F40G03). The internal purchase order version uses a line type where the A/P interface flag equals Y.
Note:
This processing option works only when you activate the Create Purchase Order processing option. - Purchase Order Entry (P4310) - External
-
The system invokes the external Purchase Order Entry (P4310) version when the Ownership Flag is set or checked, either in the Grower Harvest Maintenance program (P40G03) or in the Grower Harvest table (F40G03). The external purchase order version uses a line type where the A/P interface flag equals N.
Note:
This processing option works only when you activate the Create Purchase Order processing option.
4.4.5 Creating a Harvest
Access the Add/Edit Grower Harvest form. Collapse the navigation bar to view the entire form.
- Block Code
-
Enter the block code that is associated with this harvest.
- Harvest Period
-
Enter a harvest period. If a harvest pattern is assigned to the block, the system displays the current period based on the harvest pattern. If harvest pattern is blank on the block, you must enter a unique period, which need not be based on an existing harvest pattern.
- Harvest Suffix
-
Enter a harvest suffix for when you divide a harvest into multiple tracking entities.
- Harvest Name
-
Enter the harvest name. This name is supplied by default from the block name and can be overridden.
- Harvest Status
-
Enter the status of the harvest. Values are:
-
Closed
-
Complete
-
Current. The status of the harvest record must be current before you can perform any operations against the harvest.
-
Future. When you add a harvest, the system always sets the status to Future.
-
Terminated
-
- Harvest ID
-
The system assigns a unique ID to each harvest record.
4.4.5.1 Estimates
Figure 4-21 Add/Edit Grower Harvests form: Estimates tab
Description of "Figure 4-21 Add/Edit Grower Harvests form: Estimates tab"
- Current Estimate
-
Enter the current estimate for the harvest. The system uses the current estimate when creating purchase orders for the harvest. The current estimate is reflected on the purchase order as quantity ordered. If this value is zero, the system uses a default quantity of one on the associated purchase order.
- Current Estimate Date
-
Enter the current estimate date. This is the date that you last updated the current estimate.
- Scheduled Quantity
-
Displays the quantity scheduled for harvesting. Entering a harvest operation populates this field.
- Received Quantity
-
Displays the received harvest quantity at the crush site. Entering a receipt operation populates this field.
- Remaining Quantity
-
Displays the received harvest quantity at the crush site. Entering a receipt operation populates this field.
- Harvest Start
-
Displays the effective start date for the harvest period.
- Harvest End
-
Displays the effective end date for the harvest period. The harvest end date is reflected on the purchase order as the promised delivery date.
If the Create Purchase Order processing option is set to 1 in the Grower Harvest Maintenance program (P40G03), the system does not process a harvest end date that is less than today's date.
- Confidence of Supply
-
Enter the confidence as a percentage that the crop plans to attain the current estimate.
- Cut Date
-
Enter the expected harvest cut date.
When you close harvest operations, the system updates this field with the actual end date of the first closed harvest operation for this harvest.
- Use Continuous Estimates
-
This check box is selected on the block record and appears on the harvest record.
- Planned Maturity Date
-
Enter the planned maturity date of the harvest.
- Maturity Program Name
-
Enter the name of the program the system uses to calculate and return crop maturity dates. If you have associated a maturity calculation program with the block, the system populates the field with this maturity program name. However, you can manually override this default value if the harvest status is Current or Future.
- Calculated Maturity Date
-
Displays the calculated maturity date. The system populates this field with the result of the custom calculation that you set up in the maturity date calculation program.
- Refresh
-
Click to calculate the maturity date.
4.4.5.2 Location
Select the Location tab.
Figure 4-22 Add/Edit Grower Harvest form: Location tab
Description of "Figure 4-22 Add/Edit Grower Harvest form: Location tab"
- Growing Area
-
Enter the growing location for a harvest. The geographic area can be the appellation or the geographical indication. Geographic area can be defined as a country or a region within the country, such as a state or province, or a small area within a region, based on the desired level of specificity. Values are set up in the Set Geographic Area and Relationship program (P31B37).
- District
-
Enter a UDC (40G/GD) for the growing district.
- Region
-
Enter a UDC (40G/GR) for the growing region.
- County
-
Enter a UDC (00/CT) for the county.
- State
-
Enter a UDC (00/S) for the state.
4.4.5.3 Attributes 1
Select the Attributes 1 tab. You can change any default information from the block. When you have multiple harvests associated with a block, use the Validate Area button to verify that the sum of all harvest gross and planted areas match the areas on the block.
Figure 4-23 Add/Edit Grower Harvest form: Attributes 1 tab
Description of "Figure 4-23 Add/Edit Grower Harvest form: Attributes 1 tab"
4.4.5.4 Contract Info
Select the Contract Info. tab. When a contract is created for a harvest, the information is displayed on this tab. The information in this tab is maintained in the JD Edwards EnterpriseOne Grower Pricing and Payments system.
4.4.5.5 Additional
Select the Additional tab.
- Operational Cost
-
Displays the operational cost from the farming activities.
- Cost Per Quantity
-
Displays the cost per quantity.
- Cost Per Area
-
Displays the cost per area.
- Last Load
-
Select the Last Load check box when the final truck load is received.
- Extraction Complete
-
Select the Extraction Complete check box when the crop is crushed. This check box is only used with the JD Edwards EnterpriseOne Blend Management system to process harvested crops.
- Quarantined Flag
-
Select the Quarantine Flag check box when the harvest is in a quarantined area.
When a spray operation is created, the crop has been sprayed, and the system displays a restricted EUR warning or the timing of the operation generates a warning, you must select this check box. Another example for using this check box is when the wrong agrochemical is applied to the crop.
4.4.5.6 Block Descriptors
Select the Block Descriptors tab. You can view this information only from the harvest record.
4.4.5.7 EUR
Select the EUR tab.
Figure 4-24 Add/Edit Grower Harvest form: EUR tab
Description of "Figure 4-24 Add/Edit Grower Harvest form: EUR tab"
- EUR Code (end-use reservation code)
-
Displays the EUR codes from the block.
- Crush Site
-
Enter the site where the crop is crushed.
- Produced Site
-
Enter the site where the crop is produced.
- EUR Quantity (end-use reservation quantity)
-
Displays the calculated quantity for each EUR.
4.4.5.8 Attributes 2
Select the Attributes 2 tab.
- Grower Attribute 2–15
-
Enter a UDC (40G/02–15) for the grower attributes that are relevant and specific to the block.
- Grower Dates 01–08
-
Enter the grower dates that are relevant and specific to the block.
- Grower Checkboxes 01–05
-
Select the grower check boxes that are relevant and specific to the block.
- Grower Numerics 02–05
-
Enter the grower numerics that are relevant and specific to the block.
4.4.5.9 Contacts
Select the Contacts tab.
- Contact Type
-
Enter a UDC (40G/AT) that represents the contact type that is associated with the farm.
- Address Number
-
Enter the address number for the contact type.
4.4.5.10 Action Dates
Select the Action Dates tab.
- Action Date Code
-
Enter a UDC (40G/AD) to represent the action that should be taken.
- Recurring
-
Select to indicate whether the action on the block is recurring. Values are:
-
Selected: The action date is recurring.
-
Clear: The action date is not recurring.
If the action is recurring, you can use the Recurring Number of Days field to calculate the next action date when you close the current action date.
-
- Recurring Number of Days
-
Enter the number of days the system uses to calculate the next action date if the action is a recurring action. The system adds the number of days that you enter to the current action date to calculate the next action date.
You can also use a processing option to enter a default value for this field. If you do not define a default value and do not enter a value here, the system uses a default value of one day.
- Date Required
-
Enter the date on which the action should be taken.
- Closed
-
Select this check box to indicate that the action is closed. If both the Recurring check box and the Closed check box are selected, the system creates a new copy of the Action Date record. The system calculates the new action date by adding the days from the Recurring Number of Days field to the action date that you closed.
- Date Complete
-
Enter the date on which the action was completed.
- Person Responsible
-
Enter the address book number of the person who is responsible for completing the action.
- Action Date Comment
-
Enter free-form text with any notes about the action.
4.4.5.11 Financial
Select the Financial tab.
Figure 4-25 Add/Edit Grower Harvest form: Financial tab
Description of "Figure 4-25 Add/Edit Grower Harvest form: Financial tab"
- Default Price
-
Enter the grower default price for the harvest. This price is used in the unit price calculation.
- Pricing UOM
-
Enter a UDC (00/UM) that indicates the unit of measure in which you usually price the crop.
- Currency Code
-
Displays the domestic currency for the company.
- Cost Center
-
Displays the grower cost center that is set up in the Defaults Printers & Locations program (P400951).
- P.O. Number (purchase order number)
-
Displays the purchase order number after a weigh tag receipt operation is performed against this harvest record.
This field also displays the purchase order number that is generated after you close a scheduled harvest operation.
When the Create Purchase Order processing option is set to 1 in the Grower Harvest Maintenance program (P40G03), this field displays a purchase order number after you create a harvest or change the current estimate harvest end date.
- View PO (view purchase order)
-
Click this link to access the Order Detail program (P4310).
- External Ownership
-
The ownership flag determines what version of Purchase Order (P4310) and therefore what line type and A/P interface flag the system uses to create a purchase order in some Grower applications. External ownership exists when the A/P interface flag is set to 'N', otherwise it is considered internal and A/P interface is set to ’ Y.
Note:
The system displays the External Ownership option when you set the processing option to create a purchase order. The processing option is located on the Processing tab of the Grower Harvest Maintenance program (P40G03).
4.5 Setting Up EUR Definitions
This section provides an overview of EUR definitions, lists prerequisites, and discusses how to create EUR definitions. EURs are also referred to as intended use.
4.5.1 Understanding EUR Definitions
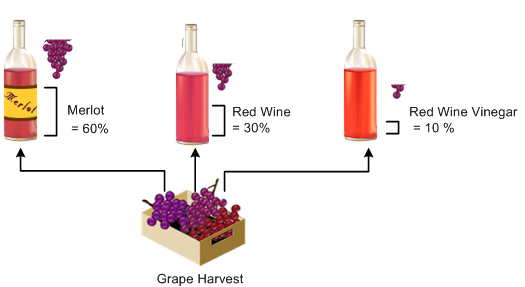
EURs are codes that you assign to the end product of the harvested crop. For example, when you are growing broccoli, 60 percent of the crop may be sold in bulk to local producers while the remaining 40 percent is used for the fresh market and is packaged by crowns, spears, and florets.
You can designate similar or related EURs as subordinate to a parent EUR. For example, a parent broccoli EUR might have several subordinate EURs if the parent broccoli is to be used in several broccoli end lots.
EURs support the production planning process only.
When you create an EUR definition, you define information about the end products to which you allocate lots or blocks. You must create a short code and attach a brand code. You can specify the harvest period, the primary appellation, wine family, and variety for the EUR. If the EUR that you are defining is a sub-EUR, you can enter a parent EUR.
You extend the EUR definition by defining a set of planning assumptions that enable you to analyze possible planning scenarios based on marketing requirements. However, these planning assumptions are for information only, and the system does not validate them. You can set up the following assumptions for an EUR:
You can edit an EUR definition only if you have not created an EUR profile version. When an EUR profile version exists, you can view the EUR definition, but the Edit EUR Definition form becomes read-only, preventing you from making any changes to the EUR definition. You can delete an EUR only if it was never used.
This diagram illustrates the EUR of a crop of grapes:
Figure 4-26 EUR Example for a Crop of Grapes
Description of "Figure 4-26 EUR Example for a Crop of Grapes"
4.5.2 Prerequisites
Before you complete the tasks in this section:
-
Set up EUR specification codes.
-
Set up brand master records.
-
Set up accounting groups.
-
Set up item master records.
-
Set up specifications.
-
Set up protocols.
4.5.3 Forms Used to Create EUR Definitions
4.5.4 Creating EUR Definitions
Access the Add EUR Definition form.
4.5.4.1 General
Select the General tab.
Figure 4-27 Edit EUR Definition form: General tab
Description of "Figure 4-27 Edit EUR Definition form: General tab"
- EUR Short Code (end use reservation short code)
-
Enter a unique identifier for the EUR.
- Description
-
Enter a description for the EUR.
- Sub EUR (sub end use reservation)
-
Select to specify this EUR as a sub-EUR. Select to make the Parent EUR field input capable.
- Parent EUR (parent end use reservation)
-
Enter an EUR short code that is used as a parent for grouping sub-EURs. If you are setting up a sub-EUR, you can enter a parent EUR to copy the header values of the parent EUR to the sub-EUR.
- Brand Code
-
Select an available brand from the Brand Master table (F31B0770).
- Product Name
-
Enter a product name to assign to the EUR.
- EUR Version (end use reservation version)
-
Displays the EUR version.
- EUR Status (end use reservation status)
-
Enter the status of an EUR. EURs can be active or inactive. Inactive EURs cannot be used in any new transactions. You can set the status to inactive only if all operations that use this EUR are closed or canceled.
- Harvest Period
-
Enter a harvest period for the EUR definition.
- Primary Appellation
-
Enter the primary appellation associate with an EUR.
- Primary Wine Family
-
Select the primary wine family from the Primary Wine Family UDC (31B/PF) to assign the EUR to a group, for example, red wines.
- Primary Variety
-
Select a primary variety to associate with an EUR.
- Harvest Assumptions
-
Click to access the Harvest Assumptions program (P31B0710).
- Loss Assumptions
-
Click to access the Loss Assumptions program (P31B0720).
- Planning Assumptions
-
Click to access the Planning Assumptions program (P31B0740).
- Valid Operations
-
Click to access the Valid EUR Operations program (P31B07750).
- Conversion Rates
-
Click to access the EUR Conversion Rate Assumptions program (P31B07760).
4.5.4.2 Category Codes
Select the Category Codes tab.
Figure 4-28 Edit EUR Definition form: Category Codes tab
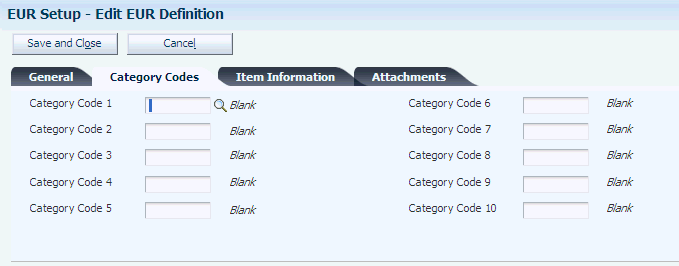
Description of "Figure 4-28 Edit EUR Definition form: Category Codes tab"
- Category Code 1 - 10
-
Enter a UDC (31B/U0–U9) for each category code that is appropriate to the EUR.
4.5.4.3 Item Information
Select the Item Information tab.
Figure 4-29 Edit EUR Definition form: Item Information tab
Description of "Figure 4-29 Edit EUR Definition form: Item Information tab"
- Accounting Group
-
Enter an alphanumeric identifier to associate similar EURs for accounting purposes. Set up EUR accounting groups in the EUR Accounting Group program (P31B07AG). Automatic accounting instructions use the EUR Accounting Group to point to an account number.
- Asset Class Code
-
Enter a code to use to group one or more EUR codes under a high-level asset classification.
- Wine Type
-
Enter a UDC (31B/WT) for the wine type that is associated with the EUR.
- Quality Designation
-
Enter a UDC (31B/QD) specifying the intended level of quality that is associated with an EUR, for example, reserve or premium.
- Item Number
-
Enter an item number to associate with the EUR. The system uses the item number to retrieve cost information from the Item Cost table (F4105).
- Branch
-
Enter a branch to associate with the EUR for costing and accounting purposes.
- For Sale
-
Select to indicate that the EUR should not be blended.
4.5.4.4 Attachments
Select the Attachments tab.
Enter explanatory text to be attached to the EUR.
4.5.4.5 Specifications
Select the Specifications group box.
- Specification
-
Select an EUR specification from the Specification Master table (F31B0700).
- Wine Status
-
Enter the wine status for the EUR for which the selected specification is valid.
4.5.4.6 Protocols
Select the Protocols group box.
- Protocol
-
Select a protocol from the Protocol Master table (F31B0720).
- Winery
-
Specify a cost center to associate with the protocol.
- Wine Status
-
Select a status from the Wine Status Master table (F31B32).
- Category Code 1,Category Code 2, and Category Code 3
-
Specify up to three category codes for the protocol for grouping and reporting purposes.
- Date 1, Date 2, and Date 3
-
Specify up to three dates for the protocol.
- Numeric 1,Numeric 2, and Numeric 3
-
Specify up to three numeric values to classify the protocol.
4.6 Running the Harvest Listing Report (R40G031)
This section discusses how to run and set processing options for the Harvest Listing Report.
4.6.2 Setting Processing Options for Harvest Listing Report (R40G031)
Use these processing options to define what data is included on the report.
4.6.2.1 Area
These processing options specify whether to include the appellation and growing code hierarchies.
- 1. Appellation Code
-
Specify the appellation code to appear on the report. If you enter both the appellation and growing area codes, the system prints only those harvest records that match both codes.
- 2. Include Harvest in Appellation Hierarchy
-
Specify whether to run the report for just one appellation or for the specified appellation and all descendents. Values are:
Blank or 0: Do not include descendents.
1: Include descendents.
- 3. Geographic Area Code
-
Specify the geographic code to appear on the report. If you enter both the appellation and growing area codes, the system prints only those harvest records that match both codes.
- 4. Include Harvest in Growing Area Hierarchy
-
Specify whether to run the report for just one geographic area or for the specified geographic area and all descendents. If left blank, the system uses default value No. Values are:
Blank or 0: Do not include descendents.
1: Include descendents.