5 Setting Up Requisition Approval Workflow
This chapter contains the following topics:
-
Section 5.1, "Understanding Requisition Approval Workflow Setup"
-
Section 5.4, "Setting Up Escalation for the Workflow Process"
5.1 Understanding Requisition Approval Workflow Setup
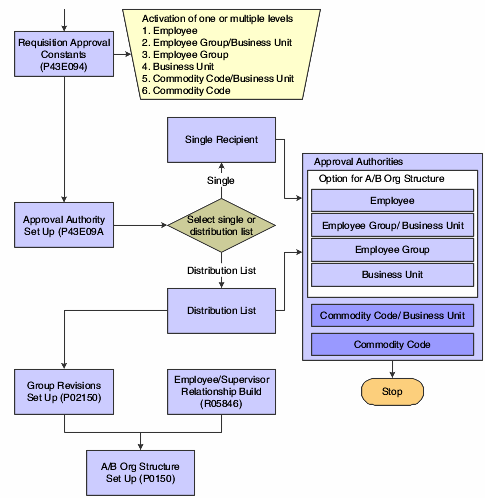
Using the Approval Authority Constants program (P43E094) in conjunction with the Approval Authority program (P43E09A), you can set up approval authority at varying levels of detail to meet the needs of your organization. For example, you can attach each employee to an approver or distribution list, or you can attach entire employee groups to approvers or distribution lists.
You first set up the Approval Authority constants; which determine the level at which the system should check for a specified approver or distribution list. After you set up the constants, you set up approval authority, which specifies the approver or distribution lists for each of the levels that you set up in the constants.
This diagram illustrates the workflow approval setup:
After you set up workflow approval, the system sends messages to required approvers using either the Work Center, an email address, or both. You specify in the Address Book system to which location the system sends a message.
|
Note: This chapter discusses the setup for approval workflow for only the Requisition Self Service system. If you want to use approval for the purchase orders created by this system, you must also set up approval in the Procurement system. |
5.1.1 Escalation for Requisition Approval Workflow
After setting up the Approval Authority constants and approval authority, you can set up escalation for requisition workflow approval. Escalations enable the system to send messages to additional approvers if the original approver does not process the requisition in a specified time frame. Setting up escalations is optional.
5.2 Setting Up Approval Authority Constants
This section provides an overview of approval authority constants and discusses how to set up approval authority constants.
5.2.1 Understanding Approval Authority Constants
Approval authority constants determine the level at which the system checks for an approver or distribution list for the requisition. Using the Approval Authority Constants program (P43E094), you can specify that the system checks for an approver or distribution list at the order level, the commodity line level, or both. At the order level, you can select any or all of these levels:
-
Employee
The system verifies whether the employee on the requisition is attached to a specific approver or distribution list.
-
Employee Group/Business Unit
The system verifies whether there is an approver or distribution list attached to the employee group and business unit to which the employee on the requisition belongs.
-
Employee Group
The system verifies whether there is an approver or distribution list attached to just the employee group to which the employee on the requisition belongs.
-
Business Unit
The system verifies whether there is an approver or distribution list attached to the business unit to which the employee on the requisition belongs.
At the line level, you can select either or both of the following:
-
Commodity/Business Unit
The system verifies whether there is an approver or distribution list attached to the commodity and the business unit on the requisition line.
-
Commodity
The system verifies whether there is an approver or distribution list attached to the commodity on the requisition line.
When the user clicks Submit on a requisition, the system accesses the Approval Authority constants. The system checks each option, in order, to see if they are selected, and then checks for an approver or distribution list for only those options that are selected. For example, the system first checks the Employee option. If the Employee option is not selected, the system then checks the Employee Group/Business Unit option. However, if the Employee option is selected, the system checks the approval authority to see if the employee on the requisition is attached to a specific approver or distribution list, and then sends the approval message to the specified approver or distribution list. If the employee on the requisition is not attached to a specific approver, the system then checks the next selected constant.
The system checks the approval authority constants at the order level first, and then sends an approval message to the approver or distribution list specified in the Approval Authority program. If the requisition is approved, the system then checks the constants at the line level to see if another approval message is required. For example, if an employee created a requisition for a new office chair, the requisition might require approval from a manager first, and then an additional approval from the buyer for that particular commodity might also be required. If the approval message generated at the order level is not approved, the system does not check the approval constants at the line level.
The system stores the approval authority constants in the F43E094 table.
|
Note: If an employee does not have a specific approver or distribution list and is not part of an employee group or business unit that has one, the system automatically approves the requisition. Therefore, you should verify that all employees needing requisition approval are attached to an approver or distribution list. |
5.2.2 Form Used to Set Up Approval Authority Constants
| Form Name | Form ID | Navigation | Usage |
|---|---|---|---|
| Manage Constants | W43E094B | Workflow Approvals (1/G43E31), Approval Authority Constants | Set up approval authority constants. |
5.2.3 Setting Up Approval Authority Constants
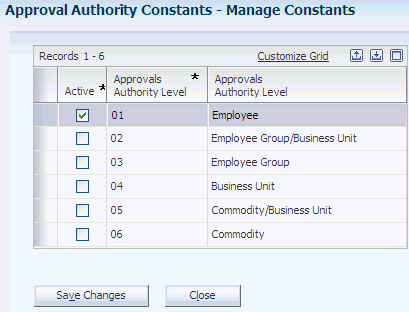
Access the Manage Constants form.
- Active
-
Select the constant for the levels for which you want the system to check for approvers or distribution lists.
5.3 Setting Up Approval Authority
This section provides overviews of approval authority and employee groups and discusses how to:
-
Set processing options for Approval Authority.
-
Set up approval authority for a single approver.
-
Set up approval authority for a distribution list.
5.3.1 Understanding Approval Authority
You use the Approval Authority program to set up approvers or distribution lists for each level that you specified in the Approval Authority constants. The system enables you to set up approvers and distribution lists for only the levels that you activated in the Approval Authority Constants program. If you do not activate any of the approval authority constants, the system generates an error when you access the Manage Distribution List form.
5.3.1.1 Manage Single Recipient
The approval authority program contains a processing option, Form Display, that enables you to determine whether you assign single approvers or distribution lists to each level of authority. If you enter 1 in the processing option, the system displays the Manage Single Recipient form, and you can assign only single approvers to each level. You cannot assign distribution lists by using this form.
In addition to entering a single approver for the level of authority, you also enter an approval limit. This amount indicates the minimum amount for a requisition that requires approval. The system evaluates the amount that you enter as a greater-than or equal-to amount. Therefore, if you enter 100.00 USD as the approval limit, the system requires approval on all requisitions with an amount greater than or equal to 100.00 USD.
5.3.1.2 Manage Distribution List
If you leave the Form Display processing option blank, the system displays the Manage Distribution List form and you can assign only distribution lists to each level of authority. You cannot assign single approvers by using this form.
When you set up distribution lists, you set up the list of required approvers, and you also specify the threshold level and escalation information for each required approver. Depending on how you set up the threshold levels, you can require approval on all requisitions, or only those with a certain amount.
This diagram illustrates how the system would route approvals if you set up a distribution list so that approval is required on all requisitions, regardless of the amount:
Figure 5-3 Approval required for all requisitions
Description of "Figure 5-3 Approval required for all requisitions"
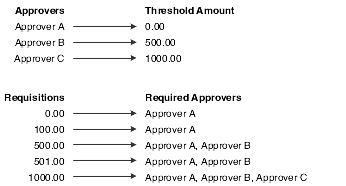
This diagram illustrates how the system would route approvals if you set up a distribution list so that approval is required, starting at a specified amount.
Figure 5-4 Approval required starting at a specified amount
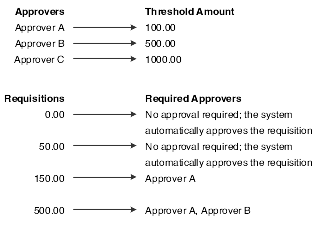
Description of "Figure 5-4 Approval required starting at a specified amount"
The Threshold field is a greater-than or equal-to field, meaning that the system requires approval for any requisitions or requisition lines with amounts greater than or equal to the amount in the Threshold field. For example, if you enter 100.00 in the Threshold field, any requisition lines of 100.00 or more must be approved.
5.3.2 Understanding Employee Groups
You can set up employee groups to attach to approvers and distribution lists so that you don't have to enter approval authority for each individual employee. To set up employee groups, you first create the groups and add them to user-defined code (UDC) table 43E/AA. You must also create address book records, using a search type of M for each group. After you have added the groups to UDC 43E/AA, you enter a group for each applicable employee by using the Employee Group Approvals field on the Additional 1 tab of the Address Book Revisions form.
5.3.3 Prerequisites
Before you complete the tasks in this section:
Create address book records for distribution lists and for approvers that you want to include in distribution lists.
Set up employee groups in UDC 43E/AA.
Add employees to employee groups.
5.3.4 Forms Used to Set Up Approval Authority
| Form Name | Form ID | Navigation | Usage |
|---|---|---|---|
| Manage Distribution List | W43E09AA | Workflow Approvals (G43E31), Approval Authority | Set up approvers or distribution lists for each level for which you have set up constants. |
| Address Parent/Child Revisions | W0150A | Select Edit Distribution List on the Manage Distribution List form. | Set up distribution lists.
Add or change threshold and escalation information. |
| Manage Single Recipient | W43E09AB | Workflow Approvals (G43E31), Approval Authority
Select Manage Single Recipient on the Manage Distribution List form. |
Set up only approvers for each approval authority. You cannot assign distribution lists to approval authority levels by using this form. |
5.3.5 Setting Processing Options for Approval Authority (P43E09A)
These processing options specify default values for using the Approval Authority program.
- 1. Form Display
-
Specify whether the system displays the Distribution List field. Values are:
Blank: Displays the Manage Distribution List form. This form allows you to enter only distribution lists for each level of authority.
1: Displays the Manage Single Recipient form. This form allows you to enter only approvers for each level of authority.
- 2. Enter the Version
-
Enter the version of the Organizational Structure Revisions program (P0150) to use when entering revisions for distribution lists. If you leave this processing option blank, the system uses version ZJDE0001.
5.3.6 Setting Up Approval Authority for a Single Approver
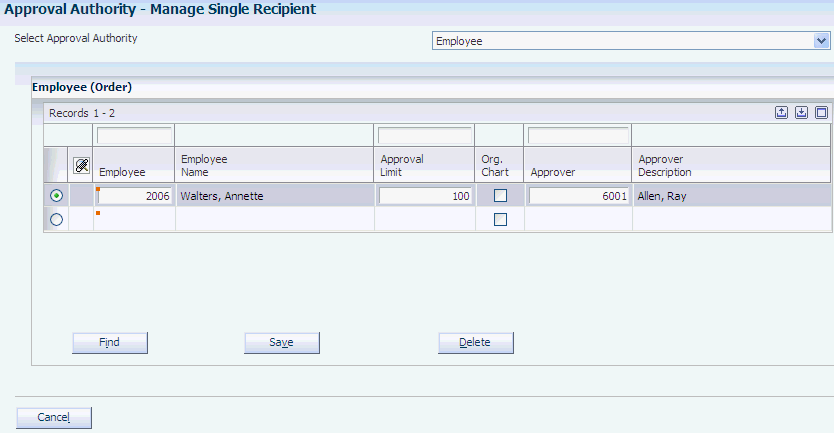
Access the Manage Single Recipient form.
Select the appropriate level of authority for which you want to set up an approver, using the Select Approval Authority field.
-
Click this button after selecting the approval level authority to display the subform that is associated with the authority level. Depending on the level selected, the system displays one or more of the fields described in this table.
- Employee
-
Enter the address book number of the employee for which you want to set up an approver.
- Approval Limit
-
Enter the minimum requisition amount that requires approval. This field is a greater-than or equal-to value.
- Org Chart (organizational chart)
-
Select this option if you want the system to use an existing organizational chart to determine the approver for the employee that you specify. If you select the Org Chart option, the organizational structure overrides any other approver setup that you create.
For the system to use this option, the employee must be included in a valid organizational structure in the Address Organization Structure Master table (F0150). The structure type must be ES, and the Authorization Required option must be selected for the structure. If you want to set up the organizational structure so that the system routes approvals based on monetary limits, you must set up threshold limits for employees under the supervisor's record.
Note:
The F0150 table must be mapped to the same data source as the workflow tables.See JD Edwards EnterpriseOne Tools Configurable Network Computing Implementation Guide.
- Approver
-
Enter the address book number of the person to approve requisitions for the employee that you specified.
- Employee Group
-
Enter the name of the group for which you want to attach an approver.
- Business Unit
-
Enter the business unit for which you want to attach an approver. When you have selected Employee Group/Business Unit for approval authority, you must enter both an employee group and a business unit.
- Commodity
-
Enter the commodity for which you want to attach an approver.
5.3.7 Setting Up Approval Authority for a Distribution List
Access the Manage Distribution List form.
Figure 5-6 Manage Distribution List form (1 of 2)
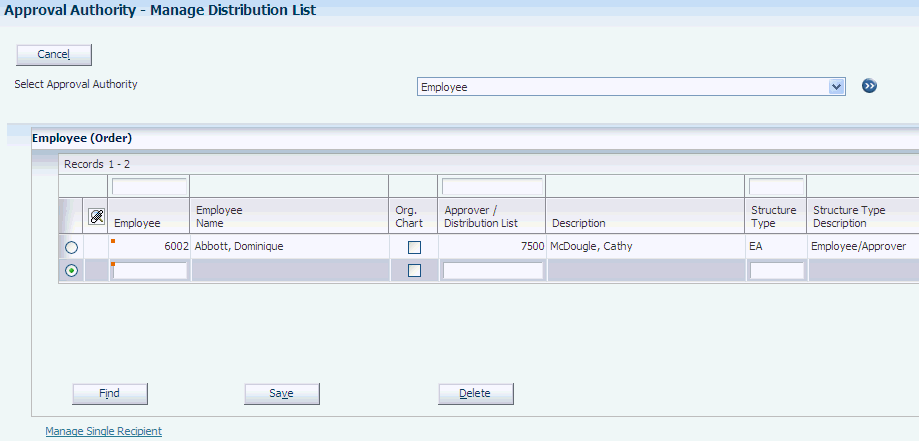
Description of "Figure 5-6 Manage Distribution List form (1 of 2)"
Figure 5-7 Manage Distribution List (2 of 2)
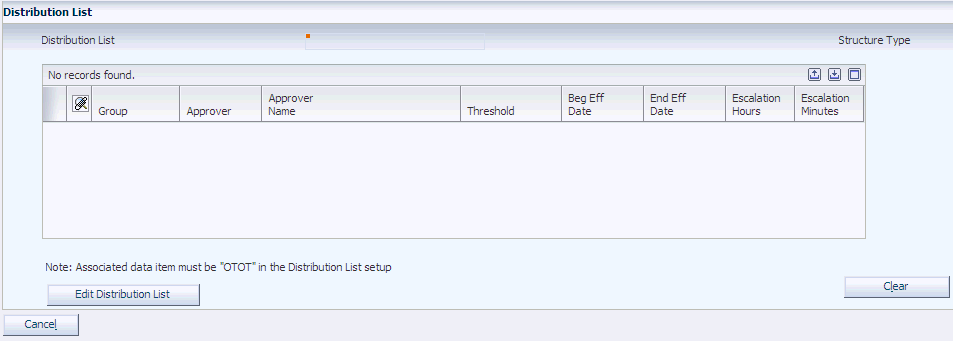
Description of "Figure 5-7 Manage Distribution List (2 of 2)"
-
Click this button after selecting the approval level authority to display the subform that is associated with the authority level. Depending on the level selected, the system displays one or more of the fields described in this table.
- Employee
-
Enter the address book number of the employee for which you want to attach a distribution list.
- Org Chart (organizational chart)
-
Select this option if you want the system to use an existing organizational chart to determine the approver for the employee that you specify. If you select this option, the organizational structure overrides any other approver setup that you create.
For the system to use the Org Chart option, the employee must be included in a valid organizational structure in the Address Organization Structure Master table (F0150). The structure type must be ES, and the Authorization Required option must be selected for the structure. If you want to set up the organizational structure so that the system routes approvals based on monetary limits, you must set up threshold limits for employees by updating the supervisor's record.
Note:
The F0150 table must be mapped to the same data source as the workflow tables.See JD Edwards EnterpriseOne Tools Configurable Network Computing Implementation Guide.
- Employee Group
-
Enter the name of the group for which you want to attach a distribution list. You must enter a valid group from UDC 43E/AA.
- Business Unit
-
Enter the business unit for which you want to attach a distribution list.
- Commodity
-
Enter the commodity for which you want to attach a distribution list.
- Approver/Distribution List
-
Enter the address book number of the distribution list to approve requisitions for the employee.
- Structure Type
-
Enter RSS. RSS is the default structure type for distribution lists for requisition approval.
5.3.7.1 Distribution List
Click Edit Distribution List to add employees to the distribution list and to enter threshold and escalation information.
- Address Number
-
Enter the address book number for each person in the distribution list.
- Threshold Value
-
Enter the amount for which requisitions should require approval. This field is a greater-than or equal-to value.
- Escalation Hours
-
Enter the number of hours that you want to elapse before the system escalates a requisition to the next approver in the distribution list for approval.
- Escalation Minutes
-
Enter the number of minutes that you want to elapse before the system escalates a requisition to the next approver in the distribution list for approval.
- Remark
-
Enter a remark to provide additional information for the threshold and escalation information.
- Begin Eff Date (beginning effective date)
-
Enter the beginning date in a range of dates for which the threshold and escalation information is effective. The system uses the current year specified in the F0010 table for company 00000 as the default year.
- End Eff Date (ending effective date)
-
Enter the ending date in a range of dates for which the threshold and escalation information is effective. The system uses the current year specified in the F0010 table for company 00000 as the default year.
5.4 Setting Up Escalation for the Workflow Process
This chapter provides overviews of the workflow process for Requisition Self Service and escalation for workflow processes and discusses how to:
-
Activate escalation for the APPROVEMSG Message task.
-
Set up the To Recipient event rule.
-
Set up the Cc Recipient event rule.
-
Set up the Bcc Recipient event rule.
-
Set up the Mailbox event rule.
-
Set up the Subject event rule.
-
Set up the Text event rule.
-
Set up the Shortcut event rule.
-
Set up the Message event rule.
-
Set up the Media Object Name and Media Object Key event rules.
-
Validate the workflow.
5.4.1 Understanding the Workflow Process for Requisition Self Service
Requisition Self Service uses the workflow process, K43E08, to monitor and process approvals for requisitions. Requisition Self Service is delivered with K43E08 activated. Use the version of K43E08 provided. If you want to create a new version, you must first deactivate the existing version. You must also replace the version name throughout the business functions used by the workflow process.
5.4.2 Understanding Escalation for Workflow Processes
When you install Requisition Self Service, the K43E08 workflow process is activated; however, the escalation feature is not activated. The escalation feature allows for messages to be sent to additional approvers if the first and subsequent approvers do not respond in a specified amount of time.
Use these guidelines when activating escalation for K43E08:
-
If you do not initially activate escalation, you must delete any existing workflow messages before activating escalation.
You use the Purge Completed Processes button on the Workflow Design form to delete existing messages.
-
If one version of K43E08 is activated and you create and activate the new version, the system does not process workflow approvals correctly and generates errors.
If you decide to create a new version of K43E08, you must first deactivate the existing version.
5.4.3 Activating Escalation for the APPROVEMSG Message Task
Access Workflow Modeler.
-
Right-click the Message task, select Escalation, and then select Add and Attach.
-
On the Escalation Rules form, complete these fields:
-
Escalation Rule
Enter a unique name for the escalation rule.
-
Description
Enter a description for the escalation rule.
-
5.4.4 Setting Up the To Recipient Event Rule
Access Workflow Modeler.
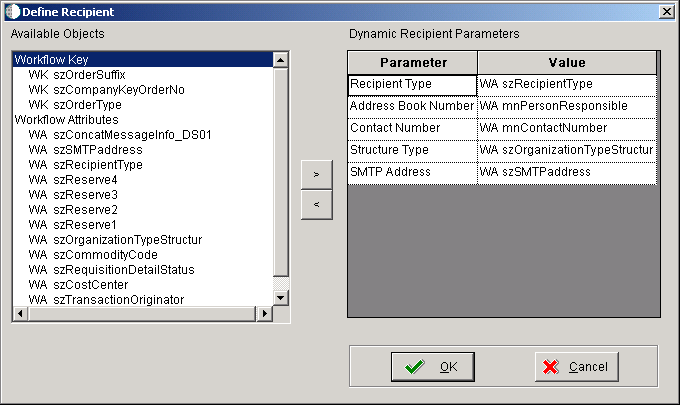
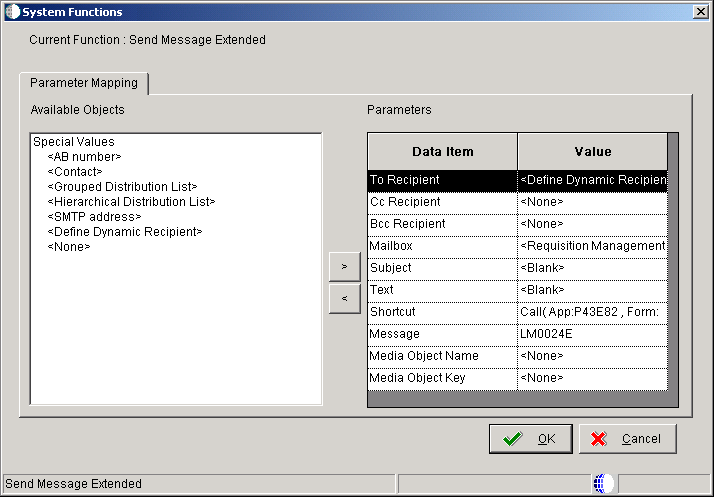
This form appears after you highlight the To Recipient parameter and then select <Define Dynamic Recipient> from the available objects on the System Functions form.
-
In Workflow Modeler, right-click the Message task and then select Event Rules from the menu.
-
On the System Functions form, highlight the To Recipient parameter and then select <Define Dynamic Recipient> from the available objects.
-
On the Define Recipient form, select WA szRecipient from the available objects for the Recipient Type field.
-
Select WA mnPerson Responsible from the available objects for the Address Book Number field.
-
Select WA mnContact Number from the available objects for the Contact Number field.
-
Select WA szOrganization Type Structure from the available objects for the Structure Type field.
-
Select WA szSMTPAddress from the available objects for the SMTP Address field.
-
Click OK to return to the System Functions form.
5.4.5 Setting Up the Cc Recipient Event Rule
Access the System Functions form.
To set up the Cc Recipient event rule:
-
On System Functions, select Cc Recipient from the Parameters form.
-
From the available objects, select <None>.
5.4.6 Setting Up the Bcc Recipient Event Rule
Access the System Functions form.
To set up the Bcc Recipient event rule:
-
On System Functions, select Bcc Recipient from the Parameters form.
-
From the available objects, select <None>.
5.4.7 Setting Up the Mailbox Event Rule
Access the System Functions form.
To set up the Mailbox event rule:
-
On System Functions, select Mailbox from the Parameters form.
-
From the available objects, select <Requisition Management>.
5.4.8 Setting Up the Subject Event Rule
Access the System Functions form.
To set up the Subject event rule:
-
On System Functions, select Subject from the Parameters form.
-
From the available objects, select <Blank>.
5.4.9 Setting Up the Text Event Rule
Access the System Functions form.
To set up the Text event rule:
-
On System Functions, select Text from the Parameters form.
-
From the available objects, select <Blank>.
5.4.10 Setting Up the Shortcut Event Rule
Access the System Functions form.
This is the fourth form that appears after the System Functions form.
To set up the Shortcut event rule:
-
On System Functions, select Shortcut from the Parameters form.
-
From the available objects, select <Define Active Message>.
The system displays the Work With Applications form.
-
On Work With Applications, enter P43E82 in the QBE line above the Object Name field.
-
Click the Find button.
-
Select the object, P43E82.
The system displays the Work With Forms form.
-
On Work With Forms, select W43E82A.
The system displays the Work With Versions form.
-
On Work With Versions, select ZJDE0001.
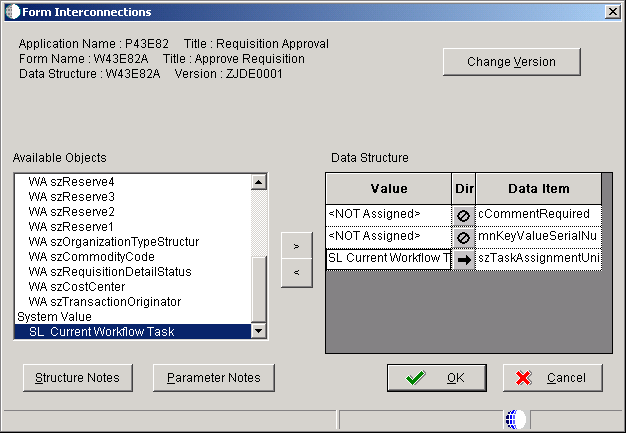
The system displays the Form Interconnections form.
-
On Form Interconnections, position the cursor on the szTaskAssignmentUnique data item.
-
From the available objects, select SL Current Workflow Task.
-
Click the Dir field so that the arrow points in the direction of the data item column.
-
Click the OK button to return to the System Functions form.
5.4.11 Setting Up the Message Event Rule
Access the System Functions form.
This form appears after the System Functions form.
To set up the Message event rule:
-
On System Functions, highlight the Message parameter, and then select <Define Message> from the available objects.
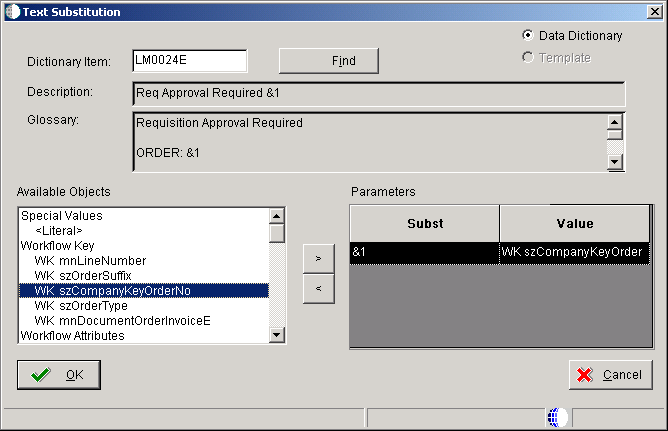
The system displays the Text Substitution form.
-
On Text Substitution, enter LM0024E in the Dictionary Item field.
-
Click Find.
-
From the available objects, select WA szCompanyKeyOrderNo.
-
Click OK to return to the System Functions form.
5.4.12 Setting Up the Media Object Name and Media Object Key Event Rules
Access the System Functions form.
To set up the Media Object Name and Media Object Key event rules:
-
From the available objects, select <None> for the Media Object Name and Media Object Key fields.
-
Click OK.
5.4.13 Validating the Workflow
Access the System Functions form.
To validate the workflow:
-
Click OK to save the event rules.
-
Click Save to return to the Workflow Design form.
-
On Workflow Design, click the Validate Workflow button.
