3 Setting Up Sales Fundamentals
This chapter contains the following topics:
-
Section 3.1, "Understanding the JD Edwards EnterpriseOne CRM Sales Force Automation System"
-
Section 3.2, "Setting Up User Defined Codes for CRM Sales Applications"
-
Section 3.3, "Setting Up Territories and Industry Groupings"
3.1 Understanding the JD Edwards EnterpriseOne CRM Sales Force Automation System
Before you can process sales information, set up sales teams, and enter leads and opportunities, you must set up the sales system. The CRM_Constants program (P90CA000) is used to drive sales processing. These constants determine the way in which the system processes sales information and the sales features that the organization uses.
You must also review, and at times, add information to sales-specific user defined code (UDC) tables. The majority of the UDC tables that are associated with the sales system can be found under system code 90CB.
If the sales force is defined by geographic areas, or industry specialties, you must also set up territories and industry groupings. This information is used when you set up and align the sales force.
You can create sales methodologies to assist the sales team members in organizing and carrying out sales activities, tasks, and strategies. Sales methodologies enable you to attach predefined activities to a sales team member at each step of the sales cycle for a particular product or service. Sales cycle steps from the associated sales methodologies are also used to calculate the weighted revenue potential for each active opportunity.
Lastly, you can set up qualification scripts. You use qualification scripts to determine whether the leads and opportunities that the sales organization generates are worth pursuing. Using qualification scripts, you can define questions, answers, and goals for each type of sale. When you complete a script, the system calculates the lead or opportunity's qualification score. The sales team member can use this score to determine whether the lead or opportunity is worth pursuing.
3.1.1 Prerequisites
Before you complete the tasks in this section:
Set up the CRM Constants.
You should also have a complete understanding of the JD Edwards EnterpriseOne CRM Foundation system, and should review the CRM Application Fundamentals documentation to determine whether additional setup is necessary to process sales information correctly.
3.2 Setting Up User Defined Codes for CRM Sales Applications
This section provides an overview of the user-defined codes (UDCs) for CRM Sales applications, and discusses how to set up UDCs for CRM Sales Applications.
3.2.1 Understanding UDCs for CRM Sales Applications
UDCs are used throughout the JD Edwards EnterpriseOne system to store values that the organization uses to process business information. Before you begin processing information, you should review the UDCs that are associated with the systems the organization uses, and verify that the appropriate values are available.
For the JD Edwards EnterpriseOne CRM Sales Force Automation system (system code 90CB), these UDCs are available:
| UDC Table | Description |
|---|---|
| 90CB/CA - Sales Driver Category | You set up sales driver categories to define the reasons that a potential customer might purchase products or services from the organization. Typically, sales drivers are the important reasons that sales representatives need to focus on in order to successfully sell to the customer.
For example, a common concern that customers have is whether the organization has enough inventory to satisfy their needs on an ongoing basis. Therefore, you can set up a sales driver category code to represent Inventory. |
| 90CB/CC - CRM Sold To Ship To | You use CRM Sold To Ship To codes to determine which customer to use when determining which members of the sales force to assign to a sales opportunity. A sales opportunity might have one customer set as the Sold To customer, and a different customer set as the Ship To customer. The system assigns sales team members from either the Sold To customer's sales team, the Ship To customer's sales team, or both, depending on this value.
You should not change these codes. |
| 90CB/CE - Category Expense | You use category expense codes to specify the types of expenses that are incurred during the sales process. Examples of category expense codes might include air travel, hotel, and per diem. |
| 90CB/CG - Category Time | You use category time codes to specify how a sales representative spends time during the sales process. Examples of category time codes might include demonstrations, development, or setup time. |
| 90CB/CT - Cost Type | You use cost type codes to specify whether a cost or expense is an amount of time or a monetary amount. |
| 90CB/FC - Function Code | You set up function codes to specify the roles that contacts have in their respective organizations.
For example, you might set up function codes to represent roles such as CEO, CIO, Staff, Supervisor, or Owner. |
| 90CB/FS - Forecast Status | You set up forecast status codes to specify whether a sales forecast has been submitted or is currently open for revision. Once a forecast has been submitted, it cannot be revised. |
| 90CB/IM - Sales Driver Importance | You set up sales driver importance codes to identify how important a particular sales driver is to a potential customer.
For example, you might set up codes 1 through 5, where 1 is the most important, and 5 is the least important. When you enter a sales driver category code on a lead or opportunity, you can then assign an importance code, which will assist the sales representative in knowing how important that driver is to the deal. |
| 90CB/LR - Lost Reason | You use lost reason codes to specify the reason that a lead or opportunity was not closed. You can then use this information to analyze the reasons why the sales force is losing business.
For example, you might find that a high percentage of sales are lost because the price is too high. This information might cause you to research the market to verify whether the prices that the organization has set are in line with prices of competitors. |
| 90CB/LS - Lead Source | You use lead source codes to specify how a lead was identified to an organization.
For example, you might set up a code for a particular trade show. You can then analyze the number of leads that were sourced from that trade show to determine whether to attend the show in upcoming years. |
| 90CB/PM - Payment Method | You use payment methods to specify how a person is paid for the expense |
| 90CB/QT - Qualification Question Type | You use qualification question type codes to specify the type of question you are asking. The code is informational only, and is used to assist the sales representative in understanding the context of the question. |
| 90CB/SL - Sponsorship Level | You use sponsorship level codes to describe how an influencer endorses the associated sales deal. For example, you use sponsorship level codes to specify that an influencer is an advocate, an opponent, enthusiastic, or pessimistic about the deal. |
| 90CB/ST - Sponsorship Type | You use sponsorship type codes to specify the role that an influencer plays in the sales deal. Examples of sponsorship type codes include executive, financial, or technical. |
| 90CB/ST - Status | You use status codes to specify the status of a lead. Examples of status codes include Active and Converted. |
You might also want to review the UDCs that are associated with other CRM system codes. These additional system codes are included in the CRM product family:
-
90B - CRM Financial Services.
-
90CA - CRM Foundation.
-
90CD - CRM Service Management.
-
90CE - CRM Solution Advisor.
-
90CF - CRM Call Scripting.
-
90CG - CRM Case Management.
-
90S - CRM Standalone Base Applications.
You should also review the UDCs for other JD Edwards EnterpriseOne systems that the organization uses. Examples of system codes that are commonly used in conjunction with the JD Edwards EnterpriseOne CRM Sales Force Automation system include:
-
01 - Address Book.
-
34A - Advanced Planning & Scheduling.
-
41 - Inventory Management.
-
42 - Sales Management.
-
42B - Sales Order Entry.
-
42S - Customer Self Service.
Note:
If you need to create custom UDCs for CRM, you should use system code 90M, CRM Custom.
3.2.2 Forms Used to Set Up UDCs for CRM Sales Applications
| Form Name | FormID | Navigation | Usage |
|---|---|---|---|
| Work With User Defined Codes | W0004AA | System Administration Tools (GH9011), User Defined Codes | Review and set up UDCs for CRM Sales applications. |
3.2.3 Setting Up UDCs for CRM Sales Applications
Access the Work With User Defined Codes form.
To set up UDCs for CRM Sales applications:
-
Locate the UDC you want to review by completing the Product Code and User Defined Code fields.
-
To search for a list of UDC tables in a specific product code, leave the User Defined Code field blank, and click Search.
You can search on all of the CRM product codes to verify that all of the necessary values have been set up. Examples of CRM product codes include 90CB, 90CA, and 90CE.
-
Review the existing values.
If necessary, add additional values to the table to support organizational requirements.
3.3 Setting Up Territories and Industry Groupings
This section provides an overview of sales territories and industry groups, and discusses how to:
-
Create sales territories.
-
Add address information to a sales territory.
-
Set processing options for the Territory Application program (P90CA140).
-
Set up industry groupings.
-
Set processing options for the Industry Grouping Application program (P90CA12A).
3.3.1 Understanding Sales Territories and Industry Groupings
Before you can align the sales force, you must enter the information that the system needs in order to automatically assign sales team members to accounts. First you must set up sales territories.
You enter territories to separate the sales force into geographic regions. When you set up territories, you assign country, state, city, and/or postal code information to each territory.
You cannot assign the same country, state, city, or postal code to multiple territories. Therefore, you enter the most specific information for each territory, for example, City, leaving the less specific fields blank.
For example, your territories for California might include:
-
Los Angeles
-
San Francisco and Oakland
-
All Other California
Using this example, you would set up three territories for California, entering geographic information as follows:
-
Los Angeles
Enter "Los Angeles" in the City field. Leave the State field blank.
-
San Francisco and Oakland
Enter "San Francisco" and "Oakland" in the City field. Lseave the State field blank.
-
All Other California
Enter CA in the State field.
When the system determines which territory a California-based customer belongs to, it will first use the customer's postal code, and search through territories that have specific postal codes listed. If there is no match, which there would not be in this example, the system then searches for a territory based on the customer's city. If the customer's city is Los Angeles, the customer would be assigned to the Los Angeles territory. However, if the customer's city was, for example, Sacramento, the system would not find a match for city, and would then continue searching, using the customer's state. The system would then assign the Sacramento customer to the All Other California territory.
To add additional countries to the system, you add new codes in UDC 00/CN. To enter additional states into the system, you add new codes to UDC 00/S. To add new cities or postal codes to the system, you use the Postal Code Transaction program (P01117). You must enter this information into the system before you can assign it to a territory.
You can set up parent and child territories. For example, you might have a large sales force that covers Europe. This sales force might be split into smaller sub-territories. Therefore, you might set up the parent territory as Europe, and create child territories such as:
-
Germany
-
France
-
Spain
-
Italy
When you enter customer records, the system uses the address information that you enter for each territory, along with the address you enter for the customer, to determine which territory the customer belongs to.
After you set up territories, you set up industry codes and industry groupings. First, you must verify that all industry codes in which your customers do business are in UDC 01/SC. Then, you create industry groupings. After you create industry groupings, you associate industry codes from UDC 01/SC to each grouping. You cannot add an industry code to more than one industry grouping.
This information is used to determine what industry grouping a customer is associated with, which is then used to determine which sales team members are assigned to the account. Additionally, you can set up parent and child industry groupings. An organization's sales force might be very specialized by product or service area. Therefore, the organization might choose to create specialized industry groupings.
For example, an organization specializing in selling widgets and gadgets to the automotive and medical industries might create these parent industry groupings:
-
Automotive
-
Medical
The organization can then create child industry groupings. Examples of child industry groupings that might be created under the Automotive parent industry grouping include:
-
Automotive Widgets
-
Automotive Gadgets
After you set up territories, industry codes, and industry groupings, you can then associated sales team members with each territory and industry grouping. The system uses this information to automatically assign sales team members to accounts based on their industry groupings, geographic proximity to the address that is associated with the account, and effective dates.
Additionally, you can click the Expand All and Collapse All options on the Search for Territories and the Search for Industry Groupings forms to review the hierarchical structure of territories and industry groupings.
3.3.2 Forms Used to Set Up Sales Territories and Industry Groupings
| Form Name | FormID | Navigation | Usage |
|---|---|---|---|
| Search for Territories | W90CA140K | Sales Force Automation Setup (G90CA03), Territory | Review existing territories or access the Add Territory form. |
| Add Territory | W90CA140H | Click Add on the Search for Territories form. | Set up territories. |
| Territory - Manage {Territory Name} | W90CA140A | Select the territory on the Search for Territories form, and then click Select. | Access forms to add address information to a territory. |
| Search for Industry Grouping | W90CA12AB | Sales Force Automation Setup (G90CA03), Industry Grouping | Review existing industry groupings or access the Add Industry Grouping form. |
| Add Industry Grouping | W90CA12AF | Click Add on the Search for Industry Grouping form. | Set up industry groupings. |
3.3.3 Creating Sales Territories
Access the Add Territory form.
- Parent Territory
-
Enter the name of the parent territory under which this new territory belongs. You must create the parent territory before you can enter it.
3.3.4 Adding Address Information to a Sales Territory
Access the Territory - Manage {Territory Name} Form.
Figure 3-1 Territory - Manage {Territory Name} form
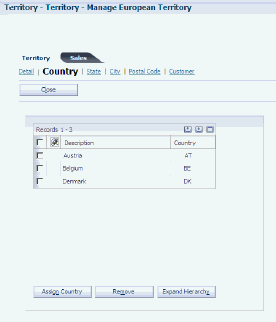
Description of ''Figure 3-1 Territory - Manage {Territory Name} form''
To add address information to a territory:
-
Click the Country link, and then click the Assign Country button.
-
Search for and select the countries that you want to attach to the territory, and then click Select.
-
Click the State link and then click the Assign State button.
-
Search for and select the states that you want to attach to the territory, and then click Select.
-
Click the City link and then click the Assign City button.
-
Search for and select the cities that you want to attach to the territory, and then click Select.
-
Click the Postal Code link and then click the Assign Postal Code button.
-
Search for and select the postal codes that you want to attach to the territory, and then click Select.
3.3.5 Setting Processing Options for the Territory Application Program (P90CA140)
Processing options enable you to specify the default processing for programs and reports.
For programs, you can specify options such as the default values for specific transactions, whether fields appear on a form, and the version of the program that you want to run.
For reports, processing options enable you to specify the information that appears on reports. For example, you set a processing option to include the fiscal year or the number of aging days on a report.
Do not modify JD Edwards EnterpriseOne demo versions, which are identified by ZJDE or XJDE prefixes. Copy these versions or create new versions to change any values, including the version number, version title, prompting options, security, and processing options.
3.3.5.1 Default
These processing options specify the default values that the Territory Application program uses.
- 1. Sales Team Search Type
-
Enter the Address Book search type that was used to create sales teams or sales groups. The default value is E.
You can only assign address book records with search types E, PA, and SG the value that you specify in this processing option to a sales territory.
If you want to assign sales teams to sales territories, you must set them up using the search type value that you enter in this processing option.
3.3.5.2 Version
These processing options specify the default versions that the Territory Application program uses.
- 1. Opportunity
-
Enter the version of the Manage Opportunities program (P90CB020) that is used when viewing the opportunities associated with a sales territory.
3.3.6 Setting Up Industry Groupings
Access the Add Industry Grouping form.
-
On the Add Industry Grouping form, complete the Name field, and if this industry grouping is a child grouping, complete the Parent Industry Group field.
You must create the parent industry grouping before you can enter it here.
-
Click Save and Continue.
-
On the Industry Grouping–Manage {Industry Grouping Name} form, click the Industry link, and then click Assign Industry.
-
On the Assign Industry form, select each industry code that you want to assign to the industry grouping, and then click Select.
-
On the Industry Grouping–Manage {Industry Grouping Name} form, click Close to exit the program.
3.3.7 Setting Processing Options for the Industry Grouping Application Program (P90CA12A)
Processing options enable you to specify the default processing for programs and reports.
For programs, you can specify options such as the default values for specific transactions, whether fields appear on a form, and the version of the program that you want to run.
For reports, processing options enable you to specify the information that appears on reports. For example, you set a processing option to include the fiscal year or the number of aging days on a report.
Do not modify JD Edwards EnterpriseOne demo versions, which are identified by ZJDE or XJDE prefixes. Copy these versions or create new versions to change any values, including the version number, version title, prompting options, security, and processing options.
3.3.7.1 Default
These processing options specify the default values that the Industry Grouping Application program uses.
- 1. Sales Team Search Type
-
Enter the Address Book search type that was used to create sales teams or sales groups.
You can only assign address book records with search types E, PA, and SG to an industry grouping.
If you want to assign sales teams to industry groupings, you must set them up using the search type value that you enter in this processing option.
3.3.7.2 Version
These processing options specify the default versions that the Industry Grouping Application program uses.
- 1. Opportunity
-
Enter the version of the Manage Opportunities program (P90CB020) that is used when viewing the opportunities associated with an industry grouping.
3.4 Setting Up Sales Methodologies
This section provides an overview of sales methodologies, lists prerequisites, and discusses how to set up sales methodologies.
3.4.1 Understanding Sales Methodologies
You use sales methodologies to define the typical steps that a sales representative might complete to close a particular type of sale. Sales methodologies define the milestones associated with a type of sale, and they assist sales representatives in completing all of the predefined tasks and activities that have proven to help with the specified type of sale.
Sales methodologies include sales cycle steps, which are also used to calculate the amount of potential revenue that is associated with each active opportunity.
You enter sales methodologies using the Sales Methodology - Entry Point program (P90CB050). Sales methodology information is stored in these tables:
3.4.1.1 Sales Methodology Setup
When you set up a sales methodology, you define sales cycle steps for the methodology. A typical sales methodology might include these sales cycle steps:
-
Initial Call
-
Proposal
-
Demonstration
-
Quote
-
Won Business
-
Lost Business
For each step, you assign a sequence and a probability of closing the sale. The sequence is used to specify the order in which the steps should be completed. The probability of closing is used to calculate the amount of business the organization might expect to receive at that step in the sales cycle.
Typically, the first steps in a sales cycle have a lower probability of closing than the later steps. For example, the organization might find that it is able to win business during the initial call step 5 times out of every 100 calls. Therefore, you might assign a 5 percent probability to the Initial Call sales cycle step. Similarly, you might find that sales representatives are able to close eight out of 10 deals once the transaction reaches the Quote sales cycle step. Therefore, you might assign a probability of 80 percent to the Quote sales cycle step.
The percentages that you assign to these sales cycle steps are used to calculate pipeline amounts. The pipeline is used to determine how much potential business is currently in process. You can exclude sales cycle steps from the pipeline calculation if you choose. The system multiplies the potential revenue amount that is associated with the opportunity by the probability that is associated with the active sales cycle step. This amount is then entered into the pipeline in the bracket associated with the probability percentage.
For example, if an opportunity has a potential revenue amount of 100,000 USD, and the active sales cycle step on the opportunity is Quote, which has a probability of 30 percent, the system performs these actions:
-
The system calculates the pipeline amount as 100,000 USD * 30 percent = 30,000 USD.
-
The system enters 30,000 USD into the pipeline in the 30-39 percent bracket.
Each sales methodology should include:
-
At least one sales cycle step with a probability greater than zero.
-
One sales cycle step with a probability of 100.
The probability must be 100 to convert a sales opportunity to a sales order.
-
One sales cycle step with a probability of zero.
When you lose a sales opportunity, you assign the sales cycle step with zero probability to that opportunity. This removes from the pipeline the potential revenue that is associated with that opportunity.
You can also associate an action plan with each sales cycle step in a methodology. An action plan is a list of predefined tasks and activities that a sales representative should complete when they are in a particular step of the sales cycle. For example, the Proposal step might be associated with an action plan that includes these activities:
-
Input the data that you received during the initial call and generate a proposal document.
-
Send the proposal document, along with a thank you note, to the opportunity contact.
-
One week from the date you mail the proposal, place a follow-up call to the opportunity contact.
In addition to sales cycle steps and action plans, you can also associate sales drivers with a sales methodology. Sales drivers are the forces that play the greatest part in a potential customer's decisions to select your business. When you add a sales driver to a methodology, you can define the importance of that sales driver.
For example, you might find that the most important sales driver in a particular sales methodology is a client's budget. Therefore, you can set up a sales driver code, and assign it a high level of importance. You set up sales driver codes in UDC 90CB/CA. You set up sales driver importance codes in UDC 90CB/IM. You must set up these codes before you can assign sales drivers and importance codes to a sales methodology.
3.4.1.2 Default Sales Methodology
When you set up sales methodologies, you must define one as the default methodology. This default methodology might be a generic methodology that can be used for any type of sale. You can have only one active default sales methodology at any given time. The default methodology must have at least one active sales cycle step with a probability greater than zero.
If you select the Default option when creating a sales methodology, and there is already an active default methodology, the system produces this message when you attempt to save the sales methodology record:
A default Sales Methodology, {Methodology Name}, already exists. Click Yes to make the current sales methodology default or No to preserve the existing default sales methodology.
If you click Yes, the system deselects the Default option on the existing default methodology, and the current record becomes the new default methodology. If you click No, the system deselects the Default option on the current record, and the existing default methodology remains the default.
3.4.1.3 Sales Methodology Usage
After you have set up sales methodologies, you can attach them to the opportunity records that the sales team generates. Attaching a sales methodology to an opportunity enables the system to accurately calculate the pipeline amount associated with each opportunity. It also assists sales representatives in completing the sales cycle by providing detailed information about what tasks and activities should be completed at each step in the cycle. Lastly, it assists sales representatives by enabling them to assign and view the sales drivers that are most important in winning the potential customer's business.
3.4.2 Prerequisites
Before you complete the tasks in this section:
Verify that sales driver and sales driver importance codes are set up in UDC tables 90CB/CA and 90CB/IM, respectively.
Additionally, if the organization chooses to associate action plans with sales cycle steps, you must define those action plans before you can add them to a sales methodology.
3.4.3 Forms Used to Set Up Sales Methodologies
| Form Name | FormID | Navigation | Usage |
|---|---|---|---|
| Search for Sales Methodologies | W90CB050A | Sales Force Automation Setup (G90CA03), Sales Methodology | Access the forms to set up a sales methodology. |
| Add Sales Methodology | W90CBSMA | Click Add on the Search for Sales Methodologies form. | Define the name of the sales methodology. |
| Sales Methodology - Manage {Methodology Name} | W90CB050B | Click Save and Continue after you enter the name of the sales methodology on the Add Sales Methodology form. | Set up a sales methodology. |
3.4.4 Setting Up Sales Methodologies
Access the Sales Methodology - Manage {Methodology Name} form.
Figure 3-2 Sales Methodology - Manage {Methodology Name} form
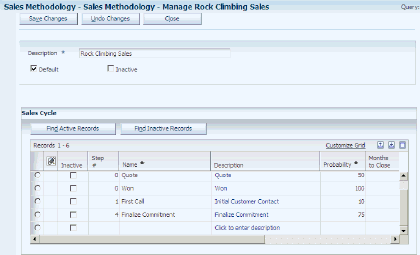
Description of ''Figure 3-2 Sales Methodology - Manage {Methodology Name} form''
- Default
-
Select this option to specify that this is the default sales methodology. When you enter a new sales opportunity, the system automatically populates opportunity records with the default sales methodology. If necessary, you can change the methodology. You can have only one active default sales methodology at any time. The default methodology must have at least one sales cycle step with a probability greater than zero.
- Inactive
-
Select this option to specify that the methodology is no longer active. You can reactivate a methodology at any time by deselecting this option.
- Inactive
-
Select this option to specify that a sales cycle step is inactive. You can reactivate the sales cycle step at any time by deselecting this option.
- Name
-
Enter the name of the sales cycle step.
- Probability
-
Enter the numeric probability, in whole numbers, that the sale will eventually close successfully. For example, if there is a 10 percent chance that sales that are currently in the Proposal step will close successfully, enter 10 in the Probability field for the Proposal sales cycle step. Values are 0 to 100.
The Probability field is used in these ways:
When the sales cycle step is selected in an opportunity record, the value in the Probability field is multiplied by the value in the Potential Amount field on the opportunity. The resulting amount is included in the pipeline. The value in the Probability field is also used to determine in which bracket of the Pipeline tab the result of the previous equation displays. For example, if the Probability is 25 percent, and the value in the Potential Amount field is 1,000,000, then 250,000 would be added to the pipeline in the 20-29 percent bracket.
- Months to Close
-
Enter the number of months it should take a sales representative to close the sale from the time the specified sales cycle step begins. For example, if it should take 3 months to close a sale from the time that the Proposal sales cycle step begins, enter 3in this field for the Proposal sales cycle step.
This field is used to populate the Closed Date field on the Opportunity Detail form. The Closed Date is calculated by adding the number of months entered to the date the Cycle Step was selected on the Opportunity Detail form.
- Step #
-
Enter the sequence number associated with the sales cycle step. This field controls the order in which the system displays the sales cycle steps on the Sales Methodology and Opportunity Detail forms.
- Pipeline Exclude
-
Select this option if you do not want any monetary amounts associated with this sales cycle step to be included in the pipeline.
- Action Plan
-
Enter the action plan associated with this sales cycle step.
The activities of the selected action plan will be assigned when the sales representative selects this sales cycle step on the opportunity record.
- Category
-
Enter the category code that best defines a customer or opportunities main concerns or motivators associated with a sale. Values for this field are stored in UDC 90CB/CA.
- Short Description
-
Enter a short, descriptive title that represents the customer or opportunities concern or motivator. For example, you might enter Budget issues are main concern in this field.
- Long Description
-
Click the link to access a free-form text box. You can enter additional information about the concern or motivator in this text box.
- Importance
-
Enter the importance of the sales driver, using a numeric value. This value assists sales representatives in identifying how important the information captured in the sale driver is to the client and their business.
3.5 Setting Up Qualification Scripts
This section provides an overview of qualification scripts, and discusses how to:
-
Create qualifications.
-
Create questions and answers.
3.5.1 Understanding Qualification
It is important that the sales team carefully qualify leads and opportunities to avoid wasting time and resources. To help with the qualification process, you can set up qualification scripts that sales representatives can use to determine whether a lead or opportunity is qualified.
The sales representative can associate a qualification script with the lead or opportunity they are working with, ask the questions that are associated with that script, and enter the answers into the system. The system automatically scores the lead or opportunity based on the responses. If the score is greater than the qualification goal for the associated script, the lead or opportunity is qualified. If the score is less than the qualification goal, the lead or opportunity should not be pursued.
These programs are used to create qualification scripts:
-
CRM - Manage Qualification Scripts program (P90CB040).
-
CRM - Qualification Script Detail-Add (P90CB043).
-
Qualifications - Qualification Answers Search & Select program (P90CB045).
These tables are used to store qualification information:
Using the qualification programs, you set up qualifications, the questions that are associated with each qualification, and the answers that are associated with each question. You can assign values to the questions in a script. You can also assign values to the answers to those questions. The system uses these values to calculate the lead or opportunity's qualification score.
3.5.1.1 Qualifications
To begin creating a script, you must first create qualifications. You use qualifications to classify the questions that you create later in the process. You can group questions according to any guidelines you choose. For example, you might choose to group questions according to product lines. Therefore, you must create a qualification for each product line. You can then create questions for each of the qualifications. When you enter a lead or opportunity, you can choose a qualification. Only the questions associated with that qualification appear for that lead or opportunity.
For example, if an organization sells mountain bikes, road bikes, and bike accessories, you might set up these qualifications:
-
Mountain Bike Sales
-
Road Bike Sales
-
Bike Accessory Sales
When you create a qualification, you enter lead and opportunity thresholds. Thresholds represent the scores that the lead or opportunity must meet or exceed to be qualified.
You would then create questions for each of the classifications, along with their associated answers. When a sales representative tries to sell mountain bikes, he or she can use the Mountain Bike Sales qualification to determine whether the lead or opportunity is qualified. The Mountain Bike Sales qualification would include all of the mountain bike-related questions and answers that were entered into the system.
|
Note: It is not mandatory that the lead or opportunity meet the threshold value. The score will not prevent a lead from being converted to a customer, or an opportunity from becoming a sales order. The numbers serve only as a guide.Additionally, once you associated a qualification with a lead or an opportunity, the qualification becomes read-only, and cannot be updated. Therefore, if you find that you must modify a script after it has been associated with a lead or opportunity, you can copy the existing script, make any necessary modifications to the newly-created script, and then mark the existing script as inactive. The inactive script will no longer be available to be attached to leads or opportunities. |
3.5.1.2 Qualification Questions
After you create qualifications, you create questions for the qualification. The questions you create appear when a sales representative selects the qualification when working with a lead or opportunity.
When you add questions to a qualification, you are required to enter a sequence number. Sequence numbers determine the order in which the questions appear. If you enter 1, the question appears first, and if you enter 2, it appears second, and so on.
You are also required to enter one of these question types for each question:
-
Leading
-
Rhetorical
-
Open ended
The question type does not affect how the question appears. It is informational only, and might help users to understand how the question should be posed. After you select a question type, you enter the question, which is the text that appears to the sales representative.
You also enter weighting points for each question. Weighting points are used to assign a value to each question. For example, among five questions you might have two key questions, one fairly important question, and two questions of minimal importance. Therefore, you might assign these weighting points to each question:
| Question | Importance | Weighting Points |
|---|---|---|
| Question 1 | High | 15 |
| Question 2 | High | 15 |
| Question 3 | Medium | 10 |
| Question 4 | Low | 5 |
| Question 5 | Low | 5 |
The sum of the weighting points for all questions that are associated with a qualification represent 100 percent, and is used as the basis for calculating the respondents' scores. In this example, the total weighting points for the script is 50. When the respondent answers the questions, the system calculates a score for each question, and totals those scores when the script is complete. The system then divides the respondent's total points by the total number of points in the script to determine the script score. For example, if the respondent received 38 points, the system performs this calculation to determine the respondent's script score: 38÷50=.76. Therefore, the respondent's score is 76 percent, or 76. If this score is greater than or equal to the lead or opportunity threshold, the respondent is considered qualified.
3.5.1.3 Answers
After you create questions, you must enter possible answers for each question. When attempting to qualify a lead or opportunity, the sales representatives can view the possible answers for each question that they ask. You can enter a sequence number for each answer, which controls the order in which the answers appear.
You can enter weighting percentages for each answer that you create. The weighting percentage is the percentage of the weighting points that are added to the qualification score when the answer is chosen. The system multiplies the answer's weighting percentage by the weighting points associated with the question to determine the number of points towards the final score. The system then adds up the totals for all of the questions to determine whether the lead or opportunity meets the qualification thresholds.
For example, if a question has 100 weighting points, and you assign a weighting percentage of 100 to an answer, if that answer is selected, 100 points are counted towards the final score. If the weighting percentage associated with the chosen answer is 20 percent, then 20 points are added to the qualification score.
The weighting percentages associated with the answers to a single question do not have to equal 100. Instead, they are used to calculate the total number of qualification points that are earned when the answer is selected.
For example, you might ask the question, "Are you in the market to buy mountain bikes right now?" This question has 50 weighting points associated with it. This example illustrates how you might assign weighting percentages to the possible answers:
| Answer | Weighting Percentage | Calculation | Points Toward Final Score |
|---|---|---|---|
| Yes | 100 | 50*1.00=50 | 50 points |
| Maybe | 50 | 50*.50=25 | 25 points |
| No | 10 | 50*.10=5 | 5 points |
3.5.1.4 Qualification Script Example
A sales representative is attempting to qualify a lead. The representative uses a qualification script that has a lead threshold of 60. Therefore, in order for this lead to be considered qualified, the qualification score must be 60 or higher. The script has these three questions:
| Question | Weighting Points | Answers - Weighting Percentage |
|---|---|---|
| Question 1 | 20 Points | Answer A - 100
Answer B - 75 Answer C - 25 |
| Question 2 | 50 Points | Answer A - 100
Answer B - 50 Answer C - 20 |
| Question 3 | 100 Points | Answer A - 100
Answer B - 80 Answer C - 0 |
| Total | 170 Points | 170 points possible |
When the sales representative runs through the script with the lead, these answers are given:
| Question | Answer | Calculation | Points Toward Score |
|---|---|---|---|
| Question 1 (20 points) | Answer B (75 percent) | 20*.75=15 | 15 points |
| Question 2 (50 points) | Answer C (20 percent) | 50*.20=10 | 10 points |
| Question 3 (100 points) | Answer B (80 percent) | 100*.80=80 | 80 points |
This gives the lead a total of 105 weighting points out of the possible 170 weighting points. 105 points is 62 percent of 170 points, giving the lead a qualification score of 62. Because this number is greater than the lead threshold percentage of 60, the lead is considered qualified.
3.5.2 Forms Used to Set Up Script Information
| Form Name | FormID | Navigation | Usage |
|---|---|---|---|
| Search for Qualifications | W90CB040B | Sales Force Automation Setup (G90CA03), Qualifications | Select existing qualifications or access the forms to create new qualifications. |
| Add Qualification | W90CB043B | Click Add on the Search for Qualifications form. | Create a qualification. |
| Manage {Qualification Name} | W90CB040A | Select a qualification on the Search for Qualifications form or click Save and Continue on the Add Qualification form. | Create questions and answers for a qualification. |
3.5.3 Creating Qualifications
Access the Add Qualification form.
After you have created the qualification, you can click Save and Continue to enter questions and answers for the qualification, or you can click Save and Close to exit the program. If you exit the program, you can access the qualification at a later time to enter questions and answers. If you want to enter multiple qualifications at once, you can click Save and Add New.
- Lead Threshold%
-
Enter the percentage score the lead should meet or exceed before being converted. Value entered must be between 0 and 100. This value is a guideline only, and does not deter a lead from being converted to an opportunity.
- Opportunity Threshold%
-
Enter the percentage score the opportunity should meet or exceed before being pursued. This value is used as a guideline only, and does not deter an opportunity from being converted to a quote or sales order. Value entered must be between 0 and 100.
- Inactive
-
Select this option to specify that the script is no longer active. If this option is selected, the script will not appear when you search for active scripts. You can reactivate a script at any time by deselecting this option.
3.5.4 Creating Questions and Answers
Access the Manage {Qualification Name} form.
Figure 3-3 Manage {Qualification Name} form (1 of 2)
Description of ''Figure 3-3 Manage {Qualification Name} form (1 of 2)''
Figure 3-4 Manage {Qualification Name} form (2 of 2)
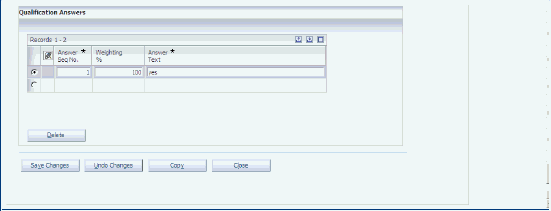
Description of ''Figure 3-4 Manage {Qualification Name} form (2 of 2)''
After you create a question, you can enter answers for that question. To associate answers with the correct question, you must select the question for which you want to enter answers before you enter the answers. You can enter all of the questions first, and then enter answers for each question, or you can enter answers for each question immediately after you enter the question. You can enter questions, save information, exit the script, and return to the script at a later time to enter answers.
- Question Seq No
-
Enter the numeric value that represents the order in which the question appears in the script. The lower the number, the earlier the question appears. For example, a question with a sequence number of 1 appears before a question with a sequence number of 4.
- Question Type
-
Enter the type of question that you are entering. Values are stored in UDC 90CB/QT, and include:
LEAD: Leading
OPN: Open Ended
RETR: Rhetorical
- Weighting Points
-
Enter the total number of points that can be counted towards the qualification score for a lead or opportunity. The system multiplies the weighting points by the weighting percentage that is assigned to the associated answer to determine the actual number of points that are added to the qualification score.
For example, you might assign 100 weighting points to a question. If the lead or opportunity selects an answer with a weighting percentage of 50, the system adds 50 points (.50*100 points) to the qualification score.
- Answer Seq
-
Enter the numeric value that represents the order in which the answers for each question appear. Answers with lower numbers appear at the top of the grid.
- Weighting%
-
Enter the percentage of weighting points that a lead or opportunity gets when they select this answer. The percentage value that you enter in this field is multiplied by the weighting points of the associated question to determine the number of points that are added to the lead or opportunity's qualification score.
For example, if the lead or opportunity selects an answer with a weighting percentage of 75, and the associated question had 100 weighting points, the system adds 75 points (.75*100 points) to the qualification score.