6 Working with Commitments
This chapter contains the following topics:
6.1 Understanding Commitments
A commitment is a reservation for the parts that are needed on a work order. You can define commitments by branch or work center. You can change commitments manually or through a batch program.
When you attach a parts list to a work order header, the system creates commitments for the required quantity of each component. The commitment reserves the material for a particular work order. The type of commitment that the program creates (hard or soft) depends on which commitment option that you specified in the Manufacturing Constants program (P3009).
A hard commitment reserves designated inventory in a specific location for a particular work order. A soft commitment enables you to commit the inventory at the primary location to a work order without designated inventory from a specific location. This inventory can be used for another work order. Soft commitments also enable you to compare the material that is needed for current work orders to available inventory.
The system enables you to use hard commitments or soft commitments in a work order, or you can let the system change the commitment from soft to hard when you process the work order. You can also set up the system to place a soft commitment at the creation of the work order and change it to a hard commitment when you run the Order Processing program (R31410).
If, at any time, the location that appears on the parts list is not the primary location, the system hard-commits that line item. Inventory remains committed until the system records the issues. Then, the system reduces the on-hand quantity and the committed quantities.
The Inventory Issues program (P31113) relieves commitments. When you issue or reverse material that you committed to a secondary location when you entered the parts list line, the system performs a hard commitment for this material. When you partially issue or reverse inventory to a different location, the system relieves the commitment from the old location and commits the remaining material to the new location.
If you use lot processing, the system creates commitments based on the commitment date method, the lot expiration date method, and the lot effectivity date, if applicable, as well as grade or potency ranges for the lot numbers. The parts list for the work order might specify a range of grade or potency values that can be used on the order. The system commits the lot of the grade or potency within the range that you defined for the item. The system can also search for inventory that you need for the order in a certain sequence. For example, you might want to search for inventory with a specific lot number, grade, or potency.
When you commit lot-controlled component quantities at the work center location, the system searches for available quantities in the lots that are available at the work center location and commits quantities from those lots based on the commitment method. When you use more than one lot, the parts list line is split. If more components are needed than are available, the system commits the remaining quantity from the primary location. This process applies only when you do not use the JD Edwards EnterpriseOne Warehouse Management system.
Use this table to identify the processing options available for both the Enter/Change Order (P48013) and Order Processing programs:
6.2 Defining Commitment Rules
This section provides an overview of commitment rules and discusses how to:
-
Define the commitment method for an item.
-
Define the commitment control and type of commitment.
6.2.1 Understanding Commitment Rules
When a parts list is attached to a work order header, either manually or by using the batch program, the system automatically creates commitments for the components unless you set the processing option to bypass inventory commitments.
When you define commitments, you set up the parameters that determine how the commitment is created. If you are using lot control, you can also manage commitments by commitment date method, as well as grade or potency. You repost commitments when you need to clear commitments and reassign quantities to other work orders.
When creating commitments, you can activate a processing option to verify whether substitutes exist for an item. To use substitutes, you must use a hard commitment at the creation of a work order or at pick time.
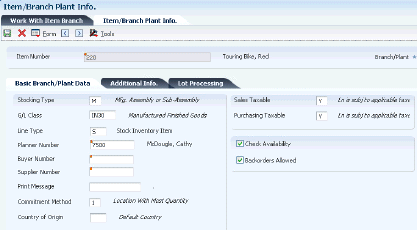
You define the method that the system uses when creating a commitment. Using the Item Branch/Plant program (P41026), you can define the commitment method by location, lot number, or date. If you define commitments by date, you specify the commitment date method, as well as the lot expiration date method, if applicable, on the Lot Processing tab. The system calculates these dates based on the default days information that you define in the Item Master (P4101) and Item Branch/Plant programs and stores them in the Lot Master table (F4108).
You use the Manufacturing Constants program (P3009) to define the commitment control method and type of commitment for the work order. Commitment control determines how the system commits inventory to a work order. For example, commitment control determines whether the system can cross branch boundaries to fill requirements. In addition, you can specify whether the commitment is soft or hard. Soft commitments can become hard commitments in certain circumstances, such as when inventory is relieved.
6.2.2 Forms Used to Define Commitment Rules
| Form Name | Form ID | Navigation | Usage |
|---|---|---|---|
| Item/Branch Plant Info. | W41026A | Inventory Master/Transactions (G4111), Item Branch/Plant
Locate and select an item on the Work With Item Branch form. |
Define the commitment method for an item. |
| Manufacturing Constants Revision | W3009B | Shop Floor Management Setup (G3141), Manufacturing Constants
Locate and select a branch/plant on the Work With Manufacturing Constants form. |
Define the commitment control and type of commitment. |
6.2.3 Defining the Commitment Method for an Item
Access the Item/Branch Plant Info form.
To define the commitment method for the item:
-
On the Item/Branch Plant Info. form, complete the Commitment Method field on the Basic Branch/Plant Data tab.
-
If you define the commitment method by date, select the Lot Processing tab and complete the Commitment Date Method field.
-
If you specify the lot expiration date as the commitment date method, complete the Lot Expiration Date Method field on the Lot Processing tab and click OK.
-
Commitment Method
Enter a code that indicates the method that the system uses to commit lot items from inventory. Codes are:
1: The normal commitment method for inventory. The system commits inventory from the primary location and then from secondary locations.
The system commits inventory from the locations with the most inventory before committing inventory from locations with the least. The system commits backorders to the primary location.
2: The inventory commitment method by lot number. The system commits inventory by lot number, starting with the lowest lot number and committing orders to available lots.
3: The inventory commitment method by lot expiration date. The system commits inventory from the locations with the earliest expiration date first. The system considers only locations with expiration dates greater than or equal to the sales order or parts list requested date.
-
6.2.4 Defining the Commitment Control and Type of Commitment
Access the Manufacturing Constants Revision form.
Figure 6-2 Manufacturing Constants Revision form, Commitment Control tab
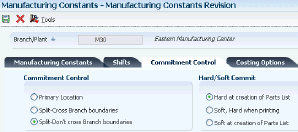
Description of ''Figure 6-2 Manufacturing Constants Revision form, Commitment Control tab''
To define the commitment control and type of commitment:
-
On the Manufacturing Constants Revision form, select the Commitment Control tab and then select an option from the Commitment Control group box
If you select the Primary Location option, the program does not select lots.
If you want to split locations, you have two options. You can either specify commitments throughout different locations within one branch/plant, or specify commitments throughout different locations from different branch/plants.
-
Select an option from the Hard/Soft Commit group box, and then click OK:
If you use substitutes, you must specify a hard commitment.
The first option will make hard commitments when parts list is attached. The second option will make soft commitments when the parts list is attached. These commitments will become hard when the parts list is printed using Work Order Generation (R31410). The last option will create soft commitments when the parts list is attached and will remain soft, until a lot is specified.
6.3 Defining Commitments at a Work Center Location
This section provides an overview of commitments at a work center location and discusses how to:
-
Define the work center in the routing instructions for an item.
-
Define the location at the work center.
-
Assign a component to a routing operation.
6.3.1 Understanding Commitments at a Work Center Location
In order to commit inventory to be issued to a particular work order, you need to define the values that allow you to make the material available where and when it is needed. For this purpose, you need to specify the work center for the routing instructions, as well as the issue location for the work center. You also specify the operation sequence at which each component is needed. If you work in a process manufacturing environment, you do not have a bill of material. Finally, you need to specify in the Manufacturing Constants program (P3009) which backflush option to use for the branch/plant.
6.3.2 Forms Used to Define Commitments at a Work Center Location
| Form Name | Form ID | Navigation | Usage |
|---|---|---|---|
| Enter Routing Information | W3003B | Daily PDM Discrete (G3011), Enter/Change Routing
Locate and select an item on the Work With Routing Operations form. |
Define the work center in the routing instructions for an item. |
| Work Center Master Revisions | W3006A | Daily PDM Discrete (G3011), Enter/Change Work Center
Locate and select a work center on the Work With Work Centers form. |
Define the location at the work center. |
| Enter Bill of Material Information | W3002A | Daily PDM Discrete (G3011), Enter/Change Bill
Locate and select an item on the Work with Bill of Material form. |
Assign a component to a routing operation. |
6.3.3 Defining the Work Center in the Routing Instruction for an Item
Access the Enter Routing Information form.
Figure 6-3 Enter Routing Information form
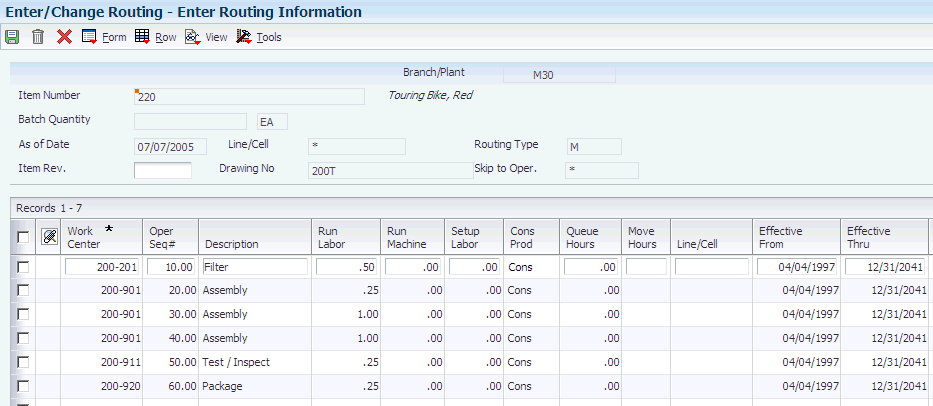
Description of ''Figure 6-3 Enter Routing Information form''
6.3.4 Defining the Location at the Work Center
Access the Work Center Master Revisions form.
Figure 6-4 Work Center Master Revisions form
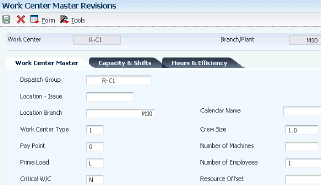
Description of ''Figure 6-4 Work Center Master Revisions form''
6.3.5 Assigning a Component to a Routing Operation
Access the Enter Bill of Material Information form.
Figure 6-5 Enter Bill of Material Information form
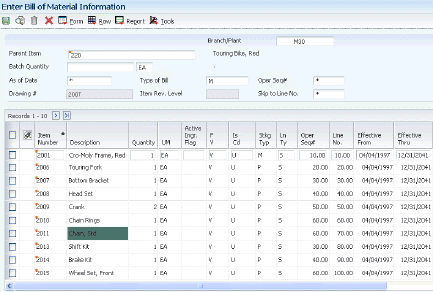
Description of ''Figure 6-5 Enter Bill of Material Information form''
6.4 Managing Commitments for Grade and Potency
This section provides an overview of commitments for grade and potency and discusses how to:
-
Convert units of measure for potent units.
-
Manage commitments for grade- and potency-controlled items.
6.4.1 Understanding Commitments for Grade and Potency
When the system creates commitments for grade- and potency-controlled items, it moves the grade and potency range to the parts list. The range is defined on the Bill of Materials. Only lots that are within the range are eligible for commitments. The system creates the commitments in date sequence.
In this example, the work order quantity required is 800, and the grade range is A01 through A03:
| Level | Location | Expiration Date | Grade | On Hand | Commit |
|---|---|---|---|---|---|
| Primary | .. | N/A | N/A | 0 | 50 |
| Secondary | 9406220000 | 08/31 | A01 | 50 | 50 |
| Secondary | 9406230000 | 08/15 | A02 | 300 | 300 |
| Secondary | 9406240000 | 12/12 | A03 | 400 | 400 |
| Secondary | 9406250000 | 09/01 | A04 | 5 | 0 |
| Secondary | 9406260000 | 09/01 | A05 | 5000 | 0 |
The system commits the quantities using the primary unit of measure. When the specified lots in the range have insufficient quantity to meet all of the commitments, the system commits the remainder to the primary location at standard grade or potency.
6.4.1.1 Conversion of Units of Measure for Potent Units
When you define a unit of measure as a potent unit of measure, and the system creates commitments, the system converts the quantity to the primary unit of measure. For example, assume that the component unit of measure is GP (potent gallons), and the standard potency is 70 percent. Also assume that the parts list requires 500 GP. However, only the equivalent of 470 potent gallons is available. The demand for the remaining 30 potent gallons is committed from the primary location in the primary unit of measure (30 GP/.7 = 43 GA).
This table illustrates the example:
| Level | Location | Potency | On Hand | Potent Units | Commit at 70 percent potency |
|---|---|---|---|---|---|
| Primary | .. | N/A | 0 | 0 | 43 |
| Secondary | 9406220000 | 80 percent | 50 | 40 | 50 |
| Secondary | 9406230000 | 90 percent | 300 | 270 | 300 |
| Secondary | 9406240000 | 40 percent | 400 | 160 | 400 |
The potency associated with the item in the Lot Master table (F4108) is for conversion purposes only.
A lot that consists of 100 potent units with a potency of 75 percent is the equivalent of 133.3333... physical gallons (100/.75). Companies that store inventory in potent units must know the physical size of the inventory.
|
Important: The system displays a warning message when it changes the standard value for grade or potency on the branch/plant record. Commitments can be brought out of balance if the primary unit of measure for an item is not potent and commitments in a potent unit of measure exist from a sales order or work order. Conversion errors work in both directions. That is, commitments can be out-of-balance by either the potent or the primary unit of measure. You can correct this imbalance by running a repost for the sales order and work order. You should run sales order reports and repost the sales order after you repost the work order. |
To create commitments for potent units, you must set up the correct unit of measure conversions. You set up a unit of measure conversion for potent units so that the system can:
-
Convert potent units of measure to physical units of measure
-
Convert physical units of measure to potent units of measure
The conversion for potent units is always 1 potent unit = 1 physical unit. For example, 1 LP = 1 LT and 1 GP = 1 GA.
6.4.2 Prerequisite
Set up potent units in UDC 00/UM (Units of Measure).
6.4.3 Forms Used to Manage Commitments for Grade and Potency
| Form Name | Form ID | Navigation | Usage |
|---|---|---|---|
| Standard Units of Measure Revisions | W41003B | Inventory Setup (G4141), Standard Units of Measure
Click Add on the Work With Standard Units of Measure form. |
Convert units of measure for potent units. |
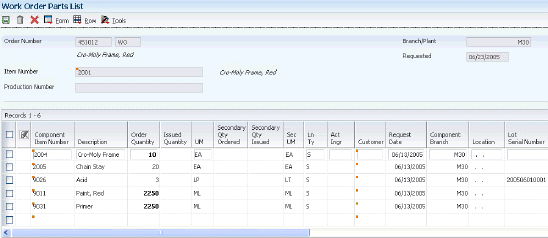
| Work Order Parts List | W3111A | Daily Order Preparation - Discrete (G3111), Enter/Change Order
Locate an order on the Work With Manufacturing Work Orders form, and select Parts List from the Row menu. |
Manage commitments for grade- and potency-controlled items. |
6.4.4 Converting Units of Measure for Potent Units
Access the Standard Units of Measure Revisions form.
Figure 6-6 Standard Units of Measure Revisions form

Description of ''Figure 6-6 Standard Units of Measure Revisions form''
6.4.5 Managing Commitments for Grade- and Potency-Controlled Items
6.5 Reposting Commitments
This section provides an overview of the Repost Open Work Orders program, lists prerequisites, and discusses how to:
-
Run the Repost Open Work Orders program.
-
Set processing options for the Repost Work Orders program.
6.5.1 Understanding the Repost Open Work Orders Program
After you set up commitments, run the Repost Open Quantities program (R3190) to perform these tasks:
-
Perform a net change on all values for the quantity in the Item Location File table (F41021) and recalculate the commitments.
-
Repost the quantity value in the Item Location File table (F41021) for the parent item. The system uses the information from the Work Order Master File table (F4801) and this calculation:
quantity ordered - (quantity completed + quantity scrapped)
-
Repost the quantity-committed value for components in the Item Location File table (F41021) for the location specified on the work order parts list for the item. The system uses the information from the Work Order Parts List table (F3111) and this calculation:
quantity required - quantity issued
Processing options enable you to repost only those work orders that are below a certain status.
The system does not repost bulk items and lines that do not have an inventory interface.
6.5.2 Prerequisites
Before you complete the tasks in this section:
-
Verify that the Item Location File table (F41021) is not in use.
-
Indicate whether you want inventory hard- or soft-committed at each branch.
6.5.3 Running the Repost Open Work Orders Program
From the Shop Floor Management Advanced menu (G3131), select Repost Open Quantities.
6.5.4 Setting Processing Options for Repost Open Work Orders (R3190)
Processing options enable you to specify the default processing for programs and reports.
For reports, processing options enable you to specify the information that appears on reports. For example, you set a processing option to include the fiscal year or the number of aging days on a report.
6.5.4.1 Process
- Work Order Status Code
-
Specify the work order status code. Values are:
1: Enter the work order status for the update.
The system will repost any order with a status less than the input status, and clear commitments for any order with a status equal to or greater than the input status.
Blank: The system uses status 99 as the default value.
