4 Creating Work Orders
This chapter contains the following topics:
4.1 Understanding Work Order Creation
You create a work order to formally request work that is to be performed, such as maintenance. By creating a work order, you also communicate important information about a task or a short-term project to others who are involved.
The Work Orders system creates a master record for every work order that you enter into the system. The master record consists of basic information that defines the work order, such as the work order number and description. You can also enter additional descriptive information to further identify the work order, such as special instructions.
You can create a new work order by entering all of the necessary task information on the Enter Work Orders form. You can also create a work order by copying the information from an existing work order for those tasks that are similar to other tasks that you perform. In addition, you can create a project hierarchy of work orders for those tasks that are related to each other and that are subordinate to a larger task.
Work orders communicate information about unique tasks to others who are involved. When you enter a work order, the system creates a master record of that work order. A master record exists for every work order that you enter in the Work Orders system. The master record includes basic information, such as:
-
Work order number.
-
Brief description.
-
Category codes.
-
Charge-to business unit.
-
Type of work order.
-
Status of work order.
The system stores master records in the Work Order Master File table (F4801). You use the Scheduling Workbench program (P48201) to search the Work Order Master table.
You can use processing options to have the system enter default information, such as type, priority, status, and so on, in a new work order. You can also use processing options to assign the manager and supervisor, if you defined them when you set up the system. You can assign record types to a work order and then enter descriptive information into each record type to note the specific details about the task. For example, you might want to include special instructions and the parts and tools that are needed to complete the task.
To further define the work orders in the system, you can enter supplemental data. Supplemental data is useful for reporting and tracking work order details that are not included in the record types.
You can also use a parent work order to create a work order. After entering a parent work order number in the Parent Number field on the Enter Work Orders form, the system updates any fields without values with the values from the parent work order. When you leave the Parent Number field blank, the system uses the work order number. To use a work order as a parent work order, leave its Parent Number field blank.
|
Note: You cannot delete a work order if it has any account ledger transactions associated with it or if it is used as a parent work order. You can, however, inactivate a work order by entering a code in the Subledger Inactive field on the Enter Work Orders form. A value other than blank indicates that the work order is inactive. |
Depending on the complexity of the organization, you can create work orders that include only the most basic information required by the system, such as the description and business unit. Alternatively, you can include a variety of explanations, scheduling dates, and control codes. You can also enter budgeting information to help you track costs and resources.
You can assign up to 10 category codes to a work order. Use category codes to further identify and organize work orders that have similar characteristics. This is especially useful for analyzing and reporting on work order information from a variety of perspectives, such as shop, division, and type of work. You can also analyze work order costs according to category codes. The system provides several predefined category codes. You can use these or customize the category codes. You define all values for each category code.
In addition, you can assign responsible people, such as an originator and a supervisor, to a work order. You can also specify a search cross-reference that the system uses to search for work orders. For example, if you enter an equipment number on the work order, the system enters the parent equipment number in the Search Cross-Reference field.
|
Note: Many of the fields on the Enter Work Orders form are optional, but information in these fields is particularly useful when you search for a work order or group of work orders. You can use processing options to direct the system to enter default values in several fields, such as address book fields, category code fields, approval type fields, and manager and supervisor fields, if you defined them during system setup. |
You can also retrieve numerous default values from a parent work order, if you specify one. For example, you can use values from a parent work order to provide default values for these fields:
-
Work Order Type
-
Start Date
-
Planned Completion Date
Note:
Before you create work orders, you must define the chart of accounts for the charge-to business unit information.
4.1.1 Common Fields Used in this Chapter
- Asset Number
-
Enter an identification code that represents an asset. You enter the identification code in one of these formats:
1: Asset number (a computer-assigned, 8-digit, numeric control number).
2: Unit number (a 12-character alphanumeric field).
3: Serial number (a 25-character alphanumeric field).
Every asset has an asset number. You can use unit number and serial number to further identify assets. If this is a data entry field, the first character that you enter indicates whether you are entering the primary (default) format that is defined for the system or one of the other two formats. A special character (such as / or *) in the first position of this field indicates which asset number format that you are using. You assign special characters to asset number formats on the fixed assets system constants form.
On this form, if you enter an equipment number when you create a work order, the system can assign a default search cross-reference number based on that equipment number.
Processing options enable you to determine whether the system assigns the equipment's immediate parent number, its top-level parent number, or a value from the parent work order number as the search cross-reference.
- Complete Date
-
Enter the date that the work order or engineering change order is completed or canceled.
- Customer
-
Enter a number that identifies an entry in the Address Book system, such as employee, applicant, participant, customer, supplier, tenant, or location. Depending on how you set processing options, you might be required to enter a customer number.
- Manager
-
Enter the address book number of a manager or planner.
Note:
A processing option for some forms allows you to enter a default value for this field based on values for category codes 1 (Phase), 2, and 3. You set up the default values on the Default Managers and Supervisors form. After you set up the default values and the processing option, the default information appears automatically on any work orders that you create if the category code criterion is met. You can either accept or override the default value. - Parent Number
-
Enter a number that identifies the parent work order. The default value for the parent number is the work order number. You can use this number to:
-
Enter default values for new work orders, such as type, priority, status, and manager.
-
Group work orders for project setup and reporting.
You can copy information from a parent work order to create a new work order.
On the new work order, you must complete some fields for unique information. If you leave the remaining fields blank, the system completes them with values from the parent work order.
-
- Parent W.O. No (parent work order number)
-
Enter a number that identifies the parent work order. You can use this number to:
-
Enter default values for new work orders, such as type, priority, status, and manager.
-
Group work orders for project setup and reporting.
-
- Phase
-
Enter a user-defined code (00/W1) that indicates the current stage or phase of development for a work order. You can assign a work order to only one phase code at a time.
Note:
Certain forms contain a processing option that allows you to enter a default value for this field. If you enter a default value on a form for which you have set this processing option, the system displays the value in the appropriate fields on any work orders that you create. The system also displays the value on the Project Setup form. You can either accept or override the default value.Category code 1 is a four-character category code that appears on all work order reports and most forms that are associated with work orders.
- Start Date
-
Enter a start date for the work order or engineering change order. You can enter the date manually or let the system enter it for you. If the work order is associated with a parent work order, the system enters the start date from the parent work order. If there is no associated parent work order, the system enters the system date.
- Subsidiary
-
Enter a subset of an object account. Subsidiary accounts include detailed records of the accounting activity for an object account.
Note:
If you are using a flexible chart of accounts and the object account is set to six digits, you must use all six digits. For example, entering 000456 is not the same as entering 456 because, if you enter 456, the system enters three blank spaces to fill a six-digit object. - Supervisor
-
Enter the address book number of the supervisor. You can enter address book numbers to track originator and supervisor information for a work order. You can set up the system to automatically enter the address book number of the supervisor for work orders.
For some programs, you can use a processing option to specify a default value for this field based on values for category codes (phases) 1, 2, and 3. You can set up the default values in the Work with Work Order Default Codes program (P48001). The system automatically displays the information that you specify on all work orders that you create, provided that you meet the category code criterion. You can override the default value.
4.2 Defining Work Orders
This section discusses how to:
-
Enter basic work order information.
-
Enter record type descriptions.
-
Set processing options for Work With Work Orders (P48201).
-
Add supplemental data.
-
Set processing options for Supplemental Data (P00092).
-
Review supplemental data by data type.
-
Set processing options for Inquiry by Data Type (P480210).
-
Review supplemental data by work order.
-
Set processing options for Work With Supplemental Data (P480200).
4.2.1 Forms Used to Define Work Orders
| Form Name | FormID | Navigation | Usage |
|---|---|---|---|
| Work With Work Orders | W48201F | Work Order Processing (G4811), Work Order Entry | Access work orders, or forms to enter work orders. |
| Enter Work Orders | W48014A | On the Work With Work Orders form, click Add. | Enter basic work order information. |
| Work With Work Order Record Types | W48217B | On the Work With Work Orders form, find and select a work order. From the Row menu, select Supplemental and then Record Types. | Enter record type descriptions for work orders.
Note: If you access this program from Service Management as a CRM user or from Capital Asset Management, the Equipment Number field might instead appear as Serial Number or Unit Number, depending on which setting you select in the Equipment Constants program (P001012). |
| Data Type Revisions | W00091D | Work Order Supplemental Data (G4813), Data Entry
On Work With Supplemental Data, select a record and select Data Type Revision from the Row menu. |
Add supplemental data. |
| Work With Supplemental Data | W480200F | Work Order Supplemental Data (G4813), Inquiry by Order
On Work With Supplemental Data, enter an order number and click Find. |
Review supplemental data by work order. |
| Work Order Data Revisions | W480210C | Work Order Supplemental Data (G4813), Inquiry by Data Type
On Work With Inquiry By Data Type, enter a data type and click Find. Select a record and click Select. |
Review supplemental data by type. |
4.2.2 Entering Basic Work Order Information
Access the Enter Work Orders form.
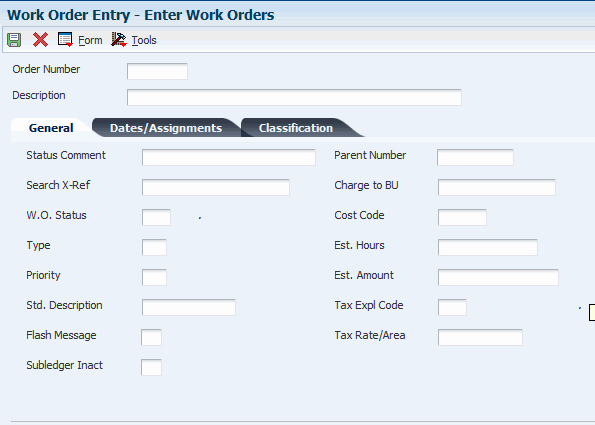
4.2.2.1 General
Select the General tab.
- Charge to BU (charge to business unit)
-
Enter a separate entity within a business for which you want to track costs. For example, a business unit might be a job, project, work center, or branch/plant.
Business unit security can prevent you from locating business units for which you have no authority.
- Status Comment
-
Enter a brief description to explain the status of the work order.
- Search X-Ref (search cross-reference)
-
Enter a cross-reference or secondary reference number. Typically, this is the customer number, supplier number, or job number.
- W.O. Status (work order status)
-
Enter a user-defined code (00/SS) that describes the status of a work order, rate schedule, or engineering change order. Any status change from 90 through 99 triggers the system to automatically update the completion date.
- Type
-
Enter a user-defined code (00/TY) that indicates the classification of a work order or engineering change order.
You can use work order type as a selection criterion for work order approvals.
- Priority
-
Enter a user-defined code (00/PR) that indicates the relative priority of a work order or engineering change order in relation to other orders.
A processing option for some forms lets you enter a default value for this field. The value then appears automatically in the appropriate fields on any work order that you create on those forms and on the Project Setup form. You can either accept or override the default value.
- Std. Description (standard description)
-
Enter a generic rates and message code (48/SN) that is assigned to a standard note, message, or general narrative explanation. You can use the Standard Description user-defined code to assign standard procedures or instructions to multiple work orders. You set up codes for this field on the Generic Message/Rate Types table (F00191).
- Flash Message
-
Enter a user-defined code (00/WM) that indicates a change in the status of a work order. The system indicates a changed work order with an asterisk in the appropriate report or inquiry form field. The system highlights the flash message in the Description field of the work order.
- Subledger Inact (subledger inactive)
-
Select an option that indicates whether a specific subledger is inactive. Examples of inactive subledgers are jobs that are closed, employees who have been terminated, or assets that have been disposed. Select this option to indicate that a subledger is inactive. If a subledger becomes active again, clear this option. If you want to use subledger information in the tables for reports, but you want to prevent transactions from posting to the record in the Account Balances table (F0902), select this option. Values are:
Off: Subledger active.
On: Subledger inactive.
You cannot delete a work order if it has any account ledger transactions associated with it or is used as a parent work order. You can, however, make a work order inactive by entering a code in the Subledger Inactive field. A value other than blank in this field indicates that the work order is inactive.
- Cost Code
-
Enter a value that is a subset of an object account. Subsidiary accounts include detailed records of the accounting activity for an object account.
Note:
If you are using a flexible chart of accounts and the object account is set to six digits, you must use all six digits. For example, entering 000456 is not the same as entering 456 because, if you enter 456, the system enters three blank spaces to fill a six-digit object. - Est. Hours (estimated hours)
-
Enter the estimated hours that are budgeted for this work order.
- Est. Amount (estimated amount)
-
Enter the estimated monetary amount that is budgeted for this work order.
- Tax Expl Code (tax explanation code)
-
Enter a user-defined code (00/EX) that controls how a tax is assessed and distributed to the GL revenue and expense accounts.
- Tax Rate/Area
-
Enter a code that identifies a tax or geographic area that has common tax rates and tax distribution. You must define the tax/rate area to include the tax authorities (for example, state, county, city, rapid transit district, province, and so on) and their rates. In order for the codes to be valid, you must set them up in the Tax Rate/Area file.
4.2.2.2 Date/Assignments
Select the Date/Assignments tab.
- Planned Comp (planned completion)
-
Enter the date that the work order or engineering change order is planned to be completed.
- Date Assigned
-
Enter the date that the person responsible for the work order receives the work order.
- Transaction
-
Enter the date that a specific order was entered into the system. The default value for this date is the system date.
- Originator
-
Enter the address book number of the person who entered the work order. The system verifies this number against the Address Book. If you leave the Originator field blank, the system enters an originator based on the user's address book number.
4.2.2.3 Classification
Select the Classification tab.
- Category 02
-
Enter a user-defined code (00/W2) that indicates the type or category of a work order.
Note:
A processing option for some forms lets you enter a default value for this field. The system enters the default value automatically in the appropriate fields on any work orders that you create on those forms and on the Project Setup form. You can either accept or override the default value. - Category 03
-
Enter a user-defined code (00/W3) that indicates the type or category of the work order.
- Category 04
-
Enter a user-defined code (00/W4) that indicates the type or category of the work order.
- Category 05
-
Enter a user-defined code (00/W5) that indicates the type or category of the work order.
- Status
-
Enter a user-defined code (00/W6) that indicates the status of the work order.
- Service Type
-
Enter a user-defined code (00/W7) that indicates the service type for the work order.
- Skill Type
-
Enter a user-defined code (00/W8) that indicates the type or category of the work order.
- Experience Level
-
Enter a user-defined code (00/W9) that indicates the type or category of the work order.
- Category 10
-
Enter a user-defined code (00/W0) that indicates the type or category of the work order.
4.2.3 Entering Record Type Descriptions
Access the Work With Work Order Record Types form.
Figure 4-2 Work With Work Order Record Types form
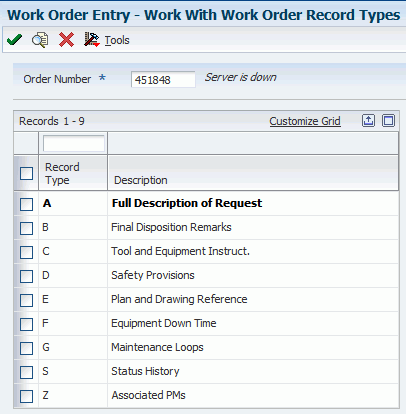
Description of "Figure 4-2 Work With Work Order Record Types form"
Record types contain specific details about work order tasks. After you enter the basic work order information, you can enter these details in the record types that are assigned to the work order. For example, you might want to include an extended description of the task in record type A, special instructions in record type B, the parts and tools that are needed in record type C, and so on.
Depending on the type of information that you need to include, you can enter text in two formats. You define the format for each record type when you set up work orders. The formats are:
-
Description only.
-
Description with three columns.
You can also copy descriptive information from another work order.
4.2.4 Setting Processing Options for Work With Work Orders (P48201)
Use these processing options to supply the default values for the Work With Work Orders program.
4.2.4.1 Defaults
These processing options control default values that are used for some of the filter fields on the Work With Work Orders form.
- 1. From Status Code W.O. (1. from status code work order)
-
Specify the beginning status code for a range of work orders. The system uses this default when searching for work orders. Enter a value from UDC 00/SS (Work Order Status).
- 2. Thru Status Code W.O. (2. thru status code work order)
-
Specify the ending status code for a range of work orders. The system uses this default when searching for work orders. Enter a value from UDC 00/SS (Work Order Status).
- 3. Type - W.O. (3. type - work order)
-
Specify the classification of work orders or engineering change orders. The system uses this default when searching for work orders. Enter a value from UDC 00/TY (Work Order/ECO Type).
- 4. Document Type
-
Specify the document type. The system uses this default when searching for work orders. Enter a value from UDC 00/DT (Document Type - All Documents).
- 5. Job or Business Unit
-
Specify the business unit or job that the system uses to search for work orders.
- 6. Models
-
Specify whether the system displays model work orders. Values are:
Blank: Do not display model work orders.
1: Display model work orders.
- 7. Originator
-
Specify the originator of the work order that the system uses to search for work orders.
- 8. Customer
-
Specify the customer of the work order that the system uses to search for work orders.
- 9. Manager/Crew
-
Specify the manager of the work order that the system uses to search for work orders.
- 10. Supervisor
-
Specify the supervisor of the work order that the system uses to search for work orders.
4.2.4.2 Categories
These processing options control which values are used for the category codes.
- 1. Phase
-
Specify the current stage or phase of development for work orders that the system uses to search for work orders. Enter a value from UDC 00/W1 (Phase/System Codes).
- 2 – 20. Category Code 02 through 20
-
Specify the type or category of work orders that the system uses to search for work orders. Enter a value from these UDCs:
-
Category Code 02: 00/W2
-
Category Code 03: 00/W3
-
Category Code 04: 00/W4
-
Category Code 05: 00/W5
-
Category Code 06: 00/W6
-
Category Code 07: 00/W7
-
Category Code 08: 00/W8
-
Category Code 09: 00/W9
-
Category Code 10: 00/W0
-
Category Code 11: 00/X1
-
Category Code 12: 00/X2
-
Category Code 13: 00/X3
-
Category Code 14: 00/X4
-
Category Code 15: 00/X5
-
Category Code 16: 00/X6
-
Category Code 17: 00/X7
-
Category Code 18: 00/X8
-
Category Code 19: 00/X9
-
Category Code 20: 00/X0
-
4.2.4.3 Versions
These processing options control which version the system uses when programs are called.
- 1. Work Order Print (R17714) Version
-
Specify the version of the Work Order Print program (R17714) that the system uses when printing work orders. If you leave this processing option blank, the system uses the XJDE0001 version.
- 2. Equipment Work Order Print (R48425) Version
-
Specify which version of the Maintenance Work Order Report program (R48425) that the system uses to print work orders. If you leave this processing option blank, the system uses the XJDE0001 version.
- 3. Project Work Order Print (R48415) Version
-
Specify the version of the Work Order Print program (R48415) to use when printing project work orders. If you leave this processing option blank, the system uses the XJDE0001 version.
- 4. Tenant Work Order Print (R15448) Version
-
Specify the version of the Tenant Work Order Print program (R15448) that the system uses when printing tenant work orders. If you leave this processing option blank, the system uses the XJDE0001 version.
- 5. Completed PM (P12071) Version
-
Specify the version of the Preventive Maintenance Backlog program (P12071) that the system uses. If you leave this processing option blank, the system uses the ZJDE0001 version.
- 6. Parts Detail (P17730) Version
-
Specify the version of the Work Order Parts Detail program (P17730) that the system uses. If you leave this processing option blank, the system uses the ZJDE0001 version.
- 7. Labor Detail (P17732) Version
-
Specify the version that the system uses for the Work Order Labor Detail program (P17732). If you leave this processing option blank, the system uses the ZJDE0001 version.
- 8. Inventory Issues (P31113) Version
-
Specify the version of the Work Order Inventory Issues program (P31113) that the system uses. If you leave this processing option blank, the system uses the ZJDE0002 version.
- 9. Time Entry (P311221) Version (S/WM Only)
-
Specify the version of the Work Order Time Entry program (P311221) that the system uses. If you leave this processing option blank, the system uses the ZJDE0001 version.
- 10. Work With Returned Material Authorization (P40051) Version (S/WM Only)
-
Specify the version of the Work With Return Material Authorization program (P40051) that the system uses. If you leave this processing option blank, the system uses the ZJDE0001 version.
- 11. Open Purchase Order (P4310) Version
-
Specify the version of the Purchase Orders program (P4310) that the system uses. If you leave this processing option blank, the system uses the ZJDE0011 version.
- 12. Returned Material Authorization Revisions (P400511) Version (S/WM Only)
-
Specify the version of the Return Material Authorization Revisions program (P400511) that the system uses. If you leave this processing option blank, the system uses the ZJDE0001 version.
- 13. On Line Work Order Quote (P17717) Version (S/WM Only)
-
Specify the version of the On Line Work Order Quote Inquiry program (P17717) that the system uses. If you leave this processing option blank, the system uses the ZJDE0001 version.
- 14. Time Entry By Employee (P051121) Version
-
Specify the version of Speed Time Entry (P051121) that the system uses. If you leave this processing option blank, the system uses the ZJDE0001 version.
- 15. Work with Failure Analysis (P17766) Version
-
Specify the version of the Work with Failure Analysis program (P17766) that the system uses. If you leave this processing option blank, the system uses the ZJDE0001 version.
- 16. Failure Analysis (P17767) Version
-
Specify the version of the Failure Analysis program (P17767) that the system uses. If you leave this processing option blank, the system uses the ZJDE0001 version.
- 17. Supplier Recovery Generation (R1776) Version
-
Specify the version of the Create Supplier Recovery Claims program (R1776) that you want to use to generate a supplier recovery claim from a work order. If you leave this processing option blank, the system uses the XJDE0001 version.
- 18. Status History (P1307) Version
-
Specify which version that the system uses for the Status History program (P1307). If you leave this processing option blank, the system uses the ZJDE0001 version.
- 19. Work with Equipment Work Orders (P13220) Version
-
Specify the version of the Work with Equipment Work Orders program (P13220) that you want to use. If you leave this processing option blank, the system uses the ZJDE0001 version.
- 20. Work Order Cost (P48211) Version
-
Specify the version of the Work Order Cost program (P48211) that you want to use when you review the cost of an order. If you leave this processing option blank, the system uses the ZJDE0001 version.
- 21. Resource Assignment (P48331) Version
-
Specify the version that the system uses for the Resource Assignment program (P48331). If you leave this processing option blank, the system uses the ZJDE0001 version.
- 22. Quick Customer/Contact Add (P01015) Version
-
Specify the version of the Quick Customer/Contact Add program (P01015) that you want to use. If you leave this processing option blank, the system uses the ZJDE0001 version.
- 23. Equipment Search/Select (P17012S) Version
-
Specify the version to use for the Equipment Search/Select application (P17012S). If this processing option is left blank, the system uses version ZJDE0001.
- 24. Work Order Mass Update (P48022) Version
-
Specify the version of the Search for Work Orders program (P48022) to use. You must access the Search for Work Orders program before you can access the Work Order Mass Update program (P48022).
If you leave this processing option blank, the system uses a default value based on the value that you enter in the Work Order Entry Program processing option on the WO Entry tab. If you enter 1 in the Work Order Entry Program processing option, the system uses version ZJDE0001 of the P48022 program. If you enter 2 in the processing option, no version is used because it is not applicable. If you enter 3 in the processing the system uses version ZJDE0003 of the P48022 program.
4.2.4.4 WO Entry
These processing options control which work order entry program and version that the system calls from the Work With Work Orders program.
- 1. Work Order Entry Program
-
Specify which program the system uses for work order entry and printing when you create or select a work order. Values are:
1: Work Order Revisions (P17714).
2: Project Task Details (P48014).
3: Tenant Work Order Entry (P15248).
- 2. Work Order Entry Version
-
Specify the version for the selected work order entry program. If you leave this processing option blank, the system uses the ZJDE0001 version.
4.2.4.5 Process
These processing options control whether the Priority Code field is highlighted and whether self-service functionality is used.
- 1. Priority
-
Specify whether the system applies a contrasting color to the Priority field within the detail area. Values are:
Blank: Do not apply a contrasting color to the Priority field.
1: Apply a contrasting color to the Priority field.
Note:
Colors for the Priority field are hard-coded by the special handling field in UDC 00/PR (Work Order Priority). - 2. Customer Self-Service Functionality
-
Specify whether the system activates customer self-service functionality. Values are:
Blank: Do not activate customer self-service functionality.
1: Activate customer self-service functionality for Java and HTML.
2: Activate customer self-service functionality for Windows.
4.2.5 Adding Supplemental Data
Access the Work with Supplemental Data form.
You can enter supplemental data to further define the work orders in the system. Supplemental data is useful for reporting and tracking work order details that are not included in the record types, such as a data type for safety procedures. You must set up the supplemental data types for the work orders in the system.
You can use these formats when you define supplemental data for work orders:
| Code Type | Description |
|---|---|
| C (Code)
XE Supplemental data: code format Code format: supplemental data |
You can define column titles and enter information, such as dates and amounts, in the columns. |
| N (Narrative)
XE Supplemental data: narrative format Narrative format: supplemental data |
You can enter free-form text, such as notes and memos. You can attach narrative information to code information. |
If the data type is in Narrative format, type the narrative text, such as safety procedures, and then click Save. If the data type is in Code format, on the General Description Entry form, complete any of the fields, as necessary, and then click OK. For Narrative data types, on Media Object Viewer, click the Text button.
- WO.Number (work order number)
-
Specify one of the numeric keys to the Generic Supplemental Database. You can select the key from a list of supported data items, such as address number, account ID, asset ID, item number, and so on.
4.2.6 Setting Processing Options for Supplemental Data (P00092)
Use these processing options to supply the default values for the Supplemental Data program.
4.2.6.1 Processing
These processing options specify the values for supplemental database codes and ending effective dates.
- 1. Select the Supplemental Database Code for the system you would like to create a central information index for.
-
Enter a user-defined code (00/SD) that sets up databases for groups of related supplemental data types. This code differentiates the supplemental data types for various systems. For example, the Employee (E) supplemental database contains data types that you use to track additional employee information, such as education and job skills.
- 2. Enter a '1' if the system should not assign an ending effective date when the field is left blank.
-
Specify whether the system assigns an ending effective date.
4.2.7 Reviewing Supplemental Data by Type
Access the Work Order Data Revisions form.
Figure 4-3 Work Order Data Revisions form
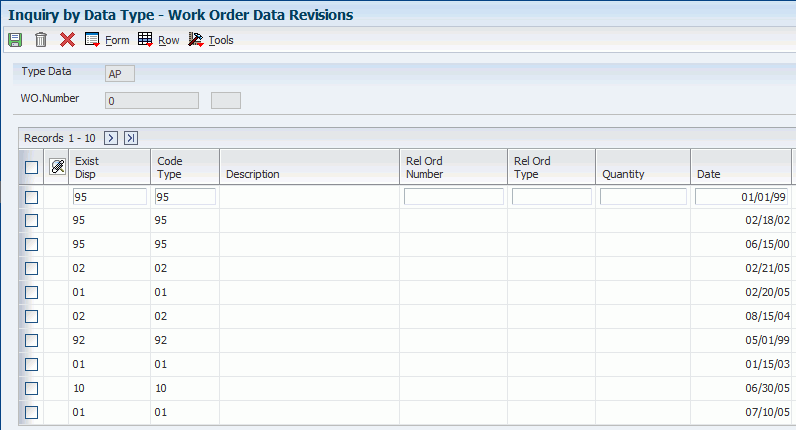
Description of "Figure 4-3 Work Order Data Revisions form"
After you enter supplemental data, you can use these formats to review and revise the information:
| Review Type | Description |
|---|---|
| By data type | You can review additional information based on a supplemental data type. For example, if you set up a data type for budget estimates, you can review a list of all work orders that have been assigned this data type. |
| By work order | You can review additional information based on work order numbers. This process enables you to review all of the supplemental data for a work order. |
4.2.8 Setting Processing Options for Inquiry by Data Type (P480210)
Use these processing options to supply default values for the Inquiry by Data Type program.
4.2.8.1 Display options
These processing options specify display options for supplemental data.
- 1. Enter the Work Order Data Base. Only Data Types with this Data Base can be displayed on the screen. Leave blank to default Data Base E (Engineering Change Orders).
-
Enter a user-defined code (00/SD) that sets up databases for groups of related supplemental data types. This code differentiates the supplemental data types for various systems. For example, the Employee (E) supplemental database contains data types that you use to track additional employee information, such as education and job skills.
- 2. Enter the Date Type within the Data Base above to default on the screen. If left blank, no Data Type will be defaulted.
-
Enter a code that you assign to supplemental data so that you can group data by categories. Values include:
A: Approval steps
B: Requisition requirements
C: Interview process
N: Requisition notes
4.2.9 Reviewing Supplemental Data by Work Order
Access the Work With Supplemental Data form.
Figure 4-4 Work With Supplemental Data form
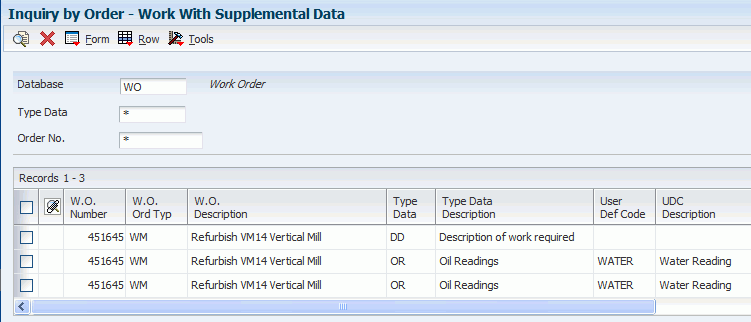
Description of "Figure 4-4 Work With Supplemental Data form"
To view additional information, select a record in the detail area, and then select the appropriate option from the Row menu.
4.2.10 Setting Processing Options for Work With Supplemental Data (P480200)
Use these processing options to supply default values for the Work With Supplemental Data program.
4.2.10.1 Defaults
- 1. Enter a Supplemental Database Code. Only Data Types with this Database Code will be displayed. If left blank, the Engineering Change Orders data types (Database "ECO") will display. Supplemental Database Code.
-
Enter a user-defined code (00/SD) that sets up databases for groups of related supplemental data types. This code differentiates the supplemental data types for various systems. For example, the Employee (E) supplemental database contains data types that you use to track additional employee information, such as education and job skills.
4.2.10.2 Defaults (Cont.)
- 2. Enter Type Data Work Order code. This is the user defined code 00, type WT, which indicates the type of data being entered into the supplemental database. Examples are PO for Pending or DT for Details. Type Data.
-
Enter a user-defined code (00/WT) that indicates the type of data being entered within the supplemental database. The code is often an abbreviation for the data that it represents. For example, EC might represent engineering change.
4.3 Copying Parent Work Orders
This section provides an overview of work order copying and discusses how to:
-
Copy work orders.
-
Update copied work orders.
4.3.1 Understanding Work Order Copying
You can use a parent work order to quickly create a new work order. On the new work order, you must complete the Parent Number field and those fields that require unique information. If you leave the remaining fields blank, the system completes them with values from the parent work order.
For example, you might need to perform maintenance on a machine that is similar to the maintenance that you performed on another machine. You can assign the previous machine's work order as the parent of the new work order. The system automatically enters the appropriate information from the parent work order into the new work order.
You can also use the Copy button on Work With Work Orders form to copy parent work orders.
When you copy an existing work order, the system assigns a unique number to the new work order. Otherwise, this information remains unchanged:
-
All information from the Work Order Details form.
-
Parts list.
-
Labor routing instructions.
-
Record types.
You can also use a parent work order as the basis for creating a work order. The system uses the information stored in the master record for the parent work order to automatically enter the basic work order information, category codes, and record type information into the new work order. Use this method when you must group work orders that share information that is used for reporting and cost accounts.
|
Note: Ensure that the processing option selection for the Work Order Entry program (P48012) is set to the program that you want to call for the purpose of copying a work order. |
4.3.2 Forms Used to Copy Parent Work Orders
| Form Name | FormID | Navigation | Usage |
|---|---|---|---|
| Work With Work Orders | W48201F | Work Order Processing (G4811), Scheduling Workbench | Update copied work orders or access work orders to copy. |
| Enter Work Orders | W48014A | On the Work With Work Orders form, find and select the parent work order. Then click the Copy button.
Alternatively, to copy a work order as well as the parts and labor lines, select Copy WO Details (copy work order details) from the Row menu. |
Copy work orders, or copy work orders as well as their corresponding parts and labor lines, from a parent work order to a new work order. |
4.3.3 Copying Work Orders
Access the Enter Work Orders form.
Complete any fields that must contain unique information. Leave the remaining fields blank so that the system can complete them with values from the parent work order.
If you click the Copy button, the system provides default information from the parent work order for those fields that you left blank.
If you select the WO Details row exit, the system also copies the parts list, labor detail, and record types from the original work order to the new work order.
After defining the work order, click Cancel to access the Work With Work Orders form, where you can update the new work order.
4.3.4 Updating Copied Work Orders
Access the Work With Work Orders form.
Locate the new work order that you created by copying a work order. The work order is identical to the one that you copied, except that it has a unique parent order number. You can revise any of the fields that contain information from the parent work order and enter any additional information, such as category codes and record types.
4.4 Creating Work Orders for a Project
This section provides an overview of project work orders and discusses how to:
-
Create project work orders.
-
Set processing options for Project Setup (P48015).
4.4.1 Understanding Project Work Orders
For a group of maintenance tasks that are interrelated and subordinate to a larger task, such as a plant shutdown or the retooling of a manufacturing line, you can combine the tasks into a project. Setting up a project is especially useful when you must monitor the day-to-day details of a project within the context of the project as a whole.
Creating work orders for a project is similar to creating work orders with parent information. However, when you use the Project Setup program (P48015) to create the work orders, you can create several work orders at the same time and group them into a hierarchy that is subordinate to an existing parent work order. The parent work order represents the project, and each work order that is assigned to the parent represents a task in the project.
For each work order in the project, the system automatically enters the basic work order information, category codes, and record type information from the parent work order. After you create the project hierarchy, you can enter additional information that is specific to each work order.
Use processing options to specify which work order detail form appears when you want to enter additional work order information. You can then enter additional information about each work order, such as status comments or an extended description of the task.
4.4.2 Form Used to Create Work Orders for a Project
| Form Name | FormID | Navigation | Usage |
|---|---|---|---|
| Project Setup | W48015A | Simple Project Management (G4812), Project Setup | Access forms to create project work orders. |
| Enter Work Orders | W48014A | On Project Setup, select a work order, and select WO Detail (work order detail) from the Row menu. | Create project work orders. |
4.4.3 Creating Project Work Orders
Access the Enter Work Orders form.
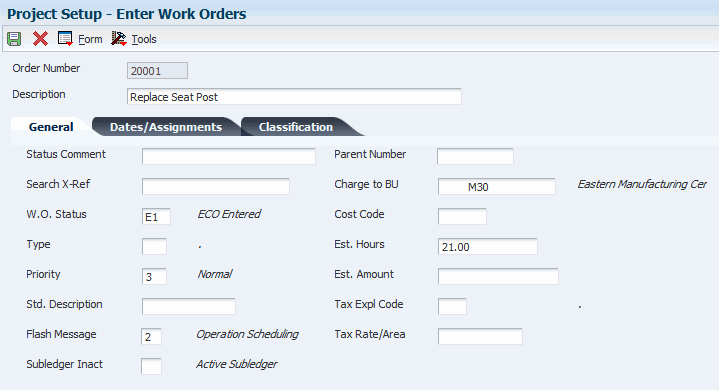
After you complete the fields and then click OK, the system creates the project for the work orders that you entered.
To locate and revise any of the unique information for project work orders, select Project Setup from the menu again, and then, on Project Setup, click Find. You can revise any fields that must contain unique information (rather than default information from the parent work order). You can also enter any additional information, such as category codes and record types, to the work order.
- Job or BU (job or business unit)
-
Enter a value that identifies a separate entity within a business for which you want to track costs. For example, a business unit might be a job, project, work center, or branch/plant.
Business unit security can prevent you from locating business units for which you have no authority.
- Task
-
Enter a user-defined name or remark.
- Hours
-
Enter the estimated hours that are budgeted for this work order.
4.4.4 Setting Processing Options for Project Setup (P48015)
Use these processing options to supply default values for the Project Setup program.
4.4.4.1 Processing
- 1. Enter a '1' to default the manager and supervisor based on the values for category codes 1, 2 or 3.
-
Enter the data selection value. A special facility has been provided to allow selection of multiple specific values. When you enter VALUES in the selection field, a special screen appears that allows you to enter up to 45 specific values. If you specify *VALUES in multiple selections of the original display, you will be prompted for multiple values lists.
Enter the value *BLANKS if you are searching on a blank value. You cannot leave the values field blank to search on blanks as it will default to *ALL.
Enter the value *ZEROS when searching for amounts equal to zero.
The *RANGE keyword displays a special screen that allows you to enter a range of values (for example, from 1 to 50). The first value must be less than the second value. If it is equal or greater than the second value, it will not work.
If you want to select all values for a field, enter *ALL.
- 2. Enter the defaults for the following fields:
-
Enter the default values for these fields:
a. Type.
A user-defined code (00/TY) that indicates the classification of a work order or engineering change order. You can use work order type as a selection criterion for work order approvals.
b. Priority.
A user-defined code (00/PR) that indicates the relative priority of a work order or engineering change order in relation to other orders. A processing option for some forms lets you enter a default value for this field. The value then appears automatically in the appropriate fields on any work order that you create on those forms and on the Project Setup form. You can either accept or override the default value.
c. Beginning Status.
A user-defined code (00/SS) that describes the status of a work order, rate schedule, or engineering change order. Any status change from 90 through 99 triggers the system to automatically update the completion date.
d. Phase (Category Code 1).
A user-defined code (00/W1) that indicates the current stage or phase of development for a work order. You can assign a work order to only one phase code at a time.
Note:
Certain forms contain a processing option that allows you to enter a default value for this field. If you enter a default value on a form for which you have set this processing option, the system displays the value in the appropriate fields on any work orders that you create. The system also displays the value on the Project Setup form. You can either accept or override the default value.e. Category Code 2
A user-defined code (00/W2) that indicates the type or category of a work order.
f. Categories Code 3
A user-defined code (00/W3) that indicates the type or category of the work order.
4.4.4.2 Program
- 1. Enter version for P48014 (if left blank version ZJDE0001 will be used)
-
Enter a user-defined set of specifications that control how applications and reports run. You use versions to group and save a set of user-defined processing option values and data selection and sequencing options. Interactive versions are associated with applications (usually as a menu selection). Batch versions are associated with batch jobs or reports. To run a batch process, you must select a version.