5 Working with Collections Management
This chapter contains the following topics:
5.1 Understanding Collections Management
A collection is a coherent assortment of style items. It may be put together by a manufacturer or designer each season to showcase new trends for a particular market. You can find many collections in the apparel industry based on seasons, such as winter collections and summer collections, as well as other themed collections, such as leather collection or cotton collection.
A collection offers total control of catalogues, seasonal offers, and collection overlap, with time frames, customer targets, pricing conditions and, if required, order entry specialization by collection to ensure control of distribution.
The main characteristics of collections are that they:
-
Are introduced for one brand (manufacturer).
-
Are time-bound.
Generally, a collection is designed and marketed for one season or year.
-
Are specifically designed for one or more markets.
-
Have a multilevel structure.
The collection structure defines the attributes of the base collection and different variations within the collection. The collection structure consists of multiple levels such as themes, brands, and styles.
-
Can contain the same style item that is present in other collections at the same time.
-
Are used by sales orders, purchase orders, and shop floor management.
By introducing a collection, you can:
-
Group related style items together.
-
Control style items used for sales, purchase, or work orders.
-
View and modify style item details using the Style Items by Collection program (PCW54).
-
Create collection templates from one or more collections using the Collection Templates Entry program (PCW42). These predefined templates are used to simplify order entry.
-
Manage sales prices by season and collection.
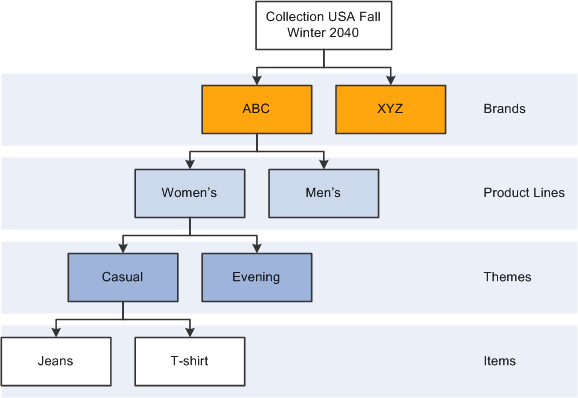
A collection structure defines the levels or segments within a collection. You can have up to five levels in a collection structure. These levels might reflect various brands, product lines, themes, and items for the collection. For example, a collection named European Summer Collection can have different levels of details based on the different customer groups for which the collection is defined (for example, women and men), and based on the variations in the style items that are included in the collection (for example, casual and evening). In the following diagram, the collection USA contains levels for brands, product lines, themes, and style items:
Setting up a collection is similar to setting up a style item because you create levels and define a structure for both.
The steps to define a collection are:
-
Define the collection structure code.
Use the 41F/CS UDC to define the collection structure code.
-
Define season codes and season years.
Define the season codes and season years in the 41F/SE and 41F/SY UDCs.
-
Create collection levels or segments by creating your own UDCs.
-
Define the collection structure by attaching UDCs to the collection structure code.
Use the Define Collection Structure Code program (PCW06) to specify which UDCs will be used for the collection.
-
Create the collection.
Use the Collection Management program (PCW07) to specify the collection name, season code, season year, and other basic information about the collection.
-
Build the collection structure.
Use the Create Collection Detail Structure program (PCW16), which is accessed from the Collection Management program, to specify the collection levels or segments that make up the collection structure. The Create Collection Detail Structure cannot be accessed directly.
-
Add and remove style items in the collection structure.
Use the Item Collection Detail program (PCW081), which is accessed from the Collection Detail program (PCW08) within the Collection Management program, to add style items to the collection structure. The Item Collection Detail program cannot be accessed directly.
-
Create collection templates.
Use the Collection Templates Entry program (PCW42) to create a collection template that can be used to simplify sales order entry and purchase order entry.
Collection templates enable you to group a subset of style items from one or more collections.
See Setting Up Collection Templates.
This diagram illustrates the collection management process:
Figure 5-2 Collection Management process flow

Description of "Figure 5-2 Collection Management process flow"
|
Note: Every style item is not required to be attached to a collection. Use collections with appropriate style items to meet the needs of your specific business processes. |
5.2 Setting Up Collection UDCs
This section provides an overview of collection UDCs and discusses how to:
-
Define the collection structure code.
-
Set up Season Code UDCs.
-
Set up Season Year UDCs.
5.2.1 Understanding Collection UDCs
Before you can define the structure of a collection, you must create the collection structure code in the 41F/CS UDC. You will specify the collection structure code to use when you define your collection structure.
Also, because a collection must be associated with a particular year and season, you must set up season codes and season years using the UDCs 41F/SE and 41F/SY respectively. Some examples of season codes are summer, winter, fall, and spring. However, the season codes are user-defined and not limited to these values. After you define the season code and season year values, you will specify the season code and season year to associate with your collection when you create the collection header.
5.2.2 Forms Used to Set Up Collection UDCs
| Form Name | FormID | Navigation | Usage |
|---|---|---|---|
| Collection Structure - Work with User Defined Codes | W0004AA | Collection Management (G41F462), Collection Structure | Define, review, update, or delete user-defined codes. |
| Collection Structure - User Defined Codes | W0004AI | Collection Management (G41F462), Collection Structure | Define the collection structure code. |
| Season Code - Work with User Defined Codes | W0004AA | Collection Management (G41F462), Season Code | Review, revise, and delete season codes. |
| Season Code - User Defined Codes | W0004AI | Collection Management (G41F462), Season Code
Click Add. |
Set up season code UDCs. |
| Season Year - Work with User Defined Codes | W0004AA | Collection Management (G41F462), Season Year | Review, revise, and delete season years. |
| Season Year - User Defined Codes | W0004AI | Collection Management (G41F462), Season Year
Click Add. |
Set up season year UDCs. |
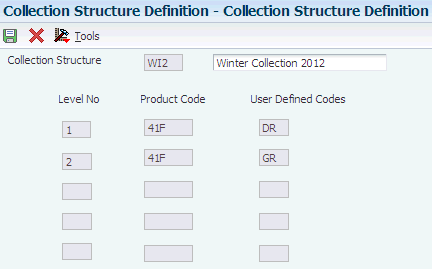
5.2.3 Defining the Collection Structure Code
Define the collection structure code (41F/CS).
Access the Collection Structure - User Defined Codes form.
-
Enter values in the grid for the Codes, Description 1,Special Handling, and Hard Coded columns.
You can define multiple item structure codes at the same time.
-
Click OK to create your new collection structure codes.
5.2.4 Setting Up Season Code UDCs
Access the Season Code - User Defined Codes form.
-
Enter values for the Codes and Description 1 columns.
For example, you might enter codes SP,SU,FA, and WN with descriptions Spring, Summer, Fall, and Winter.
-
Click OK to create your new season codes.
5.3 Defining Collection Structures
This section provides an overview of collection structures, lists prerequisites, and discusses how to define collection structures:
5.3.1 Understanding Collection Structures
Collection structures provide a way to define and organize the levels used by a particular collection. You can have up to five levels in a collection structure. Each level represents a different attribute for your collection. For example, the European Summer Collection might have the following levels: brands, product lines, and themes. You specify and organize these levels when you define the collection structure. One collection structure can be used by multiple collections. Use the Collection Structure Definition program (PCW06) to define your collection structures. The collection structure details, such as the possible levels, are stored in the Collection Structure Definition table (FCW05). You will attach your collection structure to your collection when you create your collection using the Collection Management program (PCW07).
5.3.2 Prerequisites
Before you create collection structures, you must define the levels or segments to include in your structure. Similar to the levels for a style item, these levels represent different attributes for your collection. You describe these levels by creating a UDC and valid values for each level. These levels are completely user-defined and should be specific to your business. For example, you might have a collection with the following attributes:
-
Brand
-
Product Line
-
Theme
You could set up the following UDCs and values for the levels in the preceding example:
| Attribute | UDC | Valid Values |
|---|---|---|
| Brand | 56/BR | Apollo, Gemini |
| Product Line | 56/PL | Casual, Attraction |
| Theme | 56/TM | Day, Evening, Travel |
5.3.3 Forms Used to Define Collection Structures
| Form Name | FormID | Navigation | Usage |
|---|---|---|---|
| Work with Collection Structure | WCW06B | Collection Setup (G41F44), Collection Structure Definition | Review collection structures. |
| Collection Structure Definition | WCW06C | Collection Setup (G41F44), Collection Structure Definition
Click Add. |
Define collection structures. |
5.3.4 Defining Collection Structures
Access the Collection Structure Definition form.
Figure 5-3 Collection Structure Definition form
Description of "Figure 5-3 Collection Structure Definition form"
To define collection structures:
-
Enter the collection structure that you want to define in the Collection Structure field.
-
Enter the product code and user-defined code values that you used to set up your levels in the Product Code and User Defined Codes fields respectively.
For example, if your first level is Product Line and you set up your valid brand values in UDC 56/PL, then enter 56 in the Product Code field and PL in the User Defined Codes field.
The User Defined Codes field is also sometimes referred to as a UDC type.
-
Repeat entering the product code and user-defined code for all of the levels that you want to attach to this collection structure.
You can attach up to five levels to a collection.
-
Click OK.
5.4 Creating Collections
This section provides an overview of collection creation and discusses how to:
-
Set processing options for Collection Management (PCW07).
-
Create a collection header.
-
Create a collection structure detail.
-
Add style items to a collection.
5.4.1 Understanding Collection Creation
Three steps are involved in creating a collection. You must create both a collection header and the collection structure detail. Finally, you must add style items to your collection. The collection header is where you attach the collection structure. It includes the following information:
-
Collection name
-
Season code
-
Season year
-
Collection structure
-
Price reference date
-
Effective and expiration dates
Use the Collection Management program to create the collection header. The collection header information is stored in the Collection Header table (FCW06).
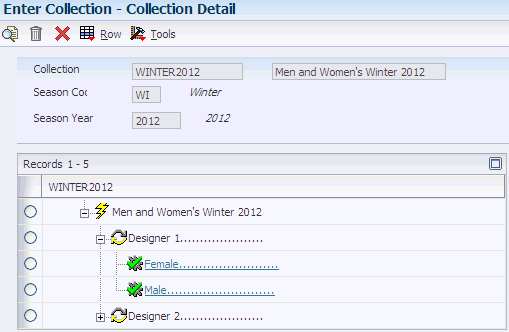
The Create Collection Detail Structure program (PCW16) is used to build the collection from the structure. It is called from the Collection Management program. In the Create Collection Detail Structure program, you build the collection by copying and pasting the available collection structure levels in a tree structure.
To add style items to your collection, you use the Item Collection Detail program (PCW081) accessed through the Add Style Items option on the Row menu of the Collection Detail program (PCW08). The Collection Detail program (PCW08) is accessed using the Collection Detail option on the Row menu of the Collection Management program (PCW07). You select the lowest collection level, where the collection hierarchy consists of a maximum of five collection levels, in the Collection Detail program (PCW08) and select the Add Style Items option on the Row menu. You can add style items to a selected collection level and remove style items from a selected collection level using the Item Collection Detail program (PCW081).
You use the Item Collection Detail program to:
-
Display collection details in the Collection Level field in the header on the Style Item Collection Detail form. (Release 9.1 Update)
The Collection Level field displays the hierarchy for the selected collection level to which style items are being added or removed. This field is noneditable. (Release 9.1 Update)
-
Add a style item to the collection by selecting the row and clicking Select. (Release 9.1 Update)
-
Display existing and new style items included in the collection in aqua color highlight in the grid. (Release 9.1 Update)
-
Remove a style item from the collection by selecting the row and clicking Select. (Release 9.1 Update)
-
Display removed style items in red color highlight in the grid. (Release 9.1 Update)
To view the items in the collection, you use the Collection Detail by Style Item program (PCW082) which you access through the View Style Items option on the Row menu of the Collection Detail program (PCW08). The Collection Detail by Style Item form displays the hierarchy of the selected collection level in the Collection Level field in the form header. (Release 9.1 Update)
The collection detail information, such as different levels and style items that exist in a collection, is stored in the Collection Detail table (FCW07).
5.4.2 Forms Used to Create Collections
| Form Name | FormID | Navigation | Usage |
|---|---|---|---|
| Work with Collections | WCW07A | Collection Setup (G41F44), Enter Collection | Review, update, and delete collections. |
| Collection Revisions | WCW07B | Collection Setup (G41F44), Enter Collection
Click Add. |
Create a collection header. |
| Build Collection | WCW16A | Collection Setup (G41F44), Enter Collection
Select a row and then select Build Collection from the Row menu. |
Create a collection structure detail.
Note: The Create Collection Detail Structure program is accessible only from the Collection Management program. |
| Collection Detail | WCW08A | Collection Setup (G41F44), Enter Collection
Select a row and then select Collection Detail from the Row menu. |
Add style items to a collection.
Review the collection detail. Note: The Collection Detail program is accessible only from another application. |
| Style Item Collection Detail | WCW081A | Collection Setup (G41F44), Enter Collection
Select a row and then select Add Style Items from the Row menu on the Collection Detail form. |
Add style items to a collection.
Note: The Item Collection Detail program is accessible only from another application. |
| Collection Detail by Style Item | WCW082A | Collection Setup (G41F44), Enter Collection
Select a row and then select View Style Items from the Row menu on the Collection Detail form. |
View the style items in a collection.
Note: The Collection Detail by Item program (PCW082) is accessible only from another application. |
5.4.3 Setting Processing Options for Collection Management (PCW07)
Processing options enable you to specify the default processing for programs and reports.
5.4.3.1 Process
- 1. Allow Same Item in Different Collection Levels
-
Specify whether an item can exist in multiple collection levels (subcollections) belonging to a collection.
Values are:
Blank: Yes
1: No
- 2. Delete Collection Level
-
Specify whether the system validates that items under a collection level are used in an open sales order.
Values are:
Blank: No validation.
1: The system issues a warning if the items under a collection level have been used in an open sales order.
2: The system issues an error message if the items under a collection level have been used in an open sales order.
|
Note: The first processing option is used by the Item Collection Detail program, which is called by the Collection Detail program when you use the Row menu to add style items to the collection. The second processing option applies to the Collection Detail program, which is called from the Collection Management program when you use the Row menu to go to the collection detail. |
5.4.4 Creating a Collection Header
Access the Collection Revisions form.
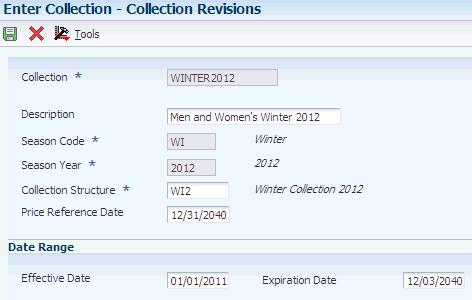
To create a collection header:
The required fields on this form have orange asterisks (*).
To create a collection header, complete these fields and click OK:
- Collection
-
Enter a code that represents a coherent assortment of items introduced at the same time mostly for one brand (manufacturer), season, year, and market.
You must enter a value from the Collection Header table (FCW06).
- Description Line 1
-
Enter a description of the collection.
- Season Code
-
Enter a code to specify the season for which the collection is being manufactured.
- Season Year
-
Enter a code that specifies the year of manufacture of the collection.
- Collection Structure
-
Enter a collection structure that was defined using the Collection Structure Definition program. The collection structure is used to define various collection levels based on the UDCs. Collections can have a maximum of five collection levels. The UDC denotes the collection levels, whereas the UDC values denote the collection segment at each collection level.
- Price Reference Date
-
Enter a date to be used to determine the price for the collection.
Note:
The Price Reference Date field is used at the time of sales order and purchase order entry to fetch the price of the style items attached under the collection. - Effective Date
-
Enter a date that identifies when a collection becomes active. This date is used for informational purposes only.
- Expiration Date
-
Enter a date that identifies when a collection expires. This date is used for informational purposes only.
5.4.5 Creating a Collection Structure Detail
Access the Build Collection form.
Your collection appears at the top of the tree structure and all available collection levels appear below it. Use this form to copy and paste the collection levels that you want to add to your collection.
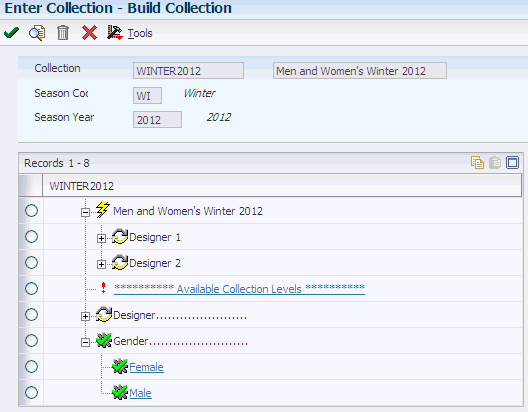
To create a collection structure detail:
-
Expand the tree structure to view all of the available collection level values.
-
Select the collection level value (for example, Attraction or Casual) that you want to add to your collection.
-
Click the Copy icon in the upper right-hand corner of the tree structure pane.
-
Select your collection to which you want to add the level.
-
Click the Paste icon in the upper right-hand corner of the tree structure pane to add it to your collection.
-
Select the next collection level that you want to add to your collection.
-
Click the Copy icon in the upper right-hand corner of the tree structure pane.
-
Select the level that you previously added to your collection and click Paste.
You are creating a structure for your collection, so the levels will nest within one another. For example, you may have a level called Casual and want to add a Travel-wear level within the Casual level.
Note:
If there is any level mismatch while building the structure, the particular level will not be added. For example, Travel-wear cannot be added under Asia Fall collection because Travel-wear is the second level. It can only be added under a first level, such as Casual. -
Repeat these steps for each collection level value that you want to add to your collection.
-
If you would like to delete a collection level, select the level and click Delete.
If the collection level that you are attempting to delete is used in any sales orders, you may receive a warning or an error depending on how you have the Delete Collection Level processing option set.
-
When you are finished creating your collection structure, click Close.
5.4.6 Adding Style Items to a Collection
Access the Collection Detail form.
To add style items to a collection:
-
Select the lowest level of the collection and select Add Style Items from the Row menu.
Note:
If the lowest level of the collection is not selected, then you will not be able to perform any action from the Row menu. -
Enter the style items or other criteria that you want to find in the Query By Example (QBE) line at the top of the grid and click Find.
-
Select the style items that you want to include in the collection by selecting the check box in the row header for each and clicking Select. If the style root level 0 item is selected, then its corresponding child items will be added to collection.
Selected rows display in aqua color highlight in the grid. (Release 9.1 Update)
Note:
Depending on how you set the Allow Same Item in Different Collection Levels processing option, you may or may not be able to select the same item for multiple collection levels (subcollections) belonging to a collection. If the processing option is blank, you can select the same item for multiple collection levels; if the processing option has a value of 1, you cannot. -
You can also use the options above the grid to see all of the attributes associated with a particular style item and narrow down the style items to include in the collection at a lower level.
For example, if you select color, all of the colors associated with the style item are displayed in the grid. You might then select size; all of the sizes with respect to the color of the style item are displayed. If you have already included the style item with the color black in the collection, all of the sizes associated with the color black have a green check mark showing that they are all associated with the collection.
-
To deselect a particular style item, click the check box in the row header for each and click Select and the style item will be removed from the collection. The row initially displays in red color highlight. The row becomes gray after you click Find. (Release 9.1 Update)
-
After you have selected all of the style items that you want to include in the collection, click Close.
-
To verify that your style items have been added, select View Style Items from the Row menu.
- Collection Level
-
Displays the hierarchy of the selected collection level to which style items are being added or removed. (Release 9.1 Update)
5.5 Setting Up Collection Templates
This section provides an overview of collection templates, lists a prerequisite, and discusses how to:
-
Define a collection template name.
-
Build the collection template.
5.5.1 Understanding Collection Templates
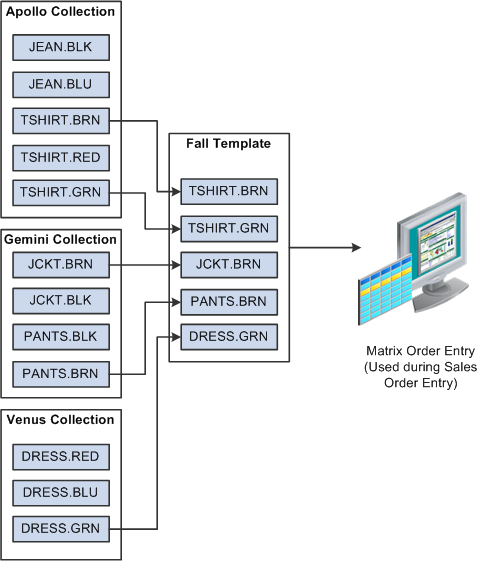
A collection template is a subset of style items from one or more collections. You can add style items from multiple collections to a collection template. For example, if a designer has 100 style items under six collections but only wants to use 20 style items associated with three particular collections during sales order entry, he can attach the desired style items in the template. Templates are all user-defined; no predefined templates are available. Use the Collection Templates Entry program (PCW42) to create templates. Collection templates are stored in the Matrix Work File table (FCW20).
These templates are used during sales order entry, as well as purchase order entry, to simplify the process of entering orders. A collection template contains frequently ordered style items. A collection template applies to all customers. For example, you can create a collection template that lists the most frequently ordered style items from a particular collection. Or you could identify a collection template that lists all of the most frequently ordered style items, regardless of their collection. You should regularly update existing collection templates to ensure that the order entry process remains accurate and efficient. For example, you can add and remove style items on an existing collection template. When you use a collection template with a sales order, the matrix order entry displays all of the style items associated with the collection template that you are using so that you can choose which style items to order and enter the appropriate quantities.
This diagram illustrates how collection templates are created and used during sales order entry:
5.5.2 Prerequisite
Before you create a collection template in the JD Edwards EnterpriseOne Apparel Management system, you must set the processing option for the Collection Templates Entry program to specify the version of the Collection Template List report (RCW10) that you want to call. This program is used to generate the matrix entry display for the collection template that you define. It is called when you select Generate Matrix from the Form menu on the Collection Template Detail form. It is also called when you select OK after making a change to a template, such as adding or removing an item.
5.5.3 Forms Used to Set Up Collection Templates
| Form Name | FormID | Navigation | Usage |
|---|---|---|---|
| Work with Collection Template | WCW42E | Collection Setup (G41F44), Enter Collection Templates | Review, revise, and delete collection templates. |
| Collection Template Header | WCW42C | Collection Setup (G41F44), Enter Collection Templates
Click Add. |
Define a collection template name. |
| Collection Template Detail | WCW42A | Collection Setup (G41F44), Enter Collection Templates
Select a row and then select Update Template from the Row menu on the Collection Template Header form or select a row and then select Update Template from the Row menu on the Work with Collection Template form. |
Build the collection template. |
| Matrix Display | WCW10B | Select Matrix Display from the Form menu on the Collection Template Detail form. | Review the collection template as it will appear in the Matrix Entry program, which is called within sales order, purchase order, and inventory transaction processing. |
5.5.4 Defining a Collection Template Name
Access the Collection Template Header form.
-
Enter the collection template name and description in the grid.
-
Click OK.
5.5.5 Building the Collection Template
Access the Collection Template Detail form:
Figure 5-8 Collection Template Detail form
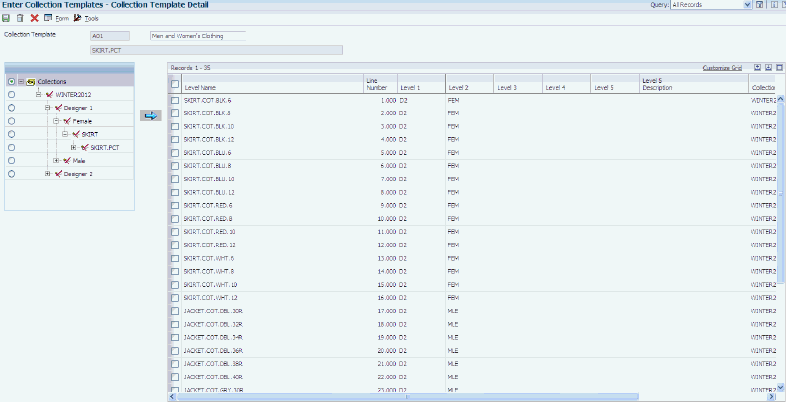
Description of "Figure 5-8 Collection Template Detail form"
To build the collection template:
-
Expand the tree structure in the right-hand pane to see all of the available collection levels and style items.
-
Select the level or specific style item that you want to add to the collection template and click the arrow button to move it into the collection template in the left-hand pane.
If you select an attribute or collection level that includes multiple style items, all of those style items will be moved to the collection template when you click the arrow button.
-
After you select all of the style items that you want to add to the collection template, select Generate Matrix from the Form menu to create the matrix entry display for the collection template. The system uses this template during sales order and purchase order entry.
-
Click OK to run the report.
Review the report output and verify the results.
The Collection Template List report (RCW10) runs and creates the list of style items included in the collection template for the matrix entry display.
Note:
This report can also be submitted manually from Batch Versions. If the report does not complete successfully, it will not contain all of the style items. Verify that the report has finished running before you view the results. Otherwise, you will not obtain the results that you expect. -
To verify and review the matrix entry display that has been created for the collection template, select Matrix Display from the Form menu.
-
If you want to remove all of the style items from the template, select Delete All from the Form menu on the Collection Template Detail form.
-
If you want to delete individual style items from the template, select those items and click Delete.
|
Note: Once you have created a template, you can update the existing template by selecting your template on either the Work with Collection Template or the Collection Template Header forms and selecting Update Template from the Row menu on either form. |
5.6 Working with Style Items by Collection
This section provides an overview of style items by collection and discusses how to:
-
Set processing options for Style Items by Collection (PCW54).
-
Work with style items by collection.
5.6.1 Understanding Style Items by Collection
The Style Items by Collection program (PCW54) is very similar to the Style Item Master program (PCW51) except that it provides a way for you to access, review, and update style items within a particular collection. It enables you to search for style items by collection or any of the collection details, and then review the detailed information for those style items. It also provides access to style items that are not attached to a collection.
5.6.2 Forms Used to Work with Style Items by Collection
| Form Name | FormID | Navigation | Usage |
|---|---|---|---|
| Work with Collection Item Master Browse | WCW54A | Style Item Management (G41F11), Work with Style Items by Collection | Work with collection style items.
Review style items associated with a collection. |
| Multi Level Item Revision | WCW02AB | Style Item Management (G41F11), Work with Style Items by Collection
Select a row and then click Select or select Revision from the Row menu. |
See Working with Item Revisions. |
| Item Structure Definition | WCW02B | Style Item Management (G41F11), Work with Style Items by Collection
Select a row and then select Structure Definition from the Row menu. |
See Working with Item Revisions. |
| Items without Collection | WCW54C | Style Item Management (G41F11), Work with Style Items by Collection
Select Item w/o Collection from the Form menu. |
Access and review style items that are not associated with a collection. |
5.6.3 Setting Processing Options for Style Items by Collection (PCW54)
Processing options enable you to specify the default processing for programs and reports.
5.6.3.1 Structure
- 1. Item Structure Creation
-
Specify how the system creates child style items.
Values are:
1: Create child items when you click Close.
2: Create child items on demand. You must click the Create Structure button on the Item Structure Definition form.
3: Create child items by batch using the Create and Process Child Style program (RCW01).
- 2. Size Grid Selection
-
Specify how the system displays size grids in the Item Structure Definition (WCW02B) form.
Values are:
Blank: Size grids appear as deselected. You must select the size grids manually.
1: Size grids appear as selected. You must deselect the size grids that you do not want to use.
5.6.3.2 Versions
- 1. Item Master Version (P4101)
-
Specify which version the system uses when you access the Item Master program (P4101). If you leave this processing option blank, the system uses version ZJDE0003 as the default version.
- 2. Create BOM for Child Style Items (RCW53) (Default version XJDE0001)
-
Specify the version of the Create BOM for Child Style Items program (RCW53) that the system calls from the Bill of Material for Style Items program (PCW12B). If you leave this processing option blank, then the system uses XJDE0001 as the default version.
- 3. Bill of Material Revisions (P3002)
-
Specify the version of the Bill of Material Revision program (P3002) that the system calls from the Style Items by Collection program (PCW54). If you leave this processing option blank, then the system uses ZJDE0001 as the default version.
- 4. Work With Routing Master (P3003)
-
Specify the version of the Work With Routing Master program (P3003) that the system calls from the Style Items by Collection program (PCW54). If you leave this processing option blank, then the system uses ZJDE0001 as the default version.
5.6.3.3 Collections
These processing options specify default values that the Style Items by Collection program uses when other values are not entered.
- 1. Collection
-
Specify a code that represents a coherent assortment of items introduced at the same time mostly for one brand (manufacturer), season, year, and market. You must enter a value from the Collection Header table (FCW06).
- 2. Season Code
-
Specify a code that specifies the season for which the collection is being manufactured.
- 3. Season Year
-
Specify a code that specifies the year of manufacture of the collection.
5.6.3.4 Delete Process
- 1. Delete Complete Levels
-
Specify whether to delete items in the multi level hierarchy of style items.
Values are:
Blank: Delete only if all levels can be deleted. You can delete the style items in the hierarchy if the child items are not created under a parent level in the hierarchy. In this case, you can delete all levels in the hierarchy.
1: Delete even if a level still contains items. You can delete any of the levels in the hierarchy even if child items exist for that particular level.
- 2. Generate Detail Log Report
-
Specify whether the system runs the Style Item Master Purge Log report (RCW36) and prints a detail log report.
Values are:
Blank: Do not print a detail log report.
1: Print a detail log report.
5.6.3.5 Bill of Material
- 1. BOM Creation
-
Specify how the system creates bills of material for child style items.
Values are:
Blank: Create bills of material for child style items on demand. You must select Create from the Form menu on the Work with Bill of Material form.
1: Create bills of material for child style items by batch. You run the Create BOM for Child Style Items program (RCW53).
5.6.4 Working with Style Items by Collection
Access the Work with Collection Item Master Browse form.
To work with style items by collection:
-
Enter information in any of the following fields and click Find.
-
Collection
-
Season Code
-
Season Year
-
Item Level No
Enter a number that identifies the level of an item structure. You can have up to ten levels starting from level 0 to level 9 in an item structure. The parent item is defined as the first level in the multi-level item structure. The child style items inherit their basic attributes from their parent level.
-
-
If you want to look for a style item that is not attached to a collection, select Item w/o Collection from the Form menu.
Use the QBE line at the top of the grid to search for a style item and narrow your results.