2 Setting Up the Contract Management Integration
This chapter contains the following topics:
2.1 Understanding Integration Setup
Before you can utilize the contract management integration, you must set up both systems to ensure that data is processed, formatted, and transmitted correctly. This list outlines the steps that you must complete to set up the integration:
-
Ensure that each system, patch, and software update has been installed.
For a list of the required releases and patches, see Section 1.2, "Understanding the Technical Requirements for the Integration."
-
Import the stub project EXP_CMPROJ_EXCHANGE.jar into Contract Management to create the custom fields that are required to support the integration in the Contract Management system.
This project is delivered with the integration functionality, and is located in the root folder of the install location. For example, C:\CMExchange. To import the stub project, and add the custom fields to the Contract Management system, you use the Single Project Restore function in Contract Management. After you restore this project, the custom fields are loaded into the Contract Management system. You can then delete the EXP_CMPROJ_EXCHANGE project.
See Using Contract Management Exchange, "Setting Up Your Environment.".
-
Set up FTP processing if you are using the automated method to transfer files between systems.
The integration uses FTP to automatically transfer XML files from one system to a predefined location in the other system. These files can then be consumed by the target system, and the data can be processed. The use of FTP to automatically transfer files is optional for this integration. This method requires users to create a standard directory structure on both the enterprise server and the FTP server, verify that the scripts are in the appropriate location, and configure script information. If you are using the IBM i on IBM Power Systems platform (also known as IBM i or AS400), you must also complete an additional setup step to ensure the success of the file transfer process.
-
Set up file transfer information for the manual method.
If you choose not to use FTP to automatically transfer files between the systems, you must create a directory structure, and verify that the script for manual file transfer processing is included in that directory.
2.2 Setting Up FTP Processing
The contract management integration uses FTP processing to transfer files between the JD Edwards EnterpriseOne and Contract Management systems. This section provides an overview of the FTP setup process and discusses how to:
-
Set up the standard directory structure.
-
Configure scripts.
-
Set up IBM i for IBM Power Systems information for FTP processing.
2.2.1 Understanding FTP Setup
This integration uses XML files that are created in both the EnterpriseOne and Contract Management systems to transfer data between the two systems. Users can choose to manually send these XML files from one system to the other, or they can use an automated FTP file transfer process.
If you are using the automated method, the system uses FTP scripts to transfer the generated XML files to a remote server. These scripts are called by the EnterpriseOne data extract and import programs.
There are seven scripts that are delivered with this integration. Six of the scripts support the automated transfer mode, and one script is used in manual mode. This section discusses the scripts used for FTP automated processing.
Because this implementation supports the use of multiple platforms, there are three versions of each script. You will use only one set of scripts in a given implementation, based on the platform. This integration supports the following platforms:
-
IBM i on IBM Power Systems
-
Windows
-
Unix/Linux
This table lists the scripts that are used for each platform:
| IBM i on IBM Power Systems | Windows | Unix/Linux |
|---|---|---|
| CMtoE1Change_IBMi.sh
CMtoE1PaymentRequisition_IBMi.sh E1toCMChange_IBMi.sh E1toCMContract_IBMi.sh E1toCMProject_IBMi.sh E1toCMRequisition_IBMi.sh GenerateDirList_IBMi.sh |
CMtoE1Change.bat
CMtoE1PaymentRequisition.bat E1toCMChange.bat E1toCMContract.bat E1toCMProject.bat E1toCMRequisition.bat GenerateDirList.bat |
CMtoE1Change.sh
CMtoE1PaymentRequisition.sh E1toCMChange.sh E1toCMContract.sh E1toCMProject.sh E1toCMRequisition.sh GenerateDirList.sh |
Two inbound FTP scripts, which include the CMtoE1Change and CMtoE1PaymentRequisition scripts, are used to transfer data from Contract Management to EnterpriseOne. The scripts are called by the data import programs in EnterpriseOne, and they locate and transfer the XML files generated by Contract Management from the specified remote server location via FTP to a local file location. The script will also generate a flat file in the same location as the script with the name of the files being transferred. These scripts are then called from business functions that are initiated when you run the data import programs within EnterpriseOne.
Four outbound FTP scripts, which include the E1toCMChange, E1toCmContract, E1toCMProject, and E1toCMRequisition scripts, transfer data from the JD Edwards EnterpriseOne system to the Contract Management system. The scripts are called from the data extract programs and they transfer the generated XML files using FTP to a specified location on a remote server.
A known directory structure must be present on both the enterprise server and the FTP server so that the scripts can perform the file transfer and archiving of files. The directory structure is delivered with the integration. The user must copy the delivered directory structure to the necessary servers.
Before you run the scripts, you must configure them so that they contain the necessary information to log in correctly to the remote system. To configure the scripts, you use the CM Automated Transfer Setup program (P51011). You access this program from the Contract Management Integration Workbench (P51010).
In addition to configuring the scripts, you must also ensure that they are stored in the delivered directory on the EnterpriseOne enterprise server, and that all directories have permissions set to allow access by the business functions. The scripts do not need to be included in the file structure on the FTP server.
A log file is created, or appended, each time a script is called. The log file is named for the corresponding script that was called. For example E1toCMChange.log or CMtoE1PaymentRequisition.log, The system saves the log in the directory associated with that flow. For example, the log file E1toCMChange.log would be saved to the E1toCMChange folder and CMtoE1PaymentRequisition.log would be saved to the CMtoE1PaymentRequisition folder.
2.2.2 Forms Used to Set Up FTP Processing
| Form Name | FormID | Navigation | Usage |
|---|---|---|---|
| Contract Management Integration Workbench | W51010A | From the Primavera Contract Management menu (G51312), select Contract Management Integration Workbench. | Access forms used to set up FTP processing. |
| Contract Mgmt Automated File Transfer Setup | W51011A | From the Contract Management Integration Workbench form, select File Transfer and then Auto Transfer Setup from the Form menu. | Configure FTP scripts. |
2.2.3 Setting Up the Standard Directory Structure
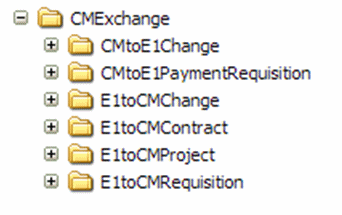
Included with this integration is the file E1toCM_Scripts.zip.
This file contains all of the scripts and the related directory structure that is required for the integration to function successfully. After accessing the file, unzip the file to the enterprise server, and note the location. You will need this location when setting the processing options of the data extract and import programs in EnterpriseOne.
|
Note: These folder names are coded into the scripts and should not be changed or reorganized. Each of the flow folders contains an archive folder to store previously transferred files. oracle recommends that you do not change this directory structure, or the names of any of the folders included in the structure. |
This graphic illustrates the standard directory structure for this integration:
Figure 2-1 Standard directory structure example
Description of "Figure 2-1 Standard directory structure example"
2.2.4 Configuring Scripts
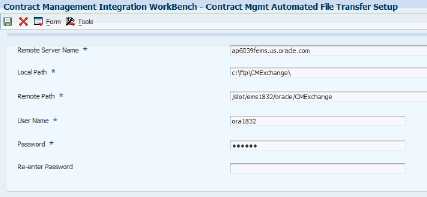
Each of the FTP scripts that are used to transfer files are delivered with the integration software. These scripts are used in the process of transferring files between EnterpriseOne and Contract Management using FTP file processing. Before you run the scripts, you must configure the system so that it can provide the proper server and authorization information to the scripts. To configure the system, you use the CM Automated Transfer Setup program (P51011). You access this program from the Contract Management Integration Workbench (P51010).
The scripts must be stored on the EnterpriseOne enterprise server, and all directories must have permissions set to allow access by the business functions.
To enter the necessary information for each script, access the Contract Mgmt Automated File Transfer Setup form.
Figure 2-2 Contract Mgmt Automated File Transfer Setup form
Description of "Figure 2-2 Contract Mgmt Automated File Transfer Setup form"
- Remote Server Name
-
Enter the address of the target server, for example, the FTP server, that the automated file transfer scripts will connect to. This value can be a machine name that will resolve via DNS or an IP address. For example, enter ftpserver.company.com in this field.
- Local Path
-
Enter the local, fully qualified path to the CMExchange folder on the enterprise server. This is the folder that contains the automated file transfer scripts. The CMExchange folder was delivered with the integration. However, if you changed the name of the folder that contains the scripts, enter the name of that folder, along with the path to it, in this field. For example, enter \\server\root\CMExchange in this field.
- Remote Path
-
Enter the remote, fully qualified path to the CMExchange folder on the target server, for example, the FTP server. For example, enter \\server\root\CMExchange in this field.
- User Name
-
Enter the user name that the system uses when the automated file transfer scripts are connecting to the target server, for example, the FTP Server.
- Password
-
This field contains a value that the user entered previously, and is encrypted so that the actual password is not displayed on the form.
- Re-enter Password
-
This field, in the top portion of the form, remains blank.
- Change Password Button
-
Click this button to change the password for the target server. When you click this button, the Original Password, New Password, and Re-Enter Password fields appear in a separate section of the form below the button.
- Original Password, New Password, Re-enter Password
-
Use these fields to change the password to the target server. These fields appear only after you click the Change Password button.
2.2.5 Setting Up IBM i on IBM Power Systems Information for FTP Processing
IBM i on IBM Power Systems is also known by these names:
-
iSeries
-
AS400
-
IBM i on Power Systems
-
IBM i
In order for the file transfer scripts to process correctly on the IBM i on IBM Power Systems, an additional CL program must be included in an active library. Included with the integration is the file E1toCM_CL_Object.zip, which includes the file ftpsh (no file extension).
You must complete these steps to ensure that the scripts process correctly on the IBM i enterprise server:
-
From the IBMi machine, type the following on the command line:
CRTSAVF QGPL/FTPSH -
Establish an FTP connection to the IBM i machine from the machine where you have extracted the object
ftpsh.
Note:
The file must be transferred in binary mode.The following FTP commands are using the AS400 FTP command line to transfer the object to the enterprise server:
cd QGPL bin put ftpsh ftpsh (replace -
From the IBMi machine, type the following on the command line:
RSTOBJ OBJ(*ALL) SAVLIB(QGPL) DEV(*SAVF) SAVF(QGPL/FTPSH) RSTLIB(QGPL)
Once this is complete, the system will be able to establish the FTP connection that is initiated from the .sh scripts.
2.3 Setting Up Manual File Transfer Information
As an alternative to using FTP to transfer files, you can use the manual method of file transfer, which does not require FTP.
If you are using the manual method, be aware of these items:
-
When you run an outbound data extract program, and setup the processing options to use manual mode, you specify a directory where the system places the resulting XML files.
These files must be manually transferred to the Contract Management system in some manner, such as copying the file to CD and sending it in the mail, E-mailing the files to a Contract Management user, or copying the files to a shared location where the Contract Management user can access them.
-
Before you run a data import program, you must have generated an XML file from Contract Management and transferred that file to a location. You must then specify that location, and also that you are running in manual mode, in the processing options of the data import program.
In addition to setting the processing options, you must also verify that the script GenerateDirList (for the appropriate platform) exists in the same folder where the XML files are stored. This script must be modified to reflect the fully qualified path to directory it is placed in. The line to be modified looks like this:
SET localdirpath=D:\CMExchange\CMtoE1Change.This script is called by the inbound data import programs, and creates a file list that the program needs in order to successfully process the XML files from Contract Management.
Oracle recommends that you follow the directory structure outlined for the automated transfer mode (FTP) in order to maintain separation of the XML files.
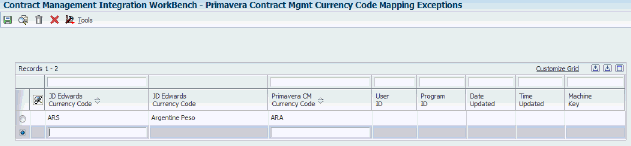
2.4 Setting Up Currency Code Information
The currency codes in EnterpriseOne and Contract Management are not always the same for the same type of currency. For example, the currency code for Argentine pesos is ARS in EnterpriseOne and is ARA in Contract Management. To accommodate any differences or exceptions in currency codes, you must set up currency code cross references.
You use the CM Currency Code Mapping program (P51006M), which you access from the Contract Management Integration Workbench, to enter currency code exceptions between the two systems.
2.4.1 Forms Used to Enter Currency Code Exceptions
| Form Name | FormID | Navigation | Usage |
|---|---|---|---|
| Contract Management Integration Workbench | W51010A | From the Primavera Contract Management menu (G51312), select Contract Management Integration Workbench. | Access forms to enter currency code information. |
| Primavera Contract Mgmt Currency Code Mapping Exceptions | W51006MA | From the Contract Management Integration Workbench form, select Project/Budget Flow and then Currency Code Map from the Form menu. | Enter currency code exceptions. |
2.4.2 Entering Currency Code Exceptions
Access the Primavera Contract Mgmt Currency Code Mapping Exceptions form. Enter any currency code exceptions and then click OK.
Figure 2-3 Primavera Contract Mgmt Currency Code Mapping Exceptions form
Description of "Figure 2-3 Primavera Contract Mgmt Currency Code Mapping Exceptions form"
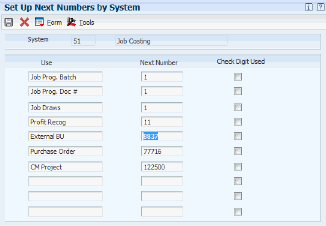
2.5 Setting Up Next Numbers
When you synchronize a project from EnterpriseOne to Contract Management, the system automatically assigns a project number that is used in the Contract Management system. Similarly, when you export a purchase order from EnterpriseOne, the system automatically assigns a committed contract number that is used in Contract Management. You set up the next numbers functions for system code 51, so that the system can automatically generate these project numbers. When setting up next numbers for this integration, you must enter a number for these two records in system 51:
-
CM Project
-
Purchase Order
So that the next numbers function does not generate a project or committed contract number that is already in use in the Contract Management system, you when set up next numbers, you should enter a beginning next number that is higher than the highest project or committed contract number that is already in use in the Contract Management system. For example, if the highest project number that is in use in the Contract Management system is 12345, you might enter a beginning next number of 12500.
This example illustrates how you might set up the next numbers for the contract management integration:
Figure 2-4 Setting Up Next Numbers by System form
Description of "Figure 2-4 Setting Up Next Numbers by System form"