4 Selecting Job and Billing Data to View
This chapter contains the following topics:
-
Section 4.1, "Understanding the Project Financial Management Process"
-
Section 4.2, "Understanding the Work with Project Management Console Program"
4.1 Understanding the Project Financial Management Process
Before you can review projects and jobs, you must specify your data selection and generate the records that you want to view. You specify jobs, dates, user-defined columns, summarization method, sequencing, and other criteria.
You can generate and view records in real-time, or you can generate and save records to view at a later time. You can generate the records to view using these three methods:
-
Use the Work with Project Management Console program (P51X0200) to specify data selection, and then click the View Now button to view the records in real-time.
The system generates the records using the data selection and processing options that you set in the Work with Project Management Console program and automatically opens the Project Management Console program (P51X0210) so that you can view the results. When you use this method, you can preview the job records used in the data selection, and can use the QBE line and enhanced queries to refine the data set that you submit for processing.
The system does not automatically save the generated records when you use this method. If you want to save the records, you must click the View Now button to view the records on the Project Management Console form, and then click Save Results button on that form. A processing option controls whether the Save Results button appears on the Project Management Console form.
-
Use the Work with Project Management Console program (P51X0200) to specify data selection, and then click the View Later button to have the system generate and save records that you can view at a later time.
When you use this method, you can preview the job records, and can use the QBE line and enhanced queries to refine the data set that you submit for processing. A processing option controls whether you can use this option. If view later processing is not enabled, then the Work with Project Management Console form does not include the View Later button.
-
Run the Submit Project Management View program (R51X0300) from a menu, the Batch Versions program, or a job scheduler to generate and save records that you can view at a later time.
When you use this method, you use Data Selection and processing options in the Submit Project Management View program to specify the data to include instead of using the Work with Project Management Console program to specify selection criteria.
No matter which method you use to generate records, you view the records in the Project Management Console program (P51X0210). If you used the method that gives you a real-time view of the records, the system automatically opens the Project Management Console program when it completes record processing. If you used a method that saves records, you locate the saved records using the Project Management Console View program (P51X0310) and then select the set of saved records to view in the Project Management Console program.
When you generate records to view, the process retrieves job records from the Business Unit Master table (F0006). It also retrieves financial information according to the columns that you set up in the Project Management Console Column Definitions program (P51X90) and the Project Management Console Column Layouts program (P51X91). After you access the generated records in the Project Management Console program, you can save the generated records so that you can view them again later, or you can exit the program without saving the records. If you saved the view results, you can use the Project Management Console View program to delete the record sets when you are finished viewing a set of records.
The project financial management process retrieves cost and other financial information from the Account Balances (F0902) and Account Ledger (F0911) tables, and billing amounts from these tables:
-
Billing Detail Workfile (F4812)
-
Billing Workfile History (F4812H)
-
Customer Ledger (F03B11)
-
Invoices Summary Workfile (F4822)
4.2 Understanding the Work with Project Management Console Program
You use the Work with Project Management Console program (P51X0200) to specify the parameters to use to select the records that you want to view. You set options on the Display tab and specify column names on the Columns 1–20 and Columns 21–40 tabs. After you specify the selection parameters, you can preview the job records that the process includes in your data selection. You then process your selections so that the system includes the job and billing records according to the parameters that you set, including calculated values that are based on the parameters that you specify. After you process the records, you can view the results in the Project Management Console form. You can process the data so that you can view it automatically after the system finishes processing, or you can process it so that the system creates a saved set of records that you can view at your convenience.
When you use the Work with Project Management Console (P51X0200) program to select the data, you select column layouts or definitions, set date criteria, specify summarization and sequencing criteria, and then process the data selection. The system generates records in the Project Management Console Worktable (F51X10) and launches the Project Management Console program (P51X0210). You view the processed data in the Project Management Console program.
You can set options on the Display, Columns 1–20, and Columns 21–40 tabs whether you want to view the records immediately after the system completes processing or whether you want to view the records at a later time. After you set data selection, click the View Now button to have the system open the Project Management Console form immediately after it finishes processing the records, or click the View Later button to have the system complete the processing and save the records without opening the processed records. If you have the system save the records, you select the saved results in the Project Management Console View program to open the Project Management Console program and view them in that program.
This image illustrates the process of specifying job and billing data to view in the Project Management Console form.
Figure 4-1 Process to Specify Job and Billing Data
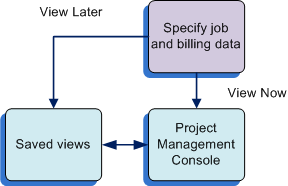
Description of "Figure 4-1 Process to Specify Job and Billing Data"
4.2.1 Display Tab
The options on the Display tab enable you to specify the parameters that the system uses to select data to include and how to display data on the Project Management Console form. For example, you can specify a specific job or project and the period for which you want to view data. You can also specify how to summarize and sequence the data, as if currency options, and other criteria.
Use these options on the Work with Project Management Console form to set parameters for how the system retrieves and calculates job, account, and billing records:
-
Job number.
-
Project number.
-
Company.
-
Subledger and subledger type.
See Subledgers.
-
Column layout.
See Defining Column Layouts and Columns 1–20 and Columns 21–40 Tabs.
-
Account range.
See Account Ranges.
-
Date options, including from and through dates for periods and years.
See Dates and Periods.
-
G/L posted code.
See G/L Posted Code.
-
Summarization by a selected parameter.
The system applies the summarization parameter to the records that it selects from the F0006 and F0901 tables and generates additional records for the summarization totals.
See Summarization.
-
Cost code sequencing by a selected value.
See Cost Sequences.
-
Level of detail totaling.
The system calculates totals by level of details according to the cost sequence that you specify in the Sequence by field. You can view the job records by the levels of detail in the Project Management Console form. The system applies the level of detail totaling for only columns that are set up with the Sum totaling method.
See Cost Sequences.
See Also Understanding Totaling Methods.
-
Currency information.
4.2.1.1 Subledgers
The Subledger and Subledger Type fields in the Work with Project Management Console form work in conjunction with each other. This table lists the display results for the allowed combination of values for these fields:
| Subledger Value | Subledger Type Value | Display Result |
|---|---|---|
| * | Blank | The program does not use the subleger or subledger type to determine which records to display. These values are the default values. |
| Blank | Blank | The program selects for display only the records that have blank values for the Subleger and Subledger Type fields. |
| * | Specified value | The program selects for display only the records that have the specified value in the Subledger Type field. |
| Specified value | Specified value | The program selects for display only the records that have the specified values in both the Subledger and Subledger Type fields. |
4.2.1.2 Account Ranges
You can specify an account range name to restrict the account range that the system displays in the Project Management Console form. You set up account range names in the Project Management Account Ranges program (P51X100). When you set up account range names, you also specify whether the system sequences the accounts by cost type and then cost code, or by cost code and then cost type. If you specify an account range name, then you must select the same sequencing option in the Sequence by field on the Work with Project Management Console form as you selected when you set up the account range. If the sequence option is not the same, the system issues an error message and does not process records to view.
4.2.1.3 Dates and Periods
You can specify how the system selects records by date. For all of the date options, if you do not specify the through period and year, the system uses the current period and year of the company. If the job extends over multiple companies, then the system uses the current period and year of the first company that the system locates.
You can specify one of these options:
-
Select the Inception to Date option to view job or project accounts through the period and year or date that you specify. When you select this option, the system includes the balance forward amount from the previous year.
Select the Period/Date check box to use full periods for the thru date. When you select the Period/Date check box, you can specify the ending period and year in the Thru Period, and Thru Fiscal Year fields. The system retrieves balances for the period and year that you specify, and then accumulates period balances for period 1 through the period and year that you specify, and adds the balance forward amount from the previous year.
Clear the Period/Date check box to use a specific date. When you clear the check box, you can specify the ending date in the Thru Date field. The system retrieves balances for the date that you specify, and then accumulates the amounts from the beginning balances and prior year-end net posting fields through the date that you specify. The specific date applies to only the AA and AU ledgers. All other ledger amounts are retrieved for the full period.
The Inception to Date option is the default option.
-
Select the Year to Date option to view job or project accounts through the period and year or date that you specify.
Select the Period/Date check box to use full periods for the thru date. When you select the Period/Date check box, you can specify the ending period and year in the Thru Period and Fiscal Year fields. The system retrieves balances for the period and fiscal year that you specify, and then accumulates period balances for period 1 through the thru period and year that you specify.
Clear the Period/Date check box to use a specific date. When you clear the check box, you can specify the ending date in the Thru Date field. The system retrieves balances for the date that you specify, and then accumulates period balances for period 1 through the date that you specify. The specific date applies to only the AA and AU ledgers. All other ledger amounts are retrieved for the full period.
-
Select the Period option to view records for the date range that you specify. You can use this option to specify a time period that extends over multiple years.
Select the Period/Date check box to use full periods for the beginning and ending dates. When you select the Period/Date check box, you can specify the beginning and ending periods and years by completing the From Period, From Fiscal Year, Thru Period and Thru Fiscal Year fields. The system retrieves balances from the beginning period and year that you specify through the ending period and year that you specify.
Clear the Period/Date check box to use specific dates. When you clear the Period/Date check box, you can complete the From Date and Thru Date fields. The system retrieves balances beginning with the date in the From Date field through the date in the Thru Data field. The specific date applies to only the AA and AU ledgers. All other ledger amounts are retrieved for the full period.
|
Note: For accounts in ledger types AA (actual amounts) and AU (actual units) only, the system uses the value in the G/L Posted Code field along with the values in the date fields to determine which records to include in the data selection.See G/L Posted Code. |
4.2.1.4 G/L Posted Code
You can specify whether to view posted, unposted, or all records for the AA and AU ledger type records. If you select All, then the system adds the amounts for the posted and unposted records.
The values that you select for dates affect how the system retrieves amounts when you select an option in the G/L Posted Code field. The system retrieves values from the F0911 table only when the amounts for the date range are not in the F0902 table, such as a date range for a partial period.
4.2.1.5 Summarization
You use the options in the Summarize by list to specify how the system calculates totals for your selected job records. The options do not affect the display of records in the grid on the Work with Project Management Console form. Instead, they affect how the system displays records, including the calculated totals, on the Project Management Console form. You can specify an option on the Work with Project Management Console form to determine the initial display of records on the Project Management Console form, and then change it as necessary after you access the Project Management Console form. If you change the summarization option on the Project Management Console form, the system refreshes the display to show columns in the new summary order.
You can summarize jobs by these options:
| Job Option | Description |
|---|---|
| Job | When you summarize by job, the Project Management Console form displays a list of jobs in sequential order in the Summary subform. If you select a job in the Summary subform, the Project Management Console form displays in the Account Details subform the accounts associated with the selected job. |
| Project | When you summarize by project, the Project Management Console form displays the projects sorted in sequential order in the Summary subform, and sorts the jobs within the project in sequential order. If you select a project-level line in the Summary subform, the Project Management Console form displays in the Account Details subform the accounts associated with the selected project. If you select a job-level line, the Project Management Console form displays in the Account Details subform the accounts associated with the job. |
| Company | When you summarize by company, the Project Management Console form sorts and displays in the Summary subform the jobs sorted by the company number. If you select a company in the Summary subform, the Project Management Console form displays in the Account Details subform the accounts associated with the selected company. |
| Job Category Code | When you summarize by a job category code, you must also specify the category code to use. You can specify any one of the job category codes that you associated with the job in the Job Master Revisions program. The Project Management Console form displays in the Summary subform the category code values and the jobs associated with the category code value. If you select a line in the Summary subform, the Project Management Console form displays in the Account Details subform summarizations of the accounts associated with the category code value. |
| Supervisor | When you summarize by supervisor, the system groups the jobs by the supervisor assigned to the job and displays the jobs in the Summary subform. If you select a job in the Summary subform, the Project Management Console form displays in the Accounts Details subform the account details associated with the job assigned to the supervisor. |
| Owner Address | When you summarize by the job owner, the system groups the jobs by the owner's address book number that you associated with the job on the More Detail tab in the Job Master Revisions program (P51006) and displays the jobs in the Summary subform. If you select a job in the Summary subform, the Project Management Console form displays in the Accounts Detail subform the accounts associated with the selected job. |
| Address Number 1–5 | When you summarize by an address book number, the system groups the jobs by the address book number that is associated with the job on the Cat Codes 41-50 / AB No tab in the Job Master Revisions program and displays the jobs in the Summary subform. If you select a job in the Summary subform, the Project Management Console form displays in the Accounts Detail subform the accounts associated with the selected job. |
| State | When you summarize by state, the system groups the jobs by the state that you associated with the job and displays the jobs in the Summary subform. If you select a job in the Summary subform, the Project Management Console form displays in the Account Details subform the accounts associated with the selected job. |
| Contract Type | When you summarize by contract type, the system groups the jobs by the contract type that you associated with the job and displays the jobs in the Summary subform. If you select a job in the Summary subform, the Project Management Console form displays in the Account Details subform the accounts associated with the selected job. |
| Account Category Codes | When you summarize by an account category code, you must also specify the category code to use. You can specify any one of the account category codes that you associated with the account. The Project Management Console form displays in the Summary subform the category code values and the jobs associated with the category code value. If you select a line in the Summary subform, the Project Management Console form displays in the Account Details subform summarizations of the accounts associated with the category code value. |
| Alternate Cost Code | In the JD Edwards EnterpriseOne Job Cost system, you can set up alternative codes by which to view costs. Select the Alternate Cost Code list item to view records summarized by the alternate cost code that you set up in the JD Edwards EnterpriseOne Job Cost system. |
4.2.1.6 Cost Sequences
When you set up the cost structure for jobs and projects, you set up cost codes and cost types as tasks in a work breakdown structure (WBS) for a job. The cost code identifies a specific task within a job. The cost code is equivalent to the subsidiary account that you use for most general ledger accounts. The cost type identifies specific costs within the activity, such as labor or materials. The cost type is equivalent to the object account that you use for most general ledger accounts. Note that the cost structure for jobs reverses the relationship of the subordinate accounts from the relationship present in most general ledger accounts.
You use the Sequence by option to specify how to sequence the data in the Project Management Console form. You can sequence records by the cost code and then the cost type, or by the cost type and then the cost code. The value that you specify for the account sequencing also controls how the system totals the accounts by level of detail in the Project Management Console form.
|
Note: If you specify an account range in the Account Range Name field, you must select in the Sequence by field the same cost structure that you assigned to the account range. For example, if you set up the account range to use the Cost Type/Cost Code sequence, you must select the Cost Type/Cost Code list item in the Sequence by field. |
4.2.1.7 As If Currency Processing
When you set up column definitions, you can specify whether to enable the display of the data in an as if currency when you generate the records to view. You can enable the as if currency processing for these column types:
-
Non-JA Budget Amount Ledgers
-
Billing Amount
Only certain billing amount options enable you to use as if currency processing. For example, you cannot enable as if currency processing for billing amounts for units.
-
Formula
-
Ledger Type
Though you can select the As If Currency Enabled check box for any ledger type, the system does not apply as if currency processing to ledgers set up as unit ledgers.
On the Work with Project Management Console form, you specify the as if currency code and the currency exchange rate date. When you generate the records to view, the system applies the exchange rate for the currency code and displays amounts for the enabled columns in the Project Management Console form in the as if currency.
You can convert the threshold amounts in visual alert columns to an as if currency by specifying the as if currency in the Threshold Currency Code field on the Project Management Console Column Definitions form. See Setting Up Columns with Visual Alerts.
|
Note: To use multicurrency processing, you must enable multicurrency processing in the General Ledger constants for your JD Edwards EnterpriseOne system. |
4.2.2 Columns 1–20 and Columns 21–40 Tabs
When you access the Work with Project Management Console form, the system populates the Column fields on the Columns 1–20 and Columns 21–40 tabs with the column names that are associated with your default column layout. For example, if you specify AB in the Column Layout processing option and the column layout that is named AB includes 15 column names, the name AB appears in the Column Layout field on the Display tab, and the names of the 15 columns appear on the Columns 1-20 tab in the order and in the column fields (Column 01–Column 40) that you used when you set up the column layout. If you did not specify a default column layout in the processing option, then no column names appear on the Columns 1–20 and Columns 21–40 tabs and you must either:
-
Enter a column layout name in the Column Layout field.
-
Select at least one column name on the Columns 1–20 or Columns 21–40 tabs.
You can add additional column names or delete the default column names that appear on the Columns 1–20 and Columns 21–40 tabs to control the data to include on the Project Management Console form. You must include at least one column name on the Columns 1–20 or Columns 21–40 tabs before you process your record selection. If you do not include at least one column name, then the system displays an error message.
You can select a column layout other than the default column layout that you specify in the Column Layout processing option. Settings in other processing options determine whether you can use a column layout that includes billing amount columns, and whether you can save changes that you make to the column layout.
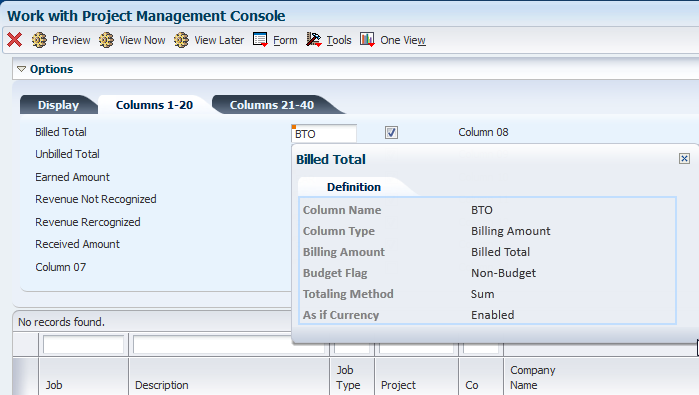
4.2.2.1 Column Information Hover Forms
As you select columns on the Columns 1–20 and Columns 21–40 tabs, you can view information about the columns by clicking on the small orange square that appears in the upper left corner of the Column fields. When you click on the square, the system opens a column information hover form that includes information such as the column type, the totaling method, whether as if currency is enabled for the column, and other factors. The form automatically closes when you move your mouse away from the form.
You can access the column information hover forms in the Project Management Console Column Layout, Work with Project Management Console, and Project Management Console programs.
The column information that the system displays on the form differs based on the column type. For all column types, the system displays the values for the Column Heading, Column Name, and Column Type fields. You can view the values for these additional fields, depending on the column type:
-
Non-JA Budget Amount Ledgers and Non-JA Budget Unit Ledgers columns.
-
Budget Flag
-
Totaling Method
-
As If Currency
-
-
Billing Amount column
-
Billing Amount
-
Budget Flag
-
Totaling Method
-
As If Currency
-
-
Formula column
-
Names of the columns used in the segments and the operators, including the segments and operators for other included formulas.
For example, the system might show this formula in the column information hover form: (AA/AU)*55. In this example the column names and operator within the parentheses is the formula column included within another formula.
You can click the With Column Headings tab to view the formula with the column headings instead of the column names.
-
As If Currency
-
-
Ledger Type column
-
Ledger Type
-
Budget Flag
-
Totaling Method
-
As If Currency
-
-
Percent column
-
Totaling Method
-
As If Currency
-
-
Visual Alert column
-
Alert Basis Column (column name and column heading)
-
Alert Operator
-
Threshold Currency Code
-
Level 1 Threshold, Level 2 Threshold, and Level 3 Threshold
-
4.2.2.2 Billing Amount Columns
The system allows you to select columns for billing amounts only when the Display Contract/Service Billing Columns processing option is set to enable you to view columns with billing amounts. If the version of the Work with Project Management Console program that you use does not enable billing columns, the system displays an error message if you select a column layout or column name that includes billing data. Clear the fields on the Columns 1–20 and Columns 21–40 tabs that indicate an error to continue the process.
4.2.2.3 Check Boxes for Chart Control
The Columns 1–20 and Columns 21–40 tabs include check boxes next to the fields for column names. If you selected check boxes when you set up the columns, the system checks the boxes on the Columns 1–20 and Columns 21–40 tabs for your selected columns. You can select or clear check boxes on the Columns 1–20 and Columns 21–40 tabs.
The system uses the check boxes to determine which columns to include in the Chart section on the Project Management Console form. Select the check box for each column that you want to include on the Display tab in the Chart section. You can change your selections on the Selection tab in the Chart section. The system does not enable the check boxes for visual alert columns.
4.2.2.4 Saving Changes to Column Layouts
If the Restrict Column Layout processing option is set to enable changes, you can save new or modified column layouts from the Work with Project Management Console form. If the processing option is set to restrict changes, then you must use the Project Management Console Column Layout program (P51X91) to change column layouts.
Note that saving column layouts in the Work with Project Management Console form does not save the display options, such as the Summarize by value that you specify on the Work with Project Management Console form.
See Saving a Column Layout in the Work with Project Management Console Program and Defining Column Layouts.
4.2.3 Grid
After you set the options on the Work with Project Management Console form, you can preview the records. When you click the Preview button, the system runs validations, such as validating that the date pattern is the same for all companies if your dataset includes multiple companies, and then displays the preview results in the grid on the Work with Project Management Console form. Previewing records on the Work with Project Management Console form is optional.
4.2.3.1 QBE Line and Query Management
You can use the query-by-example (QBE) line to define or refine the data to include in your data selection. For example, if your preview includes multiple companies and you want to include the data for one company only, you can enter the company number in the QBE line and display only the records for the specified company. When you click the View button, the system includes only the records for the specified company in the data that you can view in the Project Management Console form. You can enter values in the QBE line before you first click Preview to limit the data that the program displays in the grid.
You can use the Query Management function to save search criteria for the grid. If you save an enhanced query, you can populate the grid with data that meets the query data. For example, if you create and save an enhanced query that includes a company number and specify to use that query as a default value, then the Work with Project Management Console form initializes with the data for the specified company number when you click the Preview button.
See "Working with Search Criteria" in the JD Edwards EnterpriseOne Tools Foundation Guide.
4.2.4 Real-Time Views and Saved Views
After you specify the parameters for viewing job and billing information, you can generate the results and view them in real-time or you can save the results to view at a later time. You can save results to view later only when the Allow View Later Processing processing option is set to enable saving.
Click the View Now button to open the Project Management Console program immediately after the process generates the results. When you use the View Now button, the system does not save the generated results when you exit the Project Management Console form unless you specifically save the results.
Click the View Later button to generate results and save them to view later. When you click the View Later button, the system opens the Edit View Description form. You must enter a description. You can enter up to 120 characters.
Whether you save the results from the Project Management Console program or by clicking the View Later button, you access the saved records using the Project Management Console View program (P51X0310).
4.3 Specifying Job and Billing Data to View
This section lists prerequisites and discusses how to:
-
Set processing options for Work with Project Management Console (P51X0200).
-
Specify job and billing data to view.
-
Save a column layout in the Work with Project Management Console program.
4.3.1 Prerequisites
Before you perform the tasks in this section:
-
Set up column definitions in the Project Management Console Column Definition program (P51X90).
-
Optionally, set up column layouts in the Project Management Console Column Layouts program (P51X91).
-
Optionally, set up account ranges.
-
Verify that the next numbering scheme for view IDs is set up on line 1 for system 51X in the Next Numbers program (P0002).
-
Run the processes to update your job records so that you have up-to-date job information.
See "Tracking Job Progress" and "Recognizing Profit" in the JD Edwards EnterpriseOne Applications Job Cost Implementation Guide.
-
Generate the billing workfile so that you have up-to-date billing records.
4.3.2 Setting Processing Options for Work with Project Management Console (P51X0200)
Processing options enable you to specify default values.
4.3.2.1 Defaults
- 1. Column Layout
-
Specify the default column layout to display in the Work with Project Management Console form. You set up column layouts in the Project Management Console Column Layout program (P51X91). You can change the column layout on the Work with Project Management Console form if the Restrict Column Layout processing option is set to enable a change.
If you do not specify a column layout in this processing option, then you must specify at least one column name on the Columns 1–20 or Columns 21–40 tab.
- 2. Restrict Column Layout
-
Specify whether you can create a new column layout or save changes to an existing column layout in the Work with Project Management Console form. The system saves the changes to the Column Layout table (F51X91).
Blank: Restrict changes and additions to Column Layout. If you leave this processing option blank, then you cannot save changes or create a new column layout.
1: Allow changes and additions to Column Layout. If you enter 1 in this processing option, then you can create a new version or save changes that you make to an existing version.
- 3. Suppress Accounts with Zero Balances
-
Specify whether to initialize the Project Management Console form showing accounts with zero balances. You can select or clear the Suppress Zero Accounts check box on the Project Management Console form to override the value that you enter in this processing option.
Values are:
Blank: Display accounts. The Project Management Console form shows accounts with zero balances and does not select the Suppress Zero Accounts check box.
1: Suppress accounts. The Project Management Console form suppresses accounts with zero balances and selects the Suppress Zero Accounts check box.
- 4. Suppress Header Accounts
-
Specify whether to initialize the Project Management Console form showing header accounts. You can select or clear the Suppress Header Accounts check box on the Project Management Console form to override the value that you enter in this processing option.
Values are:
Blank: Always display header accounts. The Project Management Console form displays the non-posting header accounts with zero balances and does not select the Suppress Header Accounts check box.
1: Suppress header accounts with zero balances. The Project Management Console form does not display the non-posting header accounts with zero balances and selects the Suppress Header Accounts check box.
- 5. Display Cost Code Description
-
Specify whether to initialize the Project Management Console form showing cost code descriptions. You can select or clear the Display Cost Code Description check box on the Project Management Console form to override the value that you enter in this processing option.
Values are:
Blank: Do not show description. The Project Management Console form does not display cost code descriptions and does not select the Display Cost Code Description check box.
1: Show description. The Project Management Console form shows the cost code descriptions in the Account Details subform and selects the Display Cost Code Description check box.
- 6. Show Job Totals
-
Specify whether to initialize the Project Management Console form showing job totals in the Summary subform. Note that the grid in the Summary subform is also referred to as the top grid. You can select or clear the Show Job Totals check box on the Project Management Console form to override the value that you enter in this processing option.
Values are:
Blank: Do not show job totals in top grid. The Project Management Console form does not display job totals in the Summary subform and does not select the Show Job Totals check box.
1: Show job totals in top grid. The Project Management Console form shows job totals in the Summary subform and selects the Show Job Totals check box.
- 7. As If Currency Code
-
Specify the currency code that the system uses to generate records in an as if currency. The value that you enter must exist in the Currency Codes table (F0013). You complete this field only if you want to use as if currency. You can change the currency code on the Work with Project Management Console form. The system generates as if currency records for only the columns for which as if currency is enabled.
- 8. As If Exchange Rate Date
-
Specify the exchange rate date to use for as if currency processing. If you do not complete this field, then the system uses the current date. You can change the date on the Work with Project Management Console form. The base currency and the as if currency must be set up in the Currency Exchange Rates table (F0015).
- 9. Account Range Name
-
Specify the name of the account range for which you generate records to view. You set up account range names in the Project Management Account Ranges program (P51X100). If you do not specify an account range name, then the system generates records for all accounts. You can change the account range name on the Work with Project Management Console form.
When you set up account range names in the Project Management Account Ranges program, you specify whether to sequence by the cost type and then the cost code, or by the cost code and then the cost type. The sequence order that you specify in the Sequence by field on the Work with Project Management Console form must be the same as the named account range or the system will issue an error message.
4.3.2.2 Process
- 1. Display Contract/Service Billing Columns
-
Specify whether to enable users to include columns for contract billing and the values associated with the billing columns.
Blank: Do Not Display. The system does not enable users to select columns associated with billing amounts in the Work with Project Management Console program. If the user selects a column layout that includes a billing amount column, then the system requires that the user clear the billing column names from the Columns 1–20 and Columns 21–40 tabs before continuing.
1: Allow Display. The system does not place restrictions on the use or selection of columns associated with billing amounts.
- 2. Expand Chart Control Upon Entry
-
Specify whether to initialize the Project Management Console program with the Chart subform expanded. On the Chart subform, you can view a bar graph of your data.
Values are:
Blank: Do Not Expand Chart. The system launches the Project Management Console form without expanding the Chart subform.
1: Expand Chart. The system launches the Project Management Console form with the Chart subform expanded.
- 3. Allow View Later Processing
-
Specify whether to allow users to generate records to view at a later time or to save generated records. If you allow view later processing, the Work with Project Management Console form includes a View Later button and the Project Management Console form includes a Save Results option. If you do not allow view later processing, you cannot save records to view later.
Values are:
Blank: Do not allow view later processing.
1: Allow view later processing.
- 4. Work with Project Management Console View (P51X0310)
-
Specify the version of the Work With Project Management Console View program (P51X0310) to call when you access the program from the Work with Project Management Console form. If you leave this processing option blank, the system uses version ZJDE0001.
4.3.2.3 Account Ledger Inquiry
- 1. Account Ledger Inquiry Version (P09200)
-
Specify the version of the Account Ledger Inquiry program to use when you select a record in the Account Details subform and then select Account Ledger from the More Row Exits list in the Account Details subform. If you leave this processing option blank, the system uses version ZJDE0001.
- 2. Default Account Ledger Inquiry Types
-
Ledger Type 1: Specify the default ledger type to assign to the corresponding field when you access the Account Ledger Inquiry program (P09200). If you leave this option blank, the system assigns ledger type AA.
Ledger Type 2: Specify the value for ledger type 2 to assign to the corresponding field when you access the Account Ledger Inquiry program (P09200). Ledger type 2 is valid only when ledger type 1 has a value of AA, CA, XA, YA, or ZA. Valid values for ledger type 2 are:
AA
CA
XA
YQ
ZA
4.3.2.4 Job Versions
- 1. Account Progress Entry (P510211)
-
Specify the version of the Account Progress Entry program to use when you select a record in the Account Details subform and then select Account from the More Row Exits list in the Account Details subform. If you leave this processing option blank, the system uses version ZJDE0001.
- 2. Job Progress Entry (P510212)
-
Specify the version of the Job Progress Entry program to use when you select a record in the Summary subform and then select Job from the Row menu. If you leave this processing option blank, the system uses version ZJDE0001.
- 3. Performance Based Labor Progress Entry (P510312)
-
Specify the version of the Performance Based Labor Progress Entry program to use when you select a record in the Account Details subform and then select Performance Labor from the More Row Exits list in the Account Details subform. If you leave this processing option blank, the system uses version ZJDE0001.
- 4. Original Budget (P510121)
-
Specify the version of the Original Budget program to use when you select a record in the Summary subform and then select Budgets, then Budget Original, from the Row menu. If you leave this processing option blank, the system uses version ZJDE0001.
- 5. Budget Revisions (P510171)
-
Specify the version of the Budget Revisions program to use when you select a record in the Summary subform and then select Budgets, then Budget Revisions from the Row menu. If you leave this processing option blank, the system uses version ZJDE0001.
- 6. Scheduling Workbench (P48201)
-
Specify the version of the Scheduling Workbench program to use when you select a record in the Summary subform and then select Work Orders, then WO Sch Workbench from the Row menu. If you leave this processing option blank, the system uses version ZJDE0001.
- 7. Work w/ Contract Detail (P4310)
-
Specify the version of the Work w/ Contract Detail program to use when you select a record in the Summary subform and then select Subcontracts from the Row menu. If you leave this processing option blank, the system uses version ZJDE0015.
- 8. Commitment Inquiry (P40230A)
-
Specify the version of the Commitment Inquiry program to use when you select a record in the Account Details subform and then select Commitment Inquiry from the More Row Exits list. If you leave this processing option blank, the system uses version ZJDE0001.
- 9. Work with Change Requests (P5310)
-
Specify the version of the Change Management program to use when you select a record in the Summary subform and then select Change Management from the Row menu. If you leave this processing option blank, the system uses version ZJDE0001.
- 10. Work with Account Change Request Inquiry (P53220)
-
Specify the version of the Work with Account Change Request Inquiry program to use when you select a record in the Account Details subform and then select Account Inquiry from the More Row Exits list. If you leave this processing option blank, the system uses version ZJDE0001.
- 11. Work Order Cost by Job (P48210)
-
Specify the version of the Work Order Cost by Job program to use when you select a record in the Summary subform and then select Work Orders, WO Cost by Job from the Row menu. If you leave this processing option blank, the system uses version ZJDE0001.
- 12. Parent Work Order Inquiry (P48220)
-
Specify the version of the Parent WO Inquiry program to use when you select Parent WO Inquiry from the Form menu. If you leave this processing option blank, the system uses version ZJDE0001.
- 13. Work with Time Entry (P051121)
-
Specify the version of the Work with Time Entry program to use when you select Payroll/HRM, then TE by Employee from the Form menu. If you leave this processing option blank, the system uses version ZJDE0001.
- 14. Work with Profit Recognition (P5144)
-
Specify the version of the Profit Recognition program to use when you select a record in the Summary subform and then select Profit Recognition from the Row menu. If you leave this processing option blank, the system uses version ZJDE0001.
4.3.2.5 Contract Versions
- 1. Billing Workfile Revisions (P4812)
-
Specify the version of the Billing Workfile Revisions program to use when you select Cont/Srvc Billing, then Billing Revisions from the Form menu. If you leave this processing option blank, the system uses version ZJDE0001.
- 2. Billing Detail History (P4812H)
-
Specify the version of the Billing Detail History program to use when you select Cont/Srvc Billing, then Billing Detail Hist from the Form menu. If you leave this processing option blank, the system uses version ZJDE0001.
4.3.3 Specifying Job and Billing Data to View
To specify job and billing data to view:
-
Access the Work with Project Management Console form.
Form Name Form ID Navigation Work with Project Management Console W51X0200A Use one of these navigations: -
In-Memory Project Portfolio Mgmt (G5114).
Work with Project Management Console (P51X0200).
-
In-Memory Project Portfolio Mgmt (G5114).
Work with Project Management Console View (P51X0310).
Select the record to view.
Figure 4-2 Work with Project Management Console form: Display tab
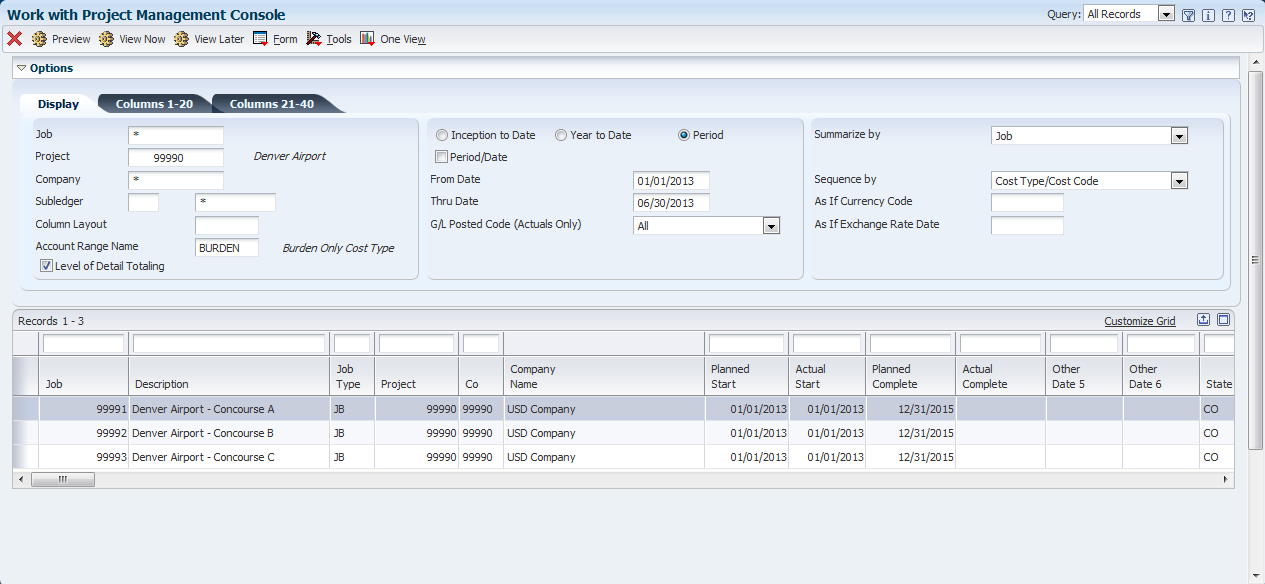
Description of "Figure 4-2 Work with Project Management Console form: Display tab"
-
-
On the Work with Project Management Console form, complete these fields on the Display tab:
- Job
-
Specify the job number for which you process records. Alternatively, you can specify a job in the QBE line or in an enhanced query. If you do not specify a job, the system includes all jobs in the data selection.
- Project
-
Specify the project number for which you process records. Alternatively, you can specify a project in the QBE line or in an enhanced query. If you do not specify a project, the system includes all projects in the data selection.
- Company
-
Specify the company for which you process records. Alternatively, you can specify a company in the QBE line or in an enhanced query. If you do not specify a company, the system includes all companies in the data selection.
- Subledger
-
Specify the subledger to use for data selection. If you do not specify a subledger, the system includes all subledgers in the data selection.
- Subledger Type
-
Specify the subledger type to use for data selection. If you do not specify a subledger type, the system includes all subleger types in the data selection.
- Column Layout
-
Verify that the column layout that you want to use appears in the Column Layout field.
You can specify a default column layout in the Column Layout processing option. If you complete the Column Layout field, the system includes the column names that are associated with the column layout on the Columns 1–20 and Columns 21–40 tabs.
Completing the Column Layout field is optional. If you do not complete this field, you must enter at least one column name on the Columns 1–20 or Columns 21–40 tabs.
- Account Range Name
-
Select an account range name to limit the display of records to the account range specified in the range. You set up account range names in the Project Management Account Ranges program (P51X100).
-
Select one of these date options:
- Inception to Date
-
Select this option to view job or project accounts through the period and year or date that you specify. When you select this option, the system includes the balance forward amount from the previous year.
- Year to Date
-
Select this option to view job or project accounts through the period and year or date that you specify.
- Period
-
Select the Period option to view records for the date range that you specify.
-
Select the Period/Date check box to enable the Thru Period and Thru Fiscal Year fields in which you enter the thru period and thru fiscal year for the Inception to Date and Year to Date options, or to enable the From Period, From Fiscal Year, Thru Period, and Thru Fiscal year fields for the Period option. Clear the Period/Date check box to enable the Thru Date field for the Inception to Date and Year to Date options, and enable the From Date and Thru Date fields for the Period option. The dates in the from date and thru date fields apply to only the AA and AU ledgers. All other ledger amounts are retrieved for the period of the specified date.
See Dates and Periods.
-
Select a value from the G/L Posted Code field to specify the account records to retrieve for the AA and AU ledgers. The values that you specify for the date options also affect how the system retrieves account values.
See G/L Posted Code.
Values are:
Posted
Unposted
All
-
Select a value from the Summarize by list. You must select an option.
You can summarize and re-summarize on the Project Management Console form using the same values as those listed here.
Values are:
-
Job
-
Project
-
Company
-
Job Category Code
When you select this value, the system displays the Category Code list from which you select the specific job category code to use for summarization.
-
Supervisor
-
Owner Address
-
Address Number 1
-
Address Number 2
-
Address Number 3
-
Address Number 4
-
Address Number 5
-
State
-
Contract type
-
Account Category Code
When you select this value, the system displays the Category Code list from which you select the specific account category code to use for summarization.
-
Alternate Cost Code
See Summarization.
-
-
Select a value from the Sequence by list. You must select an option. Values are:
-
Cost Code/Cost Type
-
Cost Type/Cost Code
See Cost Sequences.
-
-
In the As If Currency Code field, enter the currency code to use when generating records in as if currency. This field is optional.
The system processes account records in as if currency for only the columns that are set up to enable as if currency processing. The currency code that you enter must exist in the Currency Codes table (F0013).
-
In the As If Exchange Rate Date field, enter the currency exchange rate date to use for as if currency processing. If you complete the As If Currency Code field and use columns for which as if currency processing is enabled, the system uses the current date if you do not complete this field.
-
Select or clear the Level of Detail Totaling check box to control whether the process writes the rolled-up totals for accounts to the higher-level accounts for non-posting accounts.
-
Access the Columns 1–20 and Columns 21–40 tabs to add or delete column names and specify the columns to include in the Chart subform of the Project Management Console form. If you do not specify a value in the Column Layout field on the Display tab, then you must select at least one column on the Columns 1–20 or Columns 21–40 tab.
Figure 4-3 Work with Project Management Console form: Columns 1–20 tab
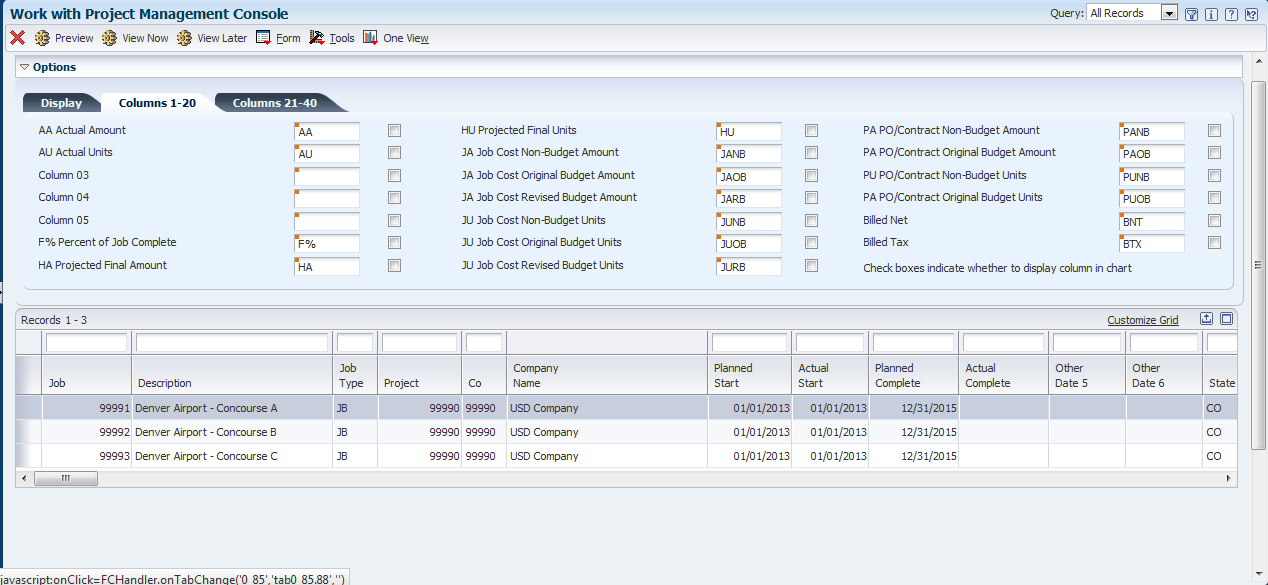
Description of "Figure 4-3 Work with Project Management Console form: Columns 1–20 tab"
You can view the details for the columns by clicking on the orange square in the upper left corner of the column fields. See Column Information Hover Forms.
-
(Optional) Select the check box to the right of a column name to have the column appear in the chart on the Display tab of the Chart subform. If you selected the check boxes when you set up the column layout that you use, then the system checks the box for you. You cannot select the check box for visual alert columns.
You can also select and clear the check boxes on the Selection tab of the Chart subform on the Project Management Console form.
-
Optionally, on the Display tab, click the Preview button to view the selected jobs in the Work with Project Management Console form. You can review data in the grid to determine if it meets your needs. Previewing records is optional. You can change the settings and click Preview as many times as necessary. After you preview records, you must click either the View Now or View Later button to continue.
-
On the Display tab, do one of the following:
-
Click the View Now button to process records and display the results in the Project Management Console form.
-
Click the View Later button to process records and save the results for later viewing.
You can use this option only when the Allow View Later Processing processing option allows you to save results.
The system opens the Edit View Description window in which you enter up to 120 characters in the Description field. You must complete the Description field.
See Viewing Job and Billing Data and Working With Saved Results.
-
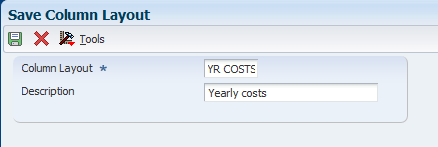
4.3.4 Saving a Column Layout in the Work with Project Management Console Program
To save a column layout in the Work with Project Management Console program:
-
Access the Work with Project Management Console form.
Form Name Form ID Navigation Work with Project Management Console W51X0200A In-Memory Project Portfolio Mgmt (G5114). Work with Project Management Console (P51X0200).
-
On the Work with Project Management Console form, select the Columns 1–20 or Columns 21–40 tab.
-
On the Columns 1–20 or Columns 21–40 tab, enter the column names that you want to include in the column layout.
You can also enter an existing column layout in the Column Layout field on the Display tab to populate the Column Name fields on the Columns 1–20 or Columns 21–40 tabs.
-
Select Save Column Layout from the Form menu.
-
On the Save Column Layout form, enter a name in the Column Layout field.
You can retain the original name if you are modifying an existing layout.
-
Optionally, enter additional text in the Description field.
If you are modifying an existing layout, the Description field shows the existing description. You can change, delete, or retain the text.
-
Click OK.