3 Setting Up Columns, Formulas, and Visual Alerts
This chapter contains the following topics:
-
Section 3.4, "Understanding the As If Currency Enabled Option"
-
Section 3.7, "Setting Up Columns for Non-JA and Non-JU Budget Ledgers"
3.1 Understanding Inquiry Columns
When you use the JD Edwards EnterpriseOne In-Memory Project Portfolio Management system, you determine the data to include. For example, you can specify that you want to see actual amounts and units from the AA and AU ledgers, or unbilled amounts for a job. To instruct the system to include the desired data, you create column definitions that specify the data to include.
When you set up column definitions, you specify features such as the column name; column type; whether the column is for amounts or units; whether the column is for a budget; and so on. You use the Project Management Console Column Definitions program (P51X90) to set up column definitions. The system saves the column definitions to the Column Definition table (F51X90).
After you set up column definitions, you can group the definitions together in a column layout. Grouping column definitions into column layouts enables you to quickly identify and use multiple columns to include in your selection criteria.
You use the column definitions and column layouts in the Work with Project Management Console program (P51X0200) to specify the data to view in the Project Management Console program (P51X0210).
To use the column definitions and layouts, you can:
-
Specify a column layout in the Work with Project Management Console form to display the columns in the Project Management Console form.
-
Omit specifying a column layout name in the Work with Project Management Console form and instead select the column definitions that you want to use by selecting the column definitions on the Columns 1–20 and Columns 21–40 tabs in the Work with Project Management Console program.
-
Specify the column layout to use, and then add additional column definitions to your inquiry criteria by selecting the additional columns on the Columns 1–20 and Columns 21–40 tabs.
Including columns by identifying them in the Work with Project Management Console program instead of, or in addition to, using a column layout enables you to make immediate changes to the list of columns to use. You can also remove from the inquiry criteria the columns that you do not want to use.
Whichever method you prefer, you use the column definitions and layouts to select the data to view in the Project Management Console program. You can set up as many column definitions as required for your business needs, and can include up to 40 column definitions in a column layout and in the Work with Project Management Console program.
This image illustrates the setup and use of column definitions and column layouts:
Figure 3-1 Setup and Use of Column Definitions and Layouts
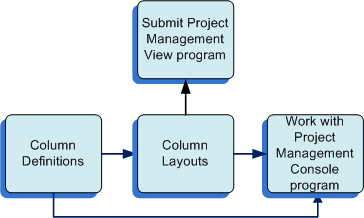
Description of "Figure 3-1 Setup and Use of Column Definitions and Layouts"
When you use columns in the Project Management Console Column Layout program (P51X91), the Work with Project Management Console program and the Project Management Console program, you can view the details about the column such as the column type, the totaling method, and whether as if currency is enabled for the column. See Column Information Hover Forms.
3.2 Understanding Column Types
You can set up columns for various column types. The type of column that you specify in the column definition determines the other factors that you identify for the column definition. The JD Edwards EnterpriseOne In-Memory Project Portfolio Management system provides hard-coded values for column types in the Column (51X/CT) UDC table.
This table lists the column types and their usage:
| Column Type | Usage |
|---|---|
| 1: Ledger Type | Use this column type to include values from a ledger type that you specify. For example, you can create a column definition for the Actual Amounts (AA) ledger to include the AA ledger amounts. When you use the column when you specify your data selection, the process includes the ledger amounts from the Account Balances table (F0902) for the jobs that you include in your data selection.
The ledger type must exist in the Ledger Type Master File (F0025). |
| 2: Non-JA Budget Amount Ledgers | Use this column type to include amounts from ledger types for which the Revised Budget Ledger option is enabled in the F0025 table. When you use this column type the system retrieves amounts from all budget amount ledgers except the JA ledger. |
| 3: Non-JA Budget Unit Ledgers | Use this column type to include amounts from ledger types for which the Revised Budget Ledger option is enabled in the F0025 table. When you use this column type the system retrieves units from all budget unit ledgers except the JU ledger.
See Setting Up Columns for Non-JA and Non-JU Budget Ledgers. |
| 4: Billing Amount | Use this column type to include values for billing amounts, such as billed, unbilled, earned, and revenue amounts. You select a value from the Billing Amount (51X/BA) UDC table to specify which billing amount to include. For example, you can create a column definition for the total billed amounts. When you use the column when you specify your data selection, the process includes the total billed amounts from the Billing Workfile History table (F4812H) for the jobs that you include in your data selection. |
| 5: Formula | Use this column type to create columns for formulas that use existing columns and arithmetic operators to build a formula. For example, you could create a ledger type column for ledger AA and a ledger type column for ledger AU and then create a formula column to divide the AA column by the AU column and show the result in the formula column when you view the job and cost details.
The system enables the fields in the Formula section when you use this column type. |
| 6: Percent Complete | Use this column type to have the system calculate the percent complete for the AA, AU, HA, and HU ledger types according to the method of computation associated with the accounts for the ledger.
If you want to display values for the F% ledger, use the Ledger Type column type. |
| 7: Visual Alerts | Use this column type to set up indicators to alert you when amounts exceed a threshold that you specify. When you set up this column type, you specify a ledger type, billing amount, or formula column, and specify the threshold levels that trigger the alerts.
The system enables the fields on the Visual Alerts section when you use this column type. |
3.3 Understanding Totaling Methods
For all column types except the visual alert column type, you can complete the Totaling Method field to specify whether to sum or average amounts, or to apply no totaling method. The system applies the totaling method that you select to the summary records in the Project Management Console form.
The totaling methods are:
-
Sum
When you select this option, the system sums amounts and displays the summed amounts in the Summary or Account Details subforms. For example, suppose that you have four records with these amounts:
-
Record 1 = 100
-
Record 2 = 300
-
Record 3 = 0
-
Record 4 = 400
When you apply the Sum totaling method, the system adds the values and displays the total in the Project Management Console form. The total for the records listed is: 100+300+0+400 = 800.
The system applies level of detail totaling for only columns that use the Sum totaling method.
Sum is the default value.
-
-
Average - Exclude zero amounts
When you select this option, the system accumulates amounts, excluding zero amounts, and then calculates an average for the amounts. For example, suppose that you have four records with these amounts:
-
Record 1 = 100
-
Record 2 = 300
-
Record 3 = 0
-
Record 4 = 400
When you apply the Average - Exclude zero amounts totaling method, the system adds the values excepting the 0 values, and then divides the total by the number of records. The system then displays the averaged amount in the Project Management Console form. The average excluding zero amounts for the records listed is: 100+300+400 = 800, and then 800 divided by 3 records, for a total of 266.67.
-
-
Average - Include zero amounts
When you select this option, the system accumulates amounts, including zero amounts, and then calculates an average for the amounts. For example, suppose that you have four records with these amounts:
-
Record 1 = 100
-
Record 2 = 300
-
Record 3 = 0
-
Record 4 = 400
When you apply the Average - Include zero amounts totaling method, the system adds the values including the 0 values, and then divides the total by the number of records. The system then displays the averaged amount in the Project Management Console form. The average including zero amounts for the records listed is: 100+300+0+400 = 800, and then 800 divided by 4 records, for a total of 200.
-
-
None
When you select this option, the system does not generate records for the totals of the columns.
You cannot specify a totaling method for visual alert columns. See Setting Up Columns with Visual Alerts.
3.3.1 Summary Option Effect on Totaling Methods
The system uses the totaling method along with the Summarize by option that you specify in the Work with Project Management Console or Project Management Console programs to determine how to display job, summary, and detail records. The Summarize by option enables you to specify whether to generate totals by these summarization options:
-
Job
-
Project
-
Company
-
Job Category Code
When you select this value, the system displays the Category Code list from which you select the specific job category code to use for summarization.
-
Supervisor
-
Owner Address
-
Address Number 1
-
Address Number 2
-
Address Number 3
-
Address Number 4
-
Address Number 5
-
State
-
Contract type
-
Account Category Code
When you select this value, the system displays the Category Code list from which you select the specific account category code to use for summarization.
-
Alternate Cost Code
3.3.1.1 Examples of Totaling Methods with Summarize by Options
Suppose that you set up columns with these totaling methods:
-
Column 1: Sum
Column 2: Average - Exclude Zero Amounts
Column 3: Average - Include Zero Amounts
Column 4: None (no totaling method)
The summary totals that the system displays in the Summary and Account Details subforms of the Project Management Console form differ depending on the Summarize by option that you select.
Suppose that you run the process for a project and summarize the results using the Job summary option. The system displays the following information in the Project Management Console form:
-
The Summary subform includes a line for each job in the project.
-
Column 1 includes totals that are the sum of amounts of all detail records.
-
Column 2 includes totals that are the average of all detail records excluding accounts with zero amounts.
-
Column 3 includes totals that are the average of all detail records including accounts with zero amounts.
-
Column 4 shows 0 (zero) for the total.
-
-
The Account Details subform includes a line for each account for the selected job. The system always applies the Sum totaling method to detail lines.
You can select a different summary option and resummarize the results. Suppose that you resummarize the results by the Supervisor, State, or Account Category Code options. When you resummarize the results, the values for the totals change. The system displays this information in the Project Management Console form when you summarize by a factor that is associated with a job or account:
-
The Summary subform includes a line for each instance of the job summary option for all jobs in the project. If you also display job records, both the summary and job records display column amounts with the totaling method applied.
The job and summary totals for the columns are:
-
Column 1 includes the sum of the amounts of all details records.
-
Column 2 includes totals that are the average of all detail records excluding accounts with zero amounts.
-
Column 3 includes totals that are the average of all detail records including accounts with zero amounts.
-
Column 4 shows 0 (zero) for the totals.
-
-
The Account Details subform includes a line for each account for the job option selected in the Summary subform. The system always applies the Sum totaling method to detail lines.
3.4 Understanding the As If Currency Enabled Option
You might need to convert the amounts displayed in the Project Management Console form to a currency other than the base currency for a company. You can specify whether to enable as if currency processing for these column types:
-
Non-JA Budget Amount Ledgers
-
Billing Amount
Only certain billing amount options enable you to use as if currency processing. For example, you cannot enable as if currency processing for billing amounts for units.
-
Formula
-
Ledger Type
Though you can select the As If Currency Enabled check box for any ledger type, the system does not apply as if currency processing to ledgers set up as unit ledgers.
The system displays amounts on the Project Management Console form in the as if currency only when you complete this set up:
-
You activate multicurrency processing by entering Y or Z in the Multi-Currency Conversion (Y, N, Z) field in the General Ledger constants for your JD Edwards EnterpriseOne system.
-
You select the As If Currency Enabled option for the column.
-
You specify a valid as if currency code in the As If Currency Code field on the Work with Project Management Console form.
Valid as if currencies are those that exist in the Currency Codes table (F0013). You can also specify this value in a processing option to provide a default value for the field on the Work with Project Management Console form.
-
You specify the currency exchange rate date in the Currency Code Exchange Rate Date field on the Work with Project Management Console form if you want to use a date other than the current date.
An exchange rate record for the base and as if currencies must exist in the Currency Exchange Rates table (F0015). You can also specify this value in a processing option to provide a default value for the field on the Work with Project Management Console form.
When you process job and billing records and include columns for which as if currency processing is enabled, the system does not use soft rounding. Because the system does not use soft rounding, rounding variances might occur in the displayed amounts.
You might run the project financial management process for multiple companies that have different currencies. When you enable as if currency processing, the system displays the amounts for all companies in the as if currency. For example, suppose that you have a company with a base currency of USD (US dollars), one with a base currency of YEN (Japanese Yen), and one with a base currency of EUR (Euro) and you want to show all amounts in EUR. When you run the process, the system uses the exchange rate information from the F0015 table to convert the display of the USD and YEN amounts to EUR. Because the amounts for the third company is already in EUR, no currency calculations are performed for the amounts for that company.
3.5 Understanding Decimal Display Values
When you process records to view, the system applies default decimal display values unless you override the default values.
For columns for amounts, the default decimal display is the number of decimal places for the currency assigned to the company, or the number of decimals for the as if currency if you specify to process records using an as if currency. If the column is for units, then the default value for the number of decimal places is the number of decimal places set up for the Units data item (data item U). If the column is for a unit price, then the default value for the number of decimal places is the number of decimal places set up for the Unit Price data item (data item UP).
You enter a value from 0-9 in the Decimal Display Override field if you want to use a value other than the default value. The system displays up to nine decimal places in the Project Management Console form whether the decimal value is from a default value for the currency or data item, or whether you enter an override value.
3.6 Setting Up Columns for Ledger Types
This section provides an overview of ledger type columns and discusses how to set up a column definition for a ledger type.
3.6.1 Understanding Ledger Type Columns
When you set up ledger type columns, you specify a ledger type to include in the column. You specify elements such as whether the ledger is for a budget, which totaling method to apply to the column, and whether to enable as if currency for the column.
For most ledger types, the system obtains values to display in the Project Management Console form from the Account Balances table (F0902). However, for the AA (account actual) and AU (account unit) ledger types, the system obtains values from the F0902 table, the Account Ledger table (F0911), or both the F0902 and F0911 tables based on your date selection and the value that you specify for the G/L posting code. See G/L Posted Code.
You can use ledger type columns as segments in formulas, and can select a ledger type column as the basis column for a visual alert column.
See Setting Up Columns with Formulas and Setting Up Columns with Visual Alerts.
3.6.2 Setting Up a Column Definition for a Ledger Type
To set up a column definition for a ledger type:
-
Access the Project Management Console Column Definitions form.
Form Name Form ID Navigation Project Management Console Column Definitions W51X90B In-Memory Project Portfolio Mgmt (G51411). Column Definitions (P51X90).
Click Add on the Work with Project Management Console Column Definitions form.
Figure 3-2 Project Management Console Column Definitions form: Ledger Type
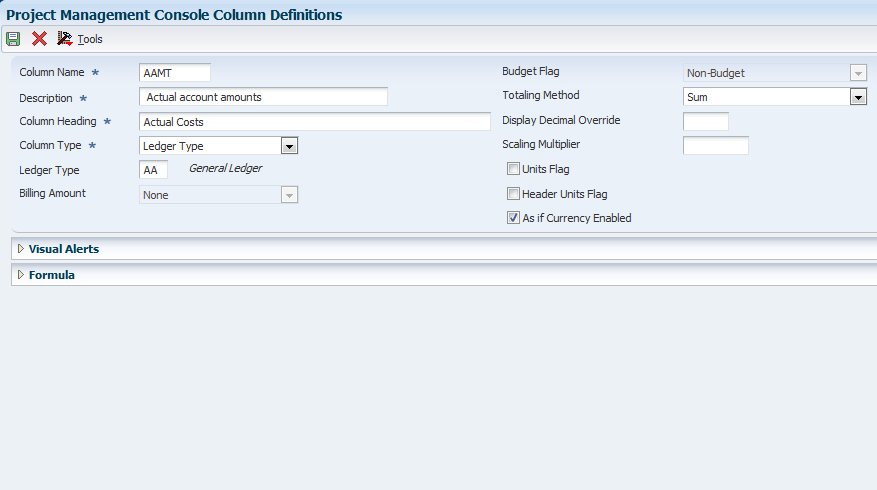
Description of "Figure 3-2 Project Management Console Column Definitions form: Ledger Type"
-
Enter values in these fields and select or clear the options:
- Column Name
-
Enter a name for the column that you create. This field is required.
- Description
-
Enter a description for the column that you create. This field is required.
- Column Heading
-
Enter the name that you want to use for a label for the column when the column name appears in the Work with Project Management Console and Project Management Console forms. This field is required.
- Column Type
-
Select Ledger Type.
- Ledger Type
-
Select a value from the Ledger Type (09/LT) UDC table to specify the ledger type for the column. The value that you enter must also exist in the Ledger Type Master File (F0025). You must complete this field when you select Ledger Type in the Column Type field.
Examples of values are:
AA: Actual amounts
AU: Actual units
JA: Budget amounts
JU: Budget units
- Budget Flag
-
Select an option to specify whether the ledger type for the column is budget ledger. If the system can determine that the ledger type that you selected is not for a budget, then the system disables the Budget Flag field.
Values are:
Non-Budget
Original Budget
Revised Budget
- Totaling Method
-
Select an option to specify whether the system sums or averages the values in the column, or whether the system does not apply any totaling method. See Understanding Totaling Methods.
Values are:
Average - Exclude zero amounts. The system does not include zero amounts when it averages the values in the column.
Average - Include zero amounts. The system includes zero amounts when it averages the values in the column.
None. The system does not apply a totaling method to the column values.
Sum. The system adds the values in the column. This is the default value.
- Display Decimal Override
-
Enter the number of decimal places to override the default decimal value for the currency amount, unit, or unit price of the column. See Understanding Decimal Display Values.
- Scaling Multiplier
-
Enter the factor by which the system multiplies amounts or units in a column. The system multiplies the accumulated amounts by the multiplier factor before it displays the result on the Project Management Console form.
For example, if you want to scale large numbers to thousands, enter.001. If you want percentages to appear as whole numbers, enter 100.
- Units Flag
-
If you selected a ledger type that is for units, select this check box to indicate that the ledger type is for units. If the system can determine that the ledger type is for units, then the system selects the check box for you.
- Header Units Flag
-
If you selected the Units Flag check box, select the Header Units Flag check box to use header units instead of account units.
- As If Currency Enabled
-
Select this check box to enable as if currency processing. If you select this check box and enter a currency code when you specify your data in the Work with Project Management Console program (P51X0200), the system calculates the values for the column in the currency specified on the Work with Project Management Console program, and displays the values in the as if currency on the Project Management Console form.
-
Click OK.
3.7 Setting Up Columns for Non-JA and Non-JU Budget Ledgers
This section provides an overview of columns for non-JA and non-JU budget ledgers, and discusses how to:
-
Set up a column definition for non-JA budget amount ledgers.
-
Set up a column definition for non-JA budget unit ledgers.
3.7.1 Understanding Columns for Non-JA and Non-JU Budget Ledgers
You can set up columns that include all budget amount ledgers or all budget unit ledgers. The system uses the value in the Flag - Job Cost Revise Budget Amt Ldgr field (data item FBL) to determine whether a ledger type is for a budget amount or unit that can be revised.
You can use the non-JA budget amount ledger and the non-JU budget unit ledger column definitions in formula columns and as the basis column for visual alert columns.
See Setting Up Columns with Formulas and Setting Up Columns with Visual Alerts.
3.7.2 Setting Up a Column Definition for Non-JA Budget Amount Ledgers
To set up a column definition for non-JA budget amount ledgers:
-
Access the Project Management Console Column Definitions form.
Form Name Form ID Navigation Project Management Console Column Definitions W51X90B In-Memory Project Portfolio Mgmt (G51411). Column Definitions (P51X90).
Click Add on the Work with Project Management Console Column Definitions form.
Figure 3-3 Project Management Console Column Definition form: Non-JA Budget Amount Ledgers
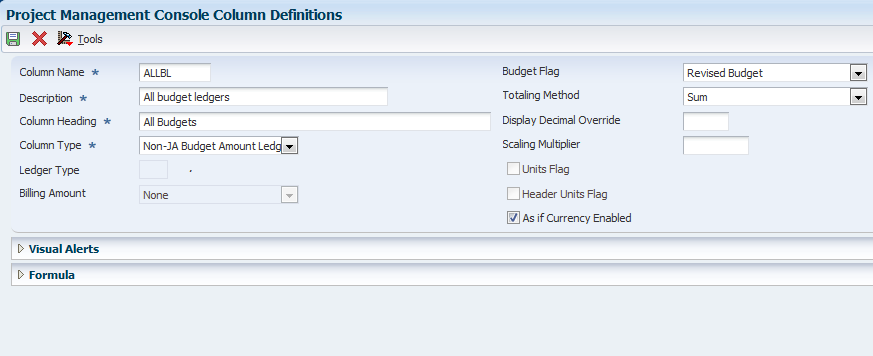
Description of "Figure 3-3 Project Management Console Column Definition form: Non-JA Budget Amount Ledgers"
-
Enter values in these fields and select or clear the options:
- Column Name
-
Enter a name for the column that you create. This field is required.
- Description
-
Enter a description for the column that you create. This field is required.
- Column Heading
-
Enter the name that you want to use for a label for the column when the column name appears in the Work with Project Management Console and Project Management Console forms. This field is required.
- Column Type
-
Select Non-JA Budget Amount Ledgers.
- Budget Flag
-
Select an option to specify whether to include original or revised budgets.
Values are:
Original Budget
Revised Budget
- Totaling Method
-
Select an option to specify whether the system sums or averages the values in the column, or whether the system does not apply any totaling method. See Understanding Totaling Methods.
Values are:
Average - Exclude zero amounts. The system does not include zero amounts when it averages the values in the column.
Average - Include zero amounts. The system includes zero amounts when it averages the values in the column.
None. The system does not apply a totaling method to the column values.
Sum. The system adds the values in the column. This is the default value.
- Display Decimal Override
-
Enter the number of decimal places to override the default decimal value for the currency amount, unit, or unit price of the column. See Understanding Decimal Display Values.
- Scaling Multiplier
-
Enter the factor by which the system multiplies amounts or units in a column. The system multiplies the accumulated amounts by the multiplier factor before it displays the result on the Project Management Console form.
For example, if you want to scale large numbers to thousands, enter.001. If you want percentages to appear as whole numbers, enter 100.
- As If Currency Enabled
-
Select this check box to enable as if currency processing. If you select this check box and enter a currency code when you specify your data in the Work with Project Management Console program (P51X0200), the system calculates the values for the column in the currency specified on the Work with Project Management Console program, and displays the values in the as if currency on the Project Management Console form.
-
Click OK.
3.7.3 Setting Up a Column Definition for Non-JU Budget Unit Ledgers
To set up a column definition for non-JU budget unit ledgers:
-
Access the Project Management Console Column Definitions form.
Form Name Form ID Navigation Project Management Console Column Definitions W51X90B In-Memory Project Portfolio Mgmt (G51411). Column Definitions (P51X90).
Click Add on the Work with Project Management Console Column Definitions form.
Figure 3-4 Project Management Console Column Definitions form: Non-JU Budget Unit Ledgers
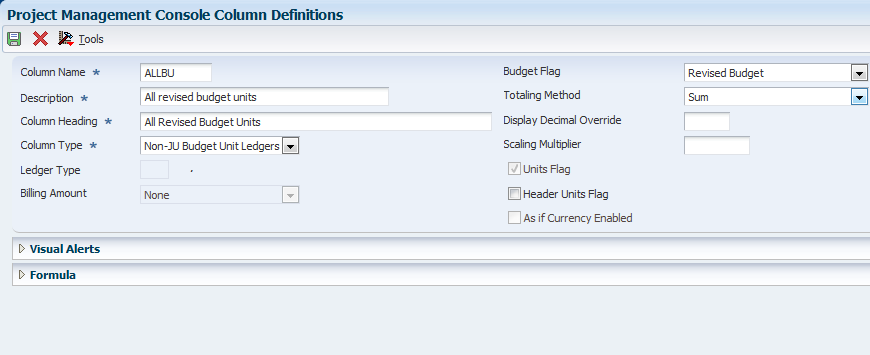
Description of "Figure 3-4 Project Management Console Column Definitions form: Non-JU Budget Unit Ledgers"
-
Enter values in these fields and select or clear the options:
- Column Name
-
Enter a name for the column that you create. This field is required.
- Description
-
Enter a description for the column that you create. This field is required.
- Column Heading
-
Enter the name that you want to use for a label for the column when the column name appears in the Work with Project Management Console and Project Management Console forms. This field is required.
- Column Type
-
Select Non-JA Budget Unit Ledgers.
- Budget Flag
-
Select an option to specify whether to include original or revised budgets.
Values are:
Original Budget
Revised Budget
- Totaling Method
-
Select an option to specify whether the system sums or averages the values in the column, or whether the system does not apply any totaling method. See Understanding Totaling Methods.
Values are:
Average - Exclude zero amounts. The system does not include zero amounts when it averages the values in the column.
Average - Include zero amounts. The system includes zero amounts when it averages the values in the column.
None. The system does not apply a totaling method to the column values.
Sum. The system adds the values in the column. This is the default value.
- Display Decimal Override
-
Enter the number of decimal places to override the default decimal value for the currency amount, unit, or unit price of the column. See Understanding Decimal Display Values.
- Scaling Multiplier
-
Enter the factor by which the system multiplies amounts or units in a column. The system multiplies the accumulated amounts by the multiplier factor before it displays the result on the Project Management Console form.
For example, if you want to scale large numbers to thousands, enter.001. If you want percentages to appear as whole numbers, enter 100.
- Units Flag
-
The system selects this check box because the column type is for units.
- Header Units Flag
-
Select the Header Units Flag check box to use header units instead of account units.
-
Click OK.
3.8 Setting Up Columns with Billing Amounts
This section provides an overview of billing amount columns and discusses how to set up a column definition for a billing amount.
3.8.1 Understanding Billing Amount Columns
If you specify Billing Amount for the column type, you must select the type of billing amount to use. The value that you specify in the Billing Amount field determines which of these tables the system accesses to retrieve values:
-
Billing Detail Workfile (F4812)
-
Billing Workfile History (F4812H)
-
Customer Ledger (F03B11)
-
Invoices Summary Workfile (F4822)
3.8.1.1 Billing Amounts and Lines
You can select from these billing amount types:
-
Billed Net
-
Billed Tax
-
Billed Total
-
Billed Unit Price
-
Billed Units
-
Earned Amount
-
Earned Unit Cost
-
Earned Units
-
Net Revenue
-
Received Amount
-
Retained Amount
-
Revenue Not Recognized
-
Revenue Recognized
-
Revenue in Excess of NTE (not to exceed)
-
Unbilled Net
-
Unbilled Tax
-
Unbilled Total
-
Unbilled Unit Price
-
Unbilled Units
You can set a processing option in the Work with Project Management Console program (P51X0200) to suppress billing amount column definitions to prevent unauthorized users from viewing billing amounts. See Billing Amount Columns.
3.8.1.2 Proration of Billing Lines
When you set up columns using the Received Amount or Retained Amount values in the Billing Amount field, the system prorates billing amounts between multiple jobs if more than one job is associated with a contract. The system calculates the prorated amounts when you process job and billing amount records.
3.8.1.2.1 Example of Proration
Suppose that you have a contract to build a warehouse. You have multiple business units (jobs) associated with the warehouse contract, as shown in this list:
-
A105: Demolition
-
A110: Grading
-
A115: Foundation
At the end of the period, you bill 5000 USD for the contract, which is the combined total of the amounts due for the demolition, grading, and foundation work. Of the 5000 total billed, 1500 (30%) is for job A105, 1500 (30%) is for job A110, and 2000 (40%) is for job A115. The F4812H table will have one billing line number that totals 5000, but the amounts are shown as three entries because you have three jobs, as illustrated in this list:
-
A105: 1500
-
A110: 1500
-
A115: 2000
You bill the customer for 5000 USD. The retainage amount, per the contract, is 10%, or 500 USD.
The F4822 table shows one billing line with one entry for 5000 (invoice number 123). It also shows the retainage amount for the billing line, as illustrated in this table:
| Contract | Line Number | Invoice Number | This Period (billed) | Retainage |
|---|---|---|---|---|
| Warehouse | 0.1 | 123 | 5000 | 500 |
The customer remits 4000 (received amount). The open amount (1000) is the gross amount (5000) less the received amount (4000). The system uses the difference between the gross amount and the open amount to calculate the received amount that is prorated in the project financial management process. The F03B11 table includes a line for the invoice, which includes the gross amount and the open amount, as illustrated in this table:
| Invoice Number | Invoice Pay Item | Gross Amount | Open Amount | Line Number |
|---|---|---|---|---|
| 123 | 001 | 5000 | 1000 | 0.1 |
When the project management financial process calculates the received amount values for the three jobs, it prorates the received amount (4000) between the three jobs based on the percentage of the received amount to the billed amount. In this example, jobs A105 and A110 were each 30% of the total billed, so the prorated amount for each is 30% of the total received (4000 x 30% = 1200). Likewise, job A115 comprised 40% of the total billed, so the prorated amount is 40% of the total received amount (4000 x 40% = 1600). This table shows the prorated amounts calculated by the system:
| Job (Business Unit) | Billed Amount | Total Billed | Open Amount | Total Received | Prorated Amount |
|---|---|---|---|---|---|
| A105 | 1500 | 5000 | 1000 | 4000 | 1200 |
| A110 | 1500 | 5000 | 1000 | 4000 | 1200 |
| A115 | 2000 | 5000 | 1000 | 4000 | 1600 |
| (5000 total amount billed) | (4000 total amount received) |
Similarly, the project financial management process calculates the retainage amount values for the three jobs, it prorates the retainage amount (500) between the three jobs, based on the percentage of the retainage amount to the billed amount. In this example, the retainage is 10%, so the system calculates 10% of the billed amount for each job.
| Job (Business Unit) | Billed Amount | Total Billed | Total Retained | Prorated Amount |
|---|---|---|---|---|
| A105 | 1500 | 5000 | 500 | 150 |
| A110 | 1500 | 5000 | 500 | 150 |
| A115 | 2000 | 5000 | 500 | 200 |
| (5000 total amount billed) | (500 total retained amount) |
3.8.2 Setting Up a Column Definition for a Billing Amount
To set up a column definition for a billing amount:
-
Access the Project Management Console Column Definitions form.
Form Name Form ID Navigation Project Management Console Column Definitions W51X90B In-Memory Project Portfolio Mgmt (G51411). Project Management Console Column Definitions (P51X90).
Click Add on the Work with Project Management Console Column Definitions form.
Figure 3-5 Project Management Console Column Definitions form: Billing Amounts
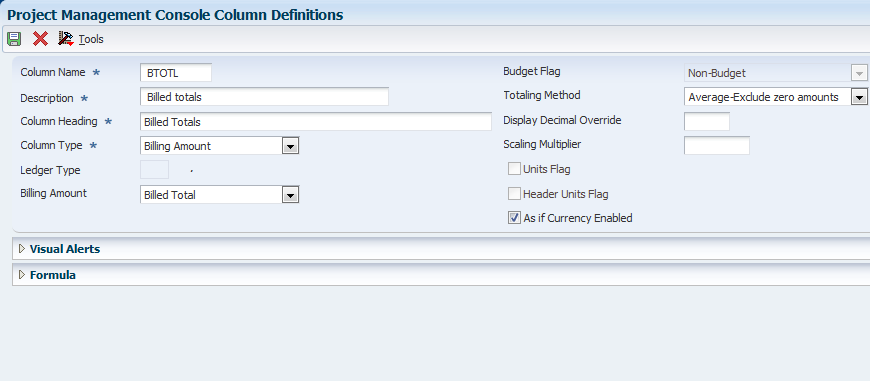
Description of "Figure 3-5 Project Management Console Column Definitions form: Billing Amounts"
-
On the Project Management Console Column Definitions form, enter values in these fields and select or clear the options:
- Column Name
-
Enter a name for the column that you create. This field is required.
- Description
-
Enter a description for the column that you create. This field is required.
- Column Heading
-
Enter the name to appear for the column heading in the Project Management Console form. This field is required.
- Column Type
-
Select Billing Amount.
- Billing Amount
-
Select the type of billing amount for the column definition.
Values are:
Billed Net
Billed Tax
Billed Total
Billed Unit Price
Billed Units
Earned Amount
Earned Unit Cost
Earned Units
Net Revenue
Received Amount
Retained Amount
Revenue Not Recognized
Revenue Recognized
Revenue in excess of NTE Limits
Unbilled Net
Unbilled Tax
Unbilled Total
Unbilled Unit Price
Unbilled Units
- Totaling Method
-
Select an option to specify whether the system sums or averages the values in the column, or whether the system does not apply any totaling method. See Understanding Totaling Methods.
Values are:
Average - Exclude zero amounts. The system does not include zero amounts when it averages the values in the column.
Average - Include zero amounts. The system includes zero amounts when it averages the values in the column.
None. The system does not apply a totaling method to the column values.
Sum. The system adds the values in the column. This is the default value.
- Display Decimal Override
-
Enter the number of decimal places to override the default decimal value for the currency amount, unit, or unit price of the column. See Understanding Decimal Display Values.
- Scaling Multiplier
-
Enter the factor by which the system multiplies amounts or units in a column. The system multiplies the accumulated amounts by the multiplier factor before it displays the result on the Project Management Console form.
For example, if you want to scale large numbers to thousands, enter.001. If you want percentages to appear as whole numbers, enter 100.
- As If Currency Enabled
-
Select this check box to enable as if currency processing. For Billing Amount column types, the system enables this option for all billing amount types except Billed Units, Earned Units, and Unbilled Units.
If you select this check box and enter a currency code when you specify your data in the Work with Project Management Console program (P51X0200), the system calculates the values for the column in the currency specified on the Work with Project Management Console program, and displays the values in the as if currency on the Project Management Console form.
-
Click OK.
3.9 Setting Up Columns with Formulas
This section provides an overview of formula columns, lists a prerequisite, and discusses how to set up a column definition for a formula.
3.9.1 Understanding Formula Columns
You can set up formula column definitions to have the system calculate values based on other columns that you set up. When you set up formula column definitions, you build formulas using existing columns and arithmetic operators for multiplication, division, addition, and subtraction. Each column that you specify in the formula is a segment. You select a segment, then an operator, then another segment. As you select segments and operators, the system shows the formula in the Formula field. You cannot edit the Formula field. If you need to remove a segment or operator from the Formula field, click the Clear Last button to remove the last segment or operator, or click the Clear All button to remove the entire formula.
You can include up to ten segments and nine operators in a formula. You must begin and end the formula with a segment. You can reuse the segments and operators as needed. For example, you can use a ledger type column that you set up for the AA ledger as more than one segment in the formula.
3.9.1.1 Formula Segments
The Formulas section on the Project Management Console Column Definitions form provides Segment buttons that you use to select the columns to include in the formula. When you click the Segment button associated with the column type that you want to include in the equation, the system displays a list of columns of that type. You can then select the specific column to include in the equation. For example, when you click the Billing Amounts button, the system displays a list of the columns that are set up as billing amount columns.
You can select segments, and thus columns, for these column types:
-
Ledger Types
-
Non-JA Budget Amount Ledgers
-
Non-JA Budget Unit Ledgers
-
Billing Amounts
-
Formulas
In addition to the column types, the Formulas section includes a segment button for a Numeric Factor. When you click the Numeric Factor button, the system displays a field in which you enter the numeric factor to include in the formula. For example, if you want to divide a segment by a numeric factor, you could select the segment, select the division operator (/), and then click the Numeric Factor button to add the factor by which to divide the column amount in the first segment.
|
Important!: If you use 0 (zero) as the denominator in a formula, the result of the formula will always be 0. For example, if you select a column named COST as your first segment, then select / (division) as the operator, and then use a numeric factor of 0 for the next segment, the formula would be: COST / 0. Because you specified to divide by 0, the result of the formula is 0. If you use a column with a 0 result in another column, the system uses 0 for the segment amount. For example, if you create a formula column that is A+B+(C/D) and the values for the columns are A=1000, B=1500, C=2000, and D=0, then the result is 2500 (1000+1500+(2000/0)). Because the system first solves the included formula (2000/0 = 0), the system adds 1000+1500+0 to return the result of 2500. |
As you select segments, the system displays the column name or the column heading of the segment in the Formula Definition field. Select the Use Column Headings check box to view the column headings. Clear the Use Column Headings check box to view column names.
3.9.1.2 Formula Columns Within Another Formula Column
You can include formula columns within another formula column if the included column does not include a formula column. For example, if you create a formula (Formula 1) using column segments that do not include another formula, then you can include Formula 1 in another formula (Formula 2). However, if you attempt to create a formula (Formula 3) using a formula column segment (Formula 2) that includes another formula (Formula 1), then the system displays an error message because the formula segment (Formula 2) includes a formula (Formula 1).
This image illustrates that you can use a formula column within another formula only when the included formula column does not include another formula:
Figure 3-6 Allowed and Disallowed Formulas
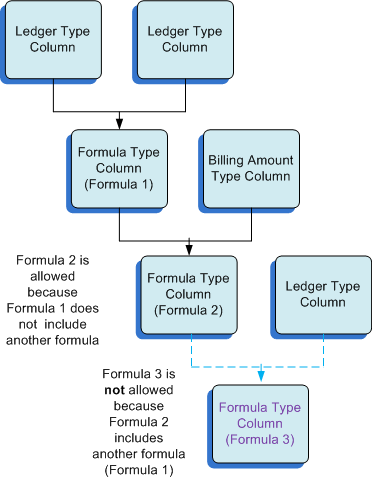
Description of "Figure 3-6 Allowed and Disallowed Formulas"
When you include a formula (Formula A) within another formula (Formula B), the system solves the included formula (Formula A) before it solves the formula that includes it (Formula B). For example, suppose Formula A is Cost/Unit and Formula B is Project - Formula A. The system will first divide Cost by Unit, and then subtract the result of that calculation from Project to solve Formula B. The system displays the result of the Formula B column in the Project Management Console program.
You can include multiple formula segments within a formula that you create. For example, you could create a formula (Formula Z) that includes Formula 1 + Formula A. The system solves for Formula 1 and for Formula A, and then adds the results for Formula 1 and Formula A to arrive at the total for Formula Z.
You can view different information about formulas by selecting or clearing the Expand Formula Details check box and the Use Column Headings check box. Selecting the Expand Formula Details check box causes the Project Management Console Column Definitions program to display the names of the columns that are included in the selected formula column instead of displaying the formula column name. Selecting the Use Column Headings check box causes the program to show column headings instead of column names.
For example, suppose that you have these columns set up in your system:
| Column Name | Column Heading | Column Type |
|---|---|---|
| AA | Actual Amounts | Ledger |
| AU | Actual Units | Ledger |
| CPU | Cost per Unit | Formula
The formula in this column is AA/AU. |
You want to include the formula column CPU in another column. When you select CPU to include it in a formula column, the information that the system displays in the Formula Definition field differs based on the check boxes that you select, as shown in this table:
| Check Boxes Selected | Display in the Formula Definition Field |
|---|---|
| None | CPU |
| Expand Column Details only | (AA/AU)
When you select only the Expand Column Details check box, the system displays the names of the columns included in the formula. |
| Use Column Headings only | Cost per Unit
When you select only the Use Column Headings check box, the system displays the column heading of the selected formula. |
| Both Expand Column Details and Use Column Headings | (Actual Amounts/Actual Units) |
3.9.1.3 Arithmetic Operator Order
The order in which you select column segments and operators is important. When the system reads formulas, it first solves formulas that are within the formula, and then reads the formula from left to right, applying the multiplication operators, then the division operators, then the addition operators, and then the subtraction operators.
For example, suppose that your formula includes these segments and operators: SEG1+SEG2/.375+SEG3-SEG4*.5. Suppose further that the values for the segments are:
-
SEG1=10000
-
SEG2=30000
-
SEG3=50000
-
SEG4=40000
The steps the system uses to resolve the formula are:
-
Calculate or accumulate the values for the segments.
The values in the equation are: 10000+30000/.375+50000-40000*.5
-
Next, the system solves the multiplication and division steps, reading the formula from left to right.
The results are: 10000+(the result of 30000/.375, which is 80000)+50000-(the result of 40000 *.5, which is 20000). The formula now is: 10000+80000+50000-20000.
-
Finally, the system solves the addition and subtraction, resulting in an amount of 120000.
If you need to create a column to calculate values and you need to use addition or subtraction as well as multiplication or division, consider creating a formula column for the addition or subtraction action, and then use that formula column in another formula column to apply the multiplication or division action. When you create a formula column and then use it in another formula column, the system treats the included formula as if it is surrounded by parentheses, so the system solves the included formula first.
In the example discussed in this section, your results would be different if you created formula columns for the addition and subtraction operations, and then used those formulas within another formula. For example, you might create a formula column named ADD that includes SEG1+SEG2, and create a formula column named SUB that includes SEG3-SEG4. You could then use those formula columns within a new formula named FORM1. The FORM1 column would include: ADD/.375+SUB*.5. When the system resolves the FORM1 formula, it will solve the ADD and SUB formulas first, and then apply the multiplication and division operators and the numeric factors. The result is (10000+30000)/.375+(50000-40000)*.5, which is equal to 40000/.375+10000*.5. The system solves the multiplication and division, and then applies the final addition step. The results are:
40000/.375 = 106667
10000*.5 =5000
10667 + 5000 = 111666.
See Also Examples of Formulas.
3.9.1.4 Examples of Formulas
This example illustrates how you set up formula columns and how the system calculates the values for a formula column.
Suppose that you want to set up columns to calculate these values:
-
Variance at Completion
-
Actual Budget Spent
-
Percent Variance at Completion
You must first set up columns to include the values that you need to use in the formulas. You set up these columns:
-
AA
This column is for actual costs and is a ledger type column.
-
HA
This column is for projected final costs and is a ledger type column.
-
JA
This column is for budgeted costs and is a ledger type column.
Next, you set up formula columns that do not include other formulas. You use the ledger type columns that you set up and create these formula columns:
-
Variance at Completion = JA - HA.
You name this column VCOMP. You will use this formula column when you set up a column for the Percent Variance at Completion formula column.
-
Budget Spent = JA - AA.
You name this column BGTSPT. You will use this formula when you set up the Percent of Budget Spent formula column.
Finally, you can use the formula columns that you set up in another formula column. You use formula column segments within other column formulas so that the system solves the formulas using the operators for the formula segments as you intend them to be applied.
You set up this formula column: Percent Variance at Completion = VCOMP / HA.
You name this column %VARC. If you click the Expand Formula Details button on the Project Management Console Column Definition form, the system displays all of the segments and operators used in the %VARC and VCOMP formulas. The system displays the segments and operator of the VCOMP formula in parentheses, and then displays the remaining operator and formula segment. The expanded %VARC formula looks like this:
(JA - HA) / HA.
When solving the %VARC formula, the system uses the standard order of arithmetic operators, and so will solve the equation in the parentheses first, and then divide that result by the HA segment. For example, if the value of JA is 5000 and the value of HA is 3000, then the system subtracts 3000 from 5000 to obtain a value of 2000. The 2000 is the result of the VCOMP formula. The system then divides that result (2000) by the value for HA (3000). The result for the %VARC formula is .67, which is the value that the system will display in the Project Management Console form for the %VARC column.
3.9.2 Prerequisite
Before you begin this task, set up column definitions for the column types that you want to include in the formulas. When you create column definitions for formulas, you select existing columns for the segments that you include in the formula.
3.9.3 Setting Up a Column Definition for a Formula
To set up a column definition for a formula:
-
Access the Project Management Console Column Definitions form.
Form Name Form ID Navigation Project Management Console Column Definitions W51X90B In-Memory Project Portfolio Mgmt (G51411). Column Definitions (P51X90).
Click Add on the Work with Project Management Console Column Definitions form.
Figure 3-7 Project Management Console Column Definitions form: Formula
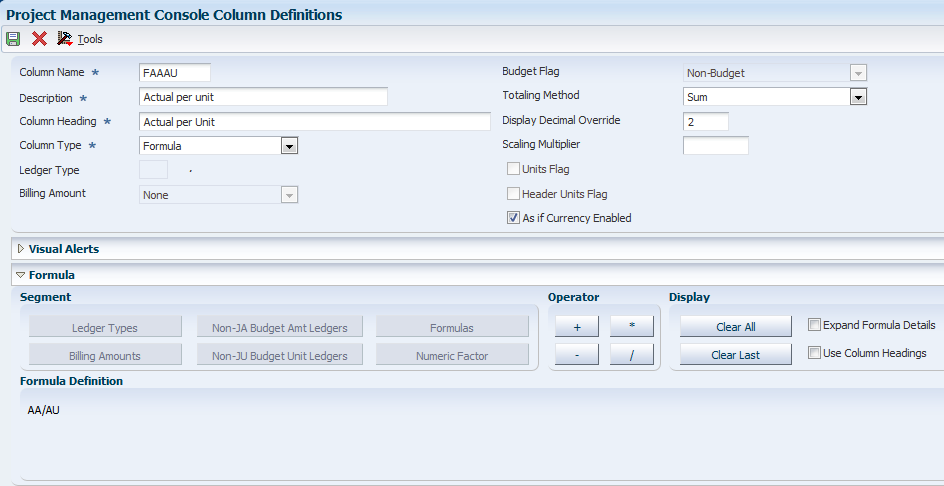
Description of "Figure 3-7 Project Management Console Column Definitions form: Formula"
-
Enter values in these fields and select or clear the options:
- Column Name
-
Enter a name for the column that you create. This field is required.
- Description
-
Enter a description for the column that you create. This field is required.
- Column Heading
-
Enter the name that you want to use for a label for the column when the column name appears in the Work with Project Management Console and Project Management Console forms. This field is required.
- Column Type
-
Select Formula.
The system expands the Formula section. The fields and options for the Formula section are discussed in Step 3.
- Totaling Method
-
Select an option to specify whether the system sums or averages the account detail values in the column, or whether the system does not apply any totaling method. For formula columns, the system does not apply the totaling method associated with the formula segment columns. The system solves the formula and then applies the totaling method that you apply to the formula column.
See Also Understanding Totaling Methods.
Values are:
Average - Exclude zero amounts. The system does not include zero amounts when it averages the values in the column.
Average - Include zero amounts. The system includes zero amounts when it averages the values in the column.
None. The system does not apply a totaling method to the column values.
Sum. The system adds the values in the column. This is the default value.
- Display Decimal Override
-
Enter the number of decimal places for account values for the display in the Project Management Console form. If you do not enter an override value in this field, the system provides a default value of 2 decimals when you enter the formula. You can change the default value.
- Scaling Multiplier
-
Enter the factor by which the system multiplies amounts or units in a column. The system multiplies the accumulated amounts by the multiplier factor before it displays the result on the Project Management Console form.
For example, if you want to scale large numbers to thousands, enter.001. If you want percentages to appear as whole numbers, enter 100.
- As If Currency Enabled
-
Select this check box to enable as if currency processing. If you select this check box and enter a currency code when you specify your data in the Work with Project Management Console program (P51X0200), the system calculates the values for the column in the currency specified on the Work with Project Management Console program, and displays the values in the as if currency on the Project Management Console form.
-
In the Formula subform, click one of these buttons in the Segment area to select the first segment for the formula:
-
Ledger Types
-
Non-JA Budget Amount Ledgers
-
Non-JA Budget Unit Ledgers
-
Billing Amounts
-
Formulas
You can select an existing formula column only if the formula column that you select does not have another formula as a segment. See Formula Columns Within Another Formula Column.
-
Numeric Factor
The system displays a form from which you select an existing column. The form includes only the columns associated with the column type button that you clicked. For example, if you click the Ledger Types button, the system displays a form with the existing ledger type columns.
-
-
Select a column from the selection form, and click OK.
The system adds the column name in the Formula field.
-
Optionally, at any time after you add the first segment, select the Use Column Headings check box to display the column headings of your selected segments instead of displaying the column names.
If you selected a formula column, you can select the Expand Column Details check box to view the segment and operators in the selected formula column.
-
Click one of these operator buttons:
-
+ (add)
-
- (subtract)
-
* (multiply)
-
/ (divide)
The system adds the operator to the Formula field after the last column name that you added.
-
-
Click a button in the Segment area to select another column to add to the formula.
-
Repeat steps 5 and 6 to add more segments and operators to your formula.
You can include up to ten segments and nine operators in your formula. You must end with a segment.
-
Click OK.
3.10 Setting Up Columns with Percent Complete
This section provides an overview of percent complete columns and discusses how to set up a column definition with percent complete.
3.10.1 Understanding Percent Complete Columns
When you set up and use a percent complete column, the system calculates the percent complete for the AA, AU, HA, HU ledger types according to the method of computation associated with the accounts for the ledger.
3.10.2 Setting Up a Column Definition with Percent Complete
To set up a column definition for percent complete:
-
Access the Project Management Console Column Definitions form.
Form Name Form ID Navigation Project Management Console Column Definitions W51X90B In-Memory Project Portfolio Mgmt (G51411). Column Definitions (P51X90).
Click Add on the Work with Project Management Console Column Definitions form.
Figure 3-8 Project Management Console Column Definitions form: Percent Complete
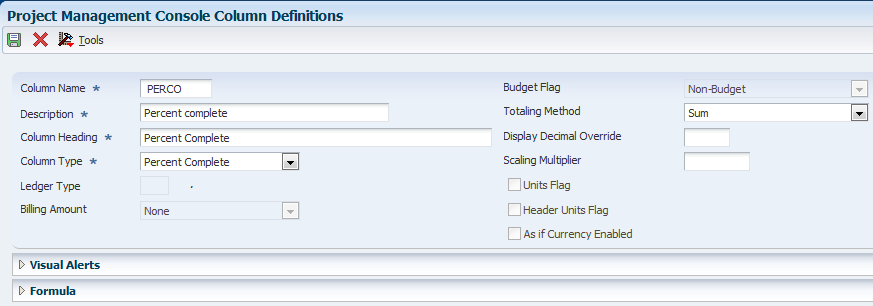
Description of "Figure 3-8 Project Management Console Column Definitions form: Percent Complete"
-
Enter values in these fields and select or clear the options:
- Column Name
-
Enter a name for the column that you create. This field is required.
- Description
-
Enter a description for the column that you create. This field is required.
- Column Heading
-
Enter the name that you want to use for a label for the column when the column name appears in the Work with Project Management Console and Project Management Console forms. This field is required.
- Column Type
-
Select Percent Complete.
- Totaling Method
-
Select an option to specify whether the system sums or averages the values in the column, or whether the system does not apply any totaling method. See Understanding Totaling Methods.
Values are:
Average - Exclude zero amounts. The system does not include zero amounts when it averages the values in the column.
Average - Include zero amounts. The system includes zero amounts when it averages the values in the column.
None. The system does not apply a totaling method to the column values.
Sum. The system adds the values in the column. This is the default value.
- Display Decimal Override
-
Enter the number of decimal places to override the default decimal value for the currency amount, unit, or unit price of the column. See Understanding Decimal Display Values.
- Scaling Multiplier
-
Enter the factor by which the system multiplies amounts or units in a column. The system multiplies the accumulated amounts by the multiplier factor before it displays the result on the Project Management Console form.
For example, if you want to scale large numbers to thousands, enter .001. If you want percentages to appear as whole numbers, enter 100.
-
Click OK.
3.11 Setting Up Columns with Visual Alerts
This section provides an overview of visual alert columns and discusses how to set up a column definition for visual alerts.
3.11.1 Understanding Visual Alert Columns
You can set up columns that provide you with a visual alert so that you can easily locate column values that exceed thresholds that you specify. When you set up visual alert columns, you specify the column for which you set up the visual alert (the basis column), and then specify up to three thresholds that will trigger the alerts. You can select a ledger type, billing amount, or formula column as the basis column.
If an amount in a cell in the basis column exceeds a threshold, the system displays the icon associated with the alert threshold in the Project Management Console program. If the row does not have a value that triggers the alert, then the cell for the visual alert column is blank. See Viewing Visual Alerts.
The order in which you select columns in the Columns Layout program (P51X91) or on the Columns 1–20 or Columns 21–40 tabs determine the order in which the columns appear when you first access the Project Management Console form. As with other grids in the JD Edwards EnterpriseOne applications, you can change the order of columns in the grids on the Project Management Console form. For easiest viewing of the alerts, place the visual alert columns next to the ledger type, billing amount, or formula column that you specify as the basis column.
You cannot select visual alert columns to appear in the chart generated by the Project Management Console program.
3.11.1.1 Threshold Amounts
When you set up visual alert columns, you specify threshold amounts and whether to trigger the alerts if amounts are greater than or equal to, or less than or equal to, the threshold amounts. When you enter amounts for the thresholds, the amounts must be in ascending order when you specify that amounts greater than the threshold amount trigger the alert, and in descending order if you specify that amounts less than the threshold amount triggers the alert. You can enter positive and negative numbers for the threshold levels.
The system associates an icon with each threshold level. The system displays the icon in the Project Management Console form for amounts that meet or exceed the set threshold. You can select an option on the Project Management Console form to view only the rows of a column that triggered the visual alert.
This table shows the icons that the system uses for each threshold level:
| Threshold | Icon |
|---|---|
| Level 1 | Yellow circle
|
| Level 2 | Orange triangle
|
| Level 3 | Red square
|
Though you must set up the thresholds in order, you can skip a level. For example, you could enter 10000 in the Threshold 1 field, leave the Threshold 2 field blank, enter 50000 in the Threshold 3 field, and specify that values greater than or equal to the threshold cause the system to display the visual alert. In this example, the system would display the yellow circle for amounts that are over 10000 but less than 50000, and would display the red square for amounts that are greater than or equal to the Threshold Level 3 amount of 50000.
3.11.1.2 Account Ranges
You can specify that the alerts apply to specific account ranges. You set up the account ranges in the Project Management Account Range program (P51X100), and then specify the account range name when you set up the visual alert column. For example, suppose that you want to have an alert icon appear when overtime costs exceed a specific amount. You could set up an account range name in the Project Management Account Range program that includes all of the accounts that you use for overtime pay. If the accounts are not contiguous, you can specify multiple account ranges for one account range name. You would then specify the account range name when you set up the visual alert column for overtime exceptions.
You can also specify account ranges on the Work with Project Management Console form. If you specify an account range on the Work with Project Management Console form, the system accumulates and displays records for only the included accounts, so the system can display visual alerts for only the accounts specified.
For example, if you set up a visual alert column with an account range of 5000 to 5999 and specify an account range in the Work with Project Management Console for 5600–5999, then the system does not display visual alerts for accounts 5000–5599 because those records were excluded from the processed dataset.
3.11.1.3 As If Currency Processing
When you view job and billing data in the Project Management Console program, you can view amounts in an as if currency. To view amounts in an as if currency, you must specify the currency code on the Work with Project Management Console form. The system displays job and billing amounts in the as if currency for only the columns for which you selected the As If Currency Enabled check box when you set up the column.
When you set up visual alert columns, you select a basis column. The system enables as if currency for visual alert columns when the basis column of the visual alert column has as if currency processing enabled. For enabled visual alert columns, the system converts the threshold levels that you set up in a base currency on the Project Management Console Column Definitions form to the currency that you specify on the Work with Project Management Console form and then compares the converted threshold levels to the converted job and billing amounts to determine whether to display a visual alert icon.
The system uses the currency code in the Threshold Currency Code field to determine the base currency code from which the system converts the threshold levels when you view records in an as if currency. For example, if you specify CAD (Canadian dollars) in the Threshold Currency Code field and specify USD (US dollars) as the as if currency code in the Work with Project Management Console form, then the system converts the threshold levels from CAD to USD before it compares the threshold levels to the converted job and billing amounts.
For example, suppose that:
-
You use a ledger type column definition as the basis column for a visual alert column.
-
Your base currency is Canadian dollars (CAD) and you want to display amounts in US dollars (USD) in the Project Management Console form.
-
The exchange rate to convert CAD to USD is .957.
To have the system calculate and display amounts in USD and to trigger the visual alerts based on the converted USD amounts, you:
-
Select the As If Currency Enabled check box when you set up the ledger type column.
This example uses a ledger type column. You can also enable as if currency processing for other column types.
-
Select the ledger type column as the basis column when you set up the visual alert column.
-
Enter CAD in the Threshold Currency Code field for the visual alert column.
The system uses the currency code in this field as the basis currency.
-
Set up threshold levels of 10,000, 20,000, and 30,000.
-
On the Work with Project Management Console form:
-
Enter USD in the As If Currency Code field.
-
Complete the As If Currency Exchange Rate Date field, or leave it blank to use the current date.
-
-
Run the process to generate job and billing data to view.
As it processes job and billing records, the system:
-
Converts the display of job and billing amounts from their base currencies to USD.
-
Converts the threshold levels to 9570, 19,140, and 28,710.
-
Compares the converted job and billing amounts to the converted threshold levels to determine whether to display a visual alert icon.
|
Note: If the basis column for a visual alert column has as if currency enabled, then the Threshold Currency Code field cannot be blank. If the field is blank, then the system issues an error message. |
3.11.2 Setting Up a Column Definition for Visual Alerts
To set up a column definition for a visual alert:
-
Access the Project Management Console Column Definitions form.
Form Name Form ID Navigation Project Management Console Column Definitions W51X90B In-Memory Project Portfolio Mgmt (G51411). Column Definitions (P51X90).
Click Add on the Work with Project Management Console Column Definitions form.
Figure 3-9 Project Management Console Column Definitions form: Visual Alerts
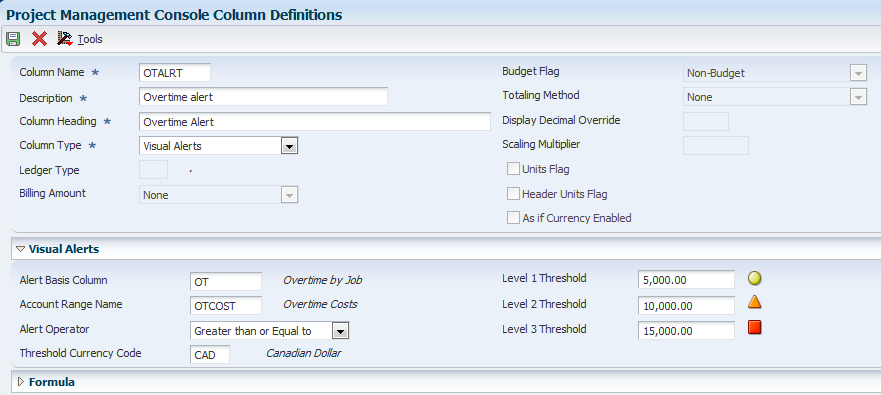
Description of "Figure 3-9 Project Management Console Column Definitions form: Visual Alerts"
-
Enter values in these fields and select or clear the options:
- Column Name
-
Enter a name for the column that you create. This field is required.
- Description
-
Enter a description for the column that you create. This field is required.
- Column Heading
-
Enter the name that you want to use for a label for the column when the column name appears in the Work with Project Management Console and Project Management Console forms. This field is required.
- Column Type
-
Select Visual Alerts from the Column Type list.
When you select Visual Alerts, the system disables all fields in the header area except for the Column Name, Description, Column Heading, and Column Type fields and opens the Visual Alerts section.
-
In the Visual Alerts section, complete these fields:
- Alert Basis Column
-
Enter the name of the existing column for which you create the visual alert.
You can enter the name of a ledger type, billing type, or formula column. All other column types are disallowed for visual alerts.
- Account Range Name
-
Optionally, specify an account range name to limit the application of the threshold amounts to the accounts that are within the account range.
- Alert Operator
-
Select Greater than or Equal to if you want the system to display the alerts when the column amounts exceed the threshold amounts or are equal to the threshold amounts. Select Less than or Equal to if you want the system to display the alerts when the column amounts are less than or equal to the threshold amounts.
If you do not select a value, the system uses the Greater than or Equal to option.
- Threshold Currency Code
-
Specify the currency in which the system stores threshold levels. The system uses the value in this field as the base currency from which it converts the threshold levels to the as if currency. The system enables this field only when you enable as if currency processing for the basis column.
If the basis column has as if currency enabled, then this field is required. The system provides a default value that is the currency code associated with company 00000. You can change the currency code to any currency code that exists in the Currency Codes table (F0013).
- Level 1 Threshold, Level 2 Threshold, Level 3 Threshold
-
Specify the threshold amounts for the visual alert. You can specify values in one, two, or all threshold fields.
If you selected Greater Than in the Alert Operator field, then the values must be in ascending order. That is, the value in the Level 1 Threshold field must be less than the amount in the Level 2 Threshold field, and the value in the Level 2 Threshold field must be less than the value in the Level 3 Threshold field.
If you selected Less Than in the Alert Operator field, then the values must be in descending order. That is, the value in the Level 1 Threshold field must be more than the amount in the Level 2 Threshold field, and the value in the Level 2 Threshold field must be more than the value in the Level 3 Threshold field.
-
Click OK.
3.12 Defining Column Layouts
This section provides an overview of column layouts, lists a prerequisite, and discusses how to define a column layout.
3.12.1 Understanding Column Layouts
After you set up column definitions, you use the Project Management Console Column Layout program (P51X91) to group column definitions together to form a column layout. After you set up column layouts, you can use them to instruct the system what to include in your data selection. The system saves the column layouts to the Column Layout table (F51X91).
You can select up to 40 column definitions to include in a column layout, and you can use each column definition in more than one column layout. The order in which you select the columns determines the order in which the columns appear in the Summary and Account Details subform of the Project Management Console form.
The order in which you place the columns in the Project Management Console Column Layout program also determines the order of the columns in the Chart section in the Project Management Console program. If you want to change which columns appear in the chart, you can use the check boxes next to the column names on the Selection tab of the Chart section to select the columns to display on the Display tab. You cannot change the order of the columns in the Display and Selection tabs of the Chart section. Carefully consider how you want charts to appear in the Project Management Console form before you set up your column layouts. Visual alert columns do not appear in the Charts section.
The Column 01–Column 40 fields include a small orange square in the upper left corner. After you select a column to include in the layout, you can click the orange square to view additional column information. See Column Information Hover Forms.
You can set a processing option in the Work with Project Management Console program (P51X0200) to suppress billing amount information to prevent unauthorized users from viewing billing amounts. If you set up a column layout that includes billing lines and assign that column layout to a version that you assign to an unauthorized user, the user receives an error message on the Work with Project Management Console form. Likewise, if a user is assigned to use a version of the Work with Project Management Console program for which access to billing lines is restricted, the user cannot manually add columns for billing lines in the Work with Project Management Console program. If a user receives an error message that billing lines are not enabled, the user must clear the billing columns from the Work with Project Management Console program before continuing the process.
The Submit Project Management View program (R51X0300) requires that you specify a column layout in the processing options for the program. Before you use the Submit Project Management View program to generate a saved collection of job data, you must set up a column layout to use in the Project Management Console Column Layout program.
See Setting Processing Options for Submit Project Management View (R51X0300).
3.12.3 Defining a Column Layout
-
Access the Project Management Console Column Layout form.
Form Name Form ID Navigation Project Management Console Column Layout W51X91B In-Memory Project Portfolio Mgmt (G51411). Column Layouts (P51X91).
Click Add on the Work with Project Management Console Column Layout form.
Figure 3-10 Project Management Console Column Layout form
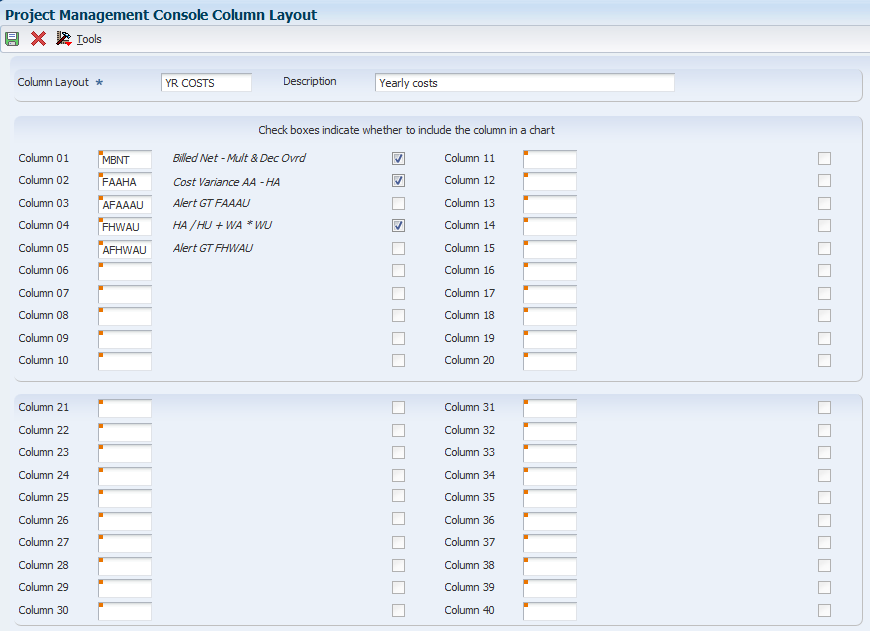
Description of "Figure 3-10 Project Management Console Column Layout form"
-
On the Project Management Console Column Layout form, complete these fields:
- Column Layout
-
Enter a name for the column layout. You must complete this field.
- Description
-
Enter a description for the column layout.
- Column 01–Column 40
-
Enter a value from the Column Definition table (F51X90) to specify a column definition to include in the column layout. Each column layout must include at least one column definition. You can complete up to 40 Column fields.
The order in which you select the columns determines the order in which the system displays the columns in the Project Management Console form.
-
Select the check boxes to the right of the column names to specify the columns to include in the chart on the Project Management Console form. The system disables the check box for visual alert columns.
You can change the selected columns on the Project Management Console form.
-
Click OK.