20 Contact Customer Mobile Applications
This chapter discusses these topics:
-
Section 20.1, "Contact Customer Mobile Applications Overview"
-
Section 20.2, "Setting Up the Contact Customer Mobile Applications"
-
Section 20.3, "Using the Contact Customer Mobile Tablet Application"
-
Section 20.4, "Using the Contact Customer Mobile Smartphone Application"
|
Important Note: Before using the mobile applications, Oracle strongly recommends that users have a complete understanding of how to use the associated processes and applications in the JD Edwards EnterpriseOne base software.For additional information about the processes and applications associated with the mobile applications discussed in this chapter, see:
|
20.1 Contact Customer Mobile Applications Overview
You use the Contact Customer mobile applications to view customer contact information on your mobile device. The smartphone and tablet applications enable you to:
-
View customer address information.
-
View customer contacts.
-
Add customer contact information to your device.
-
Use mapping and navigation features of your device to locate the customer site.
-
Send emails to customer contacts.
-
Call customer contacts (smartphone only).
-
Search for customers within a user-defined proximity (Release 9.1 Update).
|
Note: The Contact Customer mobile applications are inquiry-only, and cannot be used to update customer information in the EnterpriseOne database. |
This table lists the applications that are available to view customer contact information:
| Type of Application | Additional Information |
|---|---|
| Base EnterpriseOne Application | Use these applications in the JD Edwards EnterpriseOne system to view customer contact information:
|
| Tablet Application | Mobile Contact Customer - Tablet (M030010)
To download the application to your tablet, search on the following text in the application store:
|
| Smartphone Application | Mobile Contact Customer - Phone (M03015)
To download the application to your device, search on the following text in the application store:
|
Before using the Contact Customer tablet or smartphone application, you must complete the following setup and configuration tasks:
-
Set the processing options for both applications.
Complete this task in the EnterpriseOne system.
-
Set preferences.
Complete this task using the mobile devices.
20.1.1 Differences and Limitations: Contact Customer
Mobile applications are intended to be a simplified version of the applications that are available in the base software. In most cases, these applications provide a subset of the functionality available in the base software.
Customer Data Displayed
While the Contact Customer mobile applications do not function differently than base EnterpriseOne applications, they do offer the mobile user a subset of customer information. Not all customer information available in the base software is available in the mobile applications.
Adding Contact to Device
When reviewing customer contacts in the mobile application, you can add the EnterpriseOne contact to your mobile device. When you tap the Create Device Contact button, the system looks in your device contacts for an exact match of the contact name to determine whether the contact exists on your device already. The system does not check for duplicate phone numbers or email addresses. Therefore, if the contact already exists on your device, but the name is not exactly the same as the contact name in the mobile application, it is possible to create a duplicate contact record on your device.
Additionally, if an exact match is found, and the contact already exists on the phone, the mobile application does not update the existing device contact with the phone numbers and email addresses from the mobile application contact record.
To enable the Create Device Contact button on your iOS mobile device, you must set the privacy settings for contacts to allow the application to access contact information. If the setting is not turned on, the Create Device Contact button does not appear in the application.
This button is enabled by default in Android devices.
Searching Customers Based on Proximity (Release 9.1 Update)
To search for customers within a specific proximity to your location or another reference point, you use the Location Services functionality available in the Contact Customer mobile applications.
You can search for customers based upon their proximity to your current location, a specific street address, or a specific customer's location. You can also specify a specific number of miles or kilometers as the radius for the search. The search is done based upon the coordinates (latitude and longitude) of the reference location and those of your customers. In order to use your current location as the reference point, you must allow the application to access your location on your device.
20.2 Setting Up the Contact Customer Mobile Applications
Before using the Contact Customer mobile applications, verify that the processing options for each application are set correctly. The processing options for both the tablet and the smartphone applications specify which versions of the base EnterpriseOne applications the mobile applications use. Additionally, the processing options for the tablet application are used to specify which category codes to display in the application.
Setting processing options for these applications is a task that should be completed by the system administrator before the mobile applications are made available to end users.
End users of the mobile applications also have the ability to set up user preferences within the mobile applications. These preferences enable users to show or hide the following fields in the mobile applications:
-
Function Code
-
Type Code
-
Contact Type
End users of the mobile applications also have the ability to set up user preferences to search for customers within a user-defined proximity. These preferences enable users to show or hide customers within a specific proximity to your location or another reference point (Release 9.1 Update).
You can also set the privacy settings on your iOS device to enable the Create Device Contact feature, which enables you to add an EnterpriseOne contact to your device contacts.
To access the privacy settings on an iOS device:
-
Select Settings, then select Privacy, then select Contacts.
-
Enable the option for all applications that you want to have access to your device contacts.
This button is enabled by default in Android devices.
20.2.1 Setting Processing Options for the Mobile Contact Customer - Tablet Application (M030010)
You use processing options to specify default processing and display information for a program.
20.2.1.1 Versions
- 1. P01012 Version
-
Use this processing option to specify the version of the Address Book Revisions program (P01012) that the mobile application uses to process customer and contact address information. If this option is left blank, the system uses version ZJDE0001.
- 2. P03013 Version
-
Use this processing option to specify the version of the Customer Master program (P03013) that the mobile application uses to process customer information. If this option is left blank, the system uses version ZJDE0001.
- 3. P01111 Version
-
Use this processing option to specify the version of the Contact Information program (P01111) that the mobile application uses to process customer and contact email information. If this option is left blank, the system uses version ZJDE0001.
20.2.1.2 Category Codes
- 1. Category Code 01 through 10. Category Code 10
-
Use these options to specify which Customer Master Category Code to display in each of the ten available fields on the Category Codes tab of the tablet application. For example, if you want Category Code AC01 to display in the first field on that tab, enter AC01 in processing option 1. If you want Category Code AC04 to display in the second field on the tab, enter AC04 in processing option 2.
The system displays the description from the data dictionary as the display text for the field. For example, if the display text for AC01 is "Warehouse", field 1 on the Category Codes tab of the application will display as "Warehouse". You can display up to ten category codes on the tab. Values include:
-
Blank: Do not display a category code in this field.
-
AC01 - AC30: Display this category code in this field.
Note:
If all category code processing options are left blank, the application does not display the Category Code tab. -
20.2.2 Setting Processing Options for the Mobile Contact Customer - Phone Application (M03015)
You use processing options to specify default processing information for a program.
20.2.2.1 Versions
- 1. P01012 Version
-
Use this processing option to specify the version of the Address Book Revisions program (P01012) that the mobile application uses to process customer and contact address information. If this option is left blank, the system uses version ZJDE0001.
- 2. P03013 Version
-
Use this processing option to specify the version of the Customer Master program (P03013) that the mobile application uses to process customer information. If this option is left blank, the system uses version ZJDE0001.
- 3. P01111 Version
-
Use this processing option to specify the version of the Contact Information program (P01111) that the mobile application uses to process customer and contact email information. If this option is left blank, the system uses version ZJDE0001.
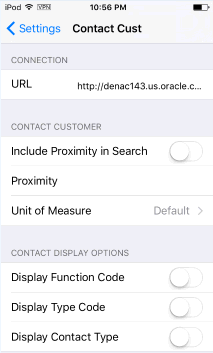
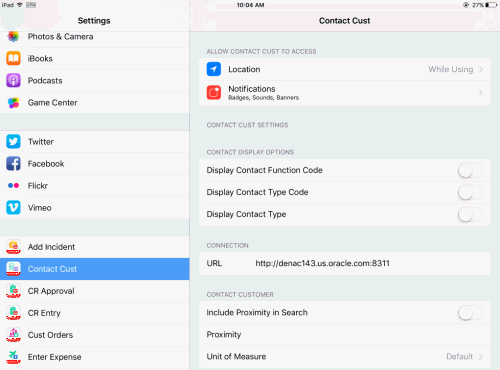
20.2.3 Setting User Preferences for the Contact Customer Mobile Applications
To set these preferences, access the Settings on your mobile device, select the application you want to configure, and set each field to On (display) or Off (do not display).
Figure 20-1 Setting User Preferences (Release 9.1 Update)
Description of ''Figure 20-1 Setting User Preferences (Release 9.1 Update)''
Figure 20-2 Setting User Preferences (Release 9.1 Update)
Description of ''Figure 20-2 Setting User Preferences (Release 9.1 Update)''
For instructions about accessing the settings on your mobile device, see the user documentation for your device.
|
Note: Entering connection information in the URL field is discussed in a separate task. See Chapter 3, "Logging Into Mobile Enterprise Applications" |
20.2.3.1 Setting User Preferences for Using Proximity Information for Customer Search (Release 9.1 Update)
You set up the user preferences for the Contact Customer mobile applications to search for customers located within a radius. To set these preferences, access the Setting screen on your mobile device, and set the Include Proximity in Search option to On (display) or Off (do not display).
After you enable the Include Proximity in Search option, you can set the Proximity and Unit of Measure preference fields. In the Proximity preference field, you can enter a numerical value for the radius within which the system locates the customer. In the Unit of Measure preference field, you can specify whether to use Miles or Kilometers for the radius.
20.3 Using the Contact Customer Mobile Tablet Application
Use the Contact Customer tablet application (M030010) to:
-
View customer address information.
-
View customer contacts.
-
Add customer contact information to your device.
-
Use mapping and navigation features of your device to locate the customer site.
-
Send emails to customer contacts.
-
View customer category code information.
-
Search for customers within a user-defined proximity (Release 9.1 Update).
Before you can use the application, you must download and install the application from the application store on your device.
To open the application, tap the icon and log in.
20.3.1 Using the Contact Customer Mobile Tablet Application
To view customer contact information on your tablet:
-
Open the application by tapping the icon on your device, and then log in.
See Chapter 3, "Logging Into Mobile Enterprise Applications"
-
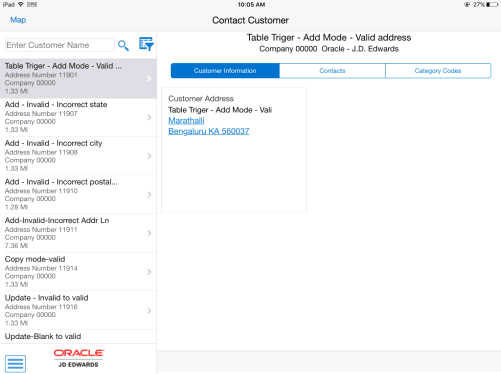
On the Contact Customer Home screen, enter the customer name and tap Search.
Note that the first record in the list of search results is displayed in the right side of the screen.
-
Select a customer record to view customer information.
Figure 20-3 Contact Customer Screen, Customer Information Tab
Description of ''Figure 20-3 Contact Customer Screen, Customer Information Tab''
On this screen you can:
-
Tap the customer address to use the map and navigation capabilities of your mobile device.
-
Tap the email address to compose an email to the customer.
-
Tap the customer url to open a browser application to view the web site on your device.
-
-
To view contact information for the selected customer, tap the Contacts tab. The device displays a list of contacts associated with the customer.
-
To view detailed information about a specific contact, tap the contact record.
On this screen you can:
-
Tap the email address to compose an email to the customer.
-
Tap the url, if available, to open a browser application to view the web site on your device.
-
-
Tap the Create Device Contact button to add the contact record to your device contacts. If the contact does not already exist, the system adds the contact to your device and displays a confirmation message, Contact Added. If the contact already exists, the system does not update anything, and returns a message, Contact Exists.
Note that the Create Device Contact button is displayed only if the device settings are set to enable the application to access the contact information for the device.
-
Tap the Category Codes tab to view additional information about the customer. Note that this tab is available only if the application has been set up to display category codes.
-
To log out of the application, tap the Menu button at the bottom left of the screen, and then tap Logout.
20.3.2 Searching for Customers within a User-Defined Proximity Using the Contact Customer Mobile Tablet Application (Release 9.1 Update)
To search for customers within a specified proximity to your location or another reference point:
-
Open the application by tapping the icon on your device, and then log in.
See Chapter 3, "Logging Into Mobile Enterprise Applications"
-
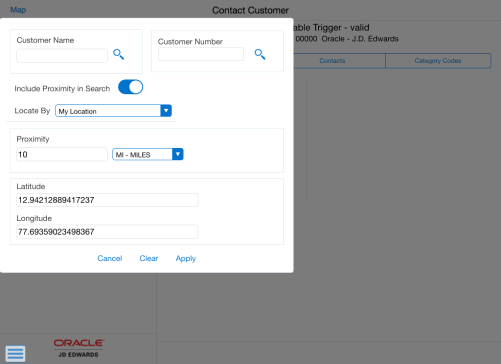
Tap the Filter button at the top of the left pane in the Contact Customer home screen.
-
To filter customer records by name or number, enter data in the Customer Name and Customer Number fields.
-
To turn on or turn off the Include Proximity in Search option, click the toggle button.
Note:
If you turn off the Include Proximity in Search option in the filters screen, the system will not display the Map link or the distance to a customer in the detail list. -
To refine your search, tap the Locate By drop-down button.
On the filters screen, the Locate By drop-down menu provides three options: My Location, Street Address, and Customer Number. The system displays the My Location option by default and populates default values in these fields: Proximity, Latitude, and Longitude.
Note:
To display the Street address option in the Filters screen, you must set the Enable Location Services option to Yes in the Work With EnterpriseOne System Control (P99410) program.My Location
Select this option from the Locate By drop-down menu to allow the mobile application to access the device's location. If you do not select this option, you must select either the Street Address or the Customer Number as the reference point. You can manually enter the latitude and longitude if desired.
Street Address
Select this option from the Locate By drop-down menu to allow the mobile application to access the device's location based on the customer's address.
Note:
The street address option is visible in the drop-down menu only when the Enable Location Services option is set to Yes in the Work With EnterpriseOne System Control (P99410) program.Customer Number
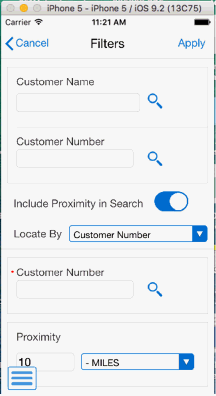
Select this option from the Locate By drop-down menu to allow the mobile application to access the device's location based on the customer name or number.
Proximity
The system populates these fields with the values that you have set up in the user preferences for the application. If you have not specified the default values in the preferences, the system populates a default value of 10 Miles. The system filters the customer's location that is within the radius specified in the Proximity field.
Enter a numerical value for the radius within which the system locates the customer location. The center of the radius is the reference point; the reference point can be your location or a user-defined location.
Unit of Measure
Specify whether to use Miles or Kilometers for the radius (proximity) within which the system locates the customer location.
Latitude Longitude
The system populates these fields with the latitude and the longitude of your location. The system uses the values in these fields to get the reference point (center of the radius).
If you do not want to use your location as the reference point, tap the latitude and longitude fields and enter new values. The system uses the updated values to locate the new reference point and calculates the proximity using this new reference point.
-
In the filters screen, to continue the search using the specified filter values, tap the Apply button.
The system takes you to the list of customer records that is displayed based upon their proximity to the reference point.
To discontinue the use of filter values in your search, tap the Cancel button.
To delete all the filter values you specified, and to enter new filter values, tap the Clear button.
-
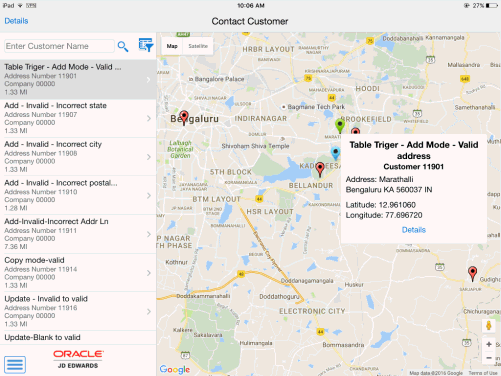
On the Details screen, to view customer locations on the map, click the Map link on the top-left corner of the screen.
On the Map screen, the system displays the list of customer records in the left pane based on the filter values and a map with marker for each customer location in the right pane.
-
To view the details of the customer, you must select a customer record. You can select the customer records either by tapping the customer record from the list on the left pane, or by tapping the red marker for the customer record on the map in the right pane.
When you select the customer record on the map, the red marker for the customer record turns to green.
The system displays a blue maker for your location or the reference point, and a red marker for each customer within the specified filter range.
-
To view the details of the customer record, tap the green marker. The system opens a pop-up window that displays the basic information of the customer (such as the customer name and number, customer location address, and latitude and longitude).
-
To access the customer details screen, tap the Details link.
-
To log out of the application, tap the Menu button at the bottom-left of the screen, and then tap Logout.
20.4 Using the Contact Customer Mobile Smartphone Application
Use the Contact Customer smartphone application (M03015) to:
-
View customer address information.
-
View customer contacts.
-
Add customer contact information to your device.
-
Use mapping and navigation features of your device to locate the customer site.
-
Send emails to customer contacts.
-
Call customer contacts from your device.
-
View the customer website by tapping the url.
-
Search for customers within a user defined proximity (Release 9.1 Update).
Before you can use the application, you must download and install the application from the application store on your device.
To open the application, tap the icon and log in.
20.4.1 Using the Contact Customer Mobile Smartphone Application
To view customer contact information:
-
Open the application by tapping the icon on your device, and then log in.
See Chapter 3, "Logging Into Mobile Enterprise Applications"
-
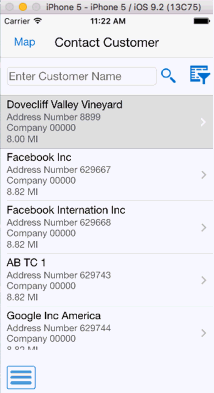
On the Contact Customer Home screen, enter the customer name and tap Search.
Figure 20-6 Contact Customer Home Screen
Description of ''Figure 20-6 Contact Customer Home Screen''
-
Select a customer record to view customer information.
On this screen you can:
-
Tap the customer address to use the map and navigation capabilities of your mobile device.
-
Tap the phone number to call the customer from your device.
-
Tap the email address to compose an email to the customer.
-
Tap the customer url to open a browser application to view the web site on your device.
-
-
To view contact information for the selected customer, tap the Contacts button. The device displays a list of contacts associated with the customer.
-
To view detailed information about a specific contact, tap the contact record.
You can tap the address to use the map and navigational features on your device.
-
Tap the Phone and Email tab to view additional information about the contact.
You can tap the phone number or email address to contact the customer using the features on your device.
-
Tap the Create Device Contact button to add the contact record to your device contacts. If the contact does not already exist, the system adds the contact to your device and displays a confirmation message, Contact Added. If the contact already exists, the system does not update anything, and returns a message, Contact Exists.
Note that this button appears only if the device privacy settings are enabled for the application to access the device contacts.
-
To log out of the application, tap the Menu button at the bottom left of the screen, and then tap Logout.
20.4.2 Searching for Customers within a User-Defined Proximity Using the Contact Customer Mobile Smartphone Application (Release 9.1 Update)
To search for customers within a specified proximity to your location or another reference point:
-
Open the application by tapping the icon on your device, and then log in.
See Chapter 3, "Logging Into Mobile Enterprise Applications"
-
Tap the Filter button in the Contact Customer home screen.
-
To filter customer records by name or number, enter data in the Customer Name an Customer Number fields.
-
To turn on or turn off the Include Proximity in Search option, click the toggle button.
Note:
If you turn off the Include Proximity in Search option in the filters screen, the system will not display the Map link or the distance to a customer in the detail list. -
To refine your search, tap the Locate By drop-down button.
On the filters screen, the Locate By drop-down menu provides three options: My Location, Street Address, and Customer Number. The system displays the My Location option by default and populates default values in these fields: Proximity, Latitude, and Longitude.
Note:
To display the Street address option in the Filters screen, you must set the Enable Location Services option to Yes in the Work With EnterpriseOne System Control (P99410) program.My Location
Select this option from the Locate By drop-down menu to allow the mobile application to access the device's location. If you do not select this option, you must select either the Street Address or the Customer Number as the reference point. You can manually enter the latitude and longitude if desired.
Street Address
Select this option from the Locate By drop-down menu to allow the mobile application to access the device's location based on the customer's address.
Note:
The street address option is visible in the drop-down menu only when the Enable Location Services option is set to Yes in the Work With EnterpriseOne System Control (P99410) program.Customer Number
Select this option from the Locate By drop-down menu to allow the mobile application to access the device's location based on the customer name or number.
Proximity
The system populates these fields with the values that you have set up in the user preferences for the application. If you have not specified the default values in the preferences, the system populates a default value of 10 Miles. The system filters the customer's location that is within the radius specified in the Proximity field.
Enter a numerical value for the radius within which the system locates the customer location. The center of the radius is the reference point; the reference point can be your location or a user-defined location.
Unit of Measure
Specify whether to use Miles or Kilometers for the radius (proximity) within which the system locates the customer location.
Latitude Longitude
The system populates these fields with the latitude and the longitude of your location. The system uses the values in these fields to get the reference point (center of the radius).
If you do not want to use your location as the reference point, tap the latitude and longitude fields and enter new values. The system uses the updated values to locate the new reference point and calculates the proximity using this new reference point.
-
In the filters screen, to continue the search using the specified filter values, tap the Apply button.
The system takes you to the list of customer records that is displayed based upon their proximity to the reference point.
To discontinue the use of filter values in your search, tap the Cancel button.
-
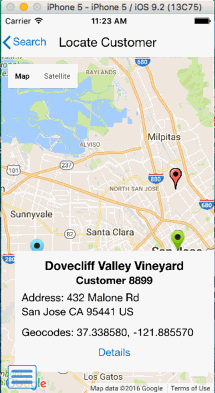
On the Details screen, to view customer locations on the map, select a customer record and click the Map link on the top-left corner of the screen.
On the Map screen, the system displays the customer record based on the filter values and a map with marker for the respective customer.
-
To view the details of the customer, tap the red marker for the customer record on the map.
When you select the customer record on the map, the red marker for the customer record turns to green.
The system displays a blue marker for your location or the reference point, and a red marker for each customer within the specified filter range.
-
To view the details of the customer record, tap the green marker. The system opens a pop-up window that displays the basic information of the customer (such as the customer name and number, customer location address, and latitude and longitude).
-
To view the details of a different customer record, return to the customers list, and tap the customer record from the list. You can also select different customer record by going back to the map, and selecting the customer record on the map.
To access the customer details screen, tap the Search link.
-
To log out of the application, tap the Menu button at the bottom-left of the screen, and then tap Logout.
