39 Creating a New Customer Center Service Panel
This section uses an example to show how to create a new Oracle Communications Billing and Revenue Management (BRM) Customer Center service panel using JBuilder.
Note:
These instructions assumed you have already set up JBuilder.Before you read this chapter, you should be familiar with these concepts:
You should also have a working knowledge of JBuilder.
Creating a New Service Panel
Service panels are extensions to the PIAExtendServiceBase class. They are used to add data entry or display fields to the account maintenance service tab. The fields displayed are dependent on the type of service selected.
Note:
You mostly work with the widgets in the CCSDK Components widget palette since they are BRM aware. Additional widgets are included under the PFC Components tab, but they are not BRM aware. They provide functionality beyond the normal Java widget set, such as links, section headers, and drop-down menus.As an example, these instructions create a panel for the email service. This panel includes three fields:
-
Maximum message size
-
Mailbox path
-
Service status
Note:
Customer Center displays status information elsewhere in the UI. The service status field is added here as an example only.
Follow these steps to create a new service panel:
-
Go to the CCSDK_Home/CustomerCenterSDK/CustCntrExamples/Service directory.
-
Copy ServiceTemplate.txt to CustomService.java. You can give the file any name.
-
Edit CustomProfile.java by changing all instances of XXX to CustomService (or whatever you have named your file) and move this file to the CCSDK_Home/CustomerCenterSDK/CustCntr/custom directory.
Important:
Always develop your deployment code in the CCSDK_Home/CustomerCenterSDK/CustCntr/custom directory. -
Start JBuilder and load the project you previously created.
The example project is called MyCustomizations.
-
Choose File – Open to open the CustomProfile.java file.
-
(Optional) Include code to inform the base class that you are handling the login and password data entry elsewhere.
You might want full control over how the login and password data are entered. For example, some services store non-traditional information in the login and password fields, such as phone numbers and URLs. In these situations, you should change the UI field labels accordingly. If you fill in these fields automatically, you may also not want to display these fields at all.
To instruct the base class that you are handling login and password data entry elsewhere:
-
In JBuilder, click the Source tab.
-
Add the following code towards the bottom of your source file:
public boolean supportsLoginAndPassword() {
return true;
}
-
Save the file
Important:
Your UI must accommodate these fields with fields you add to the UI and label yourself or by passing the appropriate data directly to the input flist.Note:
This example assumes that login and password entry is done in the traditional sense. In this situation, you do not need to add these fields to your UI.
-
-
Click the Design tab.
-
Select the gray panel in the center of the screen and make sure the layout is set to GridBagLayout.
If not, choose GridBagLayout from the drop-down menu associated with the layout property.
-
From the Swing widget palette, select the Label widget.
-
Drag one label in the gray work area in the center of the screen.
-
Select the label widget again and drag it below the first one.
-
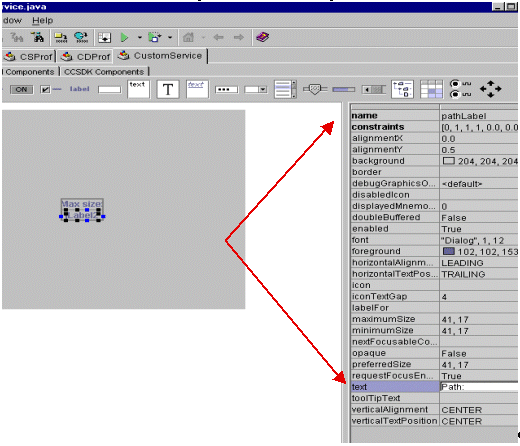
Select the first label, click the name attribute and change it to maxSizeLabel.
-
Click the text attribute and change it to Max size.
-
Select the second label, click the name attribute and change it to pathLavel.
-
Click the text attribute and change it to Path: as shown in Figure 39-1.
This represents the mailbox path value.
-
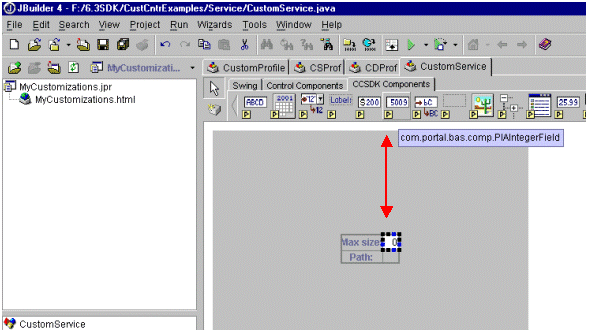
From the CCSDK Components widget palette, select the PIAIntegerTextField widget and drag it to the right of the Max size label widget as shown in Figure 39-2.
This configures the widget to capture the max size data in an integer-only text entry widget.
Figure 39-2 Adding a PIAIntegerTextField Widget
Description of ''Figure 39-2 Adding a PIAIntegerTextField Widget''
-
Select the PIAIntegerField widget and select the columns attribute.
-
Change the columns attribute to 10.
This causes the widget width to expand.
-
Right-click the widget and from the menu and set its fill to Horizontal.
-
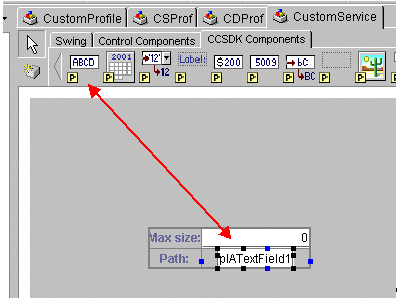
Select the PIATextField widget and drag it to the right of the Path widget as shown in Figure 39-3.
Figure 39-3 Adding a PIATextField Widget
Description of ''Figure 39-3 Adding a PIATextField Widget''
-
Change the widget columns attribute to 10 and set its fill to Horizontal.
-
Select the existing text and delete it.
This clears the text attribute so it no longer reads pIATextField.
-
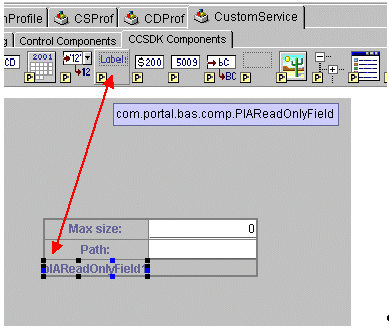
Click the PIAReadOnly widget from the CCSDK Components palette and drag it below the Path: label as shown in Figure 39-4.
Figure 39-4 Adding a PIATextReadOnly Widget
Description of ''Figure 39-4 Adding a PIATextReadOnly Widget''
-
Map the widgets to BRM fields:
-
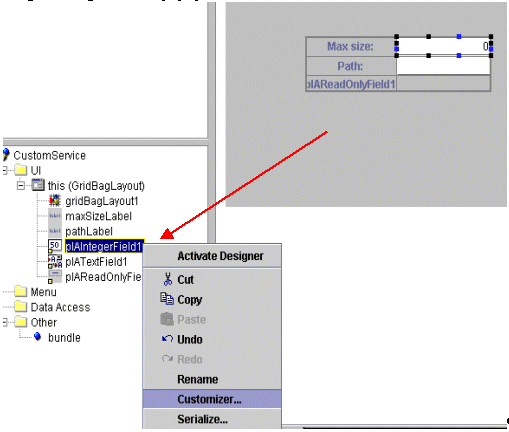
Click the PIAIntegerTextField representing "Max size" and bring up the Infranet-aware customizer.
-
Select the variable instance for this widget and right click to popup the action menu.
-
Select Customizer as shown in Figure 39-5.
Note:
Before the customizer appears, you must log in to BRM. Log in as you normally would. -
From within the customizer, locate the /service/email node in the tree and Click the PIN_FLD_MAX_MSG_SIZE field on the right.
-
Select Apply, and then OK.
You have now mapped that widget to a field in BRM.
-
Follow the same procedure to map the Path textfield widget to PIN_FLD_PATH.
-
-
Map the read-only widget to a BRM field:
-
Launch the read-only widget customizer.
-
Select that class and select PIN_FLD_STATUS.
Tip:
Since the widget is read-only and its value cannot change, you do not need to work with the ModelFieldDescription. (ModelFieldDescription is what the Business Application SDK (BAS) turns into the input flist when it saves data). You can delete this value.Note:
The field is not in the /service/email class but instead in the base /service class.
-
-
Click Display Field Format.
The Display Field Format editor appears.
Tip:
You change the display field format feature to make BRM values easier for the user to read. -
Enter the BRM data value and the string you want displayed in the UI.
-
When you are finished, click Done.
This updates the BAS widget property with the correct mapping format.
-
(Optional) Add the leading text Status - to the front of the display field format.
-
Save your file.
Your basic service panel is now complete.
-
Compile your panel using the buildAll script in the top-level SDK directory.
-
Add this entry to the CC_SDK/CustomerCareSDK/CustCntr/custom/Customized.properties file:
extended.service.email=CustomService
Replace CustomService with the name of your Java Class.
This entry makes Customer Center aware of the new service panel.
-
From the CC_SDK/CustomerCareSDK/CustCntr/bin directory, start your local copy of Customer Center (run CustomerCenter.bat).
-
Locate an account containing an email service.
-
Switch to the Services tab and select the email service in the table.
Your panel and the default widget set appear.
If the fields on your service panel need alignment, see "Correcting Field Alignment".
Correcting Field Alignment
If your panel has alignment problems, you might need to work with the Java layout to correct them.
This section describes how to add a blank widget in your panel to fix alignment problems. The widget is invisible but takes up the extra space within the panel. (By default, widgets in a GridBagLayout tend to move towards the center.)
-
Exit Customer Center.
-
Open JBuilder and click the Design tab.
-
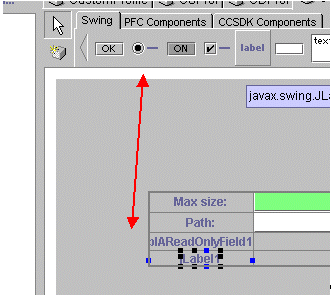
From the Swing widget palette, select the 'label' widget and drop it below your status read-only widget as seen in Figure 39-6.
-
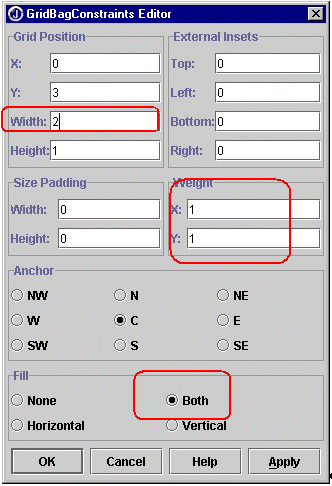
Click the constraints attribute.
-
Select the … button to launch the editor.
-
Set the Grid Position Width to 2; set the Weight X and Y parameters to 1; set the Fill parameter to BOTH as seen in Figure 39-7.
The first 3 rows of widgets should move toward the top of the panel.
You have just told the label in the fourth row to take up two columns of space, and all remaining space on the bottom.
-
Delete the value in this widget's 'text' attribute so it no longer reads 'label'. Select the 'text' attribute on the right side of JBuilder and delete the text.
-
Save your changes, compile, and re-launch Customer Center. When you revisit your service panel the layout should be improved.
What's Next
If you have no further Customer Center customizations to code, see "Building Your Customer Center Customizations".
