34 Customizing the Customer Center Interface
This chapter provides the following information on customizing Oracle Communications Billing and Revenue Management (BRM) Customer Center:
-
The requirements for customizing Customer Center
-
Using the Configurator application
-
Adding entries to customized properties files
-
Extending the Customer Center architecture and framework to add customized panels
-
The Customer Center architecture and framework
Before you read this chapter, you should be familiar with these concepts:
For information about Java classes used in Customer Center SDK, see the Customer Care API Reference.
Note:
Customer Center Software Development Kit (SDK) uses the Portal Communication Module (PCM) Java Application Programming Interface (API) to communicate with BRM database objects. While the PCM API uses the format PIN_FLD_SUBCLASS to represent an flist field to BRM, the PCM Java API uses the format FldSubClass to represent an flist to BRM. See the API Reference for PCM Java for information about the Java equivalents for the PCM API field subclasses.Related documentation:
-
To customize Self-Care Manager, see "Customizing the Self-Care Manager Interface".
-
To use the Java PCM API to create Java client applications that interface with BRM, see "Creating Client Applications by Using Java PCM".
-
To customize Customer Center online help, see "Customizing the Customer Center Help System".
-
To customize localized versions of Customer Center using Customer Center SDK and the Localization SDK, see "Modifying Localized Versions of Customer Center".
Customizing and Configuring Customer Center
This section describes the "Tools and Techniques for Customizing Customer Center" and a "Customization Procedure Overview" describing which tools and techniques to use for various types of customizations.
Tools and Techniques for Customizing Customer Center
To customize and configure the Customer Center interface, perform the following tasks.:
-
Code your customizations by:
-
Using the graphical Configurator application to configure the most commonly modified interface features. See "Using Configurator to Configure Customer Center".
-
Modifying Customer Center customized properties files. See "Modifying the Customer Center Properties Files".
-
Creating custom fields and panels with PIA (Portal Infranet Aware) widgets by using an IDE tool such as JBuilder. See "Setting Up JBuilder to Customize the Customer Center Interface".
-
Using scripts, such as the one that starts a local version of Customer Center, for testing your customizations. See "Using Customer Center SDK Scripts for Customer Center".
-
-
Build and test your customizations by using scripts such as:
-
buildAll to build your jar files. See "Building Your Customer Center Customizations".
-
runCustomerCenter to launch a local version of Customer Center to test your customizations before deployment. See "Testing Your Customizations".
-
-
Deploy your customizations. See "Deploying Your Customer Center Customizations".
Customization Procedure Overview
This section describes which "Tools and Techniques for Customizing Customer Center" to use for various types of customizations.
Coding Your Customizations
-
If you are making basic changes to the Customer Center interface, such as changing page field attributes, page order, or search fields, you use Configurator.
For a complete description of the customizations you can make with Configurator and how to make them, see "Using Configurator to Configure Customer Center".
-
If you are making minor customizations not handled by Configurator, such as changing the list of services available in the search panel, edit the Customer Center customized properties files.
-
If you are adding new fields to Customer Center, use:
-
Developer Center
-
JBuilder
-
Configurator
See "Setting Up JBuilder to Customize the Customer Center Interface" and "Adding Custom Fields to Customer Center".
-
-
If you are adding a new profile or service panel, you use JBuilder and Configurator. See:
-
Setting Up JBuilder to Customize the Customer Center Interface
-
The sample profile and service panel code in the /Profile and /Service directories in the CCSDK_Home/CustomerCareSDK/CustCntrExamples directory.
-
-
If you are adding new account maintenance tabs or pages to the new accounts wizard, see "Adding New Pages to the Customer Center Interface"
See also sample code in the CCSDK_Home/CustomerCareSDK/CustCntrExamples directory.
-
If you are doing advanced customizations, see "Understanding the BRM Business Application SDK Framework" and "Advanced Customer Center Concepts".
Building and Deploying Your Customizations
All customizations are built and deployed using the same procedures no matter which tools and techniques are used to do the customizations. See "Building Your Customer Center Customizations" and "Deploying Your Customer Center Customizations"
Modifying the Customer Center Properties Files
This section describes the properties files used to define Customer Center behavior and how to modify those behaviors.
About the Default Customer Center properties Files
Default Customer Center settings are defined with parameter-value pairs in the following files in the CCSDK_Home/CustomerCareSDK/CustCntr/Settings directory:
-
CustomerCenter.properties
-
CustomerCenterResources.properties
Caution:
Do not delete or modify the default properties files.
For information on the parameters in the default properties files, see the comments in the files.
Modifying Behaviors Defined by the Default Properties Files
To change the behaviors in the default properties files:
-
Add or modify parameters in the Customized.properties and CustomizedResources.properties files, which are located in the CCSDK_Home/CustomerCareSDK/CustCntr/custom directory. Parameters and values specified in the Customized*.properties files take precedence over values for identical parameters in the respective default properties files.
For examples of changing Customer Center behavior by modifying the Customized.properties file, see:
-
Add or modify parameters in the WizardCustomizations.properties and WizardCustomizationsResources.properties files, which are located in the CCSDK_Home/CustomerCareSDK/CustCntr/bin directory. Parameters and values specified in the WizardCustomizations*.properties files:
-
Supersede values for identical parameters in the respective default properties files.
-
Are superseded by values for identical parameters in the respective Customized*.properties files.
Note:
Values in the WizardCustomizations*.properties files are also modified by the Configurator utility.
-
To modify one of these properties files:
-
Open the file with a text editor.
-
Add appropriate parameter-value pairs.
-
Save the file.
After you modify the properties files and make any other customizations, see "Building Your Customer Center Customizations" and "Deploying Your Customer Center Customizations".
Displaying Event Timestamps with Seconds Precision
By default, Customer Center displays event timestamps with hours and minutes precision, such as, 4:30 p.m. You can configure Customer Center to display event timestamps with seconds precision, such as 4:30:55 p.m., by enabling the customercenter.datetime.showseconds entry in the Customized.properties file.
To display event timestamps with seconds precision:
-
Open the CCSDK_Home/CustCntr/custom/Customized.properties file in a text editor.
-
Add the following line after the comment statements:
customercenter.datetime.showseconds=true -
Save and close the file.
-
Restart Customer Center.
Adding Inactive Product Status Indicators
To add inactive product status indicators:
-
Open the Customized.properties file in the CCSDK_Home/CustCntr/custom directory.
-
After the comment statements, add the following lines:
product.details.status.flags.waiting=Waiting for installation
product.details.status.flags.network=Network configured
product.details.status.flags.maintenance=Maintenance
-
Save your changes.
Changing the List of Services Available in the Search Panel
To change the list of services available in the Search panel:
-
Open the Customized.properties file in the CCSDK_Home/CustCntr/custom directory.
-
Add the following line after the comment statements, changing the value to match the total number of service types to display in the Search panel:
searchpanel.service.num=3 -
Add entries for each service type to display, for example:
searchpanel.service.type.0=admin_client
searchpanel.service.type.1=broadband
searchpanel.service.type.2=email
Important:
If you add a new service type to BRM, add a searchpanel.service.type entry for it in the Customized.properties file and be sure to increment the value for searchpanel.service.num accordingly. -
Save your changes.
Improving Account Search Performance
You can improve Customer Center account search performance by reducing the maximum number of search results displayed. The default is 1000.
To reduce the maximum number of search results displayed:
-
Open the Customized.properties file in the CCSDK_Home/CustCntr/custom directory.
-
Add the following line after the comment statements:
search.accountsresults.displaylimit=<new value> -
Save your changes.
Changing Number Searches for GSM Services
You search for telephone numbers when assigning numbers for a GSM service in Customer Center. Numbers are assigned when customizing services in the New Account or Purchase wizards or when changing the number for an existing service.
One of the search criteria on the Search Number dialog box is Status. By default, the Status list has these options-<Not Specified>, New, and Unassigned. If you choose <Not Specified>, Customer Center searches for numbers with a status of either New or Unassigned. It does not search for numbers with a status of Assigned or Quarantined.
If you have customized the list to include other status options, <Not Specified> also searches for the custom options.
You can change this default so that Customer Center adds Assigned and Quarantined to the Status list and searches numbers with Assigned or Quarantined status when you choose <Not Specified>:
-
Open the Customized.properties file in the CCSDK_Home/CustCntr/custom directory.
-
After the comment statements, add the following line:
device.num.search.entry.panel.status.availability=false -
Save the file.
By default, device.num.search.entry.panel.status.availability is set to true. When you set this property to false, the following takes place:
-
The default Status list will also display Assigned and Quarantined.
-
When you choose <Not Specified>, Customer Center searches for numbers of any status.
Modifying the Shortcut Key Sequences
Customer Center provides shortcut key sequences for many of the actions in the UI. You can customize the mnemonics by adding an updated property statement for each custom shortcut in the Customized.properties file.
Important:
Make sure you do not assign the same mnemonic to different shortcuts.To customize the shortcut key sequences:
-
Open the CustomerCenter.properties file in the CCSDK_Home/CustCntr/Settings directory.
-
Copy the line containing the mnemonic property you want to change. For example:
search.startsearch.mnemonic=S -
Open the Customized.properties file in the CCSDK_Home/CustCntr/custom directory.
-
Paste in the line you copied.
-
Change the value assigned to the property, for example:
search.startsearch.mnemonic=x -
Save your changes.
Specifying the Number of Bills Displayed in the Balances Tab
In Customer Center, you can view detailed information about the bills associated with an account in the Bills section of the Balances tab. By default, the Balances tab displays a maximum of six bills for each account. You can customize the maximum number of bills displayed by adding a property to the Customized.properties file.
To customize the maximum number of bills Customer Center displays on the Balances tab:
-
Open the Customized.properties file in the CCSDK_Home/CustCntr/custom directory.
-
After the comment statements, add the following line:
balance.default.bills.count =Count
Replace Count with the number of bills you want Customer Center to display for each account on the Balances tab.
-
Save your changes.
Suppressing the "Missing Login/ID" Message for Custom Service Panels
You can create custom service panels that do not request users to enter their login IDs and passwords. However, when users exit the custom service panel, Customer Center generates a "Missing Login/ID. Do you want to fix the error now?" message.
To suppress the login error message in custom service panels, perform the following tasks.
-
Open the Customized.properties file in the CCSDK_Home/CustCntr/custom directory.
-
Set the extended.ServiceType.required entry to false:
extended.ServiceType.required=false
-
Save and close the file.
Changing the Maximum Number of Security Code Characters
When you create an account in Customer Center, you can enter security codes on the General tab of the Account Creation wizard.
You can also modify security codes in the Account Summary section of the Summary tab.
The BRM database is set up to store a maximum of 30 characters for a security code. You can change the number of allowed characters by modifying the database and adding a property to the Customized.properties file.
To change the maximum number of security code characters:
-
In the Storable Class Editor, change the length of the PIN_FLD_ACCESS_CODE1 and PIN_FLD_ACCESS_CODE2 fields in the /account storable class.
-
Open the Customized.properties file in the CCSDK_Home/CustCntr/custom directory.
-
After the comment statements, add the following line:
summary.securitycode.length=lengthReplace length with the number of characters you want to allow. The number cannot exceed the size of the PIN_FLD_ACCESS_CODE1 and PIN_FLD_ACCESS_CODE2 fields in the ACCOUNT_T database table.
-
Save the file.
Updating Notes Before Saving
By default, when you open an account in Customer Center, existing notes are cached. If two or more users have an account open at the same time and add notes, only one user's notes will be saved.
To prevent this from happening, you can add a property that directs Customer Center to refresh notes from the database before saving an account. This can slow the performance, but it ensures that notes entered by different users to the same account are not overwritten.
To have Customer Center refresh notes from the database:
-
Open the Customized.properties file in the CCSDK_Home/CustCntr/custom directory.
-
After the comment statements, add the following line:
notes.management.option=refresh
-
Save the file.
Reminding CSRs to Customize Deals Before Completing a Purchase
If you create deals with a Deal Customization setting of Required, you will probably want to ensure that CSRs go to the Customer Center Customize Product page to offer your customizations. Customer Center automatically reminds CSRs to customize deals with a Required deal customization setting when they first select the deal for purchase. You can also remind CSRs to visit the Customize Product page before completing the sale by using the customize.deal.enforce setting.
You turn this option on and off by changing the customize.deal.enforce setting in the Customized.properties file.
This example turns this option on:
customize.deal.enforce = true
The default is false.
Identifying Services by Device ID Rather than Login ID
By default, Customer Center identifies a service owned by an account by using the service login ID, allowing you to find email or IP services owned by the account. You can configure Customer Center to identify services by using device IDs rather than login IDs by using a Customized.properties entry. You might do this, for example, if you offer mostly telco services.
To configure Customer Center to identify services by using device IDs rather than login IDs:
-
Open the Customized.properties file in the CCSDK_Home/CustCntr/custom directory.
-
After the comment statements, add the following line:
service.alias.display=true -
Save and close the file.
Adding a Tax Exemption Type
If a tax exemption type does not exist, you can include it by overriding an existing property in the WizardCustomizationsResources.Properties file:
-
Make a copy of the WizardCustomizationsResources.Properties file.
-
Add the following property:
exemptionType.format={0,choice,0#Federal|1#State|2#County|3#City| 4#Secondary County|5#Secondary City|8#District} -
Place the customized file in the directory where you start Customer Center.
Customizing Event Searches
Customer Center has the following criteria to event searches for wholesale customers. Customer Center allows you to:
-
Narrow your filters for event searches by providing search criteria in the Event Search dialog box. For more information, see the Customer Center Help.
-
Customize the case sensitivity of the searches for events. See "Customizing the Case Sensitivity of Event Searches"
-
Customize event searches by adding custom settings for the following search components:
-
Service types. See "Customizing the Selections for Service Type in Event Searches"
-
Service status. See "Customizing the Selections for Service Status in Event Searches"
-
Device types. See "Customizing the Selections for Device Type in Event Searches"
-
Customizing the Case Sensitivity of Event Searches
The Match case check box in the Event Search dialog box is selected, indicating that, by default, event searches are case-sensitive in Customer Center.
To change the default case sensitivity of event searches:
-
Open the CCSDK_Home/CustCntr/custom/Customized.properties file in a text editor, where CCSDK_Home is the directory in which you installed the Customer Center software development kit (CCSDK).
-
Add the following entry:
par.eventsearch.default.matchcase=false -
Save the file.
-
Build the custom .jar file and deploy this customization.
When you deploy this customization, event searches are not case-sensitive, by default. The Match case check box in the Event Search dialog box is not selected.
Customizing the Selections for Service Type in Event Searches
The Service Type field in the Event Search dialog box displays the possible selections for service types that can be used in event searches.
To customize the selection for service types in event searches:
-
Open the CCSDK_Home/CustCntr/custom/CustomizedResources.properties file in a text editor.
-
Add the custom setting for the par.eventsearch.servicetypes.format entry. For example:
par.eventsearch.servicetypes.format={0,choice,1#/service/ip|2#/service/email|3#/service/fax|1,default,2}In this example,
-
The service types you want to include are numbered 1# 2# and so on, delimited by |.
-
The default service type that is displayed when you access the dialog box is specified as 1,default,n. In this example, the default is 2; that is, /service/email.
Note:
The default setting for the Service Type field is defined by the following statement. (The default service type is /Not Specified.)par.eventsearch.servicetypes.format={0,choice, 0#(Not Specified)|1#/service|2#/service/ip|3#/service/email|4#/service/telco|5#/service/telco/gsm|6#/service/telco/gsm/sms|7#/service/telco/gsm/telephony|1,default,0}
-
-
Save the file.
-
Build the custom .jar file and deploy this customization.
Customizing the Selections for Service Status in Event Searches
The Service Status field in the Event Search dialog box displays the possible selections for service status that can be used in event searches.
To customize the selection for service status in event searches:
-
Open the CCSDK_Home/CustCntr/custom/CustomizedResources.properties file in a text editor.
-
Add the custom setting for the par.eventsearch.servicestatus.format entry. For example:
par.eventsearch.servicestatus.format={0,choice,0#All|10100#Active|10102#Inactive|1,default,0}In this example,
-
The service status entries you want to include are numbered 0# 10100# and so on, delimited by |.
-
The default service status that is displayed when you access the dialog box is specified as 1,default,n. In this example, the default is 0; that is, All.
Note:
The default setting for the Service Status field is defined by the following statement. (The default service status is All.)par.eventsearch.servicestatus.format={0,choice,0#All|10100#Active|10102#Inactive|10103#Closed|1,default,0}
-
-
Save the file.
-
Build the custom .jar file and deploy this customization.
Customizing the Selections for Device Type in Event Searches
The Device Type field in the Event Search dialog box displays the possible selections for device types that can be used in event searches.
To customize the selection for device types in event searches:
-
Open the CCSDK_Home/CustCntr/custom/CustomizedResources.properties file in a text editor.
-
Add the custom setting for the eventsearch.devicetypes.format entry. For example:
par.eventsearch.devicetypes.format={0,choice,1#/device/num|2#/device/sim|1,default,1}In this example,
-
The device types you want to include are numbered 1# 2# and so on, delimited by |.
-
The default device type that is displayed when you access the dialog box is specified as 1,default,n. In this example, the default is 1; that is, /device/num.
Note:
The default setting for the Device Type field is defined by the following statement. (The default device type is Not Specified.)par.eventsearch.devicetypes.format={0,choice,0#(Not Specified)|1#/device|2#/device/num|3#/device/sim|1,default,0}
-
-
Save the file.
-
Build the custom .jar file and deploy this customization.
Customizing Balance Group Searches
Customer Center has the following criteria to balance group searches for wholesale customers. Customer Center allows you to:
-
Set the threshold for the number of available balance groups to display in Customer Center. For more information, see Customer Center Help.
-
Customize the case sensitivity of searches for balance groups. See "Customizing the Case Sensitivity of Balance Group Searches"
-
Customize searches for balance groups by adding custom settings for the following search components:
-
Service types. See "Customizing the Selections for Service Type in Balance Group Searches"
-
Service status. See "Customizing the Selections for Service Status in Balance Group Searches"
-
Device types. See "Customizing the Selections for Device Type in Balance Group Searches"
-
Customizing the Case Sensitivity of Balance Group Searches
The Match case check box in the Balance Group Search dialog box is selected, indicating that, by default, balance group searches are case-sensitive in Customer Center.
To change the default case sensitivity of balance group searches:
-
Open the CCSDK_Home/CustCntr/custom/Customized.properties file in a text editor, where CCSDK_Home is the directory in which you installed the Customer Center software development kit (CCSDK).
-
Add the following entry:
balancegroupsearch.default.matchcase=false -
Save the file.
-
Build the custom .jar file and deploy this customization.
When you deploy this customization, balance group searches are not case-sensitive, by default. The Match case check box in the Balance Group Search dialog box is not selected.
Customizing the Selections for Service Type in Balance Group Searches
The Service Type field in the Balance Group Search dialog box displays the possible selections for service types that can be used in balance group searches.
To customize the selection for service types in balance group searches:
-
Open the CCSDK_Home/CustCntr/custom/CustomizedResources.properties file in a text editor.
-
Add the custom setting for the balancegroupsearch.servicetypes.format entry. For example:
balancegroupsearch.servicetypes.format={0,choice,1#/service/ip|2#/service/email|3#/service/fax|1,default,2}In this example,
-
The service types you want to include are numbered 1# 2# and so on, delimited by |.
-
The default service type that is displayed when you access the dialog box is specified as 1,default,n. In this example, the default is 2; that is, /service/email.
Note:
The default setting for the Service Type field is defined by the following statement. (The default service type is /service.)balancegroupsearch.servicetypes.format={0,choice, 0#(Not Specified)|1#/service|2#/service/ip|3#/service/email|4#/service/telco|5#/service/telco/gsm|6#/service/telco/gsm/sms|7#/service/telco/gsm/telephony|1,default,1}
-
-
Save the file.
-
Build the custom .jar file and deploy this customization.
Customizing the Selections for Service Status in Balance Group Searches
The Service Status field in the Balance Group Search dialog box displays the possible selections for service status that can be used in balance group searches.
To customize the selection for service status in balance group searches:
-
Open the CCSDK_Home/CustCntr/custom/CustomizedResources.properties file in a text editor.
-
Add the custom setting for the balancegroupsearch.servicestatus.format entry. For example:
balancegroupsearch.servicestatus.format={0,choice,0#All|10100#Active|10102#Inactive|1,default,0}In this example,
-
The service status entries you want to include are numbered 0# 10100# and so on, delimited by |.
-
The default service status that is displayed when you access the dialog box is specified as 1,default,n. In this example, the default is 0; that is, All.
Note:
The default setting for the Service Status field is defined by the following statement. (The default service status is Active.)balancegroupsearch.servicestatus.format={0,choice,0#All|10100#Active|10102#Inactive|10103#Closed|1,default,10100}
-
-
Save the file.
-
Build the custom .jar file and deploy this customization.
Customizing the Selections for Device Type in Balance Group Searches
The Device Type field in the Balance Group Search dialog box displays the possible selections for device types that can be used in balance group searches.
To customize the selection for device types in balance group searches:
-
Open the CCSDK_Home/CustCntr/custom/CustomizedResources.properties file in a text editor.
-
Add the custom setting for the balancegroupsearch.devicetypes.format entry. For example:
balancegroupsearch.devicetypes.format={0,choice,1#/device/num|2#/device/sim|1,default,1}In this example,
-
The device types you want to include are numbered 1# 2# and so on, delimited by |.
-
The default device type that is displayed when you access the dialog box is specified as 1,default,n. In this example, the default is 1; that is, /device/num.
Note:
The default setting for the Device Type field is defined by the following statement. (The default device type is Not Specified.)balancegroupsearch.devicetypes.format={0,choice,0#(Not Specified)|1#/device|2#/device/num|3#/device/sim|1,default,0}
-
-
Save the file.
-
Build the custom .jar file and deploy this customization.
Customizing Product/Discount Searches
Customer Center has the following criteria to product/discount searches for wholesale customers. Customer Center allows you to:
-
Set the number of available products/discounts to display in Customer Center. For more information, see Customer Center Help.
-
Customize the case sensitivity of searches for products/discounts. See "Customizing the Case Sensitivity of Product/Discount Searches"
-
Customize searches for products/discounts by adding custom settings for the following search components:
-
Service types. See "Customizing the Selections for Service Type in Product/Discount Searches"
-
Service status. See "Customizing the Selections for Service Status in Product/Discount Searches"
-
Device types. See "Customizing the Selections for Device Type in Product/Discount Searches"
-
Customizing the Case Sensitivity of Product/Discount Searches
The Match case check box in the Product/Discount Search dialog box is selected, indicating that, by default, product/discount searches are case-sensitive in Customer Center.
To change the default case sensitivity of product/discount searches:
-
Open the CCSDK_Home/CustCntr/custom/Customized.properties file in a text editor, where CCSDK_Home is the directory in which you installed the Customer Center software development kit (CCSDK).
-
Add the following entry:
proddiscsearch.default.matchcase=false -
Save the file.
-
Build the custom .jar file and deploy this customization.
When you deploy this customization, product/discount searches are not case-sensitive, by default. The Match case check box in the Product/Discount Search dialog box is not selected.
Customizing the Selections for Service Type in Product/Discount Searches
The Service Type field in the Product/Discount Search dialog box displays the possible selections for service types that can be used in product/discount searches.
To customize the selection for service types in product/discount searches:
-
Open the CCSDK_Home/CustCntr/custom/CustomizedResources.properties file in a text editor.
-
Add the custom setting for the proddiscsearch.servicetypes.format entry. For example:
proddiscsearch.servicetypes.format={0,choice,1#/service/ip|2#/service/email|3#/service/fax|1,default,2}In this example,
-
The service types you want to include are numbered 1# 2# and so on, delimited by |.
-
The default service type that is displayed when you access the dialog box is specified as 1,default,n. In this example, the default is 2; that is, /service/email.
Note:
The default setting for the Service Type field is defined by the following statement. (The default service type is /service.)proddiscsearch.servicetypes.format={0,choice,1#/account|2#/service|3#/service/ip|4#/service/email|5#/service/telco|6#/service/telco/gsm|7#/service/telco/gsm/sms|8#/service/telco/gsm/telephony|1,default,2}
-
-
Save the file.
-
Build the custom .jar file and deploy this customization.
Customizing the Selections for Service Status in Product/Discount Searches
The Service Status field in the Product/Discount Search dialog box displays the possible selections for service status that can be used in product/discount searches.
To customize the selection for service status in product/discount searches:
-
Open the CCSDK_Home/CustCntr/custom/CustomizedResources.properties file in a text editor.
-
Add the custom setting for the proddiscsearch.servicestatus.format entry. For example:
proddiscsearch.servicestatus.format={0,choice,0#All|10100#Active|10102#Inactive|1,default,0}In this example,
-
The service status entries you want to include are numbered 0# 10100# and so on, delimited by |.
-
The default service status that is displayed when you access the dialog box is specified as 1,default,n. In this example, the default is 0; that is, All.
Note:
The default setting for the Service Status field is defined by the following statement. (The default service status is Active.)proddiscsearch.servicestatus.format={0,choice,0#All|10100#Active|10102#Inactive|10103#Closed|1,default,10100}
-
-
Save the file.
-
Build the custom .jar file and deploy this customization.
Customizing the Selections for Device Type in Product/Discount Searches
The Device Type field in the Product/Discount Search dialog box displays the possible selections for device types that can be used in product/discount searches.
To customize the selection for device types in product/discount searches:
-
Open the CCSDK_Home/CustCntr/custom/CustomizedResources.properties file in a text editor.
-
Add the custom setting for the proddiscsearch.devicetypes.format entry. For example:
proddiscsearch.devicetypes.format={0,choice,1#/device/num|2#/device/sim|1,default,1}In this example,
-
The device types you want to include are numbered 1# 2# and so on, delimited by |.
-
The default device type that is displayed when you access the dialog box is specified as 1,default,n. In this example, the default is 1; that is, /device/num.
Note:
The default setting for the Device Type field is defined by the following statement. (The default device type is Not Specified.)proddiscsearch.devicetypes.format={0,choice,0#(Not Specified)|1#/device|2#/device/num|3#/device/sim|1,default,0}
-
-
Save the file.
-
Build the custom .jar file and deploy this customization.
Customizing Service Searches
Customer Center has the following criteria to service searches. Customer Center allows you to:
-
Set the threshold for the number of available services to display in Customer Center. For more information, see the Customer Center Help.
-
Customize the case sensitivity of searches for services. See "Customizing the Case Sensitivity of Service Searches"
-
Set the step size for the searches. See "Customizing the Step Search Size"
-
Customize service searches by adding custom settings for the following search components:
-
Service types. See "Customizing the Selections for Service Type in Service Searches"
-
Service status. See "Customizing the Selections for Service Status in Service Searches"
-
Device types. See "Customizing the Selections for Device Type in Service Searches"
-
Customizing the Case Sensitivity of Service Searches
The Match case check box in the Service Search dialog box is selected, indicating that, by default, service searches are case-sensitive in Customer Center.
To change the default case sensitivity of service searches:
-
Open the CCSDK_Home/CustCntr/custom/Customized.properties file in a text editor, where CCSDK_Home is the directory in which you installed the Customer Center software development kit (CCSDK).
-
Add the following entry:
servicesearch.default.matchcase=false -
Save the file.
-
Build the custom .jar file and deploy this customization.
When you deploy this customization, service searches are not case-sensitive, by default. The Match case check box in the Service Search dialog box is not selected.
Customizing the Step Search Size
You can customize the step search size for retrieving services.
To customize the step search size:
-
Open the CCSDK_Home/CustCntr/custom/Customized.properties file in a text editor, where CCSDK_Home is the directory in which you installed the Customer Center software development kit (CCSDK).
-
Set the servicesearch.stepsize entry to the appropriate value for your server (memory) configuration. The default is 100.
-
Save the file.
-
Build the custom .jar file and deploy this customization.
Customizing the Selections for Service Type in Service Searches
The Service Type field in the Service Search dialog box displays the possible selections for service types that can be used in service searches.
To customize the selection for service types in service searches:
-
Open the CCSDK_Home/CustCntr/custom/CustomizedResources.properties file in a text editor.
-
Add the custom setting for the servicesearch.servicetypes.format entry. For example:
servicesearch.servicetypes.format={0,choice,1#/service/ip|2#/service/email|3#/service/fax|1,default,2}In this example,
-
The service types you want to include are numbered 1# 2# and so on, delimited by |.
-
The default service type that is displayed when you access the dialog box is specified as 1,default,n. In this example, the default is 2; that is, /service/email.
Note:
The default setting for the Service Type field is defined by the following statement. (The default service type is /service.)proddiscsearch.servicetypes.format={0,choice,1#/service|2#/service/ip|3#/service/email|4#/service/telco|5#/service/telco/gsm|6#/service/telco/gsm/sms|7#/service/telco/gsm/telephony|1,default,1}
-
-
Save the file.
-
Build the custom .jar file and deploy this customization.
Customizing the Selections for Service Status in Service Searches
The Service Status field in the Service Search dialog box displays the possible selections for service status that can be used in service searches.
To customize the selection for service status in service searches:
-
Open the CCSDK_Home/CustCntr/custom/CustomizedResources.properties file in a text editor.
-
Add the custom setting for the servicesearch.servicestatus.format entry. For example:
servicesearch.servicestatus.format={0,choice,0#All|10100#Active|10102#Inactive|1,default,0}In this example,
-
The service status entries you want to include are numbered 0# 10100# and so on, delimited by |.
-
The default service status that is displayed when you access the dialog box is specified as 1,default,n. In this example, the default is 0; that is, All.
Note:
The default setting for the Service Status field is defined by the following statement. (The default service status is Active.)servicesearch.servicestatus.format={0,choice,0#All|10100#Active|10102#Inactive|10103#Closed|1,default,10100}
-
-
Save the file.
-
Build the custom .jar file and deploy this customization.
Customizing the Selections for Device Type in Service Searches
The Device Type field in the Service Search dialog box displays the possible selections for device types that can be used in service searches.
To customize the selection for device types in service searches:
-
Open the CCSDK_Home/CustCntr/custom/CustomizedResources.properties file in a text editor.
-
Add the custom setting for the servicesearch.devicetypes.format entry. For example:
servicesearch.devicetypes.format={0,choice,1#/device/num|2#/device/sim|1,default,1}In this example,
-
The device types you want to include are numbered 1# 2# and so on, delimited by |.
-
The default device type that is displayed when you access the dialog box is specified as 1,default,n. In this example, the default is 1; that is, /device/num.
Note:
The default setting for the Device Type field is defined by the following statement. (The default device type is Not Specified.)servicesearch.devicetypes.format={0,choice,0#(Not Specified)|1#/device|2#/device/num|3#/device/sim|1,default,0}
-
-
Save the file.
-
Build the custom .jar file and deploy this customization.
Hiding the Password Fields in Customer Center
Hiding the password fields for services in Customer Center (in the Customize Services page and the Services tab) enhances security. When the password fields are hidden, the BRM server generates the password for services. You cannot hide the password fields for the /service/admin_client and /service/pcm_client service types.
To hide the password fields for services in Customer Center:
-
Open the CCSDK_Home/CustCntr/custom/Customized.properties file in a text editor.
-
Add the following line after the comment statements:
nonCSRservices.hide.passwordfields=value
where value is:
-
true to hide the password fields for service types other than /service/admin_client and /service/pcm_client.
-
false to display the password fields. This is the default.
-
-
Save and close the file.
-
Build the custom .jar file and deploy this customization.
-
Restart Customer Center.
Disabling the Child Amounts Check Box
To disable the include Child Amounts check box in Customer Center:
-
Open the Customized.properties file in the CCSDK_Home/CustCntr/custom directory.
-
After the comment statements, add the following line:
Customized.ReadOnlyIncludeChild=trueT -
Save and close the file.
Adding a Custom Service as a Login to Customer Center
As an alternative to /service/admin_client, you can add a custom service as a login.
To add a custom service as a login to Customer Center:
-
Open the CCSDK_Home/CustCntr/custom/Customized.properties file in a text editor.
Alternatively, you can add the line to WizardCustomizations.properties.
-
Add the following line after the comment statements:
customercenter.loginType=/service/CustomService
-
Save and close the file.
-
Build the custom .jar file and deploy this customization.
-
Restart Customer Center.
Enabling Copy and Paste of Service ID for Read-Only Access
By default, the users with read-only access cannot copy any fields in Customer Center. You can customize the Service tab in Customer Center to enable these users to copy service IDs.
To enable users with read-only access to copy service ID:
-
Create the com.custom.cc.ServiceIdSelectable class that contains the following:
package com.portal.app.cc;

import java.rmi.RemoteException;
import com.portal.bas.PModelHandle;

public class ServiceIdSelectable extends PServiceDefault {

@Override
public void setModelHandle(PModelHandle pm) throws RemoteException {
super.setModelHandle(pm);
idTF.setEnabled(true);
idTF.setEditable(false);
}
}
This extends the com.portal.app.cc.PServiceDefault class and allows the user with read-only access to copy the service ID.
-
Open the CCSDK_Home/CustCntr/custom/Customized.properties file in a text editor.
-
Add the following in the file:
com.portal.app.cc.PServiceDefault.subclass=com.custom.cc.ServiceIdSelectable -
Save and close the file.
-
Build the custom .jar file and deploy this customization. See "Building Your Customer Center Customizations" and "Deploying Your Customer Center Customizations".
-
Restart Customer Center.
Using Customer Center SDK Scripts for Customer Center
Table 34-1 contains the scripts provided with Customer Center SDK to automate many of the processes for preparing and building your customizations:
Table 34-1 Customer Center SDK Scripts
| Script | Purpose |
|---|---|
|
runConfigurator |
Runs the Configurator client. See "Using Configurator". |
|
runFldSpecWidget |
Runs a read-only Storable Class Editor widget for reading BRM field definitions to copy and use for modelFieldDescription, displayFieldDescription, and displayFieldFormat entries for new fields. You can use these field definitions when you write code to add functionality to the Customer Center and Self-Care Manager applications. |
|
makecertificate |
Creates a self-signed certificate for deploying your customizations. |
|
runCustomerCenter |
Runs a standalone version of Customer Center for local testing of your customizations. This script requires a connection to a CM, but doesn't require a Web server. |
|
compile |
Recompiles the example source files in all subdirectories under the /CustCntrExamples directory. Use this script before you run the example source files. Tip: To see how the buildAll script compiles, packages, and signs custom source code, copy Customized.properties and CustomizedResources.properties files from the example's folder to the CCSDK_Home/CustomerCareSDK/CustCntr/custom directory. |
|
testExample |
Tests the compiled Customer Center examples in the following directories under the /CustCntrExamples directory:
|
|
unpackHelp |
Unpacks the Customer Center Help file, Customer_Center_Help_en.jar. |
|
buildHelp |
Builds the ccCustomHelp_en.jar file for distributing your customized online help. |
Adding New Pages to the Customer Center Interface
This section describes the concepts and components you need to add pages for account maintenance or for the new account wizard.
To add new pages to Customer Center, you need:
-
Experience with a Java graphical user interface (GUI) builder, such as JBuilder
-
Experience in building Java applications
-
Familiarity with "Understanding the BRM Business Application SDK Framework" and "Advanced Customer Center Concepts"
This section includes these topics:
About Portal Infranet Aware Widgets
Custom Center uses the Portal Infranet Aware (PIA) widget set when building a custom page. These widgets include extra APIs that know about BRM; they are capable of automatically toggling currency data, some are capable of exporting their data to HTML, and others contain bug fixes that you need when using the normal Swing widgets. These widgets are in the com.portal.bas.comp Java package in basacAll.jar. The most important mappings from PIA widgets to Swing widgets include:
-
PIACustomizablePanel == JPanel
-
PIAScrollPane == JScrollPane
-
PIATextField == JTextField
-
PIAReadOnlyField == JLabel
-
PIASpecSpreadSheet == JTable
When constructing a custom page, always try to use the PIA widget set for the reasons described above.
For more information on PIA widgets, see:
-
Customer Care API reference
Adding Account Maintenance Pages
This section provides information and implementation tips on adding account maintenance pages.
Overview of Account Maintenance Components
When working with an existing account, the Customer Center framework uses the PCustomerCenterContext class. This class contains APIs for accessing the current account and for accessing global data managers. Each open account contains a further set of APIs encapsulated in the PAccountViewContext class. This class contains APIs for implementing drill-downs and accessing the refresh manager for the account.
Every page in the account maintenance view, including tabs and drill-down panels, must implement the PAccountViewPage interface. This interface contains methods required by the Customer Center framework to interact with the various pages in the tabbed pane. If you are creating a new page from scratch, it is highly recommended that you start with PMaintenancePage. This base class implements the PAccountViewPage interface and provides a basic implementation in many of the methods.
If you choose to override a particular method in PMaintenancePage, simply call the superclass method first to take advantage of the default implementation.
If you start with PMaintenancePage, you should be aware of these methods:
-
save(): Saves data in a page. Provide code in this method to save the data in your page.
This method is called automatically by the framework.
-
hasUnsavedChanges(): This method is called automatically by the framework to determine if your page needs to be saved.
-
getLabel() – If your page contains links allowing the user to drill down within your custom tab, you provide a string in this method that describes your page. This string appear as the initial tag in the breadcrumb trail.
-
refresh(): This method is called when the user clicks the Refresh toolbar button. You should refresh the data on your page in this method, going to BRM as required.
-
recycle(): Pages in the tabbed pane are reused between accounts. In this method, clear out all data you set manually so data from one account doesn't accidentally appear when displaying the next account.
If you are using the BAS PIA widgets on your screen, you might want to use the collectData() method when gathering data for saving. For example:
PModelHandle modl = PClientContext.getServices().
        createNewModel(PModelHandle.UNTYPED);
PCollectDataEvent evt = new PCollectDataEvent(
        this, PCollectDataEvent.FOR_DIRTY, modl);
collectData(evt);
After this code is invoked, the modl variable represents data that was modified on your page. You can now convert this data from a PModelHandle into an flist and pass it off to your appropriate opcode. The conversion is performed as shown in this example:
PCachedContext conn = (PCachedContext)
        CCCompatibilityUtility.getConnection();

//This is how you turn a PModelHandle into an FList
        FList flist = (FList)conn.lookupModel(modl);
Saving Changes
When a user leaves a Customer Center page, the page saves its own data.
Note:
Customer Center users leave a page by changing tabs, drilling down to another page, or using the Back button.The act of leaving a page invokes code that gathers the data and calls the opcode used for saving the data. Each page formats the appropriate input flist and calls the correct opcode. If a data entry error occurs, a page can use the global PSaveManager methods to notify the user of the error and locate the field causing the error. The global SaveManager contains convenience methods that the pages can use for alerting the user and locating the UI field causing the error.
To save changed data from a page, the framework calls the hasUnsavedChanges() method on the PAccountViewPage interface. If the class returns true, the save() method is called on the page. If the page signals a save failure, a PSaveException is returned.
Customer Center uses wrapper opcodes to group editable data together so that all changes can be saved with a single opcode call. For example, the CUST_UPDATE_CUSTOMER opcode is a wrapper opcode that calls CUST_MODIFY_PROFILE. This feature allows you to embed a panel for a /profile object into a panel that displays regular account data, such as contact or payment data, and save any changes using a single opcode call. Profile panels do not have to be contained within separate tabs.
Important:
Avoid calling multiple opcodes when saving page data. If you call more than one opcode, you might need to roll back a set of changes if a subsequent page save attempt fails.If your page is constructed using the BAS Portal Infranet-aware (PIA) widgets, you probably do not need to override this method.
The base implementation in PMaintenancePage returns the appropriate value. However, if you are using standard Swing widgets in your page, you probably need to determine if your page must be saved or not:
-
If your page requires saving, return true.
-
If your page doesn't require saving, return false. The method is not be called.
If you are subclassing (directly or indirectly) a PIACustomizablePanel in your custom page, call the setInputTracking(true) method after constructing the UI for your page. This is especially important if you are using collectData() to gather the data for saving. Input tracking tells the system that every PIA widget should track changes made by a user. (This feature displays the colored widgets when a user makes a change). When collectData() is called, it asks each widget if it has been modified. If it has been modified, it retrieves the modified data.
Important:
If input tracking turned is turned off, the widgets won't know that they have been changed.Refreshing Data in the UI
When components use one of the PRefreshManager listener methods to register for event notification, they are notified whenever a data type of interest changes.
PRefreshManager tracks the following types of data changes:
-
Balance impacts
-
Contact information
-
Changes to credit limits
-
Deferred actions
-
Hierarchy changes
-
Holdings changes (product and deal purchases and cancellations)
-
Payment type changes
-
Service changes (login, status, password, and deferred action count)
-
Status changes
There is a separate refresh manager instance created for each open account in Customer Center so that changes in one account do not accidentally impact an unrelated account. The PRefreshManager instance associated with an open account can be retrieved from the account's view context by using the getRefreshManager() method in PAccountViewContext.
Each PAccountViewPage instance also contains a refresh() method that is called when the user clicks the Refresh toolbar button. The refresh() method is invoked for a page if the page is currently active. Each page should update its data when this method is invoked.
Use the PRefreshManager component's refresh mechanism if you are:
-
Adding a page that displays data found in other pages.
-
Adding a page that displays data that is directly impacted by changes elsewhere in the interface.
If you change a data type, call one of the PRefreshManager process methods so that other registered components are also updated as required. See for PRefreshManager for details about the various listener and process methods supported by the default implementation.
You can implement the refresh() method by resetting the PModelHandle on the page as follows:
setModelHandle(getModelHandle());
Currency Toggling
If you use multiple currencies in an account, you can implement currency toggling. When you implement currency toggling on your panel, use the Portal Infranet-aware (PIA) widget set when building a new page. The PIA widget set is part of the com.portal.bas.comp package.
The PIA widgets are wrappers for common Swing widgets. When setting the data for any PIA widget, use the setLightData API instead of the standard Swing methods such as setText. For example, if you have a screen that displays balance information, such as Balance: $15.99, you could make the Balance widget a JLabel and the $15.99 widget a PIAReadOnlyField.
Note:
If you are specifying displayFieldDescription for your widgets, this happens automatically.Call setCurrencyDisplay(true) on each widget displaying currency data.
Note:
This API is available for the PIA widgets that are capable of displaying currency data. For more information, see Customer Care API Reference.Drill-Down Links
The Customer Center interface allows users to drill down from one page to another. The PCCLink class provides the drill down functionality, including the visual element to display your link. You create a new PCCLink as follows:
new PCCLink("text", pageClass, "trailTag", null|"parent");
Table 34-2 describes the input parameters for a new PCCLink:
Table 34-2 Input Parameters for PCCLink
| Input Parameter | Description |
|---|---|
|
text |
The text you want to appear in the link widget itself. Include the quotes. |
|
pageClass |
A quoted string that contains the name of the class you want the link to drill down to. |
|
trailTag |
The text label, in quotes, that you want to appear in the bread crumb trail above the tabbed panel. |
|
parent |
The name of the destination tab. This tag is the same tag specified in CustomerCenter.properties. Leave the value as null if you do not want to drill down to a different page. Include quotes if the value is not null. Use this parameter to drill down from one page tab to another. |
To create a PCCLink that drills down from the Summary page to the status change screen, include the following link on the Summary page:
new PCCLink("Status", com.portal.app.cc.PChangeStatusPage, "Change Status", null);
The PCCLink automatically calls the framework API required for drilling down a link selected by the user. You do not need to call any APIs or hook up event handlers.
Drill-down example 2
To make a drill down that appears as if a user had drilled down directly from the Service tab, include the following link on the Summary page:
new PCCLink("Status", com.portal.app.cc.PChangeStatusPage, "Change Status","service");
When this link is selected, the Service tab moves to the front and the bread crumb trail on the displayed page reads Service -> Change Status.
See the DrillDownTest.java sample code in CCSDK_Home/CustomerCareSDK/CustCntrExamples for a detailed example.
Invoking the drill-down API directly
You can gain further control over drill-down behavior by invoking the drill-down API directly rather that using the PCCLink class.
To invoke drill downs directly:
-
Retrieve the context for the current account view. The context is a reference to the tabbed pane for the currently active account.
You can access the PAccountViewContext through the PCustomerCenterContext:
CCCompatibilityUtility.getCustomerCenterContext().getAccountViewContext(); -
From the PAccountViewContext, call one of the four switchToPage API variants.
You can either pass in a pre-existing PAccountViewPage instance or a reference to the Class instance of the page. If a reference is passed, the framework first attempts to find an instance of this class within the current view. If one is found, it is reused and a handle to the existing PAccountViewPage is returned. If no instance is found, a new one is created and a handle to the new PAccountViewPage instance is returned.
Tip:
If possible, use the switchToPage method that takes a Class instance. If you pass a Class instance, the framework tracks the page instance for you. If you do need to call any specific API on the page you are drilling down to, an instance is returned to you from the switchToPage method to enable the drill-down. For more information, see Customer Care API Reference for information on this version of the switchToPage method.You can simulate two types of drill downs:
-
You can drill down within the current tab.
-
You can switch to a different tab and simulate a drill down from the top-level page in that tab.
Two of the switchToPage() methods take three parameters that allow you to drill down within the current tab or switch to a different tab and simulate a drill down from the new top-level tab. Pass in the tag reference for the tab you want to drill down to, and the framework automatically switches the active tab before performing the drill down.
Note:
The tag reference for each tab is the same tag specified in the custinfo.tabs property in CustomerCenter.properties.For more information on using the switchToPage(), see "Advanced Drill-Down Techniques".
Drill-down implementation procedure
To implement a drill down:
-
Pass in the following:
-
The label to display in the breadcrumb trail for the new top-level tab.
-
The Class name of the parent page to display as a drill-down. If an instance of that class exists, it becomes the current drill-down. Otherwise, the class is instantiated and added as a drill-down.
-
A String with the name of the parent component to drill down from.
The framework automatically switches the active tab before performing a drill-down. The label text used for each tab is the same as specified in the custinfo.tabs property in CustomerCenter.properties.
-
-
Provide a graphical element to invoke the switchToPage method. Normally you would use the Link widget and hook up an ActionListener to it. Within the ActionListener callback method, actionPerformed, retrieve the context for the current account and invoke the switchToPage method.
To embed a link within a table cell, use the framework API but create a renderer for your table column instead of using the PCCLink or Link widgets directly. Instead, use PLinkRenderer. For an example, see the DrillDownTest.java sample code in the General directory under CCSDK_Home/CustomerCareSDK/CustCntrExamples.
Advanced Drill-Down Techniques
To gain more control over drill downs, you can invoke the drill down API yourself instead of using PCCLink().
-
Retrieve the context for the current account view.
The context is a reference to the tabbed pane for the currently active account. You can access the PAccountViewContext through the CustomerCenterContext:
CCCompatibilityUtility.getCustomerCenterContext().getAccountViewContext(); -
From the PAccountViewContext, call one of the four variants of the switchToPage() API. You can either pass in a pre-existing PAccountViewPage instance or a reference to the class instance of the page.
If you pass in a class instance, the framework first attempts to find an instance of this class within the current view. If one is found, the framework re-uses it and return a handle to it. If no instance is found, a new one is created and a handle is returned.
Tip:
If you use the switchToPage() method that takes a class instance, the framework keeps track of the page instance for you. Also, if you do need to call any specific API on the page you are drilling down to, an instance is returned to you from the switchToPage() method to accomplish this.You must provide a graphical element to invoke the switchToPage() method. You typically use the com.portal.ctrl.Link widget, and hook up an ActionListener to it. Within the ActionListener callback method (actionPerformed), retrieve the context for the current account and invoke the switchToPage() method.
To embed a link within a table cell, you use the framework API above. However, instead of using a PCCLink or Link widget directly, you create a renderer for your table column. You can use the com.portal.app.comp.PLinkRenderer for this purpose. There is a sample of how to use this renderer in the SDK examples directory.
Modifying the Customer Center Permissions
Customer Center SDK includes the PRestriction class that defines server-side permissions for the user or the client application to perform certain functions.
Adding Your Page to the Customer Center Toolbar
You can add your page to the account maintenance toolbar button instead of as a separate tab. This section includes information on how to present your data in a floating dialog box, such as for notes, that the user can keep up at all times.
Write your toolbar button code as you do when writing tab code. You can extend PMaintenancePage, but that is not required, and you can start with any base class. However, if you plan on using BAS PIA widgets you must start with a PIACustomizablePanel. Once you have your page, you create an action class for the toolbar. Your class should extend the BAS action class as follows:
public class WorkFlowAction extends PBASAction {
    public WorkFlowAction(PClientComponent comp) {
        super(comp, "workflow");
}
Note the workflow tag highlighted above. This is a mapping into the property file indicating attributes of your toolbar button such as label, icon, and so forth. Override the actionPerformed() method and display your dialog when this method is invoked:
public void actionPerformed(ActionEvent ae) {
}
To add your custom toolbar button to Customer Center, modify Customized.properties and CustomizedResources.properties. For example, if you identify your additional button by the workflow tag, your property file changes is as follows:
customercenter.toolbar=back home SEP VSEP save refresh SEP VSEP SEP newaccounts SEP VSEP
  search notes workflow
customercenter.tb.class.workflow=WorkFlowAction
CustomizedResources.properties
customercenter.workflow.label=
customercenter.workflow.icon=myWorkFlow.gif
customercenter.workflow.desc=Launches the workflow dialog
customercenter.workflow.accel=
customercenter.workflow.mnemonic=
Tip:
You can optionally fill in values for parameters that have none. For example, if you fill in the label property, a label appears next to your toolbar button.Adding New Account Wizard Pages
This section includes concepts and guidelines for adding pages to the new accounts wizard:
Understanding the New Accounts Wizard
This section describes how the new account wizard works.
Every page in the new account wizard must implement the PWizardPage interface. This interface contains methods required by the wizard framework. For more information on the PWizardPage interface, see the Customer Care API Reference.
Tip:
If you add a new account wizard page to using Configurator, all entries are written out for you automatically.The new account wizard in Customer Center uses shared data. Shared data allows one page to access data from another page, or for one page to broadcast data changes to other pages by using data registration.
Pages in the wizard can use the shared data in a request-based or broadcast-based manner:
-
Request-based shared data. When a user switches to a page, the page can retrieve the shared data.
-
broadcast-based data sharing. If a page must be notified when a piece of data (such as the primary and secondary currency) changes, it can register for notification with the shared data manager.
Each wizard has a context that can be retrieved from the main CustomerCenterContext. Only one wizard can be active at any given time so the getWizardContext() method can be used to access the active wizard. If it is null, a wizard is not currently active. From the wizard context, you can access the SharedDataManager. Use this class if you are interested in registering for notification of data changes, or simply to access the shared data object itself.
You do not need to write a page if you want to tap into the shared data mechanism. See the AcctCreationTapNonGUI.java example in the CCSDK_Home/CustomerCareSDK/CustCntrExamples/AccountCreation directory. This example demonstrates how to retrieve shared data when starting the wizard.
The New Account wizard performs partial validation on all pages contained within it. Data is sent to BRM on a per-page basis as the user moves between pages. This mechanism catches CSR data entry errors. Each page within the wizard validates its own data and identifies any errors encountered while validating and saving the data in BRM.
When the user attempts to leave a page, the page's validateWizardPage() method is called. This signals the page to gather its data and send it to BRM for validation. A number of convenience methods that assist in performing validation are available in the WizardValidationManager.
Note:
The WizardValidationManager is available through the wizard context.For example, if a page doesn't have any special validation needs of its own, it can immediately call the validatePage API on the WizardValidationManager. This method performs default data collection on the wizard page, invokes the CUST_VALIDATE_CUSTOMER opcode in BRM, and performs default error handling when if validation fails. Alternatively, the page can collect its own data and, perhaps after examining it, call the convenience method validateModel on the WizardValidationManager. This method invokes the CUST_VALIDATE_CUSTOMER opcode and, if validation failed, hands an error data structure back to the page. The page can then pass the error information to an API in the SaveManager that attempts to identify the field(s) that caused the error.
Pages can be coded to perform data validation and any error determination itself without using the WizardValidationManager, the SaveManager, or even without calling an opcode.
If an error results when the user clicks Finish to create a new account based upon the entered data, the wizard can call the handleWizardCommitError method on each wizard page successively until a page reports back that it wants to handle the error. That page is then made visible. To handle the error, the page could then:
-
Call a convenience method on the WizardValidationManager to get the default commit-time error handling behavior.
-
Use the SaveManager method mentioned above to try and identify any fields that were responsible for the error.
-
Perform its own analysis of the error data.
Base Classes for Account Creation Pages
You can start with any base class you want when creating your account creation page.
Tip:
Customer Center SDK does not include a base class for adding account creation pages. However, you can optionally use PMaintenancePage class described in "Adding Account Maintenance Pages", especially if you want to use the same page as a tab during account maintenance.Methods Used in New Account Creation Pages
These methods are used for account creation panels:
-
getWizardHelpID(): Use this method to add custom help to your page. Include the empty string ("") if you are not including customized help.
-
recycle(): Pages in the new accounts wizard are reused between accounts. In this method, clear out all data you set manually so data from one account doesn't accidentally appear when displaying the next account.
-
validateWizardPage(): This method is called as the user leaves your page in the New Account wizard. It includes a hook to validate any data the user has entered. Since your page is custom, determine if BRM can validate your page or if you must validate it manually.
If you have modified BRM policy code to validate your page, the following code may be useful:
CustomerCenterContext ctx = CCCompatibilityUtility.getCustomerCenterContext();
if (ctx.getWizardContext() instanceofPAccountCreationWizardContext) {
    PAccountCreationWizardContext wizContext =
        PAccountCreationWizardContext) ctx.getWizardContext();
    WizardValidationManager wizValidation =
        wizContext.getWizardValidationManager();
    wizValidation.validatePage();
}
This code utilizes the convenience class WizardValidationManager to handle validation. However, your page must use the BAS PIA widget set to take full advantage of this mechanism.
-
handleWizardCommitError(): This method is called when the user attempts to create the account and an error occurs. A data structure is passed in containing a description of the error. Return true if the error actually occurs on your page. If the error is not yours, return false. When you return true, the wizard framework automatically takes the user to your page.
Tip:
Visually indicate to the user which field is causing the error. If you are using the BAS PIA widgets, the following code might be useful:
public boolean handleWizardCommitError(CustomerError error) {
    CustomerCenterContext ctx = CCCompatibilityUtility.getCustomerCenterContext();
    if (ctx.getWizardContext() instanceofPAccountCreationWizardContext) {
        PAccountCreationWizardContext wizContext = (PAccountCreationWizardContext)
          ctx.getWizardContext();
        WizardValidationManager wizValidation = wizContext.getWizardValidationManager();
        return wizValidation.handleCommitError(error, this);
    } else {
        return false;
    }
}
Removing a Payment Method from Customer Center
Removing a payment method prevents it from appearing in the Account Creation wizard, the Payments section, the Hierarchy section, the Purchase wizard, and dialog boxes.
Note:
Testing and maintaining customized code is your responsibility.To remove a payment method from Customer Center:
-
Open the CCSDK_Home/CustCntr/custom/Customized.properties file in a text editor.
-
Add the following after the comment statements:
-
custinfo.payment.class=com.portal.custom.PCustomPaymentPage
Customized.hierarchyMoveDlg.class=com.portal.custom.PCustomHierarchyMoveDlg
com.portal.app.ccare.comp.PPaymentPanelBeanImpl.subclass=com.portal.custom.PCustomPaymentPanelBeanImpl
Customized.BillUnitHierarchyPage.class=com.portal.custom.PCustomBillUnitHierpage.
-
Create a com.portal.custom.PCustomPaymentPage that contains the following:
package com.portal.custom;
.
import com.portal.app.cc.PPaymentPage;
import java.util.Vector;
.
public class PCustomPaymentPage extends PPaymentPage{
    public PCustomPaymentPage(){
        super();
    }
    public Vector getPayMethods () {
        Vector vec = super.getPayMethods();

    //Remove the entry for bad payment method from the vector and return

        return vec;
    }
}
-
Create a com.portal.custom.CustomHierarchyMoveDlg page that contains the following:
package com.portal.custom;
.
import com.portal.app.cc.PHierarchyMoveConfirmDlg
import java.util.Vector;
.
import javax.swing.JFrame;
.
public class PCustomHierarchyMoveDlg extends PHierarchyMoveConfirmDlg {
.
    public PCustomHierarchyMoveDlg(JFrame frame, String title, boolean modal)
{
        super(frame, title, modal);
        // TODO Auto-generated constructor stub
    }
.
    public Vector getPayMethods() {
        Vector vec = super.getPayMethods();
        //Remove the entry for the bad payment method from the vector
                                        //and return
        return vec;
    }
}
-
Create a com.portal.custom.PCustomPaymentPanelBeanImpl page that contains the following:
package com.portal.custom;
.
import com.portal.app.cc.BalanceGroupTreeTable;
import com.portal.app.cc.PPayType;
import com.portal.app.ccare.comp.PPaymentPanelBeanImpl;
import java.util.Iterator;
import java.util.Vector;
.
public class PCustomPaymentPanelBeanImpl extends PPaymentPanelBeanImpl {
.
    public PCustomPaymentPanelBeanImpl() {
        super();
    }
.
    public void refreshPaymentMethodModel(BalanceGroupTreeTable
balanceTreeTable) {
        super.refreshPaymentMethodModel(balanceTreeTable);
        Vector payMethod = getPayMethod();
        //Remove the entry for the bad payment method from the vector
        //and return
.
        setPayMethod(payMethod);
.
    }
.
    public Vector getPayTypes() {
        Vector list = super.getPayTypes();
        int i = 0;
        int index = -1;
        //Remove the entry for the bad payment method from the vector
        //and return
.
        for (Iterator iterator = list.iterator(); iterator.hasNext();) {
             PPayType str = (PPayType) iterator.next();
             if (str.getPayTypeName().equals("BadPaymentMethod")) {
                 index = i;
             }
             i++;
        }
        if (index != -1) {
             list.remove(index);
        }
        return list;
    }
}
-
Build the custom .jar file and deploy this customization.
-
Restart Customer Center.
Advanced Customer Center Concepts
This section describes these Customer Center concepts:
For information on the Business Application SDK (BAS) framework used by Customer Center and Self-Care Manager, see "Understanding the BRM Business Application SDK Framework".
Components Used in Customer Center
This section describes the main Portal Infranet-aware (PIA) components used in Customer Center, including "Graphical Components", "Nongraphical Components", and "Data Manager Components".
Portal Infranet-Aware Components
The Customer Center framework includes Portal Infranet-aware (PIA) components. These components, or widgets, are extensions to their corresponding Swing components and have references to specific storable class fields. They contain APIs that allow you to map them to specific fields in BRM storable classes, such as /account. PIA components have implementations that allow individual components to encapsulate data retrieval and user interface (UI) display.
Note:
Customer Center SDK also includes basic components, such as links, headers, and dates that are useful in accounting and billing applications.Customer Center consists of panels that display PIA components. These components can be made aware of specific BRM storable class fields. They can perform all the tasks required to retrieve, display, and save BRM data; so when you add a field or change the properties of a panel, you do not have to implement server functionality to communicate with BRM.
The Customer Center framework includes classes for graphical and nongraphical components as well as classes for managing changes made to the components during a login session.
The following sections describe the main components in the framework. For detailed information about the methods and API used, see Customer Care API Reference.
Graphical Components
The Java classes in Table 34-3 comprise the main Customer Center graphical components:
Table 34-3 Customer Center Graphical Components
| Component | Description |
|---|---|
|
PAccountNavigator |
A columnar component that displays a list of open accounts. As the CSR opens accounts, they are added to this graphical list with the most recently opened account at the top. This component also provides the capability of closing accounts and removing them from view in Customer Center. |
|
PBreadCrumbs |
Displays a visual history of the various data screens the CSR has visited within a single tab. The history is presented as selectable links. Note: Each account is displayed in a tabbed pane component, and each tab can have any number of virtual screens. This means it is possible to stay within the same visual tab and view many different screens. |
|
PPageTemplate |
The main component found on each tab in the account view. It contains the PBreadCrumbs component along the top, and a Business Application SDK (BAS) PIAPanelGroup component below that. The PIAPanelGroup enables the virtual tabs feature of the client by providing a mechanism for embedding a number of screens on top of each other while displaying only a single screen at any one time. The PPageTemplate hooks the PBreadCrumbs and PIAPanelGroup components together. This allows the PBreadCrumbs component to determine which screen is displayed in the PIAPanelGroup. The PMaintenancePage subclass you create exists within the PPageTemplate on a given tab. |
|
PAccountView |
Provides the concrete implementation of PAccountViewContext in Customer Center. This is implemented as a tabbed pane component, with each tab containing a PPageTemplate component. |
|
PActiveAccountManager |
Responsible for managing the components that display account data. Like the PPageTemplate component, it uses a PIAPanelGroup to manage the display of PAccountView components. Each time a new account is opened in Customer Center, PActiveAccountManager delivers a PAccountView component that can be used to display the account's data. As the user switches between open accounts, the PActiveAccountManager tracks those changes and displays the appropriate PAccountView. As accounts are closed in the client, the associated PAccountView component is removed from the panel group. Essentially, this component manages a stack of tabbed panes with only the active one visible. It takes up all the space to the right of the PAccountNavigator. |
Figure 34-1 shows the areas of the interface that some graphical components control:
Figure 34-1 Customer Center Graphical Components
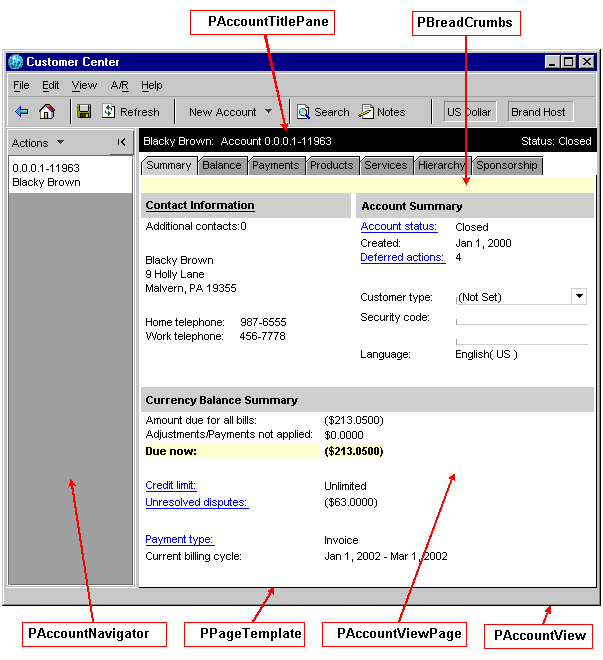
Description of ''Figure 34-1 Customer Center Graphical Components''
Nongraphical Components
The Java classes in Table 34-4 comprise the main Customer Center nongraphical components:
Table 34-4 Nongraphical Components
| Component | Description |
|---|---|
|
PCustomerCenterContext |
Provides a context for standalone Javabean components within Customer Center. Components can use this context to:
|
|
PAccountViewContext |
A context which abstracts the mechanism used to display existing account data. This context encapsulates the API for enabling drill-downs in the client and accessing the account's PRefreshManager. By default, Customer Center uses a tabbed pane component. You can implement the PAccountViewContext API to use a different type of component. |
|
PMaintenancePage |
A concrete implementation of the base page interfaces used for account maintenance. This component implements PAccountViewPage which extends PCCPage. If you are building a new page, you should subclass PMaintenancePage. |
|
PAccountInfo |
A data class instance that exists for every open account in Customer Center. The data can be retrieved from the PCustomerCenterContext. This data class contains information about an account. When an account is opened, this data is retrieved and made available for all components. It can be marked for refresh if data contained in the class has been modified and then refreshed from BRM using an API call. |
Data Manager Components
The Java classes in Table 34-5 comprise the main Customer Center data manager components:
Table 34-5 Data Manager Components
| Component | Description |
|---|---|
|
PBrandManager |
Encapsulates the management of and access to the current BRM scope. Used to determine what the current scope is or when the scope changes. This class also contains an API for determining account scope. |
|
PCurrencyManager |
Encapsulates management and notification for currency changes. This is useful if the accounts in the system use multiple currencies. Most pages do not need to use this class. If you follow the suggestions for currency toggling described in "Currency Toggling", the framework handles currency toggling automatically. |
|
PSaveManager |
Encapsulates functionality for saving data and identifying errors in a page. It also contains the logic for determining whether the CSR should be prompted before data is saved. |
|
PRefreshManager |
Encapsulates data synchronization across an account view. Use this class to register for notification of data changes or to broadcast data changes to other registered pages. Note: Each account view is recycled when it is closed and a new refresh manager is created each time an account is opened. This means that a page must register or unregister with the refresh manager each time. See the RefreshTest.java example and look specifically at the addNotify() and removeNotify() methods. |
About the BAS Data Flow with a Swing-Compatible UI
PModelHandle is a client-side representation of an flist. Because UI code typically does not directly access the PCM library, BAS creates this object for client use. PModelHandle is turned into a real flist on the server for use in opcodes. A PModelHandle, like an flist, can also represent storable classes. So it is possible to have a PModelHandle that represents an account or an event.
Every BAS widget (the PIA widgets) has a setModelHandle method. This is how data is passed in to the component. For the container PIA widgets (panel, scroll pane, and tabbed pane) the setModelHandle method automatically propagates the PModelHandle to all child components. For example, if you have a PIACustomizablePanel with ten PIATextField components on the panel, one call to setModelHandle on the panel is enough to set the PModelHandle for all ten PIATextField components.
To get data out of the PIA widgets, BAS uses the collectData method. Essentially, you create an UNTYPED PModelHandle from scratch and hand that to a new PCollectDataEvent. This event is passed into collectData, which is available on every PIA widget.
Regardless of the type of data collection (you can create many different types of PCollectDataEvent), each PIA widget properly updates the PModelHandle passed in with the event. For example, to gather all data modified by a user you could issue a PCollectDataEvent of type FOR_DIRTY. Only the modified PIA widgets would append their data to the PModelHandle that is passed in. This would happen automatically by calling collectData on the encompassing panel.
About Field Specifications
Each PIA widget contains two methods that bind the widget to a specific field in BRM. These widgets enable the setModelHandle and collectData methods to work.
-
setDisplayFieldDescription: This method is a read data mechanism. When setModelHandle is called on a widget, the widget internally attempts to extract the BRM field identified by the setDisplayFieldDescription specification from the associated PModelHandle.
For example, if a widget is passed a PModelHandle that represents an account object and a text field has a display field description of FldNameinfo[1].FldLastName, the text field can automatically extract the value of FldLastName from the PModelHandle and display it.
-
setModelFieldDescription: This method is a write data mechanism. It performs the reverse function provided by setDisplayFieldDescription. This specification indicates how to write a particular piece of data to BRM. It is a String representation of what the input flist to an opcode looks like.
In the last name example above, the model field description for storing the last name is identical to the display field description. However, that is a rare case, since most fields in BRM are read from an flist in one format, but passed in an input flist to an opcode in a different format.
About Controller Processing
The previous sections describe how data goes into a panel, and how it is extracted from that panel. If you need to perform additional data processing before your panel receives the data, use the controller for the panel. Each PIA widget contains the method getControllerClassName. This identifies the class name of the server-side component (controller) for your panel.
When setModelHandle is called on the panel, the update method is invoked remotely on the controller. This happens before any widget contained in the panel receives the data. If any type of conversion, lookup, or translation of data needs to occur before passing the data along, this is how to do it.
Building Your Customer Center Customizations
To build your Customer Center customizations, follow these steps:
Creating a Self-Signed Java Security Certificate
If you do not have an authenticated security certificate or do not want to use it for testing your customizations, use the makecertificate script to create a self-signed certificate.
Important:
The certificate created by the makecertificate script is not a validated, secure certificate. It is not an appropriate certificate to copy to the Web server you use to deploy Customer Center to your CSRs. Its use is limited to internal testing environments.-
Run the makecertificate script, located in the CCSDK_Home/CustCntr/bin directory.
-
Answer the following prompts as they appear, or press ENTER to accept the default entries displayed in brackets:
Enter keystore password: yourPassword
What is your first and last name?
   [Unknown]: yourFirstName yourLastName
What is the name of your organizational unit?
   [Unknown]: yourUnitName
What is the name of your organization?
   [Unknown]: yourOrganizationName
What is the name of your City or Locality?
   [Unknown]: yourCity_or_Locality
What is the name of your State or Province?
   [Unknown]: yourState_or_Province
What is the two-letter country code for this unit?
   [Unknown]: yourCountryCode
-
When prompted to verify whether the entries you made are correct, type yes or press ENTER to verify or change the entries you made after the keystore password.
If you accept the default answer, no, the script redisplays each of the prompts with your answers listed as the default entry in brackets. You can enter a new value or press ENTER to keep the current values.
-
After you verify that your entries are correct, the script composes a certificate and then prompts you to enter a key password for the test certificate's alias, customcert. Enter a different password or press ENTER to reuse the keystore's password.
-
The certificate is stored in a keystore file named certificate_keystore in the CCSDK_Home/bin directory.
Modifying the signjar Script
Before running the buildAll script to build and sign the ccCustom.jar file for Customer Center, first edit the CCSDK_Home/CustomerCareSDK/CustCntr/custom/signjar script to add your entries for the following values:
-
set KEYPASSWORD=yourPassword
-
set STOREPASSWORD=yourPassword
If you created a self-signed certificate with the makecertificate script, use the password values you entered to create that certificate.
If you have an authentic Java Security Certificate, use the password values associated with that certificate. Copy your certificate keystore file to the custom directory.
Building Your Customization Files
You use the buildAll script in the CCSDK_Home/CustomerCareSDK directory to build your customized files.
Requirements
Before using the buildAll script, verify that:
-
The appropriate entries are in the .properties files. See:
-
If you have customized help, the ccCustomHelp_en.jar file is generated and in the CCSDK_Home/CustCntr/custom directory.
-
If you created custom source to extend Customer Center, the source files are in the CCSDK_Home/CustomerCareSDK/CustCntr/custom directory.
-
Your certificate_keystore file is in the CCSDK_Home/CustomerCareSDK/CustCntr/custom directory.
Using the buildAll Script
To build the ccCustom.jar file for Customer Center:
-
Open a command shell and go to CCSDK_Home/CustomerCareSDK/lib.
-
Run the buildAll script:
-
To remove class files from any previous custom builds:
buildAll CustCntr clean -
To build a new copy of the ccCustom.jar file:
buildAll CustCntrNote:
For more information on the buildAll script, see "About Compiling and Packaging Your Customizations" and "Syntax for the buildAll Script".
-
When the buildAll script finishes, you can deploy your Customer Center customizations. See "Deploying Your Customer Center Customizations".
Testing Your Customizations
You can test your customizations before you deploy them by running your local version of Customer Center (the runCustomerCenter batch file) in the CCSDK_Home/CustomerCareSDK/CustCntr/bin directory.
Note:
The local version of Customer Center does not require access to the Customer Center Web Start server, but it does require access to a CM.-
If you are adding custom fields, add ccCustomFields.jar to the CLASSPATH as in this example:
set CLASSPATH=f:/CCSDK_Home/CustCntr/custom/ccCustomFields.jar;%CLASSPATH%
-
If you are adding customized help, add the ccCustomHelp_en.jar to the CLASSPATH.
-
Go to the CCSDK_Home/CustomerCareSDK/CustCntr/bin directory.
-
Double-click the runCustomerCenter batch file.
Your local version of Customer Center starts.
-
Log in to Customer Center when prompted.
Note:
You must specify the host and port of a working BRM system when logging in. -
Verify that your customizations appear and work properly in the Customer Center.
-
Close Customer Center.
Note:
In the "Building Your Customization Files" procedure, you can use runCustomerCenter to test your customizations without building jar files if:-
You are making customizations with Configurator or by editing the customizes properties files, and
-
You are not adding new fields, panels, or customized help.
-
Deploying Your Customer Center Customizations
This section describes how to deploy your Customer Center customizations.
Deploying Customer Center Customizations on UNIX
This section describes how to deploy your customizations to the Web Start server.
-
Create a new subdirectory named custom in the directory where you installed Customer Center on your Web server.
-
Make a backup copy of the CustomerCenter_en.jnlp file on your Web server.
-
Edit the CustomerCenter_en.jnlp file in the directory where you installed Customer Center and remove the comments around the following line if they are present:
<!-- <extension name="Customized" href="custom/custom.jnlp"/> --> -
Copy the custom.jnlp and, if present, ccCustomFields.jar files from the CCSDK_Home/custom directory to the directory where you installed Customer Center on your Web server.
-
Copy the ccCustom.jar and, if present, the ccCustomHelp.jar files from the CCSDK_Home/custom directory to the custom directory where you installed Customer Center on your Web server.
The next time a CSR accesses the link that opens the CustomerCenter_en.jnlp file from your Web server, Web Start installs the updated application to their system.
For more information on Web Start, see "Installing Java Web Start and Downloading Customer Center" in BRM Installation Guide.
About the Customer Center Properties Files
Customer Center SDK includes three sets of properties files that define the Customer Center interface:
Parameters in the Configurator properties files take precedence over like parameters in the default properties files. Parameters in the customized properties files take precedence over like parameters in the default and Configurator properties files.
Default Properties Files
The CCSDK_Home/CustomerCareSDK/CustCntr/Settings directory contains copies of properties files shipped with Customer Center. The two files that define the default interface are:
-
CustomerCenter.properties defines several non-text features of the Customer Center UI, for example:
-
The order of panes in the New Account wizard
-
The Account Maintenance view
-
Which threshold settings to use
-
The home page to use when no accounts are open
-
The search entry page to use
-
The color and font used by the fields
-
The number and sequence of panels in a window or wizard
-
-
CustomerCenterResources.properties contains the names of images and the localizable text for the panels, fields, and messages that appear in the UI.
These properties files are shipped in signed jar files that are installed with Customer Center and can't be directly modified.
Important:
Do not modify these or any other properties files under the CustCntr/Settings directory. Customer Center uses these in jar files that are signed with an authentic security certificate from BRM. If you directly modify these files and attempt to include them in a custom jar file signed with a different certificate, Web Start returns an error. To change a property or string, copy it to the Customized.properties or CustomizedResources.properties files.Configurator Properties Files
When you save changes you make in Configurator, the parameters are saved in the WizardCustomizations.properties and WizardCustomizationsResources.properties properties files in the BRM_Home/CustomerCareSDK/CustCntr/bin directory, where BRM_Home is the directory in which you installed BRM components.
Parameters in the Configurator properties files take precedence over like parameters in the default properties files.
Important:
Do not directly modify or add entries to the WizardCustomizations files. These files are rewritten every time you save Configurator changes.Customized Properties Files
The CCSDK_Home/CustomerCareSDK/CustCntr/custom directory contains the following files for overriding the default properties defined in the installed Customer Center properties files:
-
Customized.properties modifies the appearance of the UI components in Customer Center.
-
CustomizedResources.properties modifies the names of images and localizable text that appear in Customer Center.
Use these properties files to make global changes that affect the whole application or several related fields in an application.
The parameter values in the customized properties files take precedence over like parameter values in the default and Configurator properties files.
For examples of customizations you can make by modifying the customized properties files, see "Modifying the Customer Center Properties Files".
For more information on the properties files parameters, see the comments in the "Default Properties Files".
Tip:
You can copy and paste default parameters from the "Default Properties Files" into their "Customized Properties Files" counterparts and change the parameter values as required.Other Properties Files
Customer Center SDK includes these additional properties files in the CCSDK_Home/CustomerCareSDK/CustCntr/Settings directory:
-
CCViewResources.properties contains additional strings used in Customer Center, such as warning messages.
-
GSMManagerResources.properties contains the names of images and the localizable text for GSM Manager panels that display extended service information. This property file is only valid when the GSM Manager Customer Center Extension is installed.
Important:
Do not change entries directly in these resource files. Instead, copy the entry to the CustomizedResources.properties file and change the parameter as required. Parameters found in the CustomizedResources.properties file takes precedence over the value in the same parameter in the CCViewResources.properties and GSMManagerResources.properties files.
The CCSDK_Home/CustomerCareSDK/CustCntr/bin/Infranet.properties file provides specific server settings for starting the Configurator application or for using the runCustomerCenter script to start a standalone Customer Center session.
Deploying Customer Center Customizations on Windows
This section describes how to deploy your customizations to the Tomcat server.
-
Copy the certificate keystore file (by default at CCSDK_Home/CustomerCareSDK/CustCntr/bin) to Tomcat_home\webapps\ROOT\customercenter, where Tomcat_home is the directory in which you installed the Apache Tomcat software.
-
Copy the signjar.bat file from CCSDK_Home/CustomerCareSDK/CustCntr/custom to Tomcat_home \webapps\ROOT\customercenter\lib.
-
Edit the signjar.bat file and enter the password:
set KEYPASSWORD= password
set STOREPASSWORD= password
where password refers to the keystore password
-
Go to Tomcat_home \webapps\ROOT\customercenter\lib.
-
Using an application such as WinZip, open all the .jar files and remove the Business.sf and Business.rsa files from the archive.
-
Copy the ccCustomjar file from CCSDK_Home \CustomerCareSDK\lib to Tomcat_home \Webapps\ROOT\customercenter\lib.
-
Go to Tomcat_home \webapps\ROOT\customercenter\lib.
-
Run the following command, which signs all the JAR files:
signjarbat jarFileName -
Open the CCSDK_Home/CustCntr/custom/CustomerCenter_en.jnlp file and add the path to the ccCustomjar file in the Resources area. Replace <-NEWJAR-/> with the following:
<jar href="lib/ccCustomjar.jar"/>
Customer Center Customization Examples
When you install Customer Center SDK, separate folders with the appropriate source and support files provide examples for extending Customer Center and Self-Care Manager. Many of the example folders include brief README files to explain the purpose of each example.
You can execute many of the examples in place by using the testExamples.bat script.
Table 34-6 describes the Customer Center extension examples in the CCSDK_home/CustomerCenterSDK/CustCntrExcamples directory. Read the readme.txt files and the comments in the source files of each example for further information on their functionality and how to use them for creating your own customizations.
Table 34-6 Customer Center Extension Examples
| Directory | Contents |
|---|---|
|
AccountCreation |
AccountCreation.ipl, a BRM price list file used by the examples in this directory. To see the contents of this file, open it in Pricing Center. AcctCreationTapNonGUI.java, an example that demonstrates how you might use the New Account wizard without adding a panel to the UI. CredScoreProfile.java, an example of tapping into the New Account wizard with a custom page. A panel for a new profile subclass is added, which simulates the retrieval of a credit score that determines which plans are available for purchase. CreditScoreProfile.sce, a BRM storable class definition file, which defines a sample object used by the examples in this directory. To see the contents of this file, use Storable Class Editor. Customized.properties, a collection of properties required for implementing these examples in the Customer Center UI. To implement customizations, you copy and paste these entries into the Customized.properties file in CCSDK_Home/CustomerCareSDK/CustCntr/custom directory. CustomizedResources.properties, a collection of resource properties required for implementing these examples in the Customer Center UI. To implement customizations, you copy and paste these entries into the CustomizedResources.properties file in CCSDK_Home/CustomerCareSDK/CustCntr/custom directory. DepositSimulator.java provides a simulated deposit requirement, represented as a set of checkboxes for a CSR to select. ManageFinishButton.java, an example that demonstrates how you can control the Finish button in the New Account wizard. |
|
Controllers |
ControllerTest.java, an example of invoking methods on your controller. The controller for this class contains two methods that retrieve the number of service objects and profile objects associated with the current account. ControllerTestBeanImpl, an example of a controller that can be used in Customer Center. |
|
General |
Customized.properties, a collection of properties required for implementing these examples in the Customer Center UI. To implement customizations, you copy and paste these entries into the Customized.properties file in CCSDK_Home/CustomerCareSDK/CustCntr/custom directory. CustomizedResources.properties, a collection of resource properties required for implementing these examples in the Customer Center UI. To implement customizations, you copy and paste these entries into the CustomizedResources.properties file in CCSDK_Home/CustomerCareSDK/CustCntr/custom directory. DrillDownTest.java contains a number of examples demonstrating how to perform drill downs using the Customer Center framework. PermissionTest.java contains examples of how to retrieve CSR permissions. RefreshTest.java contains examples of registering for refresh events. SaveTest.java contains an example of saving data to BRM. It also demonstrates how to use the PIA widget API and invoke a controller other than the default controller created for this panel. |
|
HomePage |
CustomHomePage, an example of a branded Customer Center home page. Customized.properties, a collection of properties required for implementing this example in the Customer Center UI. To implement customizations, you copy and paste these entries into the Customized.properties file in CCSDK_Home/CustomerCareSDK/CustCntr/custom directory. LaunchBrowserPage, a sample home page that demonstrates using the JNLP API to invoke the system browser. |
|
Notes |
Customized.properties, a collection of properties required for implementing this example in the Customer Center UI. You copy and paste these entries into the Customized.properties file in CCSDK_Home/CustomerCareSDK/CustCntr/custom directory before running the buildAll script. HTMLNotes.java is an example of an alternate notes display. |
|
Profile |
CDProf.java, a profile panel example that can be used during account creation and account maintenance. A very simple example that captures the birthday and gender of the account holder. CDProf.sce, a BRM storable class definition file, which defines a sample object. This sample object is used by the CDprof example in this directory. To see the contents of this file, use Storable Class Editor. CombinedProfPage.java, an example of profile panels for multiple /profile subclasses that are incorporated into one UI panel. CSProf.java, a profile panel example that can be used during account creation and account maintenance. This example captures the credit score. CSProf.sce, a BRM storable class definition file, which defines a sample object. This sample object is used by the CSProf example in this directory. To see the contents of this file, use Storable Class Editor. ProfileTemplate.txt, a template for an empty Profile panel. Use this template as a starting point for creating a profile panel for use with the New Account wizard and for account maintenance. |
|
Events |
An example event displayer. You can use this generic code to retrieve and display most BRM events. This code also demonstrates how to export the displayed date to HTML. |
|
Service |
Customized.properties, a collection of properties required for implementing this example in the Customer Center UI. You copy and paste these entries into the Customized.properties file in the CCSDK_Home/CustomerCareSDK/CustCntr/custom directory before running the buildAll script. PEmailPanel.java, an example of a service panel. The service object used for this example is /service/email. ServiceTemplate.txt, a template for an empty extended-service panel. Use this template as a starting point for creating a panel for an extended service. The PGPRSPanel, PGSMPanel, PMSExchangeOrgPanel, and PMSExchangeUserPanel classes are additional examples of extended service panels. |
|
Summary |
AddToSummaryPage.java, an example of embedding panels directly into the summary page. Customized.properties, a collection of properties required for implementing these examples in the Customer Center UI. You copy and paste these entries into the Customized.properties file in the CCSDK_Home/CustomerCareSDK/CustCntr/custom directory before running the buildAll script. CustomizedResources.properties, a collection of resource properties required for implementing these examples in the Customer Center UI. You copy and paste these entries into the CustomizedResources.properties file in the CCSDK_Home/CustomerCareSDK/CustCntr/custom directory before running the buildAll script. WrappedSummaryPage.java, an example of wrapping the existing Customer Center summary page with additional information or fields at the bottom of the page. |