33 Customizing the Customer Center Help System
This chapter describes how to modify the Help in Oracle Communications Billing and Revenue Management (BRM) Customer Center. You can add, remove, or modify topics in the Customer Center Help. To do this, you work with HTML and simple XML files.
Customer Center Help uses Oracle Help for Java (OHJ). You do not need advanced knowledge of OHJ; you can use the information in this chapter, supplemented by the Oracle Help documentation.
For more information about customizing Customer Center, see "Using Customer Center SDK" and "Customizing the Customer Center Interface".
About Customizing Customer Center Help
Customer Center Help includes procedures, reference information, and context-sensitive Help topics for the version of Customer Center you receive with BRM.
You might want to customize Help for one or more of these reasons:
-
You customized the Customer Center application and want the Help to reflect your modifications.
-
You want to include information specific to your business.
-
You want to remove information not relevant to your customer service representatives (CSRs).
-
You use a BRM service integration component and want to add Help for additional fields and procedures for that service. See "About Help for Service Integration Components".
Before customizing Help, you need to install the following software:
-
Customer Center SDK. See "Installing Customer Center SDK on Windows" in BRM Installation Guide.
-
Java Development Kit (JDK). See "Downloading and Installing Java".
-
Oracle Help for Java. See "Downloading and Installing Oracle Help for Java".
Note:
-
Only the English version of Customer Center Help is packaged with the Customer Center SDK. But you can also use the procedures in this chapter to customize a localized version of Customer Center Help that you obtain from a localized version of the application or from the Localization SDK (see "About the Localization SDK").
-
Help for the Event Browser, a separate application you can open from Customer Center, is also available in the Customer Center SDK. However, the SDK is not configured for customizing Event Browser Help, so that Help system is not covered in this chapter.
-
About Help for Service Integration Components
Customer Center Help does not include procedures and information about fields added to Customer Center by optional BRM features. For example, GSM Manager adds a Promotion tab to your version of Customer Center, and you also enter data specific to the GSM service when you create an account. You can add your own Help topics to cover information for any service integration components you use.
About Oracle Help for Java
Customer Center uses Oracle Help for Java (OHJ). For OHJ, you provide Help in a single JAR file named Customer_Center_Help_locale.jar, where locale is the Java locale. The English version is Customer_Center_Help_en.jar.
This chapter provides basic information on working with OHJ. For additional information, see Oracle Help Guide. This is available both as part of the OHJ installation and on the Oracle Technology Network at http://www.oracle.com/technetwork/indexes/documentation/index.html.
About Types of Help Files
The following list shows the type of files that the Help system contains:
-
HTML files: Each Help topic has its own HTML file. Most topics are procedures, but there are also overview topics, reference topics, glossary definitions, and context-sensitive topics connected to a specific dialog box or wizard page.
-
CSS file: A style sheet referenced by each Help topic.
-
GIF files: Graphics referenced by the HTML files are GIF files located in the images subdirectory.
-
HelpSet (.hs) file: The file that describes your Help system. This is the file Customer Center looks for to start Help.
Important:
You do not need to edit the helpset file as long as you keep the names of the index, table of contents, and map files the same. The procedures in this chapter assume you do not edit this file. -
Index file: An XML file that contains the index located in the left pane of the Oracle Help window.
-
Table of Contents (TOC) file: An XML file that contains the Table of Contents located in the left pane of the Oracle Help window.
-
Map file: An XML file that associates Help IDs with HTML file names. The TOC and index use the IDs to link entries to Help topics. Customer Center dialog boxes and wizard pages use the IDs to provide context-sensitive Help. The IDs also support popup windows.
The Help also includes a full-text search database that you create with a command-line Java utility at the end of the customization process.
More information about the Oracle Help files is provided within the procedures for customizing Help in this chapter.
Installing Oracle Help for Java
To install the JDK and OHJ software, follow these procedures:
Downloading and Installing Java
-
Download the JDK (also known as Java 2 SDK) from java.sun.com.
For the version compatible with this BRM release, see "BRM Software Compatibility" in BRM Installation Guide.
-
Install the JDK by following the instructions at java.sun.com.
Note:
During the installation, you select components in the Select Components dialog box. The components you need for working with OHJ are Program Files and Java 2 Runtime Environment. -
Add the path to the java command to your Path environment variable.
Environment variables are available on the Advanced tab of the System control panel. You can use either the system or user Path variable, whichever works best in your environment.
Add this location to the beginning of the Path variable:
Java_install_dir\bin
where Java_install_dir is the JDK installation directory; for example:
C:\jdk1.5.0_09\bin
-
Open a new command window and enter:
java -versionThe output should be something like this (the version number should be the version you installed):
java version "1.5.0_09"
Java(TM) 2 Runtime Environment, Standard Edition (build 1.5.0_09-b03)
Java HotSpot(TM) Client VM (build 1.5.0_09-b03, mixed mode)
Downloading and Installing Oracle Help for Java
-
If you have a previous version of OHJ on your system, uninstall it.
-
Download the Oracle Help for Java Windows executable from:
http://www.oracle.com/technetwork/topics/utilsoft-085729.htmlFor the version compatible with this BRM release, see "BRM Software Compatibility" in BRM Installation Guide.
-
Run the installer and follow the prompts.
Customizing Help
You use the Customer Center SDK and the instructions in this chapter to customize Help.
Figure 33-1 provides an overview of the process for customizing Customer Center Help.
Figure 33-1 Customizing Customer Center Process
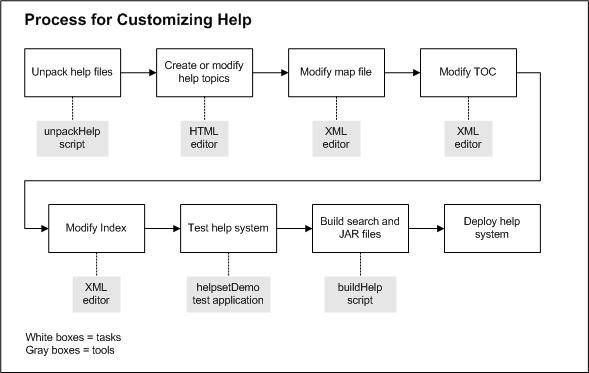
Description of ''Figure 33-1 Customizing Customer Center Process''
For details on each step, see:
About Tools for Customizing Help
The procedures in this chapter require using basic tools, including:
-
Scripts from the Customer Center SDK.
-
An HTML editor.
-
An XML editor.
-
The helpsetDemo test application from OHJ.
These tools should be adequate if your customizations are fairly limited.
For more extensive customizations, consider using a full-fledged Help authoring tool that can create OHJ systems. One good list of Help authoring tools is available in the WritersUA Online Help Resource Directory at:
http://www.welinske.com/resources/
Some of the tools listed on this page support OHJ. You can follow links to each vendor's Web site for more information.
Unpacking the Help Files
You use the Help system packaged with Customer Center as the starting point for your customizations. All Customer Center Help files are in the file Customer_Center_Help_en.jar, which is part of the Customer Center SDK.
To extract the files from the Customer Center Help JAR file:
-
Go to CustomerCareSDK_Home/CustCntr/CustomHelp.
-
Run the unpackHelp script:
unpackHelpThe script copies the file CustomerCareSDK_Home/lib/Customer_Center_Help_en.jar and extracts the files from that JAR file into the directory CustomerCareSDK_Home/CustCntr/CustomHelp/cchfiles.
Important:
If you already have a cchfiles directory, unpackHelp deletes any files in that directory before extracting files from the JAR file.Note:
If you have a Customer Center Help system in a JAR file with a different name, the JAR file must be in CustomerCareSDK_Home/lib, and you must specify its name on the command line: unpackHelp filename.jar
Creating or Modifying Help Topics
You can now add, remove, or modify HTML files. The changes you make need to appear in the cchfiles directory because that directory is the source for the script you run to compile the customized Help system at the end of the process.
To modify an HTML file, open and revise it in the HTML editor of your choice. To create a new HTML file, you might want to open an existing file and save it under a new name as a starting point.
Note:
If you remove a file, you will break any links to that file. You can use a link-checking program or other method to identify files with broken links.Working with Pop-Up Windows
A pop-up window is a separate window without a title bar that appears over the Help topic and goes away when you click outside the popup. Customer Center Help uses pop-up windows mainly for definitions of terms.
The text related to the pop-up window appears the same as any other link. If the link text is a term instead of a topic title, then it generally opens a popup.
To include a link to a pop-up window in an HTML file, you use the popup protocol in the link. Following is an example:
<a href="popup:account_html_wp538547">account</a>
In this example:
-
popup is the popup protocol, which identifies the link as a popup.
-
account_html_wp538547 is the ID of the topic to be displayed in the popup window. This ID is in the map file for the Help system and is associated with the HTML file for the topic. For more information on the map file, see "Modifying the Map File".
-
account: The hyperlinked text.
Naming Files
The Customer Center Help system uses certain file naming rules and conventions. You should follow the rules to avoid problems using your customized Help system. Following the conventions is optional, but knowing them might help you identify and work with the Customer Center files.
Follow these rules in naming HTML files:
-
Use only letters, numbers, and underscores in file names.
-
Do not use spaces in file names.
Optional naming conventions for HTML files:
-
All HTML files except glossary items start with cc_.
-
Except for the underscores in the prefix cc_, and other prefixes listed below, the names use only uppercase and lowercase letters.
-
The names are usually based on the title of the topic.
-
Context-sensitive Help topics are named based on the Java name for the dialog box or wizard page they are linked to.
-
HTML files that are glossary items do not have a special prefix. They are based on the name of the term they define. These files are part of the glossary and appear in pop-up windows, unless you access them from the index or the Search.
-
HTML files that appear in pop-up windows but not definitions start with cc_popup_.
-
HTML files that start with cc_sec_ were originally designed to appear in separate secondary windows. Customer Center Help no longer uses secondary windows, but the naming convention still exists for some files.
Follow the same rules for naming graphics files as for HTML files.
The only convention for graphic names is that they typically start with the name of the section of the Help in which they appear as shown in Table 33-1.
| File Name Prefix | Section |
|---|---|
|
CC_Accounts_ |
Creating and Finding Accounts |
|
CC_AcctGroups_ |
Creating and Managing Account Groups |
|
CC_AcctInfo_ |
Working with Account Information |
|
CC_ARinfo_ |
Working with Accounts Receivable Information |
|
CC_GetStart_ |
Getting Started with Customer Center |
|
CC_PDS_ |
Working with Products, Deals, and Services |
CS_ is added to the prefix if the image is part of a context-sensitive Help topic.
Using the Style Sheet
Customer Center Help uses a cascading style sheet (CSS), brm_help.css.
If you want to change styles, you might want to use brm_help.css as a starting point. If you remove the style sheet, you will see changes in the font, spacing, and other formatting.
The Customer Center Help style sheet uses a small number of style classes, usually to control spacing. The style sheet uses the following classes:
-
li.nospace
-
p.graphic
-
table.dialog
-
table.noborderindent
-
table.note
-
table.noteindent
-
ul.indentnospace
-
ul.nospace
You can see examples of these classes by searching for them in the HTML files.
For information about both CSS and HTML support in OHJ, see Oracle Help Guide and the Release Notes.
Modifying the Map File
The map file associates an ID with each file. OHJ uses the IDs rather than the file names for the table of contents, the index, and context-sensitive Help. The map file is in XML and has a .xml extension.
The map file for Customer Center is Customer_Center_Help Map.xml. You need to edit this file if you add or remove Help topics.
To add a new Help topic to the map file:
-
Open Customer_Center_Help.xml in an XML editor or text editor.
-
Add an ID in the following format anywhere between the <map> and </map> elements:
<mapID target="ID" url="filename" /> <!-- topic_title -->
The mapID element includes the following attributes:
-
ID is a string that identifies the Help topic. Every HTML file in Customer Center Help has an ID based on the file name. .html is replaced by _html_anchor, where anchor is an anchor in the HTML file.
Context-sensitive Help topics have another entry in this file using an ID that corresponds to their Help IDs, which Customer Center uses to launch the correct topic when a user clicks a Help button.
There are also extra sets of IDs, one based on the filename but without the anchor and one that starts with Customer_Center_Help, but these are not used.
Any file you add needs only one ID. IDs that you create do not need to follow the conventions used in Customer Center Help. You can use your own scheme for creating new IDs.
-
filename is the name of the HTML file.
-
topic_title is the title of the topic. This is optional and is included as a comment.
For example:
<mapID target="cc_GetStarted_html_wp477160" url="cc_GetStarted.html" /> <!-- Getting Started with Customer Center -->
-
If you remove a Help file, search for the Help file name in the map file and remove the <mapID> element or elements for that file.
Note:
The IDs can be in any order, as long as they are inside the <map> element.Modifying the Table of Contents
The OHJ TOC file defines the content and structure of the TOC that appears in the Help Navigator. The TOC file for Customer Center is toc.xml. You need to edit this file if:
-
You add Help topics that you want to include in the TOC.
-
You remove or change the title of topics that are already in the TOC.
Help topics do not have to be in the TOC. Most, but not all, Customer Center Help topics are in the TOC. Topics in pop-up windows and context-sensitive topics are among those that do not appear.
To edit the TOC, open toc.xml in an XML editor or text editor. The entire TOC is between the <toc> and </toc> elements. Each TOC item is a separate <tocitem> element.
Following is the syntax of a <tocitem> element:
<tocitem target="ID" text="topic_title">
where:
-
ID is the topic's ID in the map.xml file.
You can add a TOC item with no target, which means there is no Help topic associated with it. An item without a target can be used to help organize the TOC.
-
topic_title is the heading in the topic.
The <tocitem> elements are nested to create a multi-level TOC. Following is an excerpt from a Customer Center TOC file:
<tocitem target="cc_ControlAcctAccess_html_wp454423" text="Controlling access to accounts">
<tocitem target="cc_SetCSRPasswd_html_wp461812" text="Setting CSR passwords" />
<tocitem target="cc_Permissions_html_wp448861" text="Managing permissions">
 <tocitem target="cc_SetPermissions_html_wp448684" text="Setting permissions" />
 <tocitem target="cc_EditPermissions_html_wp448881" text="Editing and deleting permissions" />
 <tocitem target="cc_ControlAccessToBrands_html_wp455236" text="Controlling access to brands" />
</tocitem>
</tocitem>
Figure 33-2 depicts how the excerpt looks in OHJ:
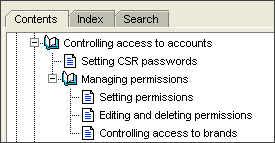
Each <tocitem> element starts a new level. A </tocitem> element closes the current level and returns to the next level up.
Modifying the Index
The Oracle Help index file defines the content and structure of the index that appears in the Help Navigator. The index file is in XML and has a .xml extension.
The index file for Customer Center is index.xml. You need to edit this file:
-
To add index entries for new, revised, or existing Help topics.
-
To remove index entries associated with a Help topic you are removing.
-
To change or remove index entries for any other reason.
To edit the index, open index.xml in an XML editor or text editor.
To edit the TOC, open toc.xml in an XML editor or text editor. The entire TOC is between the <toc> and </toc> elements. Each TOC item is a separate <tocitem> element.
Following is the syntax of a <tocitem> element:
<tocitem target="ID" text="topic_title">
where:
-
ID is the topic's ID in the map.xml file.
You can add a TOC item with no target, which means there is no Help topic associated with it. An item without a target can be used to help organize the TOC.
-
topic_title is the heading in the topic.
The <tocitem> elements are nested to create a multi-level TOC. Following is an excerpt from a Customer Center TOC file:
This is an excerpt from a Customer Center index file:
<indexitem text="brands">
 <indexitem target="cc_ControlAccessToBrands_html_wp455236" text="controlling access to" />
 <indexitem text="controlling access to" target="cc_Brands_html_wp454964" text="controlling access to" />
 <indexitem text="working with" target="cc_Brands_html_wp454964" />
</indexitem>
<indexitem target="cc_CreateFindAcct_html_wp465886" text="business accounts, description" />
<indexitem target="cc_BusIntelSegPromo_html_wp446805" text="business intelligence segment promotion" />
Figure 33-3 depicts how the excerpt looks in OHJ:
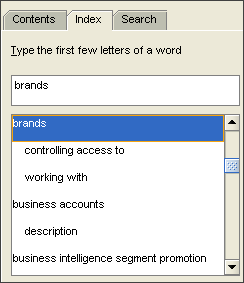
Each <indexitem> element starts a new level. An </indexitem> element closes the current level and returns to the next level up.
You can have an index entry without a target. In Customer Center Help, parent index entries do not have targets.
In the previous example, "brands" is a parent index entry, because there is a second level of entries below it, and "brands" does not link to a topic. But "business intelligence segment promotion" is a standalone entry that does link to a topic.
Entries without targets look the same as entries with targets, but when you click them the displayed topic does not change.
Note:
The target and text attributes are in reverse order in the Customer Center Help index. The index works regardless of the order of the attributes, but the Oracle Help syntax is for target to come first.Testing the Help System
You can test your Help system with the OHJ test application helpsetDemo.
Note:
This application does not work if your Help files are inside a JAR file.To test your Help system:
-
Run this batch script from either the command line or Windows Explorer:
OHJ_Install_Dir\bin\helpsetDemo.bat
where OHJ_Install_Dir is the path to your OHJ installation. The default installation directory is C:\ohelp.
The Oracle Help for Java HelpBook Previewer appears.
-
Enter the full path to your helpset file or click the Browse button to find the file.
-
(Optional) Select a look and feel.
-
Click OK.
The Help Navigator for your Help system opens. A separate Oracle Help for Java HelpBook Previewer window enables you to enter a Help ID to display a specific topic.
Include the following when testing your Customer Center Help:
-
Navigate to the topics you added or changed and make sure they display correctly. The display might not be what you expect from a standard browser, but you should verify that the appearance is acceptable.
-
Test the links within Help topics.
-
Test the links from the TOC and index to make sure they open the correct Help topics.
-
Open a topic not included in the TOC or index by entering the topic ID in the Oracle Help for Java HelpBook Previewer window.
Note:
-
This round of testing takes place before you create the search database. You should test again after creating the search database.
-
If you cannot get a Help topic to appear, make sure it is in the map file. See "Modifying the Map File".
-
Creating the Search Database and JAR File
When your Help topics are final, you run the buildHelp script to create the search database and place all the Help files in a Java Archive (JAR) file.
After you finish customizing Customer Center Help files, all your changes should be in the CustomerCareSDK_Home/CustCntr/CustomHelp/cchfiles directory.
-
Create a certificate to sign the new Customer Center Help JAR file, using the makecertificate command. See "Creating a Self-Signed Java Security Certificate" for details.
Important:
The self-signed test certificate should be used only for testing or deployment where security is not a concern.For enhanced security, obtain Java code signing certificates from a Certificate Authority such as:
-
VeriSign (
http://www.verisign.com) -
Thawte (
http://www.thawte.com)
-
-
In a shell, go to the CustomerCareSDK_Home/CustCntr/CustomHelp directory.
-
Enter the following command:
buildHelpCaution:
If a JAR file with the same name as the one buildHelp is creating already exists in the CustomerCareSDK_Home/CustCntr/custom directory, buildHelp overwrites the existing file. If you want to save the existing file, copy it to another location before running buildHelp.The buildHelp command does the following:
-
Runs the Oracle Help search indexer to create the search database.
-
Creates the ccCustomHelp_en.jar file containing all the Help files and places it in the CustomerCareSDK_Home/CustCntr/custom directory.
You can use a name other than ccCustomHelp_en.jar by specifying the name on the command line. But you cannot use the same name as the Help JAR file that ships with Customer Center-Customer_Center_Help_en.jar.
-
Runs the signjar script to sign the JAR file with your own certificate.
-
-
Test the Help system again, now with searching available. To do this, copy the JAR file to a different location and extract all the files. Then test using the instructions in "Testing the Help System".
-
If you find problems, fix them in the files in the cchfiles directory. Then run buildHelp again to create a new JAR file to test.
Deploying the Help System
Use the following procedures to deploy your customized Customer Center Help. For the full procedure you follow to deploy any Customer Center customization, see "Building Your Customer Center Customizations".
To deploy your customized Help with your version of Customer Center, follow these procedures:
Editing JNLP Files
A Java Network Launch Protocol (JNLP) file describes how to launch an application with Java WebStart. This is the technology that Customer Center uses to distribute updates to Customer Center users through a Web page.
You need to edit two JNLP files so that your custom Help is distributed with WebStart:
-
Open the custom.jnlp file in the CustomerCareSDK_Home/CustCntr/custom directory.
-
In custom.jnlp, remove the comments around the following line:
<!-- <jar href="custom/ccCustomHelp.jar"/> --> -
If you are not customizing the Customer Center application, add comments around the following line:
<!-- <jar href="custom/ccCustom.jar"/> -->
-
Save and close custom.jnlp.
-
Open the CustomerCenter_en.jnlp file in CustomerCareSDK_Home/CustCntr/custom.
-
Remove the comments around the following line:
<!-- <extension name="Customized" href="custom/custom.jnlp"/> --> -
To remove the reference to the original Customer Center Help file, add comments around the following line:
<!-- <jar href="lib/Customer_Center_Help_en.jar"/> -->
-
Save and close CustomerCenter_en.jnlp.
Copying Customized Files to Customer Center
You need to copy the modified JNLP files and your custom Help JAR file to your Customer Center installation.
-
Make a backup copy of the CustomerCenter_en.jnlp file in Customer_Center_Home, the directory where you installed Customer Center on your Web server.
-
Create a new subdirectory named custom in Customer_Center_Home.
-
Copy the revised custom.jnlp files from CCSDK_Home/CustCntr/custom to Customer_Center_Home/custom.
-
Copy the revised CustomerCenter_en.jnlp from CCSDK_Home/CustCntr/custom to Customer_Center_Home.
-
Copy ccCustomHelp.jar, or whatever you named your customized Help file, from CCSDK_Home/lib to Customer_Center_Home/custom.
The next time a CSR opens their local version of Customer Center, Java WebStart installs the updated Help file to their system.
Important:
If you previously deployed the original Help JAR file, or any other Help JAR file with a different name, to client systems, verify that Customer Center brings up your customized Help. If it does not, follow the procedure Clearing the WebStart cache for each client system.If client systems are not accessing your customized Help system after you deployed it, each client system should clear its WebStart cache:
-
Open Java WebStart.
-
Choose File - Preferences.
-
Click the Advanced tab.
-
Click Clear Folder.
A new dialog box appears.
-
Deselect the Also remove downloaded applications and certificates option.
-
Click Yes.
-
Click OK in the Preferences dialog box.
The next time a CSR starts Customer Center, either from WebStart or from your Web site, WebStart downloads the full application.
Note:
As an alternative to clearing the cache, you can also remove the Customer Center application from WebStart. In this case, the CSR must go to the Web site to download the latest version of Customer Center.Working with Context-Sensitive Help
Customer Center includes context-sensitive Help for dialog boxes and wizard pages. The user clicks this button to get a Help topic about the current dialog box or wizard page:
Description of the illustration ''prg_cust_cctr_help_icon.gif''
The Help topic typically describes each field on the dialog box or page.
Customer Center does not support field-level context-sensitive Help, where you click a field to get a brief description of that field.
If you create a custom page or dialog box, use the following code to add a Help button:
JButton helpB = new JButton(CCCompatibilityUtility.loadImage(
     "com/portal/app/cc/HelpDefault.gif"));
helpB.addActionListener(new PDefaultHelpIDAction("ID"))
where ID is the ID of the Help topic you want to appear for that page or dialog box. The ID must be mapped to a filename in the map file. For more information, see "Modifying the Map File".