7 Configuring Pipeline Manager
This chapter describes how to manage Oracle Communications Billing and Revenue Management (BRM) Pipeline Manager framework components and pipelines.
For background information, see "About the Pipeline Manager System Architecture" in BRM Concepts.
About Configuring Pipeline Manager
To configure Pipeline Manager, you use the following files:
-
Registry files, which you use to configure a Pipeline Manager instance at system startup. See "Using Registry Files to Configure Pipeline Manager".
-
Semaphore files, which you use to configure and control pipelines during runtime. See "Using Semaphore Files to Control Pipeline Manager".
You can also use the pin_ctl utility to start and stop Pipeline Manager. See "Starting and Stopping the BRM System".
Using Registry Files to Configure Pipeline Manager
A registry file is an ASCII text file that configures a Pipeline Manager instance at system startup. (There is one registry file for each Pipeline Manager instance.) You use a registry file to configure all of your Pipeline Manager system settings, such as the location of log files, your input stream format, data modules, pipelines, and the number of system threads.
Note:
All directories and folders referenced in the registry file must exist before starting the Pipeline Manager.After you have configured the registry file, you use the registry file name in the command for starting Pipeline Manager:
ifw -r RegistryFile
About the Registry File Structure
Registry files use a hierarchical structure, with each subsection nested within another. Each subsection provides the configuration for a module. These can be system modules, such as the Memory Monitor.
Each nested subsection is indented by several spaces and surrounded by curly braces { }. For example, the following shows how you specify the semaphore entries, FilePath and FileName:
ifw
{
...
    Semaphore
    {
        FilePath = /opt/ifw/semaphore
        FileName = semaphore.reg
    }
}
The registry hierarchy is shown in this chapter by the dot (.) convention. For example, this hierarchy:
ifw
{
...
    ProcessLog
    {
        Module
        {
        ...
        }
    }
}
is shown like this:
ifw.ProcessLog.Module
Where each period represents a level in the hierarchy.
The following shows the top-level subsections in the registry file. Each of these subsections controls a system-wide function as described in Table 7-1. The ifw.Pipelines section contains system-wide entries that apply to all pipelines, and subsections for each pipeline.
ifw
{
    Instrumentation
    DiagnosticDataHandler
    ParallelLoadManager
    LogMessageTable
    Semaphore
    Registry
    ProcessLog
    MemoryMonitor
    EventHandler
    DataPool
    TransactionIdController
    SequencerPool
    Pipelines
...
}
where:
Table 7-1 Top-Level Subsections in Registry File
| Registry entry | Description | Required |
|---|---|---|
|
ifw |
Specifies the registry name for the Pipeline Manager instance. This is always the first entry in the registry. It is read by the Pipeline Manager Controller. See "About the Controller" in BRM Concepts. |
Yes |
|
ifw.Instrumentation |
Section that configures Operations Management Framework (OMF) instrumentation data collection. See "Enabling SNMP Instrumentation Data Collection". |
Yes |
|
ifw.ParallelLoadManager |
Section that configures multithreaded loading of your pipelines, data modules, and function modules. See "Reducing Startup Times with Parallel Loading". |
No |
|
ifw.DiagnosticDataHandler |
Section that configures diagnostic data collection. See "Using the Diagnostic Data Handler to Get OMF Diagnostic Data". |
Yes |
|
ifw.LogMessageTable |
Section that configures global log file setting. See "About Pipeline Manager Log Files". |
Yes |
|
ifw.Semaphore |
Section that defines the name and location of your semaphore files. See "Using Semaphore Files to Control Pipeline Manager". |
Yes |
|
ifw.Registry |
Section that defines the names and locations of the files that contain updated registry information. See "Controller" in BRM Configuring Pipeline Rating and Discounting. |
Yes |
|
ifw.ProcessLog |
Section that configures your process log. For information about the log entries, see "About Pipeline Manager Log Files". |
Yes |
|
ifw.MemoryMonitor |
Section that configures memory monitoring. See "Monitoring Pipeline Manager Memory Usage". |
No |
|
ifw.EventHandler |
Section that configures the Event Handler. See "About the Event Handler" in BRM Concepts. |
No |
|
ifw.DataPool |
Section that configures your data modules. See "Configuring the Data Pool". |
Yes |
|
ifw.TransactionIdController |
Section that configures your Transaction ID Controller. See "About the Transaction ID Controller" in BRM Concepts and "About Pipeline Manager Transactions". |
Yes |
|
ifw.SequencerPool |
Section that configures all Sequencers used by a single Pipeline Manager instance. See "Configuring Sequence Checking". |
No |
|
ifw.Pipelines |
Section that configures your individual pipelines. See "About Configuring Pipelines". |
Yes |
About the Registry File Syntax
Most registry file entries are key-value pairs separated by an equal sign (=):
Entry = Value
where:
-
Entry specifies the entry name. Ensure you use the correct entry name spelling and capitalization; entry names are case-sensitive.
-
Value is a value specific to the configuration entry.
For example, Source = File or Split = True.
A few registry file entries, such as Reload, do not take a value. In these cases, follow the identifier with curly braces. For example, Reload {}.
Registry entries are either mandatory or optional. You must specify all mandatory entries. You can delete optional entries or comment them out by using a cross-hatch (#); Pipeline Manager uses default values for all unspecified optional entries.
Values can be either hard-coded and must be exact, or you can define your own.
-
Hard-coded values must be entered exactly as documented. For example, when you enter a module name, it must have the correct spelling and capitalization. For FCT_Account, you cannot use FCT_account or FCT_ACCOUNT.
-
Values that you define are often used elsewhere in the file, at which point they must be entered exactly as you defined them. For example, you might define the section for the DAT_AccountBatch module by using the entry CustomerData:
#-----------------------------------------------------------
# Infranet Customer Data
#-----------------------------------------------------------
CustomerData
{
   ModuleName = DAT_AccountBatch
When you refer to that module elsewhere in the registry file, you point to CustomerData:
DataModule = ifw.DataPool.CustomerData
About the Sample Registry Files
Pipeline Manager includes the sample registry files listed in Table 7-2 to help you get started:
Table 7-2 Pipeline Manager Sample Registry Files
| File name | Directory location | Description |
|---|---|---|
|
simple.reg |
Pipeline_home/samples/simple |
Simple registry file that you can use to verify that Pipeline Manager installed properly. It does not require a database. It tests the pipeline input, output, and runs one functional module (FCT_PrefixDesc). |
|
wireless.reg |
Pipeline_home/conf |
Registry file that configures most function modules. This sample is a good place to start for creating your customized registry file. |
|
wirelessRealtime.reg |
Pipeline_home/conf |
Registry file that configures most function modules for real-time features. This sample is a good place to start for creating your customized registry file. |
About Configuring Pipelines
Pipelines perform the Pipeline Manager functions, such as rating and zoning. See "About Pipelines" in BRM Concepts.
You configure pipelines in the ifw.Pipelines registry section. For example, a Pipeline Manager configuration with multiple pipelines looks like this:
ifw
{
...
    Pipelines
    {
        PipelineName
        {
            Input
            Functions
            Output
        }
        PipelineName
        {
            ...
        }
    }
...
You can use any name you want to identify pipelines. You use that name in many places to point to the pipeline, so it should identify the function of the pipeline.
For each pipeline, you configure a pipeline controller. This section configures pipeline-specific configurations, such as threads, log files, the EDR Factory, and the ifw.Pipelines.DataDescription section. See the following topics:
-
"About the Pipeline Controller" (see BRM Concepts)
In addition, for each pipeline controller, you configure:
-
An input section. See "Configuring EDR Input Processing" in BRM Configuring Pipeline Rating and Discounting.
-
An ifw.Pipelines.Functions section. This section configures the function modules in the pipeline. The modules are run in the order that they are configured in this section. See "About Configuring Function Modules".
-
An output section. See "Configuring EDR Output Processing" in BRM Configuring Pipeline Rating and Discounting.
The registry subsections in a pipeline are listed in Table 7-3:
Table 7-3 Pipeline Registry Subsections
| Registry Entry | Description | Required |
|---|---|---|
|
ifw.Pipelines |
Section that configures your individual pipelines. |
Yes |
|
ifw.Pipelines.PipelineName |
Section that configures a single pipeline. |
Yes |
|
ifw.Pipelines.PipelineName.Input |
Section that configures a pipeline's input module. For information about the input module entries, see "Pipeline Manager Input and Output Modules" in BRM Configuring Pipeline Rating and Discounting. |
Yes |
|
ifw.Pipelines.PipelineName.Functions |
Section that configures a pipeline's function modules. For information about the function module entries, see "About Configuring Function Modules". |
Yes |
|
ifw.Pipelines.PipelineName.Output |
Section that configures a pipeline's output module. For information about the output module entries, see "Pipeline Manager Input and Output Modules" in BRM Configuring Pipeline Rating and Discounting. |
Yes |
About Configuring Function Modules
You configure function modules in the ifw.Pipelines.Functions section.
The ifw.Pipelines.Functions section uses this hierarchy:
ifw
{
...
  Pipelines
  {
    PipelineName
    {
      Input
      ...
      Functions
      {
          Function_pool_name
          {
               FunctionPool
               {
                     Module_identifier
                     {
                         ModuleName = Module_executable
                         Module
                         {
                              Entry = value
...
The entries listed in Table 7-4 are a combination of required text and text that you define.
Table 7-4 Pipeline Registry Functions Section Entries
| Entry | Description |
|---|---|
|
Functions |
Section name. You must use Functions. |
|
Function_pool_name |
The name of the function pool. You define this name. See "Optimizing a Pipeline by Using Function Pools". |
|
FunctionPool |
Section name. You must use FunctionPool. |
|
Module_identifier |
The descriptive module identifier. For example, the module identifier for FCT_Account in the sample registry is CustomerSearch. You define these names. They are often referenced by other modules; for example, to connect to the DAT_AccountBatch module, the FCT_Account module points to CustomerData. |
|
ModuleName = Module_executable |
ModuleName is the entry. You must use ModuleName. Module_executable is the name of the module; for example, FCT_Account. This name is case-sensitive and must be spelled correctly; for example, you must use FCT_Account, not FCT_account or FCT_ACCOUNT. You can find the exact spelling and capitalization by looking at the executable name in the Pipeline_home/lib directory. |
|
Module |
Section name. You must use Module. |
|
Entry = value |
These are the registry entries, for example: Active = True |
This example shows a sample hierarchy. This sample does the following:
-
Creates a function pool named PreProcessing.
-
Runs the FCT_IRules module, using the identifier PipelineSplit.
Functions
{
    PreProcessing
    {
        FunctionPool
        {
            PipelineSplit
            {
                ModuleName = FCT_IRules
                Module
                {
                    Active = True
About iScripts and iRules
iScripts and iRules perform processing tasks similar to function modules. They are run by the FCT_iScript and FCT_iRules modules. In addition to the iScripts and iRules provided by BRM, you can create your own iScripts and iRules.
See "Creating iScripts and iRules" in BRM Developer's Guide.
About Configuring iScripts
To run iScripts, you use the FCT_IScript module. See "FCT_IScript" in BRM Configuring Pipeline Rating and Discounting.
The registry section for the FCT_IScript module includes the script to run, for example:
ApplyTaxIScript
{
    ModuleName = FCT_IScript
    Module
    {
        Active = True
        Source = File
        Scripts
        {
            ApplyTaxIScript
            {
                FileName = ./iScriptLib/iScriptLib_Roaming/ISC_ApplyTax.isc
            }
        }
    }
}
You can provide registry parameters to use in the iScript. This example provides the iScript with a G/L code:
Scripts
{
    ConsolidatedCPIScript
    {
        FileName = ./iScriptLib/iScriptLib_Roaming/ISC_ConsolidatedCP.isc
        GL_CODE = 1514
    }
}
About Configuring iRules
To run iRules, you use the FCT_IRules modules. See "FCT_IRules" In BRM Configuring Pipeline Rating and Discounting.
To configure the FCT_IRules module, provide a connection to the Pipeline Manager database. The FCT_IRules module runs the rules that apply to the conditions in the pipeline. If a condition in a rule item matches the current EDR container, the evaluation stops and the script associated with the rule item is executed for the current EDR container.
This example shows a typical FCT_IRules registry section:
PipelineSplit
{
    ModuleName = FCT_IRules
    Module
    {
        Active = TRUE
        Source = Database
        DataConnection = integrate.DataPool.DataConnection
        Rules
        {
        }
    }
}
You can use the Rules entry to specify a specific script to run:
     Rules
     {
        TAP3_VAL
     }
Configuring Multiple Instances of a Pipeline
To simplify the configuration of multiple pipelines, use the ifw.Pipelines.Instances subsection. Pipeline Manager reads the required number of instances for a given pipeline and instantiates each of them accordingly.
Note:
The ifw.Pipelines.Instances subsection creates multiple instances of pipelines. To create multiple instances of sequencers, output streams, or system brands for multiple roaming partners, use the Instances module. See "About Configuring Multiple Instances of Sequencers, Output Streams, or System Brands" for more information.For example, this subsection configures ten instances of the authorization pipeline:
ifw
{
...
    Pipelines
    {
        Instances
        {
            AuthPipeline
            {
                NumberOfInstances = 10
                InstanceSpecificRegistries
                {
                Entry1 = TransactionManager.BinaryLogFileName
                Entry2 = PipelineLog.Module.ITO.FileName
                …
                }
            }
        }
    }
}
To specify instance-specific registry entries, you add the entries in the ifw.Pipelines.Instances.Pipeline_Name.InstanceSpecificRegistries section.
The pipeline generates the instance-specific log file names by adding the instance ID to the base pipeline file names.
For example, if the base pipeline file name for the TransactionManager log file is binaryLogFile_RT_GPRS.dat, then the instance-specific files generated are binaryLogFile_RT_GPRS.dat0, binaryLogFile_RT_GPRS.dat1, and binaryLogFile_RT_GPRS.dat2.
Note:
If instance-specific entries are not specified, the pipeline uses the base pipeline configurations.About Configuring Multiple Instances of Sequencers, Output Streams, or System Brands
To manage multiple roaming partners, you can use the Instances module to configure multiple instances of sequencers, output streams, or system brands. You configure the Instances module by adding the ifw.Instances registry section in the roaming registry file (Pipeline_home/conf/roaming.reg).
Note:
To create multiple instances of pipelines, use the ifw.Pipelines.Instances subsection. See "Configuring Multiple Instances of a Pipeline" for more information.The Instances module configures multiple instances of sequencers, output streams, or system brands using template sections or entries in the roaming registry file. Instead of creating multiple sections of entries, you use the single section or entry templates in the roaming registry file. When the pipeline runs, data for each roaming partner is inserted into the templates, effectively instantiating multiple registry sections or entries. For example, if there are two roaming partners, OPRT1 and OPRT2, the template is instantiated into two sections of entries in the pipeline.
To identify which roaming partners to use with the template, the Instances module reads the roaming configuration data file generated by the RoamingConfigGen64 utility. This file includes data for each of the roaming partners. For example, the data can include the sequencing information, output information, and so on.
You use the SequencerPool or OUT_GenericStream template section or the SystemBrands template entry in the roaming registry file to configure multiple sequencers, output streams, or system brands. These template sections or entries contain the variables that must be changed in each new instance of the SequencerPool or OUT_GenericStream section or the SystemBrands entry instantiated in the pipeline.
The following example shows the SequencerPool template section:
SequencerPool
{
SEQ_GEN_TAPOUT_XXX
{
  Source = Database
  Controller
  {
   SequencerType = Generation
   ReuseGap = True
   SequenceLength = 5
   DatabaseConnection = ifw.DataPool.Login
  }
where XXX is the visiting network operator code that must be changed in each new instance of the SequencerPool section; for example, OPRT1, OPRT2, and so on.
Use the Instances module with the RoamingConfigGen64 utility. The RoamingConfigGen64 utility collects the roaming partner information from the Pipeline Manager database and creates the roaming configuration data file. The Instances module uses the values in the roaming configuration data file to replace the variables in each instance of the SequencerPool or OUT_GenericStream section or the SystemBrands entry instantiated in the pipeline.
When you run the RoamingConfigGen64 utility, you specify a home network operator code. The utility searches the Pipeline Manager database to find the VPLMNs associated with that home network operator. For example, if the home network operator has two VPLMNs, a record for each of them is created in the roaming configuration data file.
The following example shows the roaming configuration data file generated by the RoamingConfigGen64 utility:
# Column Headers
##################################################################################
############################################################################
VPLMN|TAPOUT_SEQUENCER|NRTRDEOUT_SEQUENCER|TAPOUT_STREAM|NRTRDEOUT_STREAM|
TAPOUT_PATH|NRTRDEOUT_PATH|TAPOUT_PREFIX|NRTRDEOUT_PREFIX|TMP_PREFIX|
TMP_DATA_PREFIX###################################################################
###########################################################################################OPRT1|SEQ_GEN_TAPOUT_OPRT1|SEQ_GEN_NRTRDEOUT_OPRT1|TAPOutput_OPRT1|NRTRDEOutput_OPRT1|./data/outcollect/tapout/oprt1|./data/outcollect/nrtrdeout/oprt1|CDEUR01OPRT1|NREUR01OPRT1|temptest_oprt1|temp.oprt1.tmp.|42|5|OUT_DevNullOPRT2|SEQ_GEN_TAPOUT_OPRT2|SEQ_GEN_NRTRDEOUT_OPRT2|TAPOutput_OPRT2|NRTRDEOutput_OPRT2|./data/outcollect/tapout/oprt2|./data/outcollect/nrtrdeout/oprt2|CDEUR01OPRT2|NREUR01OPRT2|temptest_oprt2|temp.oprt2.tmp.|42|5|OUT_GenericStream
The following example shows the entries in the ifw.Instances registry section to configure multiple instances of sequencers:
{
 ifw
 {
   Instances
   {
   SEQ_GEN_TAPOUT
   {
     BlockName  = SequencerPool.SEQ_GEN_TAPOUT_XXX
     DataFile = ./RoamingPartnerConf.dat
     InstanceSpecificEntries
     {
         ModifyBlockName
         {
           Instance = [BlockName]
           UseColumn = TAPOUT_SEQUENCER
          }
      }
     }
The following example shows the two instances of sequencers instantiated in the pipeline, based on the entries in the ifw.Instances registry section, using the TAPOUT_SEQUENCER values in the data file:
SequencerPool
{
SEQ_GEN_TAPOUT_OPRT1
{
     Source = Database
     Controller
     {
        SequencerType = Generation
        ReuseGap = True
        SequenceLength = 5
        DatabaseConnection = ifw.DataPool.Login
      }
}
SEQ_GEN_TAPOUT_OPRT2
{
     Source = Database
     Controller
     {
        SequencerType = Generation
        ReuseGap = True
        SequenceLength = 5
        DatabaseConnection = ifw.DataPool.Login
      }
}
See "Configuring Multiple Instances of Sequencers, Output Streams, or System Brands" for instructions.
Configuring Multiple Instances of Sequencers, Output Streams, or System Brands
To configure multiple instances of sequencers, output streams, or system brands:
-
Create the roaming configuration data file by running the following command:
RoamingConfigGen64 -l database_access_library -s server_name [-d database_name] -c operator_code [-o output_path] [-b base_path]
where:
-
database_access_library is the database access library; for example, liboci10g6312d.a for Oracle on AIX.
-
server_name specifies the name of the host machine running the Pipeline Manager database.
-
database_name specifies the database name of the Pipeline Manager database. The default is an empty string (' ').
-
operator_code specifies the home network operator code. The default is PORTL.
-
output_path specifies the output path for the data file generated by the RoamingConfigGen64 utility. By default, the data file is saved in the Pipeline_home/conf/ directory.
-
base_path specifies the base path to the directory for Transferred Account Procedure (TAP) and Near Real Time Roaming Data Exchange (NRTRDE) output files. The default path is Pipeline_home/data/outcollect/
For example:
RoamingConfigGen64 -l liboci10g6312d.so -s $ORACLE_SID -d ' ' -c EUR01 -o Pipeline_home/conf/ -b Pipeline_home/data/outcollect/
For more information about the RoamingConfigGen64 Perl script, see "RoamingConfigGen64" in BRM Configuring Pipeline Rating and Discounting.
-
-
Open the roaming registry file (Pipeline_home/conf/roaming.reg) file in a text editor.
-
Ensure that the SequencerPool or OUT_GenericStream template section or the SystemBrands template entry exists in the roaming registry file.
If the template for the roaming registry section or entry you want to instantiate does not exist, create a template for that registry section or entry in the file.
The following example shows the SequencerPool template section:
SequencerPool { SEQ_GEN_TAPOUT_XXX { Source = Database Controller { SequencerType = Generation ReuseGap = True SequenceLength = 5 DatabaseConnection = ifw.DataPool.Login } -
Add the instance-specific entries in the ifw.Instances.InstantiationName.InstanceSpecificEntries subsection. If the ifw.Instances registry section does not exist, you must add the section in the file.
The ifw.Instances registry section uses the following hierarchy:
Instances
{
   InstantiationName
    {
        BlockName  =TemplatePath
        DataFile =DataFilePath
      InstanceSpecificEntries
        {
            InstanceChangeName
            {
                Instance = InstanceValue
                UseColumn = ColumnName
                Mode = ModeValue
            }
        }
}
where:
-
InstantiationName is the descriptive name of the instantiation; for example, SEQ_GEN_TAPOUT.
-
TemplatePath is the template section or entry in the roaming registry file that is used to instantiate multiple registry sections or entries. For example, SequencerPool.SEQ_GEN_TAPOUT_XXX
-
DataFilePath is the path to the data file generated by the RoamingConfigGen64 utility; for example, Pipeline_home/conf/RoamingPartnerConf.dat.
-
InstanceChangeName is the descriptive name of the change required in each instance; for example, ModifyBlockName.
-
InstanceValue specifies whether to change the section name, entry name, or the value of the entry in each new instance created.
The valid values are:
-
[BlockName] specifies that the section name or entry name must be changed in each new instance.
-
[BlockValue] specifies that the value of the entry must be changed in each new instance.
-
RegistryEntry specifies the entry in the template section for which the value must be changed in each new instance; for example, Module.Recipient.
-
-
ColumnName is the column in the data file generated by the RoamingConfigGen64 utility that is used to change the section name, entry name, or the value of the entry in each instance according to the change mode. For example, TAPOUT_SEQUENCER.
-
ModeValue is the mode of changing (such as REPLACE) the section name, entry name, or the value of the entry in each instance using the column values in the data file generated by the RoamingConfigGen64 utility.
For more information on the Instances module, see "Instances" in BRM Configuring Pipeline Rating and Discounting.
-
-
Save and close the file.
-
Stop and restart Pipeline Manager.
Configuring the Data Pool
To configure data modules, you configure the ifw.DataPool registry subsection. This subsection uses the following hierarchy:
DataPool
{
    Module_identifier
    {
        ModuleName = Module_executable
        Module
        {
            Entry = value
The entries listed in Table 7-5 are a combination of required text and text that you define.
Table 7-5 Pipeline Registry DataPool Section Entries
| Entry | Description |
|---|---|
|
DataPool |
Section name. You must use DataPool. |
|
Module_identifier |
The descriptive module identifier. For example, in the sample registry, the module identifier for DAT_AccountBatch is CustomerData. You define these names. They are often referenced by other modules; for example, to connect to the DAT_AccountBatch module, the FCT_Account module points to CustomerData. |
|
ModuleName = Module_executable |
ModuleName is the entry. You must use ModuleName. Module_executable is the name of the module; for example, DAT_AccountBatch. This name is case-sensitive and must be spelled correctly; for example, you must use DAT_AccountBatch, not DAT_Accountbatch or DAT_Account_Batch. You can find the exact spelling and capitalization by looking at the executable name in the Pipeline_home/lib directory. |
|
Module |
Section name. You must use Module. |
|
Entry = value |
These are the registry entries; for example: Active = True |
This example shows a sample hierarchy:
DataPool
{
    CustomerData
    {
        ModuleName = DAT_AccountBatch
        Module
        {
            IntegrateConnection = ifw.DataPool.Login
Connecting a Module to a Database
You connect modules to the Pipeline Manager database and the BRM database through the Database Connect module. To do so:
-
Configure the Database Connect module in the ifw.DataPool section of the registry file. For information, see "Database Connect (DBC)" in BRM Configuring Pipeline Rating and Discounting.
You can configure three types of connections:
-
A connection to the Pipeline Manager database.
-
A connection to the BRM database.
-
A connection to the database login queue (used by the DAT_Listener module).
-
-
When configuring a module that needs a connection to the Pipeline Manager database, use one of the following registry entries:
-
DataConnection
-
IntegrateConnection
These entries do the same thing; they point to the ifw.DataPool.Login section. For example:
DataConnection = ifw.DataPool.Login
IntegrateConnection = ifw.DataPool.Login
See the documentation for each module to determine which entry to use.
Note:
Some modules can get data either from the database or from a file. If you configure the module to get data from a file, the module does not connect to the database. -
-
When configuring a module that needs a connection to the BRM database, configure one of the following registry entries:
-
DataConnection
-
InfranetConnection
These entries do the same thing; they point to the ifw.DataPool.LoginInfranet section. For example:
DataConnection = ifw.DataPool.LoginInfranet
InfranetConnection  = ifw.DataPool.LoginInfranet
-
Forcing a Database Reconnection
You can force the Database Connect module to reconnect to the Pipeline Manager database by using the following semaphore entry:
ifw.DataPool.Login.Module.Reconnect {}
This semaphore closes all open database connections and reconnects the Database Connect module to the Pipeline Manager database.
For information on how to create semaphore files, see "Updating Configuration Settings during Runtime by Using Semaphore Files".
Reloading Data into a Pipeline Manager Module
When you update data in the Pipeline Manager database, it is not automatically loaded into the modules. For example, if you change pricing data, EDRs continue to be rated by using the old pricing data until the new data is loaded into the data modules.
You use the Reload semaphore entry to reload data from the database into a module.
If the reload operation does not succeed, the module stops processing EDRs until data is loaded correctly. In some cases, you can configure how a module behaves if reloading fails:
-
To configure a module to immediately resume processing using the previous data, set its ReuseOnFailure startup registry entry to True. Not all modules have this registry entry. Check the module's reference documentation to determine whether its registry includes ReuseOnFailure.
-
To ensure that a module does not resume processing EDRs until the latest data is loaded, do not include ReuseOnFailure in the registry. This is the only option for modules that do not include this registry entry.
Using Business Parameter Settings from the BRM Database
You enable or disable optional BRM features and functionality by configuring business parameter settings, which are stored in /config/business_params objects in the BRM database. Pipeline Manager can determine whether these features and functionality are enabled by using the DAT_PortalConfig module, which retrieves and stores business parameter settings from the BRM database at pipeline initialization. Any other data modules that need a business parameter setting retrieve it directly from the DAT_PortalConfig module's internal memory.
Table 7-6 lists the data modules that use business parameter settings, the features that depend on the setting, and the /config/business_params parameter class and entry that each feature uses:
Table 7-6 Data Modules Using Business Parameter Settings
| Pipeline Manager module | Feature | Parameter class | /config/business_params entry |
|---|---|---|---|
|
DAT_AccountBatch |
Balance monitoring. See "About Balance Monitoring" in BRM Managing Accounts Receivable. |
multi_bal |
BalanceMonitoring |
|
DAT_BalanceBatch |
Validity end time for first-usage resources. See "About Restricting the End Time of Granted Resources that Start on First Usage" in BRM Setting Up Pricing and Rating. |
multi_bal |
RestrictResourceValidityToOffer SortValidityBy CreditThresholdChecking |
|
DAT_Discount |
Discount validity and exclusion rules. See "About Discount Exclusion Rules" in BRM Configuring Pipeline Rating and Discounting. |
billing |
ValidateDiscountDependency |
|
DAT_PriceModel |
Pricing model for pipeline rating. See "About Pipeline Rating" in BRM Configuring Pipeline Rating and Discounting. |
subscription |
TailormadeProductsSearch |
|
DAT_RatePlan |
Rate plan for pipeline rating. See "About Configuring Pipeline Rating" in BRM Configuring Pipeline Rating and Discounting. |
subscription |
TailormadeProductsSearch |
To set up Pipeline Manager to use business parameter settings from the BRM database, perform these tasks:
-
Configure the DAT_PortalConfig module in your registry file. This module must be listed in the registry file before any other data modules that are connected to it. See "DAT_PortalConfig" in BRM Configuring Pipeline Rating and Discounting.
-
Configure data modules to retrieve business parameter settings from DAT_PortalConfig. See "Connecting Pipeline Manager Modules to DAT_PortalConfig".
After Pipeline Manager starts, you can:
-
Verify that the entries loaded properly by printing the parameters that DAT_PortalConfig has stored in memory. See "Printing Business Parameter Settings Stored in DAT_PortalConfig Memory".
-
Refresh business parameter settings stored in the DAT_PortalConfig module's internal memory. See "Refreshing Business Parameter Settings Stored in DAT_PortalConfig Memory".
Connecting Pipeline Manager Modules to DAT_PortalConfig
You must connect all data modules in your system that need business parameter settings to DAT_PortalConfig. You connect a module to DAT_PortalConfig by using the module's PortalConfigDataModule registry entry. For example:
PortalConfigDataModule=ifw.DataPool.PortalConfigDataModule
Note:
You can use any name you want to identify the registry section that configures DAT_PortalConfig, but you must use that name exactly when configuring modules to point to that registry section.For example, the following entry, shown in bold, connects the DAT_Discount module to DAT_PortalConfig:
#-----------------------------------------------------------
# Discount Model Data Module
#-----------------------------------------------------------
DiscountModelDataModule
{
  ModuleName = DAT_Discount
  Module
  {
    InfranetConnection     = ifw.DataPool.LoginInfranet
    IntegrateConnection    = ifw.DataPool.Login
    PortalConfigDataModule = ifw.DataPool.PortalConfigDataModule
    AccountDataModule      = ifw.DataPool.CustomerData
  }
}
Printing Business Parameter Settings Stored in DAT_PortalConfig Memory
To print to a file the business parameter settings stored in the DAT_PortalConfig module's memory, use the CBPPrintData semaphore (see "DAT_PortalConfig" in BRM Configuring Pipeline Rating and Discounting). For example:
ifw.DataPool.PortalConfig.Module.CBPPrintData=[Path][Filename]
where:
-
Path specifies where to create the output file. By default, the file is created in the current directory.
-
Filename specifies the name for the output file. The default file name is DefaultCBPDataFile_timestamp.lst. The module appends a timestamp to the end of the file name to prevent the module from overwriting existing files.
For example:
ifw.DataPool.PortalConfig.Module.CBPPrintData=Portal/text/prntdata
When you submit the print semaphore, DAT_PortalConfig generates an output file that uses the format shown below:
<BusParamConfiguration>
  <BusParamConfigurationList>
    <ParamClass name="group_name">
      <Param>
        <Name>parameter_name</Name>
        <Type>data_type</Type>
        <Value>parameter_value</Value>
      </Param>
    </ParamClass>
  </BusParamConfigurationList>
</BusParamConfiguration>
For example, the following shows a sample output file for the billing parameter class:
<BusParamConfiguration>
  <BusParamConfigurationList>
    <ParamClass name="billing">
      <Param>
        <Name>rerate_during_billing</Name>
        <Type>INT</Type>
        <Value>0</Value>
      </Param>
      <Param>
        <Name>validate_discount_dependency</Name>
        <Type>INT</Type>
        <Value>0</Value>
      </Param>
      <Param>
        <Name>sub_bal_validity</Name>
        <Type>INT</Type>
        <Value>0</Value>
      </Param>
    </ParamClass>
  </BusParamConfigurationList>
</BusParamConfiguration>
For information about semaphores, see "Using Semaphore Files to Control Pipeline Manager".
Refreshing Business Parameter Settings Stored in DAT_PortalConfig Memory
You must refresh DAT_PortalConfig memory whenever you update the BalanceMonitoring, RestrictResourceValidityToOffer, or ValidateDiscountDependency business parameter settings in the BRM database.
You refresh the memory by using the CBPReload semaphore entry (see "DAT_PortalConfig" in BRM Configuring Pipeline Rating and Discounting). For example:
ifw.DataPool.PortalConfigDataModule.Module.CBPReload{}
For information about semaphores, see "Using Semaphore Files to Control Pipeline Manager".
Connecting a Pipeline Manager Module to Another Module
Most function modules connect to data modules to get configuration data. For example, the FCT_Account module requires a connection to the DAT_AccountBatch module. Also, some data modules connect to other data modules.
To connect one module to another, you configure a registry entry for the module that requires the connection. For example, to connect the FCT_Account module to the DAT_AccountBatch module, you enter this when you configure the FCT_Account module:
DataModule = ifw.DataPool.CustomerData
CustomerData identifies the DAT_AccountBatch module, which is configured in the registry like this:
#-----------------------------------------------------------
# Infranet Customer Data
#-----------------------------------------------------------
CustomerData
{
   ModuleName = DAT_AccountBatch
Note:
You can use any name you want to identify the registry section that configures a module, but you must use that name exactly when configuring modules to point to that registry section.A function module can connect to more than one data module. For example, the FCT_ApplyBalance module includes two data module connection entries:
DiscountDataModule = ifw.DataPool.DiscountModelDataModule
BalanceDataModule = ifw.DataPool.BalanceDataModule
In addition, function modules, like data modules, can require a connection to the Pipeline Manager or BRM database, for example:
DataConnection = ifw.DataPool.LoginInfranet
Configuring Pipeline Buffers
Pipeline Manager uses buffers to control the flow of data moving from one thread to another. For example, you insert a buffer block into the LOG module to temporarily store log data received from your thread before it is written by the logging thread to a file.
To insert a buffer, you configure the pipeline's or module's Buffer, InputBuffer, or OutputBuffer registry section. In each section, you specify the buffer's type and size. Pipeline Manager supports the following buffer types:
-
Rogue Wave buffers. See "Using Rogue Wave Buffers".
-
Block transfer buffers. See "Using Block Transfer Buffers on Solaris Systems".
-
Array buffers. See "Using Array Buffers on HP-UX Itanium and Solaris Systems".
Important:
When configuring buffers in multiple function pools, each buffer must have a unique name.Using Rogue Wave Buffers
By default, all buffers in Pipeline Manager are Rogue Wave buffers. These buffers are simple FIFO buffers of a configurable size. When a thread writes to or reads from a Rogue Wave buffer, it locks the entire buffer to ensure the integrity of the data. For example, if a Rogue Wave buffer has 15 containers, all 15 containers are locked when a thread accesses the buffer. Other threads must wait for the buffer to be unlocked before they can read or write data. For this reason, Rogue Wave buffers work best when only one thread will access the buffer.
Note:
If multiple threads will access the buffer, use a block transfer. See "Using Block Transfer Buffers on Solaris Systems".When a thread attempts to write to a full buffer or read from an empty buffer, the thread sleeps before attempting to access the buffer again.
To use a Rogue Wave buffer, you specify only the size of the buffer, by using the Size registry entry. This entry, listed in Table 7-7, goes in the Buffer, InputBuffer, or OutputBuffer registry section.
Table 7-7 Rogue Wave Buffers Registry Entry
| Registry entry | Description | Mandatory |
|---|---|---|
|
Size |
Specifies the size of the internal data buffer. |
Yes |
The following shows sample registry entries for a Rogue Wave buffer:
Buffer
{
    Size = 100
}
This registry example creates a Rogue Wave buffer with 100 containers.
Using Block Transfer Buffers on Solaris Systems
Block transfer buffers address performance and scalability issues that occur when two or more threads are accessing the same buffer. They are recommended for use on Solaris systems.
A block transfer buffer is a buffer that is separated into logical subsections (or blocks) with a configurable number of buffer containers. When a thread accesses a buffer container, it locks only those containers that are in the same block. This enables other threads to access other buffer containers in the remaining free blocks.
For example, a buffer has 15 containers separated into 3 logical blocks. A thread writing to a container in block B locks the block to prevent other threads from changing the container's value during the write operation. Threads dedicated to blocks A and C can still read and write data because those blocks are unlocked as shown in Figure 7-1.
Figure 7-1 Block Transfer Buffer Locking
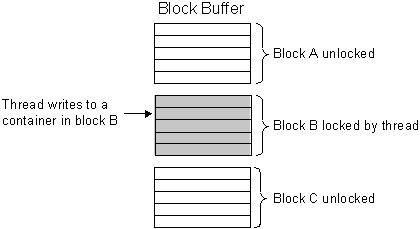
Description of ''Figure 7-1 Block Transfer Buffer Locking''
When a thread attempts to write to a full buffer or read from an empty buffer, the thread sleeps before attempting to access the buffer again.
To use a block transfer buffer, you use the buffer registry entries listed in Table 7-8. These entries go in the Buffer, InputBuffer, or OutputBuffer section.
Table 7-8 Solaris Block Transfer Buffers Registry Entries
| Registry entry | Description | Mandatory |
|---|---|---|
|
Size |
Specifies the size of the internal data buffer. |
Yes |
|
BlockTransfer |
Specifies whether the buffer operates in block transfer mode. True: The buffer operates in block transfer mode. False: The buffer does not operate in block transfer mode. If set to False, the pipeline ignores the BlockSize registry entry. The default is False. |
Yes |
|
BlockSize |
Specifies the size of each buffer block. |
Yes, if BlockSize is set to True. |
The following shows sample registry entries for a block transfer buffer:
Buffer
{
  Size = 4000
  BlockTransfer = True
  BlockSize = 500
}
This example specifies a buffer size of 4,000 containers and a block size of 500 containers. Therefore, the buffer has eight (4,000/500) blocks.
Using Array Buffers on HP-UX Itanium and Solaris Systems
Array buffers address performance and scalability issues that occur when two or more threads are accessing the same buffer. They are recommended for use on HP-UX Itanium and Solaris systems.
Array buffers are similar to Rogue Wave buffers, except threads never lock the buffer. To protect shared data, threads use a compare and swap (CAS) method that atomically compares a container's old and current values before writing new data. This enables a thread to read data from a buffer container, modify it, and write it back only if no other thread modified it in the meantime.
When writing data to an array buffer, a thread performs the following:
-
Reads the buffer container. The thread takes three arguments: the container's address, the container's current value, and the new value.
-
Updates the local variable with the new value.
-
Determines whether any other thread modified the container in the interim by comparing the container's current value with the value it initially read in step 1:
-
If the value has not changed, the thread writes the new value to the container.
-
If the value has changed, another thread modified the container during the write operation. The thread does not change the value and instead starts the process over at step 1.
-
When a thread attempts to write to a full buffer or read from an empty buffer, the thread spins for a specified number of times and then enables another thread to access the buffer before spinning again. You can specify the maximum number of times the thread yields before sleeping. The thread sleeps for a specified amount of time before starting the spin-and-yield process again.
For example, if the maximum number of spins is 2, the maximum number of yields is 2, and the sleep time is 10 milliseconds, the thread performs the following while waiting for a buffer container to become available:
-
Spins 2 times.
-
Yields to another thread.
-
Spins 2 times.
-
Yields to another thread.
-
Sleeps for 10 milliseconds.
-
Starts over at step 1.
To use an array buffer, you use the buffer registry entries listed in Table 7-9. These entries go in the Buffer, InputBuffer, or OutputBuffer section.
Table 7-9 Solaris Array Buffers Registry Entries
| Registry entry | Description | Mandatory |
|---|---|---|
|
Size |
Specifies the size of the internal data buffer. |
Yes |
|
ArrayType |
Specifies whether the buffer is an array buffer. True: The buffer is an array buffer. False: The buffer is not an array buffer. If set to False, the pipeline ignores the SpinCount, YieldCount, and SleepTimeMilliSec registry entries. The default is False. |
Yes |
|
SpinCount |
Specifies the maximum number of times the thread spins while waiting for a buffer container to become available. |
No |
|
YieldCount |
Specifies the maximum number of times a thread yields to another thread before the thread starts a sleep cycle. |
No |
|
SleepTimeMilliSec |
Specifies how long the thread sleeps, in milliseconds, before trying to access the buffer again. |
No |
The following shows sample registry entries for an array buffer:
Buffer
{
  Size = 100
  ArrayType = True
  SpinCount = 100
  YieldCount = 100
  SleepTimeMilliSec = 10
}
Using Semaphore Files to Control Pipeline Manager
You use semaphore files to configure and control Pipeline Manager during runtime. They enable you to perform business tasks regularly without having to stop and restart the pipeline. For example, you can use semaphore files to stop a module or to reload data from the database.
The Controller checks for new semaphore files to process at a regular interval. You configure where and how often the Controller checks for new semaphore files by using the Semaphore and ProcessLoopTimeout registry entries. See "Controller" in BRM Configuring Pipeline Rating and Discounting.
When the Controller finds a semaphore file, it:
-
Prevents new transactions from being created.
-
Finishes processing all open transactions in the framework.
-
Stops the pipeline framework.
-
Loads the semaphore file into memory.
-
Changes the specified configuration settings and/or executes the specified semaphores.
-
Logs any processing errors in the process.log file.
-
Renames or deletes the semaphore file from the directory.
You configure the Controller to rename or delete semaphore files by using the RetainFiles semaphore entry.
-
Stops and restarts the pipeline framework.
For information on creating semaphore files, see "Updating Configuration Settings during Runtime by Using Semaphore Files".
Updating Configuration Settings during Runtime by Using Semaphore Files
To change the Pipeline Manager configuration during runtime, you must:
-
Specify where and how often the Controller checks for semaphore files. See "Configuring Where and How Often the Controller Checks for Semaphore Files".
Note:
You perform this procedure only once, when you first configure your registry file. -
Create your semaphore files. See "Procedure for Updating Configuration Settings".
Pipeline Manager includes a set of Perl scripts, and associated semaphore files, that you can use to for system administration tasks. See "Using Perl Scripts to Administer Pipeline Manager".
Configuring Where and How Often the Controller Checks for Semaphore Files
You use the following registry entries in Table 7-10 to specify where and how often the Controller checks for semaphore files:
Table 7-10 Controller Configuration Registry Entries
| Semaphore | Value | Description | Mandatory |
|---|---|---|---|
|
ifw.ProcessLoopTimeout |
Integer |
Specifies the interval, in seconds, between polling for a new semaphore file. Note: This parameter controls the overall event loop, which includes looking for semaphore files. |
Yes |
|
ifw.Semaphore.FilePath |
String |
Specifies the directory where the Controller checks for semaphore files. |
Yes |
|
ifw.Semaphore.FileName |
String |
Specifies the name of the semaphore file. |
Yes |
|
ifw.Semaphore.RetainFiles |
True False |
Specifies whether semaphore files are deleted or saved after they are processed.
The default is False. |
No |
Sample Registry Entries
ifw
{
    ...
    ProcessLoopTimeout = 30
    ...
    Semaphore
    {
        FilePath = /opt/ifw/semaphores
        FileName = semaphore.reg
        RetainFiles = True
    ...
    {
}
Procedure for Updating Configuration Settings
To update configuration settings during runtime:
-
Create a semaphore file using the file name specified in the registry file. (The examples in this chapter use semaphore.reg.)
-
Add new configuration or semaphore entries to the file. See "Semaphore File Syntax".
Note:
The maximum number of entries you can add is 10000. -
Copy the semaphore file to the semaphore directory.
Important:
-
Some settings in the registry file cannot be configured by using semaphore files. For a list of commands that can be submitted by using semaphores for a particular module, see the Semaphore file entries section in the documentation for the module.
-
Before you submit a semaphore to Pipeline Manager, be sure that Pipeline Manager has finished starting up. (It displays the message Ready for processing.) If a semaphore file is submitted when Pipeline Manager is still starting, the system renames the semaphore file, logs a message that the semaphore file was renamed, and ignores the renamed file. The file is left in the semaphore input directory. To execute the semaphore after the system completes startup, rename the file manually.
-
If a pipeline fails to process an update semaphore, the pipeline stops. To start it again, you must send another semaphore. See "Starting and Stopping Individual Pipelines".
-
Semaphore File Syntax
Semaphore commands use one of these formats:
-
Key-value pair format, such as LoadZoneDescription = True. These semaphore commands require a value.
Note:
The semaphore command fails if you do not supply a value. -
Semaphore entry { } format, such as Reload{}.
The commands in the semaphore file can be expressed in a nested hierarchy format or in a flattened syntax that uses periods to delimit nested sections. The syntax of a command reflects the hierarchical structure of the registry.
Important:
You must specify the full path for the command when using either the hierarchy or the flattened format.The following examples show how to set the process log file name by using the hierarchy and flattened formats.
Hierarchy Format
ifw
{
    ProcessLog
    {
        Module
        {
            ITO
            {
                 FileName = process
            }
        }
    }
}
Flattened Format
ifw.ProcessLog.Module.ITO.FileName = process
Though registry files can vary in structure, commands for each type of module follow a similar pattern. For function modules, the syntax follows this pattern (shown in flattened format):
ifw.Pipelines.Pipeline_Name.Functions.Function_pool_name.
FunctionPool.Module_identifier.Module.Entry = Value
For example:
ifw.Pipelines.ALL_RATE.Functions.Processing.FunctionPool.
Aggregate.Module.Active = False
For data modules, the syntax is:
ifw.DataPool.Module_identifier.Module.Entry = Value
For example:
ifw.DataPool.ZoneDataModule.Module.ZoneModels.
ZM_MOBILE = /data9/INTEGRATE/test/config/ZM_MOBILE-new.dat
You can specify multiple commands in one semaphore file by placing each command on a separate line. For example:
ifw.Pipelines.ALL_RATE.Active = True
ifw.ProcessLog.Module.ITO.FileName = process
Important:
Avoid using multi-command semaphore files unless you are sure that each command works without error when submitted in a single-command semaphore file. For more information, see "Semaphore Error Messages".Semaphore Error Messages
When a semaphore command is executed correctly, the registry entry is removed and a success message is written to the process log.
If no command in a semaphore file can be executed correctly, the warning message Semaphore was not processed; check spelling is written to the process log.
Note:
When processing a multi-command semaphore file, if at least one command in the file runs successfully, the pipeline does not log a message indicating that a command has failed.For more information on the process log, see "About Pipeline Manager Log Files".
Using Events to Start External Programs
To use pipeline events to trigger external programs, use the Event Handler. See "About the Event Handler" in BRM Concepts.
Note:
-
See the module reference documentation to find the events that a module sends. For example, to find the events that the DAT_ExchangeRate module uses, see "DAT_ExchangeRate" in BRM Configuring Pipeline Rating and Discounting.
Events are named like this:
-
EVT_RELOAD_SUCCESSFUL
-
EVT_RELOAD_FAILED
-
-
You can configure modules to send custom events to the Event Handler by using iScripts. For information, see "Creating iScripts and iRules" in BRM Developer's Guide.
About Mapping Events to Programs
You map events to programs by using the registry file's Event subsection.
The Events subsection specifies the module and event combinations can trigger an external program. Use the following syntax to create the Events subsection:
Events
{
    ModuleSendingEvent
    {
        EventName = Action
        EventName = Action
        TimeToWait = WaitValue
    }
}
where:
-
ModuleSendingEvent specifies the registry name of the module that sends the event to the Event Handler. Add an entry for each module that can trigger an external program.
You can use wild cards (*) to specify multiple modules. For example, use ifw.Pipelines.* to specify all modules nested under the ifw.Pipelines section of the registry file.
-
EventName specifies the event that triggers an external program. Add an entry for each event that triggers an external program.
-
Action specifies the external program that is triggered by the event. Specify both the path and file name of the script or program.
-
WaitValue specifies the time in seconds that the Event Handler waits for the external program to terminate. See "Controlling External Programs".
For example:
Events
{
    ifw.DataPool.Customer.Module
    {
        EVT_ReloadSuccess = ./script/script_1
        EVT_ReloadFailed = ./script/script_2
        TimeToWait = 30
    }
}
Note:
You cannot change this event-to-program mapping while Pipeline Manager is running. To map an event to a new script or change the existing mapping, you must edit the registry file and stop and restart Pipeline Manager.Controlling External Programs
Use the TimeToWait registry entry to specify the time in seconds that the Event Handler waits for the external program to terminate. If the program does not terminate before the TimeToWait period ends, the external program is killed.
If an event is received while an external program is running, the event is queued and is started after the running program terminates.
When this option is specified, only one external program can be run at a time.
If TimeToWait is not enabled, the EventHandler does not wait for the external program to finish its job. Instead it starts new external programs depending on the events in the queue.
By default, no TimeToWait value is assumed.
About Running External Programs
The Event Handler can run only one external program at a time. If the Event Handler receives an event while an external program is running, it queues the event until the program terminates.
Troubleshooting Event Handling
You can log the events that a data module receives. This enables you to test event logging. To do so, set the data module's LogEvents registry entry to True. By default, event logging is off.
Note:
Not all data module support event logging. See the documentation for the data module that you are configuring.About Pipeline Manager Transactions
Pipeline Manager uses transactional processing to ensure data integrity. When a system crash or power outage occurs, Pipeline Manager performs an automatic rollback and continues processing. Usually, the last CDR file that was being processed is rolled back and processed again.
In some cases, Pipeline Manager recognizes an inconsistent state of the file system; for example, an output file is missing. In these cases, Pipeline Manager does not restart and gives an error message.
Note:
A transaction can consist of one CDR file or multiple CDR files. You define the number of CDR files in a transaction by configuring the UnitsPerTransaction entry. For information, see "Combining Multiple CDR Files into One Transaction".Pipeline Manager uses two components for transaction handling:
-
The Transaction Manager handles transactions for a single pipeline. See "About the Transaction Manager".
-
The Transaction ID Controller manages transaction IDs for the entire Pipeline Manager instance. See "Configuring the Transaction ID Controller".
About the Transaction Manager
The Transaction Manager is a mandatory pipeline component that coordinates the state of all transactions in one pipeline.
The Transaction Manager performs the following functions:
-
Monitors a transaction's state. Transactions move through these three states:
-
Opened (started)
-
Prepared
-
Closed (ended)
-
-
Persists state information to the binary log file. For information, see "About Transaction Log Files".
When a transaction is in progress, the following occurs:
-
The Input Controller notifies the Transaction Manager that a transaction started.
-
The Transaction Manager requests a transaction ID number from the Transaction ID Controller. See "Configuring the Transaction ID Controller".
-
The Transaction ID Controller issues the next ID number to the Transaction Manager.
-
The Input Controller, function modules, and Output Controller process the input stream and notify the Transaction Manager if any of the following are required:
-
Rollback. If a rollback is required, the Transaction Manager rolls back the transaction and undoes all changes.
Note:
When redo is enabled, the Transaction Manager also cancels any newly opened transactions. -
Cancel. If a cancel is required, the Transaction Manager undoes all changes made during the transaction.
-
-
The Output Controller notifies the Transaction Manager that the transaction ended.
-
The Transaction Manager requests the Input Controller, function modules, and Output Controller to prepare for a commit of the transaction.
-
The Transaction Manager performs one of the following:
-
If all of the modules prepare successfully, the Transaction Manager commits the transaction.
-
If the prepare fails, the Transaction Manager rolls back the transaction.
-
Two special types of EDRs are used for managing transactions:
-
Before EDRs are processed, a begin transaction EDR is created. This tells Pipeline Manager which EDRs are part of the transaction.
-
After all EDRs are processed, an end transaction EDR is created. When this EDR arrives at the output, the transaction can be committed.
You configure your Transaction Managers by using the TransactionManager section of the registry file. For information, see "Transaction Manager" in BRM Configuring Pipeline Rating and Discounting.
About Cancelling Transactions When a Rollback Occurs
Use the Transaction Manager RedoEnabled registry entry to cancel all open transactions if a rollback occurs.
When a rollback is demanded, the Transaction Manager performs the following:
-
Disables the creation of new transactions.
-
Rolls back all attached modules.
-
Cancels any open transactions.
-
Re-enables the creation of new transactions.
When RedoEnabled is disabled, the Transaction Manager only rolls back the attached modules.
About Transaction Log Files
All dynamic data, for example, aggregation results, call assembling records, and duplicate check data, is always kept in main memory. In addition, to ensure transactional integrity, data in memory has to be made persistent. To do so, transactional modules write data to work files. Data in the work files is used to record the status of the transaction.
Each Transaction Manager generates its own binary log file, which stores information about a pipeline's currently open transactions. The Transaction Manager writes information to the file when a transaction starts or changes state and deletes the transaction from the file when it ends. Thus, the file's size changes constantly.
The binary log file stores the following for each open transaction:
-
The transaction's starting timestamp.
-
Transaction ID number.
-
The list of CDR files that make up the transaction.
-
Whether any of the following occurred:
-
Rollback
-
Cancel
-
Redo
-
Prepare
-
You should regularly back up binary log files. These files are needed when you stop and restart Pipeline Manager to resolve any open transactions at the time of failure.
Note:
When you stop and restart Pipeline Manager after an ungraceful shutdown, the Transaction Manager commits all prepared transactions and rolls back all other uncommitted transactions.Configuring the Transaction ID Controller
You configure the Transaction ID Controller by using the ifw.TransactionIDController section of the registry file. For information, see "About the Transaction ID Controller" in BRM Concepts and "Transaction ID Controller" in BRM Configuring Pipeline Rating and Discounting.
About Storing IDs in Cache
When the Transaction ID Controller must cache a block of IDs, it does the following:
-
Accesses the state file or table for the increment value and last issued ID number.
-
Caches the next block of transaction IDs.
For example, if the last ID is 200 and the increment value is 100, the Transaction ID Controller caches IDs 201 through 300.
-
Resets the last ID number in the state table or file.
In the example above, the Transaction ID Controller sets the last ID to 300.
You configure the number of IDs stored in cache by using the Increment registry entry.
About the Transaction ID State File and Table
The state file or table stores the last issued transaction ID number and the configured increment value. You configure where the data is stored by using the Source registry entry.
When you configure the Transaction ID Controller to use a file, the data is stored in the file and directory you specify in the registry.
When you configure the Transaction ID Controller to use the database, the data is stored in the IFW_TAM table, which is automatically created in the Pipeline Manager database by the Pipeline Manager installer.
Caution:
If you configure the Transaction ID Controller to store IDs in the database, only one Pipeline Manager instance at a time can access the Pipeline Manager database. This can reduce transaction processing performance.You should back up the transaction ID state file or table regularly. This state information is needed to ensure that your system continues to create unique, system-wide IDs when you stop and restart Pipeline Manager.
Configuring Sequence Checking
Sequence checking ensures that a CDR file is not processed more than once. You configure your Sequencers by using the ifw.SequencerPool registry entries, and you assign Sequencers to pipelines by using the pipeline Output registry entries. See "About the Sequencer" in BRM Concepts.
Sequence Numbers in the Header Record
The Header record in the EDR container includes two fields for sequence numbers:
-
SEQUENCE_NUMBER. This is a unique reference that identifies each file. It indicates the file number of the specific file type, starting at 1 and incrementing by one for each new file of that type sent. Separate sequence numbering must be used for test and chargeable data. Having reached the maximum value (999999), the number restarts at 1.
Note:
In the case of retransmission, this number is not incremented. -
ORIGIN_SEQUENCE_NUMBER. This is the original file sequence number as generated the first time. It is the same as SEQUENCE_NUMBER, but is never changed. It is used as a reference to the original file, if any processor has changed the file sequence number.
Deciding Whether to Use Sequencers
You should add Sequencers to your system when:
-
You want to check for duplicate CDR files.
-
Your CDR software does not automatically generate sequence numbers.
-
Your pipelines split CDR files into multiple output files.
About Sequence Checking
When performing sequence checking, the Sequencer:
-
Receives the CDR file from the input module.
-
Checks for duplicates by comparing the sequence number in the stream's header with the sequence numbers in the state file or state table. See "Sequencer Log Files and Log Tables".
-
When the number is a duplicate, the Sequencer rejects the CDR file and rolls back the transaction.
-
When the number is not a duplicate, it passes the transaction directly to the Output Collection module. See "About Configuring the Output Section in the Registry" in BRM Configuring Pipeline Rating and Discounting.
-
-
Checks for gaps in sequence numbers by comparing the sequence number in the stream's header with the last sequence number in the state file or state table. If the sequence number is more than one digit greater than the previous number, a gap is identified. The Sequencer logs a message and stores the unused number in the state file or state table. See "Sequencer State Files and State Tables".
Note:
By default, the Sequencer:-
Enables gaps in sequence numbers (caused by canceled or rolled back transactions). You can direct the Sequencer to reuse these number gaps by using the Controller.ReuseGap registry entry.
-
Does not start the gap in sequence numbers from 0. For example, if the first sequence number is 3, the Sequencer does not start the gap for the skipped sequence numbers from 0 (that is, gap of 1, 2). You can direct the Sequencer to add a gap for the skipped sequence numbers starting from 0 by using the Controller.UseGapAtStartup registry entry.
See "Sequencer" in BRM Configuring Pipeline Rating and Discounting.
-
To configure the Sequencer to perform sequence checking, set the SequencerType registry entry to Check.
About Sequence Generation
When performing sequence generation, the Sequencer:
-
Receives the CDR file from the input module.
-
Assigns the next sequence number to the output file. To obtain this number, the Sequencer reads the last generated sequence number in the state file or state table and increments it by one.
This process continues for each CDR file until the maximum value is reached. For information, see "About Maximum and Minimum Sequence Numbers".
Note:
If you configure the Sequencer to reuse gap numbers, it assigns unused gap numbers to the output file before assigning new sequence numbers. See "Sequencer" in BRM Configuring Pipeline Rating and DiscountingTo configure the Sequencer to perform sequence generation, set the SequencerType registry entry to Generation.
About Maximum and Minimum Sequence Numbers
The Sequencer generates numbers by starting at the configured minimum value and then incrementing by one until it reaches the configured maximum value. After the Sequencer uses the maximum value, you must manually reset the sequence number to the minimum value.
For example, if the minimum value is 1 and the maximum value is 10,000, the Sequencer assigns 1 to the first output file, 2 to the second output file, 3 to the third output file, and so on. When the sequencer assigns 10,000 to the ten-thousandth output file, you must manually reset the sequence number to 1 by changing the following fields in the IFW_SEQCHECK table:
-
Set the seq_orignumber field to 0.
-
Set the seq_gapnumbers field to -1.
Important:
To prevent the Sequencer from incorrectly rejecting files as duplicates after you manually reset the sequence number to the minimum value, remove all the rows from the IFW_SEQLOG_IN table.To configure the maximum and minimum values, do one of the following:
-
State files. Edit the MaxSequenceNumber and MinSequenceNumber entries in the state file. The default minimum value is 0; the default maximum value is 99999.
-
State tables. Use Pricing Center to set these values as described for defining a sequence generation in BRM Pricing Center Online Help).
About Recycled EDRs
CDR input files sometimes contain nonvalid EDRs, which are rejected by the pipeline. When you recycle the input file through a pipeline to process any rejected EDRs, the file's original sequence number is no longer correct. The Sequencer automatically assigns new sequence numbers to recycled files to prevent them from being rejected as duplicates.
For more information about recycling, see "About Standard Recycling" in PI and "Recycling EDRs in Pipeline-Only Systems" in BRM Configuring Pipeline Rating and Discounting.
About Sequencer Files and Tables
Each Sequencer generates its own state and logging information, which can be stored in files or tables. You configure where state and logging information is stored by using the registry file. For information, see "Sequencer" in BRM Configuring Pipeline Rating and Discounting.
Important:
When you store state and logging information in files, the Sequencer checks for duplicates by comparing the current sequence number against the last checked sequence number only. When you use tables, the Sequencer compares the number against all previously checked sequence numbers. For this reason, Oracle recommends using tables for production systems and using files only when testing your system in a development environment.When you configure Sequencers to store logging information in files, all logging and state data is stored in the file and directory you specify in the registry file.
When you configure Sequencers to use tables, all logging and state data is stored in the database tables listed in Table 7-11, which are automatically created by the Pipeline Manager installer:
Table 7-11 Sequencer Logging and State Data Database Tables
| Table name | Description |
|---|---|
|
IFW_PIPELINE |
Stores information about pipelines. |
|
IFW_SEQCHECK |
Stores the state of the Sequencer. |
|
IFW_SEQLOG_OUT |
Stores sequence generation log information. |
|
IFW_SEQLOG_IN |
Stores sequence checking log information. |
You use Pricing Center to provide input to IFW_SEQCHECK and to view log information stored in IFW_SEQLOG_OUT and IFW_SEQLOG_IN. See Pricing Center Help.
Sequencer State Files and State Tables
Sequencer state files and state tables store the following information:
-
The last generated sequence number
-
The last checked sequence number
-
Maximum and minimum sequence numbers
You should back up state files and state tables periodically. This information is needed to ensure that your system does not process duplicate CDR files when you stop and restart Pipeline Manager.
Sequencer Log Files and Log Tables
Sequencer log files and log tables store an entry for each sequence number that is checked or generated.
Important:
When the Sequencer reaches the maximum generated sequence number, delete all log entries. Otherwise, your log will contain duplicates. For more information, see "About Maximum and Minimum Sequence Numbers".Tip:
Log files and log tables grow indefinitely, so you should trim them periodically to reduce disk usage.Checking and Generating Sequence Numbers
You can use Sequencers to configure pipelines to check for duplicate CDR input files and to check for gaps in sequence numbers. You can also configure pipelines to use Sequencers to generate sequence numbers. For information, see "Configuring Sequence Checking".
To enable sequence checking or sequence generation in a pipeline, perform the following tasks:
-
Configure your Sequencers by editing the SequencerPool section of the registry file. Ensure you specify the following:
-
The Sequencer name.
-
Whether Sequencer data is stored in a database table or files.
-
How to connect to the database or the path and file name of the Sequencer files.
-
Whether the Sequencer performs sequence checking or sequence generation. Each Sequencer performs only one of these functions.
For information, see "Sequencer" in BRM Configuring Pipeline Rating and Discounting.
-
-
For sequence generation, set minimum and maximum sequence numbers by doing one of the following:
-
If you configured the Sequencer to store data in a database, use Pricing Center to set these values. See Pricing Center Help.
-
If you configured the Sequencer to store data in files, set the MaxSequenceNumber and MinSequenceNumber entries in the Sequencer state file. For information, see "About Maximum and Minimum Sequence Numbers".
Note:
The default minimum value is 0, and the default maximum value is 99999.
-
-
Assign Sequencers to pipeline output streams:
-
To assign a sequence checker to an output stream, edit the Sequencer registry entry in the Pipeline Output Controller. Specify the name of the Sequencer assigned to the output stream:
Output
{
    ...
    Sequencer = SequenceCheckerName
    ...
}
For information, see "Output Controller" in BRM Configuring Pipeline Rating and Discounting.
-
To assign a sequence generator to an output stream, edit the Sequencer registry entry in the output module. Specify the name of the Sequencer assigned to the output stream:
OutputStreamName
{
    ModuleName = OUT_GenericStream
    Module
    {
        Sequencer = SequenceGeneratorName
    }
}
For information, see "OUT_GenericStream" in BRM Configuring Pipeline Rating and Discounting.
-
Configuring the NET_EM Module for Real-Time Processing
You can use Pipeline Manager for real-time discounting, real-time zoning, and real-time rerating. See "About the Pipeline Manager System Architecture" in BRM Concepts.
The NET_EM module provides a link between the Connection Manager (CM) and the pipelines. You configure the NET_EM module in the data pool.
To configure the NET_EM module, you configure connection information such as the port number and threads, and you configure the OpcodeName section for each type of real-time processing: discounting, rerating, and zoning.
In this example, you configure the real-time discounting by specifying the PCM_OP_RATE_DISCOUNT_EVENT opcode:
ifw
{
...
    DataPool
    {
        RealtimePipeline
        {
            ModuleName = NET_EM
            Module
            {
                ThreadPool
                {
                    Port = 14579
                    UnixSockFile = /tmp/rerating_em_port
                    Threads = 2
                }
                DiscountOpcode
                {
                    OpcodeName = PCM_OP_RATE_DISCOUNT_EVENT
                    NumberOfRTPipelines = 2
                    PipelineName = DiscountPipeline
                }
            }
        }
    }
}
Each NET_EM module can perform one type of processing; for example, discounting, rerating, or zoning. You must configure a separate instance of Pipeline Manager for each NET_EM module.
You can configure multiple instances of the same type of NET_EM processing, for example, multiple rerating Pipeline Manager instances. You can then configure the CM to point to all the NET_EM modules. When multiple rerating pipeline instances are configured, the NET_EM module routes rerate requests to whichever of these pipeline instances is available.
To configure the NET_EM module:
-
Configure the NET_EM module in the registry. See "Configuring the NET_EM Module".
-
Configure the CM to send data to the NET_EM module. See "Configuring the CM to Send Real-Time Requests to the NET_EM Module".
Configuring the NET_EM Module
The NET_EM module receives various types of requests from the CM and routes the requests to the appropriate pipeline. See "NET_EM" in BRM Configuring Pipeline Rating and Discounting.
Specifying the Type of NET_EM Opcode Processing
To specify the type of processing the NET_EM module is used for, use the OpcodeName entry.
For real-time discounting, use:
OpcodeName = PCM_OP_RATE_DISCOUNT_EVENT
For real-time zoning, use:
OpcodeName = PCM_OP_RATE_GET_ZONEMAP_INFO
For real-time rerating, use:
OpcodeName = PCM_OP_RATE_PIPELINE_EVENT
Configuring the CM to Send Real-Time Requests to the NET_EM Module
To configure the CM to send rerate requests to the NET_EM module:
-
Open the CM configuration file (BRM_home/sys/cm/pin.conf).
-
For real-time rerating, ensure the following entry is uncommented:
- cm fm_module BRM_home/lib/fm_rerate.so fm_rerate_config - pin
-
Edit the discounting em_group entry:
- cm em_group em_type Opcode_name
where:
-
em_type is the type of real-time processing; for example, discounting, zoning, or rerating. You can enter any string up to 15 characters. This entry must match the entry in the em_pointer entry.
-
Opcode_name is the opcode used.
For discounting, use:
- cm em_group discounting PCM_OP_RATE_DISCOUNT_EVENT
For zoning, use:
- cm em_group zoning PCM_OP_RATE_GET_ZONEMAP_INFO
For rerating, use:
- cm em_group rating PCM_OP_RATE_PIPELINE_EVENT
-
-
Edit the discounting em_pointer entry to match your environment, for example:
- cm em_pointer discounting ip cm_host 11945
- cm em_pointer zoning ip cm_host 11945
- cm em_pointer rating ip cm_host 11945
Instructions for this entry are included in the file.
You can enter multiple em_pointer entries. If the first NET_EM module is unavailable, the CM connects to a different NET_EM module.
Note:
To run multiple NET_EM instances, you must run multiple instances of Pipeline Manager. You use only one NET_EM module for each instance of Pipeline Manager. -
Save the file.
-
Stop and restart the CM. See "Starting and Stopping the BRM System".
About Pipeline Manager Log Files
The log module is an optional pipeline component that generates and manages your system log files, which consist of the logs listed in Table 7-12:
Table 7-12 Pipeline Manager Log Files
| Log file | Description |
|---|---|
|
Process log |
Contains general system messages for the pipeline framework, such as startup, shutdown, version numbers of modules, and semaphore file messages. The module generates one process log for the entire pipeline framework. |
|
Pipeline log |
Contains messages for one pipeline, such as the opening and closing of batch files, the number of processed EDRs, and statistics. The module generates one pipeline log file per pipeline. |
|
Stream log |
Contains detailed messages for one output stream. The module generates one stream log file per input stream. It contains all single error messages for the stream and event; for example, zone data not found. Note: The number of stream log files grows indefinitely, so you should delete them periodically to save disk space. |
You configure your system log files by editing the registry file. You create a set of log module registry entries for each type of log file you want your system to generate. For example, to configure your system to generate all three system log files, you create one set of entries for the process log, one set for the pipeline log, and one set for the stream log.
-
You configure the process log in the ProcessLog registry section.
-
You configure the pipeline log in the PipelineLog registry section for each pipeline.
-
You configure the stream log in the OutputLog registry section for each pipeline.
For information, see "LOG" in BRM Configuring Pipeline Rating and Discounting.
In addition to the log files handled by the log module:
-
All processed sequence numbers of the EDR streams are logged in the sequence log file. See "Sequencer Log Files and Log Tables".
-
All processed transactions are logged in the transaction log file. See "About Transaction Log Files".
Pipeline Manager Log File Registry Entries
The registry entries listed in Table 7-13 control Pipeline Manager log files.
Table 7-13 Pipeline Manager Log File Registry Entries
| Entry | Module | Log file | Description |
|---|---|---|---|
|
BalanceLockStatusLog |
DAT_BalanceBatch |
Process log |
Specifies that when an event transaction is locked by an EDR transaction, it is logged to the Process log. |
|
BinaryLogFileName |
Transaction Manager |
User specified |
Specifies the path and file name of the binary log file, which is used to persist and restore open transactions. |
|
InfranetPool |
DAT_ConnectionPool |
Specifies whether to log debug messages. |
|
|
LogEvents |
DAT_AccountBatch DAT_BalanceBatch DAT_Listener DAT_PriceModel DAT_Rateplan DAT_Recycle DAT_ResubmitBatch |
Pipeline log |
Specifies whether received events should be written to a log file. Use this entry to troubleshoot Pipeline Manager event handling. |
|
Logging |
FCT_Opcode |
Pipeline log |
Logs each opcode called from the processing pipeline. |
|
LogTestResults |
FCT_Suspense |
Determines whether the results of test recycling are logged. |
|
|
LogTransactions |
DAT_BalanceBatch |
Process log |
Specifies if the balances affected during the CDR processing are logged. |
|
LogZoneModelNotFoundEntries |
FCT_USC_Map |
Stream log |
Specifies that all log entries in INF_NO_USC_MAPPING_ENTRY are logged into the Stream log. |
|
RecycleLog |
FCT_Recycle |
Specifies the log file parameters. |
|
|
WriteToLogEnabled |
Transaction Manager |
Pipeline log |
Specifies whether the Transaction Manager writes status information to the pipeline log file. |
About Error Message Files
You use error message files to define the errors generated by your pipeline modules. All modules have their own error message file (.msg), which is installed by default in the Pipeline_home/etc directory.
The default error message files already define all of the module error codes, but you can add custom error codes or change the existing definitions by editing the files.
Error message file entries use the following format:
[messageName] | [messageText] | [messageNumber]
where:
-
messageName specifies the module error code. For example, ERR_WRITE_FILE.
-
messageText specifies the message text to write to the log file.
-
messageNumber specifies the error number to write to the log file. The default is 0.
For example, the DAT_AccountBatch module uses the Pipeline_home/etc/DAT_AccountBatch.msg message file. This file includes the following entries:
ERR_LISTENER_NOT_FOUND    | Listener '%s' not found.|30013
INF_STARTED_LOADING       | Started loading account data.|30024
INF_ENTRIES_LOADED        | %s %s loaded.|30025
INF_FINISHED_LOADING      | Finished loading account data.|30026
Note:
The LOG module ignores comments, which start with a pound symbol (#).About Log File Contents
The LOG module logs the following information to the system log file in ITO format:
-
Date
-
Time
-
Node
-
Application name
-
Message group
-
Severity
-
Error number
-
Text
Note:
All fields are separated by blanks.
For example:
03.10.2002 08:18:42 system ifw INTEGRATE NORMAL
00000 - No registry entry 'MultiThreaded(default is true)' found.
Troubleshooting Pipeline Modules
You can troubleshoot problems in the pipeline modules by writing the contents of the EDRs generated by various pipeline modules into a log file. The file shows how each module accessed the EDR and the changes each module made to the EDR. You can read the log file to check if the pipeline modules processed the EDRs as expected and correct any problems you find.
Use the EdrTrace entry in the pipeline registry file to write the contents of the EDR to a file. You can configure EdrTrace to write the EDR contents to a file for specific modules that you want to debug. The EdrTrace entry includes the parameters listed in Table 7-14:
Table 7-14 EdrTrace Log File Registry Entries
| Entry | Description |
|---|---|
|
EDRTraceEnabled |
Enables or disables EDR trace:
The default is False. |
|
EdrTrace |
Specifies the EDR trace. |
|
TraceLog |
Specifies the following information about the EDR log file:
|
|
TraceStartPoint |
Specifies the pipeline module from which you want to start logging the EDR contents. This registry entry is mandatory. The default is Input.module. |
|
TraceEndPoint |
Specifies the pipeline module up to which you want to log the EDR contents. The default is Output.module. Important: If both the TraceStartPoint and TraceEndPoint registry entries are specified, the EDR log file contains changes from all the modules from TraceStartPoint to TraceEndPoint. If only TraceStartPoint is specified, the EDR log file contains changes from the module specified in that entry up to the Output module. To log EDR changes for only one module, TraceStartPoint and TraceEndPoint must specify the same module. |
Writing EDR Contents to a Log File
To write the contents of the EDR to a log file and use it to debug pipeline modules, include the EdrTrace entry by using the following syntax:
...
Output
{
...
  EdrTraceEnabled = value
  EdrTrace
  {
   TraceLog
   {
    FilePath = file_path
    FileName = file_name
    FilePrefix = prefix
    FileSuffix = suffix
   }
   TraceStartPoint = Functions.Processing.FunctionPool.start_module_name
   TraceEndPoint = Functions.Processing.FunctionPool.end_module_name
  }
}
where:
-
start_module_name is the user-defined name or label of the pipeline module from where the logging of the EDR contents starts.
-
end_module_name is the user-defined name or label of the last pipeline module for the logging of the EDR contents.
Using a Semaphore to Write EDR Contents to a File for Debugging
You can change the EDR trace by sending a semaphore to the Output Controller module at run time without stopping the pipeline. You can perform the following changes to the EdrTrace entry through a semaphore:
-
Enable or disable logging the EDR contents.
-
Change TraceStartPoint and TraceEndPoint for logging the EDR contents.
To change the EDR content logging at run time, send a semaphore with the following syntax:
ifw.Pipelines.pipeline_name.Output.EdrTrace
{
  TraceStartPoint = new_start_value
  TraceEndPoint = new_end_value
}
Sample EDR Content Log File
The following sample output of EdrTrace shows EDR contents from Input to Output modules:
=  =  =  =  B E G I N    T R A N S A C T I O N  =  =  =  =
ifw.Pipelines.ALL_RATE.Input : INTERNAL.STREAM_NAME :  : test2.edr : setString
ifw.Pipelines.ALL_RATE.Input : INTERNAL.TRANSACTION_ID : 0.0 : 4 : setDecimal
ifw.Pipelines.ALL_RATE.Functions.Processing.FunctionPool.UsageType.Module : INTERNAL.TRANSACTION_ID : 4 :  : getDecimal
ifw.Pipelines.ALL_RATE.Functions.Processing.FunctionPool.ApolloDiscountModule.Module : INTERNAL.TRANSACTION_ID : 4 :  : getDecimal
ifw.Pipelines.ALL_RATE.Functions.Processing.FunctionPool.ApolloApplyBalanceModule.Module : INTERNAL.TRANSACTION_ID : 4 :  : getDecim
al
ifw.Pipelines.ALL_RATE.Functions.Processing.FunctionPool.ServiceOutputSplit.Module : INTERNAL.TRANSACTION_ID : 4 :  : getDecimal
ifw.Pipelines.ALL_RATE.Functions.Processing.FunctionPool.ObjectCacheTypeOutputSplit.Module : INTERNAL.TRANSACTION_ID : 4 :  : getDec
imal
ifw.Pipelines.ALL_RATE.Functions.Processing.FunctionPool.Rejection.Module : INTERNAL.TRANSACTION_ID : 4 :  : getDecimal
ifw.Pipelines.ALL_RATE.Output : INTERNAL.TRANSACTION_ID : 4 :  : getDecimal
=  =  =  =  B E G I N    C O N T A I N E R  =  =  =  =
ifw.Pipelines.ALL_RATE.Input : INTERNAL.STREAM_NAME :  : test2.edr : setString
ifw.Pipelines.ALL_RATE.Input : INTERNAL.SEQ_CHECK : 0 : 1 : setLong
ifw.Pipelines.ALL_RATE.Functions.Processing.FunctionPool.PreSuspense.Module : INTERNAL.STREAM_NAME : test2.edr :  : getString
ifw.Pipelines.ALL_RATE.Output : INTERNAL.STREAM_NAME : test2.edr :  : getString
ifw.Pipelines.ALL_RATE.Output : INTERNAL.STREAM_NAME : test2.edr :  : getString
ifw.Pipelines.ALL_RATE.Output : INTERNAL.SEQ_GENERATION : 0 :  : getLong
ifw.Pipelines.ALL_RATE.Output : INTERNAL.OFFSET_GENERATION : 0 :  : getLong
=  =  =  =  C O N T A I N E R    H E A D E R  =  =  =  =
ifw.Pipelines.ALL_RATE.Input : HEADER.TRANSFER_CUTOFF_TIMESTAMP : 20061204000445 :  : getDate
ifw.Pipelines.ALL_RATE.Input : HEADER.IAC_LIST :  :  : getString
ifw.Pipelines.ALL_RATE.Input : HEADER.CC_LIST :  :  : getString
ifw.Pipelines.ALL_RATE.Input : HEADER.IAC_LIST : 00 : 00 : setString
ifw.Pipelines.ALL_RATE.Input : HEADER.IAC_LIST : 00 :  : getString
ifw.Pipelines.ALL_RATE.Input : HEADER.CC_LIST : 49 : 49 : setString
ifw.Pipelines.ALL_RATE.Input : HEADER.CC_LIST : 49 :  : getString
ifw.Pipelines.ALL_RATE.Functions.Processing.FunctionPool.PreSuspense.Module : HEADER.QUERYABLE_FIELDS_MAPPING :  :  : setString
ifw.Pipelines.ALL_RATE.Functions.Processing.FunctionPool.PreSuspense.Module : HEADER.CREATION_PROCESS : PREPROCESS_PIPELINE :  : get
String
ifw.Pipelines.ALL_RATE.Functions.Processing.FunctionPool.PreSuspense.Module : HEADER.BATCH_ID :  :  : getString
ifw.Pipelines.ALL_RATE.Functions.Processing.FunctionPool.Suspense.Module : HEADER.BATCH_ID :  :  : getString
=  =  =  =  C O N T A I N E R    D E T A I L  =  =  =  =
ifw.Pipelines.ALL_RATE.Input : DETAIL.CHARGING_START_TIMESTAMP : 20061115101900 :  : getDate
ifw.Pipelines.ALL_RATE.Input : DETAIL.DURATION : 300 :  : getDecimal
ifw.Pipelines.ALL_RATE.Input : DETAIL.CHARGING_END_TIMESTAMP : 20061115102400 : 20061115102400 : setDate
ifw.Pipelines.ALL_RATE.Input : DETAIL.CHARGING_END_TIMESTAMP : 20061115102400 :  : getDate
ifw.Pipelines.ALL_RATE.Input : DETAIL.NE_CHARGING_END_TIMESTAMP : 20061115102400 : 20061115102400 : setDate
ifw.Pipelines.ALL_RATE.Input : DETAIL.NE_CHARGING_END_TIMESTAMP : 20061115102400 :  : getDate
ifw.Pipelines.ALL_RATE.Input : DETAIL.RETAIL_CHARGED_AMOUNT_VALUE : 0.0 :  : getDecimal
ifw.Pipelines.ALL_RATE.Input : DETAIL.WHOLESALE_CHARGED_AMOUNT_VALUE : 0.0 :  : getDecimal
ifw.Pipelines.ALL_RATE.Input : DETAIL.CHARGING_START_TIMESTAMP : 20061115101900 :  : getDate
ifw.Pipelines.ALL_RATE.Input : DETAIL.CHARGING_START_TIMESTAMP : 20061115101900 :  : getDate
ifw.Pipelines.ALL_RATE.Input : DETAIL.CHARGING_START_TIMESTAMP : 20061115101900 :  : getDate
ifw.Pipelines.ALL_RATE.Input : DETAIL.CHARGING_START_TIMESTAMP : 20061115101900 :  : getDate
ifw.Pipelines.ALL_RATE.Input : DETAIL.A_TYPE_OF_NUMBER : 0 :  : getLong
ifw.Pipelines.ALL_RATE.Input : DETAIL.A_MODIFICATION_INDICATOR : 00 :  : getString
ifw.Pipelines.ALL_RATE.Input : DETAIL.A_NUMBER : 0049100052 :  : getString
ifw.Pipelines.ALL_RATE.Input : DETAIL.A_NUMBER : 0049100052 : 0049100052 : setString
ifw.Pipelines.ALL_RATE.Input : DETAIL.A_NUMBER : 0049100052 :  : getString
ifw.Pipelines.ALL_RATE.Input : DETAIL.B_TYPE_OF_NUMBER : 0 :  : getLong
ifw.Pipelines.ALL_RATE.Input : DETAIL.B_MODIFICATION_INDICATOR : 00 :  : getString
ifw.Pipelines.ALL_RATE.Input : DETAIL.B_NUMBER : 0049100056 :  : getString
ifw.Pipelines.ALL_RATE.Input : DETAIL.B_NUMBER : 0049100056 : 0049100056 : setString
ifw.Pipelines.ALL_RATE.Input : DETAIL.B_NUMBER : 0049100056 :  : getString
ifw.Pipelines.ALL_RATE.Input : DETAIL.C_NUMBER :  :  : getString
ifw.Pipelines.ALL_RATE.Input : DETAIL.RECORD_TYPE : 020 :  : getString
ifw.Pipelines.ALL_RATE.Input : DETAIL.A_NUMBER : 0049100052 :  : getString
ifw.Pipelines.ALL_RATE.Input : DETAIL.INTERN_A_NUMBER_ZONE : 0049100052 : 0049100052 : setString
ifw.Pipelines.ALL_RATE.Input : DETAIL.INTERN_A_NUMBER_ZONE : 0049100052 :  : getString
ifw.Pipelines.ALL_RATE.Input : DETAIL.B_NUMBER : 0049100056 :  : getString
ifw.Pipelines.ALL_RATE.Input : DETAIL.INTERN_B_NUMBER_ZONE : 0049100056 : 0049100056 : setString
ifw.Pipelines.ALL_RATE.Input : DETAIL.INTERN_B_NUMBER_ZONE : 0049100056 :  : getString
ifw.Pipelines.ALL_RATE.Functions.Processing.FunctionPool.PreSuspense.Module : DETAIL.INTERN_PROCESS_STATUS : 0 :  : getLong
ifw.Pipelines.ALL_RATE.Functions.Processing.FunctionPool.PreSuspense.Module : DETAIL.ASS_SUSPENSE_EXT.PIPELINE_NAME.0 :  : ALL_RATE
: setString
ifw.Pipelines.ALL_RATE.Functions.Processing.FunctionPool.PreSuspense.Module : DETAIL.ASS_SUSPENSE_EXT.SOURCE_FILENAME.0 :  : test3.e
dr : setString
ifw.Pipelines.ALL_RATE.Functions.Processing.FunctionPool.PreSuspense.Module : DETAIL.ASS_SUSPENSE_EXT.QUERYABLE_FIELDS.0 :  :  : set
String
ifw.Pipelines.ALL_RATE.Functions.Processing.FunctionPool.ServiceCodeMap.Module : DETAIL.BASIC_SERVICE : TEL :  : getString
ifw.Pipelines.ALL_RATE.Functions.Processing.FunctionPool.ServiceCodeMap.Module : DETAIL.INTERN_USAGE_CLASS :  :  : getString
ifw.Pipelines.ALL_RATE.Functions.Processing.FunctionPool.ServiceCodeMap.Module : DETAIL.ASS_GSMW_EXT.LOCATION_AREA_INDICATOR.0 :  :
: getString
ifw.Pipelines.ALL_RATE.Functions.Processing.FunctionPool.ServiceCodeMap.Module : DETAIL.QOS_REQUESTED :  :  : getString
ifw.Pipelines.ALL_RATE.Functions.Processing.FunctionPool.ServiceCodeMap.Module : DETAIL.QOS_USED :  :  : getString
ifw.Pipelines.ALL_RATE.Functions.Processing.FunctionPool.ServiceCodeMap.Module : DETAIL.RECORD_TYPE : 020 :  : getString
ifw.Pipelines.ALL_RATE.Functions.Processing.FunctionPool.ServiceCodeMap.Module : DETAIL.INTERN_SERVICE_CODE : TEL : TEL : setString
ifw.Pipelines.ALL_RATE.Functions.Processing.FunctionPool.ServiceCodeMap.Module : DETAIL.INTERN_SERVICE_CLASS : DEF : DEF : setString
ifw.Pipelines.ALL_RATE.Functions.Processing.FunctionPool.UsageClassMap.Module : DETAIL.USAGE_CLASS : NORM :  : getString
ifw.Pipelines.ALL_RATE.Functions.Processing.FunctionPool.UsageClassMap.Module : DETAIL.USAGE_TYPE :  :  : getString
ifw.Pipelines.ALL_RATE.Functions.Processing.FunctionPool.UsageClassMap.Module : DETAIL.WHOLESALE_IMPACT_CATEGORY :  :  : getString
ifw.Pipelines.ALL_RATE.Functions.Processing.FunctionPool.UsageClassMap.Module : DETAIL.TARIFF_CLASS :  :  : getString
ifw.Pipelines.ALL_RATE.Functions.Processing.FunctionPool.UsageClassMap.Module : DETAIL.TARIFF_SUB_CLASS :  :  : getString
ifw.Pipelines.ALL_RATE.Functions.Processing.FunctionPool.UsageClassMap.Module : DETAIL.RECORD_TYPE : 020 :  : getString
ifw.Pipelines.ALL_RATE.Functions.Processing.FunctionPool.UsageClassMap.Module : DETAIL.CONNECT_TYPE : 17 :  : getString
ifw.Pipelines.ALL_RATE.Functions.Processing.FunctionPool.UsageClassMap.Module : DETAIL.CONNECT_SUB_TYPE : 01 :  : getString
ifw.Pipelines.ALL_RATE.Functions.Processing.FunctionPool.UsageClassMap.Module : DETAIL.INTERN_C_NUMBER_ZONE :  :  : getString
ifw.Pipelines.ALL_RATE.Functions.Processing.FunctionPool.UsageClassMap.Module : DETAIL.USAGE_CLASS : NORM :  : getString
ifw.Pipelines.ALL_RATE.Functions.Processing.FunctionPool.UsageClassMap.Module : DETAIL.INTERN_USAGE_CLASS :  : NORM : setString
ifw.Pipelines.ALL_RATE.Functions.Processing.FunctionPool.EventDiscarding.Module : DETAIL.DISCARDING : 0 :  : getLong
ifw.Pipelines.ALL_RATE.Functions.Processing.FunctionPool.EventDiscarding.Module : DETAIL.RECORD_TYPE : 020 :  : getString
ifw.Pipelines.ALL_RATE.Functions.Processing.FunctionPool.EventDiscarding.Module : DETAIL.SOURCE_NETWORK :  :  : getString
=  =  =  =  E N D    C O N T A I N E R  =  =  =  =
ifw.Pipelines.ALL_RATE.Input : INTERNAL.STREAM_NAME :  : test3.edr : setString
=  =  =  =  E N D    T R A N S A C T I O N  =  =  =  =
ifw.Pipelines.ALL_RATE.Input : INTERNAL.STREAM_NAME :  : test3.edr : setString
ifw.Pipelines.ALL_RATE.Input : INTERNAL.TRANSACTION_ID : 0.0 : 6 : setDecimal
Using Perl Scripts to Administer Pipeline Manager
Pipeline Manager includes a set of Perl scripts, and associated semaphore files, that you can use to start and stop various types of pipelines and perform other system administration tasks.
Table 7-15 describes the files and scripts used for controlling pipelines:
Table 7-15 Pipeline Manager Administration Perl Scripts
| Semaphore and Perl script file names | Description |
|---|---|
|
dump_portal_act_data.reg dump_portal_act_data.pl |
Outputs account data for all accounts currently in memory. By default, data is written to the cust.data file, located in the directory where you launch Pipeline Manager. Runs the DAT_Account module PrintData semaphore. |
|
off_queue_buffer.reg off_queue_buffer.pl |
Disables logging of the messages processed by the queue. Sets the DAT_Listener module LogEvents entry to False. |
|
reload_portal_act_data.reg reload_portal_act_data.pl |
Reloads accounts from the BRM database. Runs the DAT_Account module Reload semaphore. |
|
reload_price.reg reload_price.pl |
Reloads all the price models and rate plans. Runs the DAT_Price module Reload semaphore. |
|
reload_zone.reg reload_zone.pl |
Reloads all the zones and zone model data. Runs the DAT_Zone module Reload semaphore. |
|
set_call_ass_limit.reg set_call_ass_limit.pl |
Sets a new flush limit for call assembly (by default, 30). Runs the FCT_CallAssembling module FlushLimit semaphore. |
|
set_dup_check_limit.reg set_dup_check_limit.pl |
Sets a new limit for duplicate checking. If you do not specify any parameter, it sets the BufferLimit entry to three days before the current date, and it sets the StoreLimit entry to seven days before the BufferLimit date. This script creates and runs the set_dup_check_limit.reg semaphore. To modify the default BufferLimit and StoreLimit values, run the script with these two parameters: set_dup_check_limit.pl buffer_limit store_limit For example:
set_dup_check_limit.pl 5 5
In this example, if today is November 28, then the buffer limit is set to November 23 and the store limit is set to November 18. |