2 Monitoring and Maintaining Your BRM System
This chapter provides information and guidelines to help you manage the day-to-day operation of your Oracle Communications Billing and Revenue Management (BRM) system.
About Monitoring BRM
You use the following tools to monitor BRM components:
-
The pin_ctl utility. Use this utility to start and stop BRM components and to get diagnostic data. See "Using the pin_ctl Utility to Monitor BRM".
-
The pin_db_alert.pl utility. Use this utility to monitor key performance indicators (KPIs), which are metrics you use to quantify the health of your database and to alert you to potential risks. See "Using the pin_db_alert Utility to Monitor Key Performance Indicators".
-
Operations Management Framework (OMF) HTTP and SNMP protocols. These protocols provide access to data collected by OMF probes. See:
In addition, you can use component-specific diagnostic tools such as:
-
Pipeline Manager Diagnostic Data Handler. See "Using the Diagnostic Data Handler to Get OMF Diagnostic Data".
-
Log files. See "Using Logs to Monitor Components".
-
Connection Manager (CM) quality of service (QoS) statistics. See "Getting Quality of Service Statistics from the CM".
-
Operating system commands. See:
Table 2-1 provides an overview of the system monitoring tools:
Table 2-1 BRM System Monitoring Tools
| Monitoring Tool | Functions | Component |
|---|---|---|
|
pin_ctl utility |
Stop and start components. Get diagnostic data. Clear log files. |
All system components See "Components Monitored and Controlled by the pin_ctl Utility". |
|
pin_db_alert.pl utility |
Monitor key performance indicators. |
Oracle databases |
|
Diagnostic Data Handler |
Get application diagnostic data. |
Pipeline Manager |
|
Log files |
Get status and error messages. |
All system components |
|
QoS statistics |
Get QoS statistics. |
CM |
|
HTTP and SNMP system monitoring |
Get instrumentation data from probes. Set configuration values. |
Pipeline Manager Real-time pipeline |
Components Monitored and Controlled by the pin_ctl Utility
You can use the pin_ctl utility to monitor the following BRM components:
-
Connection Manager
-
CM Master Process (CMMP)
-
Connection Manager Proxy (cm_proxy)
-
Data Managers:
-
Oracle Data Manager
-
Email Data Manager
-
EAI Data Manager
-
Paymentech Data Manager
-
Account Synchronization Data Manager
-
Invoice Data Manager
-
-
EAI Java Server
-
Invoice Formatter
-
Paymentech Answer Simulator
-
Pipeline Manager, including:
-
Real-time pipeline
-
Batch pipeline
-
-
Batch Controller
-
System Manager
-
Node Manager
About Data Collected by OMF
You can use OMF to get instrumentation data from Pipeline Manager. See "About Operations Management Framework" and "BRM OMF Instrumented Objects".
You can use two methods to get data:
Using the pin_ctl Utility to Monitor BRM
You can perform the following monitoring tasks by using the pin_ctl utility:
-
Use the status command to get the current status of the component. See "Getting the Status of a Component by Using the pin_ctl Utility".
-
Use the clear command to delete log entries associated with the component (not the file). See "Clearing Log Files for a Component by Using the pin_ctl Utility".
-
Use the -collectdata parameter to get diagnostic data when starting, stopping, or checking the status of a component. See "Getting Diagnostic Data for a Component by Using the pin_ctl Utility".
You also use the pin_ctl utility to start, stop, halt, and restart system components. For information about starting and stopping BRM by using the pin_ctl utility, see "Starting and Stopping the BRM System".
For more information, see "pin_ctl".
Setting Up the pin_ctl Utility
Install the pin_ctl utility executable on any system that runs a BRM component.
Each instance of the pin_ctl utility is configured by a pin_ctl.conf file that contains data about the BRM components running on the system. See "Configuring the pin_ctl Utility".
Important:
(AIX only) To start more than one pipeline process in the same machine, you must assign a different IFW_EVENTHANDLER port for each pipeline process. For example, if you are starting rtp, aaa, and bre in the same AIX machine:rtp env_platform:common env_variable:IFW_EVENTHANDLER_PORT env_val:XXXX1 aaa env_platform:common env_variable:IFW_EVENTHANDLER_PORT env_val:XXXX2 bre env_platform:common env_variable:IFW_EVENTHANDLER_PORT env_val:XXXX3
To run the pin_ctl utility, set the PERL5LIB environment variable to point to the third-party application's install directory. To do so, perform one of the following:
-
Add the following paths to the PERL5LIB environment variable for the root account on each managed node:
-
BRM_home/ThirdPartyApps/tools/PerlLib
-
BRM_home/bin
-
-
Before you deploy the call_pin_ctl script in BRM_SPI_install_directory/bin, add the following paths to the PERL5LIB variable in the script:
-
BRM_home/ThirdPartyApps/tools/PerlLib
-
BRM_home/bin
-
Getting the Status of a Component by Using the pin_ctl Utility
You can get the status of a component at any time.
To get the current status of a component by using the pin_ctl utility:
-
Go to the BRM_home/bin directory.
-
Run the following command:
pin_ctl status component
where component is the component for which you want the status. For a list of valid component values, see "pin_ctl".
For example:
pin_ctl status dm_oracle
You can use the -collectdata parameter to get diagnostic data when checking the status of a component:
pin_ctl status -collectdata component
See "Getting Diagnostic Data for a Component by Using the pin_ctl Utility".
Clearing Log Files for a Component by Using the pin_ctl Utility
To clear a component's log file by using the pin_ctl utility:
-
Go to the BRM_home/bin directory.
-
Run the following command:
pin_ctl clear component
where component is the component whose log file you want to clear. For a list of valid component values, see "pin_ctl".
For example:
pin_ctl clear dm_oracle
You can also clear log files when you start a component by using the cstart command. See "Starting a Component and Clearing the Log File".
Getting Diagnostic Data for a Component by Using the pin_ctl Utility
You can use the pin_ctl utility to get diagnostic data about a component at the following times:
-
Before startup by using the start command. The data is collected before the component is started.
-
Before shutdown by using the stop command. The data is collected after the component is stopped.
-
While it is running when you use the status command.
-
When you run the restart and cstart commands.
Note:
If you collect data during the stop all or status all commands, data is collected for all components before the command is carried out. For example, if you stop all components, data is collected about all the components, and then they are stopped.
The diagnostic data is written to a file in the component's log directory. The file name is component.diag.log (for example, cm.diag.log).
When a new file is created, BRM renames the existing file to component.diag.log.YYYYMMDDhhmmss (for example, dm_oracle.diag.log.20060918094046).
To get diagnostic data about a component by using the pin_ctl utility:
-
Go to the BRM_home/bin directory.
-
Run the following command:
pin_ctl action -collectdata component
where:
-
action specifies the action to be executed (for example, start), during which you want to collect diagnostic data.
-
component is the component for which you want diagnostic data. For a list of valid component values, see "pin_ctl".
For example:
pin_ctl start -collectdata dm_oracle
-
Diagnostic Data Collected by the pin_ctl Utility
-
Date and time the data was collected.
-
Extended information from the system (for example, system, node, release, and kernel ID).
-
Environment variables for the current terminal session.
-
System limits for the current terminal session.
-
Memory information (for example, available memory).
-
Storage device information (for example, available disk space).
-
Patch level on the system.
-
Kernel parameters.
-
Network status showing all sockets, routing table entries, and interfaces.
-
Network status summary.
-
Inter-process communication facilities status.
-
NFS statistics.
-
Duration of time that the system has been up.
-
All active components.
-
All active users.
Configuring the pin_ctl Utility
You can configure the pin_ctl utility by editing the pin_ctl.conf file. See the following topics:
-
Customizing pin_ctl.conf for Starting and Stopping Optional Components
-
Configuring the Start and Stop Validation Settings for pin_ctl
The pin_ctl.conf file is in BRM_home/bin.
Customizing the Components Included in ”all”
You can customize the components that are included in the pin_ctl all component.
-
Open the pin_ctl.conf file in BRM_home/bin.
-
Find the following lines in the file:
# List of services to be part of all [Optional].
#       Mention the service names separated by a space.
# '='   should be used to create an alias for 'all'.
#       For example, all=my_all
# all=my_all dm_oracle dm_email cm cmmp formatter

all dm_oracle dm_email cm cmmp formatter
-
After all, enter each component that you want to start with the all command:
all component1 component2 component3 ...
where componentX is the component you want to add. For a list of valid component values, see "pin_ctl".
Important:
Make sure the components are in the order in which you want them started. The order is reversed when the components are stopped. -
Save and close the file.
Customizing pin_ctl.conf for Starting and Stopping Optional Components
The default pin_ctl.conf file is configured to start BRM system components only. To configure pin_ctl.conf to start an optional component, such as Synchronization Queue DM (dm_aq), you must:
-
Open the pin_ctl.conf file in BRM_home/bin.
-
Add the following line to the components list:
start_sequence service_name [=alias_name|:java|:app|:pipeline|->dependent_service]
where:
-
start_sequence is the start and stop sequence number. This determines the order in which components are started or stopped.
-
service_name is the name of the optional component.
-
=alias_name indicates that service_name is different from the standard service name. For example:
cm_1=cm
cm_2=cm
where cm_1 and cm_2 are cm services.
-
:java indicates that the component is Java-based.
-
:app indicates that the component executable is located in the BRM_home/apps directory.
-
:pipeline identifies the component as pipeline.
-
->dependent_service specifies one or more components that service_name depends on. This indicates that dependent_service must start before service_name is started.
For example, to add dm_aq to the components list:
4 dm_aq
-
-
Add the following line to the startup configuration section of the file:
start_component cpidproc:searchpattern:pidvarname cport:port_number [testnap:directory_name]
where:
-
start_component is the name of the start command for the optional component, such as start_dm_aq. It must be unique; if not, the last parsed definition is used.
-
cpidproc:searchpattern is a simple process name matching filter.
-
pidvarname is a partial match for the pidfile variable from ${program_name}. If you enter nothing (which is recommended), the default is PID$, which matches CMPID in $PIN_LOG/cm/cm.pid.
-
cport:port_number is the component port number.
-
testnap:directory_name runs the testnap utility in the specified directory. The directory is relative to BRM_home/sys.
For example, to enter a startup configuration for dm_aq:
start_dm_aq cpidproc:dm_aq: cport:--DM_AQ_PORT__
-
-
Save and close the file.
Creating a Custom ”all” Parameter List
You can create aliases for custom lists of components that are controlled by the pin_ctl utility all component. For example, if you define an alias named my_all, you can start a custom group of components by running:
pin_ctl start my_all
-
Open the pin_ctl.conf file in BRM_home/bin.
-
Find the following lines in the file:
# List of services to be part of all [Optional].
#       Mention the service names separated by a space.
# '='   should be used to create an alias for 'all'.
#       For example, all=my_all
# all=my_all dm_oracle dm_email cm cmmp formatter

all dm_oracle dm_email cm cmmp formatter
-
Add the following line at the end of the section:
all=alias component1 component2 ...
where:
-
alias specifies the name of your customized all command. For example, my_all.
-
componentX is the component you want to add. For a list of valid component values, see "pin_ctl".
Important:
Make sure the components are in the order in which you want them started. The order is reversed when the components are stopped by using the custom all command. Separate component names by using a space.
-
-
Save and close the file.
Customizing the Components List
The components list in the pin_ctl.conf file lists the BRM system components. For example:
1 dm_oracle
1 dm_email
1 dm_fusa
1 dm_invoice
...
4 rtp:pipeline
4 aaa:pipeline
4 bre:pipeline
4 bre_tt:pipeline
If you have a high-availability system that includes duplicate instances of components, you can edit the pin_ctl.conf file to customize the components list. For example:
1 dmo1=dm_oracle
1 dmo2=dm_oracle
1 dm_eai_1=dm_eai
1 dm_eai_2=dm_eai
1 dm_ifw_sync_1=dm_ifw_sync
1 dm_ifw_sync_2=dm_ifw_sync
2 cm_1=cm->dm_oracle
2 cm_2=cm->dm_oracle
3 cm_proxy_1=cm_proxy
3 cm_proxy_2=cm_proxy
3 cmmp_1=cmmp
3 cmmp_2=cmmp
3 rtp_1=rtp:pipeline
3 rtp_2=rtp:pipeline
3 aaa_1=aaa:pipeline
34 aaa_2=aaa:pipeline
To customize the component list:
-
Open the pin_ctl.conf file in BRM_home/bin.
-
Find the following lines in the file:
# The format of entry for each service is , # start_sequence service_name [=<alias_name>|:java|:app|-><list of services depends on>] # # The start sequence is a mandatory field, which gives sequence to start/stop [Mandatory]. # Sequence is a numerical value, and starts from 1. The service should be specified # in the assending order based on the sequence number. # Mention the service name. This service_name is mandatory field [Mandatory]. # NOTE: Start sequence and Service name should be separated by a space. # # '=' should be used if service name is different with standard service names [Optional]. # For example, cm2=cm # Here, cm2 is the service which is of cm category. # This is useful when multiple CMs/DMs are installed. # :app should be used if its located in BRM_home/apps directory [Optional]. # :java should be used if its a java based service [optional]. # -> should be used if the current service has any dependencies [Optional]. # This is generally useful in WINDOWS. # :pipeline should be used if it is Pipeline service [Optional]. -
Add the following line for each component in your system:
start_sequence service_name [=alias_name|:java|:app|:pipeline|->dependent_service]
where:
-
start_sequence is the start/stop sequence number.
-
service_name is the component name.
-
=alias name indicates that service_name is different from the standard service name. For example:
cm_1=cm
cm_2=cm
where cm_1 and cm_2 are cm services.
-
:java indicates that the component is Java-based.
-
:app indicates that the component executable is located in the BRM_home/apps directory.
-
:pipeline identifies the component as pipeline.
-
->dependent_service specifies one or more components that service_name depends on. This indicates that dependent_service must start before service_name is started.
-
-
Save and close the file.
Customizing the pin_ctl Startup Configuration
The pin_ctl.conf file includes startup configurations for system components. For example:
start_cm cpidproc:cm: cport:2224 testnap:test
These configurations are created automatically during installation, but you can change them. For example, if you use a high-availability system with duplicate processes, you should change the component names. In the following example, the Oracle DM name in the component list is dmo1, so the startup configuration has been changed to match:
start_dmo1 cpidproc:dmo1: cport:12432
-
Open the pin_ctl.conf file in BRM_home/bin.
-
Edit the file.
The syntax is:
start_component cpidproc:searchpattern:pidvarname cport:port_number [testnap:directory_name]
where:
-
start_component is the name of the start command. It must be unique; if not, the last parsed definition is used.
-
cpidproc:searchpattern is a simple process name matching filter.
-
pidvarname is a partial match for the pidfile variable from ${program_name}. If you enter nothing (which is recommended), the default is PID$, which matches CMPID in $PIN_LOG/cm/cm.pid.
-
cport:port_number is the component port number. This value is entered automatically during installation.
-
testnap:directory_name runs the testnap utility in the specified directory. The directory is relative to BRM_home/sys.
-
-
Save and close the file.
Customizing the pin_ctl Utility Environment Variables
Some BRM components need environment variables set before starting. You can edit the pin_ctl.conf file to change the environment variables if yours are different from the default settings.
-
Open the pin_ctl.conf file in BRM_home/bin.
-
To define environment variables for BRM components, find the following lines in the file:
# List of all environment variables which needs to be set
# or override during the execution a particular process
# The syntax for setting or overriding the environment variable will be,
# program_name env_platform:OS env_variable:ENV_VAR    env_val:ENV_VAL

#common env_platform:solaris env_variable:EXAMPLE env_val:example
-
Add the following line for each BRM component that requires an environment variable:
component env_platform:operating_system env_variable:environment_variable env_val:value
where:
-
component is the BRM component that uses the environment variable (for example, cm). Use common to apply the environment variable to the entire system.
For a list of component values, see "component Parameter".
-
operating_system can be hpux_ia64, linux, aix, solaris, or common.
-
environment_variable specifies the name of the environment variable to set before starting component.
-
value specifies the environment variable value.
For example, the following line sets the NLS_LANG environment variable before starting any BRM component:
common env_platform:common env_variable:NLS_LANG env_val:AMERICAN_AMERICA.AL32UTF8
-
-
To define environment variables for pipeline registry files, find the following lines:
# registry details for pipeline services
aaa env_platform:common env_variable:AAA_REGISTRY env_val:$IFW_HOME/conf/diameter_charge.reg
rtp env_platform:common env_variable:RTP_REGISTRY env_val:$IFW_HOME/conf/wirelessRealtime.reg
bre env_platform:common env_variable:BRE_REGISTRY env_val:$IFW_HOME/conf/wireless.reg
-
Add the following line for each pipeline component that uses a registry file:
component env_platform:common env_variable:registry_variable env_val:$IFW_HOME/registry_file
where:
-
component is the pipeline component name. For a list of valid values, see "component Parameter".
-
registry_variable is the environment variable to set before starting component. The syntax for pipeline registry environment variables is *_REGISTRY.
-
registry_file is the path and file name for the pipeline registry file.
For example:
aaa env_platform:common env_variable:AAA_REGISTRY env_val:$IFW_HOME/conf/diameter_charge.reg
-
-
Save and close the file.
Setting the CTL_SNMP_PATH variable
You can set the CTL_SNMP_PATH variable to one of the following:
-
BRM_home/bin. For example:
common env_platform:common env_variable:CTL_SNMP_PATH env_val:BRM_home/bin -
The path of the SNMP third-party software. For example:
common env_platform:common env_variable:CTL_SNMP_PATH env_val:/home2/mydir/opt/snmp/bin
Setting the pin_ctl Utility Log Level
To set the log level for the pin_ctl utility:
-
Open the pin_ctl.conf file in BRM_home/bin.
-
Edit the file.
The syntax is:
Control_script_log loglevel:level logfile:log_file
where:
-
level is the log level, which can be:
none: no logging
error: log error messages only (default)
warning: log error messages and warnings
debug: log error messages, warnings, and debugging messages
-
log_file is the name of the log file.
For example:
Control_script_log loglevel:error logfile:pin_ctl.log
Note:
Instead of always getting debugging information, you can use the pin_ctl -debug parameter to get debugging information whenever you run the pin_ctl utility. For example:pin_ctl -debug start dm_oracle
-
-
Save and close the file.
Configuring the Start and Stop Validation Settings for pin_ctl
You can configure the validations pin_ctl performs when starting and stopping components, including:
-
How long the utility waits before checking whether an action is complete.
-
The maximum number of times the utility checks whether an action is complete.
-
The home directory for the specified component:
-
For BRM processes, this overrides the BRM_home value for the specified component.
-
For pipeline processes, this overrides the IFW_home value for the specified component. This is used as the relative path for entries in the registry file. For example, if a registry entry specifies ./temp, the pipeline process uses IFW_home/temp.
-
-
The home log directory for the specified component. This overrides the $PIN_LOG value for the specified component.
To specify the validation settings used when pin_ctl starts and stops components:
-
Open the pin_ctl.conf file in BRM_home/bin.
-
Find the following lines in the file:
# This sections will be used to have different settings for each service like # 1. waittime -- number of seconds to be waited # 2. iterations -- Number of times to be checked # 3. pin_home_dir -- BRM_home path # 4. pin_log_dir -- PIN_LOG path # All these are optional, if these are not set then default values will be used. -
Add the following line for each component that you want to override the default values:
settings component waittime:wait iterations:value pin_home_dir:path pin_log_dir:logpath
where:
-
component is the BRM component. For a list of valid values, see "component Parameter".
-
wait is the number of seconds to wait before checking whether an action is complete. The default is 5.
-
value is the maximum number of times to check whether an action is complete. The default is 5.
-
path is the home directory. This overrides the BRM_home value for BRM processes and the IFW_home value for pipeline processes.
-
logpath is the BRM log file home. The default is the value set in the $PIN_LOG environment variable. You must change this only if you use a different directory than the default directory.
For example:
settings dm_oracle waittime:5 iterations:5 pin_home_dir:BRM_home pin_log_dir:$PIN_LOG -
-
Save and close the file.
Customizing snmpset and snmpget Actions
You can run snmpset and snmpget commands from the pin_ctl utility. You can edit the pin_ctl.conf file to add snmpset and snmpget actions.
-
Open the pin_ctl.conf file in BRM_home/bin.
-
Edit the file.
The syntax is:
snmp_command servicename probe registry_entry base_OID
where:
-
snmp_command is either snmpset or snmpget.
-
servicename is the name of the component. Use the names defined for the pin_ctl utility. See "pin_ctl".
-
probe is the name of the probe that receives the snmpset command. For information about probes, see "BRM OMF Instrumented Objects".
-
registry_entry is the registry entry that corresponds to the probe.
-
base_OID is the base process ID (OID) from the BRM Management Information Base (MIB) file. See "BRM OMF Instrumented Objects".
-
-
Save and close the file.
You can now use the pin_ctl utility snmpset or snmpget action by using the probe name. For example:
pin_ctl snmpset probe_name component
Using Custom pin_ctl Configuration Files
You can create custom pin_ctl configuration files to run different configurations of the same system.
-
Create a custom configuration file in BRM_home/bin. You can copy and rename the pin_ctl.conf file.
-
Use the -c file_name parameter when you run the pin_ctl utility. For example:
pin_ctl cstart all -c pin_ctl_batch.conf
Using the pin_db_alert Utility to Monitor Key Performance Indicators
KPIs are metrics you use to quantify the health of your database and to alert you when potential issues exist. They identify database tables that must be archived or purged and indexes, triggers, and stored procedures that are missing or invalid.
KPIs are monitored when you run the pin_db_alert.pl utility. Generally you set up a cron job to run the utility periodically to monitor the health of your database. For more information, see "Running the pin_db_alert.pl Utility".
Each KPI is identified by an ID that associates a component being monitored to a corresponding validation value. For example, you can monitor the size of an audit table with a size threshold that monitors the number of rows in that audit table. When the threshold value is reached, the results are returned and an alert notification can be sent, warning you of the component's condition.
The component and validation functionality for each KPI comprises:
-
A data extraction module, which queries the database for the KPI data and writes the results to an output file.
-
A validation module, which compares the query results to validation parameters defined in a configuration file and writes the validation status to an output file.
After the validation results are written to the output files, a decision module (DecisionUtility.pm) evaluates each KPI result and determines whether to generate email alert notifications based on the KPI result status. For more information, see "About KPI Status and Alert Notifications".
KPI Default Behavior
Table 2-2 contains a list of supported KPIs and provides the default behavior of their data and validation modules.
Table 2-2 Supported KPIs and Default Behavior
| KPI ID | Default Behavior |
|---|---|
|
AuditHistoryAge |
The auditAge module calculates the age of the audit tables listed in the pin_db_alert.conf file's DATA_PLUGINS entry and DEFAULT_AUDIT_TABLES entry. It writes the results to the auditAge_AuditHistoryAge.out file. The auditAge_validation module uses threshold values in the auditAge validation configuration file to determine which audit tables in the results file are at the threshold, and writes them to the auditAge_validation_AuditHistoryAge.out file. For information on changing the default age thresholds, see "Monitoring the Age of Audit Tables". |
|
AuditTableSize |
The auditSize module calculates the number of rows present in the audit tables listed in the pin_db_alert.conf file's DATA_PLUGINS entry and DEFAULT_AUDIT_TABLES entry and writes the results to the auditSize_AuditTableSize.out file. The auditSize_validation module uses the threshold values in the auditSize validation configuration file to determine which audit tables in the results file are at the threshold and writes them to the auditSize_validation_AuditTableSize.out file. For information on changing the default size thresholds, see "Monitoring the Size of Audit Tables". |
|
OldestEventAge |
The eventData module calculates the age of the oldest event in the event_t table, as well as the records in the tables defined in the pin_db_alert.conf file's DATA_PLUGINS entry, and writes the results to the eventData_OldestEventAge.out file. The eventData_validation module uses the threshold values in the eventData validation configuration file to determine which entries in the results file are at the threshold, and writes them to the eventData_validation_OldestEventAge.out file. For information on changing the default event age, see "Monitoring the Age of Events". |
|
ACTIVETRIGGERS |
The triggersList module retrieves a list of active triggers in the BRM system and writes their names and status (ENABLED or DISABLED) to the triggersList_ACTIVETRIGGERS.out file. The triggersList_validation module compares the list of active triggers in the triggersList validation configuration file to the triggers in the results file and writes missing triggers to the triggersList_validation_ACTIVETRIGGERS.out file. Important: If you installed optional managers that use unique triggers or if you created custom triggers, you must add them to the triggersList validation configuration file to monitor their status. See "Monitoring Active Triggers". |
|
INDEXES |
The indexList module retrieves a list of unique indexes in the BRM system and writes the index names and uniqueness values to the indexList_INDEXES.out file. The table name and column name for each index is also listed. The indexList_validation module compares the list of indexes in the indexList validation configuration file to the indexes in the results file and writes missing or invalid indexes to the indexList_validation_INDEXES.out file. Important: If you installed optional managers that use unique indexes or if you created custom indexes, you must add them to the indexList validation configuration file to monitor their status. See "Monitoring Indexes". |
|
PROCEDURES |
The proceduresList module retrieves a list of stored procedures in the BRM system and writes the stored procedure names and status (VALID or INVALID) to the proceduresList_PROCEDURES.out file. This enables Pipeline Manager to compile data in parallel and to restore it from the precompiled data files file. The proceduresList_validation module compares the list of stored procedures in the proceduresList validation configuration file to the procedures in the results file and writes missing procedures to the proceduresList_validation_PROCEDURES.out file. Important: If you installed optional managers that use unique stored procedures or if you created custom stored procedures, you must add them to the proceduresList validation configuration file to monitor their status. See "Monitoring Stored Procedures". |
You can enable email alerts to notify a list of people about the validation results. For more information, see "Setting Up Email Alert Notifications".
About KPI Status and Alert Notifications
When the pin_db_alert.pl utility runs, it returns a PASS or FAILURE status for each configured KPI, which includes a severity level for the status. The following severity levels listed in Table 2-3 are possible for any KPI:
Table 2-3 KPI Status Severity Levels
| Severity | Description |
|---|---|
|
CRITICAL |
Performance, functionality, or both are heavily impacted and require immediate attention. Critical failures generally involve data corruption (for example, when an event table is missing data after a system upgrade). Set up alert notifications for critical failures so you can correct such problems immediately and avoid further corruption. |
|
MAJOR |
Performance, functionality, or both are impacted and require immediate attention. Major failures generally involve potentially serious performance degradations (for example, when an index is missing or an index contains columns that are out of order). These problems can occur when you customize your BRM software. Major failures also include issues where functionality can be impacted. For example, if the TRIG_CYCLE_DEFERRED_TAX trigger is missing and billing runs, cycle taxes will not be calculated. Set up alert notifications for major failures so you can correct problems immediately and avoid further degradation or data corruption. |
|
MINOR |
Performance might be impacted and will need attention in the future. Minor failures involve large audit tables, which might impact pipeline startup time. |
|
WARNING |
Performance and functionality both work as expected, but performance may be impacted in the future. For example, depending on your hardware and software resources, you can set up an alert notification when an event table reaches an age threshold or an audit table reaches a size threshold, so they can be archived or purged. Warning failures generally do not impact performance and never impact functionality. |
|
NORMAL |
No data or performance risks were found. This status is valid only for PASS results. |
You can configure the pin_db_alert.pl utility to send email notifications to alert a list of people when a KPI is at a specified severity level. For more information, see "Setting Up Email Alert Notifications".
About Monitoring KPIs
To monitor KPIs, first you configure the KPI data entries in the pin_db_alert.pl utility's configuration file, and then you set up the validation thresholds in each validation module's configuration file.
The pin_db_alert.pl utility's configuration file contains entries for all KPIs; therefore, Oracle recommends that you configure this file for all KPIs before you set up the validation thresholds for each individual KPI.
Important:
If you do not define KPI validation thresholds, the validation process will not occur; therefore, any alert notifications you configured will not be sent.For more information, see "Setting Up KPI Monitoring".
Setting Up KPI Monitoring
The default configuration for monitoring KPIs is defined in the pin_db_alert.pl utility's configuration file (BRM_home/diagnostics/pin_db_alert/pin_db_alert.conf).
To edit this file, open it with a text editor and perform the following tasks as necessary. For more information, see the comments in the pin_db_alert.conf file.
-
In the KPI_IDS entry, specify the KPI ID for each KPI to monitor.
By default, all KPIs are listed; therefore, if you do not want to monitor one, remove it from the default list. For a list of KPI IDs, see "KPI Default Behavior".
-
In the DATA_PLUGINS entry, specify the data module and desired values for each KPI listed in the KPI_IDS entry. See "Specifying Which KPI Data Is Extracted".
Important:
In the sample pin_db_alert.conf file, values are provided for the AuditHistoryAge and AuditTableSize KPIs; however, the OldestEventAge KPI does not contain any values. You must provide your own values. See "Monitoring the Age of Events". -
In the VALIDATION_PLUGINS entry, specify the validation module for each KPI listed in the KPI_IDS entry.
Important:
Make sure the validation modules are listed in the same order as their associated data modules in the DATA_PLUGINS entry. -
In the STATUS entry, configure the alert notifications. Specify the status and severity, and list the email addresses that get notified by the status/severity combination. For more information, see "Setting Up Email Alert Notifications".
-
In the DEFAULT_AUDIT_TABLES entry, specify which audit tables to monitor by default. These audit tables are monitored in addition to any tables you list as values in the DATA_PLUGINS entry for the auditAge and auditSize modules.
-
In the DB_USER and DB_PASSWD entries, specify the database user ID and encrypted password that are listed in the sm_id and sm_pw entries in the Data Manager (DM) pin.conf file. For more information, see "Enabling Database Access".
Specifying Which KPI Data Is Extracted
To specify which data is extracted from the database during KPI monitoring:
-
Open the pin_db_alert.pl utility's configuration file (BRM_home/diagnostics/pin_db_alert/pin_db_alert.conf) with a text editor.
-
In the DATA_PLUGINS entry, specify the data module and desired values for each KPI in the KPI_IDS entry:
-
To extract data for the auditAge data module:
Specify the audit table names to monitor using the following syntax, separating each audit table name by a space:
@DATA_PLUGINS =("auditAge Audit_table_name Audit_table_name");
Note:
These tables are in addition to audit tables you have listed in the DEFAULT_AUDIT_TABLES entry. -
To extract data for the auditSize data module:
Specify the audit table names to monitor using the following syntax, separating each audit table name by a space.
@DATA_PLUGINS =("auditSize Audit_table_name Audit_table_name");
Note:
These tables are in addition to audit tables you have listed in the DEFAULT_AUDIT_TABLES entry. -
To extract data for the eventData module:
Specify the events to monitor using the following syntax:
@DATA_PLUGINS =("eventData Table_name:Column_name:Operator:Column_value");
where:
-
Table_name is the name of the table that contains the event data.
-
Column_name is the name of the table column that contains the event data.
-
Operator is any standard SQL operator.
-
Column_value is the POID of the event.
For example:
@DATA_PLUGINS =("eventData event_t:account_obj_id0:=:21950");Note:
You can add any number of values for the eventData module, separated by spaces; however, you can specify only one operator per table. If the operator or syntax is incorrect, the table is not validated, and an error is written to the data extraction output file. -
-
To extract data for the triggersList, proceduresList, and indexList modules:
The triggersList, proceduresList, and indexList modules take no values. To extract data for these modules, list them in the DATA_PLUGINS entry using the following syntax:
@DATA_PLUGINS =("triggersList","proceduresList","indexList");Enclose the entire DATA_PLUGINS value string with parentheses ( ) and separate each data value string with commas. For example:
@DATA_PLUGINS =("auditSize au_service_t au_product_t au_account_t au_rate_t",
"eventData event_t:account_obj_id0:=:21956 account_t:poid_id0:=:21956:",
"auditAge au_service_t au_product_t",
"triggersList","proceduresList","indexList");
-
-
Save and close the file.
Setting Up Email Alert Notifications
To configure the pin_db_alert.pl utility to send email notifications when a KPI validation returns a specified result/severity combination:
-
Open the pin_db_alert.pl utility's configuration file (BRM_home/diagnostics/pin_db_alert.conf) with a text editor.
-
Edit the STATUS entry using the following syntax:
'Error:MAIL_ALERT:Notification_list'
where:
-
Error is a combination of the status and severity, separated by a dot (.). The following values are valid:
FAIL.CRITICAL
FAIL.MAJOR
FAIL.MINOR
FAIL.WARNING
PASS.WARNING
PASS.NORMAL
-
Notification_list is a comma-separated list of email addresses to which the validation results are sent. You can have any number of email addresses for any error.
Be sure to enclose each status string in single quotation marks (' ').
For example:
@STATUS=('FAIL.CRITICAL:MAIL_ALERT:IT@example.com', 'FAIL.MINOR:MAIL_ALERT:john_smith@example.com, sysadm@example.com');Note:
You cannot configure email alerts for a specific KPI. -
-
Save and close the file.
Enabling Database Access
The pin_db_alert.pl utility requires the database user name and password to query the database for KPIs.
-
Open the pin_db_alert.pl utility's configuration file (BRM_home/diagnostics/pin_db_alert/pin_db_alert.conf).
-
In the DB_USER and DB_PASSWD entries, specify the database user ID and encrypted password, respectively.
Important:
These must be the same database user ID and password specified in the sm_id and sm_pw entries in the DM pin.conf file.Use the following syntax:
DB_USER="User_ID";
DB_PASSWD="Encrypted_passwd";
For example:
DB_USER="brm123";
DB_PASSWD="&aes|0D5E11BFDD97D2769D9B0DBFBD1BBF7EE03F1642861DFA57502C7FB85A654267";
-
Save and close the file.
For more information about encrypting passwords, see "About Encrypting Information" in BRM Developer's Guide.
Monitoring the Size of Audit Tables
To monitor the size of audit tables:
-
If necessary, specify the auditSize module values in the DATA_PLUGINS entry of the pin_db_alert.pl utility's configuration file. See "Setting Up KPI Monitoring".
-
Open the auditSize validation configuration file (BRM_home/diagnostics/pin_db_alert/auditSize_validation_AuditTableSize.conf) with a text editor.
-
To change a size threshold for an existing table, change the number of rows specified in the AUDIT_SIZE_THRESHOLD value for that table.
-
To add an audit table, add a new AUDIT_SIZE_THRESHOLD entry for that table.
-
To omit an audit table from the validation process, either delete the AUDIT_SIZE_THRESHOLD entry for that table or comment out the entry.
For details on how to configure the AUDIT_SIZE_THRESHOLD entry, see the comments in the AuditTableSize configuration file.
-
-
Save the file.
Monitoring the Age of Audit Tables
To monitor the age of audit tables:
-
If necessary, specify the auditAge module values in the DATA_PLUGINS entry of the pin_db_alert.pl utility's configuration file. See "Setting Up KPI Monitoring".
-
Open the auditAge validation configuration file (BRM_home/diagnostics/pin_db_alert/auditAge_validation_AuditHistoryAge.conf) with a text editor.
-
To change an age threshold for a table, change the number of days specified in the AUDIT_AGE_THRESHOLD value for that table.
-
To add an audit table, add a new AUDIT_AGE_THRESHOLD entry.
-
To omit an audit table from the validation process, either delete the AUDIT_AGE_THRESHOLD entry for that table or comment out the entry.
For details on how to configure the AUDIT_AGE_THRESHOLD entry, see the comments in the AudiHistoryAge configuration file.
-
-
Save the file.
Monitoring the Age of Events
To monitor the age of events:
-
If necessary, configure the eventData module values in the DATA_PLUGINS entry of the pin_db_alert.pl configuration file (BRM_home/diagnostics/pin_db_alert.conf). See "Specifying Which KPI Data Is Extracted".
Note:
You can add any number of arguments for the eventData module; however, you can specify only one operator per table. If the operator or syntax is incorrect, the table is not validated, and an error is written to the data extraction output file. -
Open the eventData validation configuration file (BRM_home/diagnostics/pin_db_alert/eventData_validation_OldestEventAge.conf) with a text editor.
-
To change an age threshold, change the number of days specified in the OLDEST_THRESHOLD value for the table.
-
To add a table to monitor, add a new OLDEST_THRESHOLD entry for the table.
-
To omit a table from the validation process, either delete the OLDEST_THRESHOLD entry for that table or comment it out.
For details on how to configure the OLDEST_THRESHOLD entry, see the comments in the OldestEventAge configuration file.
-
-
Save the file.
Monitoring Active Triggers
To monitor a trigger for an optional manager or customization that is not part of BRM:
-
If necessary, specify the triggersList module in the DATA_PLUGINS entry in the pin_db_alert.pl utility's configuration file. See "Setting Up KPI Monitoring".
-
Open the ACTIVETRIGGERS validation configuration file (BRM_home/diagnostics/pin_db_alert/triggersList_validation_ACTIVETRIGGERS.conf) with a text editor.
-
Add a new entry for the trigger using the following syntax:
ENABLED trigger_name
-
Save the file.
-
Restart the Connection Manager (CM).
Monitoring Indexes
To monitor an index for an optional manager or customization that is not part of BRM:
-
If necessary, specify the indexList module in the DATA_PLUGINS entry in the pin_db_alert.pl utility's configuration file. See "Setting Up KPI Monitoring".
-
Open the BRM_home/diagnostics/pin_db_alert/indexList_validation_INDEXES.conf file.
-
Add a new entry for the index using the following syntax:
table_name column_name index_name UNIQUE
Note:
To add a composite index, add each column name as a separate entry, in the order of the columns in the index. For example:ACCOUNT_NAMEINFO_T OBJ_ID0 I_ACCOUNT_NAMEINFO__I UNIQUE ACCOUNT_NAMEINFO_T REC_ID I_ACCOUNT_NAMEINFO__I UNIQUE ACCOUNT_T ACCOUNT_NO I_ACCOUNT_NO__ID UNIQUE
-
Save the file.
Monitoring Stored Procedures
To monitor a stored procedure for an optional manager or customization that is not part of BRM:
-
If necessary, specify the proceduresList module in the DATA_PLUGINS entry in the pin_db_alert.pl utility's configuration file. See "Setting Up KPI Monitoring".
-
Open the PROCEDURES validation configuration file (BRM_home/diagnostics/pin_db_alert/proceduresList_validation_PROCEDURES.conf file) with a text editor.
-
Add a new entry for the stored procedure using the following syntax:
procedure_name VALID
-
Save the file.
Running the pin_db_alert.pl Utility
Run the pin_db_alert.pl utility periodically to monitor the health of your database. The cron command is the typical way to do this.
Note:
You can also run the pin_db_alert.pl utility manually at the command line (for example, after system upgrades).Use a cron job with a crontab entry to run the pin_db_alert.pl utility at a specified time. The following crontab entry runs the utility at 1:00 a.m. on a quarterly basis:
0 1 * */3 * BRM_home/bin/pin_db_alert.pl &
Defining Custom KPIs
You can define custom KPIs (for example, to monitor the integrity of customer subscriber information after system upgrades):
-
Define a new KPI called SubscriberInformation to monitor the consistency of subscriber data over a period of time. This KPI must include a data module that retrieves the subscriber information and a validation module that verifies this data.
-
Create a configuration file for the KPI validation module and specify the relevant threshold information.
-
Add the new KPI information to the pin_db_alert.conf file. For information on the entries in this file, see "Setting Up KPI Monitoring".
Collecting Diagnostic Information by Using RDA
Remote Diagnostic Agent (RDA) is an Oracle standard tool used to collect diagnostic data from your system applications environment.
Note:
RDA replaces the Support Informer utility. Support Informer is obsolete and no longer supported. However, Support Informer libraries continue to be packaged with BRM. The libraries are accessed by the RDA profile named SupportInformer75 at run time.Use RDA to collect information about your BRM system. When you submit a service request (SR) to Oracle Technical Support, you must also provide an RDA output file. The RDA output file provides a comprehensive view of your system configuration and contains diagnostic data used by Oracle Technical Support to diagnose problems. This minimizes the number of requests from Oracle Technical Support for additional information, which can reduce the service request resolution time.
You can use RDA to collect BRM and Pipeline Manager diagnostic information. The information collected from BRM includes:
-
Component log files
RDA collects component log data from the component .pinlog, .log, and Infranet.properties files. For example, RDA collects the log data for BRM invoice formatter from formatter.pinlog, formatter.log, and Infranet.properties.
-
Application log files
RDA collects application log data from the application .pinlog, .log, and Infranet.properties files. For example, RDA collects the log data for Batch Controller from batch_controller.pinlog, BatchController.log, and Infranet.properties.
-
Configuration files
RDA collects configuration data from the pin.conf file. For example, RDA collects CMMP configuration data from the CMMP pin.conf file.
-
Other files
RDA collects installation and version details from the vpd.properties and pinrev.dat files.
The information collected from Pipeline Manager includes:
-
Configuration files
RDA collects the pipeline configuration data from the .reg (registry) and .dsc (description) files. For example, RDA collects the configuration data for wireless from the wireless.reg and containerDesc.dsc files.
-
Log files
RDA collects pipeline log data from the process log, pipeline log, and stream log files. For example, RDA collects the log data for wireless from the processWIRELESS.log file, the log_streamRT1.log file, and so on.
-
Other files
RDA collects pipeline installation and version details from the vpd.properties and piperev.dat files.
To find BRM component information, RDA looks in the following directories:
-
BRM_home/sys
-
BRM_home/apps
To find Pipeline Manager information, RDA looks at the registry files.
A complete overview of RDA is provided in the Remote Diagnostic Agent (RDA) 4 - Getting Started document. See "Viewing RDA Documentation".
RDA 4.21 collects the following customer-specific information:
-
Company name
-
Contact person
-
Contact email
-
Comment on the collection
-
Service request (when applicable)
Caution:
When you run rda.sh, the script returns the "Perl not found in the PATH" error and the command fails. To work around this issue, remove the .config file (hidden file) in the RDA directory. Oracle recommends that you do not use shell script for RDA 4.21.Installing Remote Diagnostic Agent
RDA is included in the Third-Party package along with Perl and Java Runtime Environment. It automatically gets installed when you install the Third-Party package, in the directory you choose to install the Third-Party software. For more information, see "Installing the Third-Party Software" in BRM Installation Guide.
Note:
-
RDA is not supported on Windows.
-
RDA collects diagnostic and configuration data for all BRM and Pipeline Manager components and applications only from the server on which RDA is running. To collect data for BRM or Pipeline Manager components and databases on other servers, install and run RDA on the other servers.
To determine whether RDA is installed on a server, run the following command:
>perl rda.pl -cv
If RDA is installed on the server without any error, the following message is displayed: ”No issues found in the RDA installation.”
RDA includes a profile named SupportInformer75, which runs the following modules:
-
S380BRM
Collects Oracle Communications BRM information.
-
S105PROF
Collects the user profile data.
-
S110PERF
Collects performance information.
-
S100OS
Collects operating system information.
Note:
In addition to the preceding modules, the RDA SupportInformer75 profile runs other modules, such as INI, CFG, END, RDSP, and LOAD.
Running Remote Diagnostic Agent
To run RDA:
-
Go to the directory where you installed the Third-Party package and source the source.me file:
Bash shell:
source source.me.shC shell:
source source.me.csh -
To collect BRM system information, verify that the PIN_HOME environment variable is set to the BRM installation directory. By default, it is /opt/portal.
-
To collect pipeline log files, verify that the INT_HOME environment variable is set to the Pipeline Manager installation directory. By default, it is /opt/ifw.
-
To run RDA, you must first perform an initial setup and then run data collection. To perform the initial setup, run the following command:
perl rda.pl -S -
Run one or more of the following commands:
-
To identify the list of modules:
perl rda.pl -L m
-
To identify the list of profiles:
perl rda.pl -L p
-
To identify the list of modules for the available profiles:
perl rda.pl -x profiles
-
To get online documentation about the BRM module:
perl rda.pl -M BRMr7.def
-
To perform BRM data collection using default values:
perl rda.pl -vImportant:
To collect database-specific data, you must run the command as a SYSDBA because DBA privileges are required to collect the database tables data.
-
When you run RDA, it prompts for information to determine what data to collect and for which products. You can choose to accept the default values or change them based on your BRM and Pipeline Manager installations and system configuration. RDA saves all your responses to the /rda/setup.cfg file.
Note:
You can change the default location of setup.cfg file, if required.For example, to initialize data collection and to generate the output files, RDA prompts for the following setup information:
S000INI: Initializes the Data Collection

Enter the prefix for all the files generated
Hit 'Return' to accept the default (RDA)
>
Enter the directory used for all the files generated
Hit 'Return' to accept the default (/rda/output)
>
Do you want to keep report packages from previous runs (Y/N)?
Hit 'Return' to accept the default (N)
>
Is a fresh collection done as default action (Y/N)?
Hit 'Return' to accept the default (Y)
>
Enter the Oracle home to be used for data analysis
Hit 'Return' to accept the default
>
Enter the domain name of this server
Hit 'Return' to accept the default (portal.com)
>
If your database is running on the same server as RDA, RDA prompts for the following database information:
S200DB: Controls RDBMS Data Collection

Enter the Oracle SID to be analyzed
Hit 'Return' to accept the default (PortalDB)
>
Enter the location of the spfile or the INIT.ORA (including the directory and file name)
>
To collect BRM and Pipeline Manager system information, RDA prompts for the following BRM information:
S380BRM: Collects BRM Software Information

Should RDA collect BRM Software information (Y/N)?
Hit 'Return' to accept the default (Y)
>
Should RDA collect BRM based system information (Y/N)?
Hit 'Return' to accept the default (Y)
>
Enter a pipeline registry file to analyze or . to terminate the list
>
Prompts are displayed that apply to other Oracle products. For these cases, choose the default value.
You can also run RDA in noninteractive mode by using command-line options:
Syntax:
rda.pl -v -d -S -C -R -P -p profile_name [-db_version]
-
-v: Set verbose mode
-
-d: Set debug mode
-
-S: Set up specified modules
-
-C: Collect diagnostic information
-
-R: Generate specified reports
-
-P: Package the reports
-
-p profile_name[-db_version]: Specify the setup profile and the database version. The database version is used only to collect database-specific data.
To collect BRM diagnostic data, run the following command:
perl rda.pl -vdSCRP -p SupportInformer75
To collect BRM- and database-specific data, run the following command:
perl rda.pl -vdSCRP -p SupportInformer75-DB11g
Note:
The database version in the SupportInformer75 profile depends on the version of the database installed for BRM. BRM supports Oracle Database 9i, 10g, and 11g.The final output is packaged in an archive located in the output directory chosen during RDA setup. RDA output is not encrypted and can be viewed by anyone using any web browser.
For information on reporting RDA problems, see "Reporting Problems".
Viewing RDA Documentation
To view the RDA documentation, including the Getting Started, FAQ, and Troubleshooting guides:
-
Go to My Oracle Support (support.oracle.com).
-
In the Search Knowledge Base field, enter 330364.1 and click the Global Search icon.
-
In the search results, click the Remote Diagnostic Agent (RDA) - Main Man Page link.
The Remote Diagnostic Agent (RDA) - Main Man Page appears.
-
In the RDA Main Links section of the page, click the link for the appropriate guide.
Dumping Business Parameters in XML Format
To dump BRM business parameters (/config/business_params objects) in XML format, use the pin_cfg_bpdump utility. See "pin_cfg_bpdump" in BRM Developer's Guide. For more information about business parameters, see "Using /config/business_params Objects" in BRM Developer's Guide and "business_params Reference".
You can use the output as input to another application or utility, such as a diagnostic application. You can also direct the XML output to a file. For example, to direct the output to a file called myfile.xml in the same directory in which the utility is run, enter the following command:
pin_cfg_bpdump > myfile.xml
For each /config/business_params object, the utility outputs a <RESULTS> element that supplies identifying information about the object. The <RESULTS> elements include a <PARAMS> element for each parameter they include. A <PARAMS> element provides the parameter description, name, type, and value.
The following example shows output for the subscription business parameter object with three parameters:
<RESULTS elem="0">
  <POID>0.0.0.1 /config/business_params 8526 0</POID>
  <CREATED_T>1213082439</CREATED_T>
  <MOD_T>1213082439</MOD_T>
  <READ_ACCESS>G</READ_ACCESS>
  <WRITE_ACCESS>S</WRITE_ACCESS>
  <ACCOUNT_OBJ>0.0.0.1 /account 1 0</ACCOUNT_OBJ>
  <DESCR>Business logic parameters for Subscription</DESCR>
  <HOSTNAME>-</HOSTNAME>
  <NAME>subscription</NAME>
  <PROGRAM_NAME>-</PROGRAM_NAME>
  <VALUE />
  <VERSION />

- <PARAMS elem="0">
    <DESCR>Parameter to enable contract days counter feature.This     needs to be set to 1 if the accounts contain the resource     contract days counter</DESCR>
    <PARAM_NAME>discount_based_on_contract_days_feature</PARAM_NAME>
    <PARAM_TYPE>1</PARAM_TYPE>
    <PARAM_VALUE>0</PARAM_VALUE>
  </PARAMS>

- <PARAMS elem="1">
    <DESCR>Parameter to enable or disable best pricing feature. Enabling this feature will be     effective only if license is loaded for best pricing. 1 means enabled.</DESCR>
    <PARAM_NAME>best_pricing</PARAM_NAME>
    <PARAM_TYPE>1</PARAM_TYPE>
    <PARAM_VALUE>0</PARAM_VALUE>
    </PARAMS>

- <PARAMS elem="2">
    <DESCR>Threshold of the number of offerings below which poids of offerings retrieved in     PCM_OP_SUBSCRIPTION_GET_PURCHASED_OFFERINGS with a database search are cached for use in     subsequent calls to the opcode in the same transaction. If the number of offerings     retrieved is above this threshold, then the use of the cache could become     inefficient.</DESCR>
    <PARAM_NAME>get_offerings_from_cache_threshold</PARAM_NAME>
    <PARAM_TYPE>1</PARAM_TYPE>
    <PARAM_VALUE>100</PARAM_VALUE>
    </PARAMS>

- </RESULTS>
To dump business parameters by using the pin_cfg_bpdump utility:
-
Go to the BRM_home/diagnostics/pin_cfg_bpdump directory.
-
Run the following command:
pin_cfg_bpdumpTo direct the output to a file, use the following syntax:
pin_cfg_bpdump > file_name
where file_name is the name of a file in the same directory in which the utility is run.
Using Logs to Monitor Components
BRM records system activity in log files. One log file is generated for each component or application. Review these files daily to monitor your system and detect and diagnose system problems. You can also:
-
Write scripts to look for certain conditions, such as types or numbers of errors, and to notify you when these conditions occur.
-
Record opcode calls in the CM log file. See "Recording Opcode Calls in the CM Log File".
For information about understanding errors, see "Using Error Logs to Troubleshoot BRM".
For information about Pipeline Manager log files, see "About Pipeline Manager Log Files".
Types of Log Files
BRM generates log files for system components, applications, and client applications.
Log Files for System Components
For system processes (or threads) such as CMs and DMs, BRM uses two types of log files:
-
Those that record normal startup activity are named program.log (for example, cm.log, js.log, and dm.log).
-
Those that record activity, such as error conditions, while the system is running. These pinlogs are named program.pinlog (for example, cm.pinlog, js.pinlog, and dm_oracle.pinlog).
Log Files for Applications
For BRM applications, log files are named program.pinlog (for example, pin_billd.pinlog). If an application is missing a configuration file (pin.conf) or if the application fails before it can read the configuration file, it records errors in the default.pinlog log file.
Note:
Calls made by opcodes to get data from storable objects are not recorded in log files.Log Files for Client Applications
BRM Java-based applications, such as Customer Center and Configuration Center, by default do not use log files. However, you can enable error logging by adding entries to the Infranet.properties file that provide configuration information when the application starts. For information about the Infranet.properties file, see "Setting Global Options" in BRM Developer's Guide.
For Payment Tool, the log file default.pinlog is located in the same directory as the executable file.
Location of Log Files
The following are the minimum BRM log files:
-
cm.log
-
cm.pinlog
-
dm.log
-
dm_oracle.pinlog
-
pin_billd.pinlog
Depending on what applications are running, your installation might also have one or more of these log files:
-
dm_email.log
-
dm_email.pinlog
-
pin_invoice_gen.log
-
dm_fusa.log
-
dm_fusa.pinlog
Your customizations or special applications might generate their own log files.
You may want to increase the logging level to 2 (see "Setting the Reporting Level for Logging Messages") and have your notification script detect and act on warning messages. Log files should be archived weekly to a safe storage area.
Tip:
You can write a script to compress the log files and then erase the originals. BRM automatically re-creates new empty log files as required.Default Log File Locations
Log files for system components are stored in BRM_home/sys/component. For example, the CM log file is in BRM_home/sys/cm.
If there is no log file in BRM_home/var/component, the default.pinlog file is used instead. It is stored in BRM_home/sys/component. For example, the CM pinlog file is BRM_home/sys/cm/default.pinlog.
For an application or client application log file, the default location is the directory from which the program was started.
You can leave log files in their default locations or move them.
Changing the Name or Location of a Log File
To change the name or location of the pinlog file for a component or application:
-
Open the configuration file (pin.conf or Infranet.properties) for the component or application. See "Locations of Configuration and Properties Files".
-
Change the relevant entry:
-
logfile: Applications
-
cm_logfile: CM
-
dm_logfile: DM
-
-
Enter the desired name and directory for the log file.
-
Save and close the file.
-
Stop and restart the component or application. See "Starting and Stopping the BRM System".
Tip:
You can change the name of the default application's log file by using the PIN_ERR_SET_LOGFILE function (see "PIN_ERR_SET_LOGFILE" in BRM Developer's Reference).Note:
For Payment Tool, you cannot change the name of the log file. For Java-based BRM client applications, use an Infranet.properties file to specify the name and location of a log file.
Setting the Reporting Level for Logging Messages
By default, BRM components report error messages, and BRM applications report both error and warning messages. You can set BRM to report debugging messages or to not report errors. The four levels of error reporting are:
-
0 = no logging.
-
1 = (default) log error messages only.
-
2 = log error messages and warnings.
-
3 = log error, warning, and debugging messages.
Important:
To avoid performance degradation, use only level 3 logging for debugging.
To change the severity level for logging:
-
Open the configuration file (pin.conf or .properties) for the component or application. See "Locations of Configuration and Properties Files".
-
Edit the loglevel entry. The notes in the configuration file define the options.
-
Save and close the file.
-
Stop and restart the component or application. See "Starting and Stopping the BRM System".
Important:
DMs automatically report errors and warnings and do not use the loglevel entry to set reporting level. To show debugging messages for a DM, see "Increasing the Level of Reporting for a DM".
Getting Debugging Information from Command-Line Utilities
Most BRM utilities use the following command-line parameters:
-
-d: Set the log level to debug and outputs debug information into the log file. If not set, only error-level information is output. Use this parameter if no errors were reported, but the command was not successful (for example, if a /config object was not loaded).
-
-v: Displays information about successful or failed processing as the utility runs.
Note:
This parameter is always used with other parameters and commands. It is not position dependent. For example, you can enter -v at the beginning or end of a command to initiate verbose display. To redirect the output to a log file, use the following syntax with the -v parameter. Replace filename.log with the name of the log file:command any_other_parameter –v > filename.log
Dynamically Changing the CM and DM Log Levels
You can dynamically change the log level of the CM and DM without stopping and restarting them.
To change the log levels dynamically:
-
Pass the log level for the CM and the debug flags for the DM in the input flist to the PCM_OP_INFMGR_SET_LOGLEVEL opcode.
Note:
You change the log levels of the CM and DM at the same time.You can check the current log levels by calling the PCM_OP_INFMGR_GET_LOGLEVEL opcode.
-
Call the opcode by using testnap.
All the new processes after this opcode call will use the new CM log levels and DM debug flags.
Setting the Log Level for a Specific Opcode
You can record debug-level information for a specified opcode without having to reset the default system log level. This enables you to monitor the activity of a specific opcode (and any opcode it calls) without impacting system performance.
When you enable opcode logging, the logging level is increased to debug level 3 for the specified opcode only; all other opcodes are logged at the level specified in the CM pin.conf file.
You can define how many times during a CM session the debug-level reporting occurs for the specified opcode before the default reporting level is restored. This enables you to increase the logging level without having to stop and restart the CM to reset it to the default level.
-
Open the CM pin.conf file in BRM_home/sys/cm.
-
Set the pinlog_debug_opcode entry:
cm pinlog_debug_opcode opcode
where opcode is the opcode name or opcode number.
Note:
If this entry is not set, BRM uses the loglevel entry in the CM pin.conf file to determine the log level. -
Set the pinlog_debug_op_count entry:
cm pinlog_debug_op_count number
where number is the number of times the opcode is recorded at the debug level before the default log level is restored.
-
Save and close the file.
-
Restart the CM. See "Starting and Stopping the BRM System".
For information on setting the system log level, see "Setting the Reporting Level for Logging Messages".
Recording Opcode Calls in the CM Log File
You use the enable_pcm_op_call_stack and max_pcm_op_call_stack_entries CM pin.conf entries to record opcodes in the CM log file.
When enable_pcm_op_call_stack is enabled, the opcodes that are called by BRM clients are recorded in the CM log file.
About Formatting Log Files
You can format a log file to improve readability and traceability of errors by using the splitPinlog script. This script splits a log file into multiple files, one for each combination of process ID (PID) and thread ID (TID) based on the information in the header of the pinlog entries.
To format a log file:
-
Go to the BRM_home/bin directory.
-
Run the following Perl script:
splitPinlog original_pinlog_file
The Perl script creates a file with the name original_pinlog_file.pid.tid.pinlog
For example, running the command:
splitPinlog cm.pinlog
results in these file names:
-
cm.pinlog.342353.12.pinlog
-
cm.pinlog.342353.13.pinlog
Masking Sensitive Data in Log Files
Log files may contain masked fields as configured by your BRM implementation. Subscriber fields, including payment information and user credentials, may be hidden in logs for securing sensitive subscriber data.
See "About Securing Sensitive Customer Data with Masking" in BRM Managing Customers for more information on configuring data masking in system logs.
Maintaining Log Files
Large log files degrade system performance. Check the sizes of log files periodically and delete or archive large files. When you delete or rename a log file, a new empty file is created as soon as a new log entry is created and either a maximum of four hours have elapsed or the application is stopped and restarted. Be especially vigilant when using new custom applications, which commonly makes log files grow quickly.
Checking the Number and ID of a BRM Process
You can check the number of processes running for the CM or a DM. The number should match the number specified in the configuration file (pin.conf) for that component. If not, the processes either did not start or have stopped. You can also look at the process ID (PID) for each process.
Enter the following command:
ps -ef | grep process
The system shows each process and its ID.
For example, to show the processes running for the Paymentech DM, enter the following command:
ps -ef | grep dm_fusa
Dealing with Hung and Looping Processes
A hung process does not respond in a normal fashion.
A looping process uses CPU cycles without doing any useful work.
Checking for Hung Processes
If the CM does not respond to a login attempt, one of the processes in the system might be hung. Check the status of the CM. See "Monitoring CM Activity". The CM should show a new connection. If the CM report shows that the CM is ”waiting on DM,” the DM might be hung. See "Manually Checking the Status of the DM". You can check the database by verifying that it responds to manual SQL commands.
Checking for Looping Processes
If the CPU time for a process is increasing and is out of proportion to the rest of the processes, this might be a looping process. To check the CPU time used by a process, enter the following command twice, separated by a 10- to 30-second interval (or as much as several minutes on a lightly loaded system):
ps -ef | grep process
Stopping a Hung or Looping Process
Note:
Before you stop a hung or looping DM or CM process, check its status at least twice at 30-second intervals (or up to several minutes on a lightly loaded system). For more information, see "Monitoring DM Activity" or "Monitoring CM Activity".Enter the following command to stop a hung or looping process:
kill -ABRT process_id
BRM stops the process and writes a core image file of the process. If you contact Oracle Technical Support about this problem, send the core file along with the relevant log files. (See "Getting Help with BRM Problems".)
Monitoring CM Activity
You can check the CM's status and resolve lost TCP connections.
Manually Checking the Status of the CM
You can monitor the operation of the CM by checking the status at regular intervals and comparing the results with what you expect.
To check the status of the CM:
-
Find the process ID (PID) of the master CM process by looking in the pid file for the CM in BRM_home/sys/cm.
-
Enter the following command:
kill -USR1 PID_of_CM
BRM displays a report on the CM, which shows information about the master CM such as the version and the number of children. If there are CM children, the rest of the reports consist of a single line for each child showing the state, the IP address and port for the application, and the IP address and port of the current DM connection.
Table 2-4 describes the state values:
| Value | Description |
|---|---|
|
1 |
Reading from (or waiting to read from) the application |
|
2 |
Starting to process the operation |
|
3 |
Facilities Module processing in progress (if going to FM) |
|
4 |
Facilities Module processing done, sending response |
|
5 |
Finding DM address (if going to DM) |
|
6 |
Sending operation to DM |
|
7 |
Waiting on DM |
|
8 |
Forwarding DM response to application |
|
9 |
Cleaning up after the operation |
|
10 |
Shutting down the child CM |
|
11 |
Starting the child CM |
Resolving Lost TCP Connections
BRM recognizes when an application closes a TCP connection. If the computer running the client application fails, however, the application might not close the TCP socket.
In the pin.conf files for the CM and the Connection Manager Master Process (CMMP), the keepalive entry specifies whether to monitor the TCP connection.
Note:
This entry should be set to avoid sockets not being closed properly due to network problems or hardware crashes.The CM monitors the TCP connections by using the standard TCP keepalive feature. This lets you detect lost connections and clean up the CM and DM.
With the keepalive feature turned on, BRM uses the system's keepalive APIs to detect a lost connection and to try to reconnect, before closing the socket.
For more information about TCP keepalive options, see the TCP and keepalive documentation for your operating system.
Enabling Java PCM Clients to Use Operating System TCP/IP Keepalive Parameters
If a connection for a Java PCM client is not in use for some time, a BAD_READ error may result. If this becomes a recurring problem, you can enable the client to use the underlying operating system TCP/IP keepalive parameters such as keepalive time, keepalive interval, and keepalive retry.
To enable Java PCM clients to use operating system TCP/IP keepalive parameters:
-
Open the Infranet.properties file of the Java PCM client.
A Java PCM client is any Java client application that communicates with BRM by using the Java Portal Communication Module (Java PCM) API (for example, Customer Center, Developer Center, or a custom application).
-
Add the following entry:
infranet.pcp.socket.keepalive.enabled=true-
true enables Java PCM clients to use operating system TCP/IP keepalive parameters.
-
false prevents Java PCM clients from using operating system TCP/IP keepalive parameters.
By default, BRM prevents Java PCM clients from using operating system TCP/IP keepalive parameters.
-
-
Save and close the file.
Setting the CM Log Time Resolution
By default, the time resolution in CM log files is in seconds. If you need a higher resolution to help diagnose performance issues, change the resolution to milliseconds.
To set the CM log time resolution:
-
Open the CM pin.conf file in BRM_home/sys/cm.
-
Change the value of the cm_logformat entry from 0 to 1, where 0 sets the log time resolution to seconds and 1 sets the log time resolution to milliseconds.
-
Save and close the file.
-
Stop and restart the CM. See "Starting and Stopping the BRM System".
Setting a Timeout Value for Requests Sent to the CM
BRM client applications process requests in a synchronous mode; that is, they wait for a response from the CM before sending the next request. Therefore, if there is an error on the server side, the client application has to wait indefinitely. To prevent this problem, you can set a timeout value for requests sent to the CM. If the CM does not respond within the time specified, the PCP connection layer returns an error message to the client application and closes the connection.
To specify a timeout value, configure your client applications as follows:
-
For BRM client applications that use a configuration (pin.conf) file:
-
Open the pin.conf file in a text editor.
By default, the pin.conf file is in BRM_home/apps/application_name, where application_name is the name of the application, such as pin_billd.
-
Add the following entry to the file:
- nap pcm_timeout_in_msecs milliseconds
where milliseconds is the number of milliseconds to wait before returning an error message and closing the connection.
-
Save and close the file.
-
-
For BRM client applications that use the Infranet.properties file:
-
Open the Infranet.properties file in a text editor.
By default, the Infranet.properties file is in C:/Program Files/Common Files/Portal Software.
-
Add the following entry to the file:
infranet.PcmTimeoutInMsecs= milliseconds
where milliseconds is the number of milliseconds to wait before returning an error message and closing the connection.
-
Save and close the file.
-
Note:
The timeout value specified in the configuration or Infranet.properties file is used for all open connections. If a timeout value is set for a connection in the application itself, that value overrides the value in the configuration or properties file entry.For information on setting timeout values for each connection in your custom C and Java client applications, see "Implementing Timeout for Requests in Your Application" and "Specifying a Timeout Value for Requests" in BRM Developer's Guide.
Configuring Multilevel CM Timeout for Client Requests
You can configure the CM to use two timeouts for handling client requests:
-
A short (suspect) timeout
-
A long (failover) timeout
A Short (Suspect) Timeout
When this timeout period expires, the request for the DM connection is placed in a suspect state, the current transaction is stopped, and the request is returned to the client with the PIN_ERR_TIMEOUT and PIN_ERRCLASS_SYSTEM_SUSPECT errors.
To configure the suspect timeout:
-
Open the CM configuration file (BRM_home/sys/cm/pin.conf) in a text editor.
-
Add the following entry to the file:
pcm_suspect_timeout_in_msecs = milliseconds
where milliseconds is the number of milliseconds in the suspect timeout period.
Note:
The value of this entry must be smaller than the value of the pcm_timeout_in_msecs entry. -
Save and close the file.
A Long (Failover) Timeout
When this timeout period expires, the CM returns a PIN_ERR_TIMEOUT error to the client. In a high-availability system with multiple DMs configured, the CM connects to the secondary DM to process the requests.
To configure the failover timeout:
-
Open the CM configuration file (BRM_home/sys/cm/pin.conf) in a text editor.
-
Add the following entry to the file:
pcm_timeout_in_msecs milliseconds
where milliseconds is the number of milliseconds in the failover timeout period.
Note:
The value of this entry should be larger than the value of the pcm_suspect_timeout_in_msecs entry. -
Save and close the file.
Getting Quality of Service Statistics from the CM
You can collect statistics about CM opcode performance (for example, the number of times an opcode is called or the number of times an opcode returns an error). You can collect statistics on a per-opcode basis. The statistics are written to the CM log file whenever a client connection closes. You can enable and disable this feature by modifying the CM pin.conf file.
To measure latency for an opcode, you can specify up to seven maximum latency times, with each latency time period representing a QoS bucket. For example, if you specify latencies of 10, 20, and 100, the buckets are:
-
0-10 milliseconds: QoS bucket 1
-
10-20 milliseconds: QoS bucket 2
-
20-100 milliseconds: QoS bucket 3
-
Greater than 100 milliseconds: QoS bucket 4
The QoS buckets are defined as follows:
-
QoS bucket 1: less than or equal to QoS time 1
-
QoS bucket 2: greater than QoS time 1 and less than or equal to QoS time 2
-
QoS bucket 3: greater than QoS time 2 and less than or equal to QoS time 3
-
QoS bucket 4: greater than QoS time 3
The information listed in Table 2-5 is collected per opcode:
Table 2-5 Quality Service Statistics from the CM
| Statistic | Description |
|---|---|
|
Opcode |
The opcode that this information pertains to. |
|
Interval timestamp |
The starting timestamp of this interval. |
|
Total opcode call count |
The number of times this opcode has been called in this time interval. |
|
Total error count |
The number of times this opcode has returned an error in this time interval. |
|
Minimum latency |
The fastest elapsed time that this opcode took to finish without returning an error. |
|
Timestamp of minimum latency |
The timestamp when the minimum latency occurred. |
|
Maximum latency |
The slowest elapsed time that this opcode took to finish without returning an error. |
|
Timestamp of maximum latency |
The timestamp when the maximum latency occurred. |
|
Total latency |
Total latency of all successful calls to this opcode, not including the calls that returned an error. |
|
Input flist of maximum latency |
The input flist that was used when the maximum latency occurred. |
|
QoS bucket count |
The number of active QoS buckets for this opcode. |
|
QoS bucket 1 counts |
The number of times that the latency of a successful call to the opcode falls into each bucket. For example, 10 in bucket 1, 12 in bucket 2, and so forth. |
|
QoS bucket times2 count |
The maximum time in nanoseconds for each QoS bucket. |
|
Timestamp of first received opcode |
The timestamp when the first opcode was received. |
|
Timestamp of last received opcode |
The timestamp when the latest opcode was received. |
Configuring CM QoS Statistics
To enable or disable the collection of opcode QoS statistics:
-
Open the CM pin.conf file in BRM_home/sys/cm.
-
Change the value of the cm_opcode_stats entry.
The syntax is:
- cm cm_opcode_stats opcode QoS_1 [, QoS_2, ... QoS_7]
where opcode can be an opcode name or opcode number.
For example, to use an opcode name and four buckets, enter:
- cm cm_opcode_stats PCM_OP_CUST_COMMIT_CUSTOMER 10, 20, 30
For example, to use an opcode number and four buckets, enter the following:
- cm cm_opcode_stats 63 10, 20, 30
Note:
If the entry does not exist, you can add it anywhere in the file. -
Save and close the file.
-
Stop and restart the CM. See "Starting and Stopping the BRM System".
Monitoring DM Activity
You can check the status of a Data Manager (DM) at regular intervals to monitor resource usage. You can also make inferences about the operation of the DM by checking the status at intervals and comparing the results with what you expect.
Manually Checking the Status of the DM
You can check and view the status of the DM in flist format and in a report format.
Checking the DM Status in flist Format
To check the status of the DM in flist format:
-
Go to the BRM_home/sys/test directory.
-
Enter the following commands:
testnap
robj - database_number /status_dm 1
where database_number is the database number of the DM for which you want the status.
BRM displays the status of the DM in flist format.
Note:
You can check the status of only one DM at a time.Table 2-6 describes the fields in /status_dm.
Table 2-6 /status_dm Object Fields
| /status_dm Object Field | Description |
|---|---|
|
PIN_FLD_DM_BIGSIZE |
Specifies the size, in bytes, of the big part of the DM shared memory. |
|
PIN_FLD_SM_PASSTHRU_NAME |
Specifies the current value of the dm_sm_pass_thru_obj entry in the DM pin.conf file. |
|
PIN_FLD_SM_SHMSIZE |
Specifies the maximum shared memory size, in bytes, for a custom DM. Note: Ignore this field if your system uses Oracle DM. |
|
PIN_FLD_TRANS_OP_QUEUED |
Specifies the number of transactions currently queued. This is an instantaneous counter. |
|
PIN_FLD_DM_BACKEND |
Array that defines the DM back end. |
|
PIN_FLD_FLAGS |
Specifies the internal state of the DM back end. These states are used for the internal working of the Oracle DM.
|
|
PIN_FLD_TATTLE_TALE |
This flag is reset each time you retrieve the DM status report. This enables you to see what happened since the last DM report.
|
|
PIN_FLD_DM_FRONTEND |
Array that defines the DM front end. |
|
PIN_FLD_FLAGS |
Specifies the internal state of the DM front end. These states are used for the internal working of the Oracle DM.
|
|
PIN_FLD_TATTLE_TALE |
This flag is reset each time you retrieve the DM status report. This enables you to see what happened since the last DM report.
|
|
PIN_FLD_CONNECTS |
Specifies the number of concurrent connections the front end has received. This is an instantaneous counter. |
|
PIN_FLD_HIWAT |
Specifies the maximum number of concurrent connections the front end received during the life of the DM. This is the maximum value reached by PIN_FLD_CONNECTS for this front end |
|
PIN_FLD_DM_FE_CONNECT |
Array that defines the front-end connection. |
|
PIN_FLD_FLAGS |
Specifies the internal state for a DM context:
|
|
PIN_FLD_DM_FE_STATE |
Specifies the current front-end state in the DM context.
|
|
PIN_FLD_DM_BE_STATE |
Specifies the current back-end state in the DM context:
|
|
PIN_FLD_DM_BE_IDX |
Specifies the back-end index that is performing this connection (transaction). |
|
PIN_FLD_DM_BACKEND |
Array that defines the DM back end. |
|
PIN_FLD_OPCODE |
Specifies the number of the opcode that is being executed. Note: To find an opcode's number, see the opcode header files in the BRM_home/include/ops directory. |
|
PIN_FLD_DM_USED |
Specifies the memory, in bytes, dedicated to a DM context. |
|
PIN_FLD_DM_LOW |
Specifies the smallest available free memory, in bytes, in the connection's heap. |
|
PIN_FLD_DM_HIGH |
Specifies the largest available free memory, in bytes, in the connection's heap. |
|
PIN_FLD_DM_BIG |
Specifies how much big memory this connection has allocated. |
Checking the DM Status in a Report Format
To check the status of the DM in a report format:
-
Find the process ID (PID) of the master DM process by looking in the pid file for the DM in BRM_home/sys/dm_oracle.
-
Enter the following command:
kill -USR1 PID_of_DM
where PID_of_DM is the process ID of the master DM process.
BRM displays the status of the DM in the dm_oracle.log file. The log file shows information about the DM, such as the PID, memory usage, transaction queue, and information about the back ends and the front ends.
Monitoring DM Shared Memory Usage
You can check shared memory usage by looking in the master overview section of the DM report. The number of used and free heap blocks (# used and # free) shows memory usage, expressed in 8-KB blocks. Heap High Water Mark (HWM) is 80% of the total allocated heap blocks of memory. When the #used crosses HWM, DM would throw an error. To prevent failures associated with insufficient memory, verify that # free is a relatively large number. If # free is a small portion of # used, you should increase the size of the shared memory area. Otherwise, operations might fail, returning PIN_ERR_NO_MEM.
The maximum number of bytes used out of DM shared memory (dm_bigsize) is indicated by big_max_used. The maximum number of heap blocks used is indicated by hblock_max_used. For example, let us say the heap blocks used are 3000. If 1000 blocks are released, the number of used blocks are 2000. In this case hblock_max_used will be 3000, which is the largest value of the heap blocks used.
Monitoring DM Transaction Queues
To check the status of transactions, look in the master overview section of the DM report. The trans_op_cnt entry shows the number of transactions currently being processed, and the trans_op_queued entry shows the number waiting to be processed. For applications that require rapid response times, you can adjust the load on the system to keep to a minimum the number of transactions waiting to be processed. See "Improving Data Manager and Queue Manager Performance".
Monitoring DM Back Ends
You can use the back-end report to identify each back-end process ID (PID), the back-end status, and the number of operations processed. A value of 0x1000 (4096) for FLAGS shows that the back end is active. The report also gives information on resource usage.
The second flag value is reset each time the DM status report is received. Therefore, you can tell what has happened (at least once) since the last DM report by a flag bit being clear.
Table 2-7 shows the flag bit values:
| Value | Flag | Description |
|---|---|---|
|
0x8 |
IO output |
Never cleared for back ends. |
|
0x4 |
IO input |
Cleared when the back end starts an operation. |
|
0x2 |
CMD |
Cleared when the back end is given a command or transaction. |
|
0x1 |
SELECT |
Cleared when the back end wakes up using select(2). |
On a quiet back end, the second flag value stays at f. The counters of most interest are those that keep track of the total number of operations and total transactions.
As shown in Table 2-8, the back-end state values are a bit mask flag:
Table 2-8 Back-End State Bit Mask Values
| Value | Description |
|---|---|
|
0x1 |
Busy; currently doing an operation. |
|
0x2 |
Locked to a transaction. |
The back-end index and operation may be left over from the previous operation and may be no longer valid. The used field indicates memory usage. When idle, one 8-KB chunk is normally used. During an operation or transaction, this amount varies.
Monitoring DM Front Ends
You can use the front-end report to identify each front-end process ID (PID), the front-end status, and the number of operations processed. A value of 0x1000 (4096) for FLAGS shows that the front end is active.
For each connection, the report also gives a snapshot of the connection status. When idle, the state values should each be 0 (zero).
Table 2-9 describes the front-end state values:
Table 2-9 Front-End State Values
| Value | Description |
|---|---|
|
0 |
Waiting to receive an operation from the CM. |
|
1 |
Receiving from the CM. |
|
2 |
Sent an operation to be processed, waiting for back end. |
|
3 |
The operation is done. |
|
4 |
Sending a response to the CM. |
The front-end flags are the same as the back-end flags, except that the front ends clear the IO output value when they send a reply back to the CM. The information in the connection report is a snapshot of the connection status.
Increasing the Level of Reporting for a DM
By default, DMs report errors and warnings. You can have a DM report debugging messages as well.
You can specify which debugging messages you want written to the log. There are three settings to control which debugging information is logged:
-
DM_DEBUG variables control the logging of opcode-processing debug messages.
-
DM_DEBUG2 variables control the logging of data dictionary processing debug messages.
-
DM_DEBUG3 variables debug the SQL statements produced by different parts of the DM.
The BRM_home/include/dm_debug.h file contains definitions of the flags you can set. You specify which individual flags you want to enable for each setting by summing the values of the flags and including the sum in an environment variable or in the DM configuration (pin.conf) file.
For example, to log information about transaction tracing, you set DM_DEBUG to 0x70, which is the sum of the following individual flags:
DM_DEBUG_TRANS_IN_PR     0x10
DM_DEBUG_TRANS_OUT_PR    0x20
DM_DEBUG_TRANS_TRACE     0x40
Depending on what information you want to log, you can include values for any combination of the three settings (DM_DEBUG, DM_DEBUG2, and DM_DEBUG3).
The way you increase the level of reporting depends on your operating system and the DM:
-
For all DMs other than dm_oracle and dm_tax, you can include debug statements in the DM's configuration (pin.conf) file. You specify each setting separately as in the following example:
- dm dm_debug    0xFFF003FF
- dm dm_debug2   0x10
- dm dm_debug3   0x10
-
For dm_oracle and dm_tax, you must specify the debugging information as environment variables. You set a separate environment variable for each debug setting.
You can dynamically change the debugging level without stopping the DM. For more information, see "Dynamically Changing the CM and DM Log Levels".
Using Environment Variables to Set Debug Options
To set debug options for dm_oracle and dm_tax:
-
Stop the DM. See "Starting and Stopping the BRM System".
-
In the environment from which the DM starts, set the environment variable for debugging. For example:
C-shell:
setenv DM_DEBUG3 0xFFFF003FKorn shell:
DM_DEBUG3=0xFFFF003F
export DM_DEBUG3
-
Start the DM. See "Starting and Stopping the BRM System".
-
Run the DM operations for which you want to display debugging information.
-
Stop the DM.
-
Open the log file for the DM (for example, dm_oracle.pinlog) and review the messages.
-
Return DM logging to its normal level. Otherwise, subsequent DM activity will generate large log files.
Editing the Configuration File to Set Debug Options
To set debug logging options for all DMs except dm_oracle and dm_tax:
-
Stop the DM. See "Starting and Stopping the BRM System".
-
Open the configuration file (pin.conf) for this DM. See "Locations of Configuration and Properties Files".
-
Edit the three debugging entries to set the level of debugging reporting.
-
Save and close the file.
-
Start the DM. See "Starting and Stopping the BRM System".
-
Run the DM operations for which you want debugging information.
-
Stop the DM.
-
Open the log file for the DM (for example, dm_fusa.pinlog) and review the messages.
-
Return DM logging to its normal level by commenting out the debugging entries in the configuration file. Otherwise, subsequent DM activity will generate large log files.
Logging the DM Process Time Information for Performance Diagnostics
To diagnose performance problems with the DM process, you can configure the DM to log the time it takes to process each opcode. You can use this information to determine the time the DM spends on its internal operations and the time it spends on the database operations.
Before the DM starts processing an opcode, it logs the current time. Then for each SQL statement that the DM sends to the database for the opcode, it logs the following information:
-
Session ID
-
Statement ID
-
Time taken by the database to process the SQL statement
To log the timing information for the SQL statement, set the DM_DEBUG3 flag to 0x00010000, which corresponds to the DM_DEBUG3_TIME_INFO variable defined in the BRM_home/include/dm_debug.h file.
You can also dynamically set or change this variable when the DM is running. See "Dynamically Changing the CM and DM Log Levels".
Replacing Failed DM Child Processes
All DMs, such as IMDB Cache DM, Paymentech DM and Email DM are set to automatically replace child processes that have stopped. This feature prevents the system from losing DM processes because of transient failures over time. For initial testing, or if you have recurring errors that would cause a ”fork and die” endless loop (in an Oracle database, for example), you can tell the DM to not replace failed child processes:
-
Open the configuration file (pin.conf) for this DM. See "Locations of Configuration and Properties Files".
-
Change the value of the dm_restart_children entry to 0.
-
Save and close the file.
-
Stop and restart the DM. See "Starting and Stopping the BRM System".
When a child process stops and is replaced, BRM notes the event in the error log file for the DM.
Note:
BRM does not automatically replace child processes that are hung. See "Dealing with Hung and Looping Processes".Monitoring Pipeline Manager
For information about improving Pipeline Manager performance, see "Optimizing Pipeline Manager Performance".
Monitoring Pipeline Manager Memory Usage
You can use the MemoryMonitor module to monitor Pipeline Manager memory during startup and while it is processing files. You set a threshold for the amount or percentage of memory that determines when Pipeline Manager should issue a warning or gracefully shut down. You can set the thresholds as a percentage or as kilobytes or megabytes.
For example, if you set ShutdownFreeMemLimit to 50 and ScaleUnit to M, Pipeline Manager shuts down gracefully when the remaining free system memory reaches 50 MB. If you set WarningFreeMemLimit to 10 and ScaleUnit to P, Pipeline Manager logs a warning when the remaining free system memory reaches 10 percent.
See "Memory Monitor" in BRM Configuring Pipeline Rating and Discounting.
Monitoring Pipeline Manager EDR Throughput
You can monitor the following statistics for each pipeline:
-
Number of event data records (EDRs) since startup.
-
Accumulated EDR processing time since startup.
-
Total number of EDRs since startup, independent of any transaction. This number is incremented after every processed EDR.
-
Total number of EDRs after the transaction ended. This number is not incremented until the current transaction has ended.
-
The real-time EDR count increments after each EDR is processed, while the transaction count increments EDR count only after transaction/file processing is ended.
-
Number of transactions since startup.
-
EDRs per second (throughput). This data includes the timestamp of when the measurement was taken.
You can use the Operations Management Framework (OMF) HTTP and SNMP protocols to access the data. See "Pipeline Statistics Probes".
Getting Recent Pipeline Log File Entries
You can display recent log file entries in the OMF HTTP server. See "Using the HTTP Instrumentation Protocol to Read OMF Instrumentation Data". The entries are also included in the Diagnostic Data Handler output file. See "Using the Diagnostic Data Handler to Get OMF Diagnostic Data".
The log messages are stored in a circular buffer that stores the last 1000 log messages. See "Log File Probes".
You can change the number of error messages stored in the buffer. To do so, edit the CircularBufferSize registry entry in the ITO section.
For example:
ProcessLog
{
    ModuleName = LOG
    Module
    {
        ITO
        {
            LogLevel            = Debug
...
            CircularBufferSize  = 100
         }
Monitoring IMDB Cache DM
In addition to the pin_ctl utility, you can use the following features to monitor the IMDB Cache DM:
-
Core dumps. See "Generating the IMDB Cache DM Core Dump".
-
Log files. See "Troubleshooting IMDB Cache DM errors".
-
Opcode latency statistics. See "Getting Opcode Statistics from IMDB Cache DM".
-
System tables. See "About the Global Transaction System Tables and Views".
Generating the IMDB Cache DM Core Dump
To generate the IMDB Cache DM core dump:
-
Go to the system where IMDB Cache DM is started.
-
Enter the following command:
setenv sbUtDumpCore 1
Troubleshooting IMDB Cache DM errors
By default, IMDB Cache DM reports errors and warnings in the dm_tt.pinlog file. Additionally, you can use environment variables to set debug options to report debugging information in the log file.
IMDB Cache DM logs system activities in the /var/portal/7.5/dm_tt/dm_tt.pinlog file. Any error in the IMDB Cache DM is reported in the dm_tt.pinlog file, and the error number is returned to the Connection Manager (CM). You should monitor this log file daily to detect and diagnose system problems. You might want to create a script file to periodically scan the log file and notify you if it detects any error messages.
Getting Opcode Statistics from IMDB Cache DM
You can collect statistics about opcode performance from IMDB Cache DM. IMDB Cache DM prints the opcode stack with details about the total time spent at Oracle IMDB Cache and at the BRM database. This data can be used to compare opcode performance and for debugging purposes. For example, if the database operation is taking more time, check the database statistics to ensure the database is running optimally.
To get opcode statistics from IMDB Cache DM, set the following entry in the IMDB Cache DM and Oracle DM pin.conf files:
- dm enable_pcm_op_call_stack 1
The opcode stack is printed for the whole transaction after the transaction is committed or aborted.
The following is a sample opcode stack output:
0.000000000 Enter PCM_OP_TRANS_OPEN (0x0)
0.000187000 Exit  PCM_OP_TRANS_OPEN (0x0) TT Time    0.000000000
42.727118000 Enter PCM_OP_READ_FLDS (0x0)
42.729580000 Exit  PCM_OP_READ_FLDS (0x0) TT Time    0.001472000
566.135870000 Enter PCM_OP_TRANS_ABORT (0x0)
566.136405000 Exit  PCM_OP_TRANS_ABORT (0x0) TT Time    0.000187000
To customize the opcode stack size, set the following optional configuration entry in the IMDB Cache DM and Oracle DM pin.conf files.
- dm max_pcm_op_call_stack_entries Size
About the Global Transaction System Tables and Views
You can find information about global transactions in the following system tables and views:
-
GLOBAL_TRANS_T. See "About the GLOBAL_TRANS_T Table".
-
GLOBAL_PENDING_TRANS_T. See "About the GLOBAL_PENDING_TRANS_T Table".
-
DBA_2PC_PENDING. See "About the DBA_2PC_PENDING View".
About the GLOBAL_TRANS_T Table
The GLOBAL_TRANS_T table stores the status of each Active global transaction in the system. The pin_tt_schema_gen utility creates an instance of this table for each logical partition in your system.
Table 2-10 describes the columns in the GLOBAL_TRANS_T table. This table contains one row for each back end in its associated logical partition.
Table 2-10 GLOBAL_TRANS_T Table Description
| Column Name | Description |
|---|---|
|
BACKEND_ID |
Specifies the back-end number. This table contains a row for each back end supported by the logical partition. The number of back ends (or rows) depends on the dm_n_be parameter in the IMDB Cache DM pin.conf file. For more information, see "Configuring DM Front Ends and Back Ends". |
|
GLOBAL_TRANS_NAME |
The global transaction name used by each back end. Each back end assigns the same name to each global transaction that it opens. The global transaction name uses the following naming convention: T_LogicalPartNum_BackendID where: LogicalPartNum is the logical partition ID, such as 0.1.0.1 or 0.0.0.2. BackendID is the back-end number. The Oracle database converts this name into hexadecimal format. For example, T_0.2.0.1_3 is converted into 0.545F302E322E302E315F33. Important: The global transaction name is shared between the back ends of an active-standby pair. |
|
GLOBAL_TRANS_STATE |
Specifies the state of the global transaction:
|
About the GLOBAL_PENDING_TRANS_T Table
The GLOBAL_PENDING_TRANS_T table stores the status of each Pending global transaction in the system.
The IMDB Cache Manager installer creates this table in each schema in your BRM database. You must be logged in as the database schema user to access this table.
Table 2-11 describes the columns in the GLOBAL_PENDING_TRANS_T table.
Table 2-11 GLOBAL_PENDING_TRANS_T Table Description
| Table Column | Description |
|---|---|
|
DATABASE_NO |
Specifies the database number assigned to the logical partition. For example, 0.1.0.1. |
|
BACKEND_ID |
Specifies the back-end number. This table contains a row for each back end supported b y the logical partition. The number of back ends (or rows) depends on the dm_n_be parameter in the IMDB Cache DM pin.conf file. For more information, see "Configuring DM Front Ends and Back Ends". |
|
GLOBAL_TRANS_NAME |
The global transaction name used by each back end. Each back end assigns the same name to each global transaction that it opens. The global transaction name uses the following naming convention: T_LogicalPartNum_BackendID where: LogicalPartNum is the logical partition ID, such as 0.1.0.1 or 0.0.0.2. BackendID is the back-end number. The Oracle database converts this name into hexadecimal format. For example, T_0.2.0.1_3 is converted into 0.545F302E322E302E315F33. Important: The global transaction name is shared between the back ends of an active-standby pair. |
|
LOCAL_TRANS_NAME |
Specifies the local transaction identifier, in the following the format: Integer.Integer.Integer For example: 13.45.844769 |
|
COMMIT_ADVICE |
Recommends whether the Oracle Database Administrator should commit or rollback the transaction. This is set to either Commit or Rollback. |
|
FAIL_DATE |
Specifies the data and timestamp when the global transaction failed. |
About the DBA_2PC_PENDING View
The DBA_2PC_PENDING view stores detailed information about each Pending global transaction.
DBA_2PC_PENDING is a static data dictionary view in the BRM database. To enable the IMDB Cache DM and Oracle DM processes to access this view, your system administrator must grant read privileges to the BRM database user.
Table 2-12 describes the columns in the DBA_2PC_PENDING view.
Table 2-12 DBA_2PC_PENDING View Description
| Column Name | Description |
|---|---|
|
LOCAL_TRAN_ID |
For extended architecture (XA) transactions: Specifies the branch qualifier element of an XA transaction ID (XID), which uniquely identifies the local BRM database branch of the XA transaction. For IMDB Cache Manager global transactions: Specifies the local transaction identifier in the format integer.integer.integer. For example: 13.45.844769. When the connection's LOCAL_TRAN_ID and GLOBAL_TRAN_ID are the same, the node is the transaction's global coordinator. |
|
GLOBAL_TRAN_ID |
For XA transactions: Specifies the global transaction ID element of an XID, which uniquely identifies the XA transaction. For IMDB Cache Manager global transactions: Specifies the global database identifier in the format global_db_name.db_hex_id.local_tran_id, where db_hex_id is an eight-character hexadecimal value used to uniquely identify the database. This common transaction ID is the same on every node for a distributed transaction. When the connection's LOCAL_TRAN_ID and GLOBAL_TRAN_ID are the same, the node is the transaction's global coordinator. |
|
STATE |
Specifies the transaction's state, which can be one of the following values:
|
|
MIXED |
YES means that part of the transaction was committed on one node and rolled back on another node. |
|
TRAN_COMMIT |
Specifies the transaction comment or, if transaction naming is used, the transaction name. |
|
HOST |
Specifies the host machine name. |
|
COMMIT# |
Specifies the global commit number for committed transactions. |
Maintaining IMDB Cache DM
This section describes steps you can take to maintain the IMDB Cache DM, including:
Handling Active IMDB Cache DM Failure
In a high-availability system, when an active IMDB Cache DM fails, its associated data store is not notified of the failure, so the data store's status remains active. This prevents the standby data store from becoming active.
Because its associated data store is still on standby, the standby DM rejects all CM requests with the PIN_ERR_NOT_ACTIVE error to indicate that it is in standby mode and not accepting requests. (The PIN_ERR_NOT_ACTIVE error is recorded as PIN_ERR_NOT_PRIMARY in the CM log file.)
Therefore, if an internal IMDB Cache DM error prevents Oracle Clusterware from restarting a DM, you must manually change the standby data store's state to active. This enables the standby DM to switch its state to active and process the requests redirected to it by the CM.All CM requests will fail until either the active or standby IMDB Cache DM establishes a connection with an active data store.
Handling Active Node Failure
When Oracle IMDB Cache goes down, you must restore the data store by detaching and reattaching the data store to the grid and then re-creating the schema and reloading the BRM objects.
To restore the data store, do the following:
-
Detach and reattach the data store to the grid. See Oracle In-Memory Database Cache User's Guide for information on how to detach and reattach data store to a grid.
-
Using ttIsql, run tt_schema.sql on Oracle IMDB Cache to re-create the BRM cache groups schema.
-
Using ttIsql, run the load SQL file on Oracle IMDB Cache to reload the BRM objects into the cache groups.
Note:
In a high-availability system, Oracle Clusterware handles detaching and reattaching the data store to the grid. See "How IMDB Cache DMs Fail Over".Managing Cache Group Data
Data in the cache groups is stored in shared memory. To avoid running out of shared memory, purge expired BRM objects from the Oracle IMDB Cache to free shared-memory space. Additionally, you can configure an aging policy for the cache groups to purge least-recently-used (LRU) objects.
See "About Managing Data in Oracle IMDB Cache" for more information about purging BRM objects from the Oracle IMDB Cache.
Finding and Fixing Global Transaction Errors
Your Oracle database administrator should check the GLOBAL_PENDING_TRANS_T table periodically for Pending global transactions.
Perform the following for each new record in the GLOBAL_PENDING_TRANS_T table:
-
In the GLOBAL_PENDING_TRANS_T table, check the new record's "commit_advice" and "local_trans_name" column values.
-
Determine the record's commit state in the DBA_2PC_PENDING view. To do so, connect to the BRM database, log in as the SYSDBA user, and enter the following SQL command:
select GLOBAL_TRAN_ID, STATE from DBA_2PC_PENDING where LOCAL_TRAN_ID = 'LocalTranID';
where LocalTranID is the record's local transaction ID as specified in the "local_trans_name" column of the GLOBAL_PENDING_TRANS_T table.
The query returns the record's commit state. If the state is set to Prepared, proceed to the next step.
-
Fix the error by forcing either a roll back of the transaction or a commit.
-
If the "commit_advice" column from step 1 was set to Rollback, connect to the BRM database, log in as the SYSDBA user, and enter the following SQL command:
rollback force 'LocalTranID';
-
If the "commit_advice" column from Step 1 was set to Commit, connect to the BRM database, log in as the SYSDBA user, and enter the following SQL command:
commit force 'LocalTranID';
-
For example, assume the GLOBAL_PENDING_TRANS_T table includes the entries shown in Table 2-13.
Table 2-13 Sample GLOBAL_PENDING_TRANS_T Table Entries
To fix the Pending global transaction in the first row:
-
Note that the record's "local_trans_name" is set to 13.45.844769 and the "commit_advice" is set to Rollback.
-
Determine the record's commit state in the DBA_2PC_PENDING view. Log in to the BRM database as the SYSDBA user and execute the following SQL command for local transaction ID 13.45.844769:
select GLOBAL_TRAN_ID, STATE from DBA_2PC_PENDING where LOCAL_TRAN_ID = '13.45.844769'; Rollback -
Force a rollback of the transaction, because the returned commit state was Rollback:
rollback force '13.45.844769';
Monitoring Customer Center Activity
You can configure Customer Center to send flist information to a log file by using the SDK to modify the Infranet.properties file. You can use this information to monitor Customer Center activity and to resolve problems.
See "Using Customer Center SDK" in BRM Developer's Guide.
Monitoring Hardware and Operating Systems
To monitor your system using standard tools, use monitoring utilities such as vmstat, sar, and top on UNIX, or use OS performance monitors such as Glance on HP-UX IA64 systems.
On Solaris systems, use sysdef to find information about kernel parameter settings. This is especially useful for determining if per-process shared memory, file descriptor, or thread limits are adequate. pmap is useful for separating memory usage into total, resident, shared, and private.
Checking the Version Numbers of Components
You can check the version numbers of all BRM and pipeline components installed on a machine by using the pinrev and piperev utilities. These utilities return the following information for each component, ServicePak, FeaturePak, and patch installed on a machine:
-
Product name
-
Version number
-
Components
-
Build time
-
Installation time
Tip:
Run these utilities whenever you are working with Oracle Technical Support to help them re-create your system environment and troubleshoot your problems.
Checking BRM Component Version Numbers
To check which BRM components are installed on your machine, go to the BRM_home/bin directory and run the pinrev utility:
pinrev
BRM displays the versions of all products installed on your machine. For example:
PRODUCT_NAME=Portal_Base
VERSION=7.5.0
COMPONENTS= "Portal Base Install Scripts","Rogue Wave Libraries","Common Database Scripts","batch_controller","pin_billd","pin_cfg_bpdump","pin_inv","cmmp","cm_proxy","sample","dm_email","pin_export_price","config_export","credit_control","sox_unlock_service","adu","infmgr","infmgr_cli","dm_invoice","DM Feature","dm_oracle","bip_udf","formatter","null","nmgr","pin_subscription","testnap","uei","cm","Java PCM Files","Shared Objects for Communication","Shared Perl Modules","Common Install Scripts",
BUILD_TIME= 5-23-2011 14:3:7
INSTALLED_TIME=Mon, 23 May 2011 15:27:45 -0700
Tip:
To print a report of the version information, direct the output of the pinrev utility to a file with a .csv extension, which you can open in Microsoft Excel. For example:pinrev > BRM.csv
Important:
The pinrev utility does not display information about the uninstallation of any BRM component. Only installation information is displayed.Checking Pipeline Component Version Numbers
To check which pipeline components are installed on your machine, go to the Pipeline_home/tools directory and run the piperev utility:
piperev
The pipeline displays the versions of all products installed on your machine. For example:
PRODUCT_NAME=Pipeline
VERSION=7.5.0
COMPONENTS= "Common files","Pipeline Framework Files","Pipeline Sample Files","Pipeline TimesTen(TT) Multi Partition","Pipeline Database Scripts","Pipeline Misc Files","Pipeline Tools files","PDK files","Rogue Wave Files",
BUILD_TIME= 9-28-2011 13:10:51
INSTALLED_TIME=Thu, 29 Sep 2011 17:33:27 -0700
Tip:
To print a report of the version information, direct the output of the piperev utility to a file with a .csv extension, which you can open in Microsoft Excel. For example:piperev > BRM.csv
Important:
The piperev utility does not display information about the uninstallation of any pipeline component. Only installation information is displayed.Using the Diagnostic Data Handler to Get OMF Diagnostic Data
Use the Diagnostic Data Handler to collect analysis data during a crash, exception, or critical error or by performing a snapshot. You can use the Diagnostic Data Handler with Pipeline Manager.
When the Diagnostic Data Handler collects data, it creates a text file that includes information obtained from instrumentation probes. The information includes:
-
The stack trace of the Pipeline Manager process.
-
Log file entries from the pipeline log circular buffers. See "Getting Recent Pipeline Log File Entries".
-
Diagnostic and performance data collected by Operations Management Framework (OMF) probes. The relevant data includes:
-
HTTP server
-
SNMP
-
Real-time pipeline statistics
-
EDR statistics
-
You specify the diagnostic file name by editing the DiagnosticFileName registry entry. If an existing diagnostic file exists, it is renamed to include the process ID and the date and time that the new file was created. For example:
diagnostic.dat.3418.20060824_113734
You can manually remove old files as needed. You should archive the data files regularly.
By default, diagnostic files are stored in Pipeline_home/log .
The DiagnosticDataHandler entry is a top-level section in the registry:
DiagnosticDataHandler
{
   DiagnosticFilePath = ./log
   DiagnosticFileName = diagnostic.dat
}
For more information, see "Diagnostic Data Handler" in BRM Configuring Pipeline Rating and Discounting.
About Operations Management Framework
Operations Management Framework (OMF) provides a framework for monitoring and controlling the BRM system. OMF is implemented for the following components:
-
Pipeline Manager, including batch pipeline and real-time pipeline.
-
Multi-threaded framework (MTF).
OMF includes the following components:
-
Instrumentation Probe API. This component includes probes that gather system data and can control processes.
A probe is part of the code for a component. It collects and sets instrumentation data about that component. For example:
-
A reference object cache (ROC) synchronization probe can collect information about precommits, postcommits, and rollbacks.
-
A Diagnostic Data Handler probe can create a snapshot of the Pipeline Manager system.
-
-
Instrumentation Probe Broker. This component provides data from the Instrumentation Probe API to the instrumentation protocols. The Instrumentation Probe Broker runs as part of a Pipeline Manager instance.
-
Instrumentation Protocol Plugins. These components provide an interface for client tools and web browsers. There are two protocols:
-
SNMP. This protocol uses the SNMP daemon to provide instrumentation data to client tools, and to diagnostic tools such as the Pipeline Manager Diagnostic Data Handler.
You can use SNMP utilities to get and set instrumentation data. To do so, you find the instrumentation object IDs (OIDs) in the MIB.
For more information, see "Using the SNMP Instrumentation Protocol to Monitor and Control BRM Components".
-
HTTP. This protocol uses a web interface to provide instrumentation data to web applications. BRM includes a default XML style sheet that you can customize to display selected information.
See "Using the HTTP Instrumentation Protocol to Read OMF Instrumentation Data".
Note:
The Instrumentation Protocol Plugins have their own probes (for example, to record the number of SNMP GET operations).
-
Typically, SNMP is used for monitoring the system, and the HTTP interface is for more interactive use.
Figure 2-1 shows the OMF components:
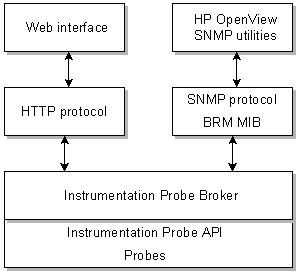
About Probe Data
Probes can handle data in the following ways:
-
Attribute probe. This is the simplest form of data, consisting of a name/value pair. For example:
Number of Startup Threads: 20
-
Group probe. This is a list of name/value pairs about a related process. For example:
Thread Info:
Pool Type       Round Robin
Thread Count    10
-
Table probe. This is a list of groups. For example:
DMO Server Configuration:
Name            Host Name             Port Number
DMO Server 1    dmo1.corp.com         13093
DMO Server 2    dmo2.corp.com         13093
-
BigTable probe. This returns large amounts of data (for example, the contents of a log file).
BigTable probes are not supported by SNMP. Therefore, you can only display data from them by using the HTTP protocol.
Using the SNMP Instrumentation Protocol to Monitor and Control BRM Components
SNMP (Simple Network Management Protocol) is a widely-used protocol for monitoring network equipment, computer equipment, and other devices.
When SNMP is configured, you can use SNMP utilities to get and set instrumented data. BRM includes the AGENT++ SNMP utilities. See "SNMP Utilities".
Important
You can use SNMP utilities other than AGENT++ (for example, NetSNMP). If you use the AGENT++ SNMP utilities, you cannot use symbolic SNMP names in SNMP commands. For example, instead of using the following command:
snmpWalk 10.196.129.31 portal.components.mtf.connectionConfigurations.dmoTable.dmoEntry –P20761 -S
Use the following command:
snmpWalk 10.196.129.31 1.3.6.1.4.1.3512.1.5.2.2.1 –P20761 -S
About the SNMP Components
The SNMP architecture consists of one master agent per machine, and multiple subagents. Each subagent reads a dynamic MIB file to support changes to the objects being monitored. The subagents use the AgentX protocol to communicate with the master agent. The SNMP clients use the SNMP protocol to communicate with the master agent.
Figure 2-2 shows the SNMP components.
Installing SNMP
Install the BRM SNMP package before installing the BRM Third-Party Software package. The SNMP package includes the following:
-
Agent++ SNMP server and configuration files.
-
Agent++ SNMP client tools.
-
The base BRM MIB file.
Configuring SNMP Components
The SNMP instrumentation protocol runs as an SNMP subagent. SNMP subagents can read from and write to instrumented objects defined in the MIB. subagents connect to the master agent by using the AgentX subagent protocol. For information on configuring and running SNMP subagents, see the SNMP documentation.
To start the SNMP master agent, use the following command:
master_agent -l Master_agent_port -x AgentX_port &
where AgentX_port must be the same as defined in the registry file.
For more information, see the SNMP documentation.
Problems Using SNMP on Oracle Solaris 10
If you are unable to run SNMP utilities, complete the following steps to solve the problem:
-
Open the etc/system file using a text editor.
-
Add the following entries:
set ip:do_tcp_fusion=0x0
set ip:tcp_fusion_rcv_unread_min=0
-
Save and close the file.
-
Restart the system.
Enabling SNMP Instrumentation Data Collection
To enable or disable instrumentation data collection, use the Instrumentation section in the Pipeline Manager registry file. If you enable these entries, the SNMP subagent starts when Pipeline Manager starts.
Important:
You can enable instrumentation data collection in any Pipeline Manager instance, including those for rating and rerating.The Instrumentation section includes the following entries:
-
Use the ProbeBroker section to point to the directory that contains probe information files. The default is Pipeline_home/instrumentation.
-
Use the SnmpServer entry to configure the SNMP protocol.
-
Use the Port entry to define the SNMP AgentX port number.
Important:
The port must be the port you assigned when you configured the SNMP master agent and subagent. -
Use the WaitTimeout entry to define how long to wait, in milliseconds, before reconnecting to the master agent and reinitializing the MIB.
The default is 10 milliseconds.
-
Use the ProcessDescription entry to provide a name for the process being monitored. You see the name when you run SNMP commands, for example, and SNMP walk. Providing different names is helpful when you run more than one of the same type of process on a single host.
The default is:
user:process_name:registry_file
where:
-
user is the name of the user who ran the process.
-
process_name is the name of the process.
-
registry_file is the name of the registry file that configured the process.
-
The following is a sample Instrumentation section:
Instrumentation
  {
  ProbeBroker
  {
    ProbeInfoFilePath = ./instrumentation
  }
  SnmpServer
  {
    Port = 11960
    ProcessDescription = ifw
    WaitTimeout = 10
  }
  HttpServer
  {
    Port = 12019
    StyleSheetFile = ./instrumentation/portal_omf.xsl
    PortalLogoFile = ./instrumentation/portal_omf.gif
  }
}
Important:
If you use SNMP monitoring in a Pipeline Manager instance, stop all monitoring requests to Pipeline Manager before you stop it. To stop the monitoring requests, stop the master SNMP agent. You can use the kill command. For example:kill -9 master_agent_pid
About the BRM MIB
The BRM MIB defines the structure of the managed data in the BRM system. It includes all the processes and probes that are registered as instrumented objects.
The MIB is described in the PORTAL-MIB.txt file in BRM_home/instrumentation. For a description of the MIB, see "BRM OMF Instrumented Objects".
About Dynamic Object IDs
You can run multiple instances of the same type of process on a single host. Therefore, these separate processes must be identified by SNMP. To do so, BRM creates object IDs (OIDs) dynamically by using:
-
The base OID from the MIB.
-
A process ID from a process table.
-
A registry ID from a registry table.
-
For table probes only, an instance ID.
The OID for a probe uses the following format:
1.3.6.1.4.1.3512.1.component_id.module_id.1.probe_id.process_id.registry_id.instance_id
To use SNMP to access the probe value, you must find the process ID, registry ID, and instance ID. For example, to find the OID for a specific process batchSizeLimit entry:
-
See "BRM OMF Instrumented Objects" to find the name of the probe.
-
To find the base OID, look in the MIB file or in "BRM OMF Instrumented Objects". For example:
1.3.6.1.4.1.3512.1.2.1.1.1.1
-
Use the snmpWalk command on the Process table to find the process ID for the component you want to find the value for.
The OID for an entry in the process table is:
1.3.6.1.4.1.3512.1.101.1
The snmpWalk command is:
snmpWalk host_name 1.3.6.1.4.1.3512.1.101.1 -Pport -S
For example:
snmpWalk frisco 1.3.6.1.4.1.3512.1.101.1 -P44293 -S
The results show:
1.3.6.1.4.1.3512.1.101.1.1.1 = 1The process ID is 1.
-
Use the snmpWalk command on the registry table to find the registry ID.
The OID for an entry in the registry table is:
1.3.6.1.4.1.3512.1.102.1
So the snmpWalk command is:
snmpWalk host_name 1.3.6.1.4.1.3512.1.102.1 -Pport -S
-
Find the instance ID.
For all probes that are not in a probe table, the instance ID is 0. In this case, the MIB file shows that batchSizeEntry is a group probe:
transactionManagerGroupEntry ::= SEQUENCE {
    batchSizeLimit                  Integer32,
    loggingOff                      DisplayString,
    transactionManagerGroupIndex    Integer32
The instance ID is 0.
The OID for this instance of batchSizeEntry is:
1.3.6.1.4.1.3512.1.2.1.1.1.1.1.18.0
You can use that OID to get or change the value. For example, to get the value:
snmpGet frisco 1.3.6.1.4.1.3512.1.2.1.1.1.1.1.18.0 -P44293
Tip:
To get all available probe values in the process, you can run the snmpWalk command at the top level of the MIB structure. For example:snmpWalk frisco 1.3.6.1.4.1.3512.1 -P44293 -S
For more information about using probe OIDs to get data, see "About Probe Data" and "Getting and Setting Instrumentation by Using SNMP".
About Instance IDs for Table Probes
The instance ID for a table probe is the row number in the table. For example, the numSnmpGetRequests probe is part of a table that shows SNMP requests as shown in Table 2-14:
Table 2-14 Instance IDs for Table Probes
| SNMP MIB Table Index | MIB Table Name | SNMP MIB Table OID | Number of 'GET' Requests | Number of 'GETNEXT' Requests | Number of 'SET' Requests |
|---|---|---|---|---|---|
|
1 |
ProcessTable |
1.3.6.1.4.1.3512.1.101.1 |
2 |
||
|
2 |
RegistryTable |
1.3.6.1.4.1.3512.1.102.1 |
98 |
An snmpWalk command on the numSnmpGetRequests probe gives these results:
1.3.6.1.4.1.3512.1.4.2.2.1.1.6.5.1 = 2
1.3.6.1.4.1.3512.1.4.2.2.1.1.6.5.2 = 98
1.3.6.1.4.1.3512.1.4.2.2.1.1.6.5.3 = 6
1.3.6.1.4.1.3512.1.4.2.2.1.1.6.5.4 = 20
1.3.6.1.4.1.3512.1.4.2.2.1.1.6.5.5 = 8
1.3.6.1.4.1.3512.1.4.2.2.1.1.6.5.6 = 1
1.3.6.1.4.1.3512.1.4.2.2.1.1.6.5.7 = 6
1.3.6.1.4.1.3512.1.4.2.2.1.1.6.5.8 = 6
1.3.6.1.4.1.3512.1.4.2.2.1.1.6.5.9 = 6
1.3.6.1.4.1.3512.1.4.2.2.1.1.6.5.10 = 14
1.3.6.1.4.1.3512.1.4.2.2.1.1.6.5.11 = 12
1.3.6.1.4.1.3512.1.4.2.2.1.1.6.5.12 = 5
The last number in the OID is the instance ID, which corresponds with the table row, 1-4. The value shown in the Number of GET Requests column is the probe value.
About the Process Table
The process table uses these OIDs:
processTable (101)
        processEntry (1)
                processIndex (1)
                processDescr (2)
-
processIndex is the process ID assigned in the table.
-
processDescr is the description of the process (for example, ifw). This description is defined in the Instrumentation section of the registry file. See "Enabling SNMP Instrumentation Data Collection".
For example, an SNMP walk could give these results, where the process ID is 1 and the process description is ifw:
1.3.6.1.4.1.3512.1.101.1.1.1 = 1
1.3.6.1.4.1.3512.1.101.1.2.1 = ifw
Note:
The last number in the OID is the row number, which is the same as the process ID.Each process can have multiple registry settings, each of which needs its unique ID. Therefore, these registered objects are identified in the registry table.
About the Registry Table
The registry table uses these OIDs:
registryTable (102)
        registryEntry (1)
                registryIndex (1)
                registryName (2)
-
registryIndex is the ID assigned in the table.
-
registryName is the name used in the registry file (for example, ifw or ifw.Pipelines.ALL_RATE).
For example, an SNMP walk could give these results:
1.3.6.1.4.1.3512.1.102.1.1.1.2 = 2
1.3.6.1.4.1.3512.1.102.1.2.1.2 = ifw.SignalHandler
Note:
The last number in the OID is the row number, which is the same as the ID.Getting and Setting Instrumentation by Using SNMP
To get and set instrumentation data, use the SNMP tools installed in BRM_home/bin. The following SNMP utilities are included:
Sample SNMP Input and Output
This section presents sample input and output for the snmpGet, snmpSet, and snmpWalk commands.
snmpGet
In the following sample, the master agent is on balrog/28093:
$ snmpGet sampleserver 1.3.6.1.4.1.3512.1.1.1.1.1.1.36.3.0 -P12345
SNMP++ Get to sampleserver SNMPV1 Retries=1 Timeout=1000ms Community=public
Oid = 1.3.6.1.4.1.3512.1.1.1.1.1.1.36.3.0
Value = Startup complete
snmpSet
In the following sample, the master agent is on sampleserver/1234:.
snmpSet sampleserver 1.3.6.1.4.1.3512.1.1.6.1.1.1.32.7.0 -P12345
SNMP++ Set to sampleserver SNMPV1 Retries=1 Timeout=1000ms SET-community=public GET-community=public
Oid = 1.3.6.1.4.1.3512.1.1.6.1.1.1.32.7.0
Current Value = << WRITE-ONLY PROBE >>
Value Type is Octet String
Please enter new value: yes
Set Status = Success

MTF / Version R2 10092 stopped at 24.08.2007 13:35:04
snmpWalk
In the following sample, the master agent is on sampleserver/12345:
snmpWalk sampleserver 1.3.6.1.4.1.3512.1.1.1.1.1 -P12345 -S
SNMP++ snmpWalk to kabini2 SNMPV1 Retries=1 Timeout=1000ms Community=public
1.3.6.1.4.1.3512.1.1.1.1.1.1.1.35.0 = true
1.3.6.1.4.1.3512.1.1.1.1.1.1.36.2.0 = Normal
1.3.6.1.4.1.3512.1.1.1.1.1.1.36.3.0 = Startup complete
1.3.6.1.4.1.3512.1.1.1.1.1.1.36.4.0 = true
1.3.6.1.4.1.3512.1.1.1.1.1.1.36.5.0 = 10
1.3.6.1.4.1.3512.1.1.1.1.1.1.36.6.0 = 5
1.3.6.1.4.1.3512.1.1.1.1.1.1.36.7.0 = 5
1.3.6.1.4.1.3512.1.1.1.1.1.1.36.8.0 = 0
1.3.6.1.4.1.3512.1.1.1.1.1.1.36.9.0 = 20
1.3.6.1.4.1.3512.1.1.1.1.1.1.36.10.0 = DEFAULT,REALTIME,DEFAULT_INACTIVE,REALTIME_INACTIVE
End of SUBTREE Reached
Total # of Requests = 11
Total # of Objects = 10
Using the HTTP Instrumentation Protocol to Read OMF Instrumentation Data
To get instrumentation data from the HTTP server, you configure the HTTP server in the Pipeline Manager registry files. You then send the URL for the data you want to retrieve.
Note:
You can read instrumentation data from the HTTP server, but you cannot set it.Figure 2-3 shows the HTTP display:
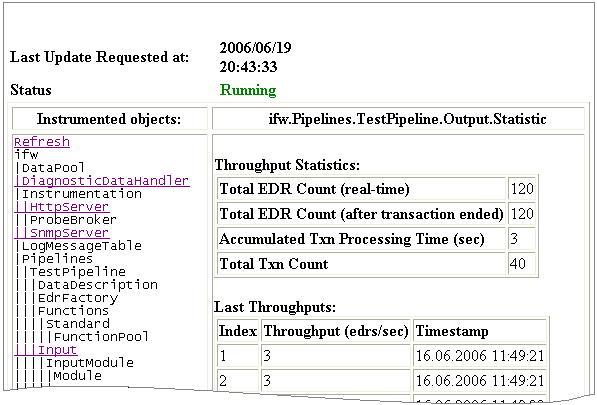
Enabling HTTP Display of Instrumentation Data
To enable or disable instrumentation data collection, use the Instrumentation section in the Pipeline Manager registry files. If you enable these entries, the HTTP server starts in a thread when Pipeline Manager starts.
Important:
You can enable instrumentation data collection in any Pipeline Manager instance, including those for running real-time rating and rerating.The Instrumentation section includes the following entries:
-
Use the ProbeBroker section to point to the directory that contains probe information files. The default is Pipeline_home/instrumentation.
-
Use the HttpServer section to configure the HTTP protocol.
-
Use the Port entry to specify the port number for the HTTP server.
-
Use the StyleSheetFile and PortalLogoFile entries to specify the path to the XML style sheet and the logo displayed in the web interface.
-
The following is a sample Instrumentation section:
Instrumentation
  {
  ProbeBroker
  {
    ProbeInfoFilePath = ./instrumentation
  }
  SnmpServer
  {
    Port = 11960>
    ProcessDescription = ifw
  }
  HttpServer
  {
    Port = 12019
    StyleSheetFile = ./instrumentation/portal_omf.xsl
    PortalLogoFile = ./instrumentation/portal_omf.gif
  }
}
Important:
If you use HTTP monitoring in a Pipeline Manager instance, stop all monitoring requests to Pipeline Manager before you stop it. To stop the monitoring requests, stop the master SNMP agent. You can use the kill command. For example:kill -9 master_agent_pid
Displaying Instrumentation Data in a Web Browser
To display instrumentation data in a web browser, use a URL with this format:
http://host_name:port/registry_entry
-
The host name and port number are those configured in the registry file.
-
The registry entry is an entry from the Pipeline Manager registry files.
For example, to get all instrumentation from Pipeline Manager, use ifw, the top-level registry entry:
http://host_name:port/ifw
Customizing the Data Displayed by the HTTP Instrumentation Protocol
BRM includes a default style sheet to display HTTP instrumentation data. You can customize the style sheet and logo to display selected instrumentation data.
The default style sheet is portal_omf.xsl. It is installed in BRM_home/instrumentation.
The default logo is portal_omf.gif. It is installed in BRM_home/instrumentation.