17 About Customizing the Services Framework Manager Client
This chapter describes how to customize the Oracle Communications Billing and Revenue Management (BRM) Services Framework Manager client.
For information about configuring other components of Customer Center and for building and deploying Customer Center customizations, see "Customizing the Customer Center Interface" in BRM Developer's Guide.
About Customizing the Services Framework Manager Client
You can customize Customer Center prepaid components according to your business requirements.
To customize prepaid components of Customer Center:
-
Use JBuilder to extend or create:
-
A service panel for a prepaid service.
-
One or more device panels for each service.
-
Search entry and search results panels for each device.
-
-
For each prepaid service, you use BRM Configurator to specify:
-
The text to be displayed in Customer Center for the service panel.
-
If the default or a custom service panel should be used.
-
(For the default service panel) if the default extended rating attribute (ERA) panel should be displayed, and if so, specify its name.
-
(For the default service panel) if the supplementary services panel should be displayed, and if so, if it should be displayed in expanded mode.
-
(For the default service panel) the order to display devices configured for the service.
-
(For a custom service panel) the custom panel class name.
-
-
For each device supported by a prepaid service, you use Configurator to specify:
-
The displayed name of the device.
-
If Customer Center should add the device to the account search.
-
If Customer Center should use system inventory retrieval to prepopulate device fields when a device is selected.
-
The class name for the device panel.
-
The class name for the device search panel.
-
The class name for the device search results panel.
-
Overview of Customizing the Services Framework Manager Client
Follow these steps to configure Customer Center prepaid components:
-
Extend or create service, device, device search entry, and device search results panels by using JBuilder. See "Creating Custom Service and Device Panels".
-
Specify layout attributes and the any extended panels by using Customer Center SDK Configurator. See "Configuring Service and Device Panel Layouts by Using Configurator"
Creating Custom Service and Device Panels
You use JBuilder for these tasks:
Coding Your Customizations
You create or extend service or device panels by using BRM Developer Center and JBuilder. See "Setting Up JBuilder to Customize the Customer Center Interface" and "Adding Custom Fields to Customer Center" in BRM Developer's Guide.
For panel extension code samples, see the CustomerCareSDK\CCExamples\TelcoFramework directory.
Creating Custom Service Panels
You can customize the default service panel by extending the base class (PTelcoServicePanel). By default, this base service panel is displayed when a service is selected in Customer Center by a customer support representative (CSR) as shown in Figure 17-1:

You can create a more specific panel for /service/telco/service_name by extending the default panel (PTelcoServicePanel) and renaming it Pservice_namePanel.
By default, the following methods return the values specified in properties entries in the CCSDK_home/CustomerCareSDK/CustCntr/custom/bin/WizardCustomizations.properties file. This properties file is created by the Customer Center SDK Configurator when you save your changes. Table 17-1 lists the Wizard Customizations properties in the file.
Note:
-
For more information on Configurator, see "Configuring Service and Device Panel Layouts by Using Configurator" and "Customizing the Customer Center Interface" in BRM Developer's Guide.
-
For more information on these methods, see the JavaDocs in CC SDK_home/CustomerCareSDK/docs directory.
Table 17-1 Wizard Customization Properties
| Method | Properties File Entry(WizardCustomizations.properties) |
|---|---|
|
protected boolean isSupplementaryVisible () |
Telco.service.service_name.supplementary.display = true |
|
protected Boolean isSupplementaryExpanded () |
telco.service.service_name.supplementary.expanded = true |
|
protected String getExtendedAttrClassName () |
telco.service.service_name.extended |
|
Protected List getDeviceSequence () |
telco.service.service_name.devices = num bar |
|
protected Map getDevicePanels () |
extended.device.bar = PBarPanel |
|
protected String getServiceName () |
extended.service.service_name = Pservice_namePanel |
Creating Custom Device Panels
You extend the PTelcoDevicesBase class to customize the layout of the device panel for a specific device. For information about the public methods in this class, see PTelcoDevicesBase in the Customer Center JavaDocs.
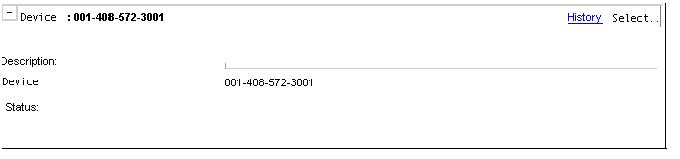
The default base device panel (PDefaultDevicePanel) appears as shown in Figure 17-2:
Important:
]You must extend TTelcoDevicesBase because it does not contain a default user interface (UI) implementation.Sample Device Panel Subclass Template
Customer Center SDK includes the subclass template ccsdk_home/CustomerCareSDK/CCExamples/TelcoFramework/TelcoDeviceTemplate.txt. Use this as a starting point to create a device panel subclass from PTelcoDevicesBase.
This template includes:
-
A header.
-
An Update button, which connects to an action listener that invokes the method prepopulate ().
Note:
The Update button is displayed only when the prepopulate option is enabled. See "About Device Prepopulation". -
A Search button, which connects to an action listener that invokes the method searchForDevice (), which displays the device search dialog.
-
A History button, which connects to an action listener that invokes the method showDeviceHistory ().
Note:
The History button is displayed only during account maintenance actions. -
One field each for Description, Device ID, and Status.
You can keep or remove the header and buttons, and you can append components to the panel by using JBuilder.
Note:
The sample template has prepopulation enabled.Creating Custom Device Search Panels
You extend PDeviceSearchDialog to customize device search panels for a specific device.
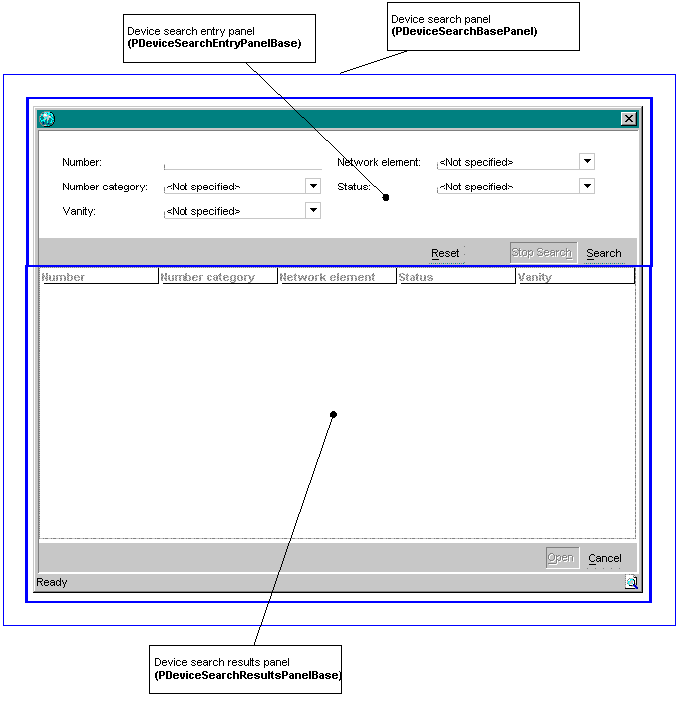
The base device search panel appears as in Figure 17-3:
You can override most of these methods in your extended class to perform custom actions. For information about the public methods in this class, see PDeviceSearchDialog in the Customer Center JavaDocs.
PDeviceSearchDialog contains the panel PDeviceSearchBasePanel which contains a search entry panel and a search results panel.
-
The search entry panel contains the fields that a search will be based on.
-
The search results panel contains a table that shows the results of a search.
PDeviceSearchBasePanel reads the names of the entry panel and results panel class names from the Configurator properties file (WizardCustomizations.properties). You configure the properties file by using Customer Center SDK Configurator. See "Configuring Service and Device Panel Layouts by Using Configurator".
For information about the public methods in this class, see PDeviceSearchBasePanel in the Customer Center JavaDocs.
Creating Custom Device Search Entry Panels
You extend PDeviceSearchEntryPanelBase to customize device search entry panels for a specific device.
The base device search entry panel appears as follows:
You can override most of these methods in your extended class to perform custom actions. For information about the public methods in this class, see PDeviceSearchEntryPanelBase in the Customer Center JavaDocs.
Sample Search Entry Subclass Template
Customer Center SDK includes the subclass template ccsdk_home/CustomerCareSDK/CCExamples/TelcoFramework/DeviceSearchEntryPanelTemplate.txt. Use this as a starting point to create a device search entry panel subclass from PDeviceSearchEntryPanelBase.
The sample entry panel uses the status and device ID fields as the search criteria. You can add more search fields to this file by using JBuilder.
Creating Custom Device Search Results Panels
You extend PDeviceSearchResultsPanelBase to customize device search results panels for a specific device.
You can override most of the public methods in your extended class to perform custom actions. For information about the public methods in this class, see PDeviceSearchResultsPanelBase in the Customer Center JavaDocs.
Sample Search Results Subclass Template
Customer Center SDK includes the subclass template ccsdk_home/CustomerCareSDK/CCExamples/TelcoFramework/DeviceSearchResultsPanelTemplate.txt. Use this as a starting point to create a device search results panel subclass from PDeviceSearchResultsPanelBase.
The sample results panel has a PIASpecSpreadSheet table. This table contains a column for device status. You can rename this template and add more columns to this table.
Utility Class CCTelcoUtility
Customer Center SDK includes the utility class CCTelcoUtility that provides methods for implementing clients. Most of the methods implement cache information retrieved from the database so that subsequent calls do not require additional calls to the database.
Important:
If there are any changes on the server side, you must shut down and restart Customer Center to apply the changes.For information about the public methods in this class, see CCTelcoUtility in the Customer Center JavaDocs.
Configuring Service and Device Panel Layouts by Using Configurator
You use Customer Center SDK Configurator to configure service and device panel layout and to specify any custom panels you created.
Telco Service Configurator
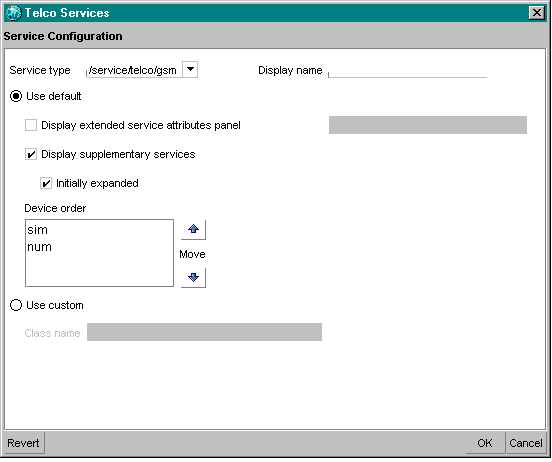
To configure the layout of the service panel for a telco service:
-
Choose Tools - Telco - Service from the Configurator main menu.
The following screen in Figure 17-4 is displayed:
-
Configure the options in Table 17-2 as required:
Table 17-2 Telco Service Configurator Options
Option Service Panel Action Default Service type
From the pull-down list, select a service type, such as /service/telco/gsm, for which the search panel configurations should apply.
One of the available services
Display name
Enter the text to be displayed for the service panel.
Blank text box
Use default
Select this option to use the default service panel.
Selected
Display extended service attributes panel
Select this option to display an extended service attributes panel.
Do not display
Display extended service attributes panel
Enter the extended service attributes panel class name.
Blank text box
Display supplementary services
Select this option to display the supplementary services panel.
Do not display
Initially expanded
Select this option to display the supplementary services panel in expanded mode.
Do not expand
Device order
Arrange the listed devices in the order you want to display their panels.
Note: Only devices relevant to the specified service type appear in the list.
random
Use custom
Select to use a custom service panel.
Note: If you use a custom panel, the fields under the Default button are unavailable. You must configure the layout attributes of your panel within your subclass.
Not selected
Custom: Class name
Enter the custom service panel name.
Blank text box
When you save your Configurator session, customizations are written to the WizardCustomizations.properties properties file.
Telco Device Configurator
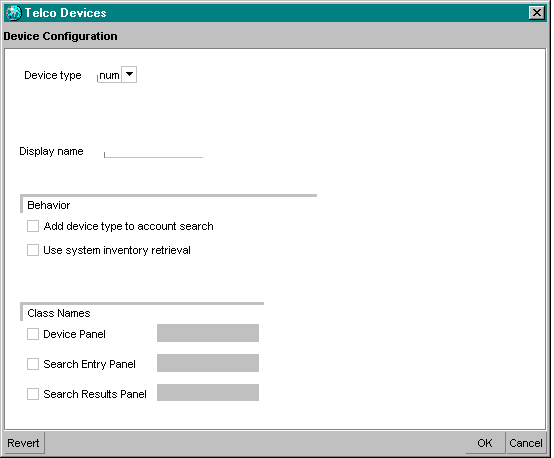
To configure the layout of device panels for a Telco service:
-
Choose Tools - Telco - Device from the Configurator main menu.
The following screen as shown in Figure 17-5 is displayed:
-
Configure the options in Table 17-3 as required:
Table 17-3 Telco Device Configurator Options
Option Device Panel Action Default Device type
Select the name of the device type for which properties are being defined.
One of the available devices
Display name
Enter the name that should be displayed in the device panel.
Blank text box
Add device type to account search
Select this option to allow CSRs to search for this device type.
Do not allow search
Use system inventory retrieval
Select this option to enable automatic search for the first available device in the system and populate the device panel with the information for that device.
Do not use system inventory retrieval
Device panel
Select this option and specify the class name for the device panel to be displayed.
Blank text box
Search entry panel
Select this option and specify the class name for the device search entry panel to be used for this device.
Blank text box
Search results panel
Select this option and enter the class name for the device search results panel to be used for this device.
Blank text box
When you save your Configurator session, customizations are written to the WizardCustomizations.properties properties file.
About Device Prepopulation
Prepopulation can speed up CSR account creation and device updating by preselecting a device from the BRM database for the CSR.
-
Prepopulation Enabled
If prepopulation is enabled, the next available device of the type is selected, and the device panel is populated with information specific to this device.
By default, when prepopulation is enabled, the device panel base class searches the BRM database to retrieve the next available device. You can override this behavior with your own prepopulation logic. See "Creating Custom Device Panels".
-
Prepopulation Disabled
If prepopulation is disabled, the device panel is not populated with any information when the CSR selects a device type. The CSR must use the search dialog box to select a device.