A User Interface
This section contains information about the interface used with Oracle URM.
The following groups of screens are shown in this chapter:
A.1 Navigation Aids
The following screens can be used to quickly access parts of the interface.
A.1.1 User Dashboard Page
The dashboard is used to navigate quickly to different elements of the software. The following screen is the default User Dashboard. An Administrative Dashboard is also available.
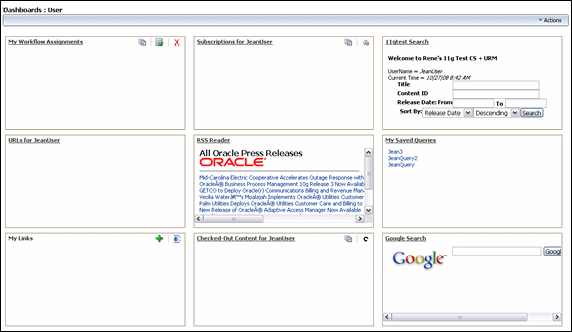
To access this screen, click Records then Dashboards then User from the main menu.
The elements on this screen will vary depending on the configuration of the system.
The following list describes the default task boxes:
-
My Workflow Assignments: lists items assigned to the user in a workflow.
-
Subscriptions for <username>: lists any items subscribed to by the user.
-
Default search panel: displays a modified search panel for the main repository.
-
URLS for <username>: displays any saved URLs.
-
RSS Reader: displays the RSS feeds set up by the user.
-
My Saved Queries: displays any saved queries created by the user. These include queries created using Oracle UCM or queries created using Oracle URM.
-
My Links: displays any linked content.
-
Checked-Out Content: displays a list of items checked out to the user.
-
Google search: displays a search box for Google search.
A.1.2 Create/Edit Dashboard Page
Use this page to create a new dashboard without basing the new dashboard on a previously created dashboard.

To access this page, click Records then Dashboards then Create New from the Top menu.
A.1.3 Assigned Rights Page
This screen displays assigned rights and roles for the logged-in user.
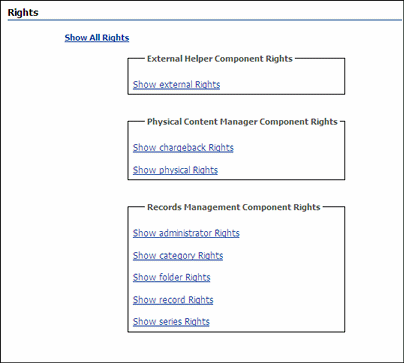
To access this screen, click Records then Rights from the Top menu. The sections are shown 'collapsed'. To expand a section, click the highlighted link.
A.1.4 My Favorites Screen
Use this screen to track the items marked for inclusion in a Favorites list.

To access this screen, click Records then Favorites from the Top menu or click My Content Server then My Favorites from the Main menu.
To add items to these lists, on a listing page select the box next to an item and click Add to Favorites. If an item can be added, the Add to Favorites menu option is displayed on the listing page.
A.2 Content Check-In Page
The following is a partial view of a sample content Check In page. This page is used to add content to the repository. A similar page is used for searching the repository for content. Details specific to a search operation are included in the following information and are noted as such.
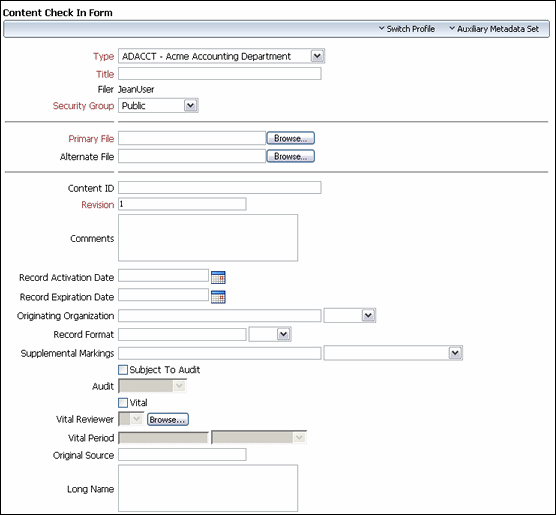
To access this page, click New Checkin from the Top menu. This screen can also be accessed from other points in the interface, such as from within a retention schedule when adding content to a schedule.
This screen may be customized to contain information specific to a particular company or organization. Other fields may also appear if specific components are enabled. In addition, profiles can be used to show or hide fields.
The follow subsections describe the information most commonly found on this screen. For details about customized fields, see the administrator of the site.
A.2.1 Check-In Page Metadata Fields
This section describes the metadata fields on a standard checkin page. Depending on a user's role and rights, the user may not see all the fields listed here.
Metadata fields on the check in form are dependent on enabled components and the profiles used. The metadata fields included and described in the following table are representative of those that may be included in the check in form.
| Field | Description |
|---|---|
| Type field | The type (department) of the file. Select from a list of predefined values.
This is required, but is pre-filled. |
| Title field | A descriptive name identifying the revision. Maximum length 80 characters. Required. |
| Filer field | The user who created or revised the content item. Required.
You may be able to select from a list of users. This value can be changed only if you have administrative permission. |
| Security Group field | The security group, which is a set of files with the same access permission. Required.Default: RecordsGroup. |
| Primary File field | The path and file name of the native file being checked in. Required.
|
| Alternate File field | The path and file name of an alternate web-viewable file or a file that can be converted to web-viewable format.
|
| Content ID field | The unique identifier for the content item. Required.
Note: If a content ID is already filled in or if this field is not displayed, the system is configured to automatically generate content IDs. |
| Revision field | Revisions increment automatically with each check-in of the content item, so generally, do not change this value. |
| Comments field | Additional notes about the file. Maximum length is 255 characters. |
| Security Fields section | See "Security Fields" for details. |
| Subject to Review section | See "Subject to Review Fields" for details. |
| Correspondence Fields section | See "Correspondence Fields" for details. |
| Date fields section | See "Date, Format, and Audit Fields" for details. |
A.2.1.1 Date, Format, and Audit Fields
Checkin forms may include the following data and format related fields:
A.2.1.2 Security Fields
The following security-related fields may be included:
| Field | Description |
|---|---|
| Supplemental Markings | One or more supplemental markings applied at the content level. |
| Security Classification | The current classification of the content item (denoted as "Current Classification" in the DoD 5015.2 specification). If No Markings is set as the lowest classification level in the system and if this field is set to No Markings, then no classification validation is performed. |
| Classifying Agency | The agency or person classifying the record. For example, an agency head, a corporate CEO, and so forth. |
| Classified By | Person classifying the item. This is required if Classification Derived from is not populated. |
| Classification Derived From | Classification guide(s) from which the classification of the item is derived. This is mandatory if the Classified by field is blank. Suggested values for the following fields are displayed automatically, but can be changed:
|
| Derived From Topic | Topic associated with a classification guide used to derive classification. This is an option list whose values are dependent on the Classification Derived from field. The information icon to the right of the list presents the description of the selected topic. |
| Initial Classification | Classification at time of creation. Required for classified content. This is entered automatically if the classification is derived from a source, multiple sources, or a topic. The available options include:
|
| Reason(s) for Classification | Specification for classification. Required if Classified by field is populated; otherwise, optional. This is entered automatically if the classification is derived from a source, multiple sources, or a topic. This is an automatically populated custom option list with values varying by organization. |
| Declassify Exemption Category | A category that exempts the item from being declassified after the standard declassification period (as defined by the records administrator; typically 10 years). Examples are 'reveal an intelligence source', 'compromises corporate security', and so on. |
| Declassify on Event | An event triggering the declassification of an item automatically. Classified content requires Declassify on event, Declassify on date, or both fields to be completed. This may be entered automatically if the classification is derived from a source, multiple sources, or a topic. For information about declassification, see the Oracle Fusion Middleware Setup Guide for Universal Records Management. |
| Declassify on Date | A date triggering the automatic declassification of an item. This can be entered automatically if the classification is derived from a source, multiple sources, or a topic. For information about declassification, see the Oracle Fusion Middleware Setup Guide for Universal Records Management. |
| Downgrade Instructions | Instructions on how content can be downgraded if it is subject to downgrading. This is required if there is a Downgrade on event or Downgrade on date or a combination of both. |
| Downgrade on Event | An event triggering the automatic downgrading of content classification. For information on downgrading, see the Oracle Fusion Middleware Setup Guide for Universal Records Management. |
| Downgrade on Date | A date triggering the automatic downgrading of content classification. For information on downgrading records, see the Oracle Fusion Middleware Setup Guide for Universal Records Management. |
| Content Relations | Used to link items to each other. After inserting a link, it can be deleted by clicking the Delete icon (a red X). |
| Classification Guide Remarks | Text describing the classification guide usage. |
| Release Date | The date and time the revision is available for viewing.
This is required but is pre-filled. |
| Expiration Date | The date and time the revision will no longer be available for viewing in the repository.
|
A.2.1.3 Subject to Review Fields
Check-in forms may include the following review-related fields:
| Field | Description |
|---|---|
| Subject to Review | Indication the item is subject to review. Selecting this box enables the Reviewer and Review Period fields.
Review items are defined by an organization as needing to be reviewed by a specified person within a specified time frame. Do not select the box if this is not considered an item that must be reviewed. |
| Reviewer | Reviewer, selected from the list. The reviewer list is a list of people, defined by a Records Administrator, who have access to this review item. The reviewer receives notifications. |
| Review Period | The period used for reviews, selected from the list. |
A.2.1.4 Correspondence Fields
Check-in forms may include the following correspondence-related fields:
| Field | Description |
|---|---|
| Is Correspondence | Additional metadata fields. Used if an item is an e-mail being checked in using Outlook Integration. |
| Author or Originator | Specifies from whom the e-mail was sent. If the Is Correspondence box is disabled, enter the content author or originator. |
| Addressee(s) | Specifies to whom the e-mail was sent. |
| Other Addressee(s) | Specifies any additional people who were copied on the original e-mail. |
| Email Subject | The subject line of the original e-mail. |
| Email To Lists | Alias lists used in the original e-mail. |
| Received Date | The date an e-mail was received. |
| Publication Date | The date an e-mail was initially sent. |
A.3 Browsing Interface
The following screens are used when browsing for content and retention schedules and storage.
A.3.1 Category or Series Content Page
This page displays the content in a category. A similar page displays content in a series.
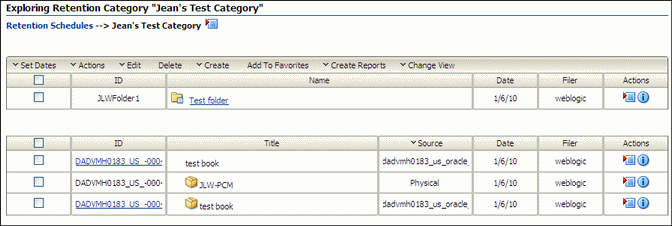
To access this page, click Browse Content then Retention Schedules. Click the name of a object in the list.
To display information about the category or series, click Information from the Action menu of an item and choose the type of information to view (category or series nformation, disposition information and metadata information if a category.)
A.3.2 Series Information Page
This page displays information about a series, including its retention schedule, identifier, and root status.
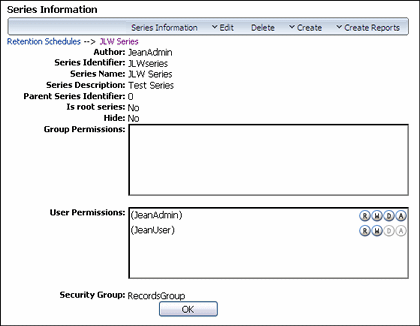
To access this screen, click Browse Content then Retention Schedules. The Exploring Series "Retention Schedules" Page is displayed. Navigate to the series to view. In the row for the series, click the Info icon or click Series Information from the item's Action menu.
Note that not all menu options appear on this screen for all users. The options depend on the rights assigned to a user.
A.3.3 Disposition Information Page
This page is used to view details about dispositions.

To access this screen, click Browse Content then Retention Schedules. The Exploring Series "Retention Schedules" Page is displayed. Navigate to the retention category whose dispositions to view. In the row for the category click Information then Disposition Information from the item's Action menu.
A.3.4 Category Information Page
This page is used to view details about categories. The information and menus on the page may differ depending on the metadata in use at a site and the permissions used to access the screen.
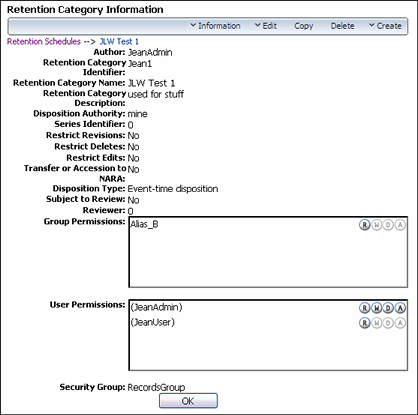
To access this screen, click Browse Content then Retention Schedules. The Exploring Series "Retention Schedules" Page is displayed. Navigate to the category to view. In the row for the category, click Information then Category Information from the item's Action menu.
Note that not all menu options appear on this screen for all users. The options depend on the rights assigned.
A.3.5 Exploring Storage Page
This page show defined storage locations. This page is only available in Physical Content Management.
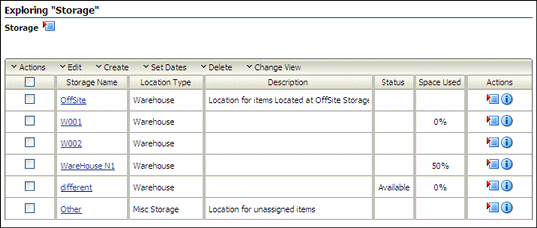
To access this page, click Physical then Storage from the Top menu.
Note that not all menu options appear on this screen for all users. The options depend on the rights assigned.
The Exploring Page for the top level (called "Storage") is displayed.Use the links on this page to navigate within the storage space hierarchy.
| Element | Description |
|---|---|
| Storage Name | The name of the storage location. Click the link to display a new Exploring Page which lists the storage locations contained in the selected storage location. This functionality enables a user to move down to the lower levels of the storage space hierarchy. |
| Location Type | The type of the storage location. The available location types are defined by an administrator. |
| Description | The description of the storage location, as specified when the location was defined. |
| Status | The current status of the storage location.
A status is displayed only for storage locations that can hold content items. If a storage location cannot hold content at that level, the status column is empty. |
| Space Used | The occupancy percentage of the storage location and all its children. For example, 25% indicates one-quarter of the maximum allowed number of items that can be stored in the storage location (and all its children) is currently assigned to the location. |
| Action Menu | The available menu options depend on the storage location in the row, and may include:
|
A.3.6 Storage Information Page
This page is used to view information about an existing storage location.
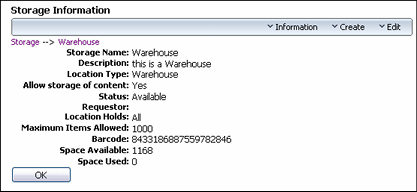
To access this page, click Physical then Storage from the Top menu. The Location Page for the top level of the storage hierarchy is displayed.
Navigate to the storage location. Click Information then Storage Information from the item's Action menu.
A storage location's ability to hold content depends on its assigned Location Type and applies to that particular level only. For example, in the default hierarchy, shelves have several positions, each of which can hold content items, but no content items can be directly assigned to the shelf level (only to the positions on a shelf). Therefore, the location type 'Shelf' cannot store content, whereas the type 'Position' can.
Important:
By default, the available storage space is recalculated daily at midnight. Therefore, the displayed storage availability information may not be entirely up to date as the day progresses since it still reflects the situation from the night before. The administrator may force a recalculation of the storage space availability at any time.A.4 Content Information Page
The Content Information Page displays detailed information about content. The information displayed depends on the configuration of the system and may vary from the screens depicted here. To access this page, click Content Information from the Action menu for an item on a Search Result Page.
For details about the fields on this page, see the "Content Check-In Page".
The page contains several distinct areas:
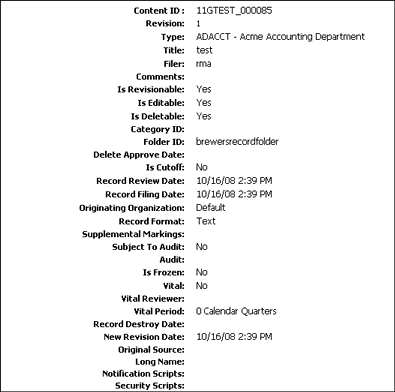
A.4.1 Content Information Section
This area provides filing information about the retained item, including content ID, title, filer, and publication date. For further details on the standard content information metadata, see the Oracle Fusion Middleware User's Guide for Content Server and online help system.
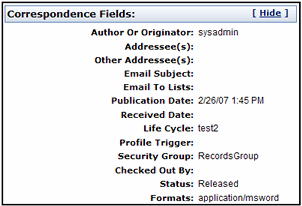
A.4.2 Correspondence Fields Section
This area provides information about the content item's author along with various related addresses and additional information about the current status of user accesses.
A.4.3 Links Area
This area provides links to the native file, a web-viewable rendition and to retention-related links if any exist.

When initially shown, the Related Content links are 'collapsed' and can be expanded by clicking the main link.
If a link contains other links, a plus sign is displayed next to the link.
A.4.4 Revision History Section
This area provides release information about the current retained item.
A.4.5 Recent Reviews of a Retained Item
This screen displays the recent reviews of a retained item.

To access this information, locate the item either by browsing or searching. On the Search Results Page, click Recent Reviews in the item's Action menu.
A.4.6 Metadata History
This screen shows the metadata history of a content item.

Permissions:
The Records Administrator role is required to use this page.To access this screen, locate the item either by browsing or searching. On the Search Results Page, click Metadata History in the item's Action menu.
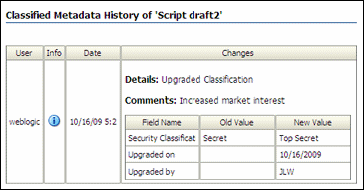
A.4.7 Classified Metadata History Page
This screen shows all changes made to the security classification of a record.
Permissions:
The Records Administrator role is required to use this page.To access this screen, locate the item either by browsing or searching. On the Search Results Page, click Classified Metadata History in the item's Action menu.
A.4.8 Select Category or Folder Dialog
This dialog is displayed when selecting a category or folder for use.
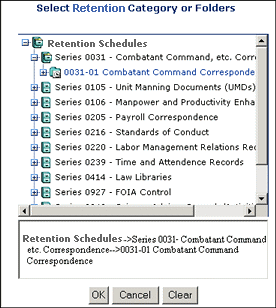
For example, this dialog appears when a user checks in a content item and click Browse to choose a category into which the content item will be filed. To use a category or folder, highlight the object and click OK.
A.5 Searching and Screening Interface Pages
The following pages are used when performing screenings:
A.5.1 Standard Search Page
This page is used to search for content. A partial page is depicted here.
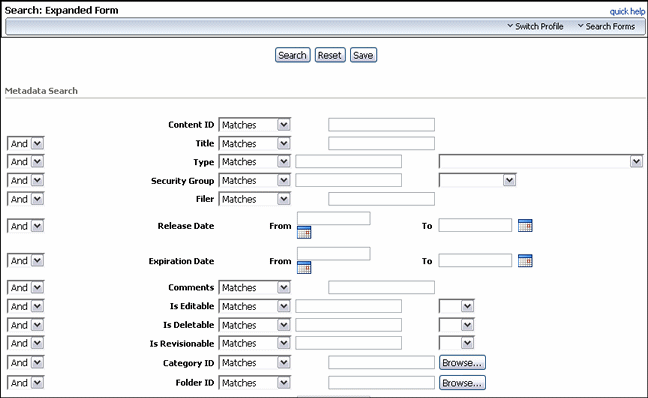
The fields in use on this screen vary depending on the fields in use at individual sites.
When searching folders, it is best to use 'Substring' as an operand instead of 'Matches'. Using the 'Matches' operand narrows the search results considerably. Using 'Substring' returns all internal content items as expected.
See the Oracle Fusion Middleware User's Guide for Content Server for details about using the Standard Search functionality.
A.5.2 Search Physical Items Page
Use the Search Physical Item Page to construct a query to search for an item.
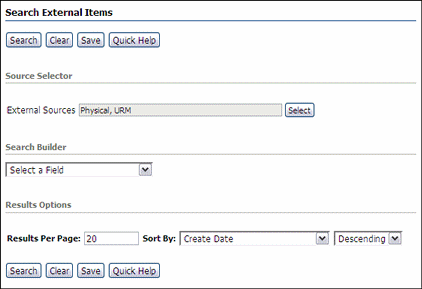
To access this page, click Search then Physical from the Top menu.
| Element | Description |
|---|---|
| Source Selector | A dropdown list of sources that can be used. These include external repositories available through adapters as well as the local physical and Oracle URM systems. |
| Search Builder | A list of fields that can be used for searching. |
| Results section | A section containing the number of results per page (default: 20), fields which can be used for sorting, and the sorting order (Ascending or Descending). |
| Search button | Initiates the search process. |
| Clear button | Resets the page to the initial defaults. |
| Save button | Prompts to save the query under a query name. Once saved, the query is available in the My Saved Query section of the My Content Server menu. |
A.5.3 Physical Search Results Page
This page is displayed after searching for physical items.
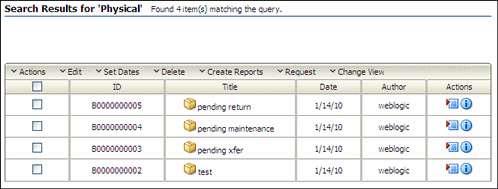
To access this screen, click Search on a search or screening page for physical items.
Note that not all menu options appear on this screen for all users. The options depend on the rights assigned.
A.5.4 Search Results Page
This page is displayed after searching for content.
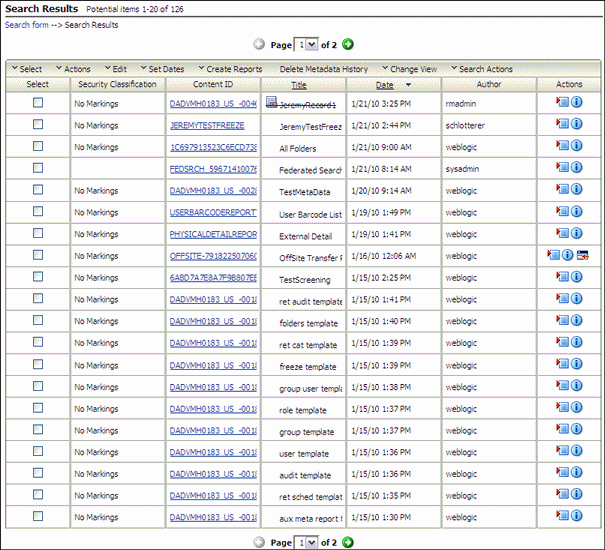
To access this screen, click Search on a search or screening page.
Note that not all menu options appear on this screen for all users. The options depend on the rights assigned.
A.5.5 Screen for topic Page
To access any screening page, click Search then Screening then the type of screening from the Top menu.
The following is a sample screening page. The actual page varies depending on the type of screening selected (Categories, Records Folders, or Content and Records) and on the metadata fields in use at the site.
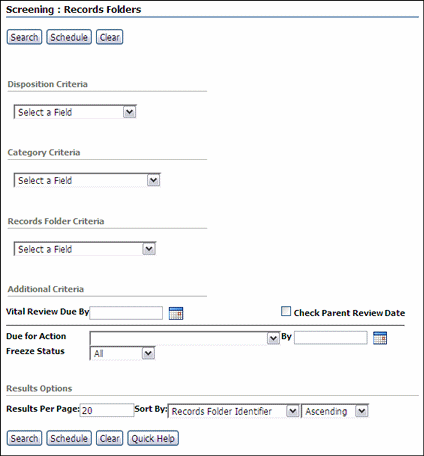
-
The Criteria menus are used to select fields for use in the query. After a field is selected for use, additional menus are available to further refine the criteria.
-
When screening content and records, the Update Sort Fields button is displayed. This opens a dialog where the user can select mulitple fields to use for sorting. For each field selected and moved to the Search Fields box, a checkbox appears below the fields section. Check the box to further refine if the sorting for that field should be in ascending order. If not checked, sort order is descending.
-
To screen for content items due for review, indicate a review date by which the review must be performed in the Review Due By box. If the retention schedule has nested folders or retention categories with differing review periods than their child record folders, select the Check Parent Review Date to ensure the screening encompasses all review dates in its search.
-
Use the Due for Action fields to screen for content items due for processing of a specific disposition action on a specific date.
-
Use the Freeze Status field to limit the screening to content that is frozen, non-frozen, or either. When screening for frozen items, the screening results contain frozen items and those inheriting their freeze status from their parent. However, if the category to which the item belongs has an empty disposition, the frozen item will not appear in the screening results. If the screening results should include only items that are themselves frozen and not those that inherit their freeze status, use the Is Frozen field.
-
Click Search without entering any criteria to return all items in the selected object (folder, retention schedule, and so on).
-
The items displayed in the results page are those that a user is authorized to access.
-
Boolean operators can be used to combine fields. Click the insert symbol (a plus sign) to access a menu of Boolean operators. Click the remove symbol (a lowercase 'x') to clear previous selections.
-
Additional wildcard search operators, such as Matches and Substring, enable further flexibility in screening.
| Criteria Definition | Description |
|---|---|
| Search button (top and bottom of page) | Searches, or "screens" for the content meeting the criteria. |
| Schedule button (top and bottom of page) | Schedules the creation of the screening report. |
| Clear button (top and bottom of page) | Clears all of the Criteria boxes of screening criteria query selections. To clear only a particular Criteria box, click the Remove symbol corresponding to the Criteria box. |
| Disposition Criteria | Displays options on a Disposition Criteria menu. |
| Retention Category Criteria | Displays options on a Retention Category menu. |
| Record Folder Criteria | Displays options on a Record Folder menu. |
| Content Criteria | Displays options specific to searching for content. |
| Review Due By (Folders screen and Content screen only) | Screens for content items with an impending review if a due date for the review is entered. |
| Check Parent Review Date box (Folders screen and Content screen only) | Screens using all review dates in the search. If the retention schedule does not have differing review periods between categories and any nested record folders, it is probably not necessary to select this box. |
| Due for Action (By date) | Select a disposition action for which content items are due and indicate the due date for the action. |
| Freeze Status | Selects a freeze status for the screening criteria:
You can also screen for items frozen with a specific freeze from the Actions menu on the Freeze Information Page of the freeze. |
| Result Options | Description |
|---|---|
| Sort By attribute list | Selects one or more attributes by which to sort the results. The list contains all of the screening criteria options. |
| Sort order list | Specifies the sort order of the screening results:
|
| Add button | Adds the Sort By attribute and order to the Sort By list. |
| Clear button (sort order) | Clears sorting criteria from the Sort By box. |
| Results Per Page | Specifies the maximum number of results displayed on each screening results page. Default: 20. Valid range: 0 to 100. |
A.5.6 Schedule Screening Report Page
Use this screen to define the attributes of a scheduled screening report.
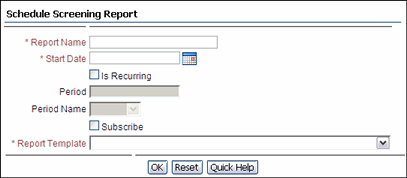
To access this page, click the Schedule button on the Screen for topic Page.
Permissions:
You must have Records Administrator privileges to use this page.A.5.7 Default Metadata for Checked-In Screening Reports Page
The following screens comprise the Default Metadata for Checked-In Screening Reports page. The screens in use at a site may differ from those shown here because of configuration differences. The top half and the bottom half of the screens are shown here. You must have the Records Administrator privileges to access this screen.
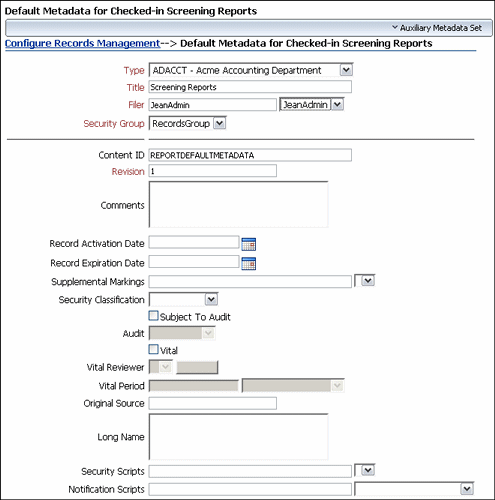
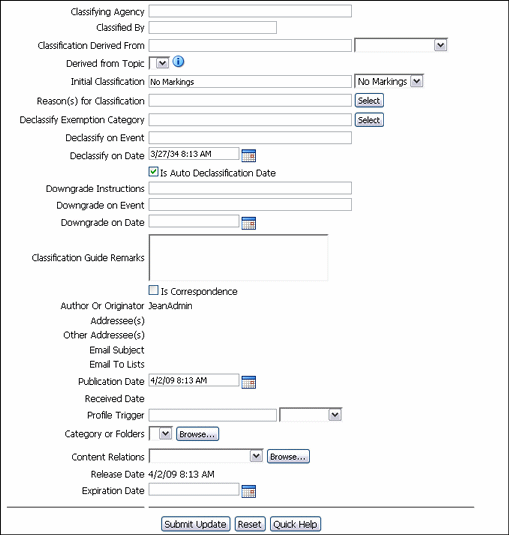
Permissions:
The Records Administrator role is required to use this page.Use this page to define the default metadata for checked-in screening reports. To access this page, click Records then Configure from the Top menu. Click Metadata then Screening Metadata Defaults.
After entering the defaults, click Submit Update.
The fields on this page are the same as those on the Content Check-In Page.
A.5.8 Screening Results Page
Use this page to view the results of screening criteria.
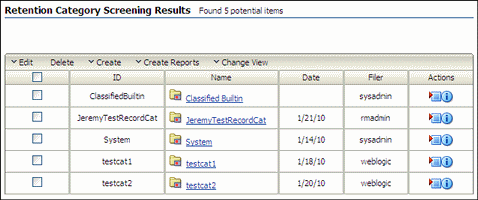
Note that not all menu options appear on this screen for all users. The menu options depend on the rights assigned. In addition, different menu options appear depending on the type of sceening performed.
This page is displayed after clicking Search on the Screen for topic Page. The results that are displayed depend on the type of search done.
Tip:
You can save the screening query so it appears in your saved query list under My Content Server. You can then perform the query later without having to go through screening pages. To save the query, click Query Actions then Save Search on the table menu above the screening results list.A.6 Record Folder Interface Screens
The following screens are used when managing record folders.
A.6.1 Record Folder Information Page
This page displays basic information about a folder.
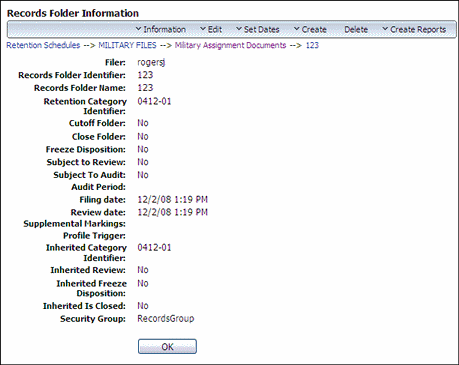
To access this page, click Browse Content then Retention Schedules from the Main menu. The Exploring Series "Retention Schedule" Page is displayed. Navigate to the record folder to use. In the row for the record folder, click Information then Folder Information from the item's Action menu.
A.6.2 Life Cycle of Record Folder Page
Use this screen to view details about a folder's life cycle. The page shows the complete life cycle of the record folder according to its scheduled disposition, including the calculated dates of each disposition action.

Permissions:
The Folder.Read right is required to use this screen. All predefined management roles have this right.To access this screen, click Browse Content then Retention Schedules. Navigate to the record folder to use. In the row for the record folder, click Information then Life Cycle on the folder's Action menu.
Note that not all menu options appear on this screen for all users. The menu options depend on the rights assigned.
| Element | Description |
|---|---|
| Computed Date | The date when the disposition has been or will be processed. |
| Disposition Instructions | The instructions used for the disposition of the folder. |
| Folder | Any sub-folders affected. |
| Reviewer | The reviewer responsible for reviewing the disposition. |
| System | An indication if the system will perform the disposition (for example, delete an item). |
A.6.3 Folder Review History Page
This page shows the review history of a record folder, including the name of the reviewer and the review date.

Permissions:
The Folder.Read right is required to use this screen. All predefined management roles have this right.To access this screen, click Browse Content then Retention Schedules. Navigate to the record folder to use. In the row for the record folder, click Information then Recent Reviews from the item's Action menu.
Note that not all menu options appear on this screen for all users. The menu options depend on the rights assigned.
A.6.4 Folder Metadata History Page
Use this page to view the metadata history of a record folder.

Permissions:
The Folder.Read right is required to use this screen. All predefined management roles have this right.To access this screen, click Browse Content then Retention Schedules. Navigate to the record folder to use. In the row for the folder, click Information then Metadata History from the item's Action menu.
The page shows an overview of all changes made to the editable properties of the record folder, and the affected metadata field name, the modification date and time, and the old and new values for the metadata fields associated with the folder.
A.6.5 Freeze Details Page
This page shows all freezes currently applied to the record folder. If the folder inherited its freeze status from a parent folder, that folder's name is shown in the Inherited From column for the freeze that was inherited.

Permissions:
The Folder.Read right is required to use this page. All predefined records management roles have this right.To access this page, click Browse Content then Retention Schedules. Navigate to the record folder to use. In the row for the record folder, click Information then Freeze Details from the item's Action menu.
If the record folder is frozen, the Freeze Disposition field value is 'Yes' and a Details hyperlink is displayed next to the field value. Click the Details hyperlink.
A.6.6 Freeze/Unfreeze Dialog
Use this screen to choose a freeze to work with. Select the freeze from the supplied list.
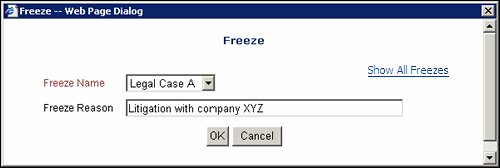
Permissions:
The Folder.Freeze/Unfreeze right is required to use this screen. This right is assigned by default to the Records Administrator role.This dialog is displayed when a freeze is chosen for a folder or content item.If freezes were chosen for a Favorites list, they appear in the pulldown menu next to Freeze Name. Click Show All Freezes to display all available freezes, not just those on the Favorite list.
A.6.7 Create or Edit Record Folder Page
This page is used to create a folder or edit the details about a record folder.
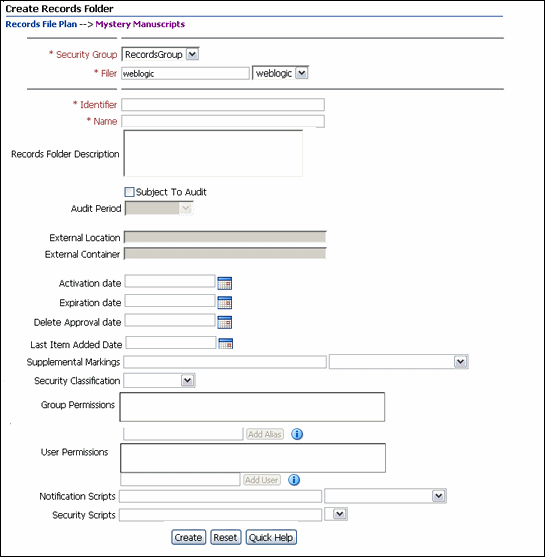
To access this screen, search or screen for a folder for use. Click Edit then Edit Folder from the item's Action menu.
The fields on this page are similar to those used to check in content. See "Content Check-In Page" for details.
A.7 Physical Item Management Interface
The following screens are used to manage physical items:
A.7.1 Create or Edit Physical Item Page
Use this page to "check in" details about a new physical content item. Use the Edit Physical Item Page to modify existing properties of a physical content item. The following screen is a partial depiction of this page. The bottom half of this page is similar to a checkin page with the addition of offsite fields (if that option is enabled at a site).
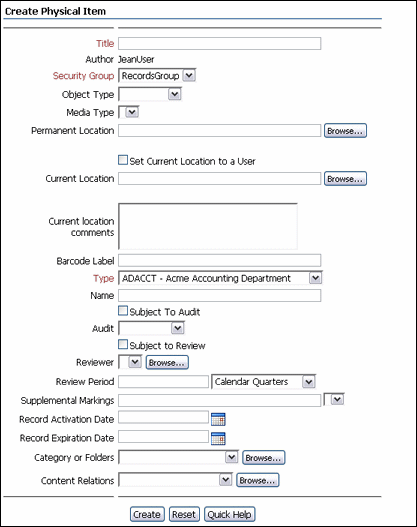
Permissions:
The PCM.Physical.Create or PCM.Physical.Edit right is required to use this screen. These rights are assigned by default to the PCM Requestor and PCM Administrator roles. To assign a life cycle to the physical item, you also need the Record.Create right in Oracle URM.Access this page at several points in the interface. Add a physical item by searching for a storage location then adding an item to the location or clicking New Checkin then Physical from the Top menu.
To edit a physical item, search for the item. On the search results page, click Edit then click Edit Physical Item in the item's Action menu.
Following are some common fields used on this screen.
| Element | Description |
|---|---|
| Title | Descriptive title for the physical item. Maximum number of characters: 80. Required. |
| Filer (Author) | Person who submitted the physical item. The default is the current user. If you have administrative permission, you can select an alternative filer in the list of available users. Required. |
| Security Group | Security group where the physical content item should be assigned. Security groups are sets of files with the same access permissions. Required. Default: Public. |
| Object Type | Type of the physical content item. Use predefined object types or create new ones.
Object types do not have to be selected for a physical item. If done, select a type matching the object type of the storage location where the item is assigned (if one was specified for the location). Otherwise an error message is displayed and the checkin fails. |
| Media Type | Type of information carrier of the physical content item. The available media types depend on the selected object type. Use the predefined media types or create new ones. |
| Permanent Location | The permanent storage location of the physical item.
Manually enter a location or click the Browse button and open the Select Storage Location Dialog to traverse the storage space hierarchy and select the location. After selecting a location, the Permanent Location field contains a reference to that location. This will be the barcode for the location or if no barcode is specified, it is a 19-digit number. Below the Permanent Location field, the full hierarchical storage path to the selected location is displayed. If a permanent location is not provided, it is automatically set to match the current location. On the Edit Physical Item page, only users with the PCM.Physical.Move right can modify an item's permanent location (assigned to the predefined PCM Administrator role by default). |
| Current Location | Current location of the physical item. Manually enter a location or click the Browse button and open the Select Storage Location Dialog dialog to traverse the storage space hierarchy and select the location.
After selecting a location, the Current Location field contains a reference to that location. The reference is the barcode for that location. If no barcode is specified, it is a 19-digit number. Below the Current Location field, the full hierarchical storage path to the selected location it displayed. Set the current location to a user by selecting the Set Current Location to a User box. If a current location is not provided, it is automatically set to "OTHER". On the Edit Physical Item page, only users with the PCM.Physical.Move right can modify an item's current location (assigned to the predefined PCM Administrator role by default). |
| Current Location Comments | If required, enter a comment about the current location (for example, handling instructions or the reason the content item is there). |
| Barcode Label | The label used for the barcode for the physical content item. This is text printed below the barcode on the item label.
If a barcode label is not provided, it is automatically set to match the specified item name (in all upper-case letters, with spaces stripped). If the repository is set up to auto-generate content IDs (in the System Properties utility), the barcode matches the automatically generated name (typically a number, possibly preceded by a prefix; for example, ID_002319). |
| Type | The content type. Select from the menu, which lists all defined content types in the repository. |
| Create button
(Create Page only) |
Checks in the information about the physical content item into the repository. |
| Submit Update button
(Edit Page only) |
Submits the updated definition of the physical content item. |
| Reset button | Resets the page to its initial default settings. When editing an existing physical content item, this returns the original content item settings before any modifications were made. |
| Quick Help button | Displays context-sensitive help information about this page. |
If this page was accessed through the retention schedules in Oracle URM, the top of the page includes the full retention schedule path
Other fields appear on this page which are identical to those on the standard checkin page. Additional fields relating to offsite functionality may appear if that option is enabled.
A.7.2 Select Storage Location Dialog
Use this dialog to select the storage location of a physical content item.
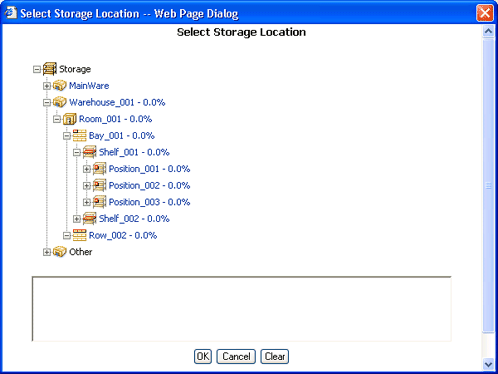
To access this dialog, click the Browse button next to either of the location fields on the Create or Edit Physical Item Page.
The main box at the top shows the defined storage space hierarchy. Traverse the hierarchy to navigate to the location where the physical item is stored. After selecting select a location in the hierarchy, the box at the bottom shows the full navigation path to the selected location.
Use the plus and minus icons in front of a storage location to unfold or collapse all child locations.
You can only select storage locations that allow storage of items in them (by default, only the locations of type "Position"). All selectable locations are visually marked as links.
After selecting the desired location, click OK to return to the Create or Edit Physical Item Page. Click Clear to delete the current storage path and select a new one.
A.7.3 Physical Item Information Page
Use this page to view information about an existing physical item.
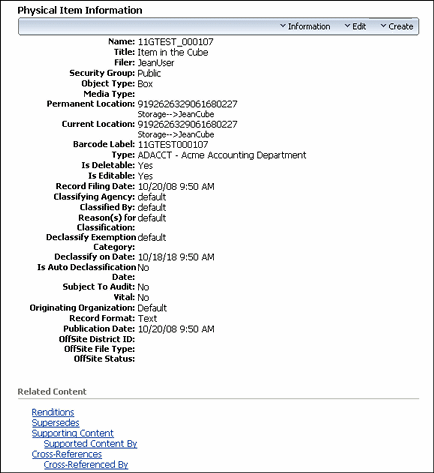
Permissions:
The PCM.Physical.View right is required to use this screen. This right is assigned by default to the PCM Requestor and PCM Administrator roles.This screen can be accessed in several ways. For example, search for the item and on the search results page click Information then External Item Information from the item's Action menu. You can also use the same menu for the item if the item is displayed on a listing screen.
This page shows the current properties of the physical item, including its basic metadata (name, title, filer, and security group), its freeze status, its object and media types, its storage location, and barcode label.
Note the following:
-
If the repository is set up to auto-generate content IDs (using the System Properties utility), the name of a physical item was generated automatically. It is typically a number, possibly preceded by a prefix (for example, ID_002319).
-
If the physical item was assigned a life cycle (retention schedule and disposition rules), the information page also includes a Retention Schedule Information section providing disposition processing and security information for the item.
-
If the physical item is currently checked out, its current location is set to the value of the deliver-to location as specified when the associated reservation request was created. If no location was provided, the current location is set to "OTHER." If a location comment was specified for the associated reservation request, the Current Location Comments field shows this comment. Otherwise it contains the login name of the user who created the reservation request.
-
If the physical item is contained within another physical item, the current location and/or permanent location field includes a Container Details link, which opens the information page of the parent physical item (the "container").
A.8 Chargeback Management Screens
The following screens are used in PCM to manage transactions and chargebacks:
A.8.1 Transaction Management Screens
The following screens are used to manage invoices and transactions:
A.8.1.1 Invoices Page
This page is used to view details about invoices. All invoices appear until specifically deleted from this list. From this page each individual invoice can be viewed, edited, deleted, or printed.

Permissions:
The PCM.AdminManager right and the CBC.ChargeBacks.Admin right are required to use this screen. These rights are assigned by default to the PCM Administrator role.To access this page, click Physical then Invoices from the Top menu.
Note that not all menu options appear on this screen for all users. The menu options depend on the rights assigned.
| Element | Description |
|---|---|
| Delete | Marks the invoice for deletion. |
| Invoice # | The invoice number, listed sequentially. |
| Date | The invoice creation date. |
| Customer ID | ID of the customer the invoice is sent to or otherwise assigned to. |
| Description | Short description of the invoice (if entered). |
| Amount | Total amount due on the invoice. |
| Paid | Listed 'Yes' or 'No' depending on whether the invoice was paid. |
A.8.1.2 Screen Contents and Records for Invoice Page
This screen is used to filter transactions based on selected parameters and use the filtered transactions to create a new invoice. This can be done at any time or it can be scheduled to run at a defined interval.
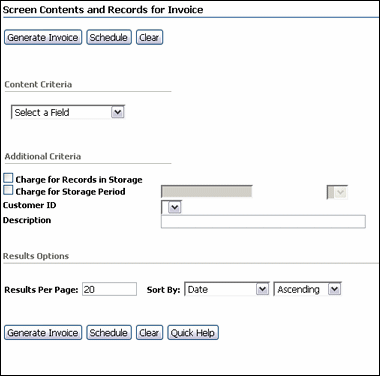
Permissions:
The PCM.AdminManager right and the CBC.ChargeBacks.Admin right are required to use this screen. These rights are assigned by default to the PCM Administrator role.To access this page, click Physical then Invoices from the Top menu. Click Add on the Invoices Page.
| Element | Description |
|---|---|
| Content Criteria | Defines transactions and records used to create the invoice. |
| Additional Criteria | Check the boxes to include charges for records in storage or the storage period. If using the storage period, enter the storage time and its label (for example, 'weeks' or 'days'). |
| Customer ID | Select a customer ID to narrow the criteria search to only items billed to that customer. |
| Description | Enter a description to use as a search criteria. |
| Results Options | Enter the number of items to display on a page and sorting criteria. |
| Generate Invoice button | Generates the invoice as a PDF file. |
| Schedule button | Schedules the screening action, so it is performed automatically. |
| Clear button | Resets the page to its initial default settings. |
A.8.1.3 Transaction Information Page
This page shows information about a transaction.
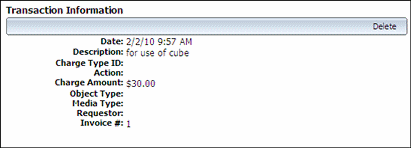
To access this page, click the Info icon on the Charge Transactions Page.
A.8.1.4 Charge Transactions Page
Use this page to view the specific information about the selected transaction.

Permissions:
The PCM.AdminManager right, the CBC.ChargeBacks.Read right, and the CBC.ChargeBacks.Admin right are required to use this screen. These rights are assigned by default to the PCM Administrator role.To access this page, click Information then View Transactions from an item's Action menu on the Invoices Page. A list of transactions for that invoice are displayed. Click Information then Item Information in the Actions menu of a transaction.
| Element | Description |
|---|---|
| Date | The transaction creation date. |
| Description | The transaction description. |
| Charge Type ID | The transaction charge type as defined when created on the Create/Edit Charge Type page. See the Oracle Fusion Middleware Setup Guide for Universal Records Management for details about creating charge types. |
| Action | Creation, destruction, reservation, or storage. |
| Charge Amount | Total amount charged for the transaction. |
| External Item | The external item associated with the transaction, if applicable. |
A.8.1.5 View Invoice Details Page
Use this page to view the specific information for the selected invoice.

Permissions:
The PCM.AdminManager right, the CBC.ChargeBacks.Read right, and the CBC.ChargeBacks.Admin right are required to use this screen. These rights are assigned by default to the PCM Administrator role.This page is displayed after clicking Generate Invoice on the Screen Contents and Records for Invoice Page. Or display this page by clicking the Info icon of an invoice on the Invoices Page.
Note that not all menu options appear on this screen for all users. The menu options depend on the rights assigned.
| Element | Description |
|---|---|
| Invoice # | The number of the invoice as sequentially created. |
| Date | The date the invoice was created. |
| Customer ID | The customer charged for the invoice. |
| Amount | The total amount of the invoice, combining all charges for all transactions. |
| Paid | The payment status (if the invoice has been paid). |
| Amount Paid | Amount the customer has paid toward the total amount of the invoice. |
A.8.2 Chargebacks, Charge Types and Billers
The following screens are used to configure chargebacks, charge types, and customers:
A.8.2.1 Configure Automatic Transactions Page
This page is used to set up the chargeback functionality in PCM.
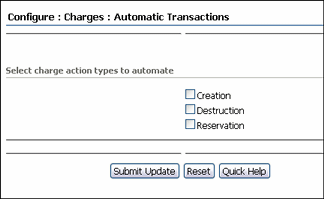
To access this page, click Physical then Configure from the Top menu. Click Charges then Automatic Transaction.
Permissions:
The PCM.Admin.Manager right and the PCM.Admin.LocationTypes right to perform this action. These rights are assigned by default to the PCM Administrator role.| Element | Description |
|---|---|
| Creation | Automatically creates transactions for creating physical items. |
| Destruction | Automatically creates transactions for destroying physical items. |
| Reservation | Automatically creates transactions for reserving physical items. |
A.8.2.2 Configure Charge Type Page
This page is used to view all defined charge types and to add and delete charge types.

To access this page, click Physical then Configure from the Top menu. Click Charges then Types.
Permissions:
The PCM.Admin.Manager right and the CBC.ChargeBacks.Admin right are needed to perform this action. These rights are assigned by default to the PCM Administrator role.The system will always use the most specific charge type. For example, if charge type A has two criteria and charge type B has the same two criteria plus another one, charge type B is recorded for a transaction meeting all three criteria of charge type B (even though it also meets the two criteria of charge type A).
| Element | Description |
|---|---|
| Add | Opens a screen to add a charge type. |
| Delete | Marks the invoice for deletion. |
A.8.2.3 Create Manual Transaction Page
This page is used to create transactions not assigned to an invoice. The transaction includes the type of object and media and the amount and charge type and other information. After a transaction is created it can be then collected into an invoice.
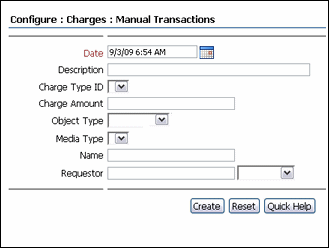
Permissions:
The PCM.AdminManager right, CBC.ChargeBacks.Create right, and the CBC.ChargeBacks.Admin right are required to use this screen. These rights are assigned by default to the PCM Administrator role.To access this page, click Physical then Configure from the Top menu. Click Chargebacks.
| Element | Description |
|---|---|
| Date | The transaction creation date. |
| Description | The transaction description. |
| Charge Type ID | The transaction charge type as defined when created on the Create/Edit Charge Type page. See the Oracle Fusion Middleware Setup Guide for Universal Records Management for details about creating charge types. |
| Charge Amount | The amount he transaction will be billed for. |
| Object Type | The object type of the physical items being transacted. |
| Media Type | The media type of the physical items being transacted. |
| Name | The ID of the physical item being transacted. |
| Requestor | The person requesting the transaction who will be charged on the invoice when the transaction is posted to an invoice. |
| Create button | Creates the transaction. |
| Reset button | Resets the page to its initial default settings. |
| Quick Help button | Displays context-specific help information about this page. |
A.8.2.4 Create or Edit Charge Type Page
Use the Create Charge Type Page to define a new charge type. Use the Edit Charge Type Page to change a charge type.
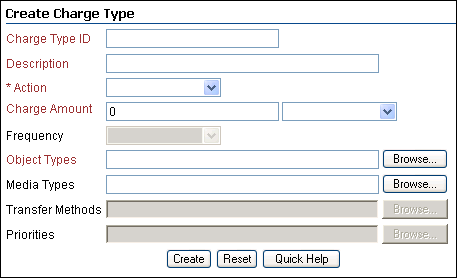
To access this page, click Add on the Configure Charge Type Page.
Permissions:
The PCM.Admin.Manager right, the CBC.ChargeBacks.Admin right and the CBC.ChargeBacks.Create or CBC.ChargeBacks.Edit rights are needed to perform these actions. These rights are assigned by default to the PCM Administrator role.| Element | Description |
|---|---|
| Charge Type ID | A unique identifier for the charge type. Maximum number of characters: 30. This field is view-only on the Edit Charge Type page. Required. |
| Description | A brief description for the charge type. Maximum number of characters: 60. Required. |
| Action | The action of the charge type, either Creation, Destruction, Reservation, or Storage. Required. |
| Charge Amount | The amount of the charge, in dollars and cents. Choose the charge action (per item or per period). |
| Frequency | The frequency of the storage period. This is available only when Action is set to 'Storage'. |
| Object Types | The appropriate object type(s) that triggers this charge type. Use the Browse button to view and select an object type from the list. |
| Media Types | The media type(s) that triggers this charge type. Use the Browse button to view and select an object type from the list. |
| Transfer Methods | The transfer method of reservations that triggers the charge type. This field is only available for reservations. |
| Priorities | The transfer priority that triggers the charge type. This field is only available for reservations. |
A.8.2.5 Configure Payment Methods Page
This page is used to view all defined payment types and to add or delete payment types.

To access this page, click Physical then Configure from the Top menu. Click Charges then Payment Methods.
Permissions:
The PCM.Admin.Manager right and the CBC.ChargeBacks.Admin right are needed to perform this action. These rights are assigned by default to the PCM Administrator role.A.8.2.6 Create or Edit Payment Method Page
Use this page to create or edit the properties of an existing payment type.
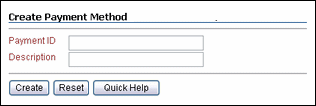
To access this page, click Physical then Configure from the Top menu. Click Charges then Payment Methods. Click Add to add a new payment type. To edit a payment type, click Edit Payment Method from the item's Action menu.
Permissions:
The PCM.Admin.Manager right, the CBC.ChargeBacks.Admin, and the CBC.ChargeBacks.Edit or CBC.ChargeBacks.Create right are needed to perform this action. These rights are assigned by default to the PCM Administrator role.| Element | Description |
|---|---|
| Payment ID | A unique name for the payment type. Maximum number of characters: 30. This field is view-only on the Edit Payment Type page. Required. |
| Description | A brief description for the payment type. Maximum number of characters: 60. Required. |
A.8.2.7 Payment Type Information Page
This page is used to view the properties of an existing charge type.
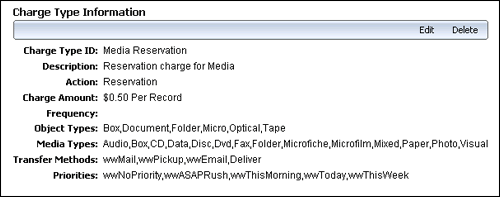
To access this page, click Information then Item Information from an item's Action menu on the Configure Charge Type Page.
Note that not all menu options appear on this screen for all users. The menu options depend on the rights assigned.
Permissions:
The PCM.Admin.Manager right, the CBC.ChargeBacks.Admin right and the CBC.ChargeBacks.Read rights are needed to perform this action. These rights are assigned by default to the PCM Administrator role.A.8.2.8 Configure Customers Page
This page is used to view information about all defined customers. Customers can also be added and deleted from this page.

To access this page, click Physical then Configure from the Top menu. Click Charges then Customers.
Permissions:
The PCM.Admin.Manager right and the CBC.ChargeBacks.Admin right are needed to perform this action. These rights are assigned by default to the PCM Administrator role.A.8.2.9 Customer Information Page
Use this page to view the properties of an existing customer.

To access this page, click Information then Item Information from the Action menu of an item on the Configure Customers Page.
Note that not all menu options appear on this screen for all users. The menu options depend on the rights assigned.
Permissions:
The PCM.Admin.Manager right, the CBC.ChargeBacks.Admin, and the CBC.ChargeBacks.Read rights are needed to perform this action. These rights are assigned by default to the PCM Administrator role.A.8.2.10 Create or Edit Customer Page
Use this page to define or edit the properties of a customer.
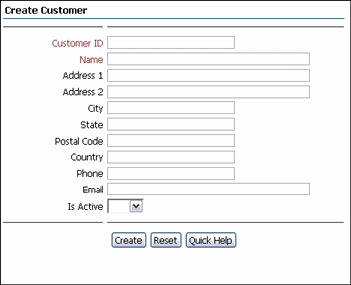
To access this page, click Add on the Configure Customers Page.
To edit a customer, click Edit Customer from the Actions menu of the customer listed on the Configure Customers Page.
Permissions:
The PCM.Admin.Manager right, the CBC.ChargeBacks.Admin right, and the CBC.ChargeBacks.Create or CBC.ChargeBacks.Edit right are needed to perform this action. These rights are assigned by default to the PCM Administrator role.| Element | Description |
|---|---|
| Customer ID | A unique identifier for the group being billed. This name is displayed in the location type hierarchy. Maximum number of characters: 30. This field is view-only on the Edit Location Type page. Required. |
| Name | A brief description for the customer. Maximum number of characters: 60. Required. |
| Address and contact information | The contact information for the customer, including address, postal code, email or phone. |
| Is Active | Indication if the customer is still active or inactive. Default: no. |
A.9 Reservation Management Screens
The following screens are used when managing physical item reservations:
A.9.1 Workflow Review for Request Page
Use this page to see what items are included in a reservation request and to approve or reject the request.

To access this page, click the Review workflow item link in the workflow review notification e-mail received.
This page shows the items included in the reservation request, including their name, barcode, current status and selected transfer method.
| Element | Description |
|---|---|
| External Item | The name of the individual physical item in a reservation request. |
| Barcode | The barcode value of the individual item in a reservation request. |
| Status | The current status of the individual item in a reservation request. |
| Transfer Method | The selected transfer method for the individual item in a reservation request. |
| Action menu | Displays a popup menu with several options relevant to the item. In addition, the popup menu for individual request items includes several actions enabling a user to change the status of the item. |
| Info icon | Displays the Request Item Information Page. |
A.9.2 Create or Edit Request Page
Use the Create Request Page to create a new reservation request. Use the Edit Request Page to modify a current request.
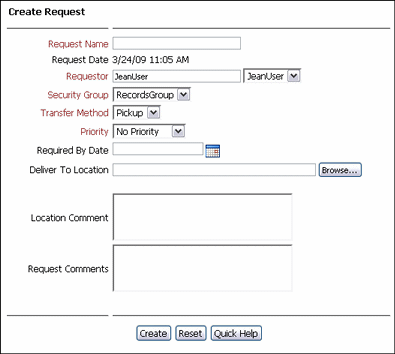
Permissions:
The PCM.Reservation.Create or PCM.Reservation.Edit right is required to use this screen. These rights are assigned by default to the PCM Requestor and PCM Administrator roles.If offsite storage has been enabled, other fields may appear on this screen.
To access this page, search for a physical item(s) to reserve. On the Search Results Page, click the check box of the item to reserve. Click Actions then Add to Active Content Basket on the Table menu. The Content Basket is displayed. Check the boxes of the items to be reserved and click Request then Request Selected Items from the Table menu.
To access the Edit Request page, locate the item to edit and click Edit Request Information from the item's Action menu.
A.9.3 Reservation Search Results Page
This page shows all active reservations.

To access this page, click Physical then Reservations from the Top menu.
| Element | Description |
|---|---|
| Request Date | The date and time the reservation request was made. |
| Requestor | The person who submitted the reservation request. |
| External Item | The name of an individual physical item currently included in a reservation request. |
| Barcode | The barcode value of an individual item currently included in a reservation request. |
| Status | The current status of an individual item currently included in a reservation request. |
| Location bar code | The bar code of the current location of the item. |
A.9.4 Request Information Page
Use this page to view the properties of an existing reservation request.

Permissions:
The PCM.Reservation.Read right is required to use this screen. This right is assigned by default to the PCM Requestor and PCM Administrator roles.To access this page, click Information then Request Information from an item's Action menu on the Reservation Search Results Page.
This page shows the current properties of the selected reservation request. It also shows if the reservation request has been completed. A reservation request is considered completed if none of its request items are still pending (in process), on a waiting list, or checked out.
Note that not all menu options appear on this screen for all users. The menu options depend on the rights assigned.
A.9.5 Items for Request Page
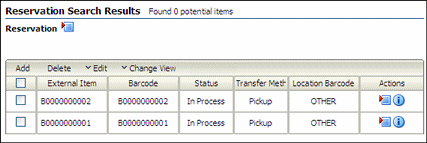
A reservation may consist of more than one requested item. Use this page to view a list of all individual items included in a reservation request.
Permissions:
The PCM.Reservation.Edit right is required to use this screen. This right is assigned by default to the PCM Administrator role.To access this page, click Information then View Request Items from the Page menu on the Request Information Page.
Note that not all menu options appear on this screen for all users. The menu options depend on the rights assigned.
| Element | Description |
|---|---|
| External Item | The name of the individual physical item in a reservation request. |
| Barcode | The barcode value of the individual item in a reservation request. |
| Status | The current status of the individual item in a reservation request. |
| Transfer Method | The selected transfer method for the individual item in a reservation request. |
| Info icon | Displays the Request Item Information Page. |
A.9.6 Request Item Information Page
Use this page to view the properties of an individual item in an existing reservation request. These properties include the offsite request status, the status of hte request, and the name of the request.

Permissions:
The PCM.Reservation.Edit right is required to use this screen. This right is assigned by default to the PCM Administrator role.To access this page, click Request Item Information from the item's Actions menu on the Items for Request Page.
Note that not all menu options appear on this screen for all users. The menu options depend on the rights assigned.
A.9.7 Edit Request Item Page
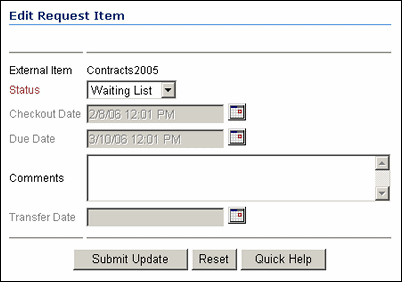
Use this page to modify the properties of an item in an existing reservation request. It can be used to change the status of the item and add or modify comments.
Permissions:
The PCM.Reservation.Edit right is required to use this screen. You must also have the PCM.Reservation.Process right to change the status of an item. These rights are assigned by default to the PCM Administrator role.To access this page, search for the request item and click Request Item Information from the Action menu. The Request Item Information Page is displayed. Click Edit on the Page menu.
| Element | Description |
|---|---|
| External Item | The name of the request item. |
| Status | The status of the request item. The default is the item's current status or select a different status from the list.
You must have the PCM.Reservation.Process right to change the status of an item. |
| Checkout Date | The date and time the item was checked out. |
| Due Date | The date and time the item should be returned according to the checkout period set when the system was configured. |
| Comments | Add or modify comments about the requested item. |
| Transfer Date | The date and time the item was transferred to its intended recipient if a timestamp was specified. |
| Submit Update button | Submits updated information about the request item. |
| Reset button | Returns the original settings before any modifications were made. |
| Quick Help button | Displays context-specific help information about this page. |
A.10 Content Basket Screens
The following screens are used to manage a Content Basket:
A.10.1 Content Basket Manager Page
This page is used to create new content baskets and to designate the currently active basket.

To access this page, click My Content Server then My Baskets.
A.10.2 Content Basket Page
This page shows all items currently in the content basket.
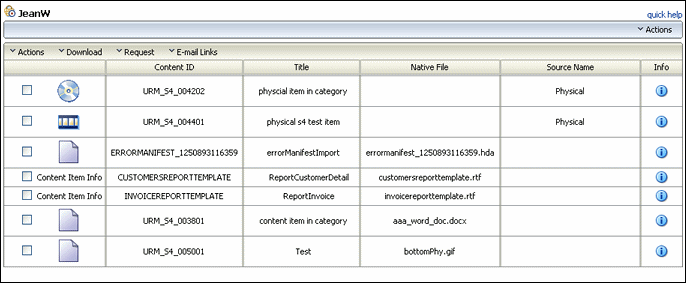
To access this page, click My Content Server from the Main menu then click the name of the content basket in the displayed list.
The Actions menu on this page has the following options:
-
Save Content Basket Ordering: used to save the ordering of items in the basket
-
Empty Content Basket: used to empty all items from the basket
-
Make Active: used to make the current basket the active basket
-
Publish to Folio: used to publish the items in the basket to a folio. See the Oracle Fusion Middleware User's Guide for Content Server for details about using folios.
| Element | Description |
|---|---|
| Thumbnail | A thumbnail image representing the type of item. |
| Content ID | The ID of the item in the basket. |
| Title | The title used for the item. |
| Native File | The name of the file associated with the item. |
| Source Name | The source from where the item was obtained. |
A.11 Link Management Interface
The following screens are used to manage links:
A.11.1 Configure Link Types Page
This page is used to view the existing types of links and to add a custom link name based on one of the predefined link classes.

To access this page, click Records then Configure from the Top menu. Click Retention then Related Content Types.
Permissions:
The Admin.ConfigureLinkTypes right is required to use this page. This right is assigned by default to the Records Administrator role.| Element | Description |
|---|---|
| Name | The name of the defined link type. |
| Destination | The destination of the defined link type, usually a description of the type of linked content item to which the parent points.
Destination descriptions are not supported for link types based on the peer-to-peer or chained list link class, so this column is always empty for these link types. |
| Class | The link class that the defined link type is based on. |
| Revision-Independent | Indicates if the relationship is revision independent. |
| System | Indicator of system types, containing "Yes" for predefined link types and "No" for custom link types. |
| Actions | Custom link types (System = "No"): this column contains an Actions menu used to edit or delete the custom link type.
Predefined link types (System = "Yes"): this column is always empty. These cannot be edited or deleted. |
A.11.2 Add or Edit Related Content Type Page
Use the Add Page to define a own custom link based on the predefined classes of links. Use the Edit Page to modify those links.
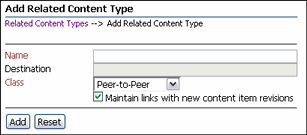
To access this page, click Add Related Content Type on the Configure Link Types Page.
Use the Edit Page to modify the properties of an existing custom link type. To access this page, select Edit from the related type's Action menu on the Configure Link Types Page.
Permissions:
The Admin.ConfigureLinkTypes right is required to use these pages. This right is assigned by default to the Records Administrator role.| Element | Description |
|---|---|
| Name | The name of a custom link. Maximum characters: 50. Required. |
| Destination field | Used for link types based on the supporting content or cross-reference link class.
A description of the destination of the custom link type, typically the type of linked item where the parent is pointing (for example, "Enclosed By" or "Rendition Of"). The destination is displayed on the Configure Link Types Page, and also in the Links area of the content information page of a content item. Maximum number of characters: 50. |
| Class list | The link class for the custom link type:
This field is view-only on the edit page. |
| Maintain links with new content item revisions | Specifies that links be maintained with future revisions of the item. |
| Add button (Add Link Type page) | Adds the new custom link type to the Configure Link Types Page. The links are also available to authorized users in the Links area of the content information pages and the Actions menu on the search results pages. |
A.12 Simple Profiles Interface
This section contains the following topics:
A.12.1 Profile Listing Page
This page lists all available profiles.

To access this page, click Records then Configure then Simple Profiles from the Top menu. Click the type of profile (content, retention category or folder). A similar action can be performed for physical profiles by clicking Physical then Configure then Physical Profile.
If you have administrative privileges an additional option appears. Configure Metadata Sets allows those users to access additional auxiliary metadata to use in configuring profiles.
A.12.2 Create/Update Simple Profile Page
This page is used to create or update a simple profile configuration and Wizard fields settings.
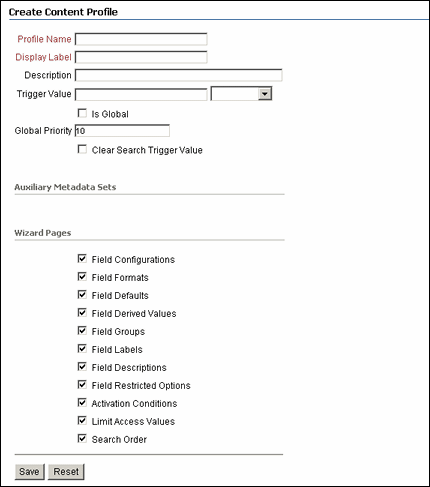
To access this page to create a new profile click Create then Create Profile on the Profile Listing Page. If you have administrative privileges, you can also click Create then Create Global Profile.
To update an existing profile click Edit then Update on the Page menu of a displayed profile or click Update Profile on the Actions menu of a profile.
| Element | Description |
|---|---|
| Profile Name field | The unique profile name. (Required.) |
| Display Label field | The unique profile display label. (Required.) |
| Description field | The profile description. |
| Trigger Value field | The trigger value. Enter a value or select a value from the menu. |
| Is Global box | If checked, rules in this profile will be used globally. Global rules are those which are always evaluated, regardless of the criteria selected for the profile.
If Create Profile was used to create the profile, the box is not selected. If Create Global Profile was used to create the profile, the box is selected. |
| Global Priority field | The number specifying the priority of field priority. Default: 10. |
| Clear Search Trigger Value box | If checked, clears the search trigger value field for global priority. |
| Auxiliary Metadata Sets boxes | If auxiliary metadata sets are available, they are listed. Select one or more of the auxiliary metadata sets to use with the profile. |
| Field Configurations box | Select to configure the field types for the profile. Default: YES. |
| Field Formats box | Select to set a field format for the profile. Default: YES. |
| Field Defaults box | Select to set default values for the profile. Default: YES. |
| Field Derived Values box | Select to set derived values for the profile. Default: YES. |
| Field Groups box | Select to specify group fields for the profile. Default: YES. |
| Field Labels box | Select to set labels for the profile. Default: YES. |
| Field Descriptions box | Select to set descriptions for the profile. Default: YES. |
| Field Restricted Options box | Select to restrict options for the profile. Default: YES. |
| Activation Conditions box | Select to set activation conditions for the profile Default: YES. |
| Limit Access Values box | Select to limit access to the profile. Default: YES. |
| Search Order box | Select to set a search sort order for the profile. Default: YES. |
| Save button | Required to start the Profile Configuration Wizard. Saves changes to the profile configuration and displays the Create/Update Simple Profile Page with the Simple Profile Field Configuration Page. |
| Reset button | Clears changes to the page and resets values to their defaults. |
A.12.3 Simple Profile Field Configuration Page
This page is used to set the field types for a profile. This is only available to administrative users.
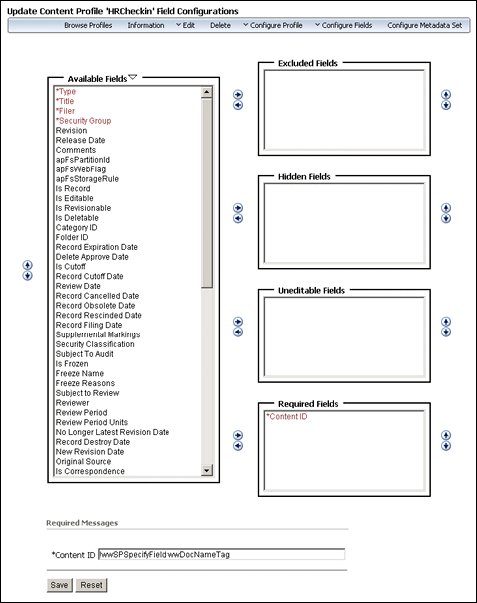
To access this page, click Save on the Profile Configuration Wizard to select Field Configuration or use the Page menu to select Configure Fields then Field Configuration.
| Element | Description |
|---|---|
| Available Fields list | Available fields to be configured for the profile. Required fields are shown in red color with an asterisk to the side of the field name. |
| Excluded Fields list | To exclude a field from the profile, select the field name from the Available Fields box and click the arrow to move it into this box. Use the arrow to move the field name back into the Available Fields box. |
| Hidden Fields list | Used to hide a field from the profile. Select the field name from the Available Fields box and click the arrow to move it into this box. Use the arrow to move the field name back into the Available Fields box. |
| Uneditable Fields list | Used to make a field uneditable in the profile. Select the field name from the Available Fields box and click the arrow to move it into this box. Use the arrow to move the field name back into the Available Fields box. |
| Required Fields list | Used to make a field required in the profile. Select the field name from the Available Fields box and click the arrow to move it into this box. Use the arrow to move the field name back into the Available Fields box.
When a field required, the field name and its code are displayed in the Required Messages list. |
| Required Messages list | When a field is selected to be required, the field name code is listed here. This can be edited. |
A.12.4 Simple Profile Field Formats Page
This page is used to configure field formats for the current profile.
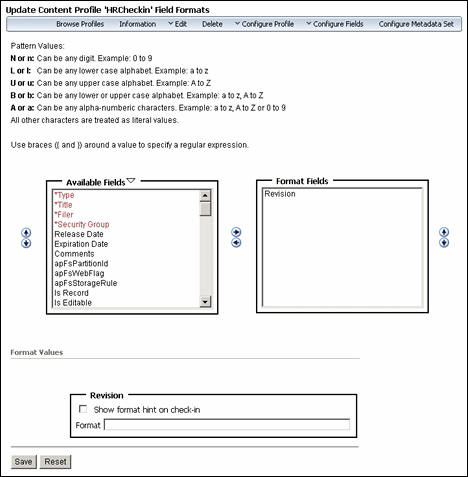
To access this page either select it through the Profile Configuration Wizard, or use the Page menu to select Configure Fields then Field Formats.
Each selected field can be assigned a specific format, such as alphabetical, numerical, or another format that enables the user to specify the type of information that the user can enter into the field when it appears on a form. Use braces { } around a value to specify a regular expression. Pattern values include the following:
-
N or n: Can be any digit. Example: 0 to 9.
-
L or l: Can be any lowercase alphabet characters. Example: a to z.
-
U or u: Can be any uppercase alphabet characters. Example: A to Z.
-
B or b: Can be any lower- or uppercase alphabetic characters. Examples: a to z; A to Z.
-
A or a: Can be any alpha-numeric characters. Example: a to z; A to Z; or 0 to 9.
All other characters are treated as literal values.
| Element | Description |
|---|---|
| Available Fields list | Fields available to be formatted. |
| Format Fields list | Used to make a field formatted in the profile. Select the field name from the Available Fields box and click the arrow to move it into this box. Use the arrow to move the field name back into the Available Fields box. |
| Format Values fields | When fields are selected to be formatted fields, they are listed here. If the box for a field is empty, the profile will not show the field format. If the Show Format Hint On Check-In box is selected, the specified field format will be shown in the field to be completed by the user. Specify the format for each field to be formatted. Formats specify the type e of information that can be entered by the user when the field appears on a form. |
A.12.5 Simple Profile Field Default Values Page
This page is used to configure field defaults for the current profile.
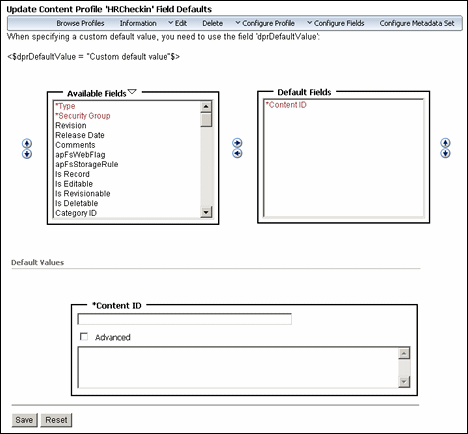
To access this page select it through the Profile Configuration Wizard, or use the Page menu to select Configure Fields then Default Values.
| Element | Description |
|---|---|
| Available Fields box | Fields available to be configured. |
| Default Fields box | Default fields. |
| Default Values list | Lists each field in the Default Values list with a box and field. If the Advanced box for a defaulted field is empty, the profile will not replace the value for the field. If the Advanced box is selected, enter the Idoc Script value to be used as the field value after evaluation for both pre-submit and post-submit processing. |
A.12.6 Simple Profile Field Derived Values Page
This page is used to configure field derived values for the current profile.
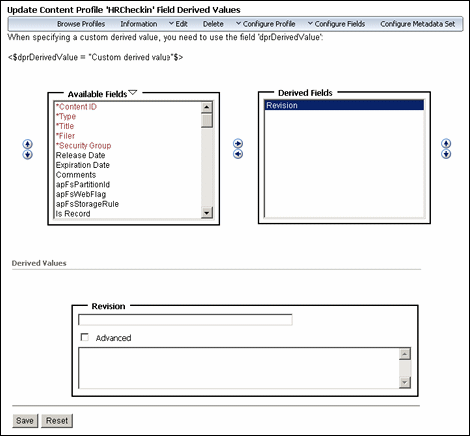
To access this page either select it through the Profile Configuration Wizard, or use the Page menu to select Configure Fields then Derived Values.
| Element | Description |
|---|---|
| Available Fields list | The fields available to be configured. |
| Derived Fields list | Specified derived fields. Use the arrow icon to move selected available field to this list. |
| Derived Values list | Lists each field in the Derived Fields list with a box and field. If the Advanced box for a derived value is empty, the profile will not replace the derived value for the field. If the box is selected, enter a Idoc Script value. The value will be used after evaluation for both pre-submit and post-submit processing. |
A.12.7 Simple Profile Field Groups Page
This page is used to configure field groups for the current profile.
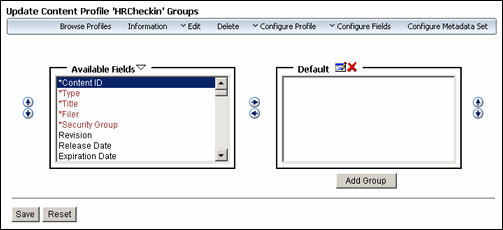
To access this page select it through the Profile Configuration Wizard, or use the Page menu to select Configure Fields then Groups.
| Element | Description |
|---|---|
| Available Fields list | Lists available fields. |
| Default list | Lists fields to be placed in groups by default.
Use the arrow icon to move fields from the Available Fields list to this list. Use the vertical arrows to sort the order of the fields in a group. To display a Edit Profile Group Dialog in which to enter group information, click the Group icon. To delete a group, click the red X icon by a Group field. |
| Add Group button | Displays the Edit Profile Group Dialog in which fields are added to create a new group. When the new group is created, it is displayed on the Groups page with the list of fields in the group. |
A.12.8 Edit Profile Group Dialog
This dialog is used to specify the fields associated with an added group in the current profile.
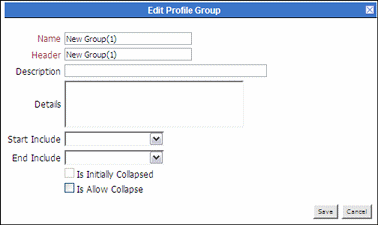
To access this dialog, first use the Page menu to select Configure Fields then Groups. On the Simple Profile Field Groups Page, click Add Group or click the Default group icon.
| Element | Description |
|---|---|
| Name field | A name for the group. Required. |
| Header field | A header for the group. Required. |
| Description field | A description of the group. |
| Detail field | Details about the group. The details will be displayed in a tool tip. |
| Start Include/End Include | Designates the separator for the group. |
| Is Initially Collapsed box | Select this box to enable groups to be initially collapsed and not fully displayed on the profile page for the user. |
| Is Allow Collapse box | Select this box to enable users to manage the collapse behavior of a group (expand or collapse). |
A.12.9 Simple Profile Field Labels Page
This page is used to configure field labels for the current profile.
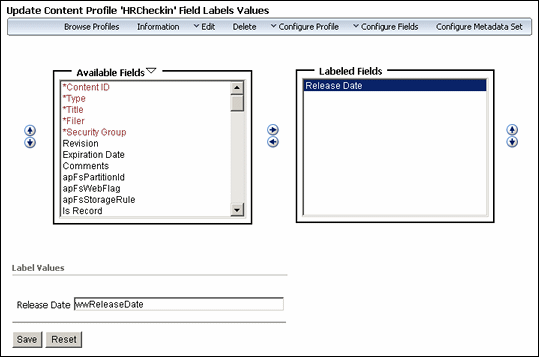
To access this page select it through the Profile Configuration Wizard, or use the Page menu to select Configure Fields then Labels.
| Element | Description |
|---|---|
| Available Fields list | Lists the available fields. |
| Labeled Fields list | Lists the fields to be given different labels. Use the arrow icon to move field from the Available Fields list to this list. |
| Label Values fields | Displays the default label value for each field moved to the Labeled Fields list. Use the field to replace the default label with a different label. |
A.12.10 Simple Profile Field Descriptions Page
This page is used to configure short and long field descriptions for the current profile.
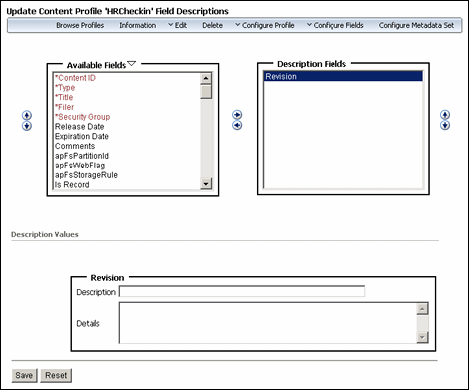
To access this page select it through the Profile Configuration Wizard, or use the Page menu to select Configure Fields then Descriptions.
| Element | Description |
|---|---|
| Available Fields list | Lists available fields. |
| Descripted Fields list | Lists fields to be given descriptions. Use the arrow icon to select fields from the Available Fields list and move them to this list. Use the vertical arrow icons to sort the order of the fields in this list. |
| Description Values fields | Displays the name of each field in the Descripted Fields list with the original field label, a field for a brief description, and a field for a detailed description. Enter information for the brief and detailed descriptions for each field. |
A.12.11 Simple Profile Field Restricted Options Page
This page is used to specify the fields that have restricted option listings for the current profile.
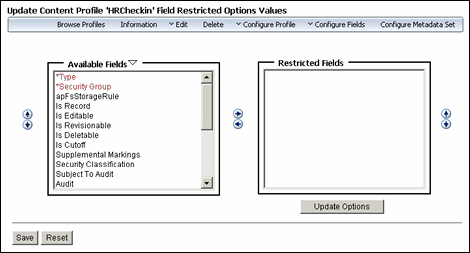
To access this page select it through the Profile Configuration Wizard, or use the Page menu to select Configure Fields then Restricted Options.
| Element | Description |
|---|---|
| Available Fields list | Lists the available fields. |
| Restricted Fields list | Lists the fields that have restricted option listings. Use the arrow icon to move selected field from the Available Fields list to this list. Use the vertical arrows to sort the order in which the fields in this list. |
| Update Options button | Displays the Restricted Options Dialog. Use this dialog to specify what options are allowed and in what order. If this button is clicked without selecting a field, a prompt appears to select a field to update. |
A.12.12 Restricted Options Dialog
This dialog is used to specify which available options are allowed for each field and in what sort order.
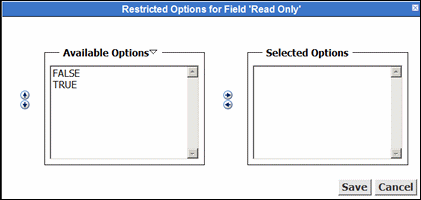
To access this dialog click the Update Options button on the Simple Profile Field Restricted Options Page.
| Element | Description |
|---|---|
| Available Options list | List of available options for the field. |
| Selected Options list | List of options allowed in the restricted field. |
A.12.13 Simple Profile Activation Conditions Page
This page is used to specify when the profile is activated based on the defined conditions.
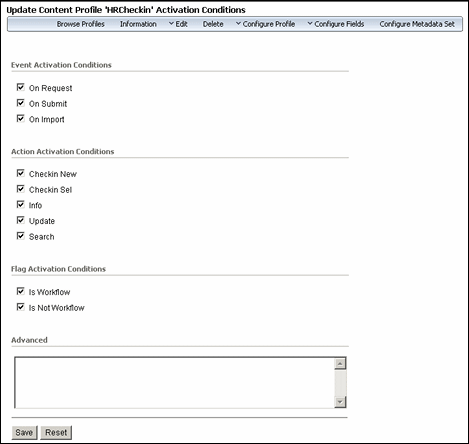
To access this page either select it through the Profile Configuration Wizard or use the Page menu to select Configure Profile then Activation Conditions.
By default, all activation condition fields are selected; the user must uncheck the conditions not wanted in the profile.
| Element | Description |
|---|---|
| Event Activation Conditions: On Request box | Activates the profile when the request event occurs. |
| Event Activation Conditions: On Submit box | Activates the profile when the submit event occurs. |
| Event Activation Conditions: On Import box | Activates the profile when the import event occurs. |
| Action Activation Conditions: Check In New box | Activates the profile when the Check In New content action occurs. |
| Action Activation Conditions: Check In Selected box | Activates the profile when the Check In Selected content action occurs. |
| Action Activation Conditions: Info box | Activates the profile when the Info content action occurs. |
| Action Activation Conditions: Update box | Activates the profile when the Update content action occurs. |
| Action Activation Conditions: Search box | Activates the profile when the Search content action occurs. |
| Flag Activation Conditions: Is Workflow box | Activates the profile when the Is Workflow flag is tripped. |
| Flag Activation Conditions: Not Workflow box | Activates the profile when the Is Not Workflow flag is tripped. |
| Advanced field | Enter Idoc Script that is associated on a profile level or field level with the profile. It is activated when the profile is submitted. |
A.12.14 Simple Profile Limit Access Values Page
This page is used to restrict the personalization links for the current profile.
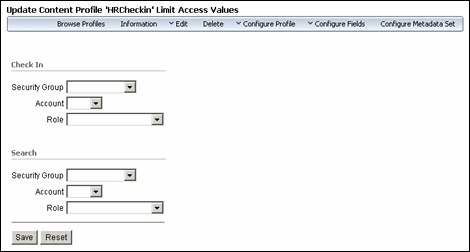
To access this page select it through the Profile Configuration Wizard, or use the Page menu to select Configure Profile then Limit Access.
| Element | Description |
|---|---|
| Check In: Security Group menu | Select a security group. The profile's Check In link is limited to this security group. |
| Check In: Account menu | Select an account. The profile's Check In link is limited to this account. |
| Check In: Role menu | Select a role. The profile's Check In link is limited to this role. |
| Search: Security Group menu | Select a security group. The profile's Search link is limited to this security group. |
| Search: Account menu | Select an account. The profile's Search link is limited to this account. |
| Search: Role menu | Select a role. The profile's Search link is limited to this role. |
A.12.15 Simple Profile Search Order Page
This page is used to specify the search order and direction for fields in the current profile.
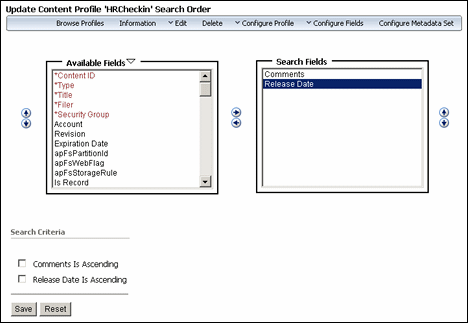
To access this page select it through the Profile Configuration Wizard, or use the Page menu to select Configure Profile then Search Order.
| Element | Description |
|---|---|
| Available Fields list | Lists available fields that can be specified for search order and direction. |
| Search Fields list | Lists field to be specified for search order and direction. Use the arrow to move field names into this list and use the vertical arrows to sort them in the desired order for searching. |
| Search Criteria list | Displays each field in the Search Fields list with a box. Check the box to specify if the field should be searched in ascending order. |
A.12.16 Actions Menu
The Actions menu is used to access many menu selections that also can be accessed from the Page menu on a Simple Profile Information Page to view and manage profiles.
The Actions menu is accessed via the Actions icon, which is displayed for each profile on the Profile Listing Page.
| Menu Item | Description |
|---|---|
| Profile Information | Displays the Simple Profile Information Page. |
| Update Profile | Displays the Create/Update Simple Profile Page. |
| Delete Profile | Deletes the currently displayed profile. |
A.12.17 Profiles Page Menu
The Page menu is used to access menus and options for configuring an existing profile and configuring a metadata set.
| Element | Description |
|---|---|
| Browse Profiles option | Shows the Profile Listing Page which lists all available simple profiles. |
| Information option | Shows the Simple Profile Information Page for the current profile. |
| Edit menu | Provides access to these functions:
|
| Delete option | Deletes the currently displayed profile. |
| Configure Profile menu | Provides access to these configuration functions:
|
| Configure Fields menu | Provides access to these configuration functions:
|
| Create option | Provides two options: Create Profile and Create Global Profile. Either selection displays the Create/Update Simple Profile Page for creating a new profile or global profile. |
| Configure Metadata Set option | (Administrators only) Provides access to the Simple Profiles Trigger Configuration Page (Administrators Only) for selecting or changing the trigger field for profiles. |
A.12.18 Wizard Page Menu
The Wizard Page menu is used to move between pages when using the Wizard to create or update a profile configuration.
This menu enables a usr to select any of the available configuration options and move directly to the page for the option. The arrows enable the user to scroll forward or backward one page with each click.
A.12.19 Simple Profile Information Page
This page is used to view summary information about a content profile.
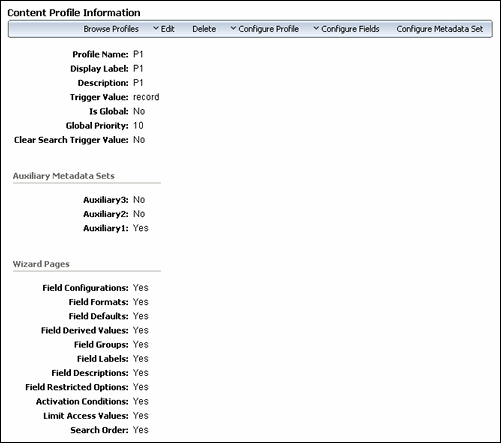
To access profile information do one of the following:
-
Click the Actions menu for a profile listed on the Profile Listing Page, then select Profile Information.
-
Click the Info icon for a profile listed on the Profile Listing Page.
| Element | Description |
|---|---|
| Profile Name field | Displays the profile name. |
| Display Label field | Displays the profile display label. |
| Description field | Displays a description of the profile. |
| Trigger Value field | Displays the trigger value for the profile. |
| Is Global box | Shows whether the trigger is global or specific to a user. |
| Global Priority field | Displays a number that specifies the field priority. |
| Clear Search Trigger Value field | Indicates that the Search page does not use the profile's trigger value. |
| Auxiliary Metadata Sets | Lists available auxiliary metadata sets. Indicates whether a set been selected as a source for metadata. |
| Field Configurations field | Displays whether fields types are configured. . |
| Field Formats field | Displays whether field formats for the profile are configured. |
| Field Defaults field | Displays whether default values are configured. |
| Field Derived Values field | Displays whether derived values are configured. |
| Field Groups field | Displays whether group fields are configured. |
| Field Labels field | Displays whether labels are configured. |
| Field Descriptions field | Displays whether descriptions are configured. |
| Field Restricted Options field | Displays whether options to be restricted are configured. |
| Activation Conditions field | Displays whether activation conditions for the profile are configured. |
| Limit Access Values field | Displays whether access limits for the profile are configured. |
| Search Order field | Displays whether the search sort order is configured. |
A.12.20 Copy Simple Profile Page
The Copy Simple Profile page is used to copy the fields and values in the current profile to a new profile.
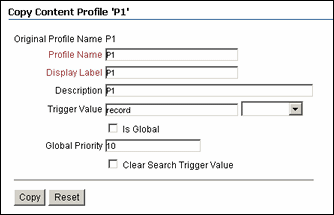
To access this page, open a simple profile, then from the Page menu select Edit then Copy Profile.
| Element | Description |
|---|---|
| Original Profile Name | Shows the name of the profile to be copied. |
| Profile Name field | Enter the unique profile name of an existing profile. Required. |
| Display Label field | Enter the unique display label of an existing profile. Required. |
| Description field | Enter a new description for the copied profile or use the existing description copied from the original profile. |
| Trigger Value field | Choose to use the same trigger value as the source profile, or select a trigger value from the menu. |
| Is Global box | Indicates if this is a global profile. |
| Global Priority field | The priority of the profile. |
| Clear Search Trigger Value box | The trigger field to use in a search. |
| Copy button | Copies the profile to another profile. |
| Reset button | Clears the fields of information. |
A.12.21 Simple Profiles Trigger Configuration Page (Administrators Only)
This page is used to select or change the trigger field for all profiles of the current type.
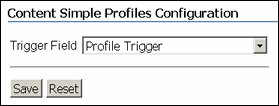
To access this page, click Configure Metadata Set on the Page menu.
Caution:
The trigger field can be changed. However, when it is changed, profiles may become invalid and it is the responsibility of the administrator to resolve the situation. The user interface provides hints about invalid profiles.| Element | Description |
|---|---|
| Trigger Field menu | Select a trigger field from the list of metadata fields that are defined as options for the current type. |
| Save button | Saves the selected trigger field. |
| Reset button | Clears changed information. |