2 Asset Management
Asset management is the process through which Oracle Enterprise Manager Ops Center begins to manage and monitor your assets, which include hardware, operating systems, and virtualization software. Managing your assets is a prerequisite for almost every action in the software.
The following topics are covered in this section:
-
Discover Assets When Enterprise Manager Ops Center discovers an asset, the asset is displayed in the center pane, showing you the assets available to be managed. You can discover assets by using specific discovery criteria, by running a search for service tags, or by specifying server information.
-
Manage Assets Managing assets gives Enterprise Manager Ops Center full access to the assets and enables you to monitor, update, and provision them. After you have discovered assets, you install agents to manage them.
-
Register Assets Registering your assets sends basic asset data, such as the asset type, to Oracle. You can view the hosted list of your registered assets. Registration is not required.
Overview
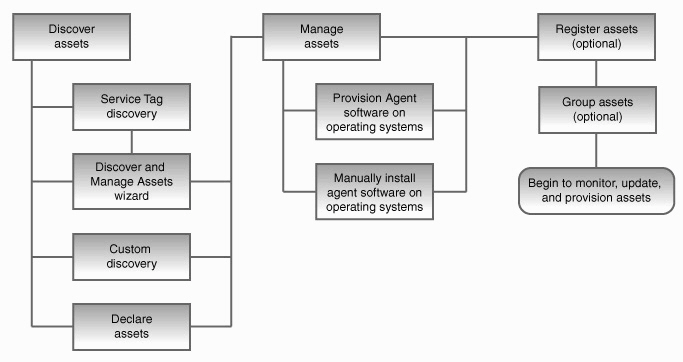
Asset Management is a process that enables Enterprise Manager Ops Center to discover assets, monitor them, and launch jobs that target them.
Asset management includes the following steps:
-
Discovering assets
-
Managing assets
-
Registering assets
Figure 2-1 shows the basic flow and options available with each task.
Discovering Assets
Asset Discovery enables Enterprise Manager Ops Center to determine what hardware, operating systems, and virtualization tools are present in the data center. All assets must be discovered before they can be managed.
For hardware with existing operating systems, you should discover the operating system first, followed by the hardware assets.
Four discovery methods are available:
-
Custom Discovery – This method uses standard protocols such as SSH, IPMI, Telnet, and SNMP to discover assets. Use this method to discover specific assets, or assets not equipped with Service Tags.
-
Declare Assets – This method uses a manual discovery file or user-supplied data to discover assets. Use this method to discover bare-metal hardware before OS provisioning.
-
Discover and Manage Assets – A wizard that uses both service tags and custom discovery to quickly discover and manage assets. Use this method to discover large numbers of Service Tag-equipped assets quickly.
-
Automatic Discovery – This method searches for service tags attached to assets. Use this method to identify large numbers of Service Tag-equipped assets quickly as a precursor to other discovery methods.
Custom Discovery
Custom discovery lets you discover assets by IP address, IP range, subnet, or host name. The discovery uses the protocols and credentials that you provide, and default credentials if you choose, to discover the addresses and hosts that you specify. A service tag discovery is also performed on those addresses and hosts.
If valid service tags are found for the assets, specific resource discovery drivers are launched based on the service tags. If no valid service tags can be found, all resource discovery drivers are used. In some cases, these drivers do not match the credential types entered in the wizard, but do represent the best matches for the asset.
Assets discovered by a Custom Discovery are placed in the Available to be Managed Assets tab. Discovered assets that cannot be managed by Enterprise Manager Ops Center are placed in the Unclassified Assets tab.
When you discover a system with Oracle Solaris 10 8/07 OS or later, the zone features are identified in the system. When you discover a global zone, all of its local zones are discovered as well.
To discover an instance of the Oracle Solaris 8 operating system using this method and the SSH protocol, you must first install OpenSSH on the OS.
To discover an ILOM system, the specified user name must have administrator privileges on the system, and both IPMI and ssh credentials must be provided.
-
Click All Assets in the Assets section of the Navigation pane.
-
Click Custom Discovery in the Actions pane. The Custom Discovery wizard is displayed.
-
(Optional) Create new criteria by clicking the Add Criteria icon.
-
(Optional) Check Save Criteria for Future Use to save the criteria for future use.
-
(Optional) Check Save Password in Criteria to save the passwords as part of the discovery criteria. This enables you to reuse the criteria for future jobs. If you do not check this option, the password is still saved as an MBean on the Proxy Controller. You can edit the system configuration to remove the access point between the system and the Proxy Controller.
-
Enter the Criteria name. If you check Save criteria for future use, the criteria is saved under this name.
-
Enter the Target Proxy Controller. This specifies the Proxy Controller to use for the discovery. The Automatic option selects the most appropriate Proxy Controller.
-
Enter the One or more IP addresses to scan. These can be entered as a comma-separated list, an IP range specified by (starting address)-(end address), or a subnet specified by (network address)/(bit mask).
-
Enter the One or more Host names to scan. All host names must be resolvable by the Enterprise Controller.
-
(Optional) Enter a service tag passphrase. Necessary if a service tag has been configured to be encrypted.
-
(Optional) Enter a service tag port. Necessary if a service tag has been configured to use a port other than the default of 6481.
-
(Optional) Enter a service tag timeout. The default value is 20 seconds.
-
Enter the type of asset to target. Specifying a type of asset restricts the list of available discovery credential types.To view all discovery credentials or discover multiple types of asset, select All.
-
Enter the discovery protocol or protocols to use and their credentials.
If you check Also Use Default Credentials, then the discovery may use default credentials, including root credentials, in addition to those specified.If you select SSH, two sets of credentials can be entered. To use root credentials, enter the root credentials as the first set. To log in as a non-root user and then switch to root, enter the non-root credentials as the first set and the root credentials as the second set.
Note:
To discover an ILOM system, the specified user name must have administrator privileges on the system, and both IPMI and ssh credentials must be provided -
Click Save.
-
-
Select one or more discovery criteria.
-
Click Discover Assets. A Custom Discovery job is launched for each set of criteria submitted. Discovered assets are displayed in the Available to be Managed Assets tab.
Automatic Discovery
When an Automatic Discovery is launched, Enterprise Manager Ops Center searches the subnets associated with the configured network interfaces of every Proxy Controller for embedded Service Tags. No credentials or specific targets are required. This discovery method is useful for initial discovery and regular discoveries of service tag-equipped assets.
Once discovered, service tag-equipped assets are placed in the Unclassified Assets tab, where they can be grouped and registered. To begin managing these assets, you must use the Discover and Manage Assets wizard or discover them using a Custom Discovery .
-
Click All Assets in the Assets section of the Navigation pane.
-
Click Automatic Discovery in the Actions pane. The Automatic Discovery window is displayed.
-
Click Discover Assets. An Automatic Discovery job is launched. Discovered assets are displayed in the Unclassified Assets tab.
Discover and Manage Assets
The Discover and Manage Assets wizard enables you to discover assets and install Agent software to begin managing them.
The wizard launches a service tag discovery to discover assets equipped with service tags. It then lets you select what hardware and operating systems you want to manage with Enterprise Manager Ops Center.
Products without service tags cannot be discovered using this method.
To discover an instance of the Oracle Solaris 8 operating system using this method and the SSH protocol, you must first install OpenSSH on the OS.
-
Click All Assets in the Assets section of the Navigation pane.
-
Click Discover/Manage Assets in the Actions pane. The Discover/Manage page of the Discover/Manage Assets wizard is displayed.
-
Select a discovery option, then click Next.
-
Click Run Discovery Now to launch an Automatic Discovery. When the discovery has completed, click Close.
-
Click I Have Already Run Discovery to skip discovery and proceed to asset management.
Note:
You cannot manage assets without first discovering them. The Discovered Hardware page is displayed. -
-
Select the hardware to manage and click Next. The Manage Hardware page is displayed.
-
Enter management information for the selected hardware, including:
-
Target Proxy - Select which Proxy Controller will manage the assets.
-
Credentials for accessing the selected hardware. Three options are available:
-
Use factory-set credentials – Uses factory standard credentials to access the hardware.
-
Use the same credentials for all systems – Uses the credentials that you provide for all hardware that you want to manage.
-
Use individual credentials for all systems – Lets you enter separate criteria for each piece of hardware.
-
Note:
To discover an ILOM system, the specified user name must have administrator privileges on the system, and both IPMI and ssh credentials must be provided. -
-
Click Next. The Discovered Operating Systems page is displayed.
-
Select the operating systems that you want to manage and click Next. The Manage Operating Systems page is displayed.
-
Enter management information for the selected assets, including:
-
Target Proxy - Select which Proxy Controller will manage the assets.
-
Credentials for accessing the selected operating systems. Two options are available:
-
Use the same SSH credentials for all systems – Uses the credentials that you provide for all operating systems that you want to manage.
-
Use individual SSH credentials for all systems – Lets you enter separate criteria for each operating system.
-
-
-
Click Next. The Summary page is displayed, and jobs are launched to manage assets.
-
Click Finish.
Declare Configured Assets
The Declare Configured Assets option lets you declare one or more bare metal systems in preparation for OS provisioning, even if the systems have no service processor.
Configured Assets are hardware assets with their network parameters already set.
This option gathers all of the information needed for OS provisioning, including:
-
MAC address of the system, host, or domain
-
Potential IP address to determine the Proxy Controller which should act as install server You do not need to use a server's actual IP address. You can use an IP address that is on the same subnet as the server to be discovered. The IP address is used to match the declared asset with the correct Proxy Controller.
-
Hardware type to allow filtering of applicable OS Profiles (SPARC or x86 platforms)
To discover multiple servers with Declare Assets, you use a discovery file that you create and upload to Enterprise Manager Ops Center. The file contains the name, model, GUID, IP address, logical port name, and MAC ID for the servers that you want to discover. You can also declare a single server by entering the information directly into the Declare Asset wizard.
Declared assets are placed in the Available to be Managed Assets tab.
-
(Optional) If you want to declare multiple servers, create a discovery file.
-
Click All Assets in the Assets section of the Navigation pane.
-
Click Declare Configured Assets in the Actions pane. The Declare Assets wizard is displayed.
-
Select a method for declaring assets.
-
To declare multiple servers at once, select Declare All Servers and enter the path of the discovery file. Click Browse to locate the discovery file.
-
To declare a single server, select Declare a Single Server and enter the required information.
-
Server Name – The name that the server should appear under in the UI.
-
IP Address – Specify an IP address
-
Model Category – Select the category in which the asset model appears.
-
Model – The model of the asset.
-
MAC Address and Port combination – Used to connect to the server once it is available on the network. Click the Add or Edit icons to add or edit a MAC Address/Port combination, then select the combination.
-
Enter a logical port name for each network interface. One of these logical port names must be GB_0. Available logical port names are GB_0 through GB_11. You can also use "mgmt" as a management port. These logical port names are mapped to network interfaces after the asset has been provisioned, according to the MAC addresses that you specify. If the server has only one network interface, use GB_0.
-
Enter the MAC addresses of the network interfaces in the server that you want to declare.
-
-
-
Click Declare Assets. A Discovery Job is launched for each declared asset. Declared assets are placed in the Available to be Managed Assets tab.
Here is an example of a discovery file.
<?xml version='1.0' encoding='utf-8'?>
<servers>
<server name="server1" model="V20z" guid="123"
ipAddress="129.147.247.1" >
<ethernetPort name="GB_0" mac="00:09:3D:11:CC:0E"/>
</server>
<server name="server2" model="V20z" guid="123"
ipAddress="129.147.247.2" >
<ethernetPort name="GB_0" mac="00:0A:2D:11:AC:31"/>
</server>
</servers>
Variables used:
-
server name – The name that the server should appear under in the UI
-
model – Must be a model supported by Enterprise Manager Ops Center
-
guid – A unique identifier for the server
-
Ethernet port name - Used to connect to the server once it is available on the network
-
Ethernet Port mac – Used to connect to the server once it is available on the network
Declare Unconfigured Assets
The Declare Unconfigured Assets option lets you declare one or more bare metal systems in preparation for OS provisioning, even if the systems have no service processor.
Unconfigured assets are assets with none or some of their network parameters set.
The assets being declared do not need to be physically connected to the network at the time of the discovery, because the assets produced by an asset declaration are skeletal representations of the real assets. These assets can then be targeted with OS provisioning jobs. Once the real assets are connected to the network, provisioned, and discovered, they are correlated with the declared version into complete assets.
Declared assets are placed in the Available to be Managed Assets tab.
To Declare Unconfigured Assets
-
Click All Assets in the Assets section of the Navigation pane.
-
Click Declare Unconfigured Assets in the Actions pane. The Declare Assets wizard is displayed.
-
Enter data for the server or servers to be discovered:
-
Number of Servers – The total number of servers to be discovered.
-
Model Categories – The model category of the servers.
-
Model – The specific model of the servers.
-
Server Names – The names of the servers, including:
-
Prefix – A prefix that appears before each server name. This field is required.
-
Starting Number – The number of the first server. The number is increased by one for each additional server. This field is required.
-
Suffix – A suffix that appears after each server name.
-
-
Network – The network on which the server or servers is added.
-
IP address – The IP addresses to be used for the servers.
-
MAC Address – The MAC Addresses of the servers.
-
-
Click Declare Asset. A Discovery Job is launched for each declared asset. Declared assets are placed in the Managed Assets tab.
Managing and Registering Assets
Managing assets allows Enterprise Manager Ops Center to monitor and control them. The Agent software is installed on operating systems during the management process.
Assets can also be registered, making a hosted version of your inventory available.
After you have discovered assets, you manage them. Managing assets changes their status so that Enterprise Manager Ops Center can monitor the assets and launch jobs that target them. Managing operating systems installs Agent software on them, while hardware can be managed without Agent software.
Agent software can be installed on Oracle Solaris, Oracle Linux, and SUSE Linux Enterprise Server operating systems. Agent software can also be installed in zones, by installing packages in directories such as the /usr directory.
When you click the Manage Assets button, assets in the Available to be Managed Assets tab move to the Managed Assets tab. To manage assets in the Unclassified Assets tab, discover them using a Custom Discovery or use the Discover and Manage Assets wizard.
When you install an Agent on a global zone, the Agent installation will install, or upgrade to, Java Runtime Environment (JRE) 1.6.0_21. Later versions of JRE are not affected.
To manage a global zone with sparse root zones, you must first manage the global zone and then manage each sparse root zone. This order ensures that the sparse root zone inherit the global zone's attributes. This does not apply to the whole root zone because it does not inherit the directories from the global zone.
-
Click All Assets in the Assets section of the Navigation pane.
-
Click the Available to be Managed Assets tab in the center pane.
-
Select one or more assets, and click the Manage Assets button.
-
If an asset is hardware, a job is launched to manage the asset.
-
If an asset is an operating system, the Manage Assets wizard is displayed.
-
-
Select an option to provide SSH credentials for the systems that you want to manage:
-
Reuse the SSH credentials used to discover the asset. Discovery Credentials expire one hour after discovery.
-
Enter one set of SSH credentials to use for all asset.
-
Enter separate SSH credentials for each asset.
-
-
Click Next. The Start Managing page is displayed.
-
Confirm your selection and click Next. The Summary page is displayed. A job is launched to install Agent software.
-
Click Close.
Installing Agents Manually
Use these procedures to install an Agent and to register the target system.
To use the agentadm command, you need the following information:
-
Administrative user name on the Enterprise Controller Configuring an Enterprise Manager Ops Center Agent using user credentials requires using an administrative user account that exists on the Enterprise Controller. This user account provides authentication that supports Agent registration. Use this user name as the argument for the
agentadm -uoption. -
Password for the administrative user name on the Enterprise Controller If you use user credentials to configure your Enterprise Manager Ops Center Agent, use this password to populate the
/var/tmp/OC/mypasswdfile. Then use this file name as the argument for theagentadm -poption. -
The auto-reg-token registration token from the
/var/opt/sun/xvm/persistence/scn-proxy/connection.propertiesfile on the appropriate proxy controller If you decide not to use user credentials to configure your Agent software, use this token to populate the/var/tmp/OC/mytokenfile. Then use this file name as the argument for theagentadm -toption. -
IP address or host name of the Proxy Controller with which you will associate the Agent Use this IP address or host name as the argument for the
agentadm -xoption. Typically, you would associate the Agent with the Proxy Controller that is connected to the same subnet as the target system. -
The IP address of the network interface that the Agent will use for registration. Use this IP address as the argument for the
agentadm -aoption.
Some example agentadm commands in this procedure use the alternative administrative user name droot. In these examples, the droot user exists on the Enterprise Controller associated with this example Enterprise Manager Ops Center installation.
When you install an Agent on a global zone, the Agent installation will install, or upgrade to, Java Runtime Environment (JRE) 1.6.0_21. Later versions of JRE are not affected.
-
Transfer an Agent software bundle to the system where you want the Agent to run
-
Install the Agent software
-
Configure the Agent software
See To Transfer and Install Agent Software for information about transferring an Agent bundle from the Enterprise Controller to the target system, and install the Agent software.
See either To Configure Agent Software Using User Credentials or To Configure Agent Software Using a Token to configure the Agent software, depending on your site security requirements.
To Transfer and Install Agent Software
-
On the Enterprise Controller, change to the
/var/opt/sun/xvm/images/agentdirectory, and list the files that it contains. This directory contains the Enterprise Manager Ops Center Agent installation archives. For example:# cd /var/opt/sun/xvm/images/agent/ # ls SunConnectionAgent.Linux.i686.2.6.0.1483.zip SunConnectionAgent.Linux.i686.2.6.0.1483.zip.sig SunConnectionAgent.SunOS.i386.2.6.0.1483.zip SunConnectionAgent.SunOS.i386.2.6.0.1483.zip.sig SunConnectionAgent.SunOS.sparc.2.6.0.1483.zip SunConnectionAgent.SunOS.sparc.2.6.0.1483.zip.sig #
-
Identify the Agent archive that is appropriate for the system where you intend to install the Agent.
-
On the system where you want to install the Agent (the target system), create a directory named
/var/tmp/OC.# mkdir /var/tmp/OC
-
Use scp or ftp to transfer the correct Agent archive from the Enterprise Controller to the
/var/tmp/OCdirectory on the target system. Respond to any authentication or confirmation prompts that are displayed. For example:# scp SunConnectionAgent.SunOS.sparc.2.6.0.1483.zip root@10.5.241.74:/var/tmp/OC Password: SunConnectionAgent.S 100% |*********************************************************************| 34695 KB 00:32 #
-
On the target system, change to the
/var/tmp/OCdirectory.# cd /var/tmp/OC #
-
Use the unzip command to uncompress the Agent archive. For example:
# unzip SunConnectionAgent.SunOS.sparc.2.6.0.1483.zip
(output omitted)
-
Run the install -a script in the
SunConnectionAgentdirectory. For example:# SunConnectionAgent/install -a Installing Ops Center Agent. No need to install 120900-04. No need to install 121133-02. No need to install 119254-63. No need to install 119042-09. No need to install 121901-02. No need to install 137321-01. Installed SUNWjdmk-runtime. Installed SUNWjdmk-runtime-jmx. (output omitted) 6 patches skipped. 19 packages installed. Installation complete. Detailed installation log is at /var/scn/install/log. Uninstall using /var/scn/install/uninstall. #
To Configure Agent Software Using User Credentials
This procedure creates a file that holds the password of the administrative user for your Enterprise Manager Ops Center installation. If you prefer to avoid creating this file, use To Configure Agent Software Using a Token instead of this procedure to configure your Agent software.
-
Create an empty file named
/var/tmp/OC/mypasswd, and set its permission mode to 400. For example:# touch /var/tmp/OC/mypasswd # chmod 400 /var/tmp/OC/mypasswd
-
Edit the
/var/tmp/OC/mypasswdfile so that it contains the password for the administrative user that exists on the Enterprise Controller to which the Proxy Controller is connected. The following echo command appends the password to the /var/tmp/OC/mypasswdfile. Replace password with the correct password. For example:# echo 'password' > /var/tmp/OC/mypasswd
-
Use the agentadm command to associate the Enterprise Manager Ops Center Agent with the Proxy Controller.
-
Oracle Solaris OS – Use the
/opt/SUNWxvmoc/bin/agentadmcommand. -
Linux OS – Use the
/opt/sun/xvmoc/bin/agentadmcommand. The example commands below use the following options: -
configure – Causes an Agent configuration operation to take place.
-
-u – Specifies the administrative user that exists on the Enterprise Controller to which the Proxy Controller is connected. Be certain that the password that you specified in the
/var/tmp/OC/mypasswdfile is correct for the user that you specify for this option.Note:
The example below uses droot as the administrative user. -
-p – Specifies the absolute path name of the file that contains the password for the user that you specified with the
-uoption. -
-x – Specifies the IP address or host name of the Proxy Controller to which this Agent will connect.
-
-a – Specifies the IP address to use during Agent registration. This selects the network interface that the Agent will use for registration. Accept the server's certificate when prompted. For example:
# /opt/SUNWxvmoc/bin/agentadm configure -u droot -p /var/tmp/OC/mypasswd -x 172.20.26.218
agentadm: Version 1.0.3 launched with args: configure -u droot -p /var/tmp/OC/mypasswd -x 172.20.26.218
workaround configuration done.
Certificate:
Serial Number: 947973225
Version: 3
Issuer: CN=flyfishing_scn-proxy_ca
Subject: CN=flyfishing_scn-proxy_agent
Not valid before: Thu Jun 19 15:36:59 MDT 1969
Not valid after: Thu Apr 19 15:36:59 MDT 2029
Certificate:
Serial Number: 1176469424
Version: 3
Issuer: CN=flyfishing_scn-proxy_ca
Subject: CN=flyfishing_scn-proxy_ca
Not valid before: Thu Jun 19 15:36:56 MDT 1969
Not valid after: Thu Apr 19 15:36:56 MDT 2029
Accept server's certificate? (y|n)
y
Connection registered successfully.
scn-agent configuration done.
Checking if UCE Agent process is still running, it may take a couple of minutes ...
Process is no longer running
UCE Agent is stopped.
UCE Agent is in [online] state.
Checking if UCE Agent process is up and running ...
The process is up and running.
UCE Agent is started.
Added the zone configuration automation successfully.
Added the service tags recreate script successfully.
#
Error messages similar to Connection cannot be registered in the following example typically indicate problems with the user credentials that you specified in the agentadm command. In this example, the user droot was not authenticated on the Enterprise Controller. If you see an error like this, check that the user name that you supplied for the
agentadm -uoption, and the password in the file that you specified for theagentadm -poption, match an existing administrative user on the Enterprise Controller.Accept server's certificate? (y|n) y Error with connection to CRS: com.sun.scn.connmgt.SCNRegClientException: droot, Code: 4, Code: 4 ERROR : Connection cannot be registered. Code--2 sc-console registration failed on [2]. sc-console : User authentication error. Error executing step : sc_console
If the system where you are installing the Agent has multiple active network interfaces, you can use the -a option to specify the IP address of the interface that you want to use for Agent registration. For example:
# /opt/SUNWxvmoc/bin/agentadm configure -u droot -p /var/tmp/OC/mypasswd -x 172.20.26.218 -a 172.20.26.128
(output omitted)
-
-
If you encountered a Connection cannot be registered error message from the
agentadmcommand, useagentadmto unconfigure the Agent. For example:# /opt/SUNWxvmoc/bin/agentadm unconfigure agentadm: Version 1.0.3 launched with args: unconfigure verified sc_console command is OK End of validation {output omitted} End of configuration.After the Agent has been unconfigured, correct the problem that was indicated by the error message, and re-run the
agentadmconfigure command. -
Use the
sc-consolecommand to list the Agent connection. For example:# sc-console list-connections scn-agent https://172.20.26.218:21165 urn:scn:clregid:a860a6d4-6899-4bcc-9ac7-a6ebaf71c1f5:20090420171121805 #
To Configure Agent Software Using a Token
This procedure uses a token to configure your Agent software. If you prefer to use user credentials for this purpose, see To Configure Agent Software Using User Credentials.
-
On the Proxy Controller that will communicate with this Agent instance, examine the
/var/opt/sun/xvm/persistence/scn-proxy/connection.propertiesfile. The last line in this file lists the auto-reg-token token that is required for Agent registration. For example:# cat /var/opt/sun/xvm/persistence/scn-proxy/connection.properties #Generated by a program. Do not edit. All manual changes subject to deletion. (output omitted) trust-store=/var/opt/sun/xvm/security/jsse/scn-proxy/truststore auto-reg-token=5b51bd9f-1700-450d-b038-ece0f9482474\:1271743200000\:T #
-
On the system where you have installed the Agent software, create an empty file named
/var/tmp/OC/mytoken, and set its permission mode to 400. For example:# touch /var/tmp/OC/mytoken # chmod 400 /var/tmp/OC/mytoken
-
Edit the /
var/tmp/OC/mytokenfile so that it contains the auto-reg-token token string from Proxy Controller with the following changes:-
Replace auto-reg-token with autoregToken.
-
Remove any backslash characters from the token string. For example:
autoregToken=5b51bd9f-1700-450d-b038-ece0f9482474:1271743200000:T
-
-
Use the agentadm command to associate the Agent with the a Proxy Controller.
-
Oracle Solaris OS – Use the
/opt/SUNWxvmoc/bin/agentadmcommand. -
Linux OS – Use the
/opt/sun/xvmoc/bin/agentadmcommand. The example commands below use the following options: -
configure – Causes an Agent configuration operation to take place.
-
-t – Specifies the absolute path name of the file that contains the registration token.
-
-x – Specifies the IP address or host name of the Proxy Controller to which this Agent will connect.
-
-a – Specifies the IP address to use during Agent registration. This selects the network interface that the Agent will use for registration. Accept the server's certificate when prompted. For example:
# /opt/SUNWxvmoc/bin/agentadm configure -t /var/tmp/OC/mytoken -x 172.20.26.218 agentadm: Version 1.0.3 launched with args: configure -t /var/tmp/OC/mytoken -x 172.20.26.218 workaround configuration done. Certificate: Serial Number: 947973225 Version: 3 Issuer: CN=flyfishing_scn-proxy_ca Subject: CN=flyfishing_scn-proxy_agent Not valid before: Thu Jun 19 15:36:59 MDT 1969 Not valid after: Thu Apr 19 15:36:59 MDT 2029 Certificate: Serial Number: 1176469424 Version: 3 Issuer: CN=flyfishing_scn-proxy_ca Subject: CN=flyfishing_scn-proxy_ca Not valid before: Thu Jun 19 15:36:56 MDT 1969 Not valid after: Thu Apr 19 15:36:56 MDT 2029 Accept server's certificate? (y|n) y Connection registered successfully. scn-agent configuration done. Checking if UCE Agent process is still running, it may take a couple of minutes ... Process is no longer running UCE Agent is stopped. UCE Agent is in [online] state. Checking if UCE Agent process is up and running ... The process is up and running. UCE Agent is started. Added the zone configuration automation successfully. Added the service tags recreate script successfully. #
If the system where you are installing the Agent has multiple active network interfaces, you can use the
-aoption to specify the IP address of the interface that you want to use for Agent registration. For example:# /opt/SUNWxvmoc/bin/agentadm configure -t /var/tmp/OC/mytoken -x 172.20.26.218 -a 172.20.26.128 (output omitted)
-
-
If you encountered a Connection cannot be registered error message from the
agentadmcommand, useagentadmto unconfigure the Agent. For example:# /opt/SUNWxvmoc/bin/agentadm unconfigure agentadm: Version 1.0.3 launched with args: unconfigure verified sc_console command is OK End of validation {output omitted} End of configuration.After the Agent has been unconfigured, correct the problem that was indicated by the error message, and re-run the
agentadmconfigure command. -
Use the sc-console command to list the Agent connection. For example:
# sc-console list-connections
scn-agent https://172.20.26.218:21165 urn:scn:clregid:a860a6d4-6899-4bcc-9ac7-a6ebaf71c1f5:20090420171121805
#
Registering the Target System
When you manually install an Agent, the target system is listed in the Managed Assets tab as a managed system. However, the target system is not automatically registered.
To Register the Target System
-
Select Assets from the Navigation pane in the Enterprise Manager Ops Center UI.
-
Select the All Assets item. The Register Assets action item is displayed in the Actions list.
-
Select the Register Assets action. The Introduction pane of the Register Assets Wizard is displayed. Click Next. The Select Assets pane is displayed.
-
Select the system that you want to register. Click Next. The Register Assets pane is displayed.
-
Click Register to submit the job.
-
Click Close to exit the Register Assets wizard.
Unmanaging and Deleting Assets
The Unmanage/Delete Asset option will uninstall Agent software and remove an asset from Enterprise Manager Ops Center.
The operating systems that support the Enterprise Controller and Proxy Controllers cannot be unmanaged.
Note:
To unmanage a global zone, you must first unmanage any subordinate zones and then unmanage the global zone.To Unmanage and Delete an Asset
-
Click All Assets in the Assets section of the Navigation pane.
-
Select the asset or assets that you want to remove from the Managed Assets or Available to be Managed Assets tabs.
-
Click Unmanage/Delete Asset if the asset is managed, or click Delete Asset if the asset is not managed. For assets that do not have an Agent Controller installed, a job is launched to delete the asset. For assets that have an Agent Controller installed, the Unmanage and Delete Asset wizard is displayed. The Enter Credentials page is displayed.
-
Select an option for providing SSH credentials for the systems that you want to unmanage:
-
Reuse the SSH credentials used to discover the asset
-
Enter one set of SSH credentials to use for all asset
-
Enter separate SSH credentials for each asset
-
-
Click Next. The Unmanage/Delete page is displayed.
-
Confirm your selection and click Next. A job is launched to unconfigure and uninstall the Agent Controllers. A second job is launched to delete the assets from Enterprise Manager Ops Center. The Summary page is displayed.
-
Click Close.
Removing Assets
The Remove Assets option removes assets from Enterprise Manager Ops Center, but does not uninstall Agent software.
The operating systems that support the Enterprise Controller and Proxy Controllers cannot be removed.
-
Click All Assets in the Assets section of the Navigation pane.
-
Select the asset or assets that you want to remove from the Managed Assets or Available to be Managed Assets tabs.
-
Click Remove Assets. A confirmation window is displayed.
-
Click Remove. A job is launched to remove the assets.
Updating Discovery Credentials
Enterprise Manager Ops Center stores the credentials that were used to discover each asset. These credentials may be reused for other jobs that require access to an asset.
The Update Discovery Credentials procedure lets you add, edit, or delete these credentials.
To Update Discovery Credentials
-
Select one or more assets.
-
Click All Assets in the Assets section of the Navigation pane, then select an asset.
-
Select a user-defined group.
-
-
Click Update Discovery Credentials in the Actions pane. The Update Discovery Credentials wizard is displayed.
-
Enter new credentials or edit existing credentials:
-
Username – The user name to be used for the initial login. If root SSH access is permitted, use the root user name. If not, use an alternate user name.
-
Password – The password to be used for the initial login.
-
Role – The secondary user name. If root SSH access is permitted, leave this field blank. If not, use the root user name here.
-
Role Password – The secondary password.
-
-
(Optional) Remove existing credentials by deleting their user name.
-
Click Next. A job is launched to update the discovery credentials. The Summary page is displayed.
-
Click Close.
Editing Attributes of an Asset
All assets have three attributes that can be edited: the name field, the description field and the tag field.
The name field is the name used for the asset in the UI. This name is created by the Proxy Controller during discovery. If the Enterprise Controller and Proxy Controller used in a discovery resolve different names for the asset's IP address, the user-friendly name might not match the name used in the discovery.
Use the description field for descriptive information about a system.
The tag field enable you to categorize assets and simplify later searches. It is automatically populated with one or more tags based on its asset type. For example, managed systems have the 'agent' tag. These default tags can be removed, and additional tags can be added.
Perform the following steps to edit an asset's attributes:
-
Click All Assets in the Assets section of the Navigation pane.
-
Click the Managed Assets tab. The managed assets list is displayed.
-
Select an asset from the managed asset list.
-
Click the Edit Asset icon. The Edit Asset window is displayed.
-
Edit one or more of the attribute fields.
-
Click Save.
A job is launched to update the asset attributes.
To Edit the Description and Tags Attributes
Perform the following stgeps to edit the description or tags for an asset:
-
Select an asset in the Assets section of the Navigation pane.
-
Click Edit Attributes in the Actions pane or click the Edit Attributes icon in the center pane. The Description and Tags fields are editable.
-
Edit the description and tags fields.
-
Click the Save icon in the center pane. The asset attributes are updated.
Viewing Access Points
An asset's access points show how Enterprise Manager Ops Center connects to the asset.
The following are possible access points:
-
The discovery credentials used to discover the asset.
-
The discovery credentials used to discover a related asset. For example, an access point for a service processor is the discovery credentials of its operating system.
-
Agent installed on the asset.
-
A virtual asset's virtual host.
-
Expand All Assets in the Assets section of the Navigation pane.
-
Select an asset.
-
Click the Configuration tab. The access points for the asset are displayed.
Deleting Access Points
An asset's access points show how Oracle Enterprise Manager Ops Center connects to the asset. You can remove access points from Oracle Enterprise Manager Ops Center if they are incorrect or no longer necessary.
-
Expand All Assets in the Assets section of the Navigation pane.
-
Select an asset.
-
Click the Configuration tab. The access points for the asset are displayed.
-
Select one or more access points.
-
Click the Delete Access Point icon. A confirmation window is displayed.
-
Click Delete. The Access Points are deleted.
Register Assets
Registering your assets uploads your asset data to My Oracle Support, matching it with your Online Account.
Assets cannot be registered until the Enterprise Controller is registered. If you click Register Assets and have not registered the Enterprise Controller, you are prompted to do so.
To Register Assets
-
Click All Assets in the Assets section of the Navigation pane.
-
Click Register Assets in the Actions pane. The Register Assets wizard is displayed.
-
The introduction page is displayed. Click Next.
-
If you have registered your Enterprise Controller, the Discovery page is displayed.
-
If you have not yet registered the Enterprise Controller, the HTTP Proxy page is displayed.
-
-
Register the Enterprise Controller with Oracle.
-
If an HTTP Proxy is needed for the Enterprise Controller to access the Internet, enter the HTTP Proxy information, then click Next. The Online Account Page is displayed.
-
Enter a valid Online Account and password, then click Next. If the specified Online Account is associated with more than one team, the Team page is displayed. Otherwise, the Discovery page is displayed.
-
Select a Team and click Next. The Discovery page is displayed.
-
-
Select a discovery option.
-
Select Discover Systems Now to run a Service Tag discovery.
-
Select Do Not Run Discovery Now to skip discovery. You can still register assets that were discovered before this wizard. Click Next. A job is launched to reconcile discovered assets with registered assets. A popup is displayed showing the status of this job.
-
-
When the job is finished, click Close. The Select Assets page is displayed.
-
Select the assets to register, then click Next. The Register Assets page is displayed.
-
Confirm your selection, then click Register.
An Asset Registration job is launched. The Summary page is displayed.
-
Click Close.
Special Discovery and Management Procedures
Most assets can be discovered and managed using the procedures in the Discovering Assets and Managing Assets sections. However, some types of assets must be discovered or managed using special procedures. These procedures should be used when any of the asset types listed below is discovered or managed.
-
Microsoft Windows OS: You must enable WMI on Microsoft Windows systems before discovering them. Once WMI is enabled, they can be discovered normally.
-
Sun SPARC Enterprise M-Series Servers: You must ensure that user privileges and the status of each dynamic system domain are correct before discovering a Sun SPARC Enterprise M-Series server.
-
Sun ZFS Storage Appliances: You must discover both the storage appliance and its service processor, and follow special procedures to manage them.
-
Oracle Solaris Clusters: You must discover and manage Oracle Solaris Clusters in a specific order so that Enterprise Manager Ops Center can manage the entire cluster.
SPARC Enterprise M-Series Server Support
To discover, manage, provision, and update a Sun or Fujitsu SPARC Enterprise® M3000, M4000, M5000, M8000, or M9000 server (SPARC Enterprise M-series servers), you monitor its XSCF service processor and its dynamic system domains.
The SPARC Enterprise M-series servers have a dedicated processor for system control that is independent of the system processor. A SPARC Enterprise M3000, M4000, and M5000 server has one service processor. The SPARC Enterprise M8000 and M9000 servers, each have two service processors; however, only one service processor is active at a time. The eXtended System Control Facility (XSCF) XSCF firmware runs on the dedicated service processor. The firmware manages hardware configuration, monitors cooling system (fan units), domain status, and error status, and can power on and power off peripheral devices.
The XSCF firmware can create dynamic system domains. Each domain is a logical unit that can function as a system. An Oracle Solaris OS can operate in each domain.
Ops Center supports the SPARC Enterprise M-series servers in the following ways:
-
Discover XSCF service processors and existing dynamic system domains.
-
Power On/power off the XSCF service processors and their dynamic system domains.
-
Provision an Oracle Solaris OS in dynamic system domains.
-
Update the Oracle Solaris OS in dynamic system domains.
-
Provision firmware on the service processor.
-
Add the system board to domain and remove it.
-
Monitor the service processor hardware.
-
Monitor a dynamic system domain's sensor information and hardware.
-
Create and delete dynamic system domains.
Requirements for Managing M-Series Servers
The following is required to manage this type of asset:
-
The XSCF service processor has a user account with the platadm privilege.
-
The server is assigned to homogeneous asset groups.
-
The server is discovered and managed.
To Discover a SPARC Enterprise M-Series Server
To discover a Sun or Fujitsu SPARC Enterprise® M3000, M4000, M5000, M8000, or M9000 server, run a custom discovery job for the XSCF service processor. The discovery job discovers the XSCF service processor and its dynamic system domains.
Perform the following tasks before discovering this type of asset:
-
In the XSCF service processor, create a user account with platadm privilege.
-
Ensure that user privileges and the status of each dynamic system domain are correct.
-
Check the status of each dynamic system domain, using the showdomainstatus -a command. Ops Center can only discover domains that do not have a "-" status.
-
Log in to the XSCF shell from an XSCF-LAN port or from the serial port.
-
Log in to Oracle Enterprise Manager Ops Center.
-
Expand All Assets in the Navigation pane.
-
Click Custom Discovery in the Actions pane. The Custom Discovery wizard is displayed.
-
(Optional) Create new criteria by clicking the Add Criteria icon. If you have already created criteria for discovering this SPARC Enterprise M-Series Server, skip this step.
-
(Optional) Check Save Criteria for Future Use if you intend to discover other SPARC Enterprise M-Series servers.
-
(Optional) Check Save Password in Criteria.
-
Criteria name. When you check Save criteria for future use, the criteria is saved with this name.
-
Targeted Proxy Controller. Specify the Proxy Controller to use for the discovery. The Automatic option selects the most appropriate Proxy Controller.
-
The IP address of the XSCF Service Processor
-
The type of asset to target Specify XSCF Service Processor.
-
The discovery protocol to use and its credentials. Select either telnet or ssh and enter the credentials for the account with platadm privileges.
-
Click Save.
-
-
Select your discovery criteria.
-
Click Discover Assets. A Custom Discovery job is launched. Dynamic system domains and the XSCF service processor are discovered at the same time. When the job is complete, the domains and the XSCF service processor are displayed in the Available to be Managed Assets tab. The XSCF service processor is listed as a chassis and the dynamic system domains are listed as blade servers under the chassis. See Adding SPARC Enterprise Manager M-Series Servers to a Group in the Oracle Enterprise Manager Ops Center User's Guide to create a group for each server.
Sun ZFS Storage Appliance Support
The Sun ZFS Storage Appliance family of products provides rich and efficient data services for file and block storage formats. Each appliance has the Analytics feature for observing the condition and behavior of the appliance in real time and the ZFS Hybrid Storage Pool that uses Flash-memory devices, high-capacity disks, and DRAM memory within a data hierarchy. The hybrid storage pool provides solid-state response time with spinning disk capacity.
When you use Sun ZFS Storage Appliances within the Enterprise Manager Ops Center environment, you not only manage the appliance as one of the assets in the data center, but you also can make use of the storage provided by these appliances as a backing storage for the storage and software libraries.
To manage a Sun ZFS storage appliance, you must discover both the storage appliance and its service processor, and follow special procedures to manage them.
-
Create a user account on the appliance with the username ocuser with the basic administration role and the following permissions and characteristics:
-
Permission to configure alert filters and thresholds
-
Permission to administer the Phone Home Service. If the user account does not have this permission, it is not possible to use the Enable Appliance Phone Home or Disable Appliance Phone Home actions.
-
Permission to power off the appliance. If the user account does not have this permission, it is not possible to power off the storage appliance remotely.
-
Permission to administer, configure and restart the SNMP service (required).
A sample user account is shown in the following figure:
Figure 2-2 Sun ZFS Storage Appliance Support
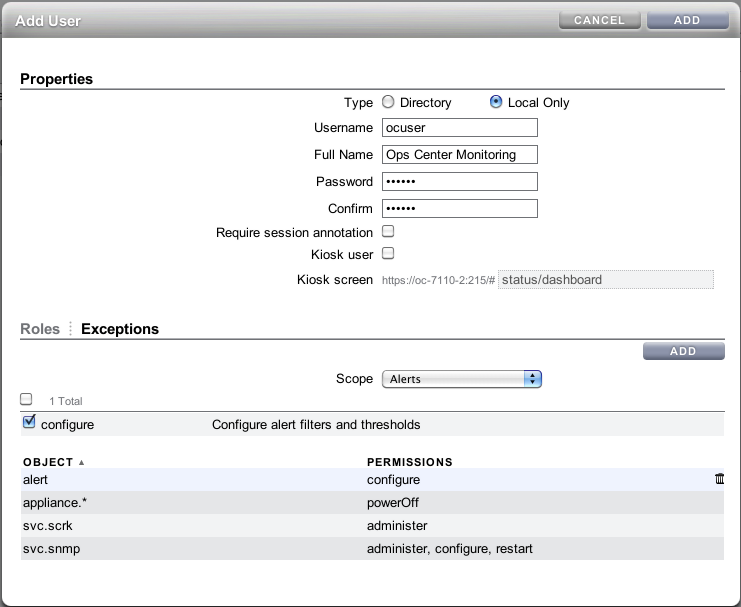
Description of "Figure 2-2 Sun ZFS Storage Appliance Support"
-
User account must not be a kiosk type.
-
User account must not require session annotation.
-
-
Power on and configure the Sun ZFS Storage Appliance.
-
Configure the storage pool on the appliance.
See the Oracle Enterprise Manager Ops Center Reference Guide for instructions on getting access to Sun ZFS Storage Appliance documentation for creating user accounts. See Discovering a Sun ZFS Storage Appliance for instructions on discovering this storage appliance.
Provisioning and Updating a Sun ZFS Storage Appliance
Unlike other hardware that you provision through a deployment plan, the Sun ZFS Storage appliance's software and firmware is handled by its own feature, Manage Appliance Updates. The software and firmware are packaged in a proprietary format and it is not possible to provision other images or packages on a Sun ZFS Storage Appliance. Therefore, Enterprise Manager Ops Center provisioning wizards do not include these storage appliances in the list of available targets.
Reports for a Sun ZFS Storage Appliance
The Enterprise Manager Ops Center software creates reports from the information it retrieves from an asset and creates charts from the history recorded for the asset. The Sun ZFS Storage Appliance has the Analytics feature that can provide information about the appliance dynamically. Click Launch Analytics in the Actions pane to start the appliance's management UI.
See Managing a Sun ZFS Storage Appliance for more information about this storage appliance.
Discovering a Sun ZFS Storage Appliance
Because the storage appliance contains a service processor, it is possible to discover the service processor but not the appliance, discover the appliance but not the service processor, or to discover both. The recommended procedure is to discover both aspects of the Sun ZFS Storage Appliance, using either Discover/Manage Assets or Custom Discovery.
-
Use Automatic Discovery. Each storage appliance is discovered as two assets: a service processor asset in the Servers section and a storage appliance asset in the Storage section. These assets are listed in the Unclassified Assets tab in the center pane. To manage the storage appliance, use the Discover and Manage Assets action. Select both the appliance and its service processor and enter the user credentials. Enterprise Manager Ops Center removes the generic server from the Servers section and displays only the asset in the Storage section. Use Discover and Manage Assets.
-
Use Custom Discovery to discover the storage appliance first and then discover its service processor. When you discover the storage appliance, Enterprise Manager Ops Center displays the device in the Storage section of the Assets tree. When you discover the service processor, its information is mapped to the already-discovered appliance.
Note:
If you change the order of discovery, the result is the same. However, Enterprise Manager Ops Center displays a generic asset in the Server section of the Asset tree. When the appliance discovery succeeds, Enterprise Manager Ops Center removes the generic server from the Servers section and displays a new asset in the Storage section.See the Oracle Enterprise Manager Ops Center Reference Guide for instructions on getting access to Sun ZFS Storage Appliance documentation for creating user accounts.
Managing a Sun ZFS Storage Appliance
After the storage appliance is discovered, you can manage it as you do other assets with the additional capabilities that the Sun ZFS Storage Appliance provides. From the Enterprise Manager Ops Center UI, you can launch the storage appliance's UI. Use the following commands in the Action pane, to launch a specific page of the appliance's user interface. For each one, enter the credentials for the appliance and then perform the appliance tasks.
-
Launch Appliance UI opens a new browser window or tab for the main page.
-
Launch Detailed Dashboard opens a new browser window or tab for the status page.
-
Launch Analytics opens a new browser window or tab for the dynamic analysis page.
-
Manage Shares opens a new browser window or tab for the share configuration page.
-
Manage Services opens a new browser window or tab for the data services configuration page.
-
Manage Appliance Updates opens a new browser window or tab for the provisioning software and firmware page.
Problem Management for a Sun ZFS Storage Appliance
The Sun ZFS Storage Appliance can create service requests when it detects a problem condition. When the Enterprise Manager Ops Center software manages the appliance, this software also reports the problem. To avoid creating duplicate reports, disable the appliance's Phone Home Service and allow the Enterprise Manager Ops Center software to report all problems. In the Action pane, two actions toggle this function. Choose Disable Appliance Phone Home Service to turn off the appliance's Phone Home service. If you unmanage a Sun ZFS Storage Appliance and want to restore the appliance's Phone Home service, use the appliance's UI or CLI and navigate to the Configuration > Services section.
Discovering an Oracle Solaris Cluster
Discovering and managing an Oracle Solaris Cluster has some specific requirements.
To Discover an Oracle Solaris Cluster
-
Verify that all global nodes in the cluster are in cluster mode.
-
Discover each of the cluster's global nodes. You must provide both ssh credentials and JMX credentials for each global node.
-
Discover the cluster by selecting Solaris Cluster or All.
Managing an Oracle Solaris Cluster
To manage a cluster, you must manage all the cluster nodes and zone cluster nodes.
The following error can be reported when a cluster is managed:
The following Oracle Solaris Cluster nodes are either missing an Operating System association or an Operating System for them was not discovered:
<name(s)_of_the_nodes>
Before trying to manage the Oracle Solaris Cluster, discover these missing Operating Systems or delete the Oracle Solaris Cluster asset and re-discover.
This message indicates one of the following conditions:
-
Not all of the nodes in the cluster were discovered so the association with the OS asset cannot be made. OR
-
After the cluster was discovered, a zone cluster was configured. Although the zone cluster and its zone cluster nodes are displayed in the Navigation pane, the associations with the OS asset cannot be made. The cluster either cannot be managed or, if the cluster was managed previously, it becomes unmanaged.
Use one of the following solutions:
-
Restart the cacao agent on all the global cluster nodes using the following command to create the missing associations and manage the cluster:
cacaoadm restart -i scn-agent
OR
-
Delete the cluster and use the Unmanage/Delete action on the OS asset on all the cluster nodes. Then discover the cluster and manage the cluster.
Another possible cause of the error condition is that a new global node has been added to the cluster. This causes a managed cluster to become unmanaged. The new global node and its system are not displayed in the Navigation pane. In this case, discover the global node as a Solaris Cluster type. Then use the Manage to re-manage the cluster.
Configuring a Windows OS for Discovery
Windows Management Instrumentation (WMI) is the infrastructure used by Windows systems for remote management and monitoring operations. It is installed on Microsoft Windows XP and Windows Server 2008, but it is often disabled. To manage and monitor a Windows system, you must configure the target system to enable (WMI) and then allow WMI through the Windows Firewall or Internet Connection Firewall.
This procedure allows the Enterprise Controller or a Proxy Controller to connect to the target system.
-
Log in to the WMI on the target host.
-
Click Administrative Tools, then click Computer Management.
-
Expand Services and Applications.
-
On WMI Control, right click Properties.
-
Click the Security tab.
-
Click the Security button.
-
Add the monitoring user (if needed).
-
Click the checkbox to allow Remote Enable.
To Allow WMI Through the Windows Firewall
This procedure allows WMI to send data through the target system's firewall.
-
Go to the command prompt on the target system.
-
Type the following command:
netsh firewall set service RemoteAdmin enable