4 Storage Libraries
Enterprise Manager Ops Center stores a guest's configuration for its operating system, data, CPU, memory, and network as metadata in the storage library associated with the virtual host. The guest's data, which results from its use, can reside in the same storage library or in a different storage library.
The following topics are covered in this section:
About Storage Libraries
A storage library can be a local, that is, a file system on the virtual host's server or it can be accessed through an NFS server or SAN network. When you create a guest, you assign it to one of the storage libraries associated with its virtual host. The guest's metadata, that is, the configuration of its operating system, CPU, memory, and network is saved in this storage library. The guest's data, which results from its operations, can reside in the same storage library or in a different storage library.
-
For the metadata of its local guest, both types of virtual hosts (Oracle VM Server for SPARC and global zones) can use a local storage library.
-
For metadata of all guests, both types of virtual hosts must use Network Attached Storage (NAS) storage library.
-
For data, Oracle VM Server for SPARC can use either NAS shares or Fibre Channel LUNs for itself and for its logical domains. A global zones can use either Fibre Channel LUNs or NAS shares for itself and for its non-global zones. The storage library must be associated with the virtual host.
-
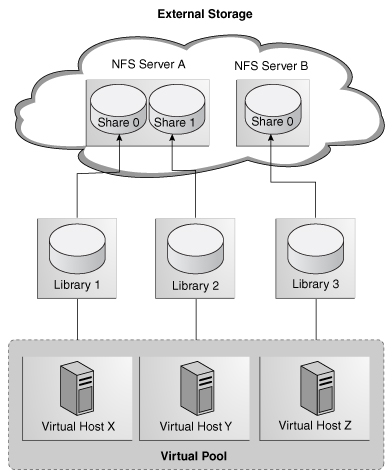
A virtual pool must use a NAS storage library.
You can group hosts with the same processor architecture to create a virtual pool. The hosts in the virtual pool share any storage and networks associated with the virtual pool. If you add a host to a virtual pool, the libraries associated with that host become available to all the other hosts in the virtual pool. The following illustration shows hosts in a virtual pool get access to storage libraries.
Enterprise Manager Ops Center does not manage storage resources; it does not create, modify or update LUNs on disk arrays and it does not manage NAS shares on NAS systems. Enterprise Manager Ops Center manages the storage libraries, which stores guests' metadata. Virtual hosts use appropriate storage management utilities and services to attach to the storage libraries.
The diagram shows how the storage libraries and types of virtualization interact with virtual disks.
-
SAN storage libraries expose data as logical units (LUNs), identified by their LUN GUIDs. A control domain makes raw partitions available to its logical domains using Fibre Channel: Fibre Channel Storage Libraries
-
NAS storage libraries expose data as raw files and files in VMDK format. All types of virtual hosts store metadata using either NFS services: Network Attached Storage (NAS) Storage Libraries
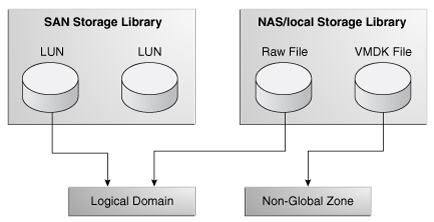
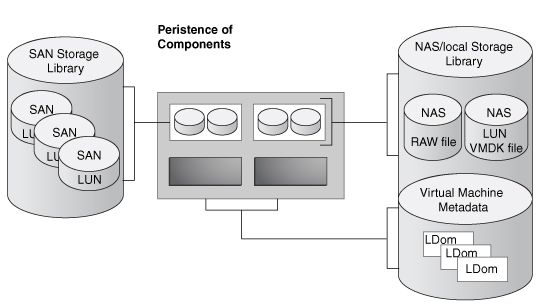
The LUNs, raw files, and raw volumes store data and metadata for the guests. The metadata for NAS virtual disks are stored in the NAS storage library. Metadata for SAN virtual disks is persisted in the SAN Storage Library.
Network Attached Storage (NAS) Storage Libraries
Network-attached-storage (NAS) libraries are storage libraries for NFS storage device mount points. The virtual hosts use NFS services to attach to the storage libraries and get access to the data and metadata.
You can store metadata for all guests in one NAS storage library or you can create separate storage libraries for each guest. The benefit of using separate storage libraries is to increase the virtual host's ease of access, to increase capacity, and to increase performance.
If a NAS storage library becomes unavailable, the guests associated with the library are affected in the following ways:
-
If the storage library is used for the guests' metadata, the guest continues to function but Enterprise Manager Ops Center can no longer manage the guest. Because Enterprise Manager Ops Center relies on its interaction with the metadata in the storage library, jobs that need to read or modify the metadata fail. You must manage the guest manually.
-
If the storage library is used for NFS large files that support virtual disks, the guest does not function.
-
If the boot disk is on the NFS share, the guest cannot be rebooted.
-
The guest cannot be migrated.
Fibre Channel Storage Libraries
A Fibre Channel storage library is SAN (storage attached network) storage, which you use to store the data for virtual hosts and their guests. A Fibre Channel storage library consists of groups of LUNs. A LUN (Logical Unit Number) is a slice of a storage volume, which is a collection of disks. Each LUN is for the exclusive use of its assigned guest or zone.
-
Disk – Physical storage media. A set of disks is a disk array.
-
Volume – An aggregation of storage space provided by several disks.
-
Slice – A partition of a volume that is exposed to the servers connected to the disk array.
-
LUN (Logical Unit Number) – The representation of a slice as seen from the outside world.
-
GUID – The Global Unique Identifier for a LUN.
Because a LUN has a fixed size and cannot be shared among zones, you must plan how to optimize the available storage in the storage library. You want to assign a LUN of the appropriate size to the zone. If you need more storage, you can add a LUN to the Fibre Channel storage library
Local Storage Libraries
Each virtual host has a default local library named /guests where data and metadata for the host's guests are stored. For the purposes of storage efficiency and your site's organization, you can create and maintain other local libraries.
If the storage library becomes unavailable, the local library remains available. However, any guest with metadata in a local library cannot be migrated.
Editing Attributes of a Storage Library
You can change the name and description of the storage library and you can add LUNs to a Fibre Channel storage library.
To Edit Attribures of a Storage Library
-
Expand Libraries in the Navigation pane.
-
In Storage Libraries, click either Fibre Channel Storage or NAS Storage.
-
Click the storage library you want to change.
-
Click Edit Library Attributes in the Actions pane.
-
Edit the library name and description.
-
Click Save.
See Adding LUNs to a Fibre Channel Library to change the storage capacity of the storage library.
Removing a Storage Library
Removing a storage library removes its association with a virtual pool, control domain, or global zone. The guests of those virtual hosts or pool whose data is stored in the storage library are no longer accessible.
Note:
If you are removing a Fibre Channel storage library, verify that no LUN in the Fibre Channel storage library is associated with any guest.-
Expand Libraries in the Navigation pane.
-
In Storage Libraries, click either Fibre Channel Storage or NAS Storage, depending on the type of storage library.
-
Click the storage library you want to remove.
-
In the Actions pane, click either Remove Fibre Channel Library or Remove NAS Library. The Remove Library popup is displayed. Guests associated the storage library are listed in the Virtual Guests table.
-
Click Remove Library.
A job is submitted to remove the association.
Disassociating a Storage Library
Control domains, global zones, and virtual pools are associated with storage libraries so that their guests' images and data can be stored.
To Disassociate a Storage Library
-
Select Assets in the Navigation pane.
-
Click the All Assets drop-down list.
-
Select the virtual host or virtual pool you want to disassociate from its storage library.
-
Click the Libraries tab in the center pane. The associated libraries and the guests that are stored in the libraries are listed.
-
Select the library you want to disassociate.
-
Click the Disassociate Library icon. The selected library is detached from the virtual asset.
See About Storage Libraries for information about how storage libraries are used.
Preparing Storage
The following procedures are the general procedures for setting up NAS storage and Fibre Channel storage.
To Configure Storage for NAS Storage Libraries
The following is the general procedure for setting up a NAS storage library:
-
Set up the mountpoint. See Setting Up the NFS Server.
-
Define the storage library. See Creating a NAS Storage Library
-
Add images to the storage library. See the topics in Images
-
Associate the storage library with a virtual host or zone. See Managing Storage Libraries of a Virtual Pool in the Oracle Enterprise Manager Ops Center User's Guide.
To Configure Storage for Fibre Channel Libraries
You configure storage hardware for Fibre Channel libraries external to Enterprise Manager Ops Center. Use a vendor-qualified Fibre Channel disk array and a Fibre Channel switch with sufficient ports. The following is the general procedure for configuring storage. See your vendor's storage documentation for the procedure.
-
Log in to the disk array using the service processor credentials.
-
Define volumes on the disk array with the required number of disks.
-
Initialize the volumes.
-
Create slices from a volume. These are the LUNs.
-
Map the LUNs.
-
Enable the Multipath support (MPxIO) on the disk array so that the LUNs are visible through Oracle Solaris multipathing.
See vendor-specific storage documentation.
Using a Sun ZFS Storage Appliance For a Storage or Software Library
When a Sun ZFS Storage Appliance provides the storage library for a virtual pool, all of the virtual hosts in the virtual pool can use the storage appliance. When you create a new zone or logical domain, you can choose the storage appliance as the location for storing the virtual machine's data and metadata. When used as a software library, the Sun ZFS Storage Appliance stores images for both physical and virtual provisioning.
The Sun ZFS Storage Appliance family of products serves shares through various protocols including NFS and CIFS. The Enterprise Manager Ops Center software supports only NFS shares as storage for its software and storage libraries, but can report on the appliance's CIFS usage. Use the appliance's Charts tab to monitor the performance of CIFS shares exported by the Sun ZFS Storage Appliance.
The Sun ZFS Storage Appliance family of product is unified storage: it provides both file format storage (NAS) and block format storage (SAN) simultaneously. Enterprise Manager Ops Center displays information about NAS shares on the appliance's Storage Shares tab and displays information about LUNs on the appliance's Logical Units tab. When you create a new NAS library and you specify the NFS service, you can select a Sun ZFS Storage Appliance. All of the appliance's exported shares are then listed for selection. In a similar way, when you create a Fibre Channel library and you specify a LUN, you can select an appliance and then select one of the appliance's exported logical units
Viewing the Contents of a NAS Storage Library
You can display the contents of the storage library, its associations, and details about the disks in the storage library. You can also see how the library is being monitored and any problems.
To View the Contents of a NAS Storage Library
-
Expand Libraries pane in the Navigation pane.
-
Click NAS Storage in Storage Libraries.
-
Click one of the storage libraries.
The details of the selected NAS library are displayed in the central pane in a set of tabs.
The Summary tab shows information about the entire storage library:
-
URL – NFS.
-
Size – Total storage capacity of the library.
-
Used Space – Space assigned to guests and zones.
-
State – State of the library.
-
Access – Read-Write The Library Contents table lists all the images in the library, organized by type, and includes the size and date the image was modified.
-
-
To see the guests that use this storage library, click the Usage tab.
The Usage tab contains a table for logical domains and zones.
For each guest, the table shows the following information: Name, Tag, Memory, vCPU, vCPU Utilization, and Image Size or Crypto Unit.
-
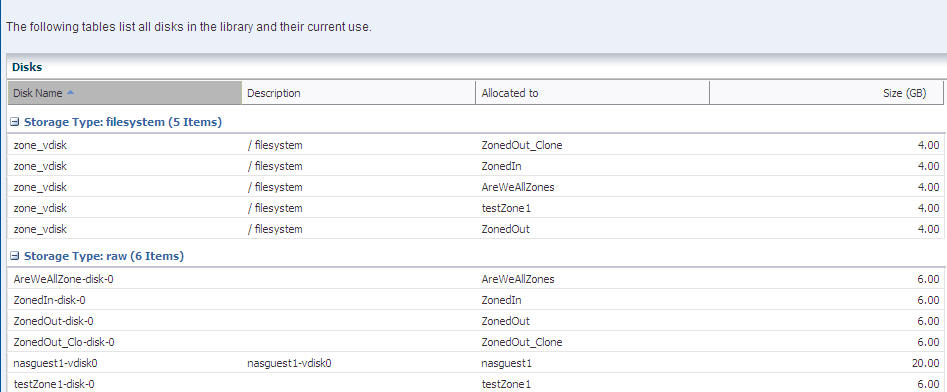
To see all the disks in the library, click the Disks tab.
The Disks tab lists all disks in the library by name and description and shows the current use of each one by allocation and size.
-
To see any problems discovered by monitoring the storage library, click the Problems tab.
-
To see the attributes and values being monitored, click the Monitoring tab.

Creating a NAS Storage Library
When you first create a new storage library, it has a size of -2 MB and a state of UNKNOWN because the storage library is not yet mounted. For storage libraries that use NFS mount points and an Enterprise Controller on Linux OS systems, the storage library is mounted when a virtual pool is associated with the storage library. The mount process occurs on a host in the virtual pool. After the virtual pool is associated with a storage library and mounted, all the actions on the library are enabled and the size of the storage library is accurate.
To Create a NAS Storage Library
-
Expand Libraries in the Navigation pane.
-
In Storage Libraries, click NAS Storage.
-
In the Actions pane, click New NAS Storage.
The Create New NAS library window is displayed.
-
Enter a name for the library and a description.
-
Select one or more virtual hosts to be associated with this library.
-
For the Type, select NFS to indicate the mount point of the library.
-
You have a choice of either entering the path of a shared directory or, if Enterprise Manager Ops Center is managing a unified storage appliance, selecting the appliance and specifying the exported share you want to use.
-
Click the New NAS Library button to create the library.
-
Associate the library with one or more virtual hosts:

Viewing the Contents of a Fibre Channel Storage Library
You can display the contents of a Fibre Channel storage library, its association, and details about the LUNs in the library. You can also see how the storage library is being monitored and any problems. You can adjust the capacity of the storage library by adding and removing LUNs.
To View the Contents of a Fibre Channel Storage Library
-
Expand Libraries pane in the Navigation pane.
-
Click Fibre Channel Storage in Storage Libraries.
-
Click one of the storage libraries.
The details of the selected Fibre Channel library appear in the center pane.
Figure 4-8 Contents of a Fibre Channel Storage Library
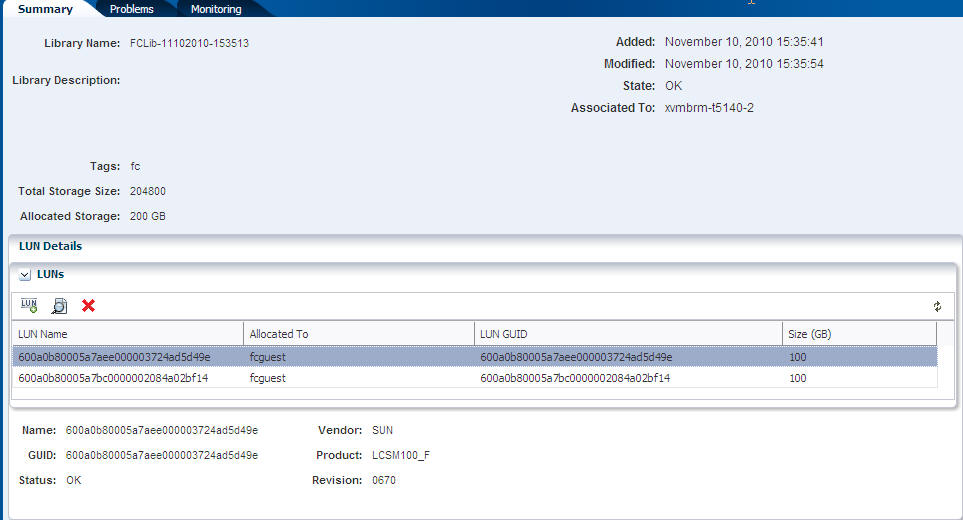
Description of "Figure 4-8 Contents of a Fibre Channel Storage Library"
The Summary tab shows information about the entire storage library:
-
Total Storage Size – Size of all LUNs in the library
-
Allocated Storage – Size of all LUNs in the library that are assigned to guests and zones
-
State – State of the Fibre Channel library. The state of the library depends on each LUN
-
Associated To – Names of the virtual pools, Oracle VM Server for SPARC, or global zones that use this library The LUN Details table lists each LUN in the Fibre Channel library. The first LUN is selected by default and shows the following information:
-
LUN Name – Name of the LUN
-
Allocated To – Name of the guest or zone that this LUN is allocated
-
LUN GUID – Global Unique Identifier that is associated with each LUN
-
Size (GB) – Size of the LUN in Gigabytes
-
-
From the LUNs table, you can add, edit, and delete LUNs.
To see any problems discovered by monitoring the storage library, click the Problems tab. To see how the storage library is being monitored, click the Monitoring tab.
Creating a Fibre Channel Library
When you create a Fibre Channel library, you specify the LUNs that are in the library in either of these ways:
Use the vendor documentation to configure storage for Fibre Channel libraries so that LUNs are mapped to and accessible to the host. See Preparing Storage for the general procedure. If you want to identify the LUNs to add to the library, you must have the GUID or WWN for each LUN.
To Create a Fibre Channel Library
-
Expand Libraries in the Navigation pane.
-
Click Fibre Channel Storage in Storage Libraries.
-
Click New Fibre Channel Library in the Actions pane.
-
In the Identify Library pane, enter the name and description of the library. Click Next.
The wizard presents two options for identifying the LUNs for the new library.
-
Specify LUNs.
-
To add specific LUNs to the library by name, select the Create the library associations later option.
Figure 4-9 Create New Fibre Channel Library
Description of "Figure 4-9 Create New Fibre Channel Library"
-
Click Next.
-
See the To Add LUNs To the Library Manually procedure.
-
-
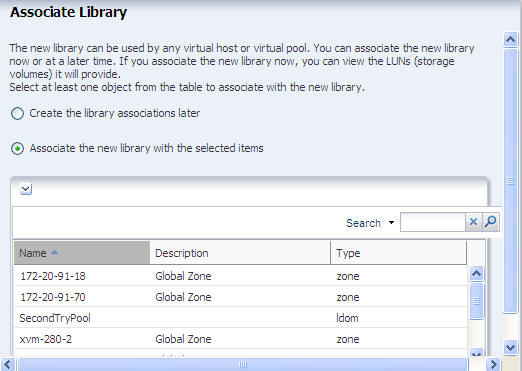
To select LUNs from a set of available LUNs, select the Associate the new library with the selected items option.
-
Select at least one of the virtual pools, control domains, or global zones from the table.
-
Click Next.
-
See the To Select LUNs For the Library procedure.
-
-
Adding LUNs to a Fibre Channel Library
If the Fibre Channel storage library is not associated with a virtual pool, control domain, or global zone, add storage capacity by specifying the LUNs to add by name. If the storage library is associated, you can also add LUNs by selecting them from a list of the LUNs mapped to those objects.
To Add LUNs to a Fibre Channel Library
-
Expand Libraries in the Navigation pane.
-
Click Fibre Channel Storage in Storage Libraries.
-
Click one of the available Fibre Channel storage libraries.
-
Click Add LUN in the Actions pane.
-
Choose the method for adding LUNs:
-
To add LUNs to the library manually, accept the default option: Manually enter the GUID/WWN of the LUNs to be added. See To Add LUNs To the Library Manually to complete the procedure.
-
To select LUNs from the available LUNs, select the Select from available LUNs option. See To Select LUNs For the Library to complete the procedure.
-
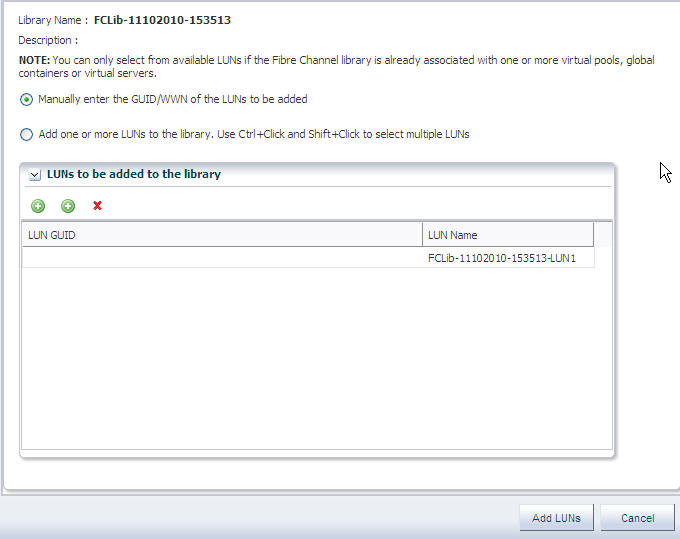
To Add LUNs To the Library Manually
You use this procedure in the following situations:
-
You are creating a new Fibre Channel storage library and have accepted the default action of adding LUNs later. You are required to add at least one LUN to create the storage library.
-
You are adding a LUN to an existing Fibre Channel storage library. You selected the library and then the Add LUN action. The default option is specify each new LUN by name.
After you have accepted the default option to add the LUNs by name, the following table is displayed:
-
Click the icon to create an entry for the LUN.
-
Click in the GUID/WWN field and type the GUID or WWN for the LUN. The GUID is the Global Unique Identifier associated with each LUN, which is a hexadecimal number of 32 digits. If your site uses SCSI initiators and targets, you can enter the WWN for the LUN. You can edit the default name for each LUN. Click Next or Add LUN.
-
If you are creating the storage library, review the details in the Summary pane.
-
Click Finish to close the Fibre Channel library.
If you are creating a new Fibre Channel storage library, you can now associate the storage library with a virtual pool, control domain, or zone.
To Select LUNs For the Library
You use this procedure in the following situations:
-
You are creating a new Fibre Channel storage library and have associated the new library with a virtual host or virtual pool immediately.
-
You are increasing the storage capacity of an existing Fibre Channel storage library and chose to select LUNs, using the following procedure:
-
Select the library.
-
Click the Add LUN action.
-
Click the Select from available LUNs option.
The Available LUNs table shows all of the LUNs that are accessible from either the associated library or from the pools, hosts, or zones you selected.
For each LUN, the following information is displayed to help you identify the ones you want to add to the library.
-
LUN GUID - The unique 32-digit identifier for the LUN.
-
Host information for the LUN:
-
Hostname - Name or IP address of the host that can access the LUN.
-
Controller Number - The host's identifier for the HBA port, which is the physical interface to the Fibre Channel disk array.
-
LUN Number - The host's identifier for the LUN.
-
-
Size (GB) - Size of each LUN in Gigabytes. Use the Search box to locate a specific LUN.
-
Click one or more LUNs. When you finished, click Next or Add LUN.
-
If you are adding a LUN to an existing storage library, a new job starts. If you are creating a Fibre Channel storage library, review the details of the LUNs you have configured in the Summary pane.
-
Click Finish to close the Fibre Channel library.
-

Viewing Local Libraries
Use this procedure to see the local libraries for a virtual host and the contents of a library. You can also see details of the local disks that support the local libraries.
To View a Virtual Host's Local Libraries
-
Expand Assets in the Navigation pane.
-
Select the virtual host.
-
Click the Libraries tab in the center pane. The Associated Libraries table's Type column identifies the libraries of the Local type.
-
Select a library of the Local type. The Usage table shows all the guests that use that local library.
-
In the Usage table, select a guest.
-
Click the Contents tab to see the Library Contents table with all of the images, sorted by type.
-
To see details of the local disks, return to the Associated Libraries table and click Local Devices. The select the local device library.
Editing the Attributes of a Local Library
You can rename a local library and you can change its description. You cannot change the filesystem defined for the local library.
-
Expand Assets in the Navigation pane.
-
Select the asset.
-
Click the Libraries tab in the center pane. The asset's associated libraries and the guests that are stored in the libraries are listed.
-
Click the Edit Local Library icon.
-
In the Edit Local Library pane, enter the new name or description for the library.
-
Click the Update button. When the job is completed, the edited local library is listed in the Associated Libraries table.
Creating a Local Library
Each virtual host has a local library, located at file: ///guests, where all images for the guests are stored by default. In addition to the default local library, you can create other local libraries to use your storage resources efficiently or organize your images. When you create a new guest, you have the option of using the default local library or one that has been created for the virtual host.
Note:
To create a local library, you specify a filesystem. This filesystem must already exist and must have read/write permissions for only the root user.To Add a Local Library To an Virtual Asset
-
Expand Assets in the Navigation pane.
-
Select the asset.
-
Click the Libraries tab in the center pane. The asset's associated libraries and the guests that are stored in the libraries are listed.
-
Click the New Local Library icon.
-
In the Create Local Library pane, type a name and description for the library.
-
In the URL field, enter the directory name for the location where you want to store images and metadata.
-
Click the Create Local Library button. When the job is completed, the new local library is listed in the Associated Libraries table.
See About Storage Libraries for information about using libraries.
Deleting a Local Library
You can delete a local library that was added to a virtual host. After the deletion, the virtual host does not have any access to either the directory defined for the local library or any of its contents. The default local library, /guests, cannot be deleted. You have the option of deleting the library and all of its contents or to delete the library but keep the contents in the directory of the storage resource. In either case, the directory is not deleted.
-
Expand Assets in the Navigation pane.
-
Select a virtual host.
-
Click the Libraries tab in the center pane. The asset's associated libraries and the guests that are stored in the libraries are listed.
-
Select the local library you want to delete. You can select more than one library.
-
Click the Delete Local Library icon.
-
In the Delete Local Library pane, verify that the library is the one you want to delete.
-
Click the Delete the libraries and their content button Or Click the Delete the libraries but keep the content button.
When the job is completed, the local library is removed from the Associated Libraries table. If you chose to keep the local library's content, you can create a new local library with the same content by specifying the same URL for the new library.