Units, Indexes, and Exchange Rates
This chapter describes units and related concepts, outlines the primary configuration options, and summarizes the available tools.
This chapter covers the following topics:
- Introduction
- Unit Conversion Data
- How Units Are Used
- Time Units
- Setting and Modifying the Base Time Unit
- Unit-Level Association
- Indexes and Exchange Rates
- Configuration Notes
Introduction
At any time, a worksheet uses one unit of measure, which is used by most of the series in that worksheet. The user can switch to another unit of measure; any series that uses a unit of measure is correspondingly multiplied by the appropriate conversion factors. For example, a worksheet can express sales and forecast in units or in cases or dollar value.
Note: You do not need to use units in this way. You can instead hard code the unit into a series definition, so that it always expresses, for example, the buyback per case. Whatever your choice is, be sure to give useful names and hints to the series.
Similarly, at any time, a worksheet can use one index or exchange rate, which is used by any series that express financial quantities. The user can switch to a different index (such as CPI) or exchange rate, and the worksheet automatically multiplies those series by the index or exchange rate.
Unit Conversion Data
The imported data contains the item quantity per sales record, expressed as the number of units sold. Note that you can rename units.
The imported data also includes the unit price, which depends on the item, location, and date. You use the item price as a conversion unit, to represent monetary values.
Typically, you define additional units of measure, of two general kinds:
-
Size units, which measure the size of a sale: cases, truckloads, and so on. When you define these units, you provide a conversion factor by which the base item quantity is automatically multiplied. This conversion factor does not have to be the same for all items.
-
Monetary units, which measure the value of a sale. When you define these units, you provide a conversion factor (the imported unit price), which depends on the item, location, and date. You can also specify time-dependent indexes and exchange rates that can be applied to monetary units within a worksheet.
Size Units
When you define a size unit, you specify the following:
-
A name, used on the vertical axis of worksheet graphs.
-
The table and data field that contains the associated conversion factor, which is generally different for different products.
The unit conversion factors must be supplied in the imported data. For example, the t_ep_sku table might include a column that indicates the number of cases per unit, as follows:
SKU ... Cases Pallets ... 109784 ... 0.01 0.001 ... 109785 ... 0.015 0.0015 ... 109786 ... 0.005 0.0005 ... ... ... ... ... ...
This means that the SKU 109784 has 0.01 cases per unit, or inversely, 100 units per case.
When you define the Case unit, you would specify the Cases column of t_ep_sku as the source of the conversion factor for this unit.
Monetary Unit
When you define a monetary unit, you specify the following:
-
A name, used on the vertical axis of worksheet graphs.
-
The table and data field that contain the price per unit.
-
An optional expression for the conversion factor, if the factor cannot be simply read from the table.
-
Optional time-dependent exchange rates and indexes that can be applied to this unit.
How Units Are Used
The token #UNIT# represents the unit conversion factor. You can include this token within the server expression for a series, which should have the following general form:
quantity * #UNIT#
Within a worksheet, this token is automatically replaced by the conversion factor that corresponds to the unit that the worksheet is currently using. For example, if the Demand was 1200 units, and if the worksheet is using cases instead, then Demand is displayed as 12 cases.
To configure a series to use units, do either of the following:
-
Create a server expression with the form shown previously.
-
Create a client expression that refers to another series that uses units.
Time Units
Any Demantra solution has a base time unit, such as weeks or months. Demantra provides some larger predefined time units, and you can add others. In general, there are two types of time units:
-
Simple time units (such as quarters) are simple multiples of the base time unit. For these, you just provide a scaling factor. For example, for a weekly system, a quarter consists of 13 time units. These time units are assumed to divide evenly into one year, and Demantra automatically figures out which base time bucket each date belongs to.
-
Data-dependent time units, such as 4-4-5 time units, require explicit data. That is, they must be assigned explicitly to each date in the system, in the Inputs table.
Note that by default, in any worksheet, the date and label for a given bucket is the first date in that bucket. Within a worksheet, another date format can be used.
Data-Dependent Time Units
The following example represents rows in the Inputs table. It shows a set of dates from a weekly system and shows how those dates are mapped into quarters and 4-4-5 periods. (A 4-4-5 time system creates quarters that consist of a four-week “month,” followed by another four-week “month,” and then followed by a five-week” month.” In practice, 4-4-5 calendars vary from company to company.) The second and third columns show the bucket numbers associated with each date, depending on the date system.
| Date | Bucket number when quarters are used | Bucket number when 4-4-5 periods are used |
|---|---|---|
| 1/3/05 | 100 | 122 |
| 1/10/05 | 100 | 122 |
| 1/17/05 | 100 | 122 |
| 1/24/05 | 100 | 122 |
| 1/31/05 | 100 | 123 |
| 2/7/05 | 100 | 123 |
| 2/14/05 | 100 | 123 |
| 2/21/05 | 100 | 123 |
| 2/28/05 | 100 | 124 |
| 3/7/05 | 100 | 124 |
| 3/14/05 | 100 | 124 |
| 3/21/05 | 100 | 124 |
| 3/28/05 | 100 | 124 |
| 4/7/05 | 101 | 125 |
The first thirteen dates belong to a single quarter, and the last date belongs to the following quarter. The first four dates belong to the first 4-4-5 “month” and so on.
Setting and Modifying the Base Time Unit
The base time unit is used by the Data Model to aggregate the source data to the specified time bucket size. Allowed settings of the base time unit (time bucket size) are:
-
day
-
week
-
Gregorian month
Impacts of Changing the Base Time Unit
If the time bucket is re-configured, the time aggregation set for all worksheets is modified to match the new time aggregation. A review of all worksheets is strongly recommended. See Worksheets.
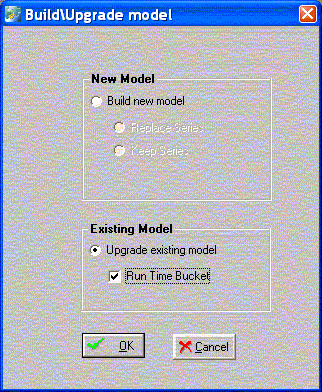
After making changes, the Data Model should be upgraded, not Rebuilt, with the Run Time Bucket option checked. See Building the Data Model and Manipulating Existing Data Models.
The erased member and fact data in Demantra must then be downloaded again. See Loading the Data into the Data Model.
Integration profiles are required to be redefined by the user, if the unit of time specified therein becomes invalid. For details, see Loading Series and Promotions.
Common changes to the Base Time Unit
The Business Modeler allows the Demantra System Administrator to change the base time unit at any time after initial installation. Common changes include:
-
Setting the start date of the weekly time bucket from Monday to Sunday
-
Changing the base time unit to month or day from week
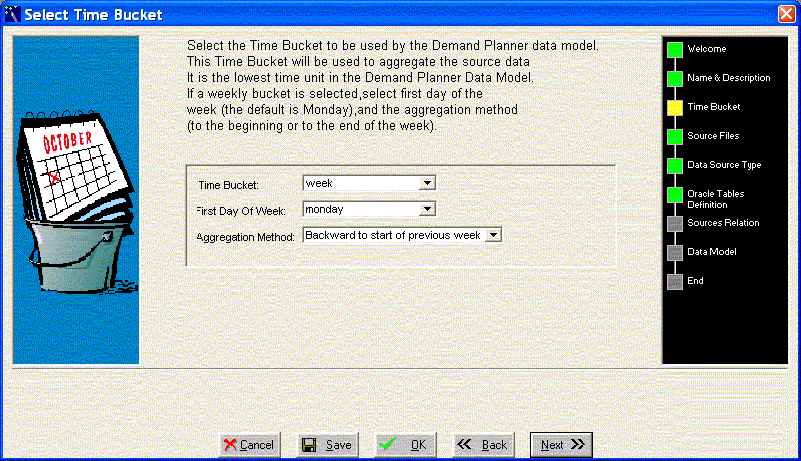
To set or change the Base Time Unit
Prerequisite
Install the Business Modeler.
-
Navigate to the data model.
Business Modeler > Data Model > Open Data Model
The Select Time Bucket window appears.
-
Select the Base Time Unit from the time bucket list of values. The default value is: week
-
If the Time Bucket field is set to week, then choose the day that represents the starting day of the week from the First Day Of Week list of values. The default value is Monday. User may change the default but must then rebuild the model.
-
If the Time Bucket field is set to week, then select the Aggregation Method from the list of values to determine whether events that occur mid week are aggregated to the start date or the end date of the weekly time bucket.
-
Save your work.
-
Click OK.
Unit-Level Association
In Demantra, you associate each unit with the levels where it makes sense to use that unit. For example, a relatively small unit might make sense only at lower levels.
Demantra uses this association within worksheets. If a worksheet contains three levels, for example, then only the units associated with those levels can be used in that worksheet.
Indexes and Exchange Rates
Monetary units of measure can use financial indexes and exchange rates. This means that when users display data in a worksheet, they can apply any of those associated indexes or exchange rates.
Each index and exchange rate is stored in a different table, except for the placeholder index (constant, equals one for all dates).
The placeholder index is used to switch a worksheet back to the same monetary units that are used in the imported data. By default this is called dollar $, because monetary values are usually imported in dollars.
Configuration Notes
This section contains configuration notes related to units, indexes, and exchange rates.
Dependencies
Before you can configure units, you will need to load some sample data for items, including unit conversion data.
If a unit requires an index or exchange rate, you must configure that index or exchange rate first.
Tools
Demantra provides the following tools for creating and configuring units:
| Tool | Purpose/Notes |
|---|---|
| Data Model Wizard* | Can define units, although this wizard provides only a subset of the options. |
| Configure > Display Units option* | Defines units. |
| Data Model > Global Factors option* | Allows you to add columns and values to the Inputs table. |
| Configure > Configure Units for Levels option* | Allows you to associate units with levels. |
| *These options are in the Business Modeler. |