Configuring Predictive Trade Planning
This chapter describes how to configure Promotion Effectiveness, if an existing Demantra implementation is already in place.
This chapter covers the following topics:
- Overview of Promotion Effectiveness
- Overview of the Configuration Process
- Configuring Levels for Promotion Effectiveness
- Setting Parameters
- Configuring the Activity Browser
- Configuring the Application Server
- Configuring Promotion Statuses
- Loading Promotion Data
- Reference: PE Levels
- PTP Data Needs
- Integration in PTP
- Reference: Staging Tables
- Reference: Integration Interfaces
- Configuring the Default Promotion Start and Span
- Changing the Default Retailer Profile
- Configuring the Right-Click "Open With" Option
- Removing Right-Click Menu Options
- Replacing Collaborator Workbench Graphics
- Configuring Promotion Status Behavior
- Re-configuring Series if Syndicated Data Is Not Used
Overview of Promotion Effectiveness
Promotion Effectiveness is a configurable Web-based product that analyzes the effectiveness of your marketing promotions, in particular trade promotions. In addition to base forecasting and forecasting lift due to promotions, Promotion Effectiveness can analyze the effects of different items on the sales patterns of others.
Promotion Effectiveness uses the same Web client that is used for Demand Management and DSM. For Promotion Effectiveness, the Analytical Engine provides a greater breakdown of details than does the engine for demand planning.
Overview of the Configuration Process
These steps assume that you have already set up the basic Demantra implementation. This means that your implementation already contains the item levels and location levels that are meaningful in the designated environment.
To configure Promotion Effectiveness, the general steps are as follows:
-
Create the levels required by Promotion Effectiveness and then optionally customize them; see "Configuring Levels for Promotion Effectiveness".
-
Set values of parameters that control the behavior of the Web client, as it relates to Promotion Effectiveness. See "Setting Parameters".
-
Optionally configure the Activity Browser, if the default configuration is not suitable. See "Configuring the Activity Browser".
-
Decide if you are going to use the default promotion life cycle provided by Demantra. Configure this life cycle as described in "Configuring Promotion Statuses".
-
Load promotions and promotion data as described in "Loading Promotion Data".
-
Configure the Analytical Engine for use with Promotion Effectiveness. See "Configuring and Running the Analytical Engine".
Note: Deductions and Settlement Management functionality can be disabled for a given user by restricting access to the Settlement Level to 'No Access" in the user's permissions. For details, please see Data Security.
Configuring Levels for Promotion Effectiveness
The Demantra installer sets up the Promotion Effectiveness (PE) structures by default.
You can customize these levels to some extent. See “Reference: PE Levels”.
Setting Parameters
To configure Promotion Effectiveness, specify values for the following parameters:
See also
-
“Configuring Parameters”
Configuring the Activity Browser
The CREATE_PE_STRUCT procedure configures the Activity Browser in the Activity Details sub tab in worksheets. You can re-configure the Activity Browser as needed.
To configure the Activity Browser
-
Click Configuration > Configure Levels. Or click the Configure Levels button.
Business Modeler displays the Configure Levels screen.
-
Right-click a general level and select Open > Activity Browser.
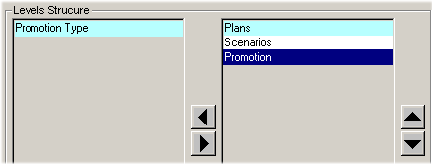
-
For each general level to include in the Activity Browser, click the left arrow to move that general level from the left list to the right list.
Or drag and drop general levels between the two lists as needed.
-
To specify the order of levels in the right side of the screen, select a level and click the up or down buttons.
-
When you are done, click Finish.
Configuring the Application Server
Note: To configure the Promotion Optimization engine for Tomcat running on Linux you must include the following in the .bash_profile file:
-
export ILJCONFIG="HandleTableSize=1"
-
export ODMS_JVM_LIBRARY_OVERRIDE=/lib/i386/server/libjvm.so
-
export LD_LIBRARY_PATH=$LD_LIBRARY_PATH:demantr_install_directory/optimization/dll
Note: To configure the engine for Oracle Application Server, set the above environment variables using Oracle Enterprise Manager.
Configuring Promotion Statuses
Demantra provides a default set of promotion statuses and structures to support a typical promotion life cycle.statuses to support a typical promotion life cycle. The IDs have default names and specific hardcoded behaviors meanings, as follows:
Automatic Advancement of Promotion Status
Demantra provides a tool to automatically advance the status of promotions based on their starting dates. The EXPOSE_PROMOTIONS procedure iterates through the promotions listed in the promotion table, checks the status field of each, and does the following:
-
If the current status is 3 (planned) and if the current date is after the from_date of the promotion, change the status to 4 (committed).
-
If the current status is 4 (committed) and if the current date is after the until_date of the promotion, change the status to 5 (executed).
You should schedule this procedure to run periodically either within the Workflow Engine.
Customizing the Promotion Status Behavior
Depending on how suitable the default behavior is, you have several options:
-
Give a new name to each status, for example:
Status ID Possible Status Names 1 Unplanned 2 Planned 3 Committed 4 Executed 5 Closed 6 Canceled
This system provides flexibility until promotions are committed.
-
If you do not mind the Analytical Engine using all promotions, you can create your own status series and your own procedure to advance the status as needed.
-
If you do want the Analytical Engine to ignore unplanned promotions but prefer to use different rules to control promotion editability, you can create a new status series that uses the same database field and update that field in the background. Also write your own procedure to advance the status as needed.
Loading Promotion Data
To load promotions (which are general levels), create and use an integration interface that includes a level profile. Demantra does not provide a predefined interface for this, because promotions vary in nature.
To load promotional data (promotion-type series), create and use an integration interface that includes a data profile that includes the desired series.
See “Series and Level Integration”.
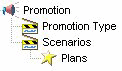
Reference: PE Levels
The CREATE_PE_STRUCT procedure adds the following levels to your database:
Note:Demantra provides the Promotion Effectiveness (PE) structures by default. Therefore, the CREATE_PE_STRUCT procedure should be run only after creating a new or custom data model from scratch (this is not common or recommended); only in this scenario would these structures not already be in place. To determine whether PE structures exist, search the DB for table names containing %PROMOTION%.
The following sections provide details on these levels:
-
Promotion
-
Promotion Type
-
Scenarios
-
Plans
Promotion
This level contains the details for promotions. This is a general level with the following attributes:
| Attribute | Column Name | Data Type | Purpose |
|---|---|---|---|
| Population Attribute | n/a | n/a | Allows you to associate the promotion with combinations and dates. |
| Status | status | Number | ID of the status of this promotion. This is a lookup attribute of type table; it uses the promotion_status_lookup table. See “Configuring Promotion Statuses”. |
Promotion Type
This level contains the default promotion types. This is a general level with no attributes. You can redefine this level as needed.
Scenarios
This level groups the promotions. This is a general level with the following attributes:
| Attribute | Column Name | Data Type | Purpose |
|---|---|---|---|
| Name | SCENARIO_DESC | Character | Name of this scenario. |
| Plans | PLAN_ID | Number | ID of the plan to which this scenario belongs. This is a lookup attribute based on the Plans level. |
You can redefine this level as needed.
Plans
This level groups the scenarios.
This is a general level with one attribute:
| Attribute | Column Name | Data Type | Purpose |
|---|---|---|---|
| Name | PLAN_DESC | Character | Name of this plan. |
You can redefine this level as needed.
PTP Data Needs
Without going into details of the specific formats (given later), this section lists the data needs for PTP.
Always Required
Every PTP system must have the following data:
-
Basic sales data: the total quantity sold of each SKU at each ship-to location over the course of each week, and the regular retail price paid by the customer.
-
The manufacturer's cost of goods (COG) for each item.
-
Information on how each SKU fits into the item hierarchy and information on how each ship-to location fits into the location hierarchies.
-
Basic data for historical or future promotions: for each promotion, the start and end dates, the items and locations to which the promotion applies, and the sale price per unit.
-
Additional details for the promotions: promotion type, slotting costs, buydown allowance per item, and total vehicle costs.
By default, PTP assumes that additional data is also available, but you can reconfigure PTP to work if it is not.
-
Syndicated data that includes the following breakdowns:
-
Base sales quantity (items sold if there had been no promotions)
-
Incremental sales quantity (additional items sold because of promotions)
-
Base sales dollars
-
Incremental sales dollars
Note: If this data is not available, see “Reconfiguring Series if Syndicated Data Is Not Used”.
-
-
Syndicated ACV data, which measures the number of stores that ran each kind of promotion, weighted by store size:
-
% ACV ANY PROMO
-
% ACV DISP
-
% ACV FEAT
-
% ACV FEAT&DISPLAY
-
% ACV FREQSHOPPER
-
% ACV TPR
Note: The ACV data is required if promotion data is unavailable.
-
Purely Optional
Other data is purely optional:
-
Additional details for promotions: consumer overlays, start and end shipping dates, and settlement payment type.
-
Additional sales data: number of units shipped from the manufacturer to the retailer.
Integration in PTP
To understand integration in PTP, it is useful to review how the Demantra platform handles integration.
Data Loading and Integration in the Platform
Demantra provides the following tools for data loading and integration:
-
The Data Model Wizard defines the basic levels and sales series in a data model and creates the ep_load_sales procedure, which handles data loading for those levels and series. The wizard also creates a batch script for running that procedure.
The Data Model Wizard does not load promotions or promotion data.
-
The Integration Interface Wizard creates integration interfaces that can load promotions and promotion data. You execute the integration interfaces from within Workflow Manager or aps.bat.
In both cases, the wizards create staging tables, which usually serve as the starting point for data loading.
These tools are documented in the Part titled: "Basic Configuration".
Data Loading and Integration in PTP
Because the PTP model is already defined, PTP provides an ep_load_sales procedure and integration interfaces that all work with the PTP model. It is not necessary to use the Data Model Wizard or the Integration Interface Wizard. The required staging tables already exist as well.
To facilitate data loading, PTP offers two options.
-
Population of staging tables into database, or
-
Population of comma delimited files.
Based on the decision made, review the Data Model Wizard as well as Integration Interface Wizard to verify that current settings match selections. Default settings for the Data Model Wizard are for loading through database tables. Promotional information loaded through integration profiles is set as a default for text files.
Reference: Staging Tables
Internally, PTP uses the following staging tables:
-
BIIO_IMP_PROMO_DATA
-
BIIO_Promotion
-
BIIO_Population
The information here is provided for reference and debugging purposes.
This staging table is used by the Import Promotion Data2 integration interface and has the following structure:
This staging table is used by the Import Promotion Levels integration interface. It contains all the promotion attributes, of which only a subset are typically imported. This table has the following structure:
| Field | Data Type | Required? | Purpose* |
|---|---|---|---|
| PROMOTION_CODE | varchar2(500) | Required | Unique code for the promotion, for use in Demantra. |
| PROMOTION_DESC | varchar2(2000) | Required | Description or name of the promotion, for use in Demantra. |
| PROMO_INTEG_STATUS_CODE | varchar2(120) | Used for integration to determine whether promotion details have been changed | |
| SCENARIO_CODE | varchar2(500) | Required | Unique code for the scenario to which this promotion belongs, as listed in the SCENARIO table. |
| PROMOTION_TYPE_CODE | varchar2(500) | Required | Unique code for the promotion type, as listed in the PROMOTION_TYPE table. |
| PROMOTION_STAT_CODE | varchar2(120) | Required | Unique code for the promotion status, as listed in the promotion_stat table. |
| BUY_DOWN | number(20,10) | Populates the Buydown attribute. | |
| OPTIMIZATION_GOAL | varchar2(2000) | Populates the Optimization Goal attribute. | |
| OPTIMAL_PRICE_DECREASE | number(20,10) | Populates the Optimal Price Decrease attribute. | |
| STATUS | varchar2(30) | Populates the Status attribute. | |
| APPROVAL | varchar2(200) | Populates the Approval attribute. | |
| SHIP_DATE | date | Populates the Start Ship attribute with the date on which shipments will start for this promotion. | |
| CONS_PROMO | varchar2(50) | Populates the Cons Promo attribute, which indicates any associated consumer overlay. | |
| OPTI_PROMOTION_TYPE_ID | varchar2(2000) | Populates the Optimal Type attribute. | |
| MAX_BUDGET | number(20,10) | Populates the Max Budget attribute. Maximum allowed budget for this promotion. | |
| SPEND | number(20,10) | Populates the Optimal Budget attribute. | |
| ROI | number(20,10) | Populates the Return on Investment (ROI) attribute. | |
| PROFIT | number(20,10) | Populates the Optimal Profit attribute. | |
| TOTAL_LIFT_U | number(20,10) | Populates the Optimal Lift attribute. | |
| TOTAL_LIFT_D | number(20,10) | Populates the Optimal Revenue attribute. | |
| PROMOTION_TYPE_ID1 | varchar2(2000) | Populates the Promotion Type1 attribute. | |
| STATUS_ID1 | varchar2(30) | Populates the Promotion Status attribute. | |
| END_SHIP | date | Populates the End Ship attribute. | |
| METHOD_STATUS | varchar2(200) | Populates the method_status attribute. | |
| OPTIMIZATION_STATUS | varchar2(50) | Populates the Optimization Status attribute. | |
| PROMOTION_BUDGET | number(20,10) | Promotional budget updated by DSM | |
| MIN_RTL_MARGIN_OVERRIDE | number(20,10) | Populates the Min Rtl Margin Override attribute. | |
| FIXED_BUYDOWN_YN | varchar2(100) | Populates the Fixed Buydown attribute. | |
| MAX_BUYDOWN | number(20,10) | Populates the Max Buydown attribute. | |
| OPTIMIZATION_RANGE_START | date | Populates the Optimization Range Start attribute. | |
| OPTIMIZATION_RANGE_END | date | Populates the Optimization Range End attribute. | |
| OPTIMIZATION_COUNT | number(20,10) | For internal use only. | |
| * For details on these attributes, see "Promotion". |
This staging table is used by the Import Promotion Levels integration interface. It describes the population of each promotion. Specifically, it contains the same information as this window:
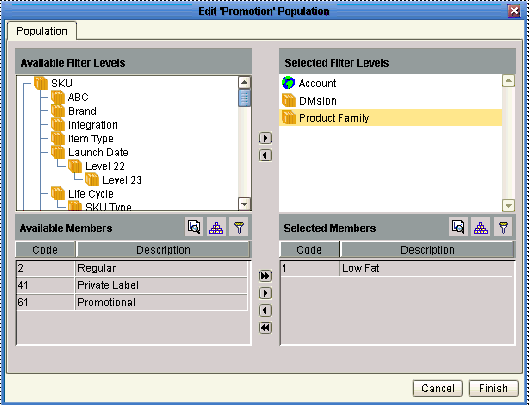
For each promotion, the table can contain multiple rows. Each row specifies a level and a member of that level, just as the preceding screen does (the previous screen shows that this promotion is associated with the Low Fat member of the Product Family). This table has the following structure:
| Field | Data Type | Required? | Purpose |
|---|---|---|---|
| LEVEL_MEMBER | varchar2(40) | Required | Code of the promotion that you are loading. |
| FROM_date | date | Required | Start date for this promotion. |
| UNTIL_date | date | Required | End date for this promotion. |
| FILTER_LEVEL | varchar2(50) | Required | Name of a level, for example "Product Family" or "SKU". |
| LEVEL_ORDER | number(15) | Required | Use "1" for a location-type level or "2" for an item-type level. |
| FILTER_MEMBER | varchar2(50) | Required | Description of a member of this level, for example "Low Fat". |
Reference: Integration Interfaces
The information here is provided for reference and debugging purposes.
Oracle Demantra provides the following integration interfaces.
Import Promotion Levels
This integration interface is defined as follows:
| Type: | Import |
| Description: | Imports rows from a staging table and adds the new members to the Promotion level. If the new promotions refer to combinations that are not yet present in this database, this interface creates those combinations as well. Also imports rows from another staging table, which contains the population of these promotions. |
| Staging Tables: | BIIO_Promotion stores the promotion members. Edit this table before editing BIIO_Population. BIIO_Population stores the populations of the promotions. |
Import Promotion Data2
This integration interface is defined as follows:
| Type: | Import |
| Description: | Imports rows from a staging table and updates the promotion series data in the appropriate internal tables. |
| Staging Table: | BIIO_IMP_PROMO_DATA |
Configuring the Default Promotion Start and Span
To configure the default promotion start and span
-
In the Business Modeler, click Parameters > System Parameters.
-
Click the Worksheet tab.
-
Edit the following parameters:
-
Click Save.
-
Click Close.
Changing the Default Retailer Profile
For any given retailer, the user can specify attributes or can instead use the default retailer profile. The CopyRetailerDefaults workflow checks for any retailers that use the default profile, and it copies the default details to those retailers. You should run this workflow each time you change a retailer to use the default profile and each time you change the default profile.
Possible Changes
You can change the default retailer profile, as follows:
-
In the Business Modeler, click Configuration > Configure Levels.
-
Right-click the Retailer level and select Open > General Attributes.
Business Modeler displays the default attributes for the retailer level. Together, these constitute the "default retailer profile."
-
Click a retailer attribute on the left.
-
In the right area, change Default Value.
-
Continue with other attributes as needed.
-
When you are done, click Next and then click Finish.
-
Restart the Application Server to make the changes available to the users.
Configuring the Right-Click "Open With" Option
By default, when users right-click a promotion, scenario, or retailer within PTP, they can use the Open and Open With menu options to open a worksheet that is filtered to that selection (the Open option opens the default worksheet). This is configurable within the Business Modeler.
To configure the "Open With" menu option
-
In the Business Modeler, click Components > Create/Open Component. Or click the Create/Open Component button.
-
Click Oracle PTP, and then click OK.
-
Click Next repeatedly until the Select Component Queries for Levels screen is displayed.
This screen allows you to associate public worksheets with levels.

This association is used in two ways:
-
Within the Members Browser, a user can use the right-click menu to open any of these associated worksheets directly from a member of the level (via the Open With menu option). In this case, Demantra opens the associated worksheet. The worksheet is filtered to show only data relevant to the member.
-
Within the worksheet designer, users can add a sub tab to a worksheet; the sub tab shows details for a given member. The sub tab can display any of the worksheets that are associated with a level included in the main worksheet. The sub tab is filtered to show only data relevant to the member.
-
-
To associate a worksheet with a level, do the following:
-
Click the level in the Select Level drop down menu.
-
Double-click the worksheet in Available Queries list, which moves it to the Selected Queries list.
-
Move other worksheets from the Available Queries list to the Selected Queries list, as needed.
-
Decide which worksheet in the Selected Queries list should be the default worksheet for this level. For that worksheet, click the Default check box. When the user right-clicks and selects Open, this is the worksheet that will be used.
-
-
When you are done on this screen, click OK.
Removing Right-Click Menu Options
The options on the right-click menu are Oracle methods. You can remove these options if needed; for example, if your system is not using optimization, you might want to remove the optimization options.
To modify a level method
-
In the Business Modeler, click Configuration > Configure Methods.
The system displays a screen showing the existing methods, including all the predefined methods.
-
Optionally click a level name (such as Promotion, Scenario, or Retailer) in the drop-down list at the top of the screen.
The screen is re-displayed with only the methods associated with that level.
-
To hide this menu option, deselect the Display in menu check box.
-
Click Finish.
Replacing Collaborator Workbench Graphics
The Web-based Demantra products contain default images that you can replace with your organization's own designs. To do so, just back up the default images and substitute your own image files, giving them the same filenames as listed here.
The graphic files are in the following directory:
Demantra_root/Collaborator/portal/images
You can replace any of the graphics files in this directory. If you replace the default graphics with other graphics that have the same width and height, those graphics will fit on the page without the need for any further editing.
Collaborator Workbench Splash Screen
The splash screen uses the graphic collaborator_splash.gif.
Collaborator Workbench Login Page
On the login page, the most commonly replaced images are the following:
On the login page, the most commonly replaced images are the following:
-
customerLogo.gif
-
customerTxt.gif
-
customerPics.gif
-
collaboratorTitle.gif
-
collaboratorTxt.gif
Collaborator Workbench Main Page
Collaborator Workbench Main Page
On the main page, the most commonly replaced images are as follows:
-
customer_logo.jpg
-
collaborator_logo.gif

Configuring Promotion Status Behavior
You can redefine the behavior of the promotion statuses in PTP.
Caution: You should not do this unless you are familiar with series definitions and with the Business Modeler.
Predefined Behavior
Demantra provides predefined promotion statuses (the Status attribute) and behavior, which PTP uses indirectly. PTP internally uses the Demantra predefined statuses but instead displays its own set of statuses (the Evt Status series).
Specifically the Status series maps the PTP statuses to the internal statuses. To do this mapping, this series has a client expression as follows:
if ( (evt status = 1), 1, if ( (evt status < 7), 2, 6))
This expression checks the value of the Evt Status series and decides the internal status value to which it maps. The resulting value is saved to the update field for the Status series, which is promotion.status. This is the field that controls whether a promotion is editable.
The following table lists the PTP status, the internal hardcoded statuses and their behavior, and explains the added TPMO behavior:
Notes
-
Because of the way that PTP handles status, users must save worksheet data and rerun the worksheet whenever they change the status of a promotion. Otherwise, the status change is not reflected in the worksheet series.
-
PTP currently includes extraneous status attributes (Event Status and Promotion Status), which you should ignore.
-
You should not redefine series unless you are familiar with series definitions and with the Business Modeler.
Possible Changes
-
You can change the drop-down choices of the Evt Status series.
-
You can change the client expression of the Evt Status series, to map the statuses differently to the hardcoded statuses.
Re-configuring Series if Syndicated Data Is Not Used
Demantra uses syndicated data that includes the following breakdowns:
-
Base sales quantity (items sold if there had been no promotions)
-
Incremental sales quantity (additional items sold because of promotions)
-
Base sales dollars
-
Incremental sales dollars
If this data is not available, it is necessary to reconfigure some PTP series. You may also need to modify some PTP procedures and triggers.
Caution: You should not do this unless you are thoroughly familiar with the Demantra platform.
Series to Reconfigure
The following series directly use the syndicated breakdowns via client expressions:
-
Base Evt $ Rtl
-
Incr Evt Vol
-
Incr Evt $ Rtl
Each of these series has a client expression of the following form:
if past end date = 1, use syndicated data; otherwise, use engine data
(For each promotion, the Past End Date series equals 1 if the promotion is past or equals 0 otherwise.) For example, the client expression for Base Evt $ Rtl is as follows:
if(past end date = 0,
if( isnull(Base Evt $ Rtl Fut),0, Base Evt $ Rtl Fut ),
if(isnull( Base Evt $ Rtl Act ),0, Base Evt $ Rtl Act ))
The Base Evt $ Rtl Act contains the syndicated data.
You can reconfigure these series by rewriting this client expression so that the series always uses engine data. Or you can modify the actuals series to contain different data, depending on your needs.
Also, several series refer directly to the syndicated incremental volume via server expressions. These include BDF Exp Ttl Act, Incr COGS $ Act, Incr Evt $ Act, and MDF Exp Ttl Act.
Data Synchronization
If you reconfigure any of these series, you should understand how PTP maintains the data for these series. PTP loads this data into sales_data. For performance reasons, this information is needed in the promotion_data table instead, so PTP uses procedures and triggers to copy this data to that table. The following section gives the details.
Syndicated Data in PTP
The following table summarizes where the syndicated data is loaded, where that data is synchronized, and what series use this data in the sales_data and promotion_data tables, respectively. For completeness, this table lists all the syndicated data, including required data and data that is not synchronized.
For information on procedures and triggers, see "Procedures".
Parameters Affecting Goal Function
Determine Optimization Focus (GOAL_FOCUS)
-
0=Manufacturer
-
1=Retailer
Determine Optimization Goal (OPTIMIZATION_GOAL)
-
0=Revenue
-
1=Profit
-
2=Units
Choosing between these three goal functions will affect the formulation of the expression that the optimization is maximizing. If Units is chosen, optimization will look for valid promotions which will generate the most lift while not exceeding constraints such as maximum budget and minimum margins.
If Revenue is chosen, the expression will incorporate the price paid for each unit sold. The price used will depend on whether the optimization is focused on a retailer or manufacturer.
When choosing Profit the optimized expression will include both incoming revenues and costs associated with the product and promotion.
Determine Buydown Behavior
-
Fixed
-
Calculated