PMO: Planning Promotions
This chapter describes how to create promotions and make changes if needed, as part of the PMO business process.
This chapter covers the following topics:
- Introduction to the Planning Environment
- Creating a Promotion
- Marking a Promotion as Planned
- Approving a Promotion
- Committing a Promotion
- Marking a Promotion as Partially Paid or Paid
- Closing a Promotion
- Making Other Changes to a Promotion
- Duplicating a Promotion
- Copying and Pasting a Promotion
- Deleting a Promotion
- Reference
Introduction to the Planning Environment
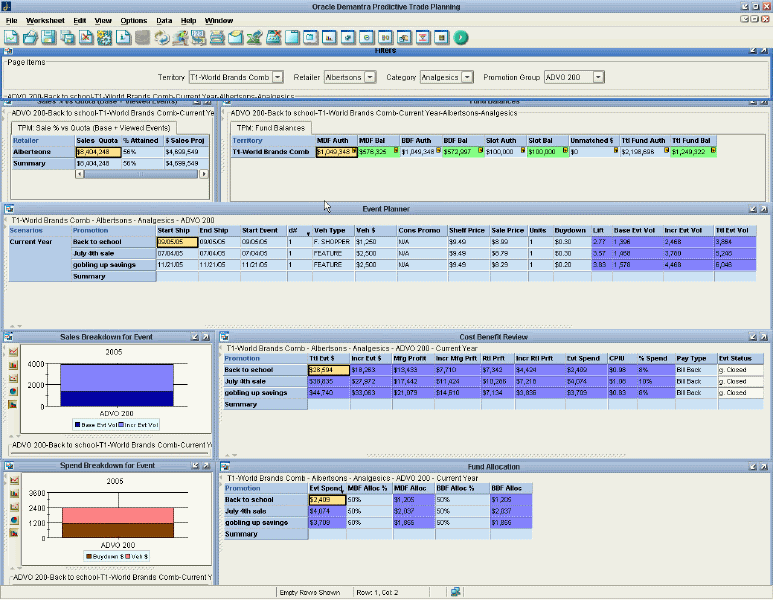
You plan and manage promotions in the Planning Environment, which is the entry point to both historical and planned event analysis. Event planning consists of creating and managing a calendar of promotional events, and understanding their impact on sales, promotion spending, and profitability, as well as their correlation with sales quotas. Demantra's Planning Environment provides all this critical information in one place.
To open and navigate the Planning Environment
-
In My Worksheets (in Collaborator Workbench), click Planning Environment.
-
If the worksheet does not show data immediately, click Data > Rerun. Or click the Run button.
-
At the top of the screen, select the territory, retailer, category, and promotion group.
-
In the Event Planner window, click a row. Notice the following changes in the rest of the worksheet, depending on the scenario and promotion associated with that row:
-
The graphs below this display graphical information for the promotion.
-
The tables below this display side-by-side details for all promotions within the currently selected scenario.
-
-
Click a promotion in the Cost Benefit Review or Fund Allocation window. Notice that the same promotion is highlighted throughout the worksheet.
Color Conventions
The Planning Environment uses the following color conventions:
-
White indicates editable fields.
-
Gray indicates loaded data such as Start Ship and End Ship.
-
Blue indicates data that is calculated by PTP, especially by the Analytical Engine.
-
Red indicates negative profit numbers.
Also notice that in the Event Planner window, the Evt Status for a promotion may be displayed in different colors, to indicate whether that promotion has been optimized. Here:
-
White means that the promotion has not been optimized.
-
Yellow means that the promotion has been optimized.
-
Green means that the promotion has been optimized and accepted, so that the promotion is using the optimization results.
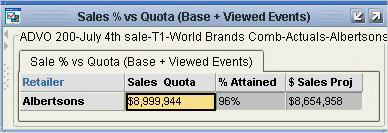
Sales % vs. Quota
This window shows an analysis of planned sales to sales quota, for the given retailer. This is the total for the retailer. For convenience, the sales projection is also shown.
Fund Balances
This window provides a detailed overview of authorized funds (MDF, BDF, slotting), spend and fund balances to date, for the given territory. This is the total for the territory.

Event Planner
This window shows event details such as the start and end ship dates, vehicle type, vehicle cost, buydown, base volume and incremental volume. Incremental volume is generated by Demantra's comprehensive analytical engine.

Notice that the events are grouped according to the associated scenario. As noted in "Promotions and Scenarios", the Sandbox scenario contains all the tentative events (unplanned events), and the Current Year scenario contains all the rest. The unplanned events have no impact on budget.
This window is the primary area in which you create or modify promotions.
Also notice that when you select a row in this window, the graphs and tables below are updated to show details depending on the scenario and promotion associated with that row.
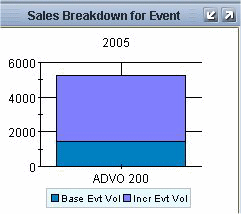
Sales Breakdown for Event
This window graphically shows the sales breakdown for the selected event. The breakdown shows both base and incremental volume.
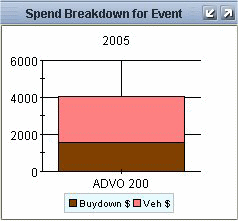
Spend Breakdown for Event
This window graphically shows the spending breakdown for the selected event. The breakdown shows both vehicle spending and buydown.
Cost Benefit Review
This window presents a detailed cost benefit analysis for each event in the currently selected scenario. Details include profitability metrics from both the manufacturer and retailer's perspective, overall event spend, cost per incremental unit (CPIU), and payment type. Here you can control the status of the event.

The incremental manufacturing profit is the additional profit that the manufacturer earns because of the promotion, in addition to the base profit that would be earned even without a promotion. The incremental retailer profit is analogous.
Fund Allocation
This window displays the allocated funding for each event in the currently selected scenario. Here you allocate the promotional costs between the MDF and BDF funds.

Possible Actions
In this worksheet, depending on your authorization, you can do the following:
-
Edit a promotion, by changing the sale price and other properties. You can also right-click a promotion and select Edit to access other properties.
-
Copy and paste promotions. See Copying and Pasting a Promotion.
-
Delete promotions. See Deleting a Promotion.
-
Run simulations. See Running a Simulation. Note that this worksheet does not contain the data needed to find cannibalization.
-
Run optimization. See Optimizing a Promotion.
-
Right-click on a promotion and open other worksheets filtered to this promotion. For example, see Examining Promotions from a Retailer's Point of View.
-
Right-click on a scenario and open the PMO: Promotion Comparison worksheet filtered to that scenario. See Comparing Promotions in a Scenario.
Creating a Promotion
Security Restrictions
The new promotion method is only displayed if the promotion level in the component is set to Write or Full Control access. Your member security settings determine the populations on which you can define the new promotion.
To create a promotion
-
Open the Planning Environment; see "Introduction to the Planning Environment".
-
At the top of the screen, select the territory, retailer, category, and then promotion group with which you want to create the promotion.
-
In the Event Planner window, right-click an existing promotion and then select New Promotion.
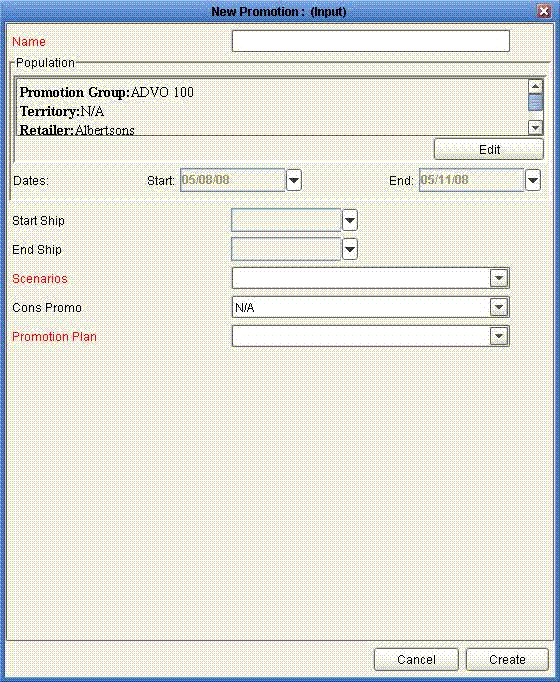
Oracle Demantra displays the following screen:
-
For Name, specify a name for this promotion.
-
The Population area shows the currently selected combinations with which the new promotion will be associated.
The default combinations are taken from the current selection in the worksheet. To change them, see "To reassign a promotion to a different item or location".
-
The Start and End dates are controlled by default settings. Edit them as needed.
-
Specify values for the other attributes as appropriate:
Start Ship, End Ship Optionally specify when the product will be shipped for the promotion. You might specify this information later, when the promotion is more certain. Scenarios Choose Sandbox. Cons Promo Specify the type of consumer overlay, if any. This affects the number of Units. For example, if Cons Promo is a two-for-one deal, then Units becomes 2. -
Click Create. The new promotion is created and is displayed in the Event Planner window. It has a default cost based on the vehicle type you specified.
-
Specify the Sale Price for use during the promotion.
-
Specify the costs for this promotion:
-
If the Veh Type is incorrect, change it, save the data and rerun the worksheet. Then PTP puts the default fixed cost for the new vehicle type into the Veh $ series.
-
Optionally edit Veh $, if the fixed cost for this promotion is different from the default.
-
For Buydown, specify the discount per promoted unit that will be paid to the retailer.
-
-
Click Data > Save Data.
Because this promotion is unplanned, it is considered hypothetical and does not have an impact on the promotion funds or on the forecast.
See also
"Duplicating a Promotion"
"Copying and Pasting a Promotion"
Marking a Promotion as Planned
Before you mark a promotion as planned, you may want to run simulation, optimization, or both, as described in "PMO: Simulation and Optimization."
Before marking a promotion as planned, you also generally examine the promotion to be sure you have chosen the best vehicle type and so on. You may want to create several tentative promotions (all in the Sandbox scenario) and view them side by side. See "PMO: Examining and Comparing Promotions."
To mark a promotion as planned
-
In the Fund Allocation window, change MDF Alloc % as desired. This specifies the percentage of the event that is funded by MDF. Enter 50 for 50%, for example.
The remainder is automatically funded by BDF, as PTP automatically computes BDF Alloc % and BDF Alloc.
-
In the Cost Benefit Review window, change the Evt Status of the promotion to Planned.
-
Right-click the promotion and then select Edit Promotion.
-
Change Scenarios to Current Year.
-
Click OK.
-
Click another promotion in the worksheet. PTP automatically updates the details for the newly planned promotion. Notice that the promotion now consumes funds and has an impact on sales projections.
Approving a Promotion
To approve a promotion
-
In the Event Planner window, change the Evt Status to Approved.
-
Click Data > Save Data.
-
Rerun the worksheet.
Committing a Promotion
You commit a promotion when you have a firm commitment from the retailer to run the promotion. When you commit a promotion, PTP takes a snapshot of the current state of the promotion, for use in later analysis. The committed promotions are included in all projections. PTP also freezes the promotion at this point, so that you cannot change its properties (apart from advancing the status further).
To commit a promotion
-
In the Event Planner window, change the Evt Status to Committed.
-
Click Data > Save Data.
-
Optionally, to see the projections that PTP has just captured, use the PMO: Promo-Evaluation: Mfg or PMO: Promo-Evaluation: Rtl worksheet. See "PMO: Reviewing Past Performance."
Marking a Promotion as Partially Paid or Paid
To mark a promotion as paid
-
Open the Planning Environment; see "Introduction to the Planning Environment."
-
In the Event Planner window, change the Evt Status to Partial Paid or Paid.
-
Click Data > Save Data.
-
Rerun the worksheet.
Closing a Promotion
To close a promotion
-
Open the Planning Environment; see "Introduction to the Planning Environment".
-
In the Event Planner window, change the Evt Status to Closed.
-
Click Data > Save Data.
-
Rerun the worksheet.
Making Other Changes to a Promotion
Security Restrictions
The Edit promotion method is only enabled for promotions that have Read and Write or Full Control security access. The component level security access must also be Write or Full Control.
-
If your security access level is Read Only, you cannot edit a promotion
-
If your security access level is Read & Write or Full Control, but the promotion level is Read Only, it cannot be edited
Note: Before you change a promotion, you should change its status back to Unplanned. After making your change, restore the previous status. This procedure ensures that Demantra triggers all internal processes as needed.
To modify a promotion
-
In the Event Planner window, edit any details in the row corresponding to the promotion.
-
Click Data > Save Data.
-
If you changed the Veh Type, rerun the worksheet to see the new default cost of this promotion.
To rename a promotion
-
Right-click it and click Edit.
-
Type a new name and click OK.
To reassign a promotion to a different item or location
You can reassign an unplanned promotion to associate it with a different territory, retailer, item, or Ship To, as needed.
Important: You must create both a Refresh Population workflow and method before executing this procedure. First, create a Refresh Population workflow that contains only the Refresh Population workflow step. Then create the Refresh Population method on the Promotion level without any input or output arguments and link it to the Refresh Population workflow.
-
Right-click a promotion and click Edit.
-
Click Edit below the Population area.
The Edit Population dialog box is displayed.
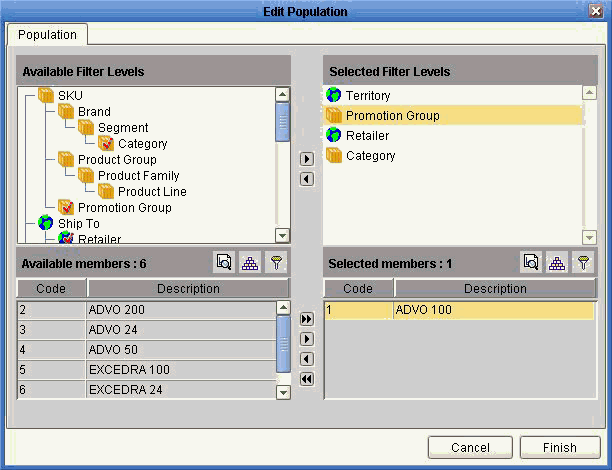
Usually a promotion is associated with a territory, retailer, category, and promotion group.
To change the territory, retailer, category, or promotion group, click that level name in Selected Filter Levels and change the selection displayed in Selected members.
For example, to associate the promotion with a different promotion group:
-
In Selected Filter Levels, click Promotion Group.
-
Then in the Selected members list, double-click the promotion group that you no longer want to use for this promotion. For example, double-click ADVO 100 to remove it from this list.
-
Then in Available members, double-click the promotion group that should be used. This promotion group is then moved to the Selected members list. For example, double-click ADVO 200 to move it to the Selected members list; now the promotion is associated with ADVO 200 instead of ADVO 100.
-
-
Repeat as necessary.
-
Click Finish to exit this dialog box.
-
From the TPM: Planning Environment worksheet, right-click on the promotion group you have modified.
-
Choose the Refresh Population method from the menu.
-
Rerun the worksheet to see the changes.
See Also
-
"Refresh Population Workflow Step" in the Oracle Demantra Implementation Guide for more information about configuring the Refresh Population workflow step.
-
"System Parameters" in the Oracle Demantra Implementation Guide for more information about the CopyPasteIntersect system parameter which determines how volume is distributed when an item is moved from one promotion group to another.
-
"Specifying Data Properties of a Series" in the Oracle Demantra Implementation Guide for more information about how to configure the Copy/Paste preservation Type series setting.
Duplicating a Promotion
The Duplicate method enables you to duplicate an existing promotion with the same duration and population (item/location). All attributes and series remain the same as the original except for the name of the promotion, its event status and starting date. If you want to perform a context sensitive copy of a promotion from one account to another and substitute accounts, use the Copy/Paste procedure instead. The Duplicate method only works on the promotion level.
To duplicate a promotion
-
Start in the TPM: Planning Environment worksheet. A list of scenarios and promotions are displayed.
-
Right-click a promotion and choose Duplicate from the methods menu. The Duplicate Promotions form appears.
-
Input the following information about the duplicate promotion:
Field name Description Name The promotion name. Event Status The status of the event. Options include: -
a. Unplanned
-
b. Planned
-
c. Approved
-
d. Committed
-
e. Partial Paid
-
f. Paid
-
g. Closed
Start Event The starting date for the promotion event. A calendar is available to assist you. If you do not specify a starting date for the promotion event, it will default to the date used for the original promotion. Note: If you specify the start date of the promotion, the duration of the promotion remains the same as the original promotion.
Note: Only the values of those attributes that appear in the Duplicate Promotions form can be changed during the duplication process. All other attributes remain the same as the original. The fields in the Duplicate Promotions form can be modified in the Business Modeler by the Administrator to include additional attributes except Population. For more information about how to customize the duplicate promotions method, see "Configuring Methods" in the Demantra Implementation Guide. If you want to change the population, create a new promotion or copy and paste a promotion.
-
-
Check the Save Parameters option if you want to customize the form's defaults.
-
Click Duplicate Promotion. The new promotion appears in the worksheet.
Copying and Pasting a Promotion
The copy method is only enabled if the promotion level in the component is set to Write or Full control access.
The paste method is only enabled if the promotion level in the component is set to Write or Full Control access and you have access to the target population. If you only have partial access to the target population, the paste method is displayed, but when the method is executed, members with Read Only access levels are removed from the population.
-
Replace the population (for example, copying a promotion from ABC Company to XYZ Company replaces the account).
-
Change the promotion duration. The data is adjusted to make the new promotion similar to the original promotion.
Security Restrictions
You can copy and paste in any level that has Write or Full Control, regardless of user security restrictions. This means that everyone can copy and paste promotions, as long as the level's access status is not Read Only, in which case no user can copy and paste promotions.
To copy and paste a promotion
-
You typically start in the Planning Environment; see "Introduction to the Planning Environment".
-
In the Event Planner window, right-click a promotion and click Copy.
Tip: You can do the same thing in any area of the worksheet that displays promotions.
-
Right-click and then select Paste.
Oracle Demantra displays a dialog box that asks for details about the copy.
-
Specify one of the following:
-
To shift the dates of the newly copied promotion, specify a number in the Shift By field. The copy will be shifted later in time by the specified amount, but will last for the same length of time. You can use any integer, including negative number or zero.
-
To specify a different start and end date, specify values in the From and To fields.
-
To make the new promotion span the entire length of time used in the worksheet, select Worksheet Derive.
-
-
Click OK.
-
When prompted for a new promotion name, type the name and click OK.
Deleting a Promotion
Security Restrictions
You can only delete a promotion if the promotion level at the component level is set to Full Control and you also have Full Control access to the promotion
To delete a promotion
-
You typically start in the Planning Environment; see "Introduction to the Planning Environment."
-
In the Event Planner window, right-click a promotion and click Delete.
Tip: You can do the same thing in any area of the worksheet that displays promotions.
-
Oracle Demantra prompts you to confirm the action. Click Yes or No.
-
Rerun the worksheet to see the change.
Reference
Planning Environment
Basics
| Accessing this worksheet |
|
| Levels you can select | Territory, Retailer, Category, Promotion Group |
| Levels used in cross tabulation | Scenario, Promotion |
| Time aggregation | Yearly |
Business Data
| View | Series | Description |
|---|---|---|
| Sales % vs Quota (Base + Viewed Events) | Sales Quota | Sales quota (revenue) |
| % Attained | Percentage of sales quota attained | |
| $ Sales Proj | Planned sales dollars: actuals plus forecast | |
| Fund Balances | MDF Auth | Authorized market development funds, calculated as follows: (base rate + dev rate)*volume + fixed MDF funds |
| MDF Bal | Remaining market development funds, calculated as the authorized MDF less the spent or committed funds | |
| BDF Auth | Authorized brand development funds+D75 | |
| BDF Bal | Remaining brand development funds, calculated as the authorized BDF less the spent or committed funds | |
| Slot Auth | Authorized slotting funds | |
| Slot Bal | Remaining slotting budget, accounting for the part that has been spent | |
| Unmatched $ | Trade spend not yet matched to a promotion. | |
| Ttl Fund Auth | Total authorized spending, including MDF, BDF, and slotting | |
| Ttl Fund Bal | Remainder of total authorized spending, after accounting for spending | |
| Event Planner | Start Ship | Date when product will start to ship |
| End Ship | Date when shipments will end for the event | |
| Start Event | Date when promotion starts in stores | |
| # Wks | Event length in whole weeks, assuming that each week starts on Monday. | |
| Veh Type | Vehicle type or event type of the promotion | |
| Veh $ | Vehicle cost for the promotion | |
| Cons Promo | Consumer overlay, the deal type as seen by the consumer. | |
| Shelf Price | Everyday price to the consumer | |
| Sale Price | Sale price per unit at shelf | |
| Units | Number of units in the deal to the consumer. Usually equal to 1. Use 2 for 2-for-1 sales, for example. | |
| Buydown | Buydown allowance per unit, discount offered to retailer for running the event | |
| Lift | Lift factor for the promotion | |
| Base Evt Vol | Base volume during the promotion | |
| Incr Evt Vol | Incremental volume due to the promotion | |
| Ttl Evt Vol | Total volume for the promotion | |
| Sales Breakdown for Event | Base Evt Vol | Base volume during the promotion |
| Incr Evt Vol | Incremental volume due to the promotion | |
| Cost Benefit Review | Ttl Evt $ | Total sales during the promotion, for the manufacturer |
| Incr Evt $ | Incremental sales to the manufacturer due to the event | |
| Mfg Profit | Manufacturer's profit from the event | |
| Incr Mfg Prft | Incremental profit to the manufacturer due to the promotion | |
| Rtl Prft | Retailer's profit from the event | |
| Incr Rtl Prft | Incremental profit to the retailer due to the promotion | |
| Evt Spend | Total planned spending for promotion, sum of buydown, vehicle costs, and slotting | |
| CPIU | Event cost per incremental unit sold as a result of the promotion. | |
| % Spend | Event spending, as a percentage of event sales | |
| Pay Type | Indicates the payment terms between the manufacturer and the retailer for this promotion | |
| Evt Status | Current status of the promotion | |
| Spend Breakdown for Event | Buydown $ | Buydown spend for the promotion |
| Veh $ | Vehicle cost for the promotion | |
| Fund Allocation | Evt Spend exS | Total planned buydown and vehicle costs for promotion |
| MDF Alloc % | Market development funds, as a percentage of total plan spending (excluding slotting costs). | |
| MDF Alloc | Allocated market development funds, based on the percentage set by the planner | |
| BDF Alloc % | Brand development funds, as a percentage of total plan spending (excluding slotting costs) | |
| BDF Alloc | Allocated brand development funds, based on the percentage set by the planner |