Setup
This chapter covers the following topics:
- Overview
- Setting Up Price Protection System Parameters
- Price Protection Execution Process Setup
- Setting Up Profile Options
- Setting Up Supplier Trade Profiles
- Setting Up Approval Rules
Overview
You can use setup tasks to modify Price Protection flows and meet your business requirements. Customers have unique business flows that are either industry driven or supplier driven. Setup tasks provide you with flexibility in configuring the price protection processes and flows. Price Protection supports the following setup tasks:
-
Trade Management System Parameters
-
Execution Process
-
Supplier Trade Profiles
-
AME Internal Approval Rule
Refer to the My Oracle Support note number 780938.1 for details on performing the BPEL and ESB setup required for the Oracle Price Protection application.
Setting Up Price Protection System Parameters
You must set up Price Protection system parameter defaults in the Trade Management System Parameters UI. These include Price Protection default accounts, claim types, and supplier trade profiles.
To set up Price Protection system parameters
-
Navigate to the Oracle Trade Management User responsibility.
-
Click Trade Management: Administration, and then Trade Management. The Channel Revenue Management page displays.
-
Click System Parameters. The System Parameters page displays.
-
Select the Administration tab.
-
In the Accounting region, enter a Receivable Clearing Account, and Vendor (Supplier) Clearing Account.
-
In the Price Protection region, enter a Cost Adjustment Account, Accrual Account, and Contra Liability Account.
In addition, enter the number of days before the effective date of the transaction that the Price Protection Auto Notifications Prior to Effective Date program automatically executes the notifications processes.
Note: If you entered an Automate Notification Days value and also enabled automatic execution for the notification processes, the Price Protection application sends notifications once on the specified days before the effective date and again after the future-dated transaction is approved.
For more information on the Price Protection Auto Notifications Prior to Effective Date program and the automation of execution processes, see the Oracle Price Protection User Guide.
-
In the Claim region, enter a Claim Reason, Claim Type, and Default Owner.
To define a Claim Type
-
Navigate to the Channel Revenue Management page and click Claim Type.
-
Click on a Claim Type Name to view or update claim type details. Ensure that you have a Receivable Clearing Account and Vendor (Supplier) Clearing Account entered for each claim type.
Related Topics
For complete Channel Revenue Management setup information, refer to the Oracle Channel Revenue Management Implementation and Administration Guide.
Price Protection Execution Process Setup
The Price Protection Execution Process setup refers to defining and implementing processes for an operating unit or a combination of supplier and supplier site. This setup task provides flexibility in defining which processes to enable and if the process is manual or automated.
This setup is available at both an operating unit level and the supplier trade profile level. Trade profiles setup takes precedence over the operating unit setup.
Disabling and enabling a process determines if the process displays on the User Interface (UI) for price protection transactions under the execution details mid-tab.
You must perform the setup manually at the Operating Unit or Supplier Trade Profile level. Once the setup has been performed, it can be enabled or disabled. By default, all the processes are set for a manual run. You have the option to indicate an automatic run for the process. An automated run is triggered once the transaction has been approved by the final approver and the transaction becomes Active. If a process is set up for a manual run, then you must manually initiate the process by clicking on the Execute button in the Execution Details tab of the Price Protection Transaction page.
Note: The automatic execution of Create Supplier Claim for Distributor’s Inventory and Create Supplier Claim for Customer’s Inventory is not supported in this release.
To set up the execution process
-
Navigate to the Oracle Trade Management User responsibility.
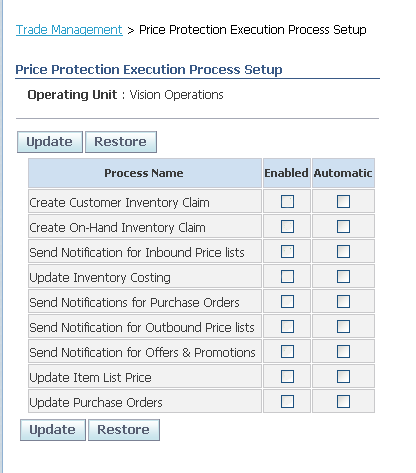
-
Click Trade Management:Administration, and then Trade Management.
-
Click System Parameters.
-
Select the Operating Unit for which you want to perform the price protection Process execution setup.
-
Click Price Protection Setup.
-
Select the appropriate check box to enable each process. You can choose to manually run a process by not selecting the Automatic check box.
-
Click Create to create a new price protection setup for the operating unit.
-
Click Update, if you are modifying the existing setup information for an operating unit.
Setting Up Profile Options
| User | Sys Admin | Sys Admin | Sys Admin | Sys Admin | |||
|---|---|---|---|---|---|---|---|
| Profile Option | User | User | Resp | App | Site | Required | Default Value |
| DPP: Audit Enabled | - | Yes | - | - | Yes | No | No |
| DPP: Currency Conversion Type | - | - | - | - | Yes | No | Corporate |
| DPP: Default Price Protection Transaction Approver | - | Yes | - | - | Yes | No | - |
| DPP: Implement Oracle Advanced Pricing | - | - | - | - | - | No | - |
| DPP: Implement Oracle Costing | - | - | - | - | - | No | - |
| DPP: Implement Oracle Inventory | - | - | - | - | - | No | - |
| DPP: Implement Oracle Order Management | - | - | - | - | - | No | - |
| DPP: Implement Oracle Payables | - | - | - | - | - | No | - |
| DPP: Implement Oracle Purchasing | - | - | - | - | - | No | - |
| DPP: Implement Oracle Receivables | - | - | - | - | - | No | - |
| DPP: Notification Report Type | - | - | - | - | Yes | No | - |
| DPP: Use Account Generator Workflow | - | - | - | - | - | Yes | - |
| Yes | You can update the profile option |
| - | You can view the profile option value but you cannot change it. |
| No | You cannot view or change the profile option value. |
DPP: Audit Enabled
Set this profile option to track and record the changes performed on a transaction. You can view the transaction history from the History page of the Price Protection Transaction Details page.
Options
Yes: If you set the profile option to Yes, then you can track the changes performed on a transaction.
No: If you set the profile option to No, then you cannot track the changes performed on a transaction.
Default
No
Restricted Change Level
You can view and update the profile value at the Site, Application, Responsibility, and User levels.
DPP: Currency Conversion Type
This profile option is set to specify the currency to use in deriving the conversion rate from the General Ledger, for any foreign currency specified in the Header and the Customer Claims tab of the Price protection Transaction Details page.
Options
Conversion Types of General Ledger.
Default
Corporate at the Site level.
Restricted Change Level
You can view the profile option in the Site, Application, Responsibility, and User levels, but you can update it only at the Site level.
DPP: Default Price Protection Transaction Approver
This profile option is used to set the default price protection transaction approver, when there are no approvers defined in AME.
Options
HRMS resources.
Default
None
Restricted Change Level
You can view and update the profile at the Site, Application, Responsibility, and User levels.
DPP: Implement Oracle Advanced Pricing
This profile option indicates whether or not Oracle Advanced Pricing is implemented by the Customer.
Options
Yes: Set the profile option to Yes to indicate that the Oracle Advanced Pricing application is implemented by the customer.
No: Set the profile option to No to indicate that the Oracle Advanced Pricing application is not implemented by the customer.
Default
Yes at the Site level.
Restricted Change Level
You can view and set this profile option only at the Site level.
DPP: Implement Oracle Costing
This profile option indicates whether or not Oracle Costing is implemented by the customer.
Options
Yes: Set the profile option to Yes to indicate that the Oracle Costing application is implemented by the customer.
No: Set the profile option to No to indicate that the Oracle Costing application is not implemented by the customer.
Default
Yes at the site level.
Restricted Change Level
You can view and set this profile option only at the Site level.
DPP: Implement Oracle Inventory
This profile option indicates whether or not Oracle Inventory is implemented by the customer.
Options
Yes: Set the profile option to Yes to indicate that the Oracle Inventory application is implemented by the customer.
No: Set the profile option to No to indicate that the Oracle Inventory application is not implemented by the customer.
Default
Yes at the site level.
Restricted Change Level
You can view and set this profile option only at the Site level.
DPP: Implement Oracle Order Management
This profile option indicates whether or not Oracle Order Management is implemented by the customer.
Options
Yes: Set the profile option to Yes to indicate that the Oracle Order Management application is implemented by the customer.
No: Set the profile option to No to indicate that the Oracle Order Management application is not implemented by the customer.
Default
Yes at the site level.
Restricted Change Level
You can view and set this profile option only at the Site level.
DPP: Implement Oracle Payables
This profile option indicates whether or not Oracle Payables is implemented by the customer.
Options
Yes: Set the profile option to Yes to indicate that the Oracle Payables application is implemented by the customer.
No: Set the profile option to No to indicate that the Oracle Payables application is not implemented by the customer.
Default
Yes at the site level.
Restricted Change Level
You can view and set this profile option only at the Site level.
DPP: Implement Oracle Purchasing
This profile option indicates whether or not Oracle Purchasing is implemented by the customer.
Options
Yes: Set the profile option to Yes to indicate that the Oracle Purchasing application is implemented by the customer.
No: Set the profile option to No to indicate that the Oracle Purchasing application is not implemented by the customer.
Default
Yes at the site level.
Restricted Change Level
You can view and set this profile option only at the Site level.
DPP: Implement Oracle Receivables
This profile option indicates whether or not Oracle Receivables is implemented by the customer.
Options
Yes: Set the profile option to Yes to indicate that the Oracle Receivables application is implemented by the customer.
No: Set the profile option to No to indicate that the Oracle Receivables application is not implemented by the customer.
Default
Yes at the site level.
Restricted Change Level
You can view and set this profile option only at the Site level.
DPP: New Price Decimal Precision
This profile option enables you to set the precision required in displaying Prior Price and Change Value.
Options
None
Default
4 at the Site Level.
Restricted Change Level
You can view and update the profile option only at the Site level.
DPP: Notification Report Type
This profile options enables you to set the format in which you want to receive the BPEL notifications after initiating the Notification Execution Processes in the Executions tab of the Price Protection Details page.
Options
HTML, RTF, PDF, XLS
Default
PDF at the Application level.
Restricted Change Level
You can view and update the profile option at the Site, Application, and Responsibility levels.
DPP: Use Account Generator Workflow
This profile option enables you to generate a cost adjustment account for the standard and average cost updates using the Trade Management Account Generator Workflow, through the Update Costing Execution process.
Options
Yes: Set the profile option to Yes to enable the Trade Management Account Generator Workflow.
No: Set the profile option to No to disable the Trade Management Account Generator Workflow.
Default
No at the Site level.
Restricted Change Level
You can view and update the profile option at the User level only.
To set up Price Protection profiles
-
Navigate to the Find System Profile Values window and search on Price Protection profiles with product code of DPP.
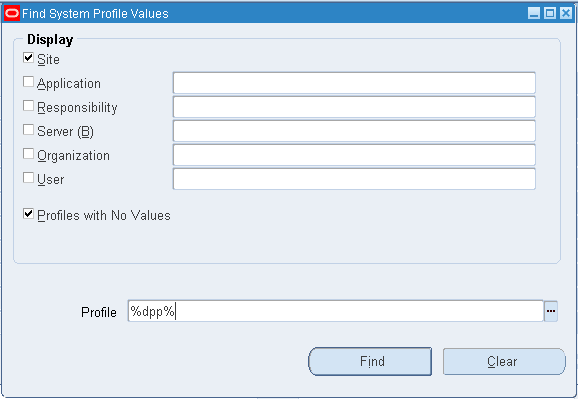
-
Click Find. The System Profile Values window appears and displays the Price Protection profile options.
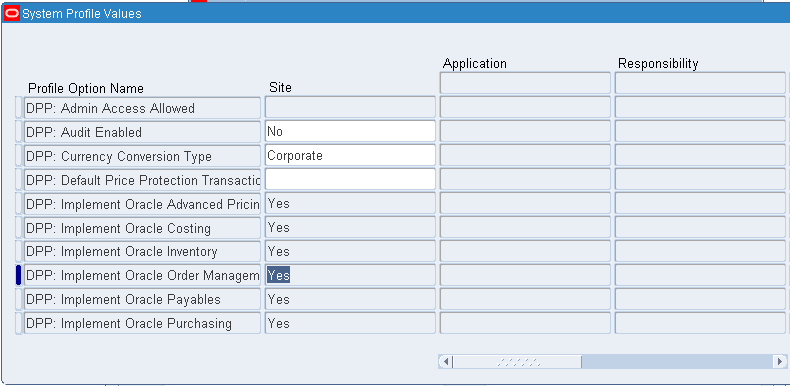
-
Enter Profile Option values.
-
Save your work.
Setting Up Supplier Trade Profiles
Supplier Trade Profiles are used to:
-
Store basic supplier information such as supplier name and address, customer name, customer account, bill to site, and address.
-
Define pre-approvals and pre-communication if required for supplier claims of a supplier.
-
Indicate that claims must also be created for price increases in price protection transactions.
-
Provide the details of contra-liability and cost adjustment accounts, and the default days covered by the price protection transaction.
-
Define Code Mapping.
To set up Supplier Trade profiles
-
Navigate to the Trade Management System Parameters UI.
-
Select the Administration tab.
-
Select the Supplier Trade Profile link in the left menu region of the System Parameters UI.
-
Select an existing supplier to update, or click Create to set up a new supplier and supplier site.
-
Enter the Operating Unit for the Supplier Trade Profile.
-
Enter the supplier information in the Supplier, Supplier Site, and Address fields.
Note: A supplier is a person or company that sells to your company. To settle claims using a check, you must set up that customer as a supplier in Oracle Payables.
The Supplier Trade Profile provides a link between the two setups in the two systems. Supplier information on claims is completed automatically; therefore, claim processors do not need to determine this. Suppliers are not organization specific. They can be seen and used across operating units.
If not set up in the Supplier Trade Profile, the claim owner must enter the supplier information on the first claim to be settled by check for this account. When this occurs, the trade profile information for the account is updated automatically.
-
Enter the customer information in the Customer, Customer Account, Bill To Site, and Address fields.
-
In the Price Protection region, select the Claim Pre-Approval Required check box when pre-approval is required. Pre-approval may be required by some suppliers and require the distributor to submit their inventory numbers for approval prior to closing the claims.
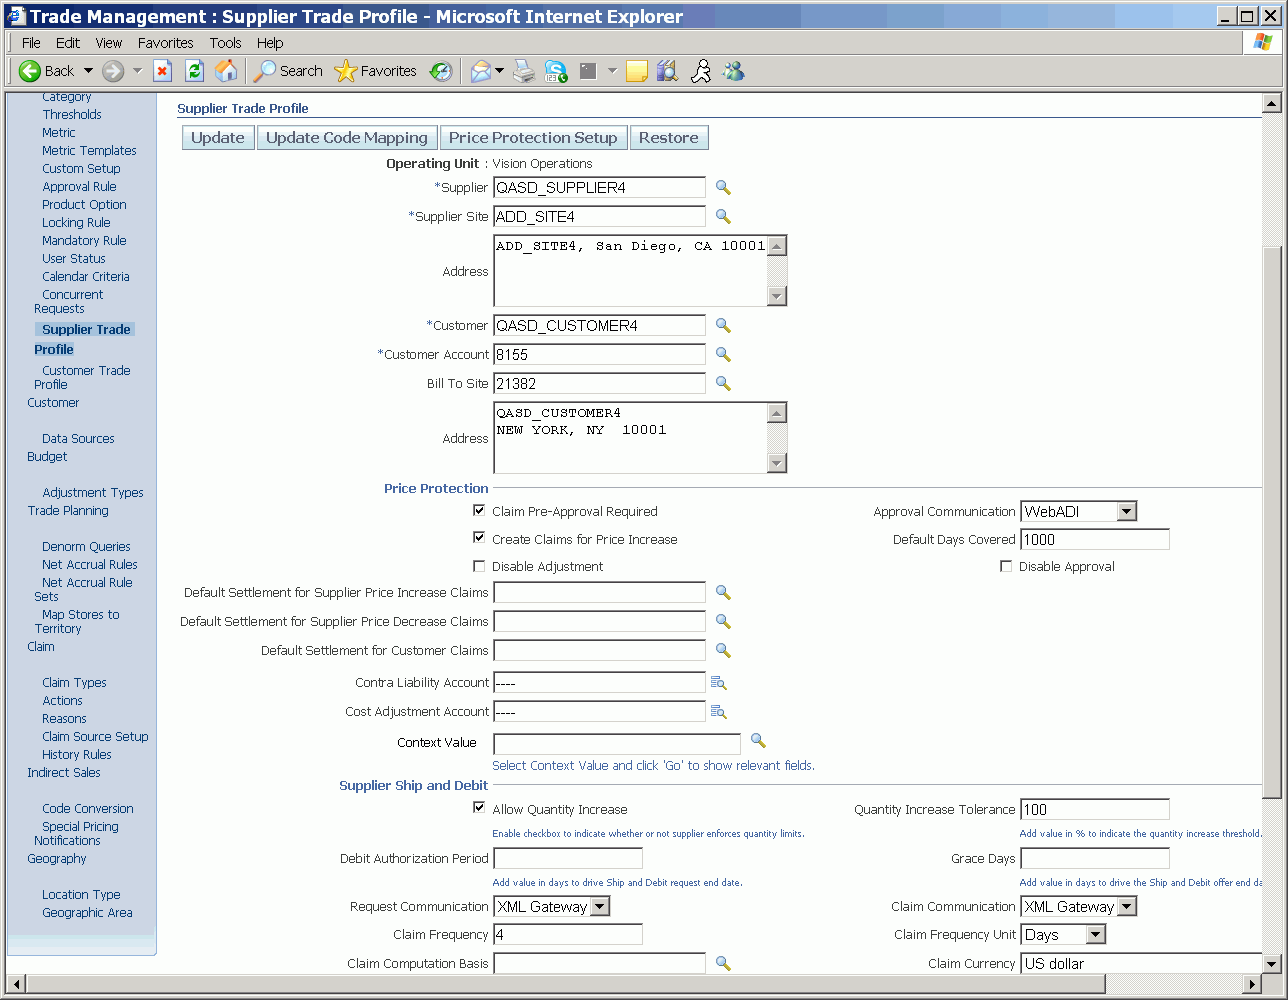
-
Select Approval Communication as WebADI or XML Gateway. This option is enabled only if the Pre-approval Required checkbox is selected.
-
Select Create Claims for Price Increase, if you want the application to create claims when there is an increase in item price in the price protection transaction.
-
Enter the details of Contra Liability Account, Cost Adjustment Account, and the Default Days Covered by the price protection transaction.
-
Select the Disable Adjustment check box if you do not want to make any inventory adjustments. The transaction then goes directly from Active to the Pending Approval status on the effective date.
-
Select the Disable Approval check box if you do not want to use the AME approval process. The transaction then goes directly from Active to Pending Adjustment status on the effective date and then you must manually approve the adjustment.
For more information on the adjustment and approval check boxes, see the Adjustments and Approvals section in the Oracle Price Protection User Guide.
-
Enter default claim settlement accounts for price increase and price decrease supplier claims, and for customer claims.
-
You can click Price Protection Setup to define and implement processes for an operating unit or a supplier and supplier site belonging to an operating unit. See: Price Protection Process Execution Setup
-
Click Update to save your work. If you are creating a new supplier trade profile, then the Create button appears.
Setting Up Approval Rules
Oracle Approvals Management Engine (AME) is a self-service web application where you can define business rules that govern the process for approving transactions in Oracle Applications where AME has been integrated. Once the rules for an application are defined, that application communicates directly with AME to manage the approvals for the application’s transactions.
You can set up multiple approvers for sequential or parallel approval. Parallel approvals include the consensus and first responder methods. By the Consensus method, all listed approvers must approve before the transaction status can change to approved. By the First Responder method, the status of the transaction is determined by the response of the first approver who responds. In the Sequential method, the chain of approvals stops at the first rejection and this determines the fate of the transaction. For more information, see the Adjustments and Approvals section in the Oracle Price Protection User Guide.
You can set up and use an internal approval process for price protection transactions before initiating any key processes or submitting the debit to suppliers. The internal approval for price protection is optional and you must create an approval rule specific to price protection transactions and establish the approving hierarchy.
After performing the adjustments to the inventory, you can submit the Price Protection transaction for internal approval. This approval flow is configured in the AME. Based on the approval rule configuration, you can send the notification to a user or a group of users.
The transaction type, DPP: Price Protection Transaction determines the approval rule and the hierarchy to be used for price protection transactions.
Approvals Management uses the following components within approval rules:
-
Attributes
-
Conditions
-
Action Types
-
Approver Groups
To create approval rule components
-
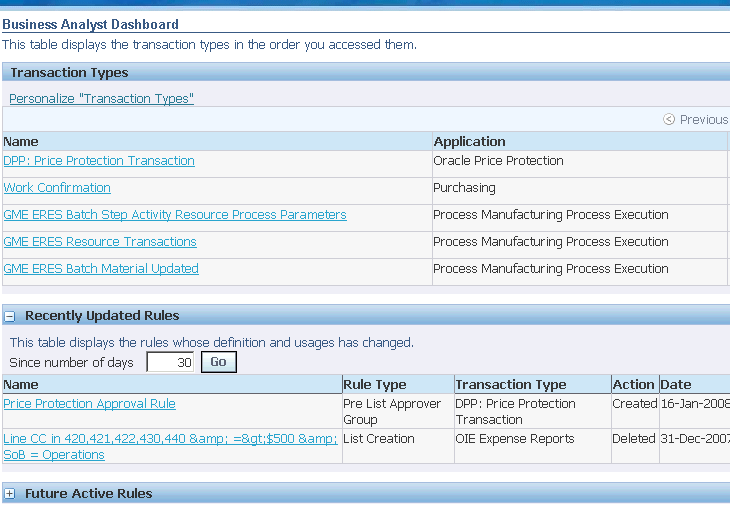
Navigate to the Approvals Management Business Analyst responsibility. .
-
Navigate to the Oracle Approvals Management, Business Analyst Dashboard UI.
-
In the Transaction Types region, click the Setup icon in the DPP: Price Protection Transaction. The Attributes Setup page appears. Define attributes to describe business facts for a specific transaction.
-
Select Conditions under the Setup tab. Define conditions to evaluate attributes within rules. If all conditions in a rule are true then the rule is active for the transaction.
-
Select Action Types under the Setup Tab. Enable action types to specify the action to take if a rule is active for a transaction.
-
Select Approver Groups under the Setup tab. The Approver Groups page appears. Define approver groups to contain approvers who are members of peer groups such as payroll or expense departments.
-
Click Update to enter or make updates to the Price Protection approval rule.
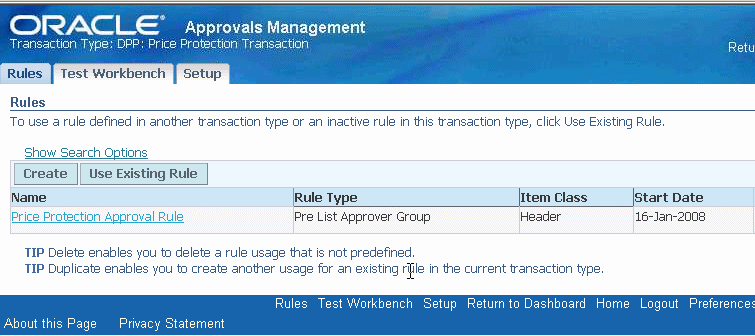
To define and update approval rules
Approval Rules determine the approvers and notification recipients required for a business transaction.
-
Select the Rules tab on the Approvals Management page.
-
Click the Create button to create a new approval rule, or click the Update icon on an existing approval rule to changes.
-
Enter approval rule details and save your work.