Spares Management Implementation Tasks
This chapter documents setup for Oracle Spares Management, External Repair Execution, and Warehouse Replenishment Planning.
This chapter covers the following topics:
- Setting Up Oracle Spares Management
- Defining Forecast Rules
- Setting Up a Forecast Rule
- Selecting a Forecast Rule
- Defining Calculation Rules
- Defining Excess Rules
- Defining Excess Reject Reasons
- Creating Business Rules to Automate Warehouse Notifications
- Defining Manual Override Reasons
- Defining Task Parts
- Defining Parts Priorities
- Defining Delivery Times
- Setting up Reschedule Rules
- Setting Up Warehouse Replenishment Planning
- Defining Excess and Defective Warehouses and Repair Suppliers
- Defining Excess Warehouses and Assigning to the Warehouse Being Planned
- Defining Defective Warehouse Organizations
- Defining and Assigning Internal Repair Suppliers
- Defining and Assigning Planned Order Release Automation Business Rules
- Setting Up Other Warehouse Planning Parameters
- Defining Planning Parameters to Create Min-Max levels for a Warehouse or Technician
- Setting Up Lead Times for Warehouse Replenishment Planning
- Setting Up External Repair Execution
- Setting Up Repair Parameters
- Setting Profile Options for External Repair Execution
- Setting Up Parts Search and Ordering Profile Options
Setting Up Oracle Spares Management
To set up the Oracle Spares Management module (Spares Management) in Oracle Field Service, perform the steps listed in the following table:
| 1. Define Forecast Rules Forecast rules are used to determine how the demand forecasts for service parts are calculated. |
| 2. Define Calculation Rules Calculation rules are used to determine which availability elements are to be included when calculating the Actual Available quantity for the purpose of producing replenishment notifications for the planner. |
| 3. Define Excess Rules Excess Rules can be used to filter out excess parts that have been recently received or that do not have a significant impact on excess value. |
| 4. Define Excess Reject Reasons Excess reject reasons can be applied when an excess recommendation is rejected. The Reject Reason activity can be used for analysis of the excess recovery process to determine why the excess was not executed. |
| 5. Define Manual Override Reasons Manual override reasons can be applied when the planner overrides a Min-Max recommendation. The Manual Override activity can be used to determine why the planner is changing or not implementing the recommendations. |
| 6. Define Task Parts Define a list of parts that are typically required for a specific product and task template. |
| 7. Define Parts Priorities Part priorities are used in Field Service Advanced Scheduler to determine which parts, based on priority, are to be used in assigning and scheduling technicians. |
| 8. Define Delivery Times Specify the delivery times for shipment methods that have been defined in Oracle Inventory. Used by Scheduler to determine when a technician could be scheduled based on the delivery time of the parts. |
| 9. Set Up Warehouse Replenishment Planning Define and assign excess and defective warehouses and internal repair suppliers. Define warehouse planning parameters, set up reschedule rules, specify plan methods, and set up lead times. |
| 10. Set Up External Repair Execution. Define and assign external repair suppliers. Set up Repair Parameters and Profile Options. |
Defining Forecast Rules
Forecast rules are used to determine how forecasts are calculated. Forecasts are used in Parts Loops, Min-Max Recommendations, and Warehouse Replenishment Planning.
See Setting Up a Forecast Rule and Selecting a Forecast Rule.
Setting Up a Forecast Rule
The forecast rule is used to generate the usage forecast for total requirements and the returns forecast for defectives in Warehouse Replenishment Planning (WRP). The forecast rule is also used to generate forecasts for Min-Max recommendations for warehouses or technicians and Parts Loops in the Planner's Desktop.
You create forecast rules using the Forecast Rules tab of the Business Rules window.
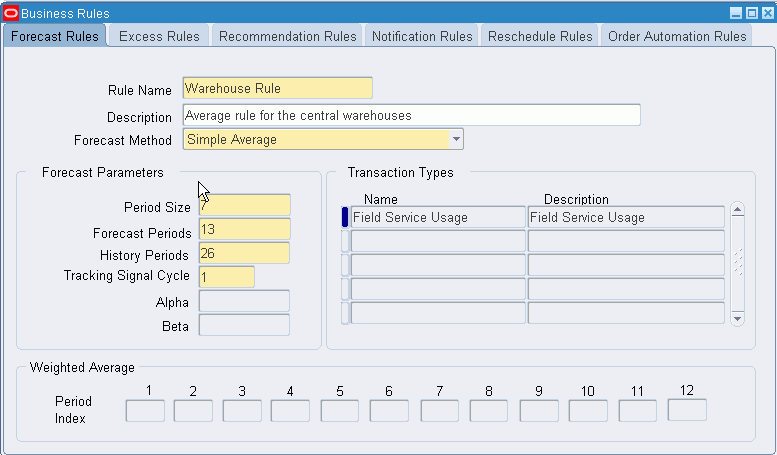
Forecast Parameters
This list details the parameters that are defined for forecast rules:
-
The Rule Name is the name of the forecast rule.
-
The Description field contains a description of the forecast rule.
-
The Period Size is expressed in days. If you want to set up a weekly period, for example, you would enter 7.
-
The Forecast Periods field indicates the number of forecast periods.
-
The History Periods field indicates the number of historical periods to include in the forecast calculation.
-
The Tracking Signal Cycle field is used to determine the number of history periods used to calculate the Tracking Signal. Each cycle is equal to the number of history periods.
The Tracking Signal is used to measure forecast error.
-
The Alpha field is used in the Exponential Smoothing and Trend Enhanced methods. In exponential smoothing, alpha determines how much weight to apply to the current period usage. In the Trend Enhanced method, alpha is used to determine the constant for the trend line.
-
The Beta field is used in the Trend Enhanced method and is used to determine the slope of the trend line.
-
The Weighted Average Period Index fields are used to specify weights for individual periods. For example, you can assign higher weights to more recent periods if that is desired. The total of the period values must equal 1 and each value must be greater than zero and less than one.
Forecast Methods
Spares Management provides the following four forecast methods:
-
Simple Average is an average based on the number of history periods selected.
-
Weighted Average is based on the number of history periods, and the different weights for each period.
-
Exponential Smoothing provides a simplified version of the weighted average. The smoothing constant Alpha is used to define the weight given to the current history period. (1 - Alpha) is used to determine the weight given to prior periods (other than the most current). This method does not produce a positive or negative trend forecast.
-
Trend Enhanced produces a trend forecast. Beta is a smoothing factor for the slope of the trend and is used to define the weight given to the trend in the current period. (1 - Beta) is used to determine the weight given to the previous trend. Alpha is a smoothing factor for the constant and is used to define the weight given to the current history period.
To Create a Forecast Rule
-
Navigate to the Forecast Rules window.
The Business Rules window appears displaying the Forecast Rules tab.
-
In the Forecast Rules window, enter a rule name in the Name field.
-
(Optional) Enter a description in the Description field.
-
Select a forecast method from the Forecast Method list of values.
The values are Simple Average, Weighted Average, Exponential Smoothing and Trend Enhanced.
-
In the Period Size field, enter the number of days.
For a period size of weekly, you would enter 7.
-
In the Forecast Periods field, enter the number of periods for the forecast.
-
In the History Periods field, enter the number of periods of history to use in generating the forecast.
-
In the Tracking Signal Cycle field, enter the number of cycles to use when calculating the Tracking Signal. Each cycle is equal to the number of history periods.
-
If you are using the Exponential Smoothing or Trend Enhanced method, enter the factor in the Alpha field.
This number is expressed as a decimal. Alpha would be greater than 0, and equal to or less than 1.
Tip: In most cases, the alpha factor should be set in the range of 0.15 - 0.25.
-
If you are using the Trend Enhanced method, enter the factor in the Beta field.
This number is expressed as a decimal. Beta should be greater than 0, and equal to or less than 1.
Tip: In most cases, the beta factor would be set in the range of 0.15 - 0.25.
-
In the Transactions Types fields, enter the transaction types from Inventory that are used to create the transaction history used to generate the forecast.
-
Save your work.
Selecting a Forecast Rule
The Forecast rule is used to generate:
-
Usage forecast for total requirements in Warehouse Replenishment Planning.
-
Forecasts for use in Min-Max recommendations for warehouses or technicians and Parts Loops.
-
WRP returns forecast for the defective warehouse.
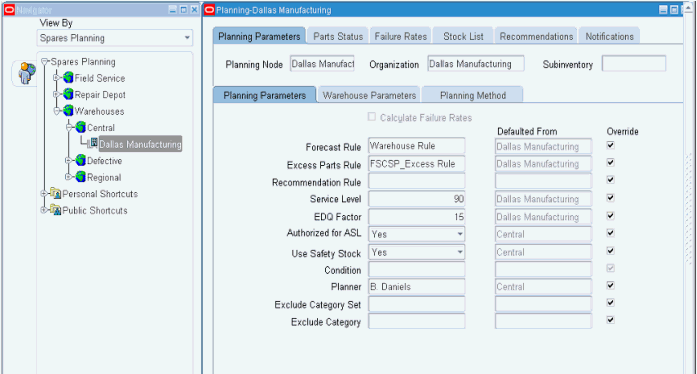
You assign the forecast rule to a warehouse (organization) or a technician (sub inventory) in the Planning Tree of the Planner's Desktop.
To select a Forecast Rule:
Steps
-
Navigate to the Planner's Desktop.
The Planner's Desktop appears displaying the Planning Parameters tab, and Planning Parameters sub tab.
-
From the Tree in the Planner's Desktop, select a warehouse, technician, or node.
Note: The warehouse can either be the warehouse being planned or the defective warehouse.
Note: If you select a node other than an organization (warehouse) or sub inventory (technician), then the Forecast Rule (or other parameters) default to lower level nodes underneath the node where the Forecast Rule was selected.
-
In the Forecast Rule field of the Planning Parameters sub tab, select a Forecast Rule from the list of values.
-
Save your work.
Defining Calculation Rules
Calculation rules are used to define the actual available quantity to produce notifications in Parts Loops.
The calculation rule includes a tolerance percentage to be used in loop planning to generate parts loop notifications. A notification is created whenever the parts quantity is over or under the loop quantity by the percentage specified.
The calculation rule also includes a value called the Time Fence that represents the number of days in the future to be used when considering the availability elements.
A calculation rule is required before setting up Parts Loops.
Example of a Calculation Rule
Suppose you want the planner to be notified when the loop quantity exceeds 110% of the desired loop quantity. You also want to consider all orders due in the next twenty days when calculating the available quantity that is compared to the desired loop quantity. Here are suggested parameter settings of the calculation rule for this scenario:
-
The Rule Name is Twenty Days.
-
The Description is Include Availability Elements for 20 Days.
-
All Availability Elements are checked.
-
The Tolerance Percent is 10.
-
The Time Fence is 20.
Use this procedure to define calculation rules:
-
Navigate to the Define Calculation Rule window.
The Define Calculation Rule window appears.
-
Enter a rule name in the Name field.
-
(Optional) Enter a description in the Description field.
-
Select the availability elements.
The choices are:
-
Usable on-hand
-
Defective on-hand
-
Purchase orders (use this only if Oracle Purchasing is installed)
-
Open WIP orders (use this only if Oracle Work in Process is installed)
-
Open Requisitions (use this only if Oracle Purchasing is installed)
-
Sales Orders (use this only if Oracle Order Management is installed)
-
Move Orders
-
Inter Organization transfers
-
In-transit Move Orders
-
-
Enter a Tolerance Percent.
This is used in loop planning to filter notifications that are within the tolerance percent. For example, if a 10 is entered, a notification will be sent whenever the quantity is plus or minus 10% of the desired quantity.
-
Enter the Time Fence, in days.
This is used in loop planning to filter incoming and outgoing orders scheduled beyond a specified time period.
-
Save your work.
Defining Excess Rules
Excess rules are used to filter out excess parts that do not have a significant impact on excess value. This enables the field technician or warehouse planner to focus excess recovery on the few items that have a high value impact.
If you do not use excess rules, available quantities that are greater than the maximum level in the Authorized Stock List (ASL) are considered to be excess and would then appear in the Excess List window for return.
You assign excess rules to either the technician or the warehouse in the Planner’s Desktop.
Use the following procedure to create excess rules:
-
Navigate to the Excess Rules window.
The Excess Rules window appears.
-
Enter a unique name for the excess rule in the Excess Rule Name field.
-
Enter a Description for the excess rule.
-
Enter a value in the Total Max Excess field to represent a maximum allowable percentage of the total Maximum value.
For example, if you enter 10 in this field, then excess parts are considered for return only if their total excess value is greater than 10% of the total Maximum value. If this field is left blank, a zero is assumed and all excesses are considered.
This rule is designed to bypass the technician or warehouse for excess recovery when the overall excess value is within acceptable limits.
-
Enter a value in the Line Max Excess field to represent a maximum allowable percentage of the total excess quantity for a line.
For example, suppose you enter a 10 in this field. If the maximum quantity is 20 and the on-hand quantity is 21, this part would not appear on the excess list because the excess quantity is less than 10% of the maximum quantity. If this field is left blank, a zero is assumed and all excesses are considered.
This rule is designed to filter out excess parts that have relatively high Max levels where the excess would be consumed fairly quickly.
-
Enter a value in the Days Since Receipt field to represent the number of days you want to exclude when calculating the excess quantity.
This enables you to exclude recently received parts from the excess list. For example, if you enter a 10 in this field, then all of the parts received within the last ten days are ignored. If this field is left blank, a zero is assumed and all receipts are included in the excess calculation.
Note: This rule would primarily apply to technicians and would prevent parts received for a task from being declared as excess until a reasonable period of time had passed.
-
You can enter a value in either the Total Excess Value field or the Top Excess Lines field.
Enter a value in the Total Excess Value field to represent the percentage of total excess value that you want to see on the excess list. For example, if you enter an 80 in this field, the excess list will display the excess lines that comprise the top 80% of the total excess value.
Alternatively, you can enter a value in the Total Excess Lines field to represent the number of lines that you want to see on the excess list. For example, if you enter 50 in this field, the excess list will contain the 50 highest value lines.
-
Select a value for Category Set if you want to exclude an item category from return, such as supplies.
A category set is a feature in Inventory where you can define your own group of categories.
If you enter a value for Category Set, the Category field is enabled.
-
Select a specific category in the Category field to exclude just this category.
A category is a code used in Inventory to group items with similar characteristics.
-
Save your work.
Note: You assign excess rules in the Planner’s Desktop by selecting the technician or warehouse from the Planning Tree, and then selecting the Excess Rule from the list of values in the Planning Parameters tab.
Defining Excess Reject Reasons
During the review of excess recommendations, a planner or technician might reject a particular excess line recommendation. You can define excess reject reasons, which will facilitate better analysis of the rejected excess recommendation activity.
The list of lookups available to your Field Service operation is user definable and can be modified throughout the life cycle of the application.
Use this procedure to define excess reject reasons:
Steps
-
Navigate to Excess Reject Reason Codes Lookup window.
The Application Object Library: Excess Reject Reason Codes Lookup window appears.
You cannot modify the lookup Type, Application, and Access Level fields in the header region. You can add values in the table below those fields.
-
Enter a code in the Code field.
This code is for internal purposes only and is not visible in the Spares Management application.
-
In the Meaning field, enter the name of the excess reject reason. This value will appear in the list of values for Excess Reject Reasons.
Note: The Meaning should represent the excess reject reason. For example, if the excess reason is because the parts are hazardous, enter the word Hazardous in the Meaning field.
-
(Optional) Enter a description in the Description field.
-
For an Excess Reject Reason, leave the Tag field blank.
-
(Optional) The current date appears by default in the Effective From Date field. You can change the Effective From date, and can add an Effective To date.
-
Repeat steps 2 -7 for each additional Excess Reject Reason you want to create.
-
Save your work.
Note: To remove an obsolete excess reject reason Lookup, you can:
-
Disable the code by clearing the Enabled check box next to the lookup value.
-
Enter an end date.
-
Change the meaning and description to match a replacement code.
-
Creating Business Rules to Automate Warehouse Notifications
Warehouse notifications are used for warehouse replenishment. The functionality which includes visibility to excess inventories and defectives for repair is found in the Notifications tab of the Planner’s Desktop.
Automating warehouse notifications is beneficial when planners have a large number of warehouse notifications to execute and when the cycles need to be processed frequently to insure timely replenishment. These rules are set up to automate notifications that have a low notification value combined with a good forecast reliability. You can create automation rules for these new-buy notification types:
-
Internal Order: This represents transfer orders between warehouses.
-
WIP Order: This is used when manufacturing is required.
-
Requisition: This is used when purchasing is required.
In each of the above cases, you can enter Excess Value, Repair Value, Notification Value, and Min-Max Values for Tracking Signals.
-
Excess value: This is the value of excess inventory that can be used to satisfy the notification.
Note: This should be set low so that automation would not occur when a significant amount of excess is available to utilize.
-
Repair value: This is the value of defective inventory that, when repaired, can be used to satisfied the notification.
Note: This should be also be set low so that automation would not occur when a significant amount of defective inventory is available for repair.
-
Notification value: This is the value of the notification recommendation.
Note: This should also be set low so that the planner can review the notifications with larger values.
-
Tracking Signal Min: This measures the forecast error when actual usage on a cumulative basis is running less than forecast.
-
Tracking Signal Max: This measures the forecast error when actual usage on a cumulative basis is running more than forecast.
Note: You can set values for all or none of the parameters. But for the automated process to be activated, ALL parameters that have been set must be met.
For all parameters with the exception of the Tracking Signal Min, the automation is triggered when the actual value is less than the parameter value. In the case of the Tracking Signal Min, the automation is triggered when the actual value is greater than the parameter value.
Note: You can set up multiple notification rules for a warehouse but only one can be assigned at a time.
Use this procedure to set up automated notification rules:
Steps
-
Navigate to the Notification Rules window.
-
From the Business Rules window, select the Notification Rules tab.
-
Enter the Name of the rule.
-
(Optional) Enter a Description.
-
For the Internal Order Line, enter an Excess Value parameter.
-
Enter a Repair Value parameter.
-
Enter a Notification Value parameter.
-
Enter Tracking Signal Min and Max parameters.
-
Repeat steps 5 - 8 for Requisition and WIP Order lines.
-
Save your work.
Defining Manual Override Reasons
You can define reasons that a planner may have for overriding the stock list recommendations or for manually creating a Min-Max. When the planner overrides a recommendation or manually enters a Min-Max, a reason, for future reference, can be entered.
Use this procedure to define the manual override reasons:
Steps
-
Navigate to the Manual Override Reason Lookups window.
The Application Object Library: ASL Reason Code Lookups window appears.
You cannot modify the lookup Type, Application, and Access Level fields in the header region. You can add values in the table below those fields.
-
Enter a code for the Override Reason.
This code is for internal purposes only and is not visible in the Spares Management application.
-
In the Meaning field, enter the name of the Override Reason that you want to have appear in the list of values for manual override reasons. Manual Override Reasons appear in the Planner's Desktop and are used when an Authorized Stock List is manually created.
Note: The Meaning should be word that makes sense in relation to the manual override reason you are trying to represent.
-
(Optional) Enter a Description for the Override Reason.
-
When defining Override Reasons, leave the Tag field blank.
-
The current date appears by default in the Effective From date field.
(Optional) You can change the Effective From date, and enter an Effective To date.
-
Repeat steps 1-6 for each additional Override Reason that you are defining.
-
Save your work.
Note: To remove an obsolete Lookup you can:
-
Disable the code by clearing the Enabled check box next to the lookup value.
-
Enter an end date.
-
Change the meaning and description to match a replacement code.
-
Defining Task Parts
You can define a list of parts that are typically required for a specific product and task template. This task parts definition provides an efficient method for creating a parts requirement for a task. Task parts saves time because there is no need to manually enter which parts are needed for tasks that are frequently executed. When using task parts, you can override the predefined list of parts, if necessary.
You define Tasks Parts for combinations of products and task templates using the Define Task Parts window.
Parts can be defined automatically by running the Create Task Parts History concurrent program, which collects usage information from the Debrief process in Field Service and populates the calculated fields based on the usage history associated with the product and task template over the time period specified in the Forecast Rule.
The Manual region of the window enables the manual entry of items used on the product and task template. The manual entries will always override the calculated entries. The Roll up region summarizes the usage information for supersessions, if applicable. The usage is rolled to the top part in the supersession chain.
Use this procedure to manually create Task Parts:
- Define a Task Template.
- Define products and items.
Steps
-
Navigate to the Define Tasks Parts window.
-
Click the New button on the Find Product Task window.
The Define Task Parts window appears.
-
In the Product field, select a product from the list of values.
The product description appears on the right. The product represents the machine on which the service task is performed.
-
Enter a Task Template name or select one from the list of values.
-
The Auto or Manual default value is Manual. The default value is set when you save your work.
-
Skip the Times Used field. It will be populated with the number of times this task template has been used for this product, after running the Create Task Parts History concurrent program.
-
Skip the Task % field. It will be populated with a number representing the percentage of times this task template was used for this product, after running the Create Task Parts History concurrent program.
-
In the Define Parts section, choose the first part number in the Item field that you want to associate with this task and product from the list of values.
The item default Unit of Measure appears in the UOM field.
-
Enter a revision number in the Rev field, if applicable for this part.
-
Enter the quantity of parts required.
-
Enter a value in the % (percentage) field to represent how likely this part is expected to be used in this task template and product combination.
This percentage value is used to define the Priority.
For example, if you expect this part to be used about 50% of the time when this task is executed on the product, then enter 50 in this field.
-
(Optional) Enter the Start Date or End Date to enable or disable this parts task definition on a specific day.
-
Repeat steps 8-12 for each additional part.
-
Save your work.
Defining Parts Priorities
Parts Priorities are used to assign a priority classification for each of the parts defined in a Task Parts definition. The Parts Priority is based on a range of likelihood or probability that a part will be used on a product and task based on the definition in the Task Parts.
The Oracle Advanced Scheduler uses the priorities when assigning and scheduling technicians to a task that requires parts.
Field Service provides two seeded priorities: All Parts and No Parts. These values, along with those defined by the user, are available for scheduling purposes, either through Advanced Scheduler functionality, or manually through the Advise button on the Field Service Dispatch Center.
Use this procedure to define parts priorities:
Steps
-
Navigate to the Parts Priorities window.
-
Enter the Lower and Upper Range.
-
Enter a code for the Priority of the part.
This code can be alphanumeric, but it should be meaningful for an end user. For example, if the priority is high, you can enter P1 as the priority designation. If it were low, you an enter P4.
For example, if you enter a Lower Range = 75, Upper Range = 100 and Priority = P1, this means that a part with a likelihood of being used on a product and task in Task Parts Requirement window between 75% and 100% of the time would be classified as P1
-
In the Meaning field, enter a meaning for the Priority that will appear in the list of values in Advanced Scheduler.
Note: The Meaning should be text that represents the part priority you are defining. A high percentage priority range, for example, should be reflected by a similar meaning, in other words, High range = 100: Meaning = P1.
-
(Optional) Enter a description of the priority in the Description field.
For example, for a Priority = P1, then the description could be Highest Priority.
-
Repeat steps 2-5 for each additional priority you want to create.
-
Save your work.
Note: The Parts Priority interacts with Task Parts to assign a priority to each of the parts defined in a Task Parts definition. The priority assignment is made based on the likelihood (percent) that a part will be used as defined in Task Parts.
For example, in Task Parts if the Percent for a part = 80%, then based on the example noted in Step 2 the priority assignment would be P1.
The percent, or likelihood of being needed, can be manually or automatically defined.
Defining Delivery Times
Spares Management provides a method for defining the specific delivery times for shipment methods that are defined in Oracle Inventory.
If your Shipment Method is next day delivery, in Delivery Times, the specific time, for example, 10:30 AM can be defined for that Shipment Method. If the technician needs to receive a part required for a task, Advanced Scheduler could not schedule the technician to the task before the delivery time based on the Shipment Method.
A Comfort Zone can also be used to provide buffer time between the receipt of the part and the schedule for the task. In the previous example, a Comfort Zone of two hours would keep the task from being scheduled by Scheduler before 12:30 PM.
Use this procedure to define delivery times:
- Define Shipment methods in Oracle Inventory.
- Define Freight Carriers in Oracle Inventory.
Steps
-
Navigate to the Define Delivery Time window.
The Define Delivery Time window appears.
-
From the Define Delivery Time window, execute a query for the organization you want to update.
You can do this either by using the Find All menu option, or if you know the organization you want to update, you can Query By Example.
The window displays the shipping methods and freight codes that have been defined in Oracle Inventory for each inventory organization.
-
Enter a value in the Lead Time field for the number of time units this freight carrier commits to make a delivery.
For example, for an overnight delivery, enter a 1 in this field and then choose Day in the UOM field.
-
In the UOM field, enter the unit of time that corresponds to the previous field, Lead Time.
-
Enter the carrier's expected delivery time in the Delivery Time field.
This value is expressed in military time. For example, if you enter a 1, the window displays 01:00, or one o'clock in the morning.
-
Enter any time value between 0100 and 2400 in the Cutoff Time field.
The Cutoff Time is the time for which the order must be entered to achieve the lead time and delivery time. For example, if the order is entered by 16:00 hours, then the part can be delivered by the next day (Lead Time = 1) by 10:30 (delivery time). Otherwise, if the order is entered after 16:00 hours, then the cutoff is missed for that method of shipment and the part would be delivered in two days where the intransit time is set to 1 for the method of shipment.
-
The Time Zone field will default to the time zone associated with the organization that you choose.
-
Enter a number of hours in the Comfort Zone field.
The Comfort Zone (Hours) is the time to allow between the expected delivery time of the part and the schedule of the field technician when the receipt of a part is required.
-
Save your work.
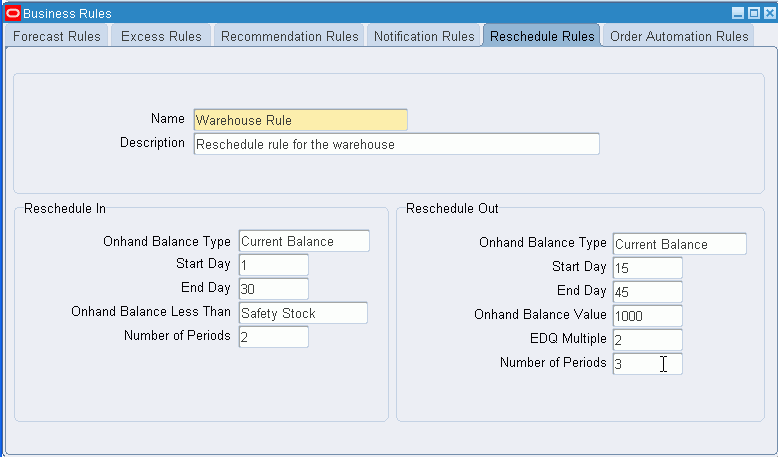
Setting up Reschedule Rules
The Reschedule In Rule defines gaps in the schedule where parts are on-order but the projected on-hand balance is tracking too low ahead of the scheduled delivery. The current order may need to be repositioned earlier in the schedule to eliminate gaps or situations where the projected on-hand balance is potentially putting service at risk.
Reschedule Out defines schedule segments where parts are on-order and are due to arrive well before they are needed causing the projected on-hand balance to track too high. The current order may need to be repositioned later in the schedule to avoid an inventory level that is higher than needed.
An exception condition exists when the projected balance is out of the range defined by the reschedule rules. Reschedule Rules are used in Warehouse Replenishment Planning (WRP) to capture reschedule recommendations for the planner.
Use this procedure to set up Reschedule Rules:
Steps
-
Navigate to the Reschedule Rules window.
The Business Rules window opens to the Forecast Rules tab.
-
Select the Reschedule Rules tab.
-
Enter the Reschedule Rule Name, and optionally, a Description.
-
In the Reschedule In region, select the On Hand Balance Type for the Reschedule In Rule to monitor.
The Current Balance option projects the on-hand balance period by period using Requirements, Current On-hand, and Current On-order. The Planned Balance option includes Planned Orders and the Repairable Returns forecast.
Normally, the rescheduling would be based on the Current Balance.
-
Enter the Start Day and End Day to define the period applicable for the Reschedule In Rule to monitor.
-
Select the On Hand Balance Less Than condition for Reschedule In.
-
Enter the Number of Periods. This specifies the number of occurrences that the Projected On Hand Balance falls below the On Hand Balance condition (within the range of days defined by the Start Day and the End Day) to qualify for Reschedule In.
For example, if the On Hand Balance Less Than condition is Safety Stock, the Start Day is 1, the End Day is 30, and the Number of Periods value is set to 2. If the On Hand Balance falls below the Safety Stock on two or more occasions during the next thirty days, then the Reschedule In rule creates a recommendation.
-
In the Reschedule Out region, select the On Hand Balance Type for the Reschedule Out Rule to monitor.
-
Enter the Start Day and End Day to define the range of days for the Reschedule Out Rule to monitor.
-
Select the On Hand Balance Value for the Reschedule Out exception condition.
The On-hand Balance Value defines the value that the projected balance must exceed the upper limit by to qualify as a Reschedule-Out.
-
Enter the EDQ (Economic Delivery Quantity) Multiple used to define the reschedule upper limit.
The EDQ Multiple along with the Reorder Point (ROP) is used to define the Upper Limit. The Upper Limit is equal to the ROP plus the EDQ Multiple times the EDQ.
-
Enter the Number of Periods. This specifies the number of periods the On Hand Balance must track above the On Hand Balance value parameter (within the range of days defined by the Start Day and the End Day) to qualify for Reschedule Out.
For example, the On Hand Balance value is 1000, the Start Day is 15, the End Day is 45, and the Number of Periods value is set to 3. If the On Hand Balance exceeds the Upper Limit by 1000 USD on at least three consecutive periods during the thirty-day period that starts 15 days from now, then the Reschedule Out rule creates an exception message.
-
Save your work.
Note: The Reschedule Rules are assigned to the warehouse being planned in the Warehouse Parameters tab.
Setting Up Warehouse Replenishment Planning
Planners use Warehouse Replenishment Planning (WRP) to plan warehouse inventories and to execute replenishment in the field service supply chain. WRP is specifically designed to incorporate the unique features and functionality needed to manage the inventory at a warehouse in field service.
To set up Oracle Spares Management Warehouse Replenishment Planning complete the following steps:
Prerequisites
- Set up the warehouse being planned as an inventory organization.
- Set up the excess warehouses as inventory organizations.
- Set up the defective warehouses as inventory organizations.
Steps
-
Set up Forecast Rules and assign them to the warehouse being planned. See
-
Define Excess and Defective Warehouses and assign them to the warehouse being planned. See
-
Define Repair Suppliers and Assign to the warehouse. See Defining and Assigning Internal Repair Suppliers.
-
Set up Reschedule Rules and assign them to warehouses. See Setting Up Reschedule Rules.
-
(Optional) Define Order Automation rules and assign them to a warehouse. See Defining and Assigning Planned Order Release Automation Business Rules.
-
Set up Other Warehouse Planning Parameters for the warehouse. See Setting Up Other Warehouse Planning Parameters.
-
Set up Lead Times for excess, repair, and new-buy. See Setting Up Lead Times.
-
Set up External Repair Execution, if required. See Setting Up External Repair Execution.
Defining Excess and Defective Warehouses and Repair Suppliers
When planning the field service warehouse other warehouses need to be defined for the utilization of excess and defective inventory. Repair suppliers also need to be defined that are to be used in the repair and replenishment of parts for the primary warehouse being planned.
All warehouses: primary, excess, and defective need to be set up as inventory organizations. Repair Suppliers also need to be set up as inventory organizations and repair suppliers in Purchasing.
Defining Excess Warehouses and Assigning to the Warehouse Being Planned
When planning the field warehouse there might be other warehouses whose excess needs to be incorporated into the planning of that warehouse. You define the specific excess warehouses using Sourcing Rules and then link them to the warehouse being planned in WRP in Assignment Sets. Excess, for the purpose of planning at the primary warehouse, is defined as available inventory in excess of the Maximum level.
Excess warehouses are used in the Warehouse Replenishment Planning module. They are also used in the basic replenishment functionality found in the Notifications tab of the Planner’s Desktop.
This section covers creating the Sourcing Rule and Assignment Set and linking the Assignment Set to the warehouse that is being planned in WRP.
Use this procedure to set up excess warehouses for usable excess parts:
Prerequisites
- Set up the warehouse that is being planned as an inventory organization.
- Set up the excess warehouses as inventory organizations.
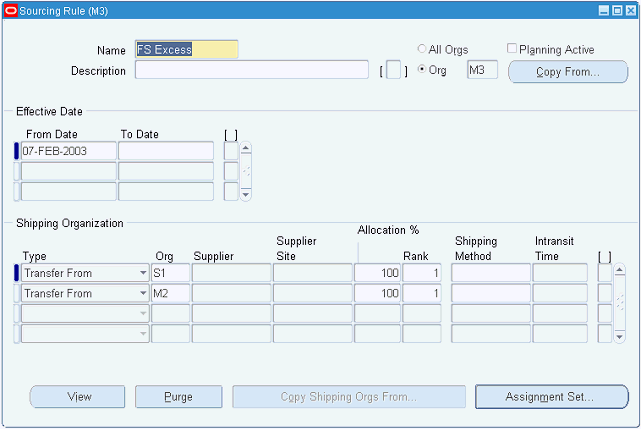
To Create A Sourcing Rule
-
Navigate to the Sourcing Rule window.
The Sourcing Rule window appears.
Note: You would create the Sourcing Rule for the organization representing the warehouse that is being planned.
-
Enter a Sourcing Rule name.
-
(Optional) Enter a Description.
-
In the Shipping Organization region enter Transfer From as the Type. Enter the organization representing the excess warehouse where excess inventory will be utilized in the Org field.
See Defining Sourcing Rules, in the Oracle Purchasing User's Guide
-
Save your work.
In this example organizations S1 and M2 have been defined in the Sourcing Rule as excess warehouses that will be used in the replenishment planning for another warehouse.
To Create an Assignment Set and Assign the Sourcing Rule to the Primary Warehouse Being Planned
-
Navigate to the Sourcing Rule / Bill of Distribution Assignments window.
The Sourcing Rule / Bill of Distribution Assignments window appears.
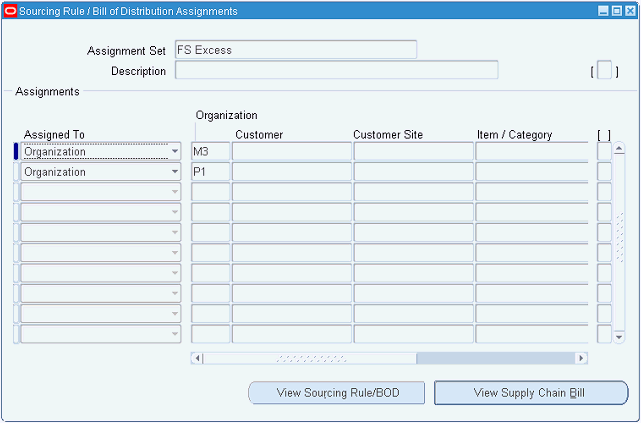
The Assignment Set is the link between the Sourcing Rule that defines the excess warehouses and the warehouse being planned.
-
Enter the Assignment Set name and Description.
-
Enter Organization in the Assigned To field from the list of values.
-
Enter the organization (warehouse being planned) in the Organization field.
-
Enter Sourcing Rule in the Type field and the name of the Sourcing Rule in the Sourcing Rule/BOD field.
See Assigning Sourcing Rules and Bills of Distribution, Oracle Purchasing User's Guide.
-
Navigate to the Planner's Desktop.
The Planner's Desktop window appears displaying the Planning Parameters tab, and Planning Parameters sub tab.
-
In the Spares Planning tree of the Planner's Desktop select the warehouse being planned.
-
Select the Warehouse Parameters sub tab within the Planning Parameters tab of the Planning window.
The Warehouse Parameters sub tab appears.
-
Enter the Assignment Set for the excess warehouses in the Assignment Usable field of the Warehouse Parameters tab.
-
Save your work.
In this example through the use of Sourcing Rules and Assignment Sets two organizations, S1 and M2, have been designated as warehouses where excess will be utilized in the planning and replenishment of organization Dallas Manufacturing.
In WRP this enables the excess warehouses defined in the Sourcing Rule to be incorporated into the warehouse planning.
In the Notifications tab of the Planner’s Desktop this also enables excess inventories from the excess warehouses defined in the Sourcing Rule to be visible in the warehouse replenishment notification.
Defining Defective Warehouse Organizations
When planning the field service warehouse there might be other warehouses whose defective inventory needs to be incorporated into the planning of that warehouse. The defective inventory would be repaired and used for the replenishment of inventory in the warehouse being planned. You define the specific defective warehouses using Sourcing Rules and then link them to the warehouse being planned in Assignment Sets.
This section covers creating the Sourcing Rule and Assignment Set and linking the Assignment Set to the warehouse being planned.
Defective warehouses are used in the Warehouse Replenishment Planning module. They are also used in the replenishment functionality found in the Notifications tab of the Planner’s Desktop.
Note: Defective inventory for the purpose of planning at the primary warehouse is defined as all available inventory.
Use this procedure to set up warehouses for defective parts and then assign them to the warehouse being planned:
Prerequisites
- Set up the warehouse that is being planned as an inventory organization.
- Set up the defective warehouses as inventory organizations.
To Create a Sourcing Rule
-
Navigate to the Sourcing Rule window.
The Sourcing Rule window appears.
Note: You would create the Sourcing Rule for the organization representing the warehouse that is being planned.
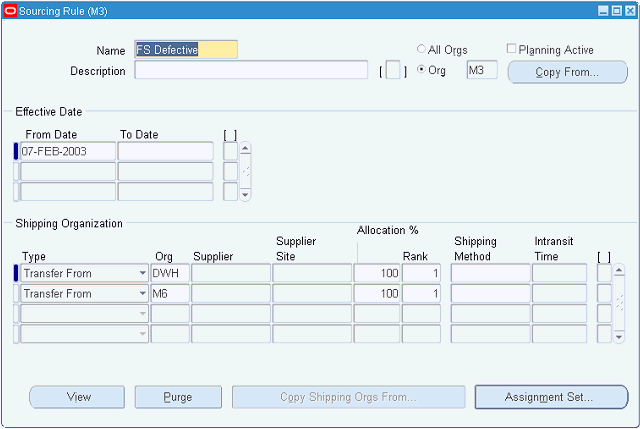
-
Enter a Sourcing Rule name.
-
(Optional) Enter a Description.
-
In the Shipping Organization region enter Transfer From as the Type. Enter the organization representing the defective warehouse where defective inventory will be utilized in the Org field.
See Defining Sourcing Rules, Oracle Purchasing User's Guide
In this example organizations DWH and M6 have been defined in the Sourcing Rule as defective parts warehouses that will be used in the replenishment planning for the warehouse.
To Create an Assignment Set and Assign the Sourcing Rule to the Primary Warehouse Being Planned
-
Navigate to the Sourcing Rule / Bill of Distribution Assignments window.
The Sourcing Rule / Bill of Distribution Assignments window appears.
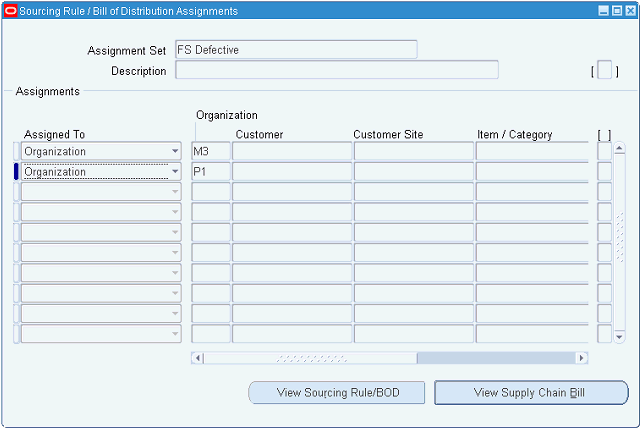
The Assignment Set is the link between the Sourcing Rule that defines the defective warehouses and the warehouse being planned.
-
Enter the Sourcing Rule name in the Assignment Set field.
-
(Optional) Enter a Description.
-
Enter Organization in the Assigned To field from the list of values.
-
Enter the organization (warehouse being planned) in the Organization field.
-
Enter Sourcing Rule in the Type field and the name of the Sourcing Rule in the Sourcing Rule/BOD field.
See Assigning Sourcing Rules and Bills of Distribution, Oracle Purchasing User's Guide.
-
Navigate to the Planner's Desktop.
The Planner's Desktop appears displaying the Planning Parameters tab, and Planning Parameters sub tab.
-
In the Spares Planning tree of the Planner's Desktop, select the warehouse being planned.
-
Select the Warehouse Parameters sub tab within the Planning Parameters tab of the Planning window.
The Warehouse Parameters sub tab appears.
-
Enter the Assignment Set for the defective warehouses in the Assignment Defective field of the Warehouse Parameters tab.
-
Save your work.
In this example through the use of Sourcing Rules and Assignment Sets two organizations, DWH and M6, have been designated as warehouses where defective parts will be utilized in the planning and replenishment of organization M3.
In WRP this enables the defective warehouses defined in the Sourcing Rule to be incorporated into the warehouse planning.
In the Notifications tab of the Planner’s Desktop this also enables excess inventories from the defective warehouses defined in the Sourcing Rule to be visible in the warehouse replenishment notification.
Defining and Assigning Internal Repair Suppliers
Repair Suppliers in the field service supply chain can be both internal and external. For internal repair suppliers that are using Oracle Depot Repair there is integration with WRP and the Notifications tab in the Planner's Desktop. That integration consists of automated execution that creates two internal orders: one into the repair depot, and one out of the depot to the warehouse being planned, and the Repair Order in Depot Repair. You define the internal repair suppliers using Sourcing Rules and then link them to the warehouse being planned in Assignment Sets.
This section covers creating the Sourcing Rule and Assignment Set and linking the Assignment Set to the warehouse being planned.
Use this procedure to set up internal depot repair suppliers:
Prerequisites
- Set up the warehouse that is being planned as an inventory organization.
- Set up the internal repair supplier as an inventory organization.
To Create a Sourcing Rule
-
Navigate to the Sourcing Rule window.
The Sourcing Rule window appears.
Note: You would create the Sourcing Rule for the organization representing the warehouse being planned.
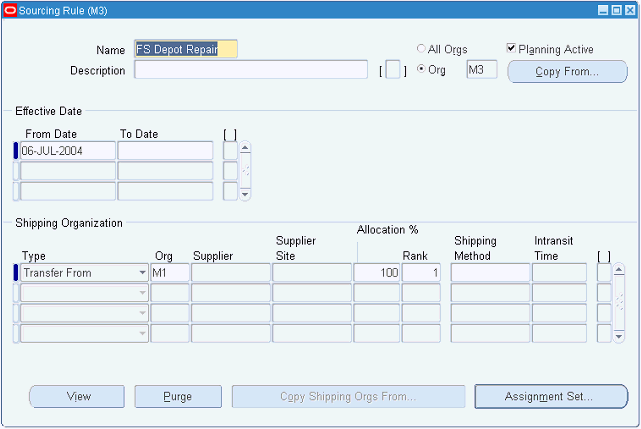
-
Enter a Sourcing Rule Name.
-
(Optional) Enter a Description.
-
In the Shipping Organization region enter Transfer From as the Type. Enter the organization representing the internal repair depot where defective inventory will be repaired and used as replenishment in the Org field.
See Defining Sourcing Rules, in the Oracle Purchasing User's Guide
In this example organization M1 has been defined in the Sourcing Rule as an internal repair supplier that will be used in the replenishment planning for the warehouse M3.
To Create an Assignment Set and Assign the Sourcing Rule
-
Navigate to the Sourcing Rule / Bill of Distribution Assignments window.
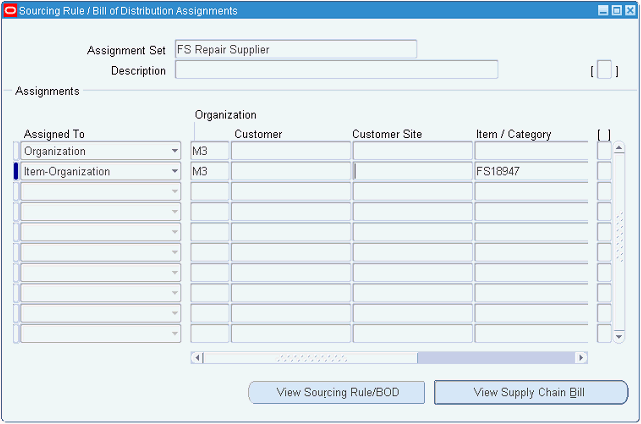
The Assignment Set is the link between the Sourcing Rule that defines the internal repair suppliers and the warehouse being planned.
Note: You can use the same Assignment Set for other Sourcing rules that define sourcing for external repair. For information on external repair, see Setting Up External Repair Execution.
In this example the Sourcing Rule has been assigned to the organization M3 and also specifically to the item FS18947 at M3.
See Assigning Sourcing Rules and Bills of Distribution, Oracle Purchasing User's Guide.
-
Navigate to the Planner's Desktop.
The Planner's Desktop appears displaying the Planning Parameters tab, and Planning Parameters sub tab.
-
In the Planner's Desktop, select the warehouse being planned in the Planning Tree.
-
Click the Warehouse Parameters sub tab within the Planning Parameters tab of the Planning window.
The Warehouse Parameters sub tab appears.
-
Enter the Assignment Set for the repair sourcing in the Depot Repair Suppliers field of the Warehouse Parameters tab.
-
Save your work.
In this example organization M1 has been defined in the Sourcing Rule as an internal repair supplier that will be used to repair defective parts in the replenishment planning for the warehouse M3.
In WRP this enables the Repair Suppliers defined in the Sourcing Rule to be incorporated into the warehouse planning.
In the Notifications tab of the Planner’s Desktop this also enables execution automation for internal repair suppliers.
Defining and Assigning Planned Order Release Automation Business Rules
Planned Order Release Automation business rules are used by Warehouse Replenishment Planning in Spares Management to automate the creation of actual orders from planned orders without user intervention.
Warehouses in the Field Service supply chain are in a constant need of replenishment. Large numbers of planned orders from the planning system are often required in the replenishment process. Planned Order Release Automation business rules enable planners to automate the more routine planned orders giving them more time to focus on the exceptions.
The Create Warehouse Replenishment Data concurrent program uses the Order Automation business rules defined for each supply type to create the actual orders from the planned orders.
The Order Automation business rules should be used to automate the lower value planned orders that have a good forecast. The business rule parameters are based on planned order value and the tracking signal that measures forecast error.
To understand more details of the automation process, see Overview: Planned Order Release Automation, Oracle Spares Management User Guide
Order Automation Business Rule Parameters
For each Order Automation business rule, parameters for each supply type (excess, repair, and new-buy) can be defined. All applicable parameters must be met for the planned order to be automated. For example, if the value limit was met but the tracking signal or lead time parameter was not met, then the planned order will not be automated by the system.
This table describes the different parameters:
| Parameter | Description |
|---|---|
| Value Limits | Dollar value of a planned order. If the actual value of the planned order is less than the Value Limit, then the planned order will be a candidate for automation based on that parameter. Define this parameter by internal and external for each supply type. (Actual value = Planned Order Quantity x Cost) Parts with zero cost will be excluded from automation. |
| Tracking Signal | Measure of forecast error for the part being planned. If the actual tracking signal fell within the minimum and maximum parameters, then the planned order would be a candidate for automation based on that parameter. Define this parameter by internal and external for each supply type. |
| Lead Time | The Need date of a planned order falls inside of the lead time or outside of the lead time. Using the lead time parameter, the planner could select for automation only those orders inside of lead time or outside of lead time or both. Define this parameter by internal and external for each supply type. |
To Set Up Order Automation Business Rules
Use this procedure to set up Order Automation business rules:
-
Navigate to the Order Automation Rules window.
The Business Rules window appears displaying the Forecast Rules tab.
-
Select the Order Automation Rules tab.
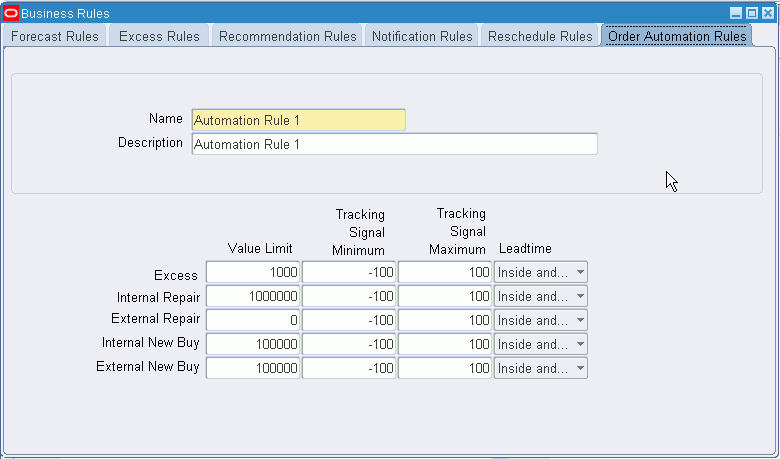
The Business Rules window appears displaying the Order Automation Rules tab.
-
Enter a rule name in the Name field.
-
(Optional) Enter a description in the Description field.
-
(Optional) Enter the Internal and External Value Limit for the Repair and New-Buy supply types, and the Value Limit for the Excess supply type.
Excess External Value Limit is not applicable.
The Value Limit must be a whole positive number and can be up to 12 characters long.
-
(Optional) Enter the Minimum and Maximum Tracking Signal values for the Excess, Repair, and New-Buy supply types.
The Minimum Tracking Signal value must be a negative number and can be up to 8 characters long.
The Maximum Tracking Signal value must be a positive number and can be up to 8 characters long.
-
(Optional) Select the lead time parameter for the Excess, Repair, and New-Buy supply types. Values are Inside, Outside, or Inside and Outside.
-
Save your work.
To Assign an Order Automation Business Rule to a Warehouse Being Planned
After the Order Automation business rule has been created, it can be assigned to a warehouse that will be planned in Warehouse Replenishment Planning. When the Create Warehouse Replenishment Data concurrent program is run it will use the business rule to create the actual orders from the planned orders.
Use this procedure to assign an Order Automation business rule to a warehouse:
-
Navigate to the Planner's Desktop.
The Planner's Desktop appears displaying the Planning Parameters tab, and Planning Parameters sub tab.
-
In the Spares Planning tree select the warehouse being planned.
-
Select the Warehouse Parameters sub tab within the Planning Parameters tab of the Planning window.
The Warehouse Parameters sub tab appears.
-
Select the order automation business rule in the Order Automation Rule field.
-
Save your work.
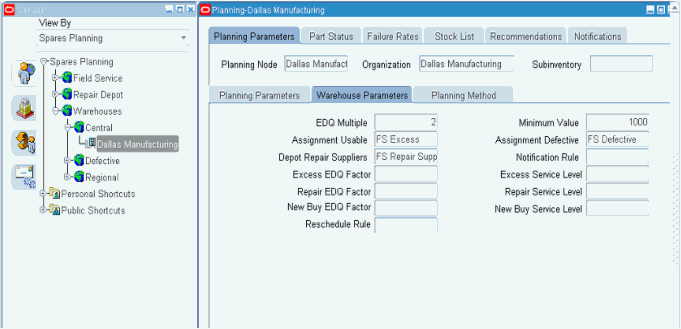
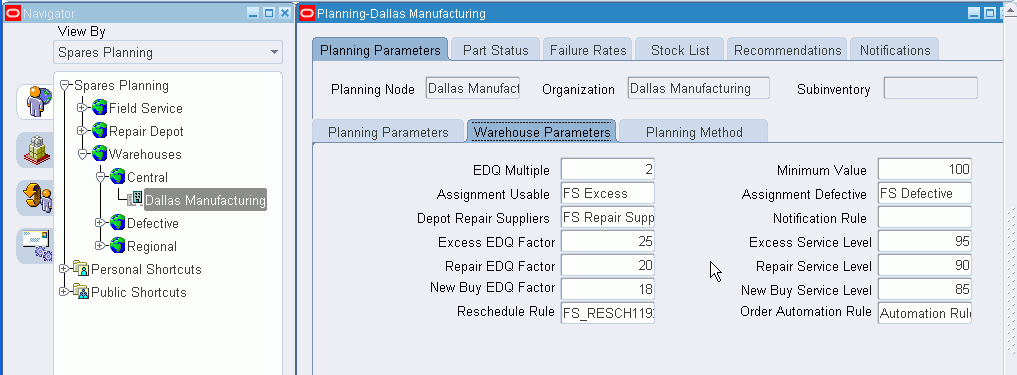
Setting Up Other Warehouse Planning Parameters
Other warehouse planning parameters include Economic Delivery Quantity (EDQ) Factor and Service Level parameters by supply type. Planning parameters by supply type enable the planner to adjust the planning result depending on the supply type being used: excess, repair, or new-buy. Other parameters also include parameters for defining Excess On-order: EDQ Multiple and Minimum Value.
The planning parameters covered in this section act as Warehouse Replenishment Planning (WRP) defaults. In the WRP window, the planner can set unique parameters at the part and warehouse level if necessary.
To set up the Reschedule Rule, see Setting Up Reschedule Rules.
See also, Specifying Planning Parameters for a Warehouse Organization, Oracle Spares Management User Guide.
Use this procedure to set up other warehouse planning parameters:
Steps
-
Navigate to the Planner's Desktop.
The Planner's Desktop window appears.
-
From the Spares Planning Tree, select the warehouse organization.
The adjacent Planning Parameters and Warehouse Parameters windows provide details of the planning tree node (warehouse) that you selected.
-
Select the Warehouse Parameters sub tab.
The Warehouse Parameters tab displays fields for the EDQ Multiple and Minimum Value for excess on order. Also included are Service Level, and EDQ Factor by Supply Type.
-
EDQ Multiple: This value is used to define the Excess Limit in the excess on-order recommendation in WRP and the Notifications Tab in the Planner's Desktop. The Excess On-Order Limit is equal to the Reorder Point (ROP) plus the EDQ Multiple times the EDQ.
-
Minimum Value: Excess on-order recommendations are created when on-hand plus on-order quantities exceed the excess on-order limit, and the value of the excess on-order is in excess of the Minimum Value which is expressed in the currency value.
The Minimum Value is used in WRP and the Notifications tab of the Planner’s Desktop.
-
Service Level by Supply Type: Expressed as a percentage, the service level is used along with the EDQ to calculate the safety stock quantity. The service level defines on a planned basis the desired percent of demand filled when needed.
Service Level by supply type is only used in WRP.
-
EDQ Factor by Supply Type: This factor is used in calculating the EDQ. The EDQ Factor combines both ordering costs and carrying costs in the EDQ calculation to determine the delivery quantity.
EDQ Factor by supply type is only used in WRP.
EDQ varies directly with the EDQ Factor. Increasing the EDQ Factor produces a larger calculated EDQ and vice versa.
-
-
To change any of these values, enter a different number in the appropriate field for the supply type.
-
Save your work.
Defining Planning Parameters to Create Min-Max levels for a Warehouse or Technician
Service Level, Economic Delivery Quantity (EDQ) Factor, Forecast Method, and Forecast Rules are required to create Min-Max level recommendations for the technician or warehouse in the Planner’s Desktop. A recommendation rule is optional, but can be used to identify and automate the more routine Min-Max recommendations.
Use this procedure to specify planning parameters for a warehouse or technician:
Steps
-
Navigate to the Planner's Desktop.
The Planner's Desktop window appears.
-
Select a technician (sub-inventory) or warehouse (organization) from the Spares Planning Tree and select the Planning Method sub tab.
-
Select a Planning Method.
Personal Usage: For a technician, this is the activity history based on the Forecast Rule for the sub-inventory assigned to the technician. For a warehouse, this is the activity history based on the Forecast Rule rolled up from the technicians sourced to the warehouse and the activity at the warehouse. The activity history and Forecast Rule will be used to create a forecast that is used to create the Min-Max levels.
Territory Norm: Used for a new or transferred technician. The activity forecast is based on a consolidation of the activity for all technicians tiering into a node in the Planning Tree. Territory Norm is not used to plan warehouses.
Product Norm: Based on product populations and failure rates defined in the Failure Rates tab. Product Norm is used for new product introductions or to plan for a product population change.
Personal Usage and Product Norm: A combination method with weighting factors to determine the blend from each method.
Personal Usage and Territory Norm: A combination method with weighting factors to determine the blend from each method.
-
Select the Planning Parameters sub tab and enter Forecast Rule, Recommendation Rule, Service Level, and EDQ Factor.
-
See Setting Up Other Warehouse Planning Parameters for an understanding of Service Level and EDQ.
-
See Defining Forecast Rules for a better understanding of forecasting.
-
-
Save your work.
Setting Up Lead Times for Warehouse Replenishment Planning
Lead Time is the period of time between recognizing that an order needs to be created and receiving the order at the warehouse being replenished. Warehouse Replenishment Planning (WRP) uses different lead times to plan each of the three supply types: Excess, Repair, and New-Buy.
Excess Lead Time
You define lead times for the Excess supply type using the Intransit Time column for the Shipment Methods listed in the Inter-Org Shipping Network window.
To Define Excess Lead Time:
-
Navigate to the Shipping Networks window.
The Shipping Network is defined by the organization representing the Excess Warehouse as the Ship From and the organization representing the warehouse being planned as the Ship To.
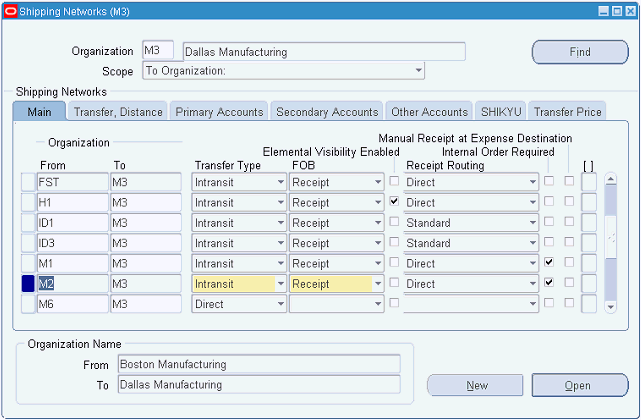
-
Select a row for an Organization from-to combination.
-
Navigate to the Inter-Org Shipping Networks window.
The Inter-Org Shipping Networks window appears.
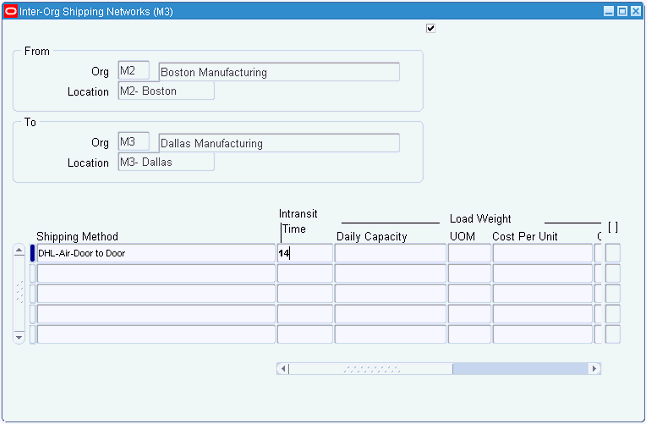
-
Enter the Intransit Time (lead time) expressed in days for the Shipping Method.
Note: Make sure one of the Shipping Methods is designated as the default. WRP uses the lead time from the default Shipping Method to define the lead time for Excess planning.
In this example the lead time from the excess warehouse or M2 to the warehouse being replenished or M3 is 14 days.
New Buy Lead Time
You define the lead times for the New-Buy supply type for the item and organization in the Lead Times tab of the Organization Item window.
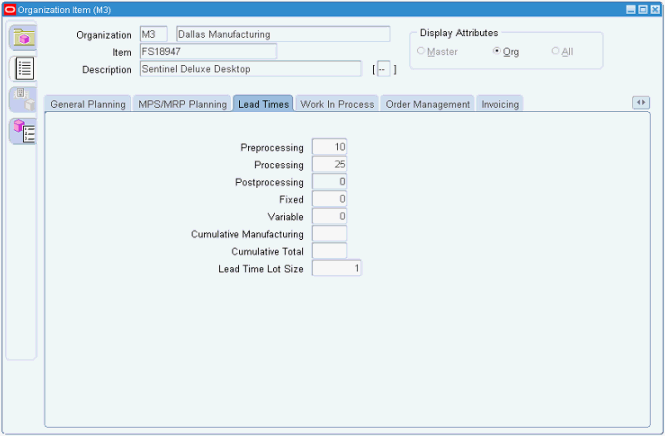
The new-buy lead time, expressed in days, is equal to the sum of pre-processing, processing, and post-processing or 35 days in the example shown above.
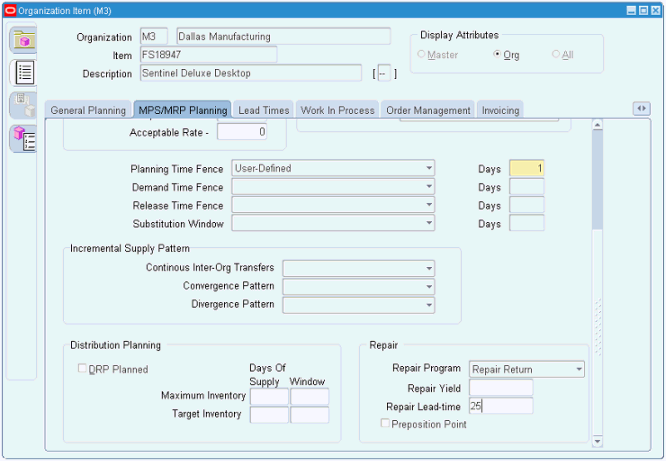
Repair Lead Time
The lead times for the Repair supply type are divided into three legs. These legs are:
-
Leg 1: In-transit time for defective parts from the defective warehouse to the depot repair supplier.
-
Leg 2: The period of time from the receipt of defective parts at the depot repair supplier to the shipment from the depot repair supplier.
-
Leg 3: In-transit time for repaired parts from the depot repair supplier to the Field Service warehouse being replenished.
You define Leg 1 and Leg 3 lead times in the Intransit Time column for the Shipment Method row on the Inter-Org Shipping Network window.
This process is identical to defining the Excess Lead Time. See Defining Excess Lead Time.
Note: Make sure you designate one of the Shipping Methods as the default. WRP uses the lead time from the default Shipping Method.
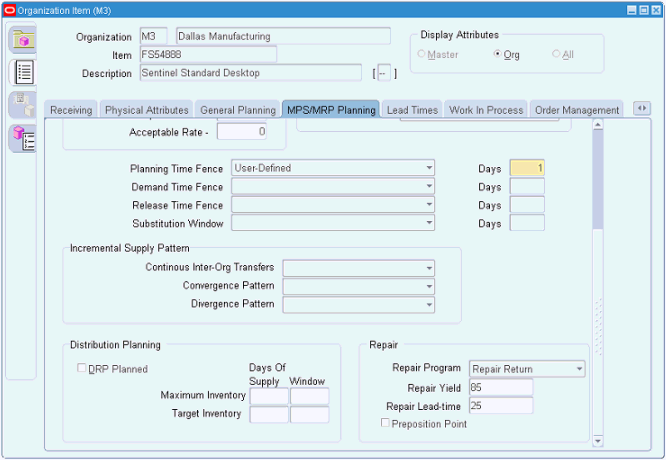
You define Leg 2 lead times for the item and organization in the Repair Lead-time field within the Repair region of the MPS/MRP Planning tab of the Organization Item window. The Organization is the Repair Supplier organization.
Setting Up External Repair Execution
Repair suppliers in the field service supply chain can be both internal and external. External Repair Execution (ERE) is integrated into Warehouse Replenishment Planning (WRP) and provides automated functionality to execute repair at an external repair supplier and replenish the field service warehouse with repaired parts based on need.
You define the specific external repair suppliers using Sourcing Rules and then link them to the warehouse being planned in WRP in Assignment Sets.
This section covers creating the Sourcing Rule and Assignment Set and linking the Assignment Set to the warehouse being planned in WRP.
Repair Suppliers and Inventory Organizations
In External Repair Execution each repair supplier needs to be modeled as an inventory organization in Inventory and a Supplier in Purchasing. The supplier is assigned to the organization in Oracle Inventory.
To set up inventory organizations and assign the supplier to the organization, see the Inventory Structure chapter in the Oracle Inventory User's Guide.
To set up suppliers in purchasing, see the Supply Base Management chapter in the Oracle Purchasing User's Guide.
Sourcing Rules and Assignment Sets
Create a Sourcing Rule for organizations where external repair suppliers will be used for the replenishment of the warehouse being planned.
Navigate to the Sourcing Rule window for the organization used for the warehouse being planned by WRP.
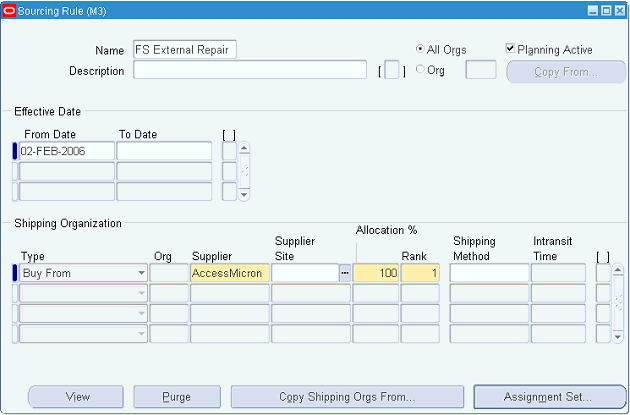
See Defining Sourcing Rules, Oracle Purchasing User's Guide.
Note: Use the same Assignment Set used for Sourcing Rules that define sourcing for internal repair.
See Defining and Assigning Internal Repair Suppliers.
Defective Warehouses
When planning the field service warehouse there may be other warehouses whose defective inventory needs to be incorporated into the planning of that warehouse. The specific defective warehouses are defined using Sourcing Rules and linked to the warehouse in Assignment Sets. Defective inventory for the purpose of planning at the primary warehouse is defined as all available inventory.
See Defining and Assigning Excess and Defective Warehouses and Repair Suppliers.
Shipping Networks and Shipping Methods
External Repair Execution (ERE) utilizes both shipping networks and shipping methods.
Shipping Networks
ERE requires that a shipping network be defined for the defective warehouse to the repair supplier. This shipping network is a prerequisite to processing an internal order between the two organizations.
Another shipping network is required between the repair supplier and the field service warehouse being replenished in WRP. This shipping network along with the method of shipment is used to create the in-transit lead time from the repair supplier to the warehouse.
Navigation: Inventory > Setup > Organizations > Shipping Networks
See Defining Inter-Organization Shipping Networks, Oracle Inventory User's Guide.
Shipping Methods
ERE requires that at least one shipping method is defined for the defective warehouse to the repair supplier. When more than one method is defined, ERE will use the default to determine the in-transit time to the repair supplier from the defective warehouse.
Another shipping method is required between the repair supplier and the field service warehouse being replenished. When more than one method is defined ERE will use the default to determine the in-transit time to the repair supplier from the defective warehouse.
Navigation: Inventory > Setup > Organizations > Shipping Networks > (M) Tools > Shipping Method
See Defining Shipping Methods, Oracle Inventory User's Guide.
Repair Parameters
Repair parameters for a particular item appear on the MPS/MRP Planning tab of the Inventory Organization Item window. The parameters define the repair program name, the repair yield percentage, the repair lead time in days, and indicate whether an inventory of defective parts is pre-positioned at the repair supplier to reduce in-transit time.
See Setting Up Repair Parameters.
Profiles
The values set in the CSP: Repair Supplier Organization's Defective Subinventory profile option and the CSP: Repair Supplier Organization's Usable Subinventory profile option define the names used for those subinventories.
See Setting Profile Options for External Repair Execution.
See also the Profile Options Appendix in the Oracle Field Service Implementation Guide.
Setting Up Repair Parameters
Use this procedure to set up repair parameters for the inventory item:
Prerequisites
- Set up the item in Inventory for the repair part.
Steps
-
Navigate to the Organization Item window.
The Organizations window appears.
-
In the Organizations window, select the repair supplier organization. Click OK.
The Find Organization Items <Org> window appears.
-
Select the item in the Find Organization Items window.
The Organization Item <Org> window appears.
-
Select the MPS/MRP Planning tab.
The MPS/MRP Planning tab appears. Scroll down to the Repair region.
-
In the Repair region:
-
Select the Repair Program from the list of values.
The repair program will appear on the repair purchase requisition. The repair program will determine the process used to execute the repair activity at the repair supplier.
For example: Repair and Return, Exchange, or Advance Exchange.
-
Enter the Repair Yield. This is the average percentage of defectives sent to the repair supplier that can actually be repaired.
-
Specify the Repair Lead Time, in days.
This lead time represents the internal processing time at the repair supplier. This lead time, along with the in-transit time to the repair supplier and the in-transit time from the repair supplier determines the total repair lead time for planning purposes. Repair lead time is used to determine the release date for the planned repair order.
For information on setting up repair lead times, see Setting Up Lead Times for Warehouse Replenishment Planning.
-
Optionally, select the Preposition Point check box to indicate whether the defective parts will be pre-positioned in inventory at the repair supplier.
-
-
Save your work.
Setting Profile Options for External Repair Execution
External Repair Execution requires the set up of two sub-inventories for each external repair supplier organization. The sub-inventories are used for automation of transactions at the repair supplier. The first sub-inventory is used to receive defective parts at the external repair supplier from the defective warehouse. The second sub-inventory is used to receive the repaired parts after the WIP order has been completed.
See also the Profile Options Appendix in the Oracle Field Service Implementation Guide.
Use this procedure to set up site profile options for External Repair Execution:
Steps
-
Navigate to the System Profile Values window.
The Find System Profile Values window appears.
-
In the Profile field enter CSP:%. Click Find.
The System Profile Values window appears displaying the CSP: profile options in alphabetical order.
-
Scroll to the CSP: Repair Supplier Organization's Defective Subinventory profile option. In the Site column, enter the name for the defective sub-inventory at the repair supplier organization.
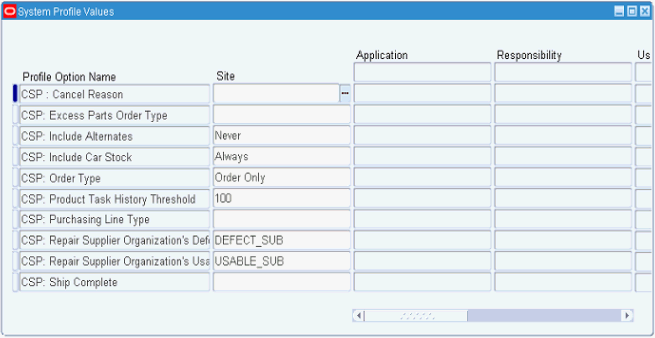
-
At the CSP: Repair Supplier Organization's Usable Subinventory profile option, in the Site column, enter the name for the usable sub-inventory.
-
Save your work.
Setting Up Parts Search and Ordering Profile Options
To use Parts Search and Ordering, set the following profile options in Spares Management:
-
CSP: Part Sourcing Method
-
CSP: Part Sourcing Method for Scheduler