Performing an Installation
Rapid Install offers two options for a new installation: a standard installation, which involves creating a new system using system-specific configuration parameters, and an Express installation, where Rapid Install supplies default values for many parameters, requiring only a few to be supplied by the user carrying out the install.
This chapter covers the following topics:
Standard Installation
This section describes the setup steps for a standard installation, where the user supplies various system-specific parameters. An Express installation is described in Setting Up an Express Installation.
Follow the instructions in the section Before You Begin in Getting Started. Then complete the following tasks, which are grouped into logical sections.
Important: You need to carry out the relevant steps on every node that will be part of your Oracle E-Business Suite system: for example, a database node and two Applications nodes. Where applicable, operations should always be carried out on the database node first.
Describe System Configuration
-
Start the Rapid Install wizard
Start the wizard from the command line by entering rapidwiz at the prompt. The Welcome screen lists the database and the technology stack components that are installed with Oracle E-Business Suite.
Welcome Screen
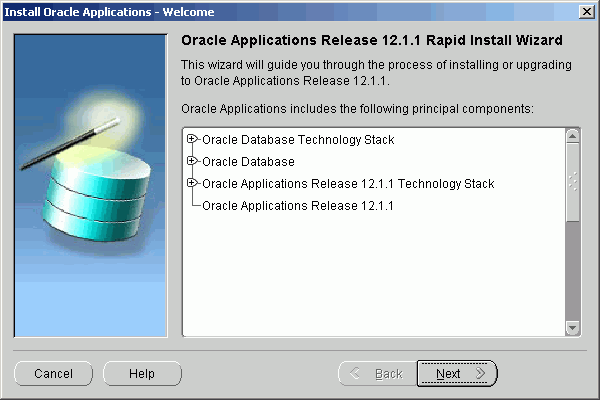
This screen lists the components that are included in, or supported by, this release of Oracle E-Business Suite. You can expand the component lists, using the scroll bar to bring all the components into view.
A new installation includes a fresh Oracle 11g Release 1 (11gR1) database. In an upgrade, Rapid Install creates an Oracle 11gR1 database Oracle Home without a database. You can use this Oracle Home to upgrade or migrate your existing database to Oracle 11gR1.
Note: See Oracle E-Business Suite Upgrade Guide: Release 11i to Release 12.1.1.
This screen is for information only. No decisions need to be made. When you have reviewed the information, click Next to continue.
-
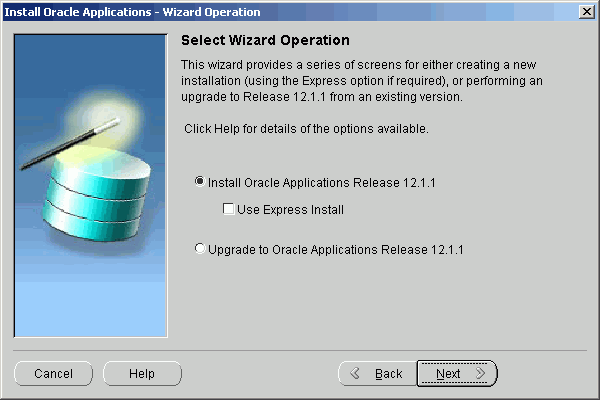
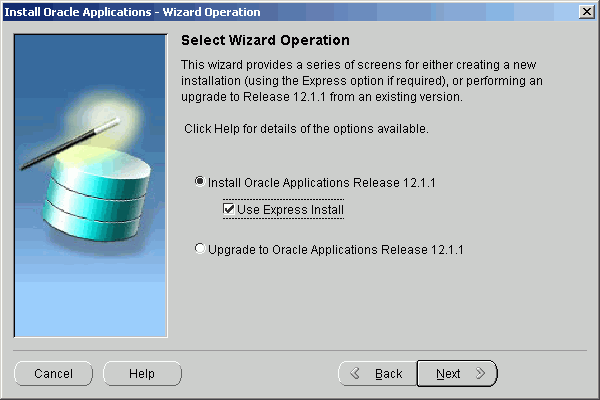
Use the Select Wizard Operation screen to indicate the action you want Rapid Install to perform. You begin both new installations and upgrades from this screen. Based on the action you choose, the Rapid Install wizard continues with the appropriate screen flow.
Select Wizard Operation - Install Oracle Applications Release 12.1.1
The available actions are as follows:
-
Install Oracle Applications Release 12.1.1
This action sets up a new, fully configured system, with either a fresh database or a Vision Demo database. The configuration is derived from the system-specific configuration parameters you will enter in the Rapid Install wizard and save in the Oracle E-Business Suite database (conf_<SID>.txt file initially, until the database has been created).
-
Express Configuration
This install option sets up a fully configured, single-user system with either a fresh database or Vision Demo database. You supply a few basic parameters, such as database type and name, top-level install directory, and choice of port pool. The remaining directories and mount points are supplied by Rapid Install using default values.
Note: The steps in Setting Up an Express Installation in this chapter describe this option.
-
Upgrade to Oracle Applications Release 12.1.1
Choose this option to indicate that you are upgrading your E-Business Suite products to the current version of Oracle E-Business Suite. The wizard screen flow presents two paths: one that lays down the file system and installs the new technology stack, and one that configures servers and starts services.
Note: See Performing an Upgrade to learn how Rapid Install works during a system upgrade.
Using the following steps, you will set up a new installation. Choose Install Oracle Applications Release 12.1.1 and then click Next to continue.
-
-
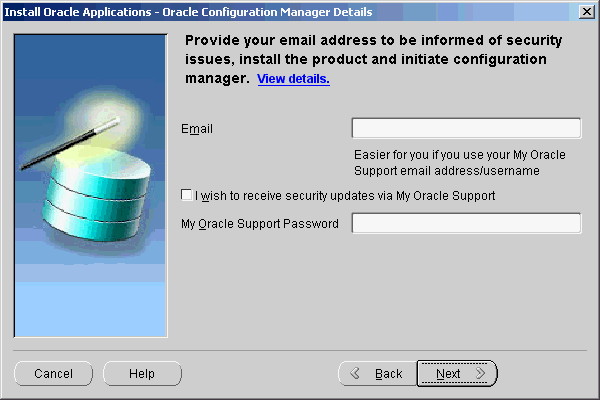
Supply Oracle Configuration Manager details
Oracle Configuration Manager (OCM) is a component that is designed to facilitate support for your Oracle products. Use of Oracle Configuration Manager is optional, but recommended.
A lightweight agent that consumes minimal CPU resources, OCM supports automatic discovery of installed components and configuration information, and provides continuous tracking of key Oracle and system statistics of the machine it is running on.
Data collected is sent via HTTPS (secure HTTP) to Oracle Support, who can thereby maintain an up-to-date view of your Oracle installation, facilitating pro-active problem avoidance and helping to reduce the time needed for resolution of support issues.
Note: For further details of OCM, click the View details link on the OCM screen.
Specify Oracle Configuration Manager Details
If submission of your details fails because no connection can be made, you are presented with a pop-up screen prompting for proxy server information:
Oracle Configuration Manager Proxy Server [Shown After Failed Connection Attempt]
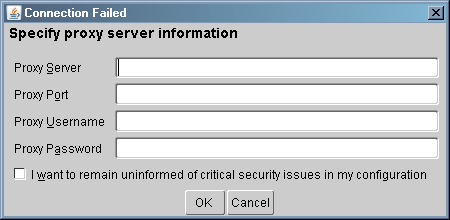
If this screen appears, respond appropriately and then click OK.
-
Identify configuration file
On the Configuration Choice screen, you indicate whether you will be using previously saved configuration details.
Configuration Choice

If you choose Create a new configuration , Rapid Install saves the configuration parameters you enter on the wizard screens in the Oracle E-Business Suite database, and in a configuration file (conf_<SID>.txt), which is stored in your system temporary directory until the installation is completed.
If you choose Load the following saved configuration, the database connect string field becomes active. For a configuration stored in the database, this field is made up of <hostname>:<SID>:<database port>, for example appserv2.company.com:VIS:1521.
Important: The host name must include the domain.
Enter the appropriate database connect string (or conf_<SID>.txt file location, if applicable) to point Rapid Install to a stored configuration whose parameters you wish to use. Typically, you would choose this option when performing a multi-node install, or when restarting Rapid Install after an interruption to the installation process.
Note: See Restart the Installation.
Because this is a new installation, choose Create a new configuration, then click Next to continue.
-
Specify Global System Settings
On the Global System Settings screen, you indicate whether you want to accept the default port values. You can specify a Port Pool setting to enable multiple Oracle E-Business Suite environments to co-exist on the same machine.
For example, if you select an increment of 3 from the Port Pool list, the values in the Derived Port Settings will reflect this choice. Use the scroll bar or click Advanced Edit to see the Port Values screen.
Global System Settings
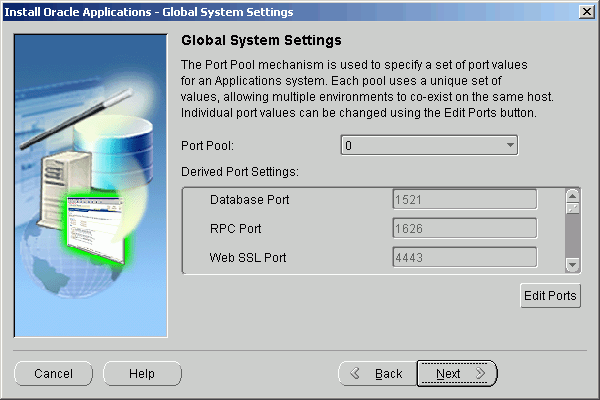
The default value of the Port Pool set is zero, but you can customize it by selecting another value from the drop-down list in the Port Pool field. There are 100 port pool selections: if you select an increment of 3, the default values are increased by that value. The Database Port (1521) becomes 1524, the RPC Port (1626) becomes 1629, and so on.
At this point, you can simply accept the values for the chosen Port Pool (and therefore individual ports) by clicking Next. This will suffice for many installations.
Otherwise, you can add an extra level of sophistication by specifying individual port values to meet particular site-specific requirements, over and above the basic use of the Port Pool mechanism described above. For example, you might wish to avoid using a particular port for some reason, perhaps because it will be needed by some other software. Clicking on the Edit Ports button will open a screen that allows you to specify the values of any ports you wish.
Port Values
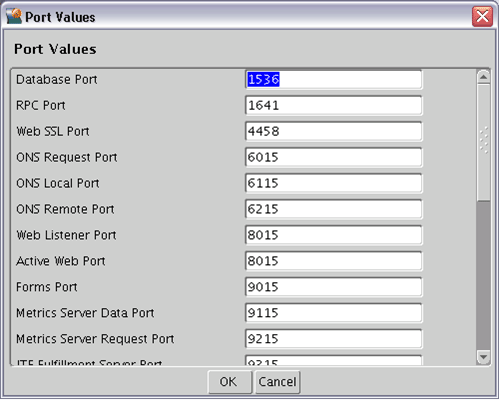
When finished on this screen, click OK to return to the Global System Settings screen, and click Next on that screen.
-
Define Database Node Configuration
On the Database Node Configuration screen, indicate the kind of database you want to install in the new system, the name you will use to identify it, the machine on which it will run, and that machine's domain name. You then need to confirm the operating system shown on the drop-down list is correct, specify the Oracle user's operating system account name and group, and finally specify the base directory under which the installation is to take place.
Database Node Configuration
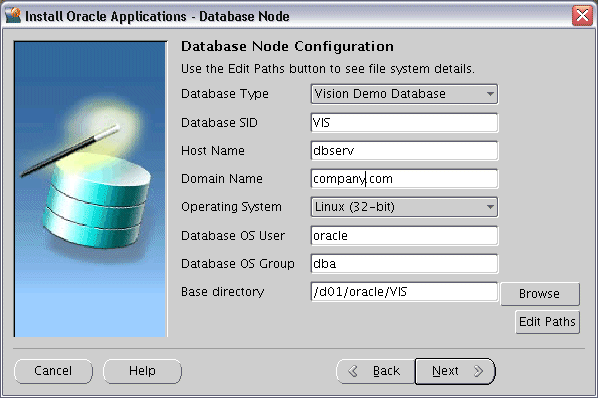
You can install either a fresh database or a Vision Demo database.
-
A fresh database is fully configured and ready to be used for a new implementation. This type of database is suitable for any type of system that requires a fresh database, such as a production system or test system. The default name for a production database is PROD. If you are installing a database for another use, for example as a test system or a backup system, choose the Fresh Database option and enter a database name that reflects its purpose, for example TEST.
-
A Vision Demo database is used for demonstration or training purposes. It contains a fully configured Oracle E-Business Suite system that has been implemented and populated with a set of transactions for a fictitious company. The Vision Demo database is set up for multiple-organization use. It is installed with the AL32UTF8 character set to maximize the support for character sets in this release. The default database name is VIS.
In this example, use the Database Type drop-down list to select a fresh database. Accept the default database name or type in another name (alphanumeric, not to exceed 8 characters in length, with no spaces) for the local instance. This name is often referred to as the database SID.
The Database Install Information screen prompts you for information Rapid Install needs to set up and install the database.
The Base directory field defaults to a sample directory name, using the operating system syntax for the machine where you started the Rapid Install wizard. This directory is the top-level directory that Rapid Install uses to derive the mount points associated with the RDBMS.
The Database OS User is the account that will own the database technology stack and file system. Enter the name of the Database OS Group. The Database OS User may belong to other groups, but it must belong to this group.
If you wish to search the file system for a suitable base directory, click Browse to open a navigation window.
Choose Directory
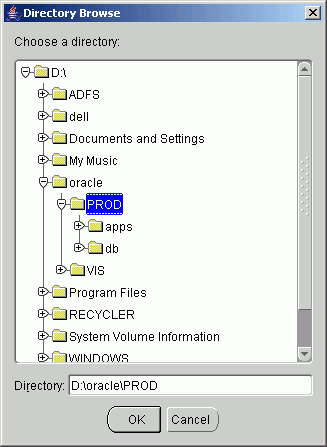
On this screen, click on a suitable folder, or type a path in the Directory field. Click OK to confirm your choice and return to the Database Node Configuration screen, or click Cancel to return without making a selection.
After returning to the parent screen, then click Next to continue with the install.
-
-
Select product license type (Fresh Database installation only)
When installing a fresh database (not a Vision demo database), the wizard prompts you to indicate the type of licensing agreement you have purchased from Oracle. It then presents the appropriate licensing screen.
Completing a licensing screen does not constitute a license agreement. It simply registers your products as active. The only way to set up a license agreement is to purchase Oracle E-Business Suite products through the Oracle Store or an Oracle sales representative. You should have complete information about your product license before you complete the licensing screens.
Select Licensing Type
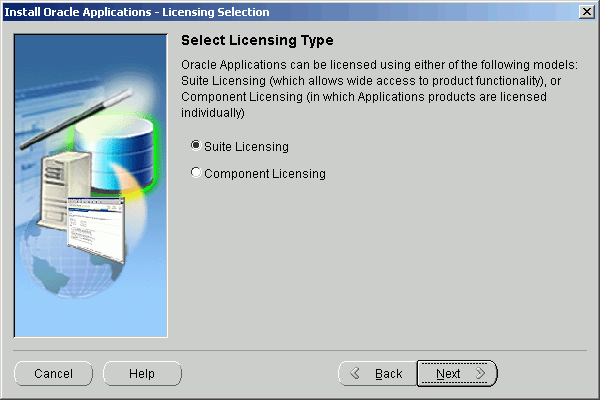
Rapid Install installs all products regardless of their licensed status. However, you must register products you have licensed so that they are flagged in the system as active. An active flag marks products for inclusion in patching and other tasks that you will perform to update and maintain your system after the initial installation.
Note: Rapid Install automatically installs and registers shared and dependent products for you.
You can register products using either the Suite license model or the Component license model. Complete only one of these licensing screens, to match your licensing agreement.
If you clicked the Suite licensing option on the Suite Selection screen, the Licensing Page for that option appears.
License Additional Products
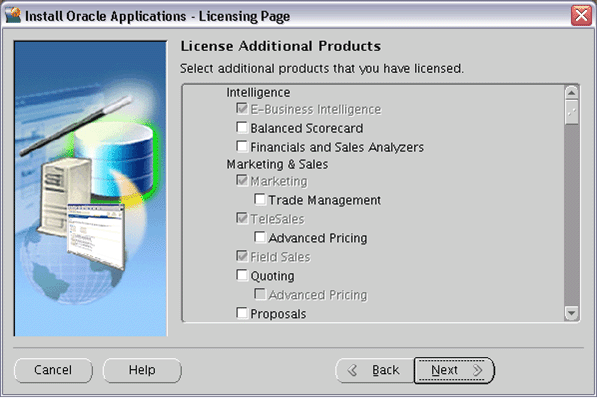
This licensing model allows wide access to Oracle E-Business Suite functionality. By choosing it, you tell Rapid Install to automatically register all products included in the Oracle E-Business Suite price bundle. The products that are checked and grayed are licensed automatically as a part of the suite. The ones that are not must be registered separately as additional products — they are not part of the E-Business Suite price bundle. Place a check mark next to any additional products you have licensed and want to register.
If you clicked the Component licensing option on the Suite Selection screen, the Licensing Page for that option appears.
License Products
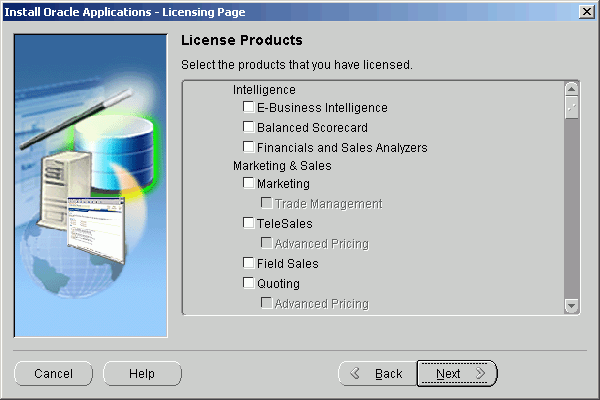
Choose this option if your licensing agreement is for individual Oracle E-Business Suite component products. These products are licensed based on the number of authorized users or on the number of business transactions processed. All individual products are listed on this screen. Products that are grayed out cannot be selected unless the "parent" component is selected.
Note: To register additional products after the initial installation, use the License Manager component of Oracle Applications Manager. For more details, see License Manager in Oracle E-Business Suite System Administrator's Guide - Maintenance.
Complete the appropriate licensing screen and click Next to continue.
-
Select Country-Specific Functionality (Fresh Database installation only)
Some systems require the country-specific functionality of a localized Oracle E-Business Suite product. For example, if your company operates in Canada, products such as Human Resources require additional features to accommodate the Canadian labor laws and codes that differ from those in the United States. You register the name of the region associated with the localized product on the Select Country-specific Functionalities screen.
If your company operates only in the United States, you can bypass this screen. If you begin doing business in another country at a later date, you can use License Manager to register the associated region at any time after the original installation or upgrade.
Select Country-Specific Functionalities - Initial Screen
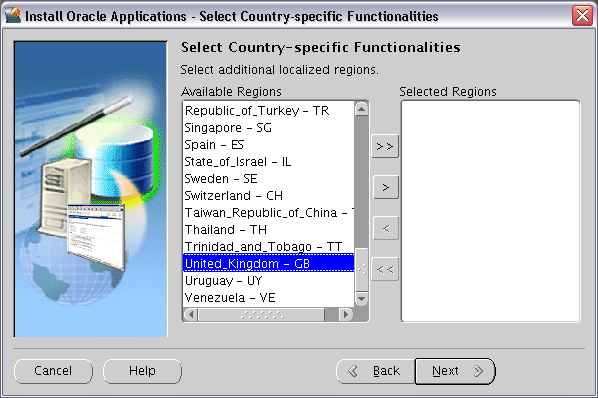
All the country-specific functionalities that Oracle supports are listed on this screen, arranged alphabetically. Double-click a region in the Available Regions box to move it into the Selected Regions box or highlight it and click the right arrow (>). To deselect a region, highlight it and double-click or click the left arrow (<) to remove it from the Selected Regions box.
For example, if you select Canada, the screen would look like this.
Select Country-Specific Functionalities - Subsequent Screen
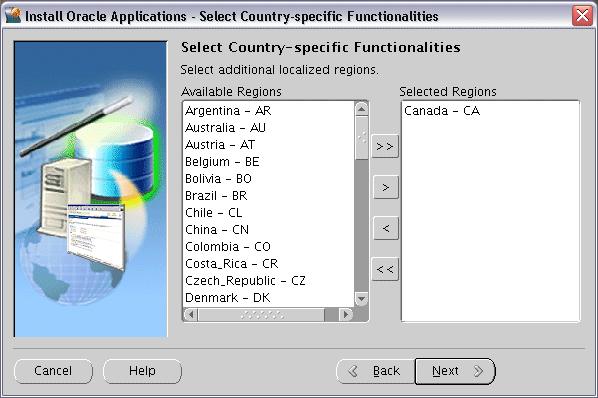
To select or deselect all the regions and move them between boxes in a single action, use the relevant double arrows, >> or <<.
After making your selection, click Next to continue.
-
Select Internationalization Settings (Fresh Database installation only)
American English is the only language installed in your system by default. However, Oracle E-Business Suite supports numerous other languages. These can be activated using License Manager (part of Oracle Applications Manager), and installed after the initial Release 12.1.1 installation is complete.
Note: For further details, refer to Adding and Maintaining Languages in Oracle E-Business Suite Maintenance Procedures.
Select Internationalization Settings
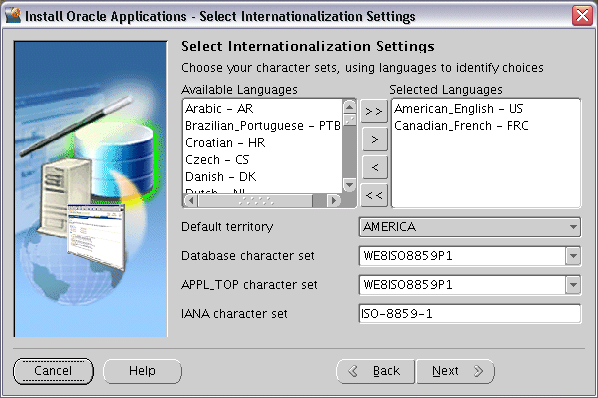
The languages you select help determine to the available options for the other NLS-related configuration parameters (such as territory and character set) that your system requires and can support.
Note: See Globalization Support in Oracle E-Business Suite Concepts.
Double-click a language in the Available Languages box to move it into the Selected Languages box or highlight it and click the right arrow (>). Highlight a language in the Selected Languages box and click the left arrow (<) to remove it. The example shows Canadian French selected as an additional language. To select or deselect all languages in a single action, use the double arrows, >> or <<.
Note: You cannot remove American English from the Selected Languages box.
Languages are no longer licensed using Rapid Install; instead, use License Manager (part of Oracle Applications Manager) to license languages. To install new languages after Rapid Install is complete, refer to Adding and Maintaining Languages section in Oracle E-Business Suite Maintenance Procedures.
Click Next to continue.
The NLS language and territory settings are stored as profile options in the database. They are configured at the site level when you run Rapid Install. The base language is used for the default language setting and the default territory is used for the territory profile option. Users inherit these values the first time they log in via the Oracle E-Business Suite Home Page.
The base language defaults to American English. If you choose additional languages on the Select Additional Languages screen, they appear in the Selected Languages box. In this example, the choices are American English and Canadian French.
Rapid Install does not set RDBMS date and numeric formats during installation. It uses default formats based on the territory profile setting (as derived from NLS_LANG). The Default Territory is AMERICA at the site level. Enter a new value, as needed, based on your user requirements.
The "Database character set" and the "APPL_TOP character set" drop-down menus initially show US7ASCII as the default character set. Other compatible character sets are listed as well.
Note: AL32UTF8 is the default character set for the Vision Demo database and the APPL_TOP. You cannot convert either of these character sets. Additional setup steps may be required for systems with fresh install databases that will use AL32UTF8. See Set Up Unicode Character Sets in Finishing Tasks for details.
However, because you selected Canadian French as an additional language, the character set choices have changed and now include only those that are compatible with both American English and Canadian French.
If you want to change the character set in either the database or the APPL_TOP, select a new value from the drop-down list.
Caution: Any languages you plan to install after Rapid Install is complete must be compatible with the character set of your Oracle E-Business Suite system.
The IANA (Internet Assigned Numbers Authority) character set is the Internet-assigned standard character set name used by the Web server. See http://www.iana.org/assignments/character-sets for more information.
You can change this value, as needed. Complete the appropriate fields on this screen, and click Next to continue.
-
Enter Primary Applications Node Information
You have already specified the top-level directory for the RDBMS. Now you must specify top-level directory and subdirectories associated with the Applications nodes.
Primary Applications Node Configuration - UNIX
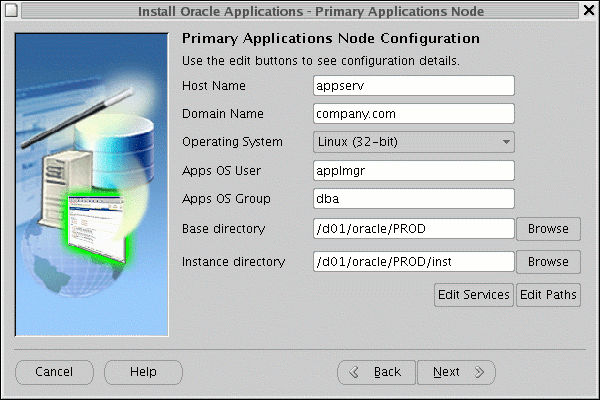
The default sample directories use the syntax of the operating system where you started Rapid Install. In addition, some of the fields are operating system-specific.
The above example shows this screen for a Linux system, where you need to complete the information for Apps OS User (the account that owns the Applications tier file system and technology stack) and Apps OS Group (the group to which the Apps OS User belongs). Accept the defaults, or enter new values.
On Windows, the equivalent screen looks like this:
Primary Applications Node Configuration - Windows
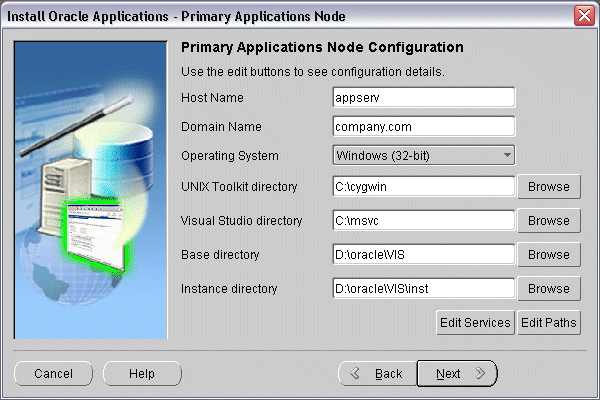
The UNIX Toolkit directory and Visual Studio directories are specific to Windows. Enter the appropriate values in these fields, or accept the defaults if applicable.
On all these equivalent Primary Applications Node Configuration screens, the Base directory is the top-level directory that Rapid Install will use to derive the mount points for the Applications nodes. You can accept the default or enter a new value.
Clicking the Edit Services button enables you to choose which services are enabled on this Applications node. Categories are: Root Services, Web Entry Point Services, Web Application Services, Batch Processing Services, and Other Services.
Specify Services to be Enabled
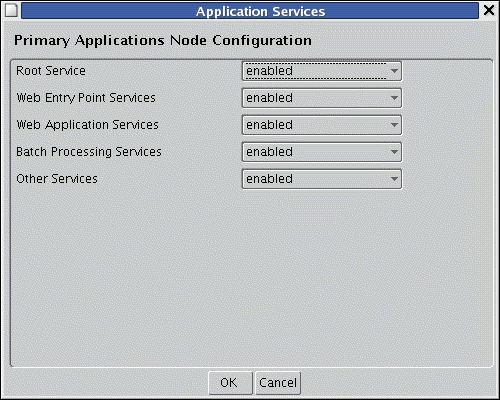
The services define the set of processes that will be started on each Applications node, and can be activated or deactivated according to the function the node is to perform. There is no concept of a "Forms node", "Web node", and so on, as there is no association between installed files and the services that can be run on that machine. This model enforces the three-tier architecture and simplifies tasks such as patching and upgrading.
Note: All the APPL_TOPs on a multi-node system contain the same files, regardless of a particular node's role (as defined by the currently activated services).
The services provide the following functionality:
Applications Node Services Summary This Service Group: Supports: Root Services -
Oracle Process Manager (OPMN)
Web Entry Point Services -
HTTP Server
Web Application Services -
OACORE OC4J
-
Forms OC4J
-
OAFM OC4J
Batch Processing Services -
Applications TNS Listener
-
Concurrent Managers
-
Fulfillment Server
Other Services -
Oracle Forms Services
-
Oracle MWA Service
The scripts for managing these services are located in $INST_TOP/admin/scripts.
Note: http://www.oracle.com/technology/documentation/ocm.htmldescribes management of Oracle Configuration Manager (OCM) processes, which are not managed by standard service management scripts.
Applications nodes should have services enabled according to the following criteria:
-
To support Web and Forms services: Root Services, Web Entry Point Services, Web Application Services, and Other Services
-
To support Concurrent Processing services: Batch Processing Services
As an example, consider a two-node installation where you wish to deploy the Oracle E-Business Suite database and Concurrent Processing services on Server A, and Web and Forms services on Server B.
-
On Server A, you would select Batch Processing Services.
-
On Server B, you would select Root Services, Web Entry Point Services, Web Application Services, and Other Services.
In terms of Oracle Home creation, the result will be that:
-
Server A has an Oracle Home for the 11gR1 Oracle E-Business Suite database, plus an Oracle Home for Oracle Application Server 10.1.2.3, and an Oracle Home for Oracle Application Server 10.1.3.4.
-
Server B has an Oracle Home for Oracle Application Server 10.1.2.3, and an Oracle Home for Oracle Application Server 10.1.3.4.
When installing, be aware of the following important service dependencies:
-
When you select Root Services, the Web services are automatically selected as well. This is because Web Entry Point Services, Web Application Services, and Root Services must all be installed on the same node.
-
If you are selecting Other Services for installation on a node, you must also select Root Services.
-
Web Application services may be installed only after installation of the database and Batch Processing services has been completed.
Note: For further details, see My Oracle Support Knowledge Document 406558.1, Understanding Applications Node Services in Oracle E-Business Suite Release 12.
Specifying Web Entry Points
In some specialized configurations, detailed below, you may need to set certain context variables according to your node deployment.
Note: Only customers with configurations of the types listed below will need to perform these steps. If you are unsure, contact Oracle Support Services before taking any action.
With the unified file system supported in Oracle E-Business Suite Release 12.1, some scripts should only be run on nodes that update URL parameters. For example, in a two-node install, with the database and concurrent processing server running on Node A and Web and Forms services running on Node B, AutoConfig should not update the URL-related parameters when run on Node A, because Node B is the web entry point.
For example, installations that have multiple concurrent processing nodes or simply multiple web entry points may need to have the web entry point variables set to different values. Similarly, when adding a new node to a group of existing nodes, the new node may need to use the existing web entry point or a new web entry point (for example, in a DMZ configuration, when using load balancing; or when using a reverse proxy). In such cases, the web entry point variables must be set in each application context file to point to the correct web entry point, which will typically be the URL used to access the application.
In such circumstances, the following context variables need to be set on the applicable nodes, and AutoConfig run to update the relevant configuration files:
Web-Related Context Variables This variable: Specifies the: s_webentryurlprotocol Web Entry URL Protocol s_webentryhost Web Entry Host s_webentrydomain Web Entry Domain s_active_webport Active Web Port Note: For further details of specifying context variables, see My Oracle Support Knowledge Document 387859.1,Using AutoConfig to Manage System Configurations in Oracle E-Business Suite Release 12.
As well as editing services, the Primary Applications Node Configuration screen also allows you to specify a value for one or more of the key Applications node directory paths by clicking the Edit Paths button.
Specify Directory Paths on Primary Applications Node
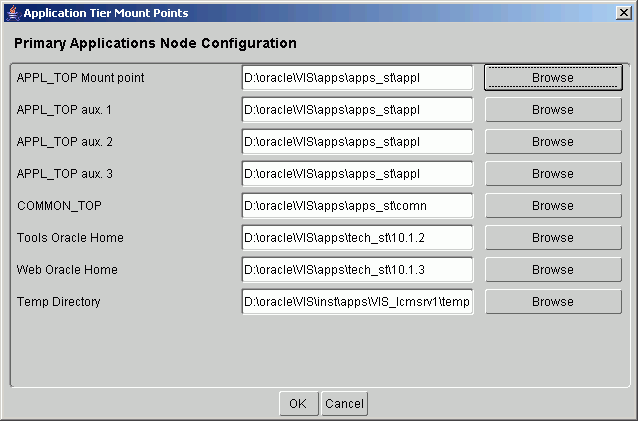
You can use the Browse button to navigate to a new directory path for each category, and double-click the path to select it. After specifying values to suit your site, click Next to continue.
-
-
Review Database and Applications Node Information
Review Node Information
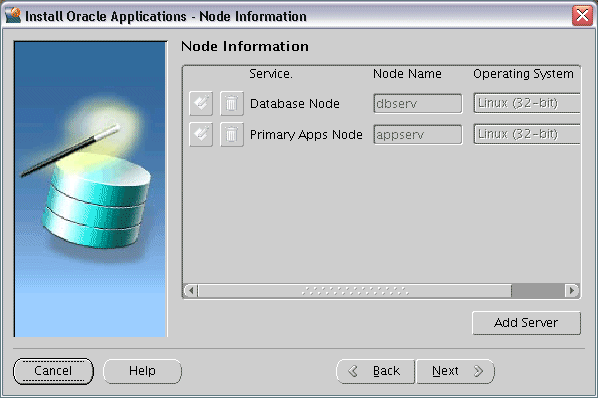
At this stage, you have specified details for the database node and the primary Applications node. For simple environments, you may only want a single Applications node, in which case you simply click Next to bypass the next step.
If you do want to specify details for additional Applications nodes, proceed to the next step.
-
Provide Details of Additional Applications Nodes
If additional Applications nodes are required, click the Add Server button. This opens a window that allows details to be specified.
Specify Additional Applications Node - Initial Screen
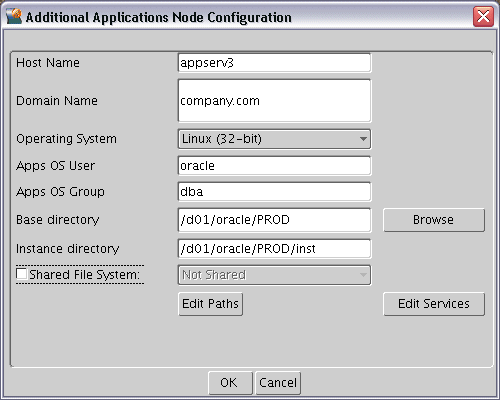
Here, you specify details of the first additional Applications node. You can either accept the defaults and suggested values, or edit them as needed.
The buttons on this screen fulfill the same roles as their counterparts on the Primary Applications Node screen. The Browse button allows you to search the file system for a suitable location to use as the Base directory. The Edit Paths button opens a window where you can specify a new value for one or more of the Applications node paths. Clicking the Edit Services button enables you to choose which services are enabled on this Applications node.
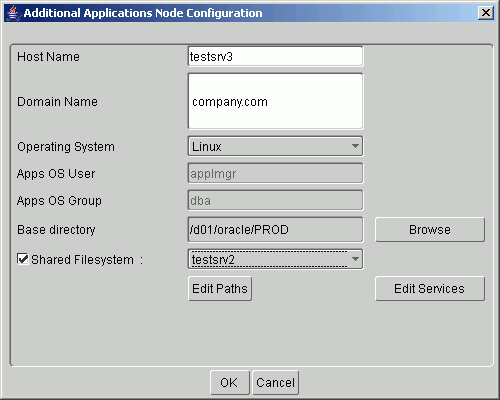
An additional feature on this screen is the Shared Filesystem checkbox and associated drop-down list. By checking the box and selecting a node from the existing Applications nodes that appear on the drop-down list, you enable the node being added on this screen to share the Applications tier file system with the node selected from the drop-down list.
Note: For further details of available capabilities and options, see Shared Application Tier File System in Oracle E-Business Suite Concepts. See also My Oracle Support Knowledge Document 384248.1, Sharing the Application Tier File System in Oracle E-Business Suite Release 12.
The following example shows the addition of a second Applications node, testsrv3, which is to share its file system with an existing Applications node, testsrv2.
Specify Additional Applications Node - Subsequent Screen
When you have finished providing details for the first additional Applications node, click OK to return to the Primary Applications Node screen. If you want to add further Applications nodes, click on Add Server again and repeat the process.
The following screen shows the result of adding a total of two further Applications nodes, over and above the Primary Applications node.
Review Node Information - With Additional Nodes
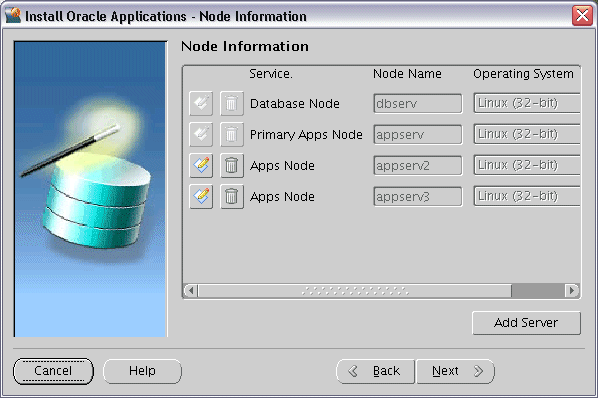
You will see that two additional actions are available for the new Applications nodes: the icons to their left enable you to edit their details and delete them, respectively.
If you click on the wastebasket icon to delete a node, a popup window appears to request confirmation. You cannot delete either the Database Node or the Primary Applications node.
-
Review Pre-Install Checks
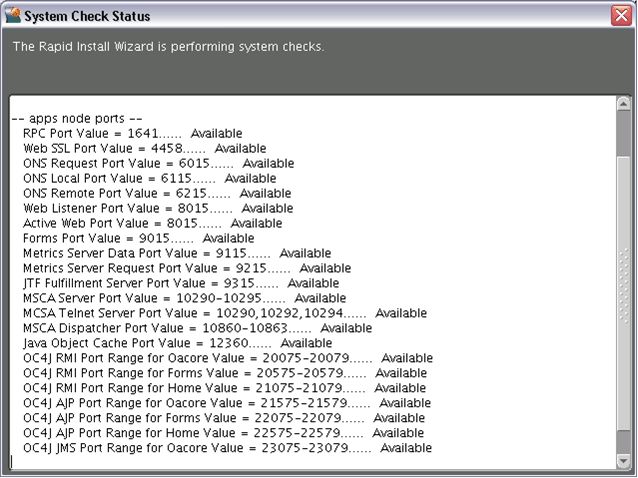
Rapid Install performs a series of system tests to validate the configuration specified. The System Check Status screen checks port availability.
System Checks
The Validate System Configuration screen now appears, to indicate whether various pre-install requirements for the installation have been met.
Pre-Install Checks
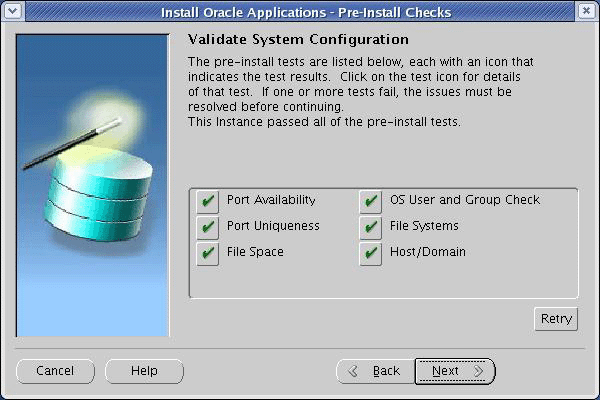
The parameters that Rapid Install validates and reports on this screen include:
The results of each test are labeled with icons. There are three result types:
-
Check (tick) mark
The test succeeded. Click the mark to get details of the test performed.
-
Exclamation mark (!)
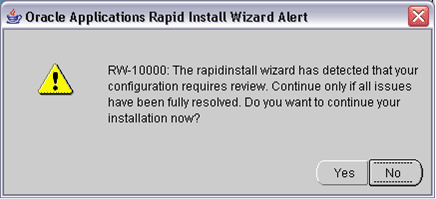
The configuration requires review. Click the ! to get information about the system test review. Click Yes to continue, or No if you are going to resolve the issues. Rapid Install displays an alert if you continue without resolving the issues.
-
An x mark
All issues marked x must be resolved before you continue with the installation. Click the x to see the errors. If you can resolve an issue by altering the values provided on one of the wizard screens, click Back until you reach the appropriate screen, and re-enter the values. Some tests must be resolved in the operating system. In that case, you may have to restart the Rapid Install wizard after the problem has been fixed.
Note: See Restart the Installation in this chapter.
If problems are identified, a pop-up window will appear:
Configuration Alert
When you have resolved any issues, click Next on the Validate System Configuration screen to continue with the installation.
-
-
Begin the Installation
On the Component Installation Review screen, Rapid Install lists the components it will install, based on the system parameters you entered in the wizard.
Review Components
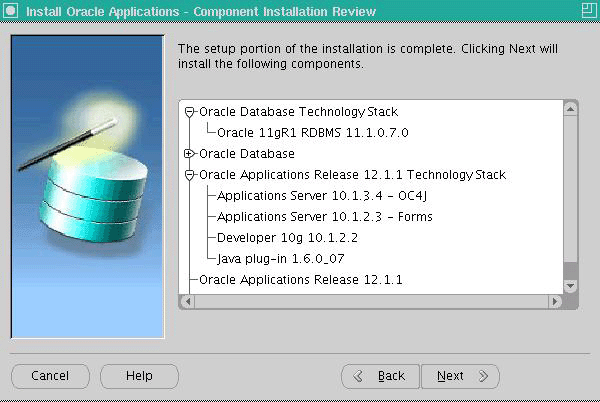
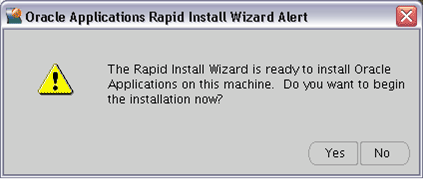
Click Next. Rapid Install now displays another alert screen asking you to verify that you are ready to begin the installation. Click Yes.
Begin Installation
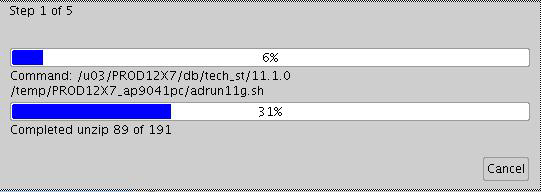
Monitor Installation Progress
-
Check progress bars
During an installation, Rapid Install displays a main progress bar and an individual progress bar. The main progress bar reports on the completion percentage of the installation as a whole. The individual progress bar reports on the progress of each individual step. The installation is not complete until all the progress bars disappear from your screen.
Installation Progress
Restart Installation (if required)
If the installation process terminates abnormally before completion, you can restart it and carry on, after correcting any problems.
-
Re-run the Rapid Install wizard, adding the -restart option to the rapidwiz command.
When the initial Rapid Install screen appears, select the same operation you chose originally, then click Next.
Rapid Install has stored the configuration in the Oracle E-Business Suite database (or conf_<SID>.txt file), so choose "Load the following saved configuration". This avoids having to complete the wizard screens a second time. After accepting or specifying the configuration details, click Next.
Configuration Choice - Load Saved Configuration
-
Continue with the install
Rapid Install moves through the installed components and automatically starts at the point where it previously stopped. Previously completed actions start and complete rapidly as the wizard determines that there is nothing additional to do.
Note: You may see validation warnings (for example, port already in use) if your database was already installed before the restart process. You can safely ignore these messages.
Post-Install Review
After the installation is complete, Rapid Install automatically validates the installed Oracle E-Business Suite environment. Tests include database availability, correctly-configured environment files, and functioning listeners.
Post-Install Checks
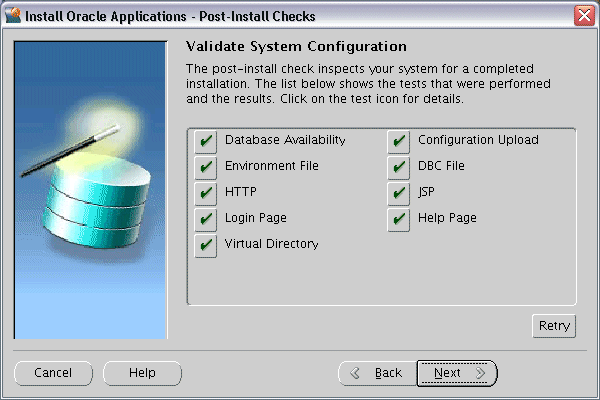
Post-installation tests include:
-
Review the information from the tests Rapid Install has completed
If there is an ! or x icon, click it to see the details. If any of the checks fail, refer to the Rapid Install log files to determine the reason, and resolve each problem before continuing. When the errors are fixed, click Retry to perform the post-install validation again.
-
Click Next if there are no errors.
Rapid Install informs you of the components that it installed on the Finish screen.
Finish Screen
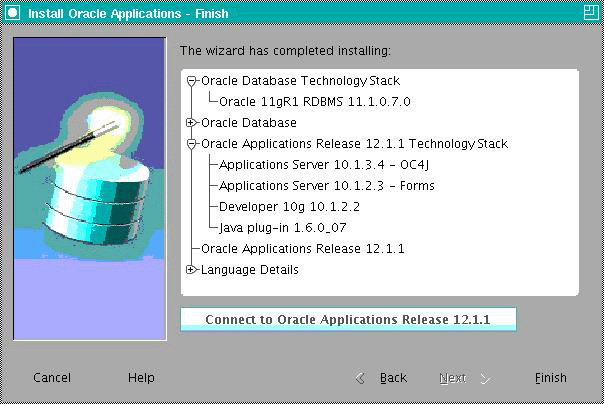
If you wish to review the Post-install Checks screen, click Back. If you want to log on to Oracle E-Business Suite now, click Connect to Oracle Applications Release 12.1.1 to access the Oracle E-Business Suite Login page. Otherwise, click Finish to complete the Rapid Install session.
Note: See Log On to Oracle E-Business Suite in Finishing Tasks for more information.
Express Installation
An Express installation sets up a fully configured single-user/single-machine system with either a fresh database or Vision Demo database. You specify basic configuration parameters, such as database type and name, top-level installation directory, and port increments. The remaining directories and mount points are supplied by Rapid Install using default values.
This type of installation contains (by default) a set of core Oracle E-Business Suite products. It also contains the US7ASCII character set (for a fresh install) and the AL32UTF8 character set (for a Vision Demo install), in both the database and the APPL_TOP. You can easily register additional products (according to your Oracle licensing agreement) after the installation is complete, by using License Manager. However, converting the character set may be time-consuming, and is best avoided if possible.
Note: For more details, see License Manager in Oracle E-Business Suite System Administrator's Guide - Maintenance
-
Start Rapid Install
On the Select Wizard Operation screen, select Install Oracle Applications Release 12.1.1 and then check Use Express Configuration.
Select Wizard Operation - Install Oracle Applications Release 12.1.1, Use Express Install
Click Next to continue.
-
Supply Oracle Configuration Manager details
Oracle Configuration Manager (OCM) is a component that is designed to facilitate support for your Oracle products. Use of Oracle Configuration Manager is optional, but recommended.
A lightweight agent that consumes minimal CPU resources, OCM supports automatic discovery of installed components and configuration information, and provides continuous tracking of key Oracle and system statistics of the machine it is running on.
Data collected is sent via HTTPS (secure HTTP) to Oracle Support, who can thereby maintain an up-to-date view of your Oracle installation, facilitating pro-active problem avoidance and helping to reduce the time needed for resolution of support issues.
Note: For further details of OCM, click the View details link on the OCM screen.
Specify Oracle Configuration Manager Details
If submission of your details fails because no connection can be made, you are presented with a pop-up screen prompting for proxy server information:
Oracle Configuration Manager Proxy Server [Shown After Failed Connection Attempt]
If this screen appears, respond appropriately and then click OK.
-
Enter Configuration Values
The Express Configuration Information screen prompts for minimal configuration values. Default values are provided for all fields except Domain.
This example screen is for Windows:
Express Configuration Information
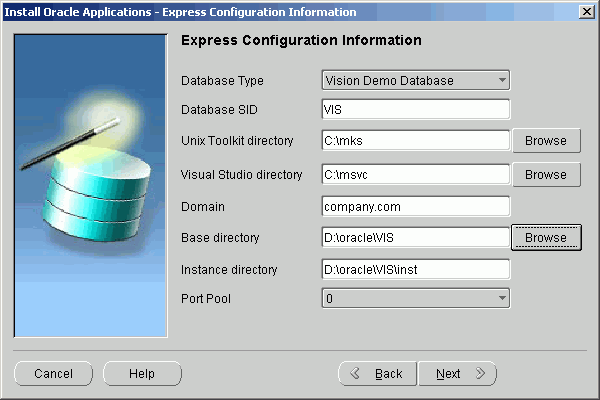
In the Database Type field, use the drop-down list to choose either a Vision Demo database or a fresh database, and then either accept VIS or enter another name in the Database SID field. On Windows (as shown in the example above), enter the path to the UNIX Toolkit directory and Visual Studio directory, or click Browse and navigate to the desired path for each of these. On UNIX systems, the DISPLAY environment variable must be set to an active and authorized display.
In the Domain field, enter a value that produces a fully qualified domain name (FQDN) when combined with a host (machine) name. For example, a host name of apps1 and domain name of company.com make up an FQDN of apps1.company.com.
In the Base Directory field, enter the top-level directory path you want Rapid Install to use to create the derived mount points for the database node and all Applications nodes. Alternatively, click Browse and navigate to the desired path.
The default value of the Port Pool set is zero, but you can customize it by selecting another value from the drop-down list in the Port Pool field. There are 100 port pool selections: if you select an increment of 3, the default values are increased by that value. The Database Port (1521) becomes 1524, the RPC Port (1626) becomes 1629, and so on.
Note: The fields on this screen are fully described in Node-specific Configuration Information in Configuration Details.
Click Next to continue.
-
Start Installation Process
Rapid Install displays the pre-install tests as it performs them. When it is complete, the Pre-install Checks screen appears.
Pre-Install Checks
If there is an exclamation mark (!) or x icon shown, click on it to see the details stored during the check process. For example, if you see an exclamation mark beside File Space Check, clicking on it may display a screen such as this:
Error Example - Insufficient File System Free Space
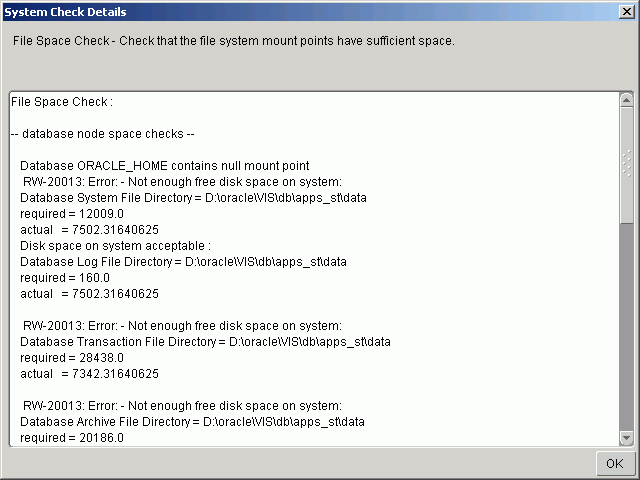
Resolve any issues you need to fix, and then click OK to return to the Pre-install Checks screen.
If you decide to continue the installation without fixing the flagged issues, Rapid Install displays the following warning when you click Next.
Configuration Alert
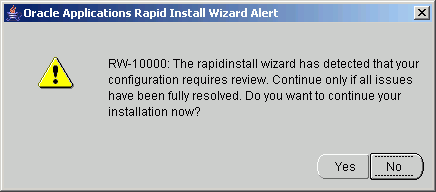
Click Yes to continue or No to stop the installation. If you click No, you must go back to the appropriate screen and re-enter the incorrect or incompatible parameter. Click Back to return to a previous screen.
-
Continue Installation
The remaining screens in the Rapid Install flow for an Express installation are the same as for a standard installation.
What To Do Next
Once the installation is complete, there are some finishing steps that are required for all users, and some that are required for specific types of installations. For example, all users must configure the client software, but some users may also need to set up NLS support. Go to Finishing Tasks, and perform the tasks that apply to your system.