Using Additional Flexfield Features
Overview of Shorthand Flexfield Entry
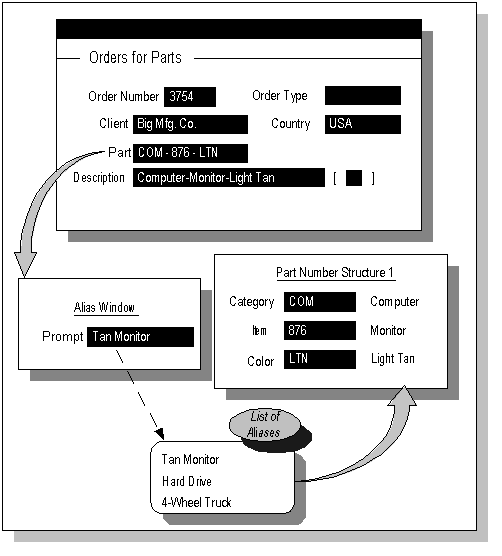
Shorthand flexfield entry lets you enter key flexfield data quickly by using shorthand aliases to represent valid flexfield combinations or patterns of valid segment values. A shorthand alias is a word or code that represents a complete or partial key flexfield combination.
Shorthand flexfield entry helps you satisfy the following data entry needs:
-
Enter key flexfield data quickly by associating shorthand aliases with frequently-used sets of valid key flexfield segment values.
-
Associate either complete or partial flexfield combinations with shorthand aliases.
You can define a shorthand flexfield entry pop-up window (the shorthand window) for any key flexfield. You specify a name and size for each shorthand window.
You define the complete or partial set of key flexfield segment values (the template) that each shorthand alias represents. These values can be valid flexfield combinations or different patterns of valid segment values. For example, if the flexfield consists of six segments, you can define a shorthand alias to represent a partial combination where four of the six segments contain valid values for those segments. The other two segments remain blank. When you enter this alias at the shorthand window prompt, you only need to enter values for two segments manually, and shorthand flexfield entry enters the other four for you automatically. Or, you can define an alias to represent a valid flexfield combination, where all six segments contain valid values and meet any appropriate flexfield cross-validation rules. For this shorthand alias, you would not have to enter any segment values manually.
For each key flexfield structure, you can define as many shorthand aliases as you need. If you make changes to your shorthand aliases, your changes take effect immediately for both you and other users.
If Shorthand Flexfield Entry is enabled and the Flexfields:Shorthand Entry profile option is set to an appropriate value, the shorthand window allows you to enter an alias before the flexfield window opens. The combination or partial combination you defined for your alias is entered into your flexfield window.
Validation of alias values
You cannot enter invalid values into a single segment of a shorthand alias, but the Shorthand Aliases window does not identify invalid combinations of segment values in an alias. If you define aliases that contain values that become invalid later, your flexfield detects these invalid values at the time you use your alias in your flexfield window. Your flexfield then does not allow you to enter the invalid values. Your flexfield also checks your alias against your security and cross-validation rules when you use your alias to enter data in your flexfield window.
Note that if the alias contains a value that you are restricted from using (by flexfield value security), that value disappears immediately and you must enter a different value in that segment.
After you enter an alias that represents a complete flexfield combination, the flexfield validates your combination using the criteria you define in the Cross-Validation Rules window. See: Cross-Validation Rules Window.
Changing your key flexfield structure after defining aliases
If you change your key flexfield structure after you define your aliases, you must change your existing aliases to match your new structure. Changes that make your existing aliases invalid include:
-
changing the order of segments
-
adding a new segment
-
disabling a segment
-
changing segment lengths
Enabling Shorthand Entry
Prerequisite Steps
-
Set up your key flexfield structure. See: Key Flexfield Segments Window.
-
Define valid segment values for your structure. See: Segment Values Window.
To enable shorthand entry:
-
Navigate to the Shorthand Aliases window.
-
Select the name and structure of the key flexfield for which you want to enable shorthand entry.
-
Check the Enabled check box in the Shorthand region.
-
Enter a prompt for the shorthand window.
-
Enter the maximum alias size, which determines the maximum length of your shorthand aliases.
-
Save your changes.
Whenever you enable or disable shorthand entry, you must also recompile your key flexfield using the Key Flexfield Segments window. See: Key Flexfield Segments Window.
On a user-by-user basis, you can enable or disable shorthand flexfield entry for yourself (for all key flexfields that use it) by setting your user profile option Flexfield: Shorthand Entry to an appropriate value. Your System Administrator can set this profile option at other levels (such as for a responsibility).
However, in some forms, such as forms where you define new key flexfield combinations (combinations forms), you do not see the shorthand window even if shorthand entry is enabled. For example, you cannot use shorthand entry in the Oracle General Ledger Define Accounting Flexfield Combinations form. See: Disabling or Enabling a Shorthand Alias.
Defining Shorthand Aliases
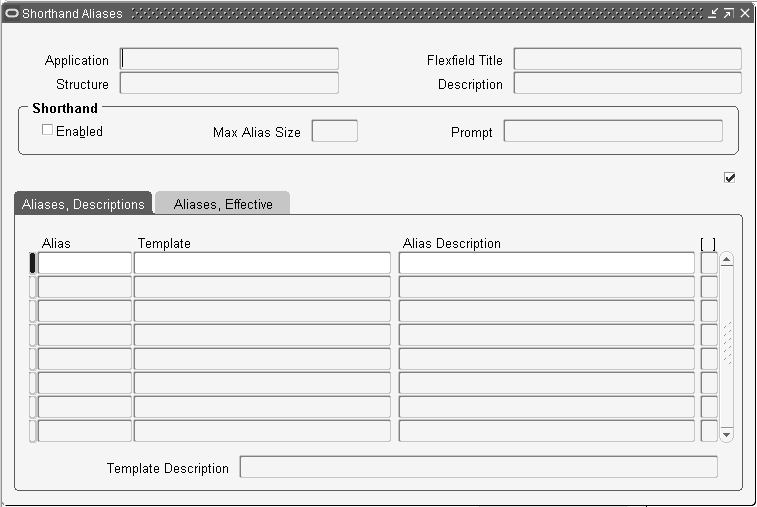
To define shorthand aliases:
-
Navigate to the Shorthand Aliases window.
-
Select the name and structure of the key flexfield for which you want to define shorthand aliases.
-
Enter an alias, which serves as a "name" for a combination or partial combination. A shorthand alias can be any combination of characters.
-
In the Template field, enter either an entire flexfield combination or the pattern of segment values that your alias represents.
Your flexfield validates each segment value you enter but does not check whether the combination is a valid combination (if you enter an entire combination).
If you want to enter a value for a segment that depends on another segment, you must first enter a value into the corresponding independent segment.
-
Enter an alias description. This field is required.
-
If you want to have the alias effective for a limited time, you can enter a start date and/or an end date for the alias. The alias is valid for the time including the From and To dates.
-
Save your changes.
Related Topics
Overview of Shorthand Flexfield Entry
Disabling or Enabling a Shorthand Alias
You can disable or re-enable individual existing aliases.
To disable a shorthand alias:
-
Navigate to the Shorthand Aliases window.
-
Select the name and structure of the key flexfield for which you want to disable shorthand aliases.
-
Select the alias you want to disable.
-
In the Effective tabbed region, uncheck the Enabled check box, or set either "From" to a date later than today or "To" to the date of the last day the alias should be valid.
If the Enabled check box is unchecked, the alias is disabled regardless of the effective dates given.
-
Save your changes.
To re-enable a disabled shorthand alias:
-
Navigate to the Shorthand Aliases window.
-
Select the name and structure of the key flexfield for which you want to enable shorthand aliases.
-
Select the alias you want to enable.
-
In the Effective tabbed region, check the Enabled check box if it is not already checked.
Also, set either From to a date no later than today or To to the date of the new last day the alias should be valid. Alternatively, you can blank out the effective dates as appropriate to make your alias valid.
If the Enabled check box is unchecked, the alias is disabled regardless of the start and end dates given.
-
Save your changes.
Related Topics
Overview of Shorthand Flexfield Entry
Overview of Flexfield Value Security
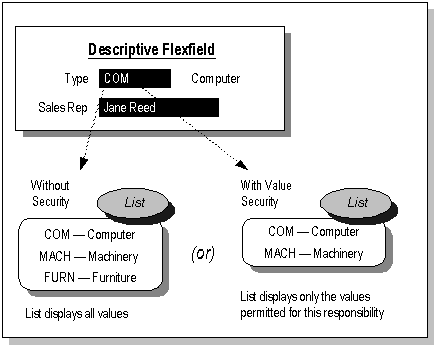
Flexfield Value Security gives you the capability to restrict the set of values a user can use during data entry. With easy-to-define security rules and responsibility level control, you can quickly set up data entry security on your flexfield segments and report parameters.
Flexfield Value Security lets you determine who can use flexfield segment values and report parameter values. Based on your responsibility and access rules that you define, Flexfield Value Security limits what values you can enter in flexfield pop-up windows and report parameters. Flexfield Value Security gives you greater control over who can use restricted data in your application. When you use Flexfield Value Security, users see only values they are allowed to use; restricted values do not appear in lists of values associated with the flexfield or report parameter.
Flexfield Value Security provides you with the features you need to satisfy the following basic security needs:
-
Specify ranges of segment values particular users are allowed to enter.
-
Prevent users from entering segment values they are not allowed to use.
Related Topics
Effects of Flexfield Value Security
Understanding Flexfield Value Security
Activating Flexfield Value Security
Defining Security Rule Elements
Effects of Flexfield Value Security
The security rules you define and assign affect any segment or parameter that uses the same value set as the segment for which you initially set up your rules, provided that the other segment has security enabled and that the user works within the responsibility to which the rule is assigned.
For example, if your key flexfield segment shares its value set with a descriptive flexfield segment, your security rules also affect that descriptive segment. If you use the same value set for Standard Request Submission parameter values, the rules you assign here also affect your request parameter, provided that the parameter has security enabled.
Many Oracle E-Business Suite reports use predefined value sets that you may also use with your flexfield segments. If your flexfield segment uses a value set associated with a Standard Request Submission report parameter, the security rules you define here also affect the report parameter, provided that the parameter has security enabled. In addition, if you query a key flexfield combination where one or more of the segments already contain a secure value, you cannot update any of the segment values in the combination.
Security rules for the Accounting Flexfield also restrict query access to segment values in the Account Inquiry, Funds Available, and Summary Account Inquiry windows. In these windows, you cannot query up any combination that contains a secure value.
Entering Values in Flexfields and Report Parameters
Flexfield Value Security limits the values you can enter in segments in flexfield pop-up windows or report parameters. If you enter a secure segment or parameter, you cannot enter values for which you do not have access. Values to which you do not have access do not appear in the list of values for that segment or parameter, unless they are child values secured through their parent values with Hierarchical Security. Such child values appear in the list of values, but you cannot use these values in the segment or parameter.
If you try to enter a value for which you do not have access, you see an error message defined by the person who created the security rule. Note that if a segment default value or shorthand entry alias contains a value that you are restricted from using, that value disappears immediately and you must enter a different value in that segment.
Defining Values
If Flexfield Value Security is available for your value set and you are using a responsibility that has enabled security rules, you cannot define or update excluded values using the Segment Values window. See: Segment Values Window.
Related Topics
Overview of Flexfield Value Security
Understanding Flexfield Value Security
Activating Flexfield Value Security
Defining Security Rule Elements
Understanding Flexfield Value Security
Defining Security Rules
You can define security rules for each segment or report parameter for which you want to restrict data entry. Within a rule, you specify ranges of segment values to include and exclude from use. You can create many rules for the same segment or parameter, and assign the rules to different responsibilities. You also define the error message you see if you try to enter a value for which you do not have access. If you define no security rules for a segment, you can enter any value you have defined into that segment.
Before you define your security rules, you should determine what segments you want to enable security on, and what types of access limits you want to place on segment values for the different responsibilities that use your flexfield.
Create Ranges of Approved Values
Since you include or exclude values by ranges, you should plan your segment values carefully to make security rules easy to define. Organizing your values in ranges or "chunks" of related values helps you keep your security rules simpler (and helps keep cross-validation rules simpler as well).
Tip: We recommend that you define many rules that each have few rule elements rather than a few rules that each have many rule elements. The more rules you provide, the more specific you can make your message text.
You can only use flexfield value security rules on segments or report parameters that use value sets with a validation type of Independent, Dependent, or Table. You cannot use security rules for segments that use value sets with a validation type of None, Special, or Pair.
Interaction of Security Rules
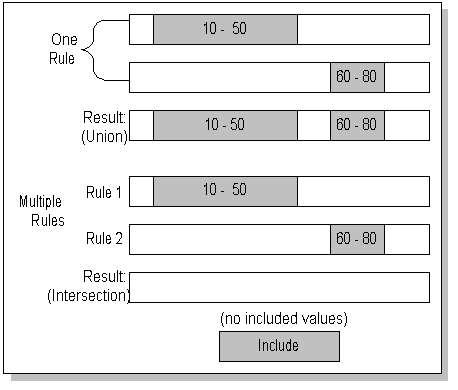
It is important for you to understand how the rules interact before you define them. You can define many security rules for a segment. Each security rule is composed of one or more rule elements. A rule element specifies a range of values to include or exclude. If you create rule elements that have overlapping ranges, the result is that all values included in either range are included by the rule. However, if you define two different rules that have overlapping ranges and assign both rules to the same responsibility, the effect is that only the values included in the overlap of both rules are available to users of the responsibility. More rules restrict more, not less. All values must pass all security rules for it to appear in a segment or parameter list of values. The following examples (shown in the following diagrams) illustrates how your rules interact:
Suppose you have one rule with two rule elements. The first element includes values 10 through 50, and the second element includes values 40 through 80. The resulting rule includes the union of the two elements, values 10 through 80.
Suppose instead you have two separate rules. The first rule includes values 10 through 50, and the second rule includes values 40 through 80. The resulting effect of the two rules includes the intersection of the two rules, values 40 through 50.
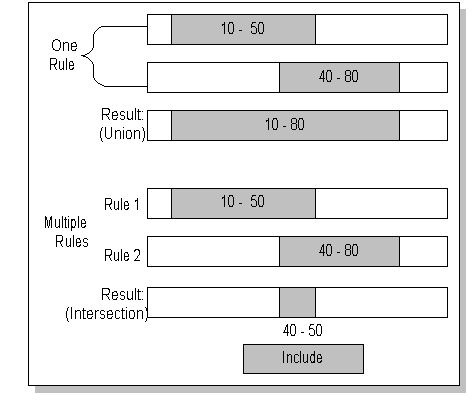
If you have multiple separate rules whose included values do not overlap, then no values will be allowed at all, because values must be included by all active security rules for that segment to be valid.
Now suppose you have one rule with two rule elements. The first element includes values 10 through 50, and the second element includes values 60 through 80. The resulting rule includes the union of the two elements, values 10 through 50 and values 60 through 80.
Suppose instead you have two separate rules. The first rule includes values 10 through 50, and the second rule includes values 60 through 80. The resulting effect of the two rules includes the intersection of the two rules, which is no values at all.
Assign Your Security Rules
Once you define your security rules, you can assign them to responsibilities. The rules are active for every user in that responsibility. You can assign different rules to different responsibilities, and you can share rules across responsibilities. So, you can create some responsibilities with access to all segment values, and others with limited access. You are free to change the assignments of your security rules or create new ones at any time. See: Assigning Security Rules.
Hierarchical Value Security
With hierarchical value security, the features of flexfield value security and flexfield value hierarchy are combined. With this feature any security rule that applies to a parent value also applies to its child values.
With hierarchical security enabled, the system does the following for a given value:
-
Checks if this value is excluded by any of the security rules.
-
Checks if this value is not included by any of the security rules.
-
Checks if any of the parents is excluded by any of the security rules.
-
Checks if any of the parents is not included by any of the security rules.
Warning: If you have a large hierarchical tree of values, then a security rule that applies to a parent value will also apply to all its child values, regardless of how many levels below the child values are.
Related Topics
Overview of Flexfield Value Security
Effects of Flexfield Value Security
Activating Flexfield Value Security
Defining Security Rule Elements
Defining Hierarchy and Qualifiers Information
Parent and Child Values and Rollup Groups, Oracle General Ledger User's Guide
Activating Flexfield Value Security
There are two levels where you must activate Flexfield Value Security, the value set level and the individual segment or parameter level. You make Flexfield Value Security available for your value set by choosing Hierarchical Security or Non-Hierarchical Security for the Security Type. When you make security available for a value set, all segments and report parameters that use that value set can use security. You then enable security for a particular segment or parameter.
Choose Non-Hierarchical Security if you do not want security on a parent value to "cascade down" to its child values. Choose Hierarchical Security if you do want the hierarchical security feature enabled.
Security Available
With security available, you can create flexfield security rules, and you allow your rules to take effect for any segment or parameter that uses this value set and has security enabled. Otherwise, you disable all security rules for this value set.
You define security rules for this value set using the Define Security Rules window. Any security rules you define for this value set affect every segment (in any flexfield) that uses this value set, if the segment has security enabled.
Using the Flexfield Value Security feature may negatively affect your application performance. If you have many security rules or a large value set with many secure values, you may notice that a list of values on a segment appears slower than it would if you do not use Flexfield Value Security. Users with responsibilities where security is not enabled should not notice any loss in performance.
If you are using a validation table with special arguments such as :$FLEX$.Value_Set_Name for your value set, you should specify No in this field, since any security rules you have for your value set would ignore the values of these special arguments, and your rules could have effects other than what you intend.
You then enable security for a particular segment or parameter by checking Enable Security for that segment or parameter. Once you enable security on a segment, you must freeze and recompile the flexfield definition for that flexfield structure. Flexfield Value Security activates for that segment after you freeze and recompile your flexfield definition using the Key Flexfield Segments window or Descriptive Flexfield Segments window.
Once you define your rule, you must assign your rule to a responsibility before the rule can be enforced. You assign your rule to a responsibility using the Assign Security Rules window. You may define rules for a segment that does not have security enabled, but your rule has no effect until you enable security for that segment and assign your rule to a responsibility.
After you define or make changes to your security rules, you and your users must either change responsibilities or exit from your application and sign on again in order for your changes to take effect.
Enabling Hierarchical Security
With hierarchical value security, the features of flexfield value security and flexfield value hierarchy are combined. With this feature any security rule that applies to a parent value also applies to its child values.
You enable the hierarchical security feature using the following steps:
-
Set up your value hierarchy
-
Set up your security rules
-
Enable security for a particular segment or parameter
-
Choose Hierarchical Security for the Security Type for your value set
Related Topics
Descriptive Flexfield Segments
Defining Hierarchy and Qualifiers Information
Effects of Flexfield Value Security
Understanding Flexfield Value Security
Defining Security Rule Elements
Define Security Rules Window and Assign Security Rules Window
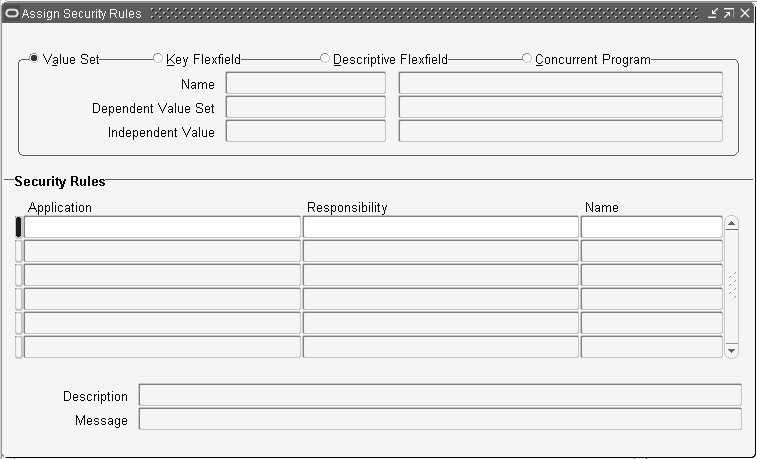
Use the Define Security Rules window to define value security rules for ranges of flexfield and report parameter values.
Then, use the Assign Security Rules window to assign the flexfield security rules to an application responsibility.
After you assign or change your security rules, you and your users must either change responsibilities or exit from your application and re-sign on in order for your changes to take effect. See: Overview of Flexfield Value Security.
Related Topics
Overview of Flexfield Value Security
Effects of Flexfield Value Security
Understanding Flexfield Value Security
Activating Flexfield Value Security
Defining Security Rule Elements
Defining Security Rule Elements
Defining Security Rules
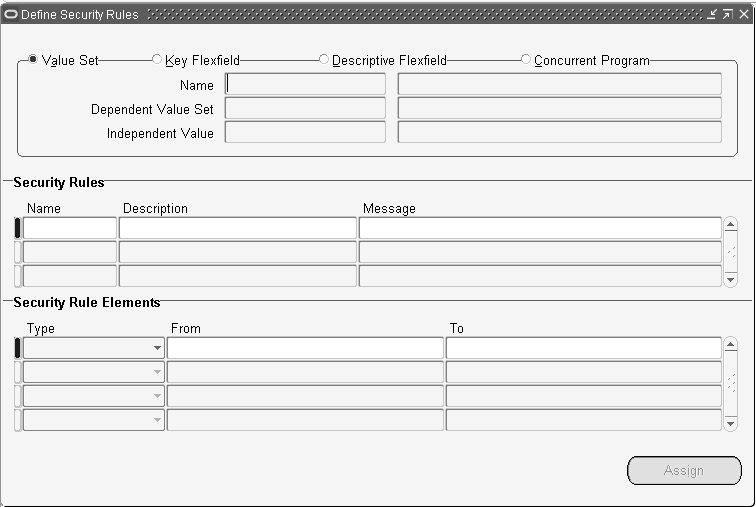
To define security rules:
-
Navigate to Define Security Rules window.
-
In the Segment Values block, identify the value set to which your values belong. You can identify your value set or by the flexfield segment or concurrent program parameter that uses the value set.
-
In the Security Rule region, enter a name and description for your security rule.
-
Enter a message for this security rule. This message appears automatically whenever a user enters a segment value that violates your security rule.
-
Define the security rule elements that make up your rule. See: Defining Security Rule Elements.
-
Save your changes.
Related Topics
Overview of Flexfield Value Security
Defining Security Rule Elements
Effects of Flexfield Value Security
Understanding Flexfield Value Security
Activating Flexfield Value Security
Defining Security Rule Elements
You define a security rule element by specifying a value range that includes both a low and high value for your segment. A security rule element applies to all segment values included in the value range you specify.
You identify each security rule element as either Include or Exclude, where Include includes all values in the specified range, and Exclude excludes all values in the specified range. Every rule must have at least one Include rule element, since a rule automatically excludes all values unless you specifically include them. Exclude rule elements override Include rule elements.
You should always include any default values you use in your segments or dependent value sets. If the default value is secured, the flexfield window erases it from the segment as the window opens, and the user must enter a value manually.
If you want to specify a single value to include or exclude, enter the same value in both the Low and High fields.
Minimum and maximum possible values
The lowest and highest possible values in a range depend on the format type of your value set. For example, you might create a value set with format type of Number where the user can enter only the values between 0 and 100. Or, you might create a value set with format type of Standard Date where the user can enter only dates for the current year (a range of 01-JAN-2008 to 31-DEC-2008, for example). For example, if your format type is Char, then 1000 is less than 110, but if your format type is Number, 110 is less than 1000. The lowest and highest possible values in a range are also operating system dependent. When you use a Char format type for most platforms (ASCII platforms), numeric characters are "less" than alphabetic characters (that is, 9 is less than A), but for some platforms (EBCDIC platforms) numeric characters are "greater" than alphabetic characters (that is, Z is less than 0). The window gives you an error message if you specify a larger minimum value than your maximum value for your platform.
If you leave the low segment blank, the minimum value for this range is automatically the smallest value possible for your segment's value set. For example, if the value set maximum size is 3 and Right-justify and Zero-fill Numbers is checked, the minimum value is 000. However, if the value set has a maximum size of 3, has Numbers Only checked and Right-justify and Zero-fill Numbers unchecked, the minimum value is 0.
If you leave the high segment blank, the maximum value for this range is automatically the largest value possible for your segment's value set. For example, if the value set maximum size is 3 and Numbers Only is checked, the maximum value is 999. However, if the value set maximum size is 5, and Numbers Only is checked, the maximum value is 99999.
Tip: Use blank segments to specify the minimum or maximum possible values for a range to avoid having operating system dependent rules.
Note that security rules do not check or affect a blank segment value (null value).
To define security rule elements:
-
In the Security Rule Elements block, select the type of security rule element. Valid types are:
Variable Description Include Your user can enter any segment value that falls in the following range. Exclude Your user cannot enter any segment value that falls in the following range. -
Enter the low (From) and high (To) ends of this value range. Your value does not have to be a valid segment value.
Related Topics
Overview of Flexfield Value Security
Activating Flexfield Value Security
Assigning Security Rules
Prerequisite Steps
-
Use the Define Security Rules window to define your flexfield security rules. See: Defining Security Rules.
To assign security rules:
-
Navigate to Assign Security Rules window.
-
In the Assign Security Rules block, identify the value set to which your values belong. You can identify your value set or by the flexfield segment or concurrent program parameter that uses the value set.
-
In the Security Rules block, enter the application and responsibility name that uniquely identifies the responsibility to which you want to assign security rules.
-
Enter the name of a security rule you want to assign to this responsibility.
-
Save your changes.
Related Topics
Overview of Flexfield Value Security
Effects of Flexfield Value Security
Understanding Flexfield Value Security
Activating Flexfield Value Security
Defining Security Rule Elements
Cross-Validation Rules
A key flexfield can perform automatic cross-validation of segment values according to rules your organization defines when you customize the key flexfield. You can use cross-validation to closely control the creation of new key flexfield combinations, and you can maintain a consistent and logical set of key flexfield combinations that you need to run your organization.
What is Cross-Validation?
Cross-validation (also known as cross-segment validation) controls the combinations of values you can create when you enter values for key flexfields. A cross-validation rule defines whether a value of a particular segment can be combined with specific values of other segments. Cross-validation is different from segment validation, which controls the values you can enter for a particular segment.
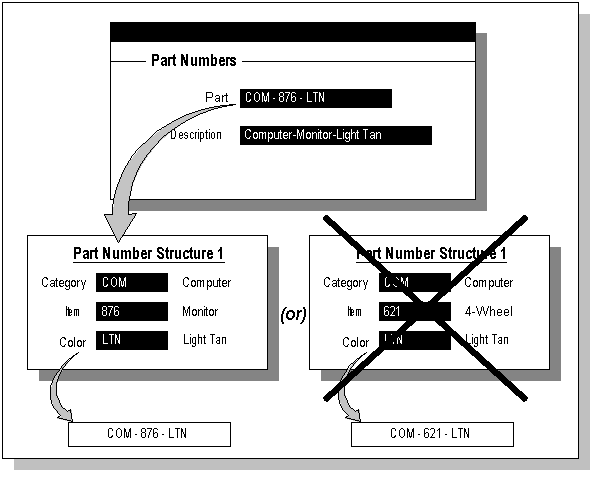
You use cross-validation rules to prevent the creation of combinations that should never exist (combinations with values that should not coexist in the same combination). For example, if your organization manufactures both computer equipment and vehicles such as trucks, you might want to prevent the creation of "hybrid" part numbers for objects such as "truck keyboards" or "CPU headlights".
As another example, if you use the Accounting Flexfield, you may decide that all revenue accounts must have a department. Therefore, all your "revenue" account values (such as all values between 4000 and 5999) must have a corresponding department value other than 000 (which means "non-specific").
For example, suppose you have an Accounting Flexfield where you have a Company or Organization segment with two possible values, 01 and 02. You also have a Natural Account segment, with many possible values, but your company policy requires that Company or Organization 01 uses the natural account values 001 to 499 and Company or Organization 02 uses the natural account values 500 to 999. You can create cross-validation rules to ensure that users cannot create a GL account with combinations of values such as 02-342 or 01-750, for example.
Related Topics
Designing Your Cross-Validation Rules
Maintaining Your Cross-Validation Rules and Valid Combinations
Defining Cross-validation Rules
Defining Cross-validation Rule Elements
How Cross-Validation Works
When a user finishes entering segment values in a flexfield pop-up window, the flexfield checks whether the values make up a valid combination before updating the database. If the user entered an invalid combination, a diagnostic error message appears, and the cursor returns to the first segment assumed to contain an invalid value.
Cross-validation rules control combinations of values within a particular key flexfield structure. Cross-validation applies to combinations users attempt to create using either the combinations form or foreign key forms (using dynamic inserts).
Cross-Validation Rules and Existing Combinations
Cross-validation rules have no effect on combinations that already exist when you define your cross-validation rules.
Suppose you define a new cross-validation rule, but have existing entries in your combinations table that violate the rule. Since the existing combinations pre-date the rule, your flexfield continues to treat them as valid. However, if your end user tries to create a new combination that violates your new rule, your flexfield returns an error message and rejects the combination.
If you want to prevent users from using previously-existing combinations that are no longer valid according to your cross-validation rules, you can always manually disable those combinations using the combinations form. See: Maintaining Your Cross-Validation Rules and Valid Combinations.
Dynamic Insertion and Cross-Validation
Your use of cross-validation is separate from (and in addition to) your use of dynamic inserts.
By allowing dynamic inserts, you can let users create new combinations automatically upon entering the combination in a foreign key form (any form other than the combinations form) and in the combinations form itself.
If you want greater control, you can disallow dynamic inserts. You can thus restrict the creation of new combinations to certain authorized people who have access to the combinations form on their menu. You simply turn dynamic insertion off using the Define Key Flexfield Segments form. Depending on the key flexfield you use, you can still create new combinations using one of your product setup forms (the combinations form). For example, if you use the Accounting Flexfield, you can enter new combinations using the Define Accounting Flexfield Combination form.
In either case, however, there is no inherent protection against a user creating an invalid new combination. Cross-validation rules ensure that nobody can create invalid new combinations from either foreign key forms or the combinations form, regardless of whether you allow dynamic inserts.
As you consider the controls you want over your key flexfield combinations, determine whether you need cross-validation rules at all. To provide an extra level of security, use cross-validation rules even if you turn dynamic insertion off. This allows you to double-check new combinations that even your authorized personnel enter using the combinations form.
Changing your key flexfield structure after defining rules
Changing an existing key flexfield structure may adversely affect the behavior of any cross-validation rules you have for that structure, so you should be sure to manually disable or redefine any cross-validation rules to reflect your changed structure. Flexfield structure changes that make your existing rules invalid include:
-
changing the order of segments
-
adding a new segment
-
disabling a segment
-
changing segment lengths
For example, if you change a six-segment structure to contain only five segments, you would not be able to use any new five-segment code combinations since any rules existing for the old six-segment structure would be violated. See: Cross-Validation Rules, Key Flexfield Segments Window.
Related Topics
Designing Your Cross-Validation Rules
Maintaining Your Cross-Validation Rules and Valid Combinations
Defining Cross-validation Rules
Defining Cross-validation Rule Elements
Designing Your Cross-Validation Rules
Oracle E-Business Suite provides many key flexfields, such as the Accounting Flexfield, Location Flexfield and System Items Flexfield. In this essay, we use the Accounting Flexfield to present suggestions for designing your cross-validation rules, but you can use cross-validation rules for any key flexfield structure that has cross-validation enabled.
Rules
You set up cross-validation by specifying rules that describe valid combinations for key flexfields. You can define new cross-validation rules anytime using the Define Cross-Validation Rules form. Your rules are effective only while you have Cross-Validate Multiple Segments set to Yes in the Define Key Flexfield Segments form.
Each cross-validation rule contains one or more rule elements, where each element is a key flexfield range that specifies low and high values for each segment. You identify a rule element as either Include or Exclude. Include means include all values in the specified segment ranges, and Exclude means exclude all values in the specified segment ranges. Every cross-validation rule must contain at least one Include rule element. Exclude rule elements override Include rule elements. See: Key Flexfield Segments, Cross-Validation Rules.
Determine Your Error Messages
You can define your own error messages for your validation rules. Define error messages to explain errors to users. Your flexfield automatically places the cursor next to the value your user needs to change to correct the error. Define error messages based on the frequency with which key flexfields errors are made.
For example, if you use the Accounting Flexfield, you might have a rule preventing revenue account values (values between 4000 and 9999) with the balance sheet department value 000. An incorrect combination can result from the user entering an incorrect department or an incorrect account. Maybe you intended to enter 100-4500 instead of 000-4500. Or, maybe you intended to enter 000-3500.
If you expect that most of the time the account will be wrong, define an error message such as, "Enter only balance sheet accounts with department 000." If you expect that most of the time the department will be wrong, define an error message such as, "Enter departments other than 000 with revenue accounts." If you expect that either segment is just as likely to be incorrect, define an error message that does not imply a particular segment is in error.
For example, "You have entered an incompatible department/account combination. Please re-enter."
Determine Your Error Segment
Determine in which segment you want to place the cursor when a key flexfield combination fails a validation rule. Choose the segment you feel will most likely be in error. If you have defined a good error message, the message and the segment to which the cursor returns should correspond.
For example, if your account segment is most likely to be in error, define your error message to be, "Please enter only balance sheet accounts with department 000," and specify the cursor to return to the account segment.
If either segment is as likely to be in error, specify the cursor to return to the first of the two segments. If the second segment is actually the one in error, it is more intuitive to move down to a subsequent segment than it is to move back to a previous segment.
Define Simple Rules
Avoid rules that control cross-validation across more than two segments, where possible.
For example, if you use the Accounting Flexfield, you may want to prevent using department 000 with accounts greater than 3999 for all balancing segment values except 99.
While you can define cross-validation rules that span two or more segments, keep in mind that it becomes more difficult to interpret cross-validation error messages and correct invalid key flexfield combinations as your rules encompass more segments.
Using Include and Exclude Ranges
Consider the following basics of cross-validation rules:
-
Combinations must pass all cross-validation rules.
-
Within each rule, combinations must be in at least one include range.
-
Within each rule, combinations cannot be in any exclude ranges.
In summary, a key flexfield value must fall within at least one include range and outside all exclude ranges to pass your validation rule.
Using Include Ranges
Accomplish your control objectives primarily with include ranges when you have a stricter structure for your key flexfield structure. With include ranges, you list valid combinations instead of invalid combinations.
For example, if you use the Accounting Flexfield and want to allow users to enter only certain balancing segment values with certain products or projects, you can enumerate the possibilities:
Include: From 01–100
         To   01–199
Include: From 02–200
         To   02–399
Include: From 03–500
         To 03–699
Using Exclude Ranges
Accomplish your control objectives primarily with exclude ranges when your key flexfield structure is less structured and your key flexfield segments do not have a lot of interdependencies. In this situation, you generally want to accept most combinations. You just want some exceptions to this general rule.
For example, if you use the Accounting Flexfield and want to prevent users from entering balancing segment values 01 and 02 with departments greater than 899, you can specify this exception:
Include: From 00–000
         To   99–999
Exclude: From 01–900
         To   02–999
Minimum and maximum possible values
The lowest and highest possible values in a range depend on the format type of your value set. For example, you might create a value set with format type of Number where the user can enter only the values between 0 and 100. Or, you might create a value set with format type of Standard Date where the user can enter only dates for the current year (a range of 01-JAN-2007 to 31-DEC-2007, for example). For example, if your format type is Char, then 1000 is less than 110, but if your format type is Number, 110 is less than 1000. The lowest and highest possible values in a range are also operating system dependent. When you use a Char format type for most platforms (ASCII platforms), numeric characters are "less" than alphabetic characters (that is, 9 is less than A), but for some platforms (EBCDIC platforms) numeric characters are "greater" than alphabetic characters (that is, Z is less than 0). The window gives you an error message if you specify a larger minimum value than your maximum value for your platform.
As discussed below, you can use blank segment values in your rules to make rules easier to define and maintain. A blank segment value means you want to include or exclude "all the way to the end" of the range (either minimum or maximum).
Tip: Use blank segments to specify the minimum or maximum possible values for a range to avoid having operating system dependent rules.
Using Blank Segment Values
Blank segment values in your rules make the rules easier to define and maintain. A blank segment value means you want to include or exclude "all the way to the end" of the range (either minimum or maximum).
If you leave a low segment blank, the minimum value for your Include or Exclude range is automatically the smallest value possible for your segment's value set. For example, if the value set maximum size is 3 and Right-justify Zero-fill Numbers is set to Yes, the minimum value is 000. However, if the value set maximum size is 3, Alphabetic Characters is set to No, and Right-justify Zero-fill Numbers is set to No, the minimum value is 0.
If you leave the high segment blank, the maximum value for your Include or Exclude range is automatically the largest value possible for your segment's value set. For example, if the value set maximum size is 3 and Alphabetic Characters is set to No, the maximum value is 999. However, if the value set maximum size is 5, and Alphabetic Characters is set to No, the maximum value is 99999.
Note that a blank segment value (null value) is considered to fall within a range that has one or both ends specified as a blank. However, if each of your segments require a value, you would not be able to create a combination with a blank segment anyhow.
You may use blank minimum or maximum segment values to create cross-validation rules that can test for blank segments (that are not already required to have a value). For example, if you allow a null value for your last optional segment but not the second-to-last optional segment, you would use a blank minimum or maximum value for the last segment but fill in a value (such as 000 or 999) for both the minimum and maximums for the second-to-last optional segment.
Using Blank Values in Your Ranges
You may create cross-validation rules for flexfield structures where you allow users to leave some segments blank (that is, where you set the Required field to No for one or more segments in a flexfield structure using the Define Key Flexfield Segments window). You may also create cross-validation rules for flexfield structures where you do not allow users to leave any segments blank.
Often you want to control the values in just one or two segments, and any valid segment values may be used in the remaining segments. For example, if you have a six-segment Accounting Flexfield of the form 00-000-0000-000-000-0000, you may want to allow (include) all possible combinations where the first segment contains 01 and the second segment contains values between 200 and 299, inclusive. You can specify the minimum and maximum values for each segment as follows (assuming that only numeric characters are allowed for these segments):
Include: From 01–200–0000–000–000–0000
         To   01–299–9999–999–999–9999
Or, you could use blank values as both the minimum and maximum values for each of the unrestricted segments (the last four segments):
Include: From 01–200–____–___–___–____
         To   01–299–____–___–___–____
Since the blank values clearly signify the ends of the ranges, you may find them easier to use than explicitly specifying the range ending values. Of course, you can always specify only one blank value in a range if the range has one fixed value:
Include: From 01–200–2000–___–___–____
         To   01–299–____–___–299–____
Define Multiple Rules
You should use several simple validation rules instead of using one complex rule. Simple validation rules let you provide a more specific error message and return your cursor to the most appropriate key flexfield segment. Simple rules are also easier to maintain over time.
For example, if you use the Accounting Flexfield, you might want users to enter departments 100 to 199 and asset accounts 2000 to 2999 only for balancing segment value 01. While you can accomplish this objective with one rule, you can see that it is more cumbersome:
Include: From 00–000–0000–000–000–0000
         To   99–999–9999–999–999–9999

Exclude: From 02–100–2000–000–000–0000
         To   99–199–2999–999–999–9999
Error message: Incorrect department or account with this balancing segment value.
Error segment: Department? Account?
Here's how to express your control objective more clearly using two rules:
| Variable | Description |
|---|---|
| Rule 1 |
Include: From 00–000–0000–000–000–0000
         To   99–999–9999–999–999–9999

Exclude: From 02–100–0000–000–000–0000
         To   99–199–9999–999–999–9999
Error message: Please use departments 100-199 only with balancing segment value 01.Error segment: Department |
| Rule 2 |
Include: From 00–000–0000–000–000–0000
         To   99–999–9999–999–999–9999

Exclude: From 02–000–2000–000–000–0000
         To   99–999–2999–999–999–9999
Error message: Please use accounts 2000-2999 only with balancing segment value 01.Error segment: Account |
Related Topics
Maintaining Your Cross-Validation Rules and Valid Combinations
Defining Cross-validation Rules
Defining Cross-validation Rule Elements
Maintaining Your Cross-Validation Rules and Valid Combinations
Review existing key flexfields when you update your cross-validation rules to maintain consistent validation. Regardless of your current validation rules, Oracle E-Business Suite accepts a key flexfield combination if the combination already exists and is enabled. Therefore, to ensure accurate validation, you must review your existing combinations and disable any combinations that do not match the criteria of your new rules.
Tip: To keep this type of key flexfield maintenance to a minimum, decide upon your cross-validation rules when you first set up your key flexfield structure.
If you want to prevent users from using previously-existing combinations that are no longer valid according to your cross-validation rules, you can always disable those combinations using the combinations form.
Refer to the Oracle General Ledger documentation for information on defining accounts in the Accounting Flexfield.
Related Topics
Reports
Oracle E-Business Suite contains two reports you can use to help maintain a consistent and logical set of rules and key flexfield combinations. The two new flexfield cross-validation reports appear in the System Administration responsibility.
Cross-Validation Rule Violation Report
This report provides a listing of all the previously-created flexfield combinations that violate your cross-validation rules for a given flexfield structure. You can also choose to have the report program actually disable the existing combinations that violate your new rules.
You can check for existing combinations that violate any of the cross-validation rules set up for a given structure, for all the rules at once. Or you can run this report for just one cross-validation rule at a time, to test to see if the specific rule is set up correctly by seeing which existing combinations violate that rule.
The report can be run for a range of cross-validation rules as well. Suppose there are 5 cross- validation rules regarding a structure. The report can be run for a range of 3 rules out of the 5.
You have the option to specify whether to include combinations that have an end date in the past, and therefore "inactive," or to include only "active" combinations. End-dated (inactive) combinations are considered to be those with an end date in the past or a start date in the future.
Note that this report does not include combinations that violate a rule and are disabled.
Cross-Validation Rules Listing Report
This report lists all the cross-validation rules that exist for a particular flexfield structure. This is the information you define using the Define Cross-Validation Rules form, presented in a multiple-rule format you can review and keep for your records.
Related Topics
Maintaining Your Cross-Validation Rules and Valid Combinations
Cross-Validation Rules Window
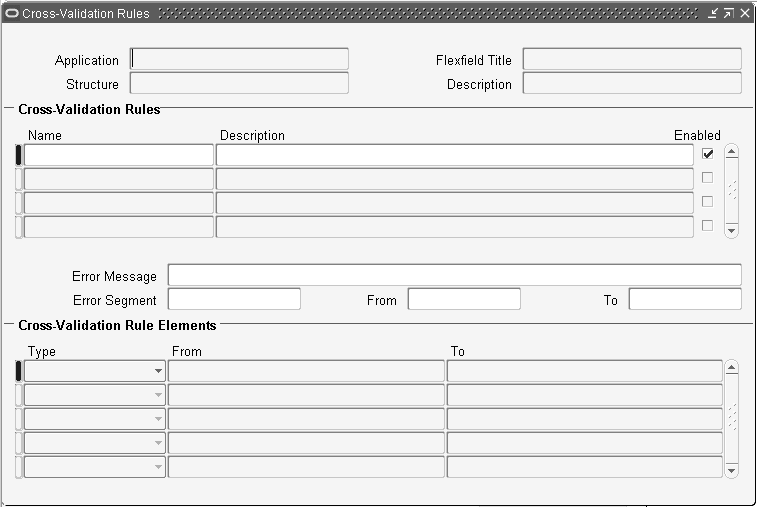
Your flexfield checks cross-validation rules while attempting to create a new combination of flexfield values (for example, a new Accounting Flexfield combination). Your cross-validation rules have no effect on flexfield combinations that already exist. If you want to disable an existing combination, you must disable that combination specifically using the appropriate window. For example, you can disable an existing Accounting Flexfield combination using the Define Accounting Flexfield Combinations window.
Tip: We recommend that you define many rules that each have few rule elements rather than a few rules that each have many rule elements. The more rules you provide, the more specific you can make your error message text.
Your flexfield checks cross-validation rules only if you set Cross-Validate Multiple Segments to Yes using the Define Key Flexfield Segments window.
If you make changes to your cross-validation rules, you need to either change responsibilities or exit from your application and sign on again in order for the changes to take effect.
Related Topics
Designing Your Cross-Validation Rules
Maintaining Your Cross-Validation Rules and Valid Combinations
Defining Cross-validation Rules
Defining Cross-validation Rule Elements
Defining Cross-validation Rules
Prerequisite Steps
-
Use the Key Flexfield Segments window to define your flexfield structure and segments and specify Yes in the Cross-Validate Multiple Segments field for your flexfield structure.
-
Define your values.
To define cross-validation rules:
-
Select the name and structure of your key flexfield for which you wish to define cross-validation rules. Your list only contains structures with the field Cross-Validate Multiple Segments set to Yes on the Key Flexfield Segments window.
-
Enter a unique name and a description for your cross-validation rule.
-
Enter your error message text for this cross-validation rule.
Your flexfield automatically displays this error message on the message line whenever a new combination of segment values violates your cross-validation rule. You should make your error messages as specific as possible so that your users can correct any errors easily.
-
Enter the name of the segment most likely to have caused this cross-validation rule to fail. Your flexfield leaves the cursor in this segment whenever a new segment combination violates this cross-validation rule to indicate where your user can probably correct the error. If you do not specify an error segment name, your flexfield leaves the cursor in the first segment of the flexfield window following a violation of this rule.
-
If you want to have the rule effective for a limited time, you can enter a start date and/or an end date for the rule. The rule is valid for the time including the From and To dates.
-
Define the cross-validation rule elements that make up your rule. See: Defining Cross-validation Rule Elements.
-
Save your changes.
Related Topics
Designing Your Cross-Validation Rules
Maintaining Your Cross-Validation Rules and Valid Combinations
Defining Cross-validation Rule Elements
Use this block to define the cross-validation rule elements that make up your cross-validation rule. You define a cross-validation rule element by specifying a value range that includes both a low and high value for each key segment. A cross-validation rule element applies to all segment values included in the value ranges you specify. You identify each cross-validation rule element as either Include or Exclude, where Include includes all values in the specified ranges, and Exclude excludes all values in the specified ranges. Every rule must have at least one Include rule element, since a rule automatically excludes all values unless you specifically include them. Exclude rule elements override Include rule elements.
Tip: We recommend that you define one all-encompassing Include rule element and several restricting Exclude rule elements.
Select the type of cross-validation rule element. Valid types are:
| Variable | Description |
|---|---|
| Include | Your user can enter any segment value combinations that fall in the following range. |
| Exclude | Your user cannot enter any segment value combinations that fall in the following range. |
When you enter the From (low) field, this window automatically displays a window that contains a prompt for each segment in your flexfield structure. You enter both the low and high ends of your value range in this window. After you finish entering your ranges, this zone displays your low segment values in concatenated window in the Low field and displays your high segment values similarly in the High field.
Enter the low end and the high end of your segment combination range. Neither the low nor the high combination has to be a valid key flexfield combination, nor do they need to be made up of valid segment values.
Note that a blank segment value (null value) is considered to fall within a range that has one or both ends specified as a blank. However, if all of your segments require a value, you would not be able to create a combination with a blank segment anyhow.
You may use blank minimum or maximum segment values to create cross-validation rules that can test for blank segments (that are not already required to have a value). For example, if you allow a null value for your last optional segment but not the second-to-last optional segment, you would use a blank minimum or maximum value for the last segment but fill in a value (such as 000 or 999) for both the minimum and maximums for the second-to-last optional segment.
If you want to specify a single combination to include or exclude, enter the same combination in both the Low and High fields.
Disabled rules are ignored when your key flexfield validates a combination of segment values. Deleting the rule has the same effect, but you can re-enable a disabled rule.
Related Topics
Designing Your Cross-Validation Rules
Maintaining Your Cross-Validation Rules and Valid Combinations