MES Workstation
This chapter describes the features of the MES Workstation and the Operator role, including the ability to view the work dispatch list and perform transactions.
This chapter covers the following topics:
- Overview of the MES Workstation
- Workstation Startup and Initialization Modes
- Viewing Dispatch Lists
- Viewing Work Content
- Job Operation Actions
- Moving and Completing Assemblies
- Overview of Serialized Manufacturing Transactions
- Searching for Serialized Jobs and Performing Express Moves
- Creating Move Transactions for Serialized Jobs
- Viewing Job Information
- Reporting Exceptions
- Returning Assemblies
- Shop Floor Time Entry
Overview of the MES Workstation
The MES Workstation for the operator includes one tabbed region that provides Manufacturing Execution System (MES) capabilities on top of Oracle Work in Process. It provides the ability to view the work dispatch list, and then navigate to a number of transaction windows.
MES Operator responsibilities include:
-
Viewing dispatch lists for jobs in the work queue
-
Viewing job components and instructions
-
Performing work in process transactions including move, completion, and assembly scrap
-
Recording quality results and material transactions
-
Reporting exceptions if unable to perform job transactions
-
Reporting time and labor information
-
Ability to assign lot and serial numbers during operation and work order completion
-
Functionality for serialized jobs to search and perform transactions by serial number record
-
Ability to create electronic signatures for audit capability
Electronic Signature Support
MES for Discrete Manufacturing supports Federal Food and Drug Administration's (FDA) code regulation 21 CFR Part 11 through the Oracle E-Records application. This provides traceability for move, completion, and material transactions. In these transactions the operator or supervisor can first certify or acknowledge instructions to successfully process the transaction:
-
If a signature is required for a transaction, a signature page displays
-
Transaction pages display a check box, enabling you to indicate if instructions were acknowledged
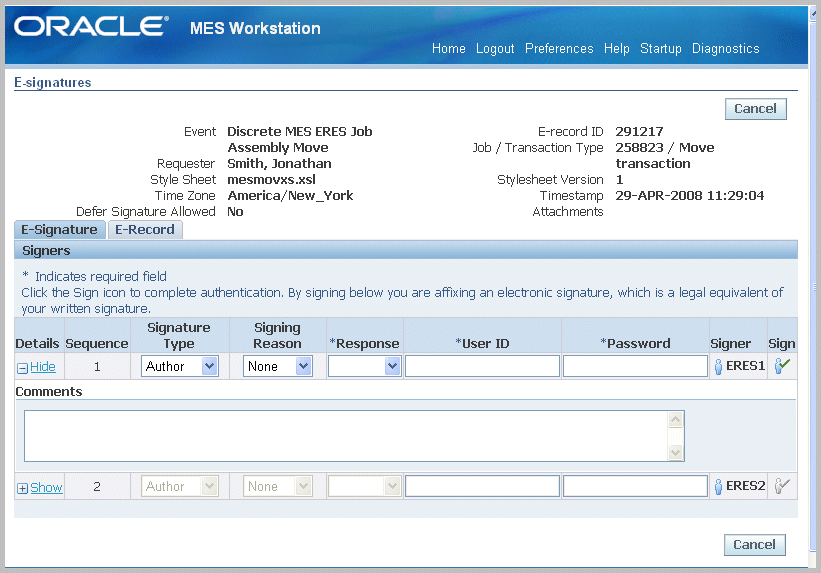
Oracle Approval Management contains transaction types for e-sginatures in MES for Discrete including Discrete MES ERES Job Assembly Completion, Discrete MES ERES Job Material Transaction, and Discrete MES ERES Job Assembly Move. The MES for Discrete transactions creating electronic signatures include the following:
-
Material Transactions
-
WIP Component issue
-
WIP Component return
-
WIP Negative component issue
-
WIP Negative component return
-
-
Move Transactions: Quality results are included in the e–record.
-
Move
-
Move and Scrap
-
Move and Reject
-
Move and Complete
-
Return and Move
-
-
Completion Transactions: Quality results are included in the e–record.
-
Assembly completion
-
Assembly return
-
Setup
The e-records and e-signatures (ERES) framework uses Oracle Workflow business events and Oracle XML Gateway. Oracle Workflow is required to initiate the e-signatures (EDRPSIGF) workflow for sending notifications. The Workflow Business Event system is used to define an e-signature event and associate synchronous e-signature subscription to the event.
If e-signature capability is setup, combination transactions generate records depending on parameter configurations. If the Move Option parameter is enabled, two records are generated in e-signatures for combination transactions.
The Oracle E–Records Implementation Guide and the Oracle E–Records Developer's Guide contains setup information. See:
-
Evidence Store, Oracle E-Records Implementation Guide
-
Implementing E-Records, Oracle E-Records Implementation Guide
-
Oracle Manufacturing: Implementing Oracle E-Records in Discrete Manufacturing Guide
-
Oracle Approvals Management Implementation Guide
Workstation Startup and Initialization Modes
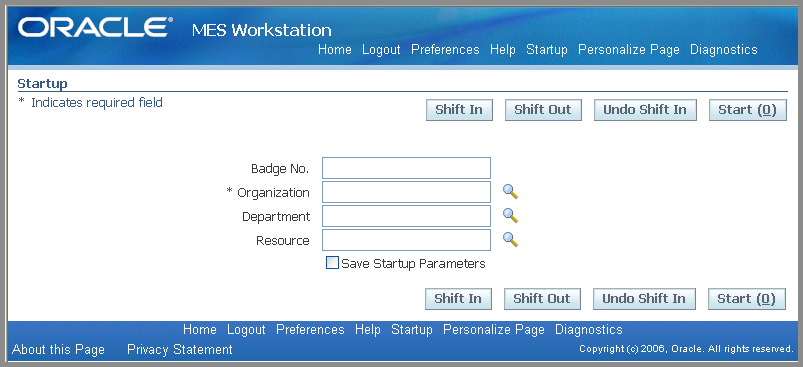
The details displayed on both the MES Workstation and the MES Supervisor Workbench are determined by the specifics of your login information. The Startup page is used to enter your information to view the entire organization and a particular department; you can also specify a resource, employee, or machine. You can set parameters and integrate other Oracle Application functions for different login and Workbench initialization modes.
Job Selection Modes
The Job Selection Mode parameter is used to set a job search page when initializing the workstation. Each page type returns records within the login parameter values entered. Choices include:
-
Dispatch Lists to display job operation records according to your configuration including operation schedule times, job type, working order, and a number of other parameter settings. See: Viewing Dispatch Lists
-
Search page enabling search by job number or sales order number for records. See: Searching for Jobs
-
Search Serial Numbers page enabling search according to serialized job records. See: Searching for Serialized Jobs and Performing Express Moves
Assigned Resources
In Oracle Bills of Material, departments are assigned to each operation, and available employee labor resources instances are assigned to departments. For a specific login:
-
If the employee is assigned to one organization, department, and resource instance combination—the search mode page appears automatically for that login parameter combination. The employee can perform transactions only within those parameters, and values cannot be changed.
-
If the employee has several assigned organizations, departments, or resources associated to his login—the information can be changed to the assigned values.
See: Defining a Resource, Oracle Bills of Material User's Guide, and Assigning Resources to a Department, Oracle Bills of Material User's Guide
Departmental Access
The Departmental Access parameter determines which records display, in the list of values, in the Department parameter of the Startup page. If the parameter is set to:
-
All—All departments in a particular organization appear.
-
Assigned—Only departments where the employee is assigned as a resource instance appear.
Save Startup Parameters
Your job selection mode page displays automatically when you save startup parameters from a prior login. Enable the Save Startup Parameters check box to save parameters for future logins. This reduces navigation for repeated combinations of organization, department, and resource. To change saved login information, access the Startup page again by selecting Startup in the MES Workstation.
To log on to the MES Workstation
-
Navigate to the Startup page.
-
If Shift In and Shift Out is configured on the page, you can enable or disable employee time and labor reporting. These flags are configured in the Time Entry Mode parameter.
-
Shift In enables the recording of actual attendance hours entered
-
Shift Out stops actual attendance hours
-
Undo Shift clears actual attendance hours entered
See: Labor Performance Views for information on employee shift calculations.
-
-
If the employee login has an associated Badge Number, this field appears. Optionally, you can enter an appropriate value in this field.
Badge numbers are created as Employee Numbers in the Oracle Human Resources application. Shop floor labor resources are tracked using employee badge numbers.
-
Select values in the Organization and Department fields.
-
Optionally, you can select a value in the Resource field.
-
Equipment and Serial Number fields appear if the resource value is a machine type, select appropriate values.
-
The Employee field appears if the resource value is a labor type. You can select an employee name.
-
-
Enable the Save Startup Parameters check box to save these parameters for future logins.
-
Select Start to display the job search mode page selected.
On the job search page you can record transactions, or access other pages for shop floor work.
Viewing Dispatch Lists
Dispatch lists are a listing of all job operations to be worked on—according to specific department, resource, resource instance, or a combination of these values. The Dispatch List enables you to perform express move transactions and access other pages for performing and viewing transactions. This list is based on operation schedule times within the specified time range. This includes:
-
Current: Job operations with assembly quantities in all steps except Scrap and Reject.
-
Scheduled: Job operations with assembly quantities in all steps except Scrap and Reject, plus all other job operations having schedule times within time range.
-
Upstream: Job operations that have quantities in Queue, Run and To Move steps in their immediate preceding count point operation within the time range.
The display is modifiable—providing filtering, ordering, and grouping. Several parameters are used to control information displayed on the dispatch list. See: MES Administrator
-
Default Dispatch List Type determines the job type initially displayed on the list when the workstation opens. Choices are to display current work on the shop floor, or current work and any scheduled job operations.
-
Dispatch List Ordering Criteria specifies the attribute fields shown on the list. See: Dispatch List Ordering Criteria
-
Dispatch List Working Order determines the order of jobs displayed on the list—that is, any order or first ready.
-
Include Complete Quantity in Dispatch List provides the ability to include job operations with quantities in the To Move step.
-
Include Job Status specifies the status types of jobs displayed. See: Include Job Status
The list is formatted in a table view, columns in the list display information about each job. This includes scheduled start and end times, assembly name, customer, job readiness, and component and resource availability. If the Dispatch list Ordering Criteria parameter is not set, and The Dispatch List Working Order parameters is set to Any Order— you can sort the dispatch list on the columns by clicking on the column header. You can print a hardcopy version of the document by choosing Printable Page, and reorder the records on the list. See: Reordering Job Operations on the Dispatch List. In addition, you can hide or show columns on the dispatch list, by using the personalization capability.
Ready Status
The Ready column on Dispatch List page indicates if the job operation is ready for work. Use the Ready Status Criteria parameter to define your qualifications for readiness. This includes if a job is released, has no exceptions, status is not assigned, and a quantity is in Queue or Run. When a job meets the criteria set, a check mark appears in this column. See: Ready Status Criteria
The design of this setting leaves the decision to the supervisor to determine whether or not the job operation is ready for work. If the supervisor decides the job is not ready, a job hold or exception can be issued.
Resource and component shortages as displayed on the Shopfloor Progress region of the Dashboard are not used in calculating the Ready Status definition. If you want to modify this design function, you can create a customized interface in the Ready Status client extension to enable custom logic to determine specific readiness definitions. See: Overview of MES Client Extensions
To view and update Dispatch List information
-
Navigate to the Dispatch List.
The default dispatch list appears, displaying default details determined by the specifics of login values, along with a region to select filtering criteria.
-
If Shift In and Shift Out is configured on the page, you can enable or disable employee time and labor reporting. These flags are configured in the Time Entry Mode parameter.
-
Shift In enables the recording of actual attendance hours entered
-
Shift Out stops actual attendance hours
-
Undo Shift clears actual attendance hours entered
See: Labor Performance Views for information on employee shift calculations.
-
-
Optionally, you can select filter information in the View Options region. Select filtering criteria from the following fields:
-
Department
-
Resource
-
Instance
-
Dispatch List type
-
From Date and time
-
To Date and time
-
-
You can select additional filter criteria in the More Options region.
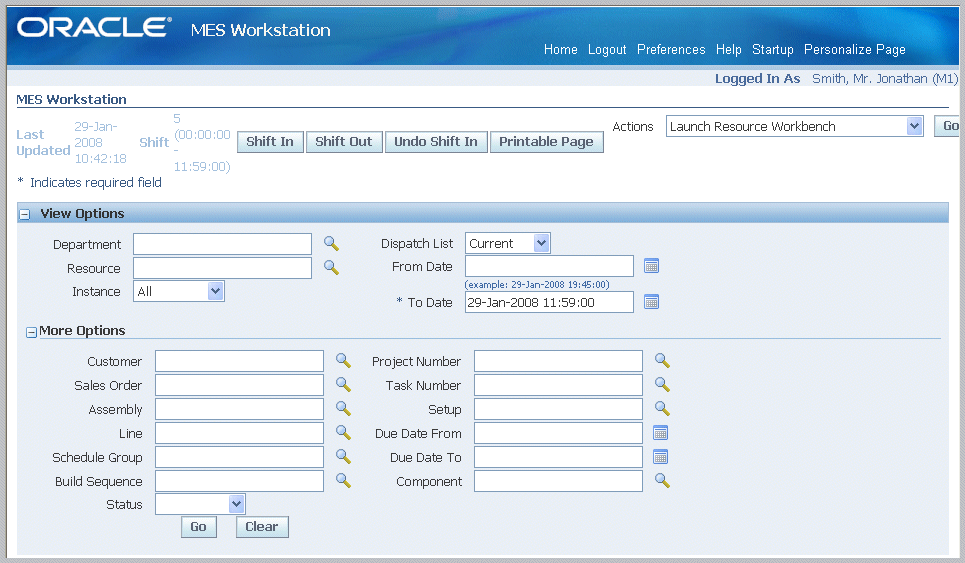
The following fields are available: Customer, Sales Order, Assembly, Line, Schedule Group, Build Sequence, Status, Project Number, Task Number, Setup, Due Date From, Due Date To, and Component.
-
Select Go to display the dispatch list with the filtering results.
The setup and layout of the dispatch list is configured in the Manufacturing Execution System Parameters page. The header displays available actions. These actions can be configured as both buttons or choice lists.
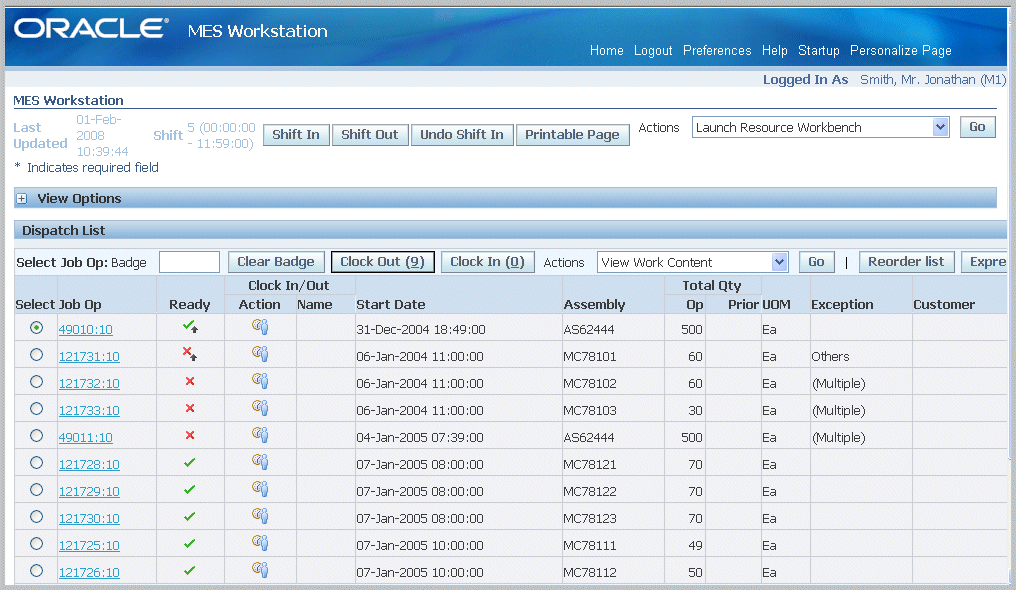
The Dispatch List Ordering Criteria parameter determines the fields displayed on the dispatch list. See: Dispatch List Ordering Criteria. Fields that appear can include:
-
Assembly
-
Customer
-
Exceptions
-
Dispatch list type
-
Job’s ready status
-
Expedited status
-
Employees working on the job
-
Shift
-
Start Date
-
-
Select the Job Operation you want to work on to display the Work Content page, see Viewing Work Content
-
If you are using clock functionality, select the Clock or Job actions to record the time worked on a job operation.
-
The display for this action depends on your parameter configuration.
-
You can also set clock actions in the Action column for the specific job. When you select the Clock and Worker icon, the job is clocked on and the icon displays a red colored box with a cross out indicating the job is locked.
-
The operator name displays in the Name column. To end this action, select the icon again, and the lock display disappears.
-
-
Select actions available on this page:
-
You can create job operation transactions. See: Job Operation Actions and Global Actions
-
You can perform express move transactions on this page. This enables you to move the quantity in one action, and create move transactions for a number of job operations performed in one action. See: Moving and Completing Assemblies
-
Viewing Work Content
The Work Content page displays the information needed to perform work on an operation. It includes component and resource requirements, work instructions, attachments and other job property information. You can navigate to action pages and view employees currently working. Clocked in time of the employees currently working displays.
The actions available and the page layout are determined by parameter settings. See: Work Content Actions, and Work Content Layout
To view and update work content
-
Navigate to the Work Content page.
The Job Properties region displays information about the job including job number, description, assembly information, status, and schedule and completion dates.
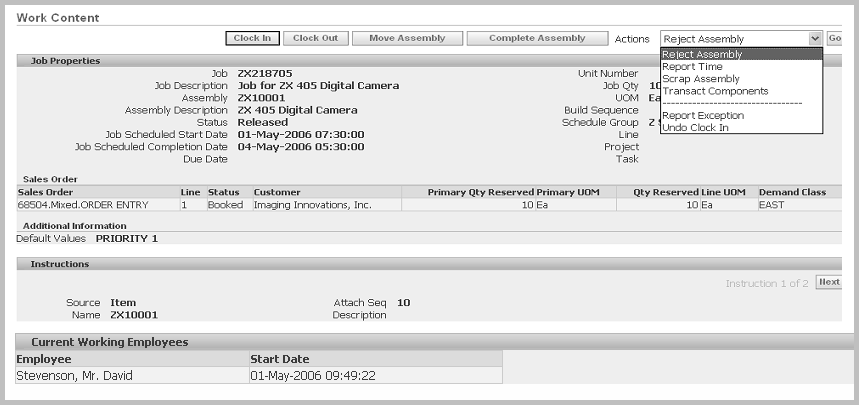
Other data displays depending on integrations with other applications and the settings of the Work Content Layout parameter including:
-
If this job is linked to a sales order, the sales order and customer information displays in the Sales Order region.
-
The Additional Information region appears for customized information entered in flexfield records.
-
You can setup a sequential display of instructions needed to perform the operation in the Instructions region.
-
If labor skills validation is used to certify the qualifications of operators performing transactions, the Competencies region lists all competency requirements for the job operation.
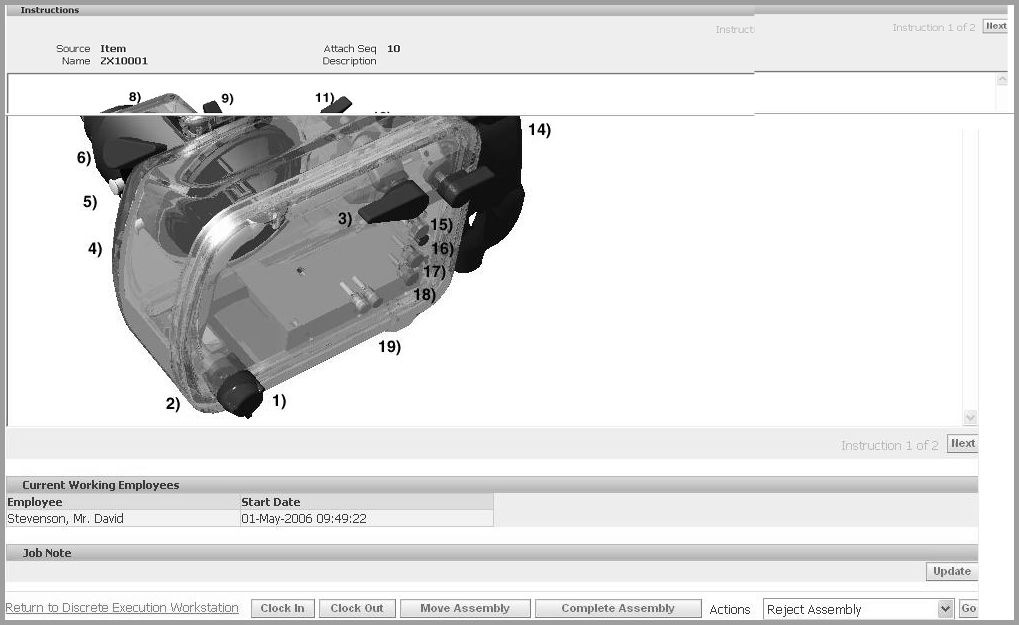
-
-
Select the actions available on this page to access the pages for job transactions.
Job Operation Actions
Job operation actions are the job transactions and actions used in your environment. The list of actions available are set in a parameter, see: Job Operation Actions. These actions are also set on the Search Jobs page using the Search Job Operation Actions Parameter. The list of actions available include the following:
Assign Alternate Resources
You can substitute alternate resources and resource groups to balance your resource load, and resolve exception conditions. See: Assigning Alternate Resources
Clock In, Clock Out, and Undo Clock In
Clocks flag the job operation as started or ended, enabling you to record resource charges for time entry. See: Clock In and Clock Out
Expedite and Undo Expedite
Any job operation can be moved to top priority on the dispatch list. Scheduled operation start and end times are not changed—the operation is moved on the display to make it prominent. The Ready column displays an arrow icon indicating the operation is expedited. Since expediting is performed at the job level, all operations are affected—and moved and marked on the dispatch list.
Job On and Job Off
Job On and Job Off actions are a separate action of clock actions, required when multiple employees are working on a single job operation. This action flags the job operation as picked and ready, enabling the recording of resource charges for time entry. See: Clock In and Clock Out
Move Assembly, Move and Complete, Express Move, and Complete Assembly
You can move assemblies within an operation, from one operation to another, backward and forward within the routing, and onto completion of the job. You also have the ability to create express moves—enabling simultaneous completion and scrap, or completion and reject, for the entire quantity in one action. See: Moving and Completing Assemblies
Label printing ability is provided while performing work on the shop floor from various pages. The Print Label action is defined in the Job Operation Actions and Work Content Actions parameters. You can print labels for:
-
Job related information
-
Serialized numbers in specific jobs
-
Move and completion transactions
-
Multiple labels for a range of jobs—one label for the entire job quantity, and individual labels are printed for each serial number in the job
Two parameters are used to specify at what point in the transaction labels are printed:
-
Assemblies for Completion Labels specifies which assemblies or categories have labels printed at completion.
-
Standard Operations for Move Labels defines the operations where labels are automatically printed when a move transaction is performed.
See: Labeling Overview, Oracle Warehouse Management User's Guide, and Label Printing Integration Kit, Oracle Warehouse Management Implementation Guide
Reject Assembly and Scrap Assembly
You can reject and disposition assemblies on the production floor that do not meet standards. The Reject and Scrap process isolates problem assemblies by moving the assemblies into a scrap or reject intraoperation step. If these assemblies are reworked, they can be returned to their routing operation, see: Rejecting and Scrapping Assemblies
Reschedule Operation and Undo Reschedule Operation
You can reschedule operations to balance the work load. See: Rescheduling Operations
Return Assembly, Return and Move, Return From Scrap, and Return From Reject
You can return assemblies to production from the supply subinventory, or reworked parts that were originally scrapped or rejected. See: Returning Assemblies
Separator1, Separator2, Separator3
Separators are not actions, they are used to group actions together.
Transact Components
You can create component transactions for a job. See: Job Component Transactions
View Exceptions and Report Exception
Exceptions are reported when work is stopped on the production line. When notified about exceptions, you can view other job operations affected and take action. See: Viewing and Resolving Exceptions
Viewing Job Information
Detailed information about job and operation transactions is available in the following pages: View Job Detail, View Job Transactions, View Operation Transactions, View Related Jobs, and View Work Content. See: Viewing Job Information and Viewing Work Content
View and Print Job Traveler
You can view and print a job traveler in the Dispatch List, Work Content, Search Jobs, and Shopfloor Progress pages. The traveler displays as a PDF file in a separate window.
The job traveler can contain associated attachments such as instructions for the job in the body of the traveler, or at the end as an appendix. You can:
-
Configure the job traveler template at several levels including category set, item, category, or organization level. See: Job Traveler Template Setup
-
Customize the traveler, including enabling bar code scans, if Oracle XML Publisher is installed.
-
Attach files types such as images, short text, long text, and PDF.
Note: All attachments display on the traveler, however you can customize the template if you want to delete certain sections using Oracle XML Publisher.
-
Print the job traveler in batch mode. For example, you can print the job traveler for all the jobs for a shift before starting a shift. In the Shopfloor Progress region of the Dashboard page, you can select multiple jobs that are scheduled to start in a shift—and select View Job Traveler.
See: Attaching Files to Jobs, Schedules, and Operations, Oracle Work in Process User's Guide
Update Note
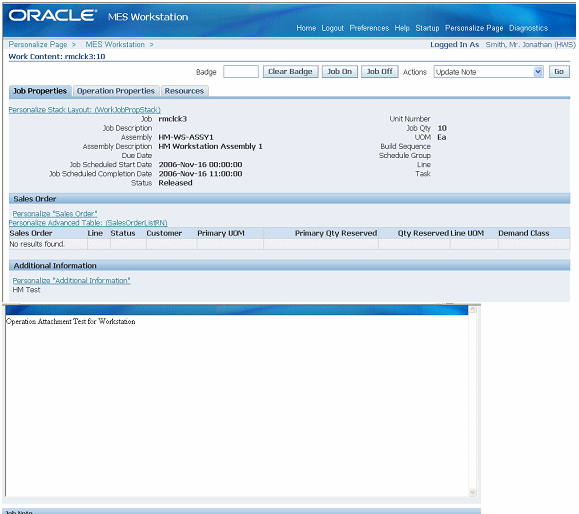
Notes created during job transactions can be updated on the Update Note page. See: Updating Job Notes
Updating Job Notes
Information about assemblies is added in the Note region of the various transaction pages. The Update Note page is used to add or append new information. The new text is appended to the existing note for each update.
Enter your comments in the Append Note region. Select Apply to save your work.
Job Component Transactions
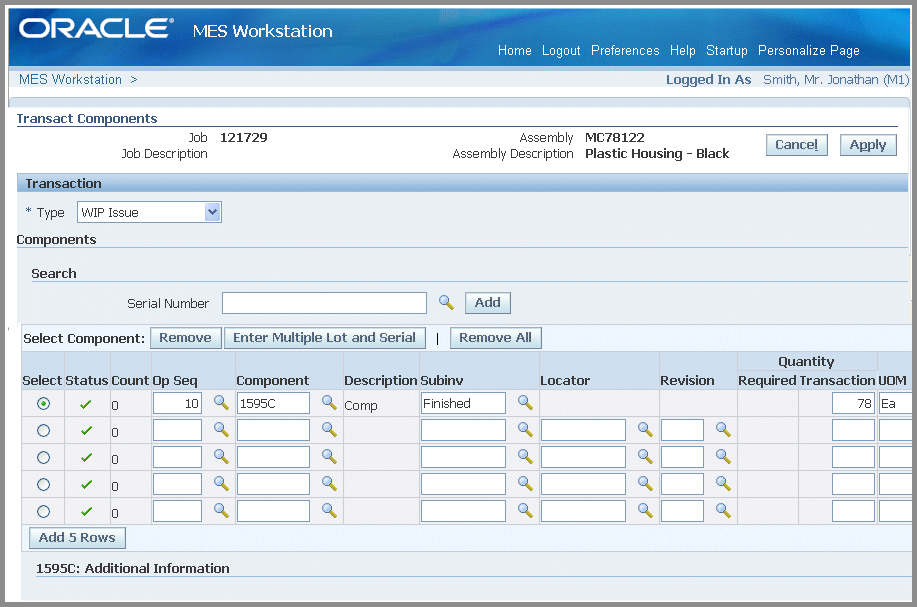
The Transact Components page enables you to create a number of component transactions for your job, including
-
Issuing and returning components
-
Entering subinventory and locator information
-
Entering applicable lot and serial number data
The page display defaults the open quantity ( quantity required/quantity issued) of supply type push components as defined on the assembly's bill of material. You can also scan or enter component serial numbers.
Transacting components
To create component transactions for a job
-
Navigate to the Transact Components page.
-
In the Transaction region, select a transaction type. Your choices are Issue, Return, Negative Issue, and Negative Return.
-
In the Search region, you can search for component serial numbers in the Serial Number field. Select Add to populate the component transaction table with the information from the serial number record.
-
The page display defaults supply type push components as defined on the job. You can edit these records or remove them.
-
To add individual component records, select information in the Components table for applicable fields:
-
Operation Sequence
-
Component
-
Subinventory
-
Locator
-
Revision
-
Transaction Quantity
-
Unit of Measure
-
-
You can enter information for components under both lot and serial number control.
This page enables you to access the Serial Detail or Lot Detail pages, and generate lot and serial numbers, and assign lot and serial numbers.
-
For individual components, in the Serial region of this table, select from applicable generated lot serial numbers in the From, To, and Parent fields. You can also select values in the Reason and Reference fields.
-
If serial numbers have not been generated, select Enter Multiple Lot and Serial to access the Add Lot and Serial page in Oracle Inventory.
-
-
Select Apply to save your work.
Related Topics
Overview of Serialized Manufacturing Transactions
Lot Control, Oracle Inventory User's Guide
Setting Up Lot Control, Oracle Inventory User's Guide
Maintaining Item Lot Information, Oracle Inventory User's Guide
Setting Up Serial Number Control, Oracle Inventory User's Guide
Assigning Serial Numbers, Oracle Inventory User's Guide
Moving and Completing Assemblies
Assemblies can be moved from one operation and intraoperation step to another, and backward and forward within the routing.
-
When assemblies are completed at an operation, the system automatically backflushes operation pull components and charges resources.
-
You have the ability to combine transactions such as move and scrap, and move and reject. This enables you to complete the transaction in a single step. This option is set in the Move Option parameter. See: MES Administrator
-
You can setup custom flexfield information to meet your site's needs.
-
Applicable quality plans display for entering collection data.
-
Lot and serial number information can be assigned during move and completion transactions.
-
You can insert custom programming instructions to control job operation readiness and transaction movements according to your site's specifications. See: Overview of MES Client Extensions
-
You can confirm instructions, and also capture move related transactions in e-records if using electronic signature functionality.
See: Move Transactions Process Diagram, Oracle Work in Process User's Guide
Express Moves
Express moves enable you to move the quantity in one action, defaulting all required values. It also provides a way to move several job operations in one transaction. For express move options:
-
The setting of the Default Intra Op Step parameter determines the intraoperation step of the next operation where the assembles are moved. See: Default Intra Op Step
-
The Enforce Sequential Move parameter is used to determine the next operation where the assembles are moved.
-
The assembly quantity in the current operation cannot be in more than one intraoperation step of Queue, Run, or To Move.
-
Completion and scrap transactions require a default scrap account defined if the organization requires a scrap account. This is set in the Default Scrap Account parameter. See: Default Scrap Account
-
Mandatory quality collection plans are not applicable for express moves.
-
Functionality is supported for preassigned assembly serial number jobs if the qualifying criteria is met, see: Overview of Serialized Manufacturing Transactions
-
Express moves for partial quantities is dependent on the method the Search Serial Numbers page is accessed. If the page is accessed from the Dispatch List Serialized icon, you cannot move partial quantities of serialized jobs. If the page is accessed directly from startup or from global actions, you can perform express moves for any quantity at the operation.
To perform express moves on job operations
-
Navigate to the Dispatch List page.
-
Select the job operation record you want to complete. You can select multiple records.
-
In the Express Move Quantity columns, enter a value in the Complete field.
-
If there is a quantity to scrap, enter a value in the Scrap field.
-
Select Express Move to complete your transaction.
Labor Skills Validation
Labor skills validation is used to certify the qualifications and required competencies needed to perform assigned manufacturing activities. This help you meet International Organization for Standardization (ISO) 9000 requirements, preventing potential errors and issues during job transactions. Regulatory requirements for specific industries may mandate companies to execute and document employee competencies. The labor skills validation process includes:
-
When the operator Clocks In for job operation move transactions—such as move, scrap, reject, and return—levels of qualifications are checked.
-
The View Content and Job Details pages contain Competencies regions listing all competency requirements for the job operation.
-
E-records can be setup to capture the competencies validated for move transactions.
The setup for labor skills validation is integrated with other Oracle applications including Human Resources Management Systems, Bills of Material, Work in Process, and E-Records. This includes:
-
Defining competencies and qualifications, and associating to employees at the appropriate skill levels.
-
Defining competencies for standard operations and routing operations.
-
Defining competencies for job operations.
-
Configuring the Operator Skills Validation parameter for specific organizations.
See: Operator Skills Validation
Quality Display Modes
There are several methods for entering collection plan data in the Quality Plans region of the MES move transaction pages. You can:
-
Access the Enter Quality Results page in Oracle Quality if any parent-child, or multi-level, relationship plans exist for the associated transaction.
-
Enter quality results in the same page as the transaction detail pages without navigating to another page. If the collection plan for the move transaction in MES does not have a child plan, then the collection plan can be rendered in the Quality region of the Move Assembly Detail page. This simplifies navigation across pages.
-
This display mode only appears if single level plans exist.
-
If any applicable parent and child relationship plans also exist, the Parent-Child Entry Mode button is enabled to access the Quality Workbench.
-
If both exist, you can enter the data in the inline region first—and then navigate to the parent child region. If you choose to enter data in the parent-child mode first, you cannot return to the inline mode.
-
-
Enter quality plan results using the inline mode using the device integration feature, if enabled in Oracle Quality.
You have the option to enter the results for any plan by navigating directly to the Quality Workbench.
Device integration provides the ability to capture data directly into the application using programmable logic controller devices. In MES for Discrete Manufacturing, you can move collection plan transactions directly from the move transaction pages into the Quality Workbench.
See:
Parent-Child Collection Plans, Oracle Quality User's Guide
Entering Quality Results, Oracle Quality User's Guide
Device Integration Setup, Oracle Quality User's Guide
Creating Collection Plans, Oracle Quality User's Guide
Defining Collection Plan Elements, Oracle Quality User's Guide
Moving Assemblies
To move assemblies through job operations
-
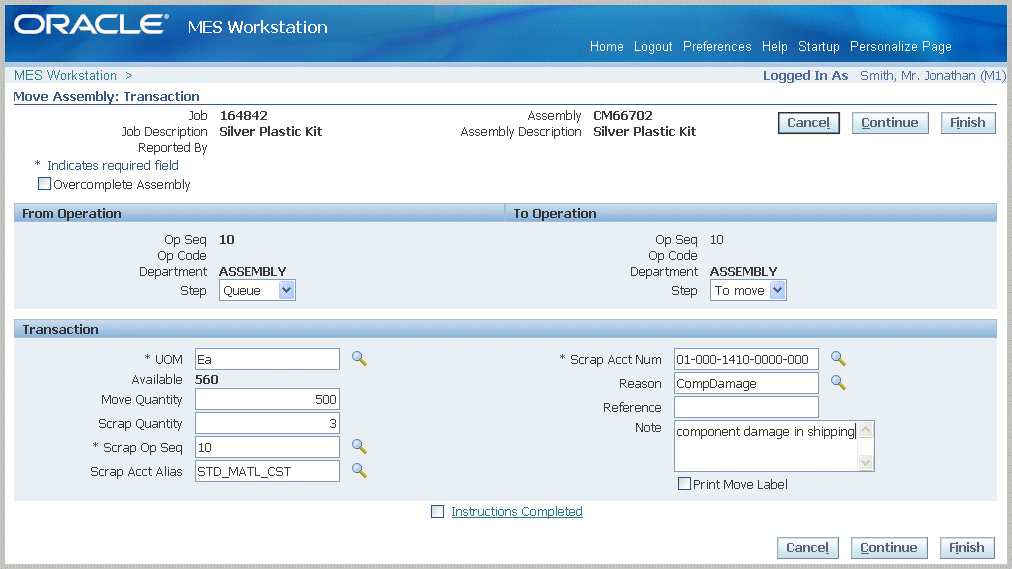
Navigate to the Move Assembly: Transaction page.
This page displays job information including job number and description, operator, and assembly number and description.
-
You have the choice to select Finish to save your record using the values displayed on this page. You can also change the defaulted values before saving the record.
-
Enable the Overcomplete Assembly check box if the transaction quantity is greater than the job quantity. See: Assembly Over-Completions and Over-Moves, Oracle Work in Process User's Guide
-
In the From Operation region, select values in the From Operation Step, To Operation Sequence, and To Operation Step fields.
Depending on how the following parameters are set, certain fields display in this region:
-
Enforce Sequential Move
-
Move Option
See: MES Administrator
-
In the Transaction region, select a value in the Move Quantity field. Optionally, you can enter a transaction Reason, Reference, and descriptive text in the Note region.
Notes can be updated, see: Updating Job Notes
Note: The Move Option parameter enables you to combine a move transaction with scrap or reject transactions.
-
If you have a quantity to scrap, enter a value in the Scrap Quantity field.
-
When a value is entered in the Scrap Quantity field, the fields for Scrap Operation Sequence, Scrap Account Alias, and Scrap Account Number display.Enter the applicable values in these fields.
-
If a customized descriptive flexfield is used in your environment, the Additional Information region displays. Enter your information in this region. If you are not using customized information, this region does not appear.

-
Select Finish to complete your move transaction, or select Continue to enter information about manual resources and quality plans.
-
If you select Finish, the transaction is saved.
-
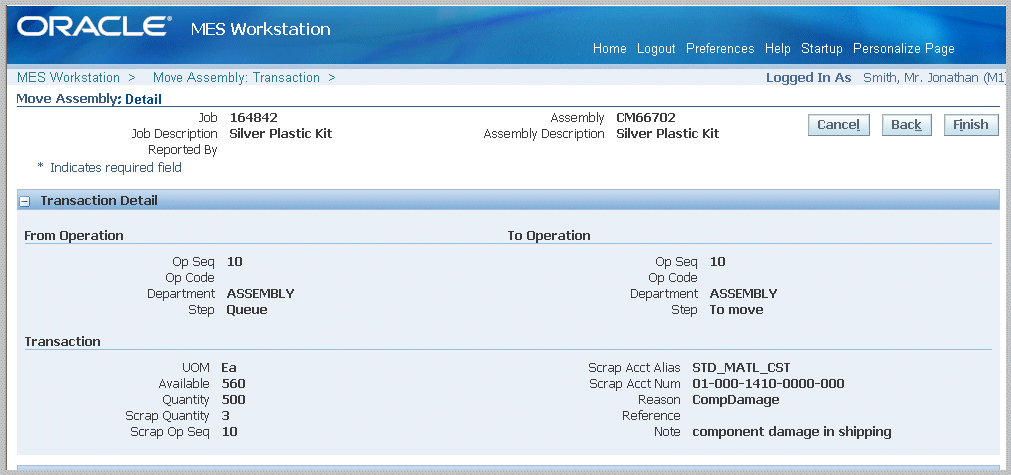
If you select Continue, the Move Assembly: Detail page displays.
On the Move Assembly: Detail page, the specifics of the data entered on the Move Assembly: Transaction page display in the Transaction Detail region.
-
-
In the Manual Resources region, you have the option to add machine resources by selecting Retrieve Non-Labor Resources—or individually adding records.
-
When you select Retrieve Non-Labor Resources, applicable machine resources populate the fields for Resource, Instance, and Start Time and End Time. You can edit or delete these records.
-
For individual records you are manually entering, select values in the Resource, Instance, and Start Time and End Time fields.

-
-
Quality collection plan information displays in the Quality Plans region. Several different modes may appear, For collection plans with a parent-child relationship only, the Quality Plans region displays fields for Plan Name, Information, Mandatory flag, Completed status, and Attachments. Select Add Child Data to navigate to the Enter Quality Results page in Oracle Quality.
The Enter Results page on the Quality Workbench appears for entering quality data. See: Entering Quality Results, Oracle Quality User's Guide
After quality data is entered, the transaction page is refreshed with the updated information. You have the option to duplicate, update, or delete these records.
-
If single level plans exist, enter quality results directly in the MES transaction pages . Select information in the following fields: Inspection Resolution, Quantity Defects, Subinvenvory and Locator, and Remarks.
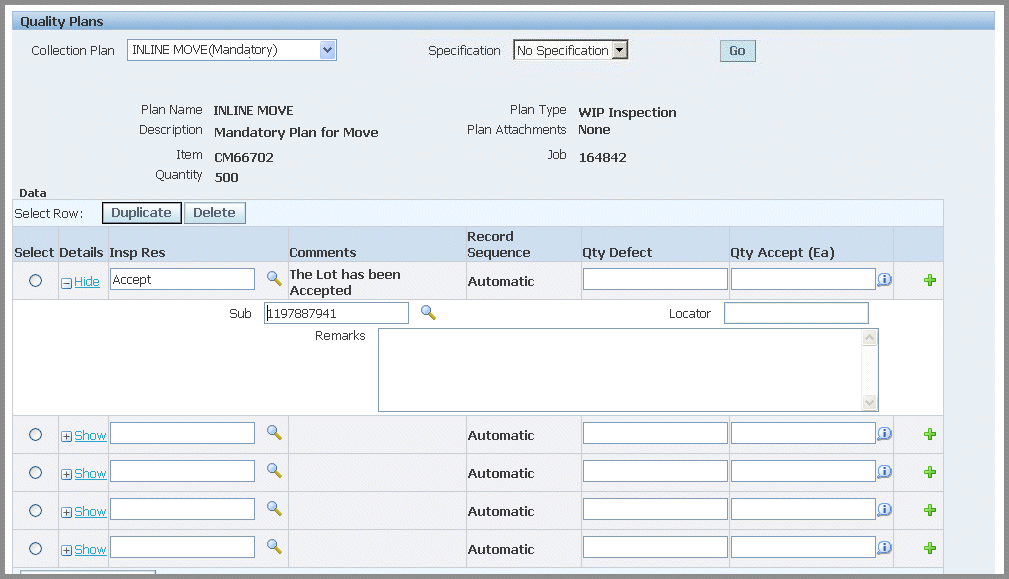
If applicable parent and child relationships plans also exist, the Parent-Child Entry Mode button is enabled to access the Quality Workbench. If you choose to enter data in the parent-child mode, you cannot return to the inline mode. However, you can enter data first in the inline region, and then navigate to the parent-child region.
-
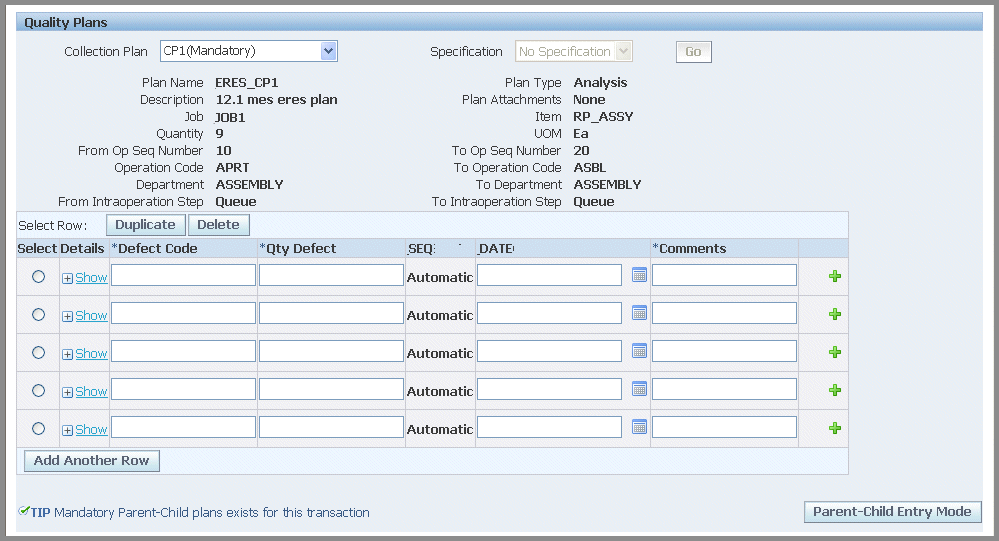
Oracle Applications also provides the ability to enter collection plan transactions using integrated devices. Scan your data into the fields for Defect Code, Quantity Defect, Date, and Comments.
If applicable parent and child relationships plans also exist, the Parent-Child Entry Mode button is enabled to access the Quality Workbench.
-
Use the Backflush Components region to manually backflush components under lot and serial control. Search for preassigned assembly component serial numbers in the Serial Number field. Select Add to populate the component transaction table with the information from the serial number record.
If lot and serial information is required, the status column displays X. Edit this list by enabling or disabling the Select field for applicable components. See:
Overview of Backflush Transactions, Oracle Work in Process User's Guide
Backflush Transactions, Oracle Work in Process User's Guide
Backflushing Pull Components, Oracle Work in Process User's Guide

-
For component lot and serial number assignments—select applicable values in the Subinventory, Locator, Revision, and Lot fields:
-
Select from applicable generated serial numbers in the From, To, and Parent fields. You can also select values in the Reason and Reference fields.
-
If lot and serial numbers have not been generated, select Enter Multiple Lot and Serial to access the Add Lot and Serial page in Oracle Inventory.
See: Assigning Serial Numbers, Oracle Inventory User's Guide
-
-
Select Finish to save your work.
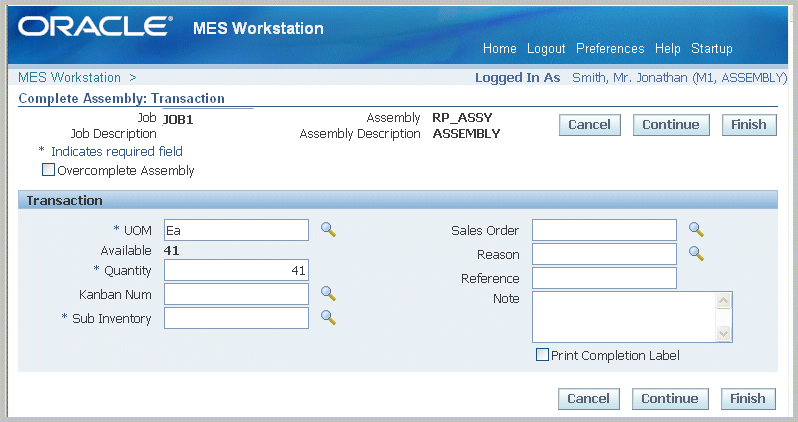
Completing Assemblies
You complete job assemblies into inventory using both the Move Assembly and Complete Assembly pages. In cases where your production process may yield more assemblies, you have the ability to overcomplete assemblies into inventory.
To complete an assembly
-
Navigate to the Complete Assembly: Transaction page.
This page displays job information including job number and description, operator, assembly number, and description.
-
Enable the Overcomplete Assembly check box if the completions transaction quantity is greater than the job quantity.
See:Assembly Over-completions, Oracle Work in Process User's Guide, and Completing and Returning Assemblies, Oracle Work in Process User's Guide
-
Select Finish to use the defaults displayed to create a completion transaction. Or select values for fields displayed on this page for this completion transaction.
-
In the Transaction region, you can select applicable values for the following fields:
-
Unit of Measure
-
Quantity
-
Kanban Number
-
Subinventory
-
Sales Order
-
Reason
-
Reference
-
Note
Notes can be updated, see: Updating Job Notes
-
-
If a customized descriptive flexfield is used in your environment, the Additional Information region displays. Enter your information in this region. If you are not using customized information, this region does not appear.
-
Select Finish to complete this transaction, or select Continue to enter information for quality plans, component backflush, and lot and serial assignments.
-
If you select Finish, the transaction is saved.
-
If you select Continue, the Complete Assembly: Detail page displays.
-
-
In the Manual Resources region, you have the option to add machine resources by selecting Retrieve Non-Labor Resources—or individually adding records.
-
When you select Retrieve Non-Labor Resources, applicable machine resources populate the fields for Resource, Instance, and Start Time and End Time. You can edit or delete these records.
-
For individual records you are manually entering, select values in the Resource, Instance, and Start Time and End Time fields.
-
-
Quality collection plan information displays in the Quality Plans region. Several different modes may appear, For collection plans with a parent-child relationship only, the Quality Plans region displays fields for Plan Name, Information, Mandatory flag, Completed status, and Attachments. Select Add Child Data to navigate to the Enter Quality Results page in Oracle Quality.
The Enter Results page on the Quality Workbench appears for entering quality data. See: Entering Quality Results, Oracle Quality User's Guide
After quality data is entered, the transaction page is refreshed with the updated information. You have the option to duplicate, update, or delete these records.
-
If single level plans exist, enter quality results directly in the MES transaction pages . Select information in the following fields: Inspection Resolution, Quantity Defects, Subinvenvory and Locator, and Remarks.
If applicable parent and child relationships plans also exist, the Parent-Child Entry Mode button is enabled to access the Quality Workbench. If you choose to enter data in the parent-child mode, you cannot return to the inline mode. However, you can enter data first in the inline region, and then navigate to the parent-child region.
-
Oracle Applications also provides the ability to enter collection plan transactions using integrated devices. Scan your data into the fields for Defect Code, Quantity Defect, Date, and Comments.
If applicable parent and child relationships plans also exist, the Parent-Child Entry Mode button is enabled to access the Quality Workbench.
-
Use the Backflush Components region to manually backflush components under lot and serial control. Search for preassigned assembly serial numbers in the Serial Number field. Select Add to populate the component transaction table with the information from the serial number record.
If lot and serial information is required, the status column displays X. Edit this list by enabling or disabling the Select field for applicable components. See:
Overview of Backflush Transactions, Oracle Work in Process User's Guide
Backflush Transactions, Oracle Work in Process User's Guide
Backflushing Pull Components, Oracle Work in Process User's Guide
-
For component lot and serial number assignments—select applicable values in the Subinventory, Locator, Revision, and Lot fields:
-
Select from applicable generated serial numbers in the From, To, and Parent fields. You can also select values in the Reason and Reference fields.
-
If lot and serial numbers have not been generated, select Enter Multiple Lot and Serial to access the Add Lot and Serial page in Oracle Inventory.
See: Assigning Serial Numbers, Oracle Inventory User's Guide
-
-
Select Finish to save your work.
Rejecting and Scrapping Assemblies
You can reject or scrap, and then disposition assemblies that do not meet standards. The reject and scrap process isolates problem assemblies. When it is possible to rework defective assemblies, they can be returned to their routing operation.
-
Rejected assemblies are considered complete and resources consumed. Assemblies in the Reject intraoperation step of an operation may be waiting to be reworked or scrapped. You can move assemblies from the Reject step to any other intraoperation step in the routing.
-
Scrapped assemblies moved into the Scrap intraoperation step from the Queue or Run step of the same operation are considered complete at that operation. Operation completion information is updated including, backflushing pull components and charging resource costs.
To reject or scrap assemblies
-
Navigate to the Reject Assembly: Transaction page for assemblies you want to reject.
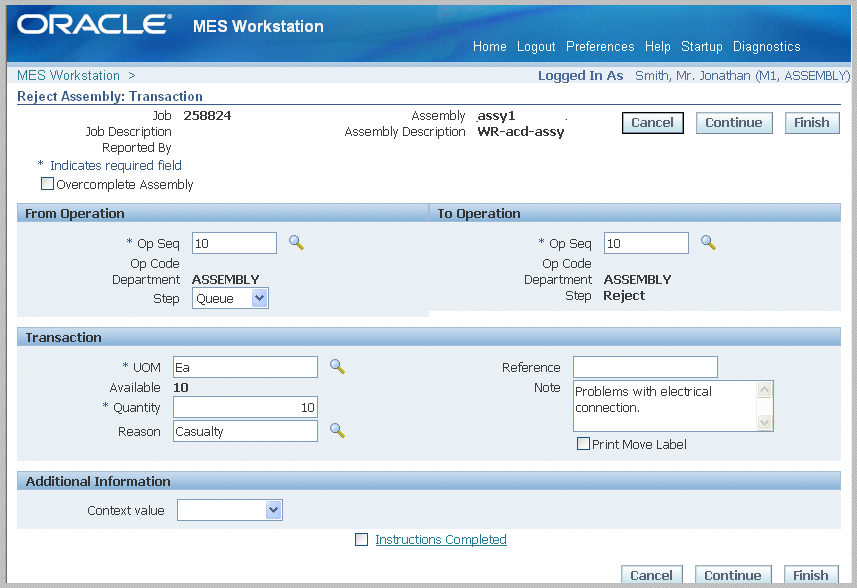
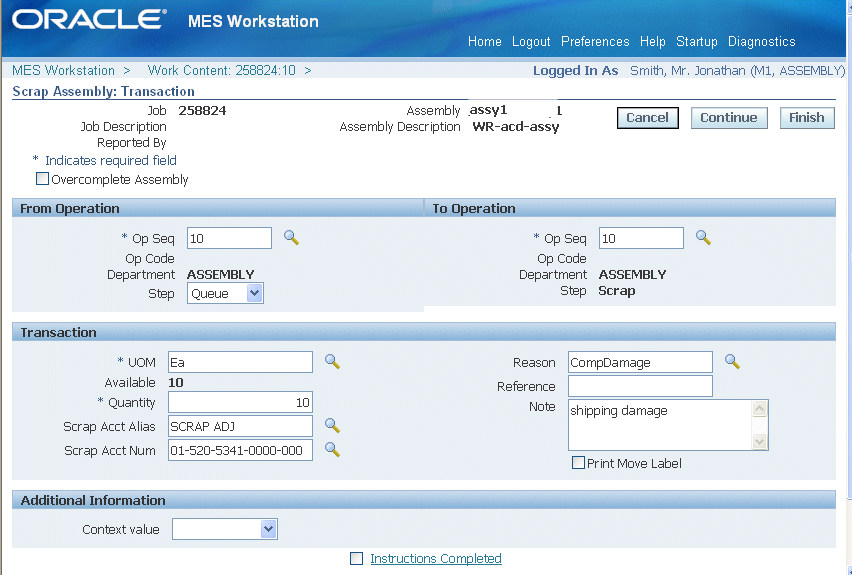
Or navigate to the Scrap Assembly: Transaction page for assemblies you want to scrap.
Both pages display job information including job number and description, operator, and assembly number and description.
-
Enable the Overcomplete Assembly check box if the transaction quantity is greater than the job quantity.
-
Select Finish to use the defaults displayed to create a reject or scrap transaction. Or, select Continue to add information needed to create this transaction.
-
In the From Operation region, select the originating interoperation step you are rejecting or scrapping assemblies.
In the To Operation region, select the destination operation sequence you are moving the assemblies.
-
In the To Operation region, select the destination operation sequence for rejecting or scrapping the assemblies.
-
In the Transaction region, select applicable quantities in the Unit of Measure and Quantity fields. Optionally, you can enter a transaction Reason, Reference, and descriptive text in the Note region.
Notes can be updated, see: Updating Job Notes
-
If a customized descriptive flexfield is used in your environment, you have the option to enter the value in the Additional Information region.
-
Select Finish to complete your reject or scrap transaction, or select Continue to enter information about manual resources and quality plans.
-
If you select Finish, the transaction is saved.
-
If you select Continue, the Detail page displays.
-
-
On the Detail page, in the Manual Resources region, you have the option to add machine resources by selecting Retrieve Non-Labor Resources.
For any applicable machine resources, this region populates the fields for Operation Sequence, Resource, Instance, Start Time.
-
Quality collection plan information displays in the Quality Plans region. Several different modes may appear, For collection plans with a parent-child relationship only, the Quality Plans region displays fields for Plan Name, Information, Mandatory flag, Completed status, and Attachments. Select Add Child Data to navigate to the Enter Quality Results page in Oracle Quality.
The Enter Results page on the Quality Workbench appears for entering quality data. See: Entering Quality Results, Oracle Quality User's Guide
After quality data is entered, the transaction page is refreshed with the updated information. You have the option to duplicate, update, or delete these records.
-
If single level plans exist, enter quality results directly in the MES transaction pages . Select information in the following fields: Inspection Resolution, Quantity Defects, Subinvenvory and Locator, and Remarks.
If applicable parent and child relationships plans also exist, the Parent-Child Entry Mode button is enabled to access the Quality Workbench. If you choose to enter data in the parent-child mode, you cannot return to the inline mode. However, you can enter data first in the inline region, and then navigate to the parent-child region.
-
Oracle Applications also provides the ability to enter collection plan transactions using integrated devices. Scan your data into the fields for Defect Code, Quantity Defect, Date, and Comments.
If applicable parent and child relationships plans also exist, the Parent-Child Entry Mode button is enabled to access the Quality Workbench.
-
Use the Backflush Components region to manually backflush components under lot and serial control. Search for preassigned assembly serial numbers in the Serial Number field. Select Add to populate the component transaction table with the information from the serial number record.
If lot and serial information is required, the status column displays X. Edit this list by enabling or disabling the Select field for applicable components. See:
Overview of Backflush Transactions, Oracle Work in Process User's Guide
Backflush Transactions, Oracle Work in Process User's Guide
Backflushing Pull Components, Oracle Work in Process User's Guide
-
For component lot and serial number assignments—select applicable values in the Subinventory, Locator, Revision, and Lot fields:
-
Select from applicable generated serial numbers in the From, To, and Parent fields. You can also select values in the Reason and Reference fields.
-
If lot and serial numbers have not been generated, select Enter Multiple Lot and Serial to access the Add Lot and Serial page in Oracle Inventory.
See: Assigning Serial Numbers, Oracle Inventory User's Guide
-
-
Select Finish to save your work.
Related Topics
Generating Serial Numbers, Oracle Inventory User's Guide
Lot Control, Oracle Inventory User's Guide
Setting Up Lot Control, Oracle Inventory User's Guide
Maintaining Item Lot Information, Oracle Inventory User's Guide
Setting Up Serial Number Control, Oracle Inventory User's Guide
Assigning Serial Numbers, Oracle Inventory User's Guide
Overview of Serialized Manufacturing Transactions
Oracle MES provides preassigned assembly serial numbers enabling the creation of serialized jobs. You have the ability to perform operation and assembly completion by job serial number record. And the progress of the job can be tracked after the serialization start operation using the assembly serial number . In serialized manufacturing you can:
-
Query jobs and perform transactions by serial number. The Job Selection Mode parameter is used to set your search preferences by serial number when initializing the workstation. Use selection mode Assembly Serial Numbers to use the Search Serial Numbers page as the initial page display for entering search criteria.
-
Use a mobile device to scan jobs by serial number for transactions.
-
Perform express moves for serialized assemblies. This action moves all the serial number records in a job operation.
-
Control move transactions sequentially up to the next count point operation. If the Enforce Sequential Move parameter is set to Yes, you can restrict moves for assemblies for particular departments. The Dispatch List, Search Serial Numbers page, and move and completion transaction pages display only up to the count point operation.
-
Create transactions in specialized move, return, scrap, and completion pages for serial number transactions. This enables you to move only one serial number record, and restricts overcompletions.
The Search Serial Numbers page is the starting point for the serialized transactions. Available transactions and default values displayed are tied to the method the page is accessed. For example:
-
If the page is accessed from the Dispatch List Serialized icon, the information and the transactions available are for that job operation only.
-
If the page is accessed directly from startup or from global actions, you can create transactions for the entire job operation quantities.
Express Moves
Express move functionality is supported for serialized jobs enabling you to move the quantity in one action; and create move transactions for a number of job operations performed in one action. In these jobs you can:
-
Moving partial quantities is dependent on the method the Search Serial Numbers page is accessed. You cannot move partial quantities if accessed from the Dispatch List Serialized icon, but you can if accessed directly from startup or from global actions.
-
Move multiple serial numbers assigned to the job operation
Related Topics
Serial Number Control, Oracle Inventory User's Guide
Setting Up Serial Number Control, Oracle Inventory User's Guide
Serial Number Tracking Throughout Manufacturing, Oracle Work in Process User's Guide
Searching for Serialized Jobs and Performing Express Moves
Creating Move Transactions for Serialized Jobs
Searching for Serialized Jobs and Performing Express Moves
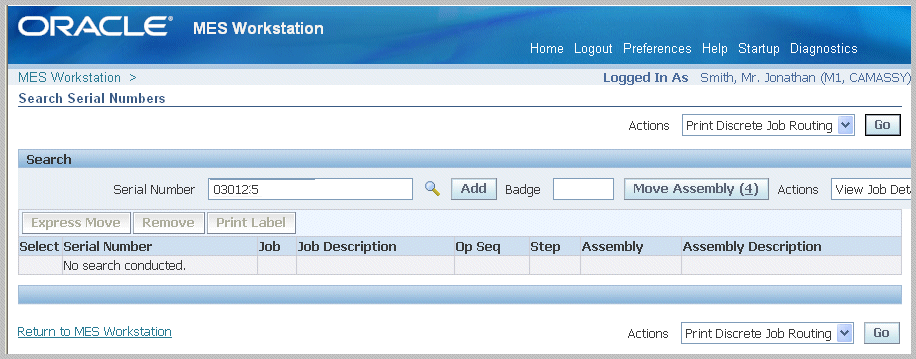
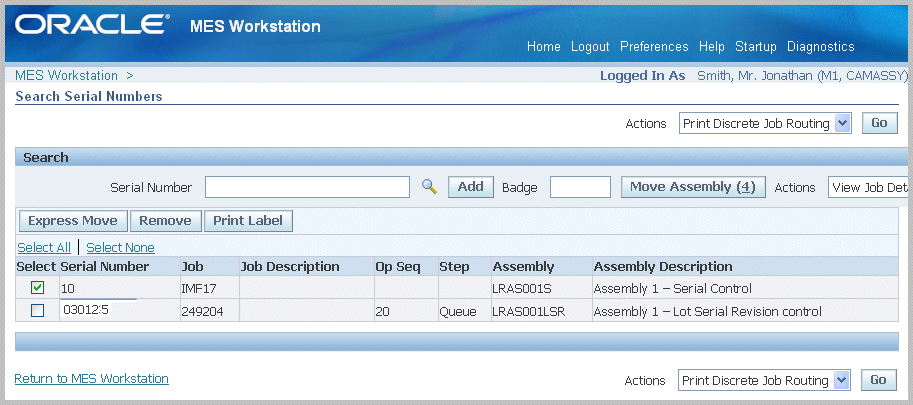
The Search Serial Numbers page enables you to find serialized job records, perform express moves, print serial number labels, and navigate to other transaction pages. In addition to the initial job selection mode setup—you can access this page from:
-
The Dispatch List using the Serialized icon for specific job operations. When you navigate to the page from the Serialized icon in Dispatch List page, the page is populated with the serial numbers in the job operation selected.
-
The Global Actions list of values.
-
The Search Job page.
To search for serial number records and perform express moves
-
Navigate to the Search Serial Numbers page from the initialization Startup page, or global actions.
Use the Job Selection Mode parameter—and select value Assembly Serial Numbers—to set the Search Serial Numbers page as the initialization page.
-
Enter or scan the serial number record in the Serial Number field.
-
For transactions performed for one serial number record at a time, select an action either in:
The button or choice list action values to navigate to other pages. See: Job Operation Actions
-
If this serialized job meets the criteria for express move functionality, select Express Move to move the quantity in one action, See: Overview of Serialized Manufacturing Transactions
-
For transactions for multiple serial numbers, enter or scan the serial number records in the Serial Number field, and select Add to move records to the table.
The table view displays detail information such as Job Number, Job Description, Assembly number, Assembly Description, Completion Date, Operation Sequence, and Step.
-
Enable the records by checking the Select box, for transactions for records using the button actions. Or scan or enter serial numbers, and perform actions in choice list actions.
You can also remove records from the table, and select Express Move to move multiple records if they meet express move criteria.
To access serial number records from the Dispatch List or Search Jobs page
-
Navigate to the Dispatch List or Search Jobs page, and select your search criteria.
-
Select the Serialized icon that is enabled for a specific job operation.
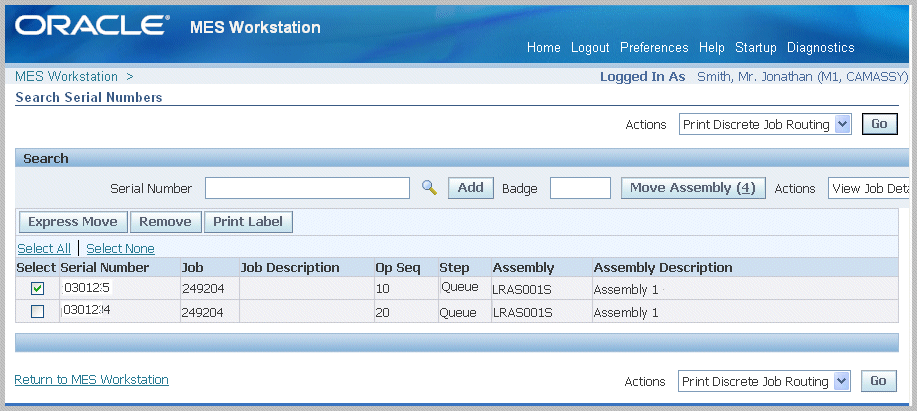
The Search Serial Numbers page displays with the table rows populated with the serial numbers in the job operation selected.
Note: You cannot add or remove serial number records if you navigate to the Serial Numbers page from the Dispatch List or Search Jobs page.
-
Enable the records by checking the Select box, and then choose an action in the button or choice list action values, or global actions.
You can also remove records from the table, and select Express Move to move multiple records if they meet express move criteria.
Note: You cannot remove serial number records if you navigate to the Serial Numbers page from the Dispatch List or Search Jobs page.
Related Topics
Creating Move Transactions for Serialized Jobs
Creating Move Transactions for Serialized Jobs
Serialized transaction pages are invoked when you select a move task from the Search Serial Numbers page. This includes Complete Assembly, Move Assembly, Return Assembly, Return From Scrap, Return From Reject, Reject Assembly, Move and Complete, Return and Move, and Scrap Assembly transaction pages. The serialized transaction page is a one page flow, unlike the assembly transaction and detail pages for non-serialized moves. The following rules are set for these pages:
-
You move only one serial number record. Therefore, the Move Quantity field does not appear on the transaction page.
-
If the Enforce Sequential Move parameter is set to Yes, the To Operation value displays only the operation up to the count point operation. Moves across the count point operation are disabled.
-
For backward moves, the assembly cannot be moved back before the serialization start operation.
-
Overcompletion and moves combinations with scrap and reject transactions are not available for serialized move transactions.
-
In completion, and completion and move combination transactions—the To Operation and To Step fields are not displayed.
-
For a return transaction, the To Operation and To Step fields are not displayed since an assembly is always returned to the last operation’s run step.
To move job operations for serialized jobs
-
Select your serialized job record, and navigate to the Move Assembly: Transaction page. See: Searching for Serialized Jobs and Performing Express Moves
This page displays job information including serial number, assembly number and description, job number and description, operation sequence, and step.
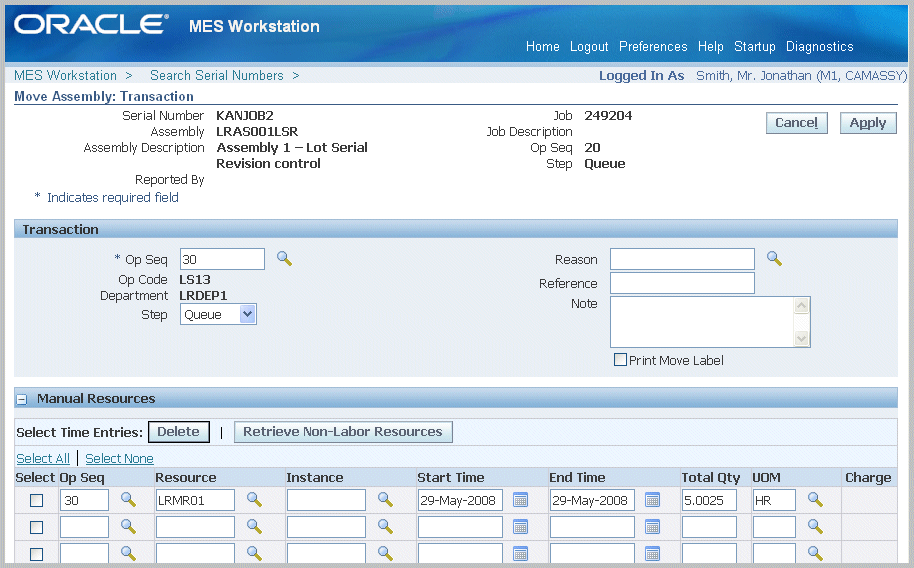
Depending on how the following parameters are set, certain fields display and are available for updates in this region:
-
Enforce Sequential Move, see: MES Administrator
-
You have the choice to select Apply to save your record using the values displayed on this page. You can also change the defaulted values before saving the record.
-
In the Transaction region, select values in the Step, Reason, Reference, and descriptive text in the Note region field.
-
If a customized descriptive flexfield is used in your environment, the Additional Information region displays. Enter your information in this region. If you are not using customized information, this region does not appear.
-
In the Manual Resources region, you have the option to add machine resources by selecting Retrieve Non-Labor Resources—or individually adding records.
-
When you select Retrieve Non-Labor Resources, applicable machine resources populate the fields for Resource, Instance, and Start Time and End Time. You can edit or delete these records.
-
For individual records you are manually entering, select values in the Resource, Instance, and Start Time and End Time fields.
-
-
Quality collection plan information displays in the Quality Plans region. Several different modes may appear, For collection plans with a parent-child relationship only, the Quality Plans region displays fields for Plan Name, Information, Mandatory flag, Completed status, and Attachments. Select Add Child Data to navigate to the Enter Quality Results page in Oracle Quality.
The Enter Results page on the Quality Workbench appears for entering quality data. See: Entering Quality Results, Oracle Quality User's Guide
After quality data is entered, the transaction page is refreshed with the updated information. You have the option to duplicate, update, or delete these records.
-
If single level plans exist, enter quality results directly in the MES transaction pages . Select information in the following fields: Inspection Resolution, Quantity Defects, Subinvenvory and Locator, and Remarks.
If applicable parent and child relationships plans also exist, the Parent-Child Entry Mode button is enabled to access the Quality Workbench. If you choose to enter data in the parent-child mode, you cannot return to the inline mode. However, you can enter data first in the inline region, and then navigate to the parent-child region.
-
Oracle Applications also provides the ability to enter collection plan transactions using integrated devices. Scan your data into the fields for Defect Code, Quantity Defect, Date, and Comments.
If applicable parent and child relationships plans also exist, the Parent-Child Entry Mode button is enabled to access the Quality Workbench.
-
Use the Backflush Components region to manually backflush components under lot and serial control. Search for component assembly serial numbers in the Serial Number field. Select Add to populate the component transaction table with the information from the serial number record.
If lot and serial information is required, the status column displays X. Edit this list by enabling or disabling the Select field for applicable components. See:
Overview of Backflush Transactions, Oracle Work in Process User's Guide
Backflush Transactions, Oracle Work in Process User's Guide
Backflushing Pull Components, Oracle Work in Process User's Guide
-
For component lot and serial number assignments—select applicable values in the Subinventory, Locator, Revision, and Lot fields:
-
Select from applicable generated serial numbers in the From, To, and Parent fields. You can also select values in the Reason and Reference fields.
-
If lot and serial numbers have not been generated, select Enter Multiple Lot and Serial to access the Add Lot and Serial page in Oracle Inventory.
See: Assigning Serial Numbers, Oracle Inventory User's Guide
-
-
Select Apply to save your work.
Viewing Job Information
Job information is available on a number of pages and provide views of job details, quality results, job transactions, operation transactions, and related jobs.
Viewing Job Transactions
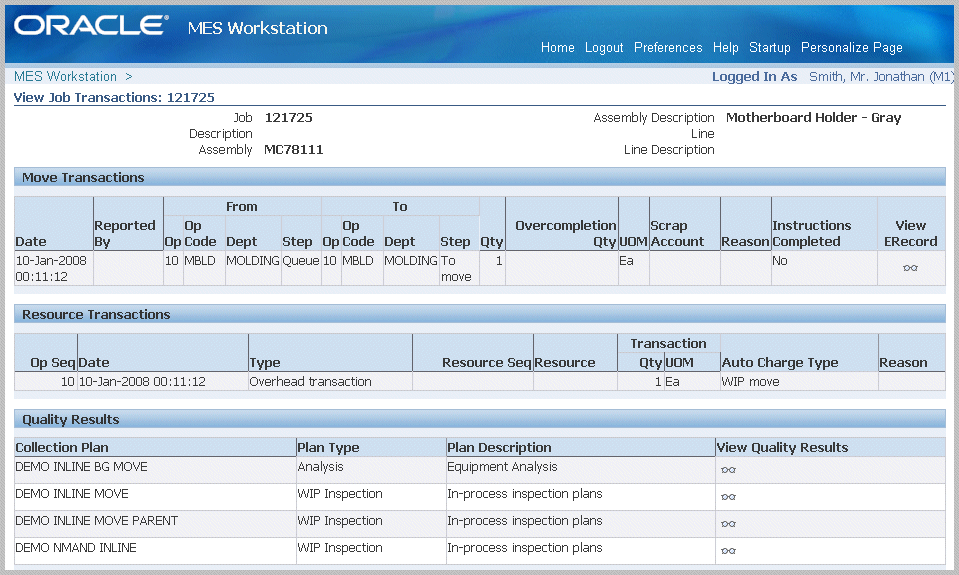
The View Job Transactions page displays regions for various job transactions for a specific job and includes move, resource, quality, and material transactions.
Move Transactions: The pertinent move transaction data for each operation step is listed including date, operator, operation steps from and to, charging departments, quantities, and login information.
Resource Transactions: Resources are listed for each operation sequence and resource by date, transaction type, resource sequence, and quantity.
Quality Results: Relevant quality results are displayed for a job and job operation. This summary view displays collection Plan name, Plan Type, and a link to the View Quality Results page. See: Viewing Quality Results
Material Transactions: Each component and quantity is listed, along with the transaction type, subinventory, locator, revision, and operator.

Viewing Quality Results
The View Quality Results page enables you to see the results entered for your quality plan for a particular job and job operation. You can navigate to this page from the View Job Transactions, Job Details, and View Operation Transactions pages.
In the Quality Plan summary region, details display for any other information about the plan and applicable attachment files.
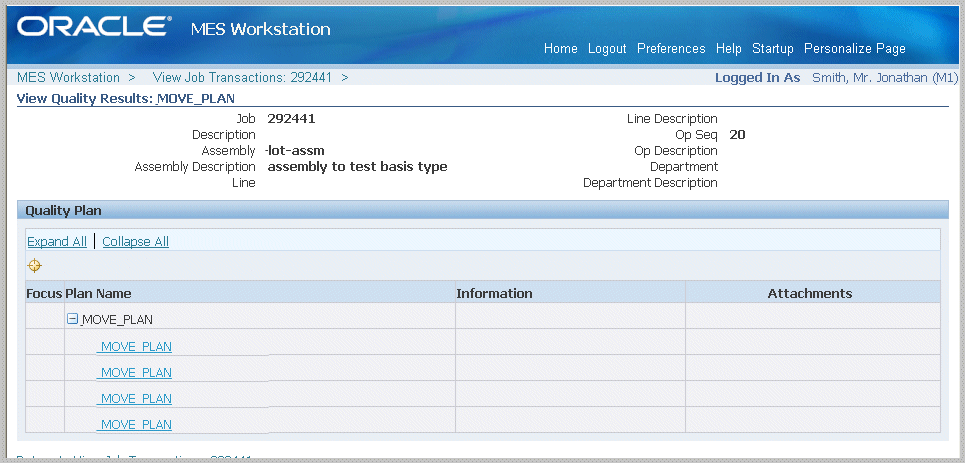
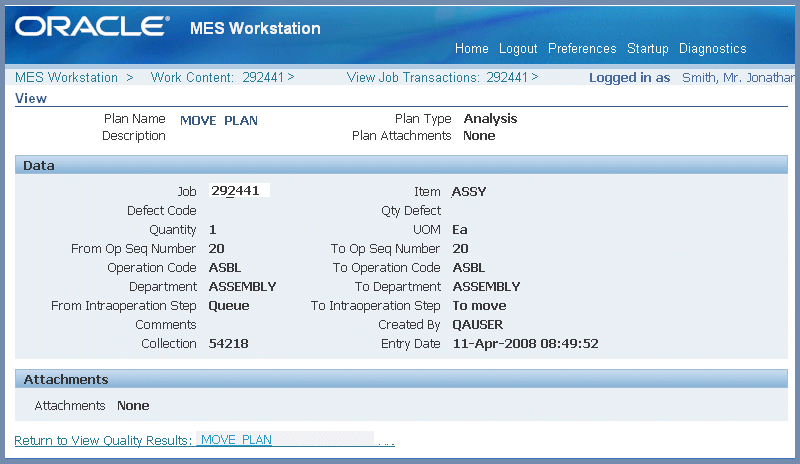
Select a plan in the Quality Plan region, to navigate to the detail Data page. This page displays quantity, defect, and operation step and sequence data.
Viewing Job Details
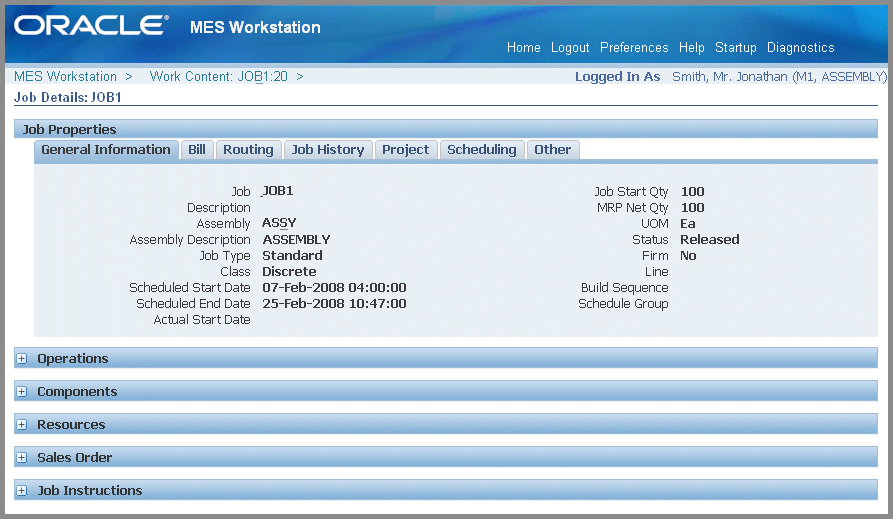
The Job Details page displays six regions for job details including:
-
Job Properties
-
Operations
-
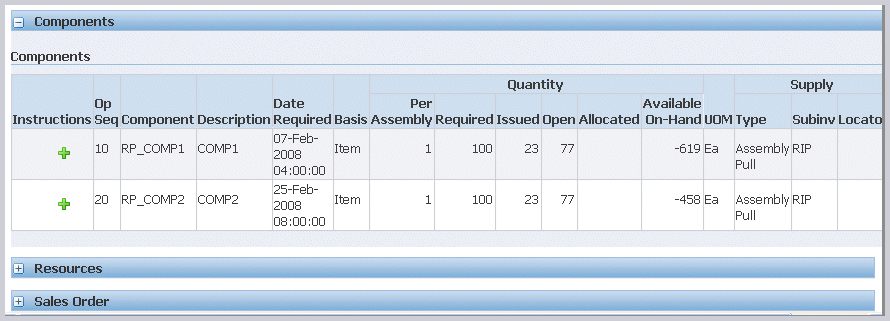
Components
-
Resources
-
Competencies
-
Sales Order
-
Job Instructions
Job Properties
This region has seven tabbed sections related to this job and displays the following details:
-
General Information—Job details such as number, description, dates, and quantity
-
Bill—Bill of material information including revision and supply type
-
Routing—Revision, supply type, completion subinventory, and Serializaton Start Operation flag.
-
Job History—Dates and quantities
-
Project—Project and task related data
-
Scheduling—Request due date and priority if you are using constraint-based scheduling
-
Other—On demand data, class, kanban, overcompletion tolerance, and locator
See: Defining Discrete Jobs Manually, Oracle Work in Process User's Guide
Operations
This region shows information on operation sequence, operation code, charging department, quantities, dates, and instructions. See: Viewing Operations, Oracle Work in Process User's Guide

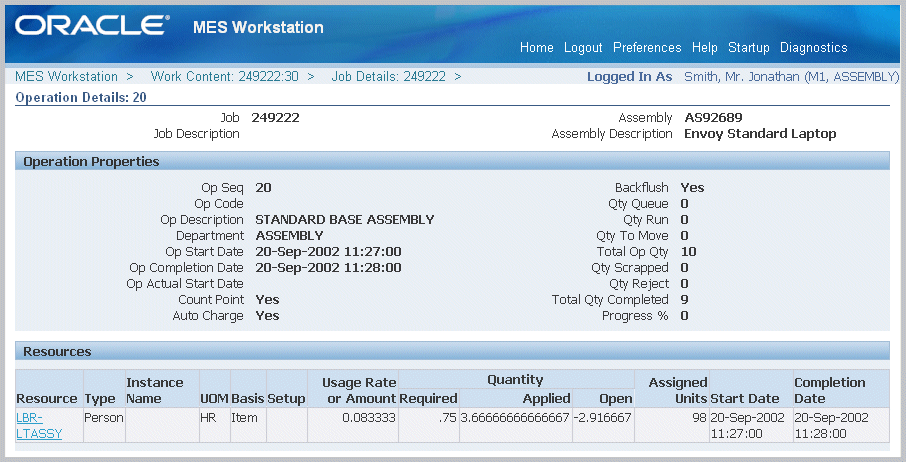
Select the Operation Sequence to display the Operation Details page.
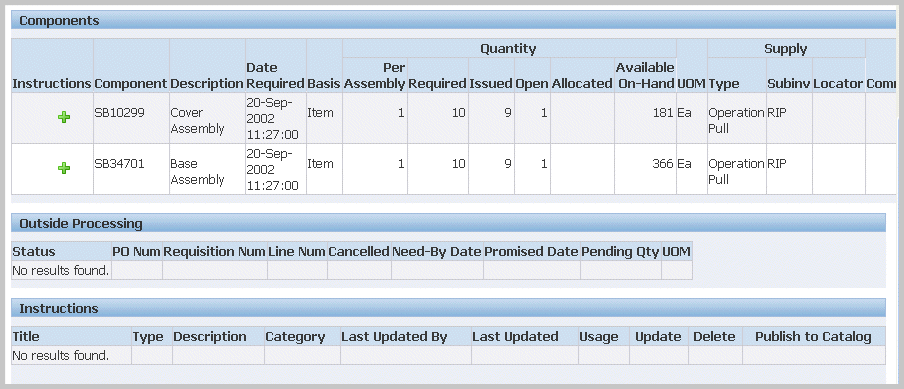
The Operation Properties region of this page displays information about this operation including description, department, dates, quantity at the intraoperation steps, and progress percent. The page contains regions for more details on the specific operation including Resources, Components, Outside Processing, and Instructions.
Competencies
This region lists all competency requirements for the job operation if using labor skills validation functionality at Clock In. For each operation—requirements for skill level, certification, and qualifications appear.

Components
This region shows bill of material component data including name, date required, quantities, and applicable supply and locator data. See: Viewing Component Requirements, Oracle Work in Process User's Guide
Resources
Resources are viewed per operation sequence and resource sequence including instance, basis, usage rate, and dates. See: Viewing Resource Requirements, Oracle Work in Process User's Guide
Sales Order
Sales orders linked to jobs are displayed in this region including sales order number, line, customer, and quantities.
Job Instructions
Instructions attached to a job including category, updates, and publish to catalog information.
Viewing Operation Transactions
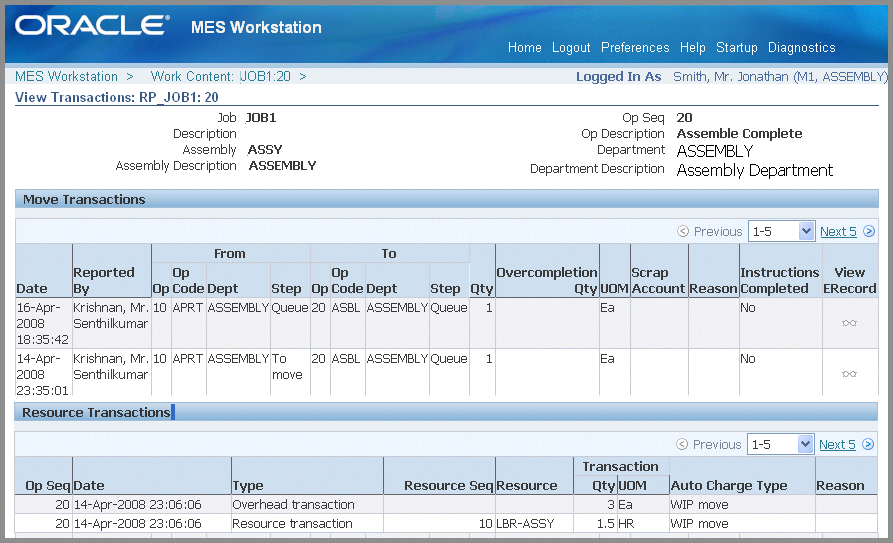
The View Operation Transactions page shows the detail information of an operation. Four regions display on this page:
Move Transactions: The pertinent move transaction data for each operation in a particular job is listed. This includes date, operator, operation steps and codes from and to, charging departments, quantities, and instructions completed flag.
Resource Transactions: Resource data for this operation is listed and includes date, type, resource, resource sequence, quantity, and autocharge type.
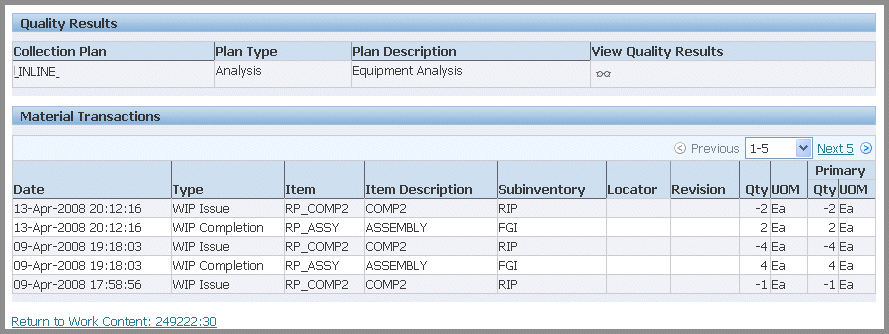
Quality Results: Quality summary information is displayed for this job operation including Collection Plan name, Plan Type, and a link to navigate to the View Quality Results page. See: Viewing Quality Results
Material Transactions: Each component and quantity is listed, along with the transaction type, subinventory, locator, revision, and operator.
Viewing Related Jobs
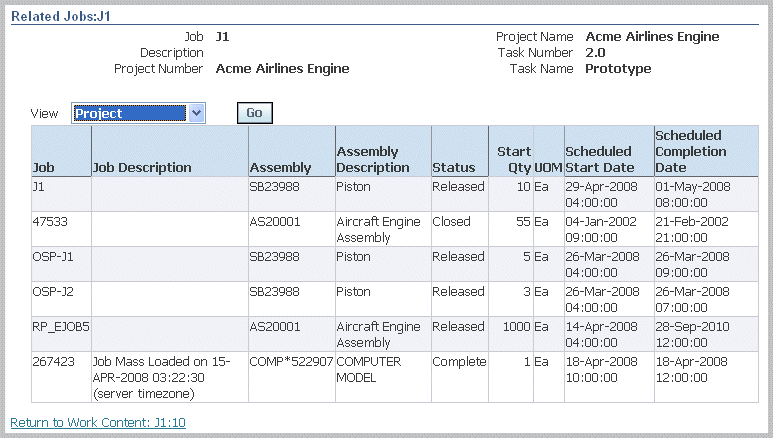
For scheduling effects and other cross dependencies, you can view jobs related to one of the records on the dispatch list. This view is displayed by Project, Project and Task, or a user defined attribute. This enables schedulers and supervisors to see jobs related to one job record, and reschedule other jobs as needed.
This page lists jobs and assemblies by status, start quantity, and schedule dates.
Reporting Exceptions
There are a number of situations that may affect work on the production floor such as missing components and quality problems:
-
Report Exception action is used to create a signal on the MES Workstation pages indicating problems.
-
Update Exception action is used to add and update notes concerning the exception.
You can associate reason codes with the different exception types to display on Exceptions pages. This relationship is set up in the Reason Codes for Exception Types parameter.
To report an exception
-
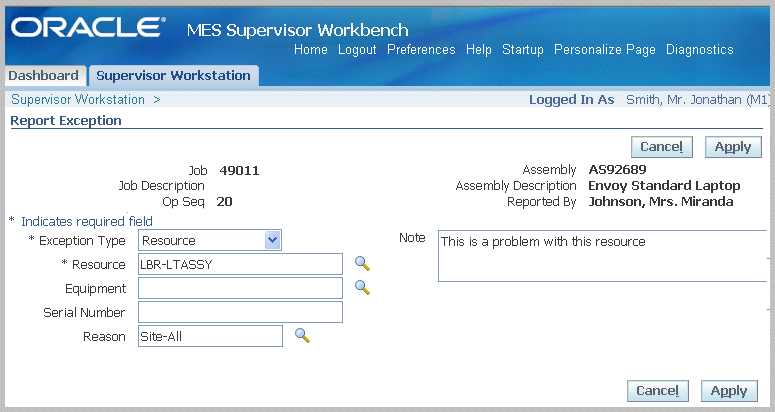
Navigate to the Report Exception page from the Job Operation or Work Content actions.
Details for this job operation display such as number, description, assembly.
-
Select a value in the Exception Type field. Your choices are:
-
Resource
-
Component
-
In Process Assembly
-
Quality
-
Other
For resource and component exceptions, you can select information to define the specific record.
-
-
Optionally, select a reason for this exception.
-
Enter any descriptive information in the Note region.
This information displays in the Note History region of the Exception page detail, and is updated using the Update Exception page. See: Exceptions
-
Select Apply to save your work.
A notification message is sent to the supervisor. You can customize the WIP Exception Notification workflow to suit your specific business rules, see: WIP Exception Notification Workflow
Related Topics
Viewing and Resolving Exceptions
Returning Assemblies
You can return assemblies in a number of transactions pages including Return Assembly, Return From Scrap, and Return From Reject. You can return a greater quantity than the original transaction quantity. The return process enables you to move assemblies either back to the stockroom. Or move assemblies taken out of production back to the original production job, and proceed through the remainder of the routing.
To return assemblies
-
Navigate to the Return Assembly page.
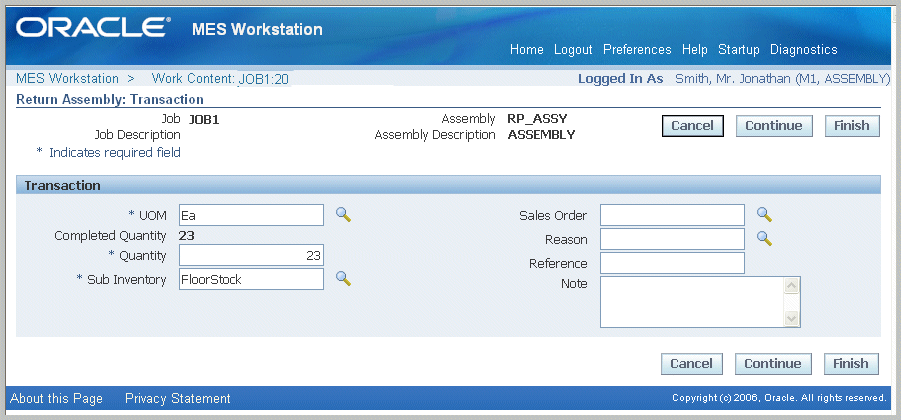
The page displays job information including job number and description, operator, and assembly number and description.
-
Select Finish to use the defaults displayed to create a return transaction. Or select values for fields displayed on this page.
-
In the Transaction region, enter values in the Quantity and Subinventory fields. You have the option to change the unit of measure.
-
You can select applicable information in the Sales Order, Reason, and Reference fields—and descriptive text in the Note region.
-
The Lots and Serials region displays for assemblies under lot or serial number control, or both. Select Lot Details or Serial Details to access lot or serial detail pages. See: Lot Control, Oracle Inventory User's Guide, and Setting Up Serial Number Control, Oracle Inventory User's Guide
-
For lot controlled assemblies, select applicable values in the Lot, Parent Lot, and Quantity fields.
-
For serial controlled assemblies, select applicable values in the Serial From and To, and Quantity fields.
-
If the assembly is under both lot and serial control, select values in the Lot, Parent Lot, Serial From and To, and Quantity fields.
-
-
Select Finish to complete your return transaction, or select Continue to enter information for quality plans and component backflushing.
-
If you select Finish, the transaction is saved.
-
If you select Continue, the Return Assembly Detail page displays.
-
-
On the Return Assembly: Detail page, collection plan information displays in the Quality Plans region. This region displays fields for Plan Name, Information, Mandatory flag, and Completed status. Select the plan you want to update by choosing Add Child Data.
The Enter Results page on the Quality Workbench appears for entering quality data. See: Entering Quality Results, Oracle Quality User's Guide
After quality data is entered, the transaction page is refreshed with the updated information. You have the option to duplicate, update, or delete these records.
-
The Backflush Components region displays components under lot and serial control requiring backflushing. If lot and serial information is required, the status column displays X. Edit this list by enabling or disabling the Select field for applicable components:
-
Select applicable lot values in the Subinventory, Locator, Revision, and Lot fields.
-
Select applicable generated serial numbers in the From, To, and Parent fields. You can also select values in the Reason and Reference fields.
-
-
Select Finish to save your work.
To return assemblies from scrap or reject
-
Navigate to the appropriate page. Choices are Return From Scrap or Return From Reject.
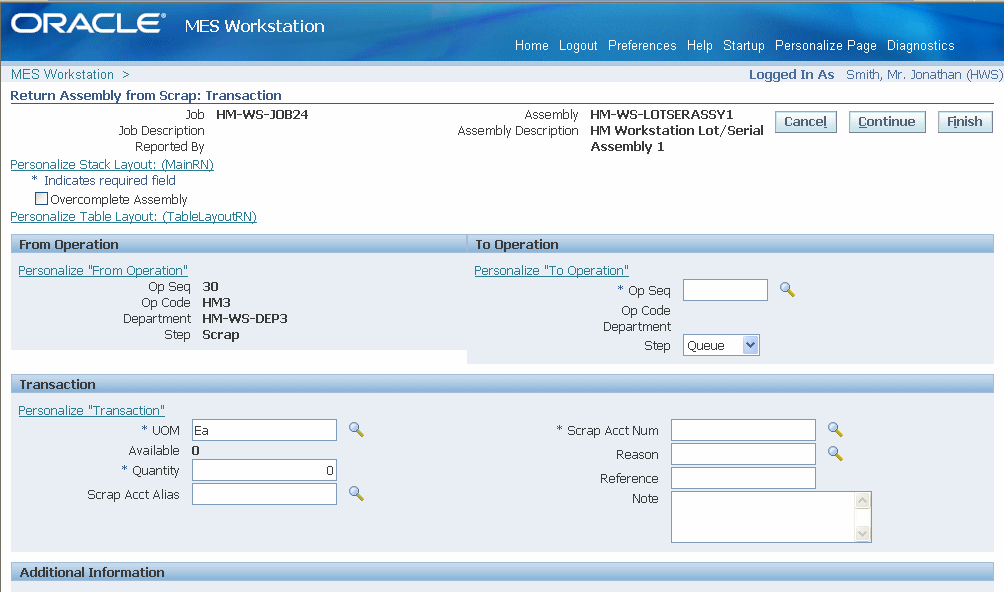
The page displays job information fields including Job number, Job Description, Assembly number, Assembly Description, and Reported By.
-
For reject returns, you have the option to return a quantity greater than the job quantity by enabling the Overcomplete Assembly check box.
Note: This function is not available for Return From Scrap transactions.
-
Select Finish to use the defaults displayed to create a return transaction. Or select values for fields displayed on this page.
-
In the From Operation and to Operation region, select values in the following fields:
-
From Operation Sequence
-
To Operation Sequence
-
To Step
-
-
In the Transaction region, select a quantity value.
-
If this is a return from scrap transaction, you can enter information in the Scrap Account Alias and Scrap Account Number fields.
-
Optionally, you can enter a transaction Reason, Reference, and descriptive text in the Note region.
-
-
If a customized descriptive flexfield is used in your environment, the Additional Information region displays. Enter your information in this region. If you are not using customized information, this region does not appear.
-
Select Finish to complete your return transaction, or select Continue to enter information about manual resources, quality plans, or component backflushing.
-
If you select Finish, the transaction is saved.
-
If you select Continue, the detail page displays.
-
-
On the detail page, in the Manual Resources region, you have the option to add machine resources by selecting Retrieve Non-Labor Resources.
For applicable machine resources, this region populates the fields for Operation Sequence, Resource, Instance, and Start Time.
Enter values in the End Time and Total Quantity fields. You have the option to change the unit of measure.
-
You can collect quality results in the Quality Plans region. This region provides information on Plan Name, Information, whether data collection is mandatory, and Completed status. Select the plan you want to update by choosing Add Child Data.
This Enter Results page on the Quality Workbench appears for entering quality data. See: Entering Quality Results, Oracle Quality User's Guide
After quality data is entered, the transaction page is refreshed with the updated information. You have the option to duplicate, update, or delete these records.
-
The Backflush Components region displays components under lot and serial control requiring backflushing. If lot and serial information is required, the status column displays X. Edit this list by enabling or disabling the Select field for applicable components:
-
Select applicable lot values in the Subinventory, Locator, Revision, and Lot fields.
-
Select applicable generated serial numbers in the From, To, and Parent fields. You can also select values in the Reason and Reference fields.
-
-
Select Finish to save your work.
Shop Floor Time Entry
Shop floor time entry captures resource times using Job On and Job Off, Clock In and Clock Out, and time entry page functionality. Employee and job time is tracked by user login identification and employee badge number. Several parameters control time entry behavior:
-
Charge Resource at Report Time specifies if resource transactions are created at the time the job operation transaction time is reported.
-
Time Entry Mode enables Clock In and Clock Out, and Shift In and Shift Out functionality.
-
Combine Job On and Clock In Buttons enables you to combine the actions of Job On and Off, and Clock In and Out time entry.
-
Job Operation Actions, and Work Content Actions set the display of actions for Job On, Job Off, Clock In, Clock Out, and Undo Clock In on the MES Workstation and MES Supervisor Workbench.
See: MES Administrator
Clock In and Clock Out
When an operator performs a Job On action, that job is assigned to that employee. Clock In signifies that an operator is working on the job operation, and Clock Out signals that work has stopped.
-
For environments where one employee, the single user mode, is working on a job—the tracking is performed by user login identification. For multiple employees, the identification is derived from the employee badge number.
-
You can also set clock actions in the Ready Action column on the dispatch list for a specific job. When you select the clock and worker icon, the job operation is clocked in. The icon displays a red colored box with a cross out, signifying that the operation is locked.
-
The Undo Clock In action removes the clock action you performed.
Performing Job On and Clock In Actions
Job On is an action used when multiple employees are working on a single job operation. Job On means that a job has been picked, it is ready for work, enabling the recording of charges for time entry. It is used to indicate that a particular job has been taken up for work but does not necessarily indicate actual work start. When an operator performs a Job On action, that job is assigned to that employee and the name is displayed in the dispatch list.
An operator Clocks In to record actual times for starting work on a specific job operation, and Clocks Out to signal that work has stopped. As an operator, you can pick and Job On to multiple jobs—but will most likely Clock In to one job at a time.
-
When you Clock Off, the job is still associated with your operator name. If you are no longer performing work on a job operation, you must select Job Off to remove your name as associated with the operation.
-
In production floor environments where work on specific job operations are assigned to only one employee, you can combine the Job On and Clock In actions using the Combine Job On and Clock In Buttons parameter. If the actions are combined, Job On and Job Off tasks do not appear on the page. When multiple employees are working on specific job operations, this parameter is set to No.
Using Badge Numbers
Badge numbers in MES are used for the operator to report labor resource time, and for the supervisor to track that time. Badges are either scanned on the transaction pages, or manual entered. In the Oracle Human Resources application, every employee is given a unique identifier. Badge number values are created as Employee Numbers in the Oracle HRMS. See: Entering a New Person, Oracle Human Resources Management Systems Workforce Sourcing, Deployment, and Talent Management Guide (Global)
Several parameters used for setting badge numbers:
-
Single User Mode: If enabled, indicates that only one operator is reported for the job transaction, rather than multiple operators. For single users, the employee Badge number field is not shown on the transaction pages.
-
Require Badge Number for Move Transaction: If enabled, operators are required to enter their badge numbers when reporting moves and completions. This parameter is not applicable for the single user mode.
-
Retain Badge Number: Controls whether to retain the employee badge number on the dispatch list after it is entered. If enabled, the badge number is active for transactions until it is cleared.
When using badge numbers as identifiers, you can set specific employees to work as resources on job operations. You can also setup labor skills validation to certify that the required qualifications for performing an operation are met by the employee.
-
When setting employees as person type resources, any employee who is a resource instance in the organization in any of the departments can move the job:
-
In the Department window, assign resources to the department, and resource instances to the resources.
-
The Resources window is used to associate specific employees as Person type resources. Person resource instances are assigned by selecting the Employee Number value created in Oracle HRMS. This value is used as the Badge value in MES. See: Assigning Resources to a Department, Oracle Bills of Material User's Guide
-
-
When labor skills validation is set up, required qualifications for performing an operation are certified when the operator Clocks In. If badge numbers are required for move transactions in the environment, after the operator enters the number, and Clocks In to a job operation, the skill levels are checked. This feature is set up in several applications. See: Moving and Completing Assemblies
Reporting Time Pages
Report Time pages provide a manual method of reporting, reviewing and charging resources if time is not reported during the move transaction. The entries are used in calculating labor resources:
-
The Report My Time page is used for reporting resource time for job operations on a number of different jobs.
-
The Report Time page is used to report resource time on one specific job.
These pages can be used in environments where the clock functionality is disabled in the Time Entry Mode parameter. Or to revise automatic clock calculations to adjust and revise time.
If the parameter Charge Resource at Report Time is enabled, and the job operation is flagged as autocharge—the Charge check box displays a check symbol. The autocharge resource charges the move transaction at the standard rate to avoid doubling the cost transactions. Calculated actual times for operations are system derived for manual resources.
To report your time on job operations
-
Navigate to the Report My Time page.
-
Select the appropriate information in the following fields:
-
Job
-
Operation Sequence
-
Resource
-
-
Enter a value in two of these fields—Start Time, End Time, and Total Quantity. The other fields automatically calculate the correct values.
Optionally, you can change the value in the Unit of Measure field.
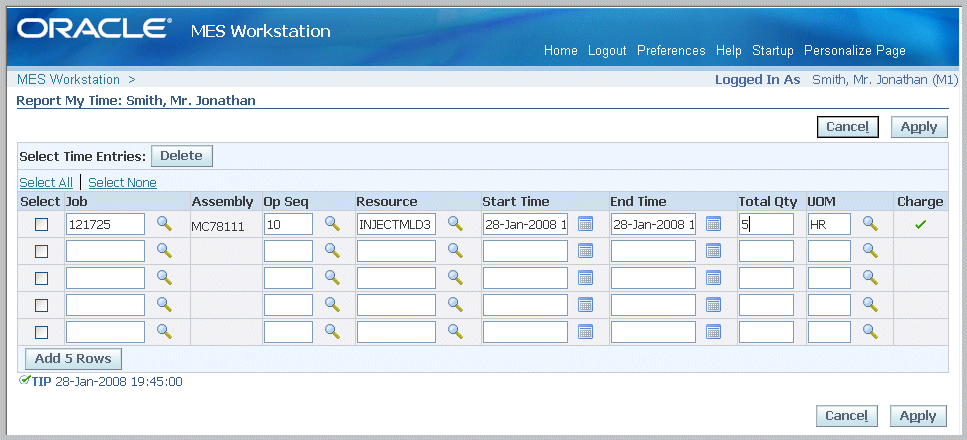
-
Select Apply to save your work.
To report resource time for one job
-
Navigate to the Report Time page.
-
Select a value in the Resource field, and if applicable, a resource instance in the Instance field.
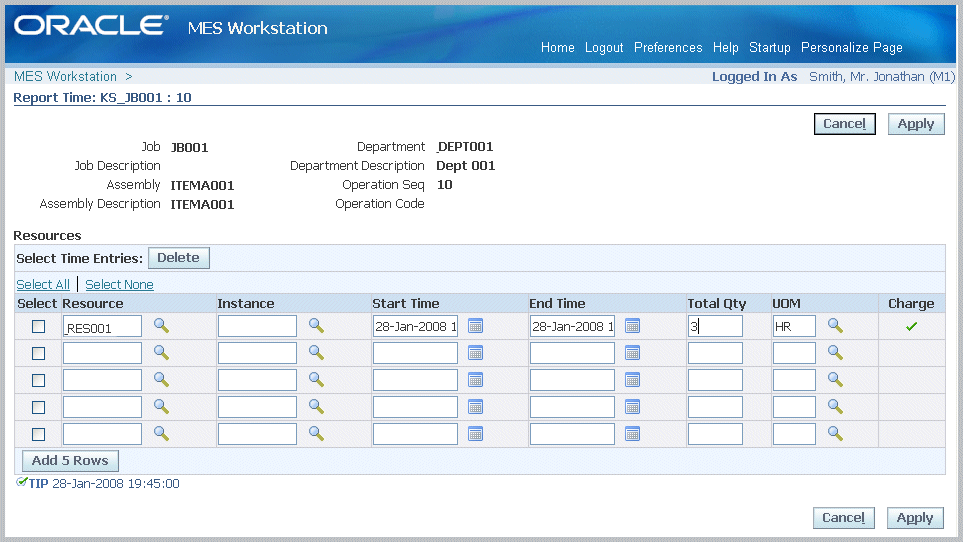
-
Enter a value in two of these fields—Start Time, End Time, and Total Quantity. The other fields automatically calculate the correct values.
-
Optionally, you can change the value in the Unit of Measure field.
-
Select Apply to save your work.