Collecting Source Data
This chapter covers the following topics:
- Collecting Source Data
- Summary of Collected Source Data
- Collection Programs for Planning
- Starting Planning Data Pull and Planning ODS Load
- Collecting Supersession Notes
- Collection Programs for Forecasting
- Collecting Service Parts Usage History – Field Service
- Collecting Service Parts Usage History – Depot Repair
- Collecting Service Parts Return History
- Collecting Service Products Return History
- Collecting Shipment History
- Collecting Install Base History
- Load History Data from Flat Files
- Collecting Data for Demantra
- Purging Interface Tables
- Viewing Collected Data
Collecting Source Data
Component architecture allows a single instance of Oracle Service Parts Planning to plan one or more transaction instances. The planning instance, also referred to as the planning server, can reside on the same instance as one of the transaction instances, or it can be an altogether separate instance. In either case, data to be planned is brought from the transaction instances to the planning server through a process called Collection.
Oracle planning uses a data store based on the planning data model that is exposed through interface tables. The data is pulled from the designated data sources into its data store. Oracle Collections are responsible for synchronization as changes are made to the data sources. Thus, different business objects can be collected at different frequencies. Supplies and demands, which change frequently, can be collected frequently, while routings and resources, which change relatively less often, can be collected less frequently.
This chapter provides procedural steps for running the collections programs and viewing collected data. It describes the data collected for Service Parts Planning by the following programs:
-
Collection Programs for Planning
-
Planning Data Pull
-
Planning ODS Load
-
Summary of Collected Source Data
Transactional data collected from the source instance by the Planning Data Pull program includes, but is not limited to:
-
On-hand inventory
-
Purchase orders
-
Sales orders
-
Repair orders (external and internal)
In addition to transactional data, the other collection programs are started to:
-
Collect the following item attributes as set up on the Organization Item window from the Manufacturing and Distribution Requirements responsibility. Inventory > Items > Organization Item > (T) MPS/MRP Planning.
See Defining Source Instance Item Attributes.
-
Repair Program
-
Repair Lead Time
-
Repair Yield
-
Prepositioning Point
-
-
Collect the organization type (Depot Repair or Field Technician), as set up on the Organizations form from the Advanced Planning Administrator responsibility. Admin > Instances > (B) Organizations.
-
Collect the employee to subinventory association as set up on the Addresses and Subinventory window from the Spares Management responsibility. Spares Management > Setup > Addresses and Subinventories.
-
Collect the part condition value (Usable or Defective) as set up on the Addresses and Subinventory window from the Spares Management responsibility. Spares Management > Setup > Addresses and Subinventories.
-
Collect the item relationships Supersession and Repair to as set up on Item Relationships window from the Manufacturing and Distribution responsibility. Inventory > Items > Item Relationships.
Collecting Repair Orders – External and Internal
To support multilevel reservation in Service Parts Planning, and to ensure that repair order documents are not cross-pegged, Collections obtains repair order detail for both internal and external repair orders. Collections brings repair order details over as reservations.
The Planning Data Pull program collects external repair orders from Spares Management. An external repair order pegs (or links) purchase orders to work orders to internal orders for transferring defectives. Spares Management manages these links as described in Release Process (for Service Parts Planning). Orders are appropriately reserved and pegged to retain the sanctity of the external repair order defined in Spares Management.
In the case of internal repair orders, the Planning Data Pull program collects the repair order and the open component requirements from the associated work orders, as long as the work order belongs to the same organization as the Depot Repair order.
For example, Depot Repair order #1121 is in organization M1, and three work orders are associated with it. Work order #1 and work order #2 are in organization M1, while work order #3 is in organization M2. In this case, Collections retrieves the open component requirements associated with work orders #1 and #2, and then rolls them up to a master work order that is analogous to the Depot Repair order.
Related Topics
For more information about setup in the source instance, see Source Instance Setup Data.
Collection Programs for Planning
Planning Data Pull and Planning ODS Load
The Planning Data Pull program copies the appropriate data streams to the Planning Data Store (PDS) table. The Planning ODS Load program moves the data from the PDS table to the Operational Data Store (ODS) table that forms the basis for generating plans.
These two programs are typically started with a single request, and run sequentially without user intervention. Using two programs with an intermediate storage table provides flexibility for customization.
For example, custom collection programs could be used to collect shipment history, usage history, returns history, and failure rates from a legacy system. That data could be imported to the PDS table from flat files. As another example, when the implementation provides a custom data cleansing program, position that cleansing program in the request sequence to run after the Load Transaction Data program, and before the Planning ODS Load program. This strategy manipulates collected data in the PDS before it is moved to the ODS.
Important: It is important that collections run from Advanced Supply Chain Planning (ASCP) or Distribution Requirements Planning (DRP) responsibilities are identical to those run from SPP responsibilities. This is especially true for implementations that are using SPP in conjunction with other VCP products.
Standard Collections
You start the Standard collections program from the Service Supply Chain Planner responsibility > Collections > Standard Collections to collect data from the source to the PDS, and then immediately move that data to the ODS. These programs have been enhanced to collect additional data, such as item relationships, needed for Service Parts Planning.
Using the standard collections process, you can manually run three types of collection methods, including a complete refresh, a net change refresh, or a targeted refresh on specific business entities. You set parameters to specify which data types to collect, whether to purge previously collected data, whether to analyze staging tables, and so on.
Continuous Collections
You start the Continuos Collections program from the Service Supply Chain Planner responsibility > Collections > Continuous Collections. The continuous collections process is an automated process that efficiently synchronizes the data on the planning server by looking up the sources. If you opt for continuous collections, the system automatically determines the type of collection that needs to be run on entities selected by you. The continuous collections process requires less user intervention than does standard collections.
Related Topics
For more information on running collection programs, see the “Running Collections” chapter in the Advanced Supply Chain Planning User Guide.
Starting Planning Data Pull and Planning ODS Load
To start planning data pull and planning ODS load programs
-
From the Service Supply Chain Planner responsibility, navigate to the Planning Data Collection window.
Collections > Standard Collections
The Planning Data Collection window appears.
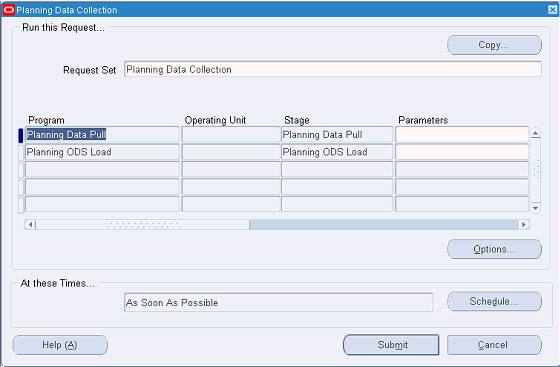
-
Click the Parameters field.
The Parameters window appears.

-
Set the program parameters.
Planning Data Pull Parameters Parameter / Description Value Instance
This parameter identifies the collection target source instance.Enter the source instance ID. Collection Group
This parameter identifies a named group of organizations. To set up a collection group, from the Advanced Planning Administrator responsibility, navigate to the Instances Form. Click Organizations, and then set the Collections Group column.All enabled organizations Number of Workers 2 Timeout Minutes 180 Purge Previously Collected Data Yes Collection Method Complete Refresh Analyze Staging Tables No and so on The remaining parameters in the Planning Data Pull Parameters are a list of business entities. Selecting Yes for an entity means collect the information for that entity over from the source instance. Selecting No for an entity means don't collect the information for that entity over from the source instance.
-
Click OK.
-
Click Submit.
Collecting Supersession Notes
When new item relationships with supersession notes are created, you need to perform a collection with the Items, End Item Substitutions, which defines item relationship, and Notes (Attachments) fields set to Yes before new information appears in SPP. Any supersession note updates or deletions performed in Oracle Spares Management will need to be recollected by submitting or scheduling a collection request with Notes (Attachments) field set to Yes before the changes are reflected in SPP.
If End Item Substitutions (item relationships) is NOT collected, but Notes (Attachments) are collected, the collections would still go through, but the supersession notes would not appear in SPP.
To collect supersession notes information
-
From the Service Supply Chain Planner responsibility, navigate to the Planning Data Collection window.
Collections > Standard Collections
The Planning Data Collection window appears.
-
Click in the Parameters field for Planning Data Pull row.
The Parameters window appears.
-
To collect note information associated with a supersession relationship, set Notes (Attachments) field to Yes.
-
Click OK.
-
In the Planning Data Collection window, click Submit.
Collection Programs for Forecasting
This section describes collection programs available for collecting various data history streams. For each collection, you navigate to the appropriate request form, select parameters, and then submit your request.
Collecting Service Parts Usage History – Field Service
To collect field service usage history
-
From the Service Supply Chain Planner responsibility, navigate to the FIELD_SERVICE window.
Collections > Oracle Systems > Service Parts Usage History – Field Service
The FIELD_SERVICE window appears with the Name: Collect Service Parts Usage History – Field Service.
The Parameters window opens in front of the requests window. If you close this window, you can reopen it by clicking the Parameters field.
-
Complete the Parameters information as explained in the History Collection Parameters table.
-
Click OK.
-
On the Request form, click Submit.
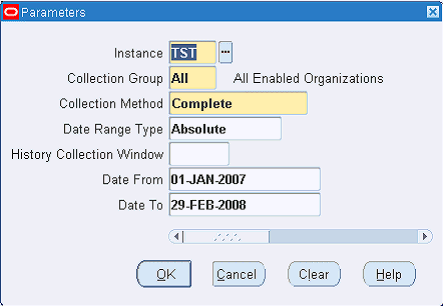
History Collection Parameters Parameter Description Value Instance Source (target) instance from which the data stream is to be collected. LOV Collection Group You can run collections for a named group of organizations. The default value is All enabled organizations. All Collection Method The default collection method is Complete. This method collects source data regardless of whether it has changed. LOV
Complete
Net ChangeDate Range Type When this parameter is set to Absolute, the Date From and Date To fields define the time period for which history data is collected.
When this parameter is set to Rolling the History Collection Window field value defines the number of days for which history data is collected.LOV
Absolute
RollingHistory Collection Window In case Date Range Type is set to Rolling, the History Collection window specifies the number of days (from the current date) for which data is collected. Number Date From Start date of collected data history stream. Date Date To End date of collected data history stream. Date Note: You specify the date range for historical data in the Parameters form. While the system is collecting history, the same date range applies across all items and data streams. Collections obtained at the day level are appropriately aggregated to buckets, depending on the Plan Option parameters.
Collecting Service Parts Usage History – Depot Repair
This program collects all components issued to work orders in the same depot repair organization into the planning data store.
Note: To support the case where the internal depot repair organization is the same as a manufacturing organization, service part item numbers are assumed to differ from the component item numbers used in production.
To collect depot repair usage history
-
From the Service Supply Chain Planner responsibility, navigate to the Collect Service Parts Usage History – Depot Repair window.
Collections > Oracle Systems > Service Parts Usage History – Depot Repair
-
Complete the Parameters information as explained in the History Collection Parameters table.
-
Complete the additional parameter: Include Accounting classes.
-
Click Submit.
Collecting Service Parts Return History
To collect parts return history
-
From the Service Supply Chain Planner responsibility, navigate to the SERVICE_PARTS_RETURN_HISTORY window.
Collections > Oracle Systems > Service Parts Return History
The Collect Product and Service Part History window appears, with the Name: Collect Product and Service Part Return History.
The Parameters window opens in front of the requests window.
-
Complete the Parameters information as explained in the History Collection Parameters table.
-
Click OK.
-
On the Request form, click Submit.
Collecting Service Products Return History
To collect product returns history
-
From the Service Supply Chain Planner responsibility, navigate to the Collect Product and Service Part History window.
Collections > Oracle Systems > Product Return History
The Collect Product and Service Part History window appears.
-
Complete the Parameters information as explained in the History Collection Parameters table.
-
Select an RMA Type from the list of values (LOV).
-
Click OK.
-
On the Collect Product and Service Part History window, click Submit.
Collecting Shipment History
-
From the Service Supply Chain Planner responsibility, navigate to the Collect Shipment History window.
Collections > Oracle Systems > Shipment History
The SHIPMENT_HISTORY window appears, with the Name: Collect Shipment History.
The Parameters window opens in front of the requests window.
-
Complete the Parameters information as explained in the History Collection Parameters table.
-
Choose Yes or No to indicate whether to collect the following data streams:
-
Booking History – Booked Items – Booked Date
-
Booking History – Booked Items – Requested Date
-
Booking History – Requested Items – Booked Date
-
Booking History – Requested Items – Requested Date
-
Shipment History – Shipped Items – Shipped Date
-
Shipment History – Shipped Items – Requested Date
-
Shipment History – Requested Items – Shipped Date
-
Shipment History – Requested Items – Requested Date
-
Collect Internal Sales Orders
-
-
Choose whether to perform the following:
-
Collect All Order Types
-
Include listed Order Types
-
Exclude listed Order Types
-
-
Choose whether to Launch Download.
-
Click OK.
-
On the Request form, click Submit.
Collecting Install Base History
Install Base history can be used to track the products or assets at a customer site, and can represent the total number of serviceable products in the field. Retirements of products must be taken into account to arrive at accurate install base numbers.
To collect install base history
-
From the Service Supply Chain Planner responsibility, navigate to the Install Base History window.
Collections > Oracle Systems > Install Base History
The INSTALL_BASE_HISTORY window appears, with the Name: Collect Install Base History.
-
Complete the Parameters information as explained in the History Collection Parameters table.
-
Click OK.
-
On the Request form, click Submit.
Related Topics
See Spare Parts Demand Forecasts Based on Product Population.
Load History Data from Flat Files
To load history data from flat files
-
From the Service Supply Chain Planner responsibility, navigate to the Load SRP Streams window.
Collections > Legacy Systems > SRP Streams – Self Service
The Load SRP Streams window appears.
-
Browse to the flat file.
-
Select the instance where the flat file is located from the Instance LOV.
-
Click Start Load Now.
Collecting Data for Demantra
Demantra Demand Management is capable of generating a forecast for service parts and computing and publishing forecast related metrics that planners can use to determine if any unusual scenarios may warrant their attention. SPP is integrated with Demantra Demand Management so that the relevant history information can be sent to Demantra for forecast generation and fine-tuning; the forecasts can then be used in SPP. Oracle Demantra Demand Management can generate a forecast for spares based on (a) history of Install base of products under contract and usage of parts to service them, (b) usage history of parts, and (c) shipment history of parts.
In case of an EBS source, the history of Install Base of products under Contract must first be collected through a Standard collection. Next, the "Populate Org for Install Base Aggregations" concurrent program must be run to determine the organization from which the Install Base products are serviced. This program takes an Assignment set as a parameter; the assignment set specifies the organizations that service Install Base in each zone. Finally, the "Collect Service Parts Forecasting Data" (Navigation: Service Parts Planning > Service Parts Forecasting (Demantra) > Forecasting Data (EBS)) concurrent program must be run to make the relevant history data available for Demantra (once the workflow is run). It is also possible to use a legacy collection of usage history and shipment history.
Note: Legacy collection is not available for Install Base under Contract.
To collect data for Demantra
For implementation information and processes on collecting data for Demantra, refer to "Demantra Demand Management to EBS Integration" and "Demantra Demand Management to EBS Service Parts Planning Integration" chapters in the Oracle Demantra Implementation Guide. Refer to the Oracle Demantra Demand Management User Guide for information on Service Parts Forecasting (SPF) functionality and using Demantra to generate a forecast for Spare Parts, which can then be used in SPP.
Purging Interface Tables
-
From the Service Supply Chain Planner responsibility, navigate to the
Collections > Oracle Systems > Purge Interface Tables
The Parameters window opens in front of the Launch Purge Program for Staging Tables window.
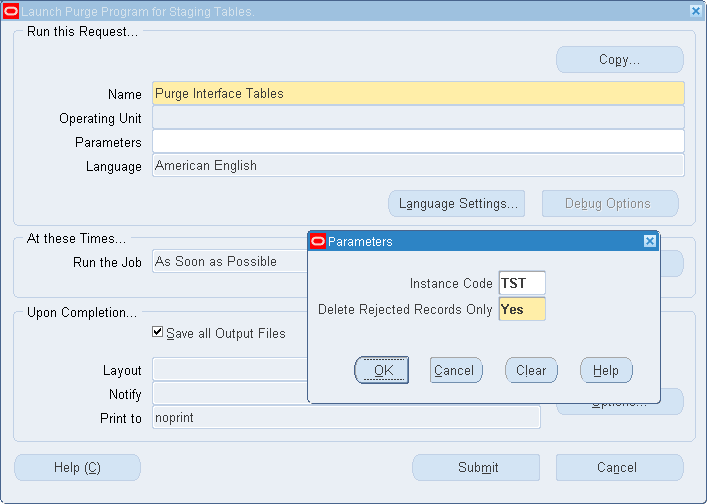
-
Select the Instance Code and specify whether you want to delete only the rejected records.
-
Click OK to close the Parameters window.
-
On the Launch Purge Program for Staging Tables window, click Submit.
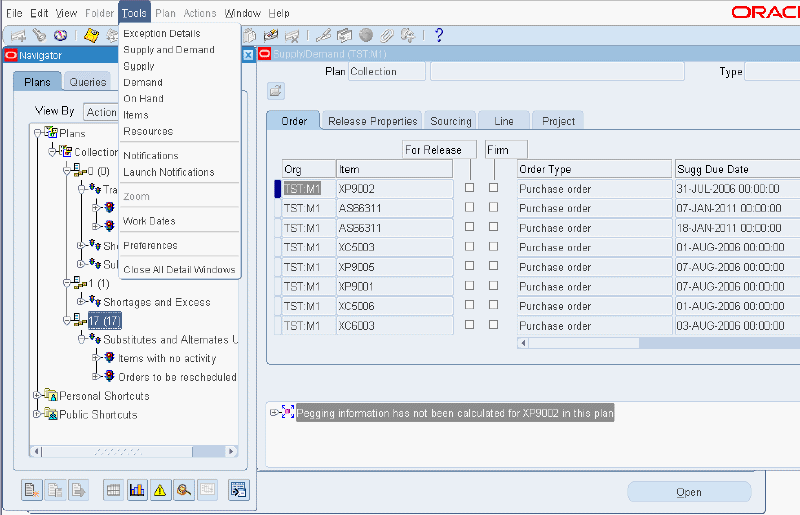
Viewing Collected Data
-
From the Supply Chain Planner responsibility, open the Navigator window.
Collections > View Collected Data
-
If the Organizations window appears, select the organization, and then click OK.
The Navigator window opens to either the Plans or Queries tab, depending on the default tab set in User Preferences.
-
Select the Plans tab, if it is not already open.
-
Select View by Actions.
-
On the Plans tab, click the “+” signs to expand Plans > Collection.
-
Highlight a version. Select Supply and Demand from the Tools menu.
-
Enter query criteria. For example, set Org equal to TST:M1.
-
Click Find.
-
The Supply Demand window opens and is populated with data collected from the selected organization.